- Table of Contents
- Related Documents
-
| Title | Size | Download |
|---|---|---|
| 04-SSL VPN configuration | 1.33 MB |
Contents
Restrictions: Hardware compatibility with SSL VPN
Restrictions: Licensing requirements for SSL VPN
Restrictions and guidelines: SSL VPN configuration
Configuring an SSL VPN gateway
Configuring an SSL VPN context
Configuring user authentication in an SSL VPN context
Restrictions and guidelines for user authentication configuration in an SSL VPN context
User authentication tasks at a glance
Specifying the authentication methods required for user login
Configuring username/password authentication
Configuring certificate authentication
Configuring verification code authentication
Configuring IMC SMS authentication
Configuring SMS gateway authentication
Configuring password modification for users
Configuring the SSL VPN user authentication server
Specifying the SSL VPN user authentication server type
Configuring the custom authentication server
Configuring the Web access service
Web access service tasks at a glance
Configuring an SSL VPN policy group for Web access
Configuring the TCP access service
TCP access service tasks at a glance
Configuring a port forwarding list
Configuring an SSL VPN policy group for TCP access
Configuring the IP access service
Restrictions and guidelines for IP access service configuration
IP access service tasks at a glance
Configuring an SSL VPN AC interface for IP access
Creating an address pool for IP access users
Configuring IP access parameters in an SSL VPN context
Configuring an SSL VPN policy group for IP access
Binding IP addresses to an SSL VPN user
Configuring outbound dynamic NAT for SSL VPN IP access
Configuring SSL VPN access for mobile clients
SSL VPN access for mobile clients tasks at a glance
Specifying an EMO server for mobile clients
Specifying a message server for mobile clients
Configuring redirect resources
Configuring the default policy group for an SSL VPN context
Associating an SSL VPN context with a VPN instance
Specifying a VPN instance for an SSL VPN gateway
Configuring online SSL VPN user control
Configuring SSL VPN session rate limit
Configuring SSL VPN cracking prevention
About configuring SSL VPN SSO login
Configuring SSO login in auto-build method
Configuring SSO login through basic authentication
Configuring WeChat Work authentication
About WeChat Work authentication
Configuring denied SSL VPN client types
Customizing SSL VPN webpage elements
Specifying an SSL VPN webpage template
Configuring an SSL VPN SNAT address pool
Enabling flow redirection for SSL VPN IP access
Display and maintenance commands for SSL VPN
SSL VPN configuration examples
Example: Configuring Web access
Example: Configuring TCP access
Example: Configuring IP access
Example: Configuring RADIUS authentication and authorization
Example: Configuring LDAP authentication and authorization
Example: Configuring IP access with USB key certificate authentication
Configuring SSL VPN
About SSL VPN
SSL VPN operating mechanism
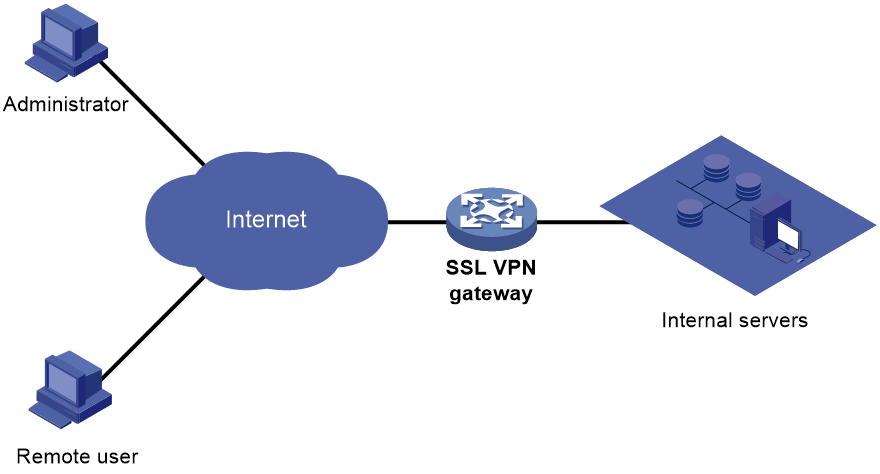
To allow remote user access to protected resources behind an SSL VPN gateway, you must configure these resources on the gateway. Remote users can access only the resources authorized to them after they establish an SSL-encrypted connection to the gateway and pass the identity authentication.
As shown in Figure 1, SSL VPN operates as follows:
1. The remote user establishes an HTTPS connection to the SSL VPN gateway.
In this process, the remote user and the SSL VPN gateway perform SSL certificate authentication.
2. The remote user enters the username and password.
3. The SSL VPN gateway authenticates the credentials that the user entered, and authorizes the user to access a range of resources.
4. The user selects a resource to access.
An access request for that resource is sent to the SSL VPN gateway through the SSL connection.
5. The SSL VPN gateway resolves the request and forwards the request to the corresponding internal server.
6. The SSL VPN gateway forwards the server's reply to the user through the SSL connection.
Figure 1 SSL VPN network diagram
SSL VPN networking modes
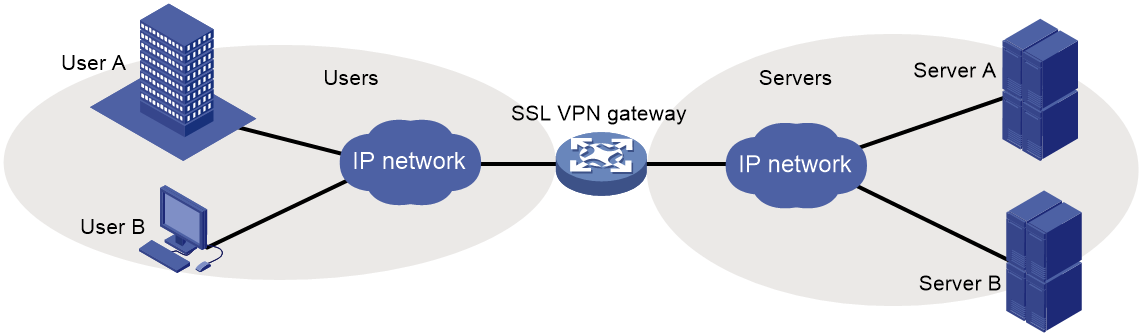
Gateway mode
In gateway mode, the SSL VPN gateway acts as a gateway that connects remote users and the internal servers network, as shown in Figure 2. Because the SSL VPN gateway is deployed in line, it can provide full protection to the internal network but it affects data transmission performance.
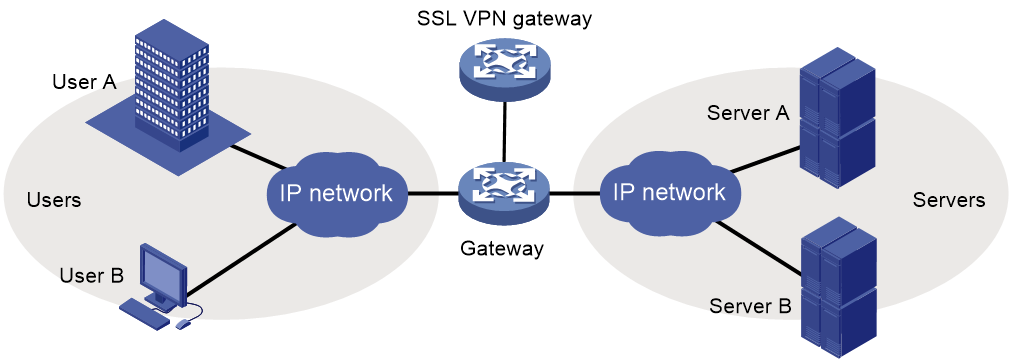
Single-arm mode
In single-arm mode, the SSL VPN gateway is attached to the network gateway, as shown in Figure 3.
The gateway forwards user-to-server traffic to the SSL VPN gateway. The SSL VPN gateway processes the traffic and sends the processed traffic back to the gateway. The gateway forwards the traffic to the internal servers. The SSL VPN gateway is not a performance bottleneck in the network because it is not deployed on the key path. However, the SSL VPN gateway cannot provide full protection to the internal network.
SSL VPN access modes
Web access
In Web access mode, remote users use browsers to access Web resources allowed by an SSL VPN gateway through HTTPS. After login, a user can access any resources listed on the webpage. In Web access mode, all operations are performed on webpages.
The resources available for SSL VPN Web access users are Web servers only.
To implement Web access, you must configure a list of URLs on the SSL VPN gateway. A URL is the IP address or domain name of an internal Web server.
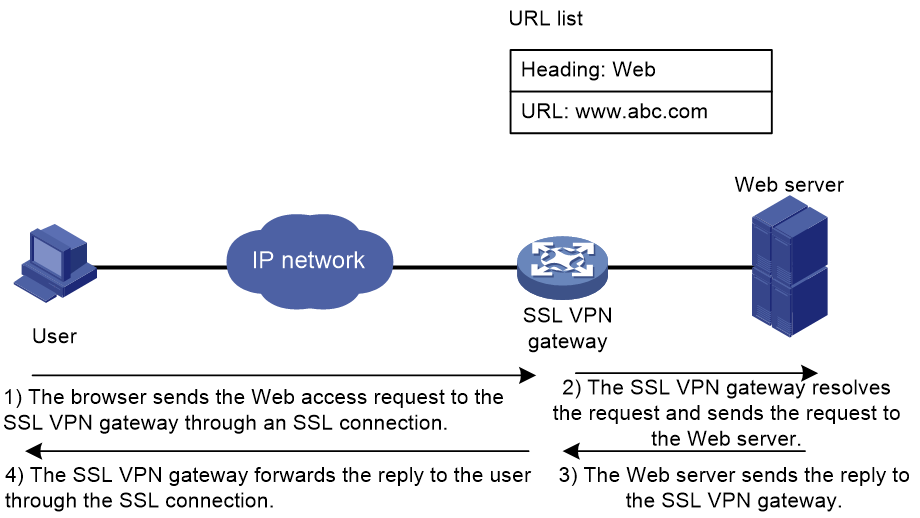
The Web access procedure is as follows:
1. A user uses a browser to log in to an SSL VPN gateway through HTTPS.
2. The SSL VPN gateway authenticates the user and authorizes the user to access the available URLs.
The authorized URLs are displayed on the SSL VPN gateway webpage as URL links.
3. The user selects a URL to access on the SSL VPN gateway webpage. The browser sends the access request to the SSL VPN gateway through the SSL connection for HTTPS.
4. The SSL VPN gateway resolves the request and sends the request to the Web server through HTTP or HTTPS.
5. After receiving the reply from the Web server, the SSL VPN gateway forwards the reply to the user through the SSL connection for HTTPS.
Figure 4 illustrates the Web access process. The administrator configures a URL of www.h3c.com on the SSL VPN gateway. Then, the SSL VPN user can access the internal Web server by accessing the URL on the SSL VPN gateway webpage.
Figure 4 Network diagram for Web access
TCP access
In TCP access mode, users access TCP applications on internal servers by accessing the applications' open ports. Supported applications include remote access services (such as Telnet), desktop sharing services, mail services, Notes services, and other TCP services that use fixed ports.
In TCP access mode, a user installs the TCP access client software on the SSL VPN client (the terminal device that the user uses). The client software uses an SSL connection to transmit the application layer data.
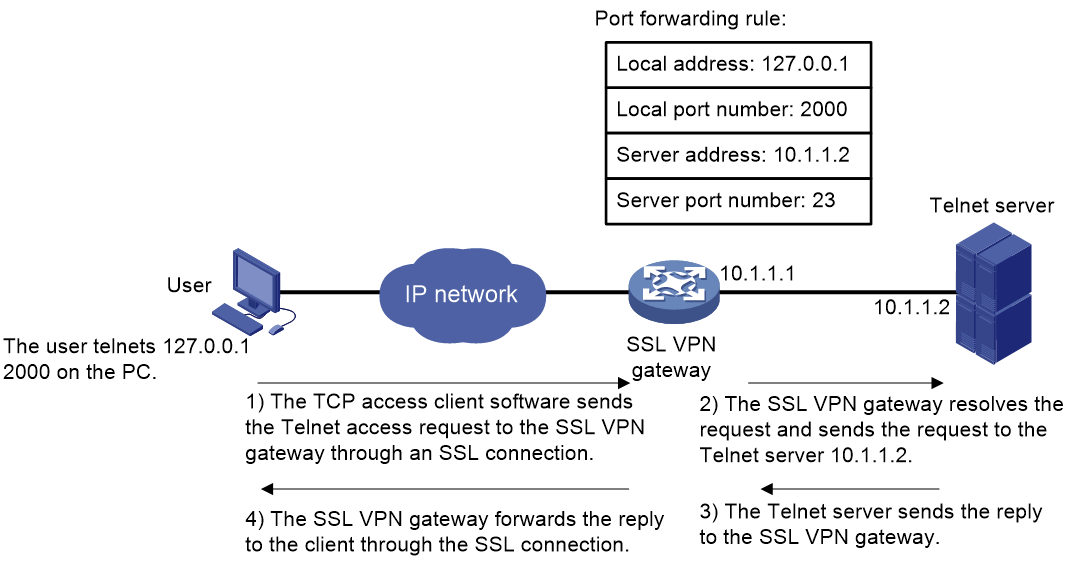
To implement TCP access, you must configure port forwarding instances on the SSL VPN gateway. A port forwarding instance maps a TCP service (identified by an IP address/domain name and port number) to an SSL VPN client's local IP address (or host name) and port number.
The TCP access procedure is as follows:
1. A user uses a browser to log in to an SSL VPN gateway through HTTPS.
2. The SSL VPN gateway authenticates the user and authorizes the user to access the Telnet service (port forwarding instance).
3. The user downloads the TCP access client software from the webpage of the SSL VPN gateway, and launches the software. The software opens the authorized local port in the port forwarding instance.
4. The user tries to access the local IP address and port number. The TCP access client software sends the access request to the SSL VPN gateway through an SSL connection.
5. The SSL VPN gateway resolves the request and sends the request to the Telnet server according to the port forwarding instance.
6. After receiving the reply from the Telnet server, the SSL VPN gateway forwards the reply to the user through the SSL connection.
As shown in Figure 5, the administrator creates a port forwarding instance for the Telnet service on the SSL VPN gateway. The rule maps the internal Telnet server address 10.1.1.2 and port number 23 to the SSL VPN client's local address 127.0.0.1 and local port number 2000. Then, the SSL VPN user can access the internal Telnet server by telneting the local address 127.0.0.1 and local port number 2000.
Figure 5 Network diagram for TCP access
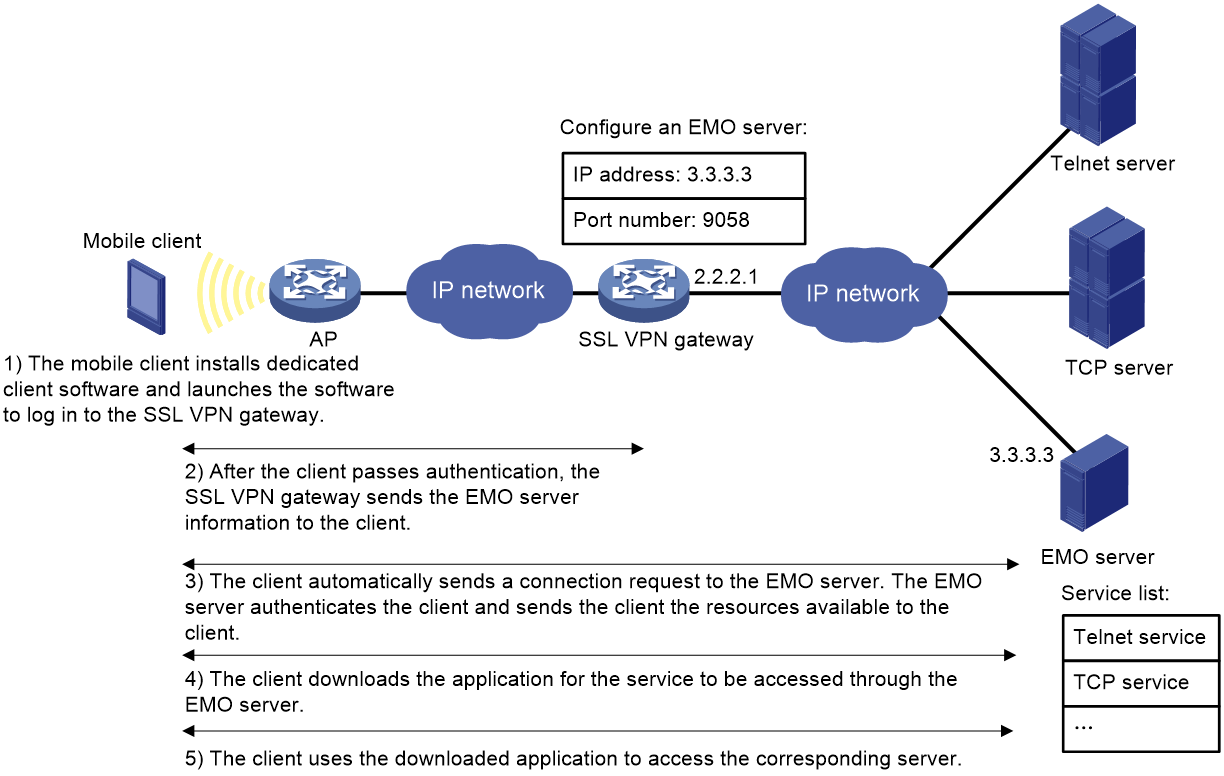
For mobile clients to use the TCP access mode, you do not need to configure port forwarding instances on the SSL VPN gateway. However, client software dedicated for mobile clients is required, and you must specify an Endpoint Mobile Office (EMO) server for mobile clients on the SSL VPN gateway. Mobile clients access internal resources through the EMO server. Figure 6 shows the access process.
Figure 6 Network diagram for mobile client access to internal servers
IP access
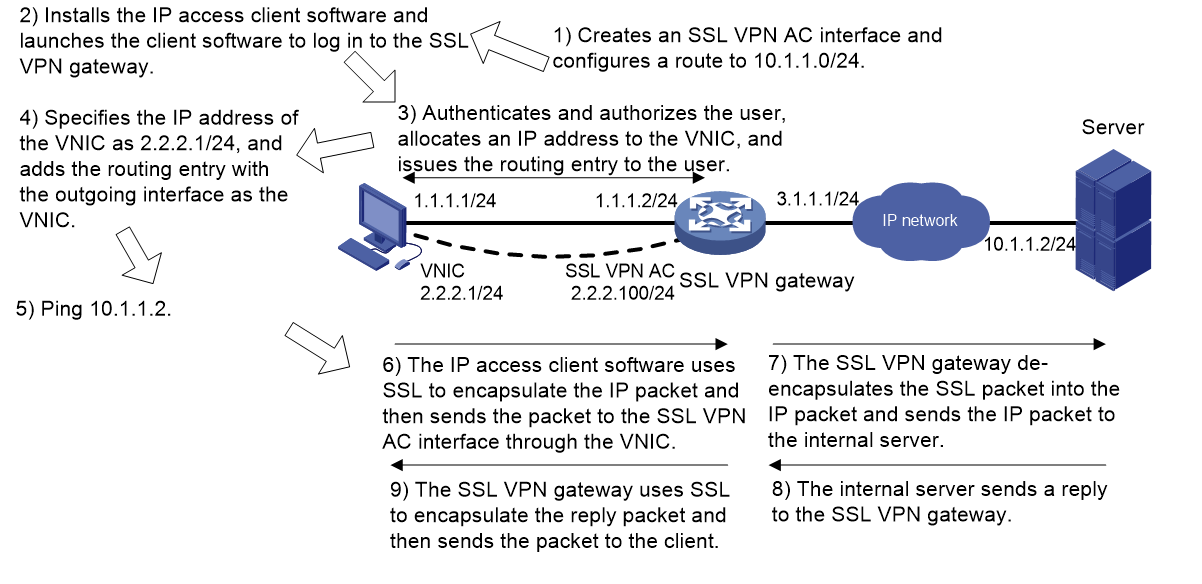
IP access implements secured IP communication between remote users and internal servers.
To access an internal server in IP access mode, a user must install dedicated IP access client software. The client software will install a virtual network interface card (VNIC) on the SSL VPN client.
To implement IP access, you must configure the following on the SSL VPN gateway:
· An SSL VPN AC interface.
· Routes to accessible IP resources. The routes will be issued to SSL VPN clients to instruct packet forwarding.
Figure 7 uses a ping operation to illustrate the IP access process. The administrator must first configure a route to the ping destination (server 10.1.1.2/24) on the SSL VPN gateway.
The access process is as follows:
1. The user installs the IP access client software and launches the client software to log in to the SSL VPN gateway.
2. The SSL VPN gateway performs the following operations:
a. Authenticates and authorizes the user.
b. Allocates an IP address to the VNIC of the user.
c. Issues the authorized IP access resources to the client.
In this example, a route to server 10.1.1.2/24 is issued.
3. The client specifies the allocated IP address as the VNIC's address and adds the route to the local routing table, using the VNIC as output interface.
4. The user pings the server address.
The ping request matches the route. Matching packets will be encapsulated by SSL.
5. The client uses SSL to encapsulate the ping request packet, and then sends the packet to the SSL VPN AC interface through the VNIC.
6. The SSL VPN gateway de-encapsulates the SSL packet into the IP packet and forwards the IP packet to the corresponding internal server.
7. The internal server sends a reply to the SSL VPN gateway.
8. The SSL VPN gateway uses SSL to encapsulate the reply packet and then sends the packet to the client through the SSL VPN AC interface.
Figure 7 Network diagram for IP access
SSL VPN user authentication
To access resources in an SSL VPN context, a user must first pass identity authentication to log in to the SSL VPN context. The authentication methods for an SSL VPN context include username/password authentication, certificate authentication, verification code authentication, SMS authentication, and custom authentication. If SMS authentication and custom authentication are both enabled, only custom authentication takes effect.
You can enable username/password authentication, certificate authentication, or both in an SSL VPN context. Whether these authentication methods are required for logging in to the SSL VPN context depends on the configuration of the authentication use command. To use username/password authentication for users, you must also create accounts for the users in AAA. For more information, see "Configuring AAA."
You can also enable the verification code authentication, SMS authentication, and custom authentication in an SSL VPN context. These authentication methods are required for login authentication if they are configured.
Username/password authentication
The username/password authentication process is as follows:
1. The SSL VPN user enters the login username and password on the SSL VPN login page. The username and password are sent to the SSL VPN gateway.
2. The SSL VPN gateway sends the received username and password to AAA for authentication, authorization, and accounting, or to a custom authentication server for authentication and authorization.
Certification authentication
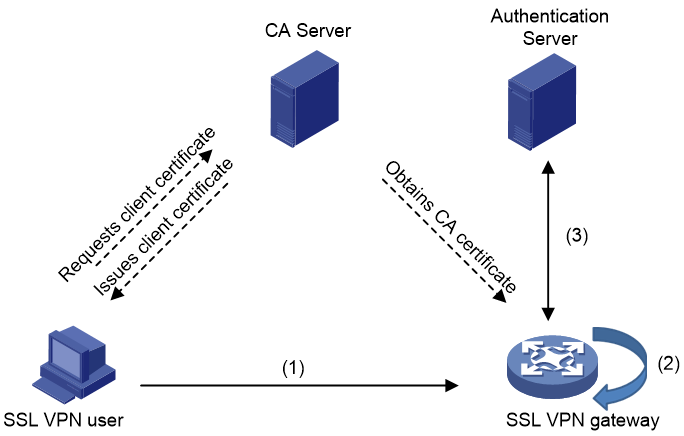
As shown in Figure 8, the certificate authentication process is as follows:
1. The SSL VPN user selects the certificate for login when prompted. The certificate is sent in an SSL connection request to the SSL VPN gateway.
2. The SSL VPN gateway verifies the validity of the user certificate.
¡ If the certificate is verified as invalid, the gateway rejects the SSL connection request. The user cannot log in to the SSL VPN context.
¡ If the certificate is verified as valid, the SSL connection is established and the gateway performs the next step.
3. The SSL VPN gateway checks for certificate revocation if CRL checking is enabled.
¡ If the certificate is verified as not revoked, the SSL connection is established and the gateway performs the next step.
¡ If the certificate is verified as revoked, the gateway rejects the SSL connection request. The user cannot log in to the SSL VPN context.
For more inforamtion about CRL checking, see "Configuring PKI."
4. The SSL VPN gateway extracts the username from the certificate attribute (CN attribute by default). Then, the SSL VPN gateway sends the username to AAA for authorization and accounting, or to a custom authentication server for authorization.
|
|
NOTE: To use certificate authentication, make sure the username extracted from the specified certificate attribute exists on the authentication server. |
Figure 8 Certificate authentication process
Combined username/password authentication and certificate authentication
The authentication process of combined username/password authentication and certificate authentication is as follows:
1. The SSL VPN user selects the certificate for login when prompted. The certificate is sent in an SSL connection request to the SSL VPN gateway.
2. The SSL VPN gateway verifies the validity of the user certificate.
¡ If the certificate is verified as invalid, the gateway rejects the SSL connection request. The user cannot log in to the SSL VPN context.
¡ If the certificate is verified as valid, the SSL connection is established and the gateway performs the next step.
3. The SSL VPN gateway checks for certificate revocation if CRL checking is enabled.
¡ If the certificate is verified as not revoked, the SSL connection is established and the gateway performs the next step.
¡ If the certificate is verified as revoked, the gateway rejects the SSL connection request. The user cannot log in to the SSL VPN context.
4. The SSL VPN gateway extracts the username from the certificate and compares the extracted username with the username provided by the user:
¡ The user passes identity authentication if the two usernames match. The SSL VPN gateway then sends the username and password to AAA for authentication, authorization and accounting, or to a custom authentication server for authentication and authorization.
¡ The user fails the identity authentication if the two usernames do not match.
|
|
NOTE: A user might enter the username and password when the user selects the certificate or after the SSL connection is established, depending on the access mode. |
SMS authentication
After you enable SMS authentication, the device uses SMS verification codes to authenticate SSL VPN users. A user is allowed to log in to the SSL VPN gateway only when the user passes the SMS authentication.
The device supports the following types of SMS authentication:
· IMC SMS authentication.
SMS authentication for SSL VPN users is performed by an IMC server. You must configure the IP address and port number for the IMC server in IMC SMS authentication view.
· SMS gateway authentication.
SMS gateway authentication for SSL VPN users is performed by an SMS gateway. You must specify the SMS gateway, the verification code resend interval, and the verification code validity period in SMS gateway authentication view.
The two SMS authentication types cannot both be configured.
For SMS gateway authentication, one username can be bound to only one mobile number. When multiple users log in to the SSL VPN gateway by using the same username, the users must check the verification codes reception order. A user must submit the verification code received right for his own login attempt.
Custom authentication
Custom authentication allows you to set up and configure a custom authentication server as needed. The device can use the custom authentication server for user authentication and authorization. The custom authentication server does not support accounting.
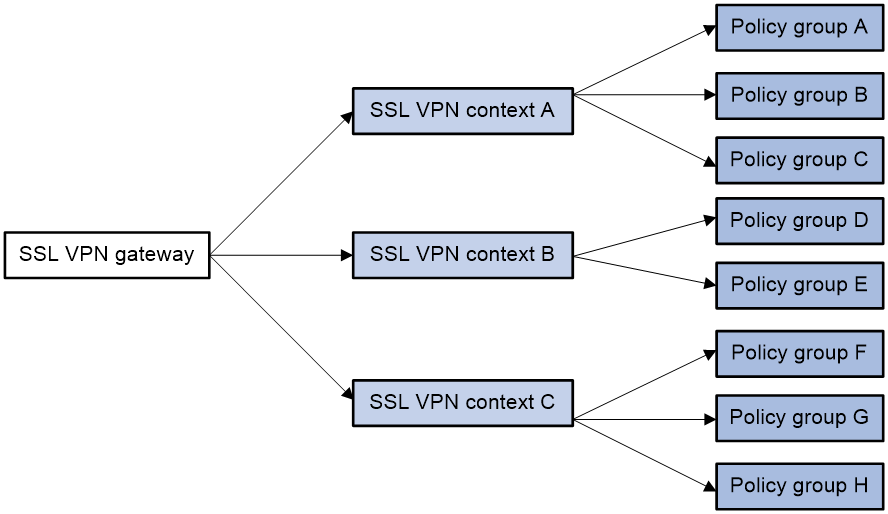
Resource access control
SSL VPN controls user access to resources on a per-user basis.
As shown in Figure 9, an SSL VPN gateway can be associated with multiple SSL VPN contexts. An SSL VPN context contains multiple policy groups. A policy group defines accessible Web resources, TCP resources, and IP resources.
Figure 9 SSL VPN resource access control
You can specify domain names or virtual host names for the SSL VPN contexts associated with an SSL VPN gateway. When a user logs in to the SSL VPN gateway, the SSL VPN gateway performs the following operations:
1. Uses the domain name or virtual host name that the user entered to determine the SSL VPN context to which the user belongs.
2. Uses the authentication and authorization methods of the ISP domain specified for the context to perform authentication and authorization for the user.
¡ If the SSL VPN gateway authorizes the user to use a policy group, the user can access resources allowed by the policy group.
¡ If the SSL VPN gateway does not authorize the user to use a policy group, the user can access resources allowed by the default policy group.
|
|
NOTE: The SSL VPN gateway uses an AAA server or a custom authentication server to perform user authentication and authorization. SSL VPN supports AAA protocols RADIUS and LDAP. RADIUS is most often used. |
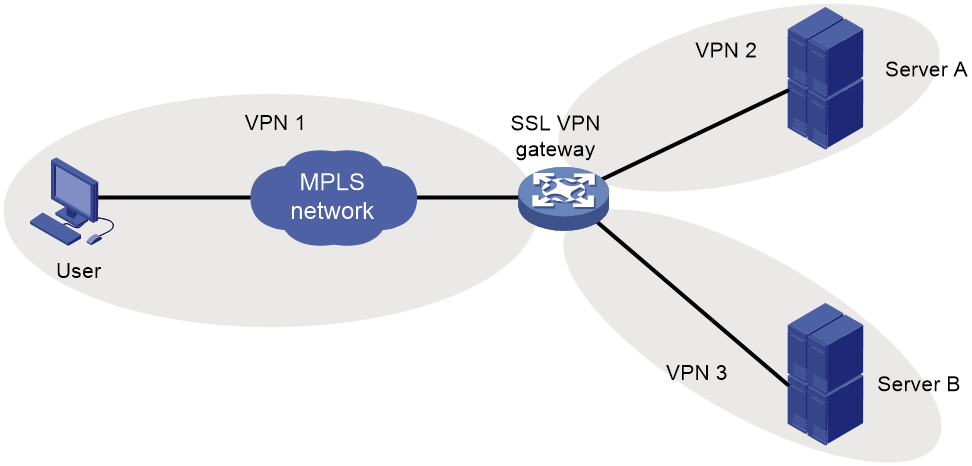
VRF-aware SSL VPN
VRF-aware SSL VPN provides the following functionalities:
· VRF-aware SSL VPN context—You associate different SSL VPN contexts with different VRF instances (VPN instances) on the SSL VPN gateway. Users in an SSL VPN context can access only the resources in the VPN instance associated with the SSL VPN context. VRF-aware SSL VPN contexts also allow server addresses to overlap.
· VRF-aware SSL VPN gateway—You specify the VPN instance to which the SSL VPN gateway belongs. Only users in the same VPN can access the SSL VPN gateway. The VRF-aware SSL VPN gateway prevents the internal server resources from leaking into the public network or other VPNs.
For more information about VPN instances, see VPN instance configuration in VPN Instance Configuration Guide.
Restrictions: Hardware compatibility with SSL VPN
|
Hardware platform |
Module type |
SSL VPN compatibility |
|
M9006 M9010 M9014 |
Blade IV firewall module |
Yes |
|
Blade V firewall module |
No |
|
|
NAT module |
No |
|
|
M9010-GM |
Encryption module |
Yes |
|
M9016-V |
Blade V firewall module |
No |
|
M9008-S M9012-S |
Blade IV firewall module |
Yes |
|
Intrusion prevention service (IPS) module |
Yes |
|
|
Video network gateway module |
Yes |
|
|
M9008-S-6GW |
IPv6 module |
Yes |
|
M9008-S-V |
Blade IV firewall module |
Yes |
|
M9000-AI-E4 M9000-AI-E8 M9000-AI-E16 |
Blade V firewall module |
Yes |
|
M9000-X06 M9000-X10 |
Blade VI firewall module |
Yes |
Restrictions: Licensing requirements for SSL VPN
By default, the SSL VPN gateway supports a maximum of 15 online user accounts.
You can purchase and install a license to increase the number of supported online users. For more information about licenses, see license management in Fundamentals Configuration Guide.
The maximum number of online users supported by an IRF fabric is calculated as follows:
Maximum online users supported by the IRF fabric = Sum of the maximum online users permitted by the license of each member device + maximum online users supported by default.
After a member device becomes faulty, its license can still take effect on the IRF fabric for 60 days.
vSystem support for features
Non-default vSystems do not support the following features:
· Configuring SSL VPN user authentication, authorization, and accounting.
¡ Configuring IMC SMS authentication.
¡ Configuring SMS gateway authentication.
¡ Configuring password modification for users.
¡ Configuring the SSL VPN user authentication server.
· Configuring SSL VPN resource access control.
¡ Configuring the Web access service.
¡ Configuring the TCP access service.
¡ Configuring the IP access service.
¡ Configuring an SSL VPN AC interface for IP access.
¡ Binding IP addresses to an SSL VPN user.
¡ Configuring shortcuts.
¡ Configuring redirect resources.
· Configuring VRF-aware SSL VPN.
· Configuring SSL VPN user control.
¡ Configuring SSL VPN session rate limit.
¡ Configuring SSL VPN cracking prevention.
¡ Configuring SSL VPN SSO login.
¡ Configuring WeChat Work authentication.
¡ Configuring denied SSL VPN client types.
· Customizing SSL VPN webpages.
· Configuring an SSL VPN SNAT address pool.
· Configuring HA for SSL VPN gateways.
For information about the support of non-default vSystems for the commands, see the device management command reference. For more information about vSystem, see Virtual Technologies Configuration Guide.
Restrictions and guidelines: SSL VPN configuration
The SSL VPN gateway generates only one session for a user who accesses both Web and IP resources in the following method:
1. First, the user accesses the SSL VPN gateway through a Web browser.
2. Then, the user downloads the IP access client through the Web page and launches the IP access client.
Once the user exits the Web browser or IP access client, the session is terminated and the user can access neither Web nor IP access resources.
You can specify ACLs for user access filtering in an SSL VPN policy group. Rules in the specified ACLs do not take effect if they contain VPN settings.
SSL VPN tasks at a glance
To configure SSL VPN, perform the following tasks on the SSL VPN gateway:
1. Configuring an SSL VPN gateway
2. Configuring an SSL VPN context
3. Configuring SSL VPN user authentication, authorization, and accounting
a. Configuring user authentication in an SSL VPN context
b. Configuring the SSL VPN user authentication server
A custom authentication server must be configured for custom authentication.
4. Configuring SSL VPN resource access control as needed
¡ Configuring the Web access service
¡ Configuring the TCP access service
¡ Configuring the IP access service
¡ Configuring SSL VPN access for mobile clients
¡ (Optional.) Configuring shortcuts
¡ (Optional.) Configuring redirect resources
¡ (Optional.) Configuring HTTP redirection
¡ (Optional.) Configuring the default policy group for an SSL VPN context
5. (Optional.) Configuring VRF-aware SSL VPN
¡ Associating an SSL VPN context with a VPN instance
¡ Specifying a VPN instance for an SSL VPN gateway
6. (Optional.) Configuring SSL VPN user control
¡ Configuring online SSL VPN user control
¡ Configuring SSL VPN session rate limit
¡ Configuring SSL VPN cracking prevention
¡ Configuring SSL VPN SSO login
¡ Configuring WeChat Work authentication
¡ Configuring denied SSL VPN client types
7. (Optional.) Customizing SSL VPN webpages
¡ Customizing SSL VPN webpage elements
¡ Specifying an SSL VPN webpage template
8. (Optional.) Configuring an SSL VPN SNAT address pool
9. (Optional.) Enabling flow redirection for SSL VPN IP access
10. (Optional.) Enabling SSL VPN logging
Prerequisites for SSL VPN
Before you configure the SSL VPN gateway, complete the following tasks:
· Configure PKI and obtain a digital certificate for the SSL VPN gateway (see "Configuring PKI").
· Configure an SSL server policy to be used by the SSL VPN gateway (see "Configuring SSL").
Configuring an SSL VPN gateway
Restrictions and guidelines
An SSL VPN gateway that uses the default IPv4 or IPv6 address must use a port number that is different from the HTTPS service port number.
If the settings of the SSL server policy applied to an SSL VPN gateway are changed, you must disable and then enable the SSL VPN gateway to use the modified policy.
The IP address and port number of an SSL VPN gateway cannot both be the same as those of the HTTPS server on the device. Otherwise, you can access only the SSL VPN Web interface but cannot access the device management Web interface by using those IP address and port number.
An SSL VPN gateway can use an IPv4 address, an IPv6 address, but not both. If you configure both IPv4 and IPv6 addresses, the most recent configuration takes effect.
Procedure
1. Enter system view.
system-view
2. Create an SSL VPN gateway and enter its view.
sslvpn gateway gateway-name
3. Configure an IPv4 address and a port number for the SSL VPN gateway.
ip address ip-address [ port port-number ]
By default, the SSL VPN gateway uses IPv4 address 0.0.0.0 and port number 443.
If you configure the ip address command without specifying a port number, the default port number (443) is used.
4. Configure an IPv6 address and a port number for the SSL VPN gateway.
ipv6 address ipv6-address [ port port-number ]
By default, no IPv6 address or port number is configured for the SSL VPN gateway.
If you configure the ipv6 address command without specifying a port number, the default port number (443) is used.
5. Apply an SSL server policy to the SSL VPN gateway.
ssl server-policy policy-name
By default, an SSL VPN gateway uses the SSL server policy of its self-signed certificate.
6. Enable the SSL VPN gateway.
service enable
By default, the SSL VPN gateway is disabled.
Configuring an SSL VPN context
About this task
An SSL VPN context manages user sessions and resources available to users.
Restrictions and guidelines
When you associate an SSL VPN context with an SSL VPN gateway, follow these guidelines:
· Make sure the context has a domain name or virtual host name different than any existing contexts associated with the SSL VPN gateway.
· If you do not specify a domain name or virtual host name for the context, you cannot associate other SSL VPN contexts with the SSL VPN gateway.
· If you specify a virtual host name, deploy a DNS server in the network to resolve the virtual host name to the SSL VPN gateway's IP address.
You can associate an SSL VPN context with a maximum of 10 SSL VPN gateways.
Procedure
1. Enter system view.
system-view
2. Create an SSL VPN context and enter its view.
sslvpn context context-name
3. Associate the context with an SSL VPN gateway.
gateway gateway-name [ domain domain-name | virtual-host virtual-host-name ]
By default, the context is not associated with an SSL VPN gateway.
4. Specify an ISP domain for AAA of SSL VPN users in the context.
aaa domain domain-name
By default, the default ISP domain is used for AAA of SSL VPN users in an SSL VPN context.
An SSL VPN username cannot carry ISP domain information. After this command is executed, the SSL VPN gateway uses the specified domain for AAA of SSL VPN users in the context.
5. Enable the context.
service enable
By default, the context is disabled.
6. (Optional.) Set the maximum number of sessions (online users) for the context.
max-users max-number
By default, an SSL VPN context supports a maximum of 1048575 sessions (online users).
7. (Optional.) Set the idle timeout timer for SSL VPN sessions.
timeout idle minutes
By default, the idle timeout timer for SSL VPN sessions is 30 minutes.
8. (Optional.) Set the idle-cut traffic threshold for SSL VPN sessions.
idle-cut traffic-threshold
By default, the SSL VPN session idle-cut traffic threshold is 0 bytes. An SSL VPN session will be disconnected if no traffic is transmitted within the session idle timeout time specified by the timeout idle command.
9. (Optional.) Apply an SSL client policy to the SSL VPN context.
ssl client-policy policy-name
The default SSL client policy for SSL VPN is used. This policy supports the dhe_rsa_aes_128_cbc_sha, dhe_rsa_aes_256_cbc_sha, rsa_3des_ede_cbc_sha, rsa_aes_128_cbc_sha, and rsa_aes_256_cbc_sha cipher suites.
The SSL VPN gateway will use the settings in the specified SSL client policy to connect to HTTPS servers.
10. (Optional.) Enable URL masking globally.
url-masking enable
URL masking is disabled by default.
After URL masking is enabled, the URLs of the Web access resources configured in the SSL VPN context are converted into coded strings.
Configuring user authentication in an SSL VPN context
Restrictions and guidelines for user authentication configuration in an SSL VPN context
How certificate authentication works depends on the configuration of the client-verify command in SSL server policy view. You can use the command to enable mandatory or optional SSL client authentication. Mandatory certificate authentication is supported only for Web users and IP access users. For TCP access users and mobile client users to access the SSL VPN gateway successfully, optional SSL client authentication must be used.
User authentication tasks at a glance
To configure user authentication in an SSL VPN context, perform the following tasks:
1. Specifying the authentication methods required for user login
2. Configuring basic authentication methods
¡ Configuring username/password authentication
¡ Configuring certificate authentication
3. (Optional.) Configuring verification code authentication
4. (Optional.) Configuring IMC SMS authentication
5. (Optional.) Configuring SMS gateway authentication
6. (Optional.) Configuring password modification for users
Specifying the authentication methods required for user login
About this task
You can enable username/password authentication, certificate authentication, or both in an SSL VPN context. Whether these authentication methods are required for logging in to the SSL VPN context depend on the configuration of the authentication use all command:
· If the authentication use all command is configured, a user must pass all the enabled authentication methods for login.
· If the authentication use any-one command is configured, a user can log in after passing any enabled authentication method.
Procedure
1. Enter system view.
system-view
2. Enter SSL VPN context view.
sslvpn context context-name
3. Specify the authentication methods required for user login.
authentication use { all | any-one }
By default, a user must pass all the enabled authentication methods to log in to an SSL VPN context.
Configuring username/password authentication
1. Enter system view.
system-view
2. Enter SSL VPN context view.
sslvpn context context-name
3. Enable username/password authentication.
password-authentication enable
Username/password authentication is enabled by default.
Configuring certificate authentication
1. Enter system view.
system-view
2. Enter SSL VPN context view.
sslvpn context context-name
3. Enable certificate authentication.
certificate-authentication enable
Certificate authentication is disabled by default.
4. Specify the certificate attribute as the SSL VPN username.
certificate username-attribute { cn | email-prefix | oid extern-id }
By default, the device uses the value of the CN attribute in the subject of the certificate as the SSL VPN username.
Configuring verification code authentication
1. Enter system view.
system-view
2. Enter SSL VPN context view.
sslvpn context context-name
3. Enable verification code authentication.
verify-code enable
By default, verification code authentication is enabled.
Configuring IMC SMS authentication
1. Enter system view.
system-view
2. Enter SSL VPN context view.
sslvpn context context-name
3. Enable IMC SMS authentication.
sms-auth type imc
By default, IMC SMS authentication is disabled.
4. Create and enter IMC SMS authentication view.
sms-auth imc
5. Specify an IMC server.
server-address { ip-address | ipv6 ipv6-address } port port-number [ vpn-instance vpn-instance-name ]
By default, no IMC server is specified.
Configuring SMS gateway authentication
Prerequisites
Complete the SMS gateway configuration. For information about configuring an SMS gateway, see "Configuring SMS."
Procedure
1. Enter system view.
system-view
2. Enter SSL VPN context view.
sslvpn context context-name
3. Enter SSL VPN user view.
user username
4. Specify the mobile number for the SSL VPN user to receive SMS messages.
mobile-num number
By default, no mobile number is specified for receiving SMS messages.
5. Return to SSL VPN context view.
quit
6. Enable SMS gateway authentication.
sms-auth type sms-gw
By default, SMS gateway authentication is disabled.
7. Create and enter SMS gateway authentication view.
sms-auth sms-gw
By default, the SMS gateway authentication view does not exist.
8. Specify an SMS gateway.
gateway sms-gateway-name
By default, no SMS gateway is specified.
9. Enable mobile number binding.
mobile-num-binding enable
By default, mobile number binding is disabled.
10. Set the verification code resend interval.
verification-code send-interval seconds
By default, the verification code resend interval is 60 seconds.
11. Set the verification code validity period.
verification-code validity minutes
By default, the verification code validity period is one minute.
12. Specify the mobile country code.
country-code country-code
By default, the mobile country code is 86.
13. Configure the SMS content template.
sms-content string
By default, the SMS content template is Hello, $$USER$$, the verification code is $$VERIFYCODE$$, and its validity period is $$VALIDTIME$$ in minutes..
Configuring password modification for users
About this task
Password modification allows SSL VPN users to modify login passwords on the personal settings page after logging in to the SSL VPN Web interface. This feature is available only for IMC authentication users.
If you disable this feature, the modify password function will be hidden on the SSL VPN Web interface, so users cannot modify their passwords.
Procedure
1. Enter system view.
system-view
2. Enter SSL VPN context view.
sslvpn context context-name
3. Enable SSL VPN users in the SSL VPN context to modify passwords.
password-changing enable
By default, SSL VPN users in the SSL VPN context are allowed to modify passwords.
4. Enter SSL VPN user view.
user username
5. (Optional.) Enable password modification for the SSL VPN user.
password-changing enable
By default, an SSL VPN user is allowed to modify the password.
6. Specify an IMC server for password modification.
self-service imc address { ip-address | ipv6 ipv6-address } port port-number [ vpn-instance vpn-instance-name ]
By default, no IMC server is specified for password modification.
Execute this command only when IMC authentication users need to modify the SSL VPN login passwords.
Configuring the SSL VPN user authentication server
Specifying the SSL VPN user authentication server type
About this task
The SSL VPN user authentication supports the following types of servers:
· AAA authentication server—The device uses an AAA server for user authentication, authorization, and accounting. For more information about AAA, see "Configuring AAA."
· Custom authentication server—You can set up and configure a custom authentication server as needed. The device can use the custom authentication server for user authentication and authorization. The custom authentication server does not support accounting. For more information about configuring the custom authentication server, see "Configuring the custom authentication server."
Procedure
1. Enter system view.
system-view
2. Enter SSL VPN context view.
sslvpn context context-name
3. Specify the authentication server type.
authentication server-type { aaa | custom }
By default, the SSL VPN authentication server is an AAA server.
Configuring the custom authentication server
About this task
To use a custom authentication server for user authentication and authorization, configure the following settings:
· URL of the custom authentication server.
The SSL VPN gateway uses HTTP to send authentication requests to the specified URL.
· Custom authentication timeout.
After sending an HTTP request to the custom authentication server, the SSL VPN gateway waits for reponses from the server. If the gateway receives no response within the authentication timeout, it returns an authentication failure message to the SSL VPN client.
· HTTP request settings for custom authentication.
The SSL VPN gateway constructs an HTTP request based on the authentication request settings, including HTTP request method, request header fields, and request template.
· HTTP response settings for custom authentication.
The SSL VPN gateway parses an HTTP response based on the authentication response settings. The settings include HTTP response format, authentication success value in the response, field names in the response, and response templates for the custom-format HTTP response.
Procedure
1. Enter system view.
system-view
2. Enter SSL VPN context view.
sslvpn context context-name
3. Configure the URL of the custom authentication server.
custom-authentication url url
By default, no custom authentication server URL is configured.
4. Specify the custom authentication timeout.
custom-authentication timeout seconds
By default, the custom authentication timeout is 15 seconds.
5. Configure settings for a custom authentication request:
a. Configure the HTTP request method.
custom-authentication request-method { get | post }
By default, the HTTP request method is GET.
b. Configure HTTP request header fields.
custom-authentication request-header-field field-name value value
By default, a custom authentication request header includes the following fields:
- Content-type:application/x-www-form-urlencoded.
- User-Agent:nodejs 4.1.
- Accept:text/html,application/xhtml+xml,application/xml;q=0.9,image/webp,*/*;q.
c. Configure the HTTP request template.
custom-authentication request-template template
By default, no request template is configured.
6. Configure settings for a custom authentication response:
a. Specify the HTTP response format.
custom-authentication response-format { custom | json | xml }
By default, the HTTP response format is JSON.
b. Configure the authentication success value in the HTTP response.
custom-authentication response-success-value success-value
By default, no authentication success value is configured for the HTTP response.
c. Configure field names in the HTTP response.
custom-authentication response-field { group group | message message | result result }
By default, no HTTP response field names are configured.
You must configure HTTP response field names if the HTTP response format is JSON or XML.
d. Configure response templates for the fields in the custom-format HTTP response.
custom-authentication response-custom-template { group | message | result } template
By default, no response templates are configured.
The response templates are required when the HTTP response format is custom.
Configuring a URI ACL
About this task
A URI ACL is a set of rules that permit or deny access to resources. You can use URI ACLs for fine-grained IP, TCP, and Web access filtering of SSL VPN users.
You can add multiple rules to a URI ACL. The device matches a packet against the rules in ascending order of rule ID. The match process stops once a matching rule is found.
You can create multiple URI ACLs in an SSL VPN context.
A URI ACL can filter SSL VPN users' HTTP, HTTPS, TCP, UDP, ICMP, and IP traffic based on the following fields:
· Protocol type.
· IP address.
· Host name.
· Port number.
· URL.
Procedure
1. Enter system view.
system-view
2. Enter SSL VPN context view.
sslvpn context context-name
3. Create a URI ACL and enter its view.
uri-acl uri-acl-name
4. Configure a rule in the URI ACL.
rule [ rule-id ] { deny | permit } uri uri-pattern-string
By default, no rules are configured in a URI ACL.
Configuring the Web access service
Web access service tasks at a glance
To configure the Web access service, perform the following tasks:
2. Configuring an SSL VPN policy group for Web access
3. (Optional.) Configuring a file policy
Configuring a URL list
About this task
A URL list is a list of URL items that define the accessible Web resources behind the SSL VPN gateway. Each URL item corresponds to an internal Web resource.
The SSL VPN gateway rewrites the resource URL returned from the internal server before sending the URL to the requesting user. The URL mapping type determines how the gateway rewrites the URL.
The following example describes how URL mapping works when the user accesses internal resources at URL http://www.server.com:8080. The SSL VPN gateway name is gw, domain name is https://www.gateway.com:4430, and IP address is 1.1.1.1.
· Normal rewriting—This is the default mapping method. The resource URL returned to the client will be rewritten to https://www.gateway.com:4430/_proxy2/http/8080/www.server.com.
· Domain mapping—The resource URL returned to the client will be rewritten to https://mapped domain name:4430, where mapped domain name is the user-defined domain name.
· Port mapping—You can specify a gateway name with or without a virtual host name for port mapping. For example:
¡ If you specify gw2 as the gateway name and do not specify a virtual host name, the resource URL will be rewritten to https://2.2.2.2:4430, where 2.2.2.2 and 4430 are the IP address and port number of SSL VPN gateway gw2.
¡ If you specify gw as the gateway name and vhosta as the virtual host name, the resource URL will be rewritten to https://vhosta:4430.
Restrictions and guidelines
Resource URL rewriting is available only for resource access responses that contain HTML, XML, CSS, or JavaScript files.
Normal rewriting might cause problems such as missed URL rewriting and rewriting errors, resulting in SSL VPN clients not being able to access the internal resources. Use domain mapping or URL mapping as a best practice.
Procedure
1. Enter system view.
system-view
2. Enter SSL VPN context view.
sslvpn context context-name
3. Create a URL item and enter its view.
url-item name
4. Specify the resource URL in the URL item.
url url
By default, no resource URL is specified in a URL item.
If you do not specify a protocol type in the resource URL, the default protocol (HTTP) is used.
5. (Optional.) Enable URL masking.
url-masking enable
By default, URL masking is disabled.
After URL masking is enabled, the Web resource URL for the URL item is converted into a coded string.
6. (Optional.) Specify a URI ACL in the URL item.
resources uri-acl uri-acl-name
By default, no URI ACL is specified.
7. (Optional.) Configure the URL mapping method.
url-mapping { domain-mapping domain-name | port-mapping gateway gateway-name [ virtual-host virtual-host-name ] } [ rewrite-enable ]
By default, the normal rewriting method is used.
8. Return to SSL VPN context view.
quit
9. Create a URL list and enter its view.
url-list name
10. (Optional.) Configure a heading for the URL list.
heading string
By default, the URL list heading is Web.
11. Add the URL item to the URL list.
resources url-item name
By default, a URL list does not contain any URL items.
Configuring an SSL VPN policy group for Web access
About this task
To configure an SSL VPN policy group for Web access, associate a URL list with the policy group. After the authentication server authorizes a user to use a policy group, the user can access the Web resources provided by the URL list associated with the policy group.
In a policy group, you can specify an advanced ACL and a URI ACL to filter users' Web access requests.
The advanced ACL supports filtering Web access requests by destination IP address and destination port number. The URI ACL supports filtering Web access requests by protocol type, destination address, domain name, port number, and URL.
The SSL VPN gateway uses the following procedure to determine whether to forward a Web access request:
1. Matches the request against the authorized URL list.
¡ If the request matches a URL item in the list, the gateway forwards the request.
¡ If the request does not match any URL items in the list, the gateway proceeds to the next step.
2. Matches the request against rules in the URI ACL:
¡ If the request matches a permit rule, the gateway forwards the request.
¡ If the request matches a deny rule, the gateway drops the request.
¡ If the request does not match any rules in the URI ACL or if no URI ACL is available, the gateway proceeds to the next step.
3. Matches the request against rules in the advanced ACL:
¡ If the request matches a permit rule, the gateway forwards the request.
¡ If the request matches a deny rule, the gateway drops the request.
¡ If the request does not match any rules in the advanced ACL or if no advanced ACL is available, the gateway drops the request.
Procedure
1. Enter system view.
system-view
2. Enter SSL VPN context view.
sslvpn context context-name
3. Create an SSL VPN policy group and enter SSL VPN policy group view.
policy-group group-name
4. Associate a URL list with the policy group.
resources url-list url-list-name
By default, no URL list associated with a policy group.
5. (Optional.) Specify the ACLs for Web access filtering:
¡ Specify an advanced ACL for Web access filtering.
filter web-access [ ipv6 ] acl advanced-acl-number
¡ Specify a URI ACL for Web access filtering.
filter web-access uri-acl uri-acl-name
By default, users can access only the Web resources authorized to them through the URL list.
Configuring a file policy
About this task
A file policy enables the SSL VPN gateway to rewrite Web page files before forwarding them to requesting Web access users.
A file policy contains the following settings:
· A URL that identifies the path of the file to which the file policy is applied.
· One or more rewrite rules.
A rewrite rule defines the old file content to be rewritten and the new content used to replace the old content.
· (Optional.) The file type that the file is changed to after being rewritten by the file policy.
Procedure
1. Enter system view.
system-view
2. Enter SSL VPN context view.
sslvpn context context-name
3. Create a file policy and enter its view.
file-policy policy-name
By default, no file policies exist.
4. Specify the URL of the file to be rewritten.
url url
By default, no file URL is specified in a file policy.
5. Specify the file type that a file is changed to after being rewritten by the file policy.
content-type { css | html | javascript | other }
By default, a file policy rewrites a file in an HTTP response to the file type indicated by the content-type field in the HTTP response.
6. Create a rewrite rule and enter its view.
rewrite-rule rule-name
7. Specify the old content to be rewritten.
old-content string
By default, the old content to be rewritten is not specified.
8. Specify the new content used to replace the old content.
new-content string
By default, the new content used to replace the old content is not specified.
Configuring the TCP access service
To allow remote users to access internal resources in TCP access mode, you must configure TCP access resources and associate the resources with an SSL VPN policy group.
TCP access service tasks at a glance
To configure the TCP access service, perform the following tasks:
1. Configuring a port forwarding list
2. Configuring an SSL VPN policy group for TCP access
Configuring a port forwarding list
About this task
A port forwarding list is a list of port forwarding items. Each port forwarding item contains a port forwarding instance.
A port forwarding instance maps a TCP service (such as Telnet, SSH, or POP3) hosted on an internal server to a local address and port number on the SSL VPN client. Remote users can access the TCP service though the local address and port number.
The port forwarding instance is displayed together with the port forwarding item name on the SSL VPN Web page. If you configure a resource link for the port forwarding item, the port forwarding item name will be displayed as a link on the SSL VPN Web page. You can click the link to access the resource directly.
Procedure
1. Enter system view.
system-view
2. Enter SSL VPN context view.
sslvpn context context-name
3. Create a port forwarding item and enter its view.
port-forward-item item-name
4. Configure a port forwarding instance for the port forwarding item.
local-port local-port-number local-name local-name remote-server remote-server remote-port remote-port-number [ description text ]
5. (Optional.) Configure a resource link for the port forwarding item.
execution script
6. Return to SSL VPN context view.
quit
7. Create a port forwarding list and enter its view.
port-forward port-forward-name
8. Assign the port forwarding item to the port forwarding list.
resources port-forward-item item-name
By default, a port forwarding list does not contain port forwarding items.
Configuring an SSL VPN policy group for TCP access
About this task
To configure an SSL VPN policy group for TCP access, associate a port forwarding list with the policy group. After the authentication server authorizes a user to use a policy group, the user can access the TCP services provided by the port forwarding list associated with the policy group.
In a policy group, you can specify an advanced ACL and a URI ACL to filter users' TCP access requests.
The advanced ACL supports filtering TCP access requests by destination IP address and destination port number. The URI ACL supports filtering TCP access requests by protocol type, destination address, domain name, port number, and URL.
For PC users, the ACLs configured for TCP access filtering do not take effect. They can access only the TCP resources authorized to them through the TCP port forwarding list.
For mobile client users, the SSL VPN gateway uses the following procedure to determine whether to forward a TCP access request:
1. Matches the request against the authorized port forwarding list.
¡ If the request matches a port forwarding item in the list, the gateway forwards the request.
¡ If the request does not match any port forwarding items in the list, the gateway proceeds to the next step.
2. Matches the request against the rules in the URI ACL:
¡ If the request matches a permit rule, the gateway forwards the request.
¡ If the request matches a deny rule, the gateway drops the request.
¡ If the request does not match any rules in the URI ACL or if no URI ACL is available, the gateway proceeds to the next step.
3. Matches the request against the rules in the advanced ACL:
¡ If the request matches a permit rule, the gateway forwards the request.
¡ If the request matches a deny rule, the gateway drops the request.
¡ If the request does not match any rules in the advanced ACL or if no advanced ACL is available, the gateway drops the request.
Procedure
1. Enter system view.
system-view
2. Enter SSL VPN context view.
sslvpn context context-name
3. Create an SSL VPN policy group and enter SSL VPN policy group view.
policy-group group-name
4. Associate a port forwarding list with the policy group.
resources port-forward port-forward-name
By default, no port forwarding list is associated with a policy group.
5. (Optional.) Specify the ACLs for TCP access filtering:
¡ Specify an advanced ACL for TCP access filtering.
filter tcp-access [ ipv6 ] acl advanced-acl-number
¡ Specify a URI ACL for TCP access filtering.
filter tcp-access uri-acl uri-acl-name
By default, users can access only the TCP resources authorized to them through the TCP port forwarding list.
Configuring the IP access service
To allow remote users to access internal resources in IP access mode, you must configure IP access resources and associate the resources with an SSL VPN policy group.
Restrictions and guidelines for IP access service configuration
To ensure correct forwarding of reply packets to an SSL VPN client, configure static routes from the internal servers to the network segment where the client's VNIC resides.
If the device installs with multiple security modules, the IP access mode need to cooperate with NAT to ensure that the forward and return packets of a data flow are forwarded to the same security module.
IP access service tasks at a glance
To configure the IP access service, perform the following tasks:
1. Configuring an SSL VPN AC interface for IP access
2. Creating an address pool for IP access users
3. Configuring IP access parameters in an SSL VPN context
4. Configuring an SSL VPN policy group for IP access
5. (Optional.) Binding IP addresses to an SSL VPN user
6. (Optional.) Configuring outbound dynamic NAT for SSL VPN IP access
Configuring an SSL VPN AC interface for IP access
Configuring an SSL VPN AC interface
1. Enter system view.
system-view
2. Create an SSL VPN AC interface and enter its view.
interface sslvpn-ac interface-number
3. Configure an IPv4 address for the interface.
ip address ip-address { mask | mask-length }
By default, no IPv4 address is configured for an AC interface.
4. Configure an IPv6 address for the interface.
ipv6 address { ipv6-address prefix-length | ipv6-address/ prefix-length }
By default, no IPv6 address is configured for an AC interface.
5. (Optional.) Set the expected bandwidth for the interface.
bandwidth bandwidth-value
The expected bandwidth is 64 kbps by default.
The expected bandwidth is an informational parameter used only by higher-layer protocols for calculation. You cannot adjust the actual bandwidth of an interface by using this command.
6. (Optional.) Configure the description of the interface.
description text
The default interface description is interface name Interface. For example, SSLVPN-AC1000 Interface.
7. (Optional.) Set the MTU of the interface.
mtu size
The default MTU is 1500 bytes.
8. Bring up the interface.
undo shutdown
By default, an SSL VPN AC interface is up.
Restoring the default settings for the SSL VPN AC interface
|
|
IMPORTANT: Restoring the default interface settings might interrupt ongoing network services. Make sure you are fully aware of the impact of this operation when you perform it on a live network. |
To restore the default settings for the SSL VPN AC interface:
1. Enter system view.
system-view
2. Enter SSL VPN AC interface view.
interface sslvpn-ac interface-number
3. Restore the default settings for the SSL VPN AC interface.
default
This command might fail to restore the default settings for some commands for reasons such as command dependencies and system restrictions. You can use the display this command in interface view to check for these commands, and use their undo forms or follow the command reference to restore their respective default settings. If your restoration attempt still fails, follow the error message instructions to resolve the problem.
Creating an address pool for IP access users
About this task
An address pool defines the IP addresses that can be assigned to IP access users.
Restrictions and guidelines
To prevent IP address conflicts, make sure the IP addresses in the address pool meet the following requirements:
· Not in the same network segment as the physical NICs on the clients.
· Exclude IP addresses of the interfaces on the device that operates as the SSL VPN gateway.
· Not in the same network segment as the internal addresses to be accessed.
Procedure
1. Enter system view.
system-view
2. Create an IPv4 address pool.
sslvpn ip address-pool pool-name start-ip-address end-ip-address
3. Create an IPv6 address pool.
sslvpn ipv6 address-pool ipv6-pool-name start-ipv6-address end-ipv6-address
Configuring IP access parameters in an SSL VPN context
About this task
To provide service to IP access users, you must configure IP access parameters in an SSL VPN context, including the SSL VPN AC interface, address pool, and route list. After a user passes identity authentication, the SSL VPN context allocates an IP address to the VNIC of the user from the specified address pool. The route list can be used by an SSL VPN policy group to issue route entries to users.
Restrictions and guidelines
Automatic pushing of accessible resources to IP access users through the Web page is available only for users that use the iNode client in Windows. You can install the iNode client by using one of the following methods:
· Log in to the SSL VPN gateway from a Web browser, and then download and install the iNode client that comes with the device.
· Install the iNode client downloaded from the official website. Select the option of generating iNode installation package for VPN gateway when customizing the iNode client. If you do not select this option, the user will be automatically logged out because the SSL VPN gateway cannot detect that the iNode client is logged in.
Procedure
1. Enter system view.
system-view
2. Enter SSL VPN context view.
sslvpn context context-name
3. Specify an SSL VPN AC interface for IP access.
ip-tunnel interface sslvpn-ac interface-number
By default, no SSL VPN AC interface is specified for IP access in the SSL VPN context.
4. Configure an IPv4 route list:
a. Create an IPv4 route list and enter its view.
ip-route-list list-name
b. Add an included IPv4 route to the IPv4 route list.
include ip-address { mask | mask-length }
c. Add an excluded IPv4 route to the IPv4 route list.
exclude ip-address { mask | mask-length }
d. Return to SSL VPN context view.
quit
5. Configure an IPv6 route list:
a. Create an IPv6 route list and enter its view.
ipv6-route-list ipv6-list-name
b. Add an included IPv6 route to the IPv6 route list.
include ipv6 ipv6-address prefix-length
c. Add an excluded IPv6 route to the IPv6 route list.
exclude ipv6 ipv6-address prefix-length
d. Return to SSL VPN context view.
quit
6. Specify an IPv4 address pool for IP access.
ip-tunnel address-pool pool-name mask { mask-length | mask }
By default, no IPv4 address pool is specified for IP access.
7. Specify an IPv6 address pool for IP access.
ip-tunnel ipv6 address-pool ipv6-pool-name prefix prefix-length
By default, no IPv6 address pool is specified for IP access.
8. (Optional.) Set the keepalive interval.
ip-tunnel keepalive seconds
By default, the keepalive interval is 30 seconds.
9. (Optional.) Specify an IPv4 DNS server for IP access.
ip-tunnel dns-server { primary | secondary } ip-address
By default, no IPv4 DNS servers are specified for IP access.
10. (Optional.) Specify an IPv6 DNS server for IP access.
ip-tunnel ipv6 dns-server { primary | secondary } ipv6-address
By default, no IPv6 DNS servers are specified for IP access.
11. (Optional.) Specify a WINS server for IP access.
ip-tunnel wins-server { primary | secondary } ip-address
By default, no WINS servers are specified for IP access.
12. (Optional.) Enable automatic startup of the IP access client after Web login.
web-access ip-client auto-activate
By default, automatic startup of the IP access client after Web login is disabled.
13. (Optional.) Enable automatic pushing of accessible resources to IP access users through the Web page.
ip-tunnel web-resource auto-push
By default, automatic pushing of accessible resources to IP access users through the Web page is disabled.
14. (Optional.) Set a rate limit for IP access upstream or downstream traffic.
ip-tunnel rate-limit { downstream | upstream } { kbps | pps } value
By default, no rate limit is set for IP access upstream or downstream traffic.
Configuring an SSL VPN policy group for IP access
About this task
To configure an SSL VPN policy group for IP access, configure routes for the accessible IP resources in the policy group. After the AAA server or custom authentication server authorizes a user to use a policy group, the SSL VPN gateway issues the routes to the user so the user can access the IP resources.
You can configure the routes to be issued to users by using one of the following methods:
· Manually configure a route.
· Specify a route list.
· Force all traffic to be sent to the SSL VPN gateway.
The SSL VPN gateway issues a default route to the SSL VPN client. The default route uses the VNIC as the output interface and has the highest priority among all default routes on the client. Packets for destinations not in the routing table are sent to the SSL VPN gateway through the VNIC. The SSL VPN gateway monitors the SSL VPN client in real time. It does not allow the client to delete the default route or add a default route with a higher priority.
In a policy group, you can specify an advanced ACL and a URI ACL to filter users' IP access requests.
The SSL VPN gateway uses the following procedure to determine whether to forward an IP access request:
1. Matches the request against the rules in the URI ACL:
¡ If the request matches a permit rule, the gateway forwards the request.
¡ If the request matches a deny rule, the gateway drops the request.
¡ If the request does not match any rules in the URI ACL or if no URI ACL is available, the gateway proceeds to step 2.
2. Matches the request against the rules in the advanced ACL:
¡ If the request matches a permit rule, the gateway forwards the request.
¡ If the request matches a deny rule, the gateway drops the request.
¡ If the request does not match any rules in the advanced ACL or if no advanced ACL is available, the gateway drops the request.
If no URI ACL or advanced ACL is specified for IP access filtering, the SSL VPN gateway permits all IP accesses by default.
The advanced ACL supports filtering IP access requests by using the following criteria:
· Destination IP address.
· Destination port number.
· Source IP address.
· Source port number.
· Protocol type.
· Packet priority.
· Fragment information.
· TCP flag.
· ICMP message type and message code.
The URI ACL supports filtering IP access requests by protocol type, destination address, domain name, port number, and URL.
Restrictions and guidelines
If a rule in the URI ACL specified for IP access filtering contains HTTP or HTTPS settings, the rule does not take effect.
Procedure
1. Enter system view.
system-view
2. Enter SSL VPN context view.
sslvpn context context-name
3. Create an SSL VPN policy group and enter SSL VPN policy group view.
policy-group group-name
4. Specify the IPv4 routes to be issued to clients.
ip-tunnel access-route { ip-address { mask-length | mask } | force-all | ip-route-list list-name }
By default, no IPv4 routes are configured.
5. Specify the IPv6 routes to be issued to clients.
ip-tunnel ipv6 access-route { ipv6-address prefix-length | ipv6-route-list ipv6-list-name }
By default, no IPv6 routes are configured.
6. Configure force forwarding of all IPv6 traffic of a client to the SSL VPN gateway.
ip-tunnel ipv6 access-route force-all
By default, force forwarding of all IPv6 traffic of a client to the SSL VPN gateway is not configured.
7. Specify the ACLs for IP access filtering:
¡ Specify an advanced ACL for IP access filtering.
filter ip-tunnel [ ipv6 ] acl advanced-acl-number
¡ Specify a URI ACL for IP access filtering.
filter ip-tunnel uri-acl uri-acl-name
By default, an SSL VPN gateway permits all IP access requests.
8. (Optional.) Specify an IPv4 address pool for IP access.
ip-tunnel address-pool pool-name mask { mask-length | mask }
By default, no IPv4 address pool is specified for IP access in an SSL VPN policy group.
If no free address is available in the IPv4 address pool or the IPv4 address pool does not exist, address allocation to IP access users will fail and the users' access requests will be rejected.
If no IPv4 address pool is specified for the policy group, the SSL VPN gateway allocates IPv4 addresses to users from the IPv4 address pool specified for the SSL VPN context.
9. (Optional.) Specify an IPv6 address pool for IP access.
ip-tunnel ipv6 address-pool ipv6-pool-name prefix prefix-length
By default, no IPv6 address pool is specified for IP access in an SSL VPN policy group.
If no free address is available in the IPv6 address pool or the IPv6 address pool does not exist, address allocation to IP access users will fail and the users' access requests will be rejected.
If no IPv6 address pool is specified for the policy group, the SSL VPN gateway allocates IPv6 addresses to users from the IPv6 address pool specified for the SSL VPN context.
Binding IP addresses to an SSL VPN user
About this task
When an SSL VPN user accesses the SSL VPN gateway in IP access mode, the SSL VPN gateway must assign an IP address to the user. This feature allows you to specify the IP addresses that can be assigned to a user.
You can bind IP addresses to an SSL VPN user as follows:
· Bind a list of IP addresses to the user. When the user accesses the SSL VPN gateway in IP access mode, the SSL VPN gateway assigns a bound IP address to the user.
· Enable the SSL VPN gateway to automatically bind the specified number of free addresses in the IP access address pool to the user.
Restrictions and guidelines
The IP addresses to be bound to an SSL VPN user must meet the following requirements:
· If an IP access address pool is specified for the SSL VPN policy group authorized to the user, the IP addresses must exist in the address pool.
· If no address pool is specified for the SSL VPN policy group, the IP addresses must exist in the address pool specified for the SSL VPN context of the user.
You can bind the same IP address to different SSL VPN users only when the SSL VPN contexts of the users are associated with different networks (public network or VPN).
Procedure
1. Enter system view.
system-view
2. Enter SSL VPN context view.
sslvpn context context-name
3. Create an SSL VPN user and enter SSL VPN user view.
user username
4. Bind IPv4 addresses to the SSL VPN user.
ip-tunnel bind address { ip-address-list | auto-allocate number }
By default, an SSL VPN user does not have bound IPv4 addresses.
5. Bind IPv6 addresses to the SSL VPN user.
ip-tunnel ipv6 bind address { ipv6-address-list | auto-allocate number }
By default, an SSL VPN user does not have bound IPv6 addresses.
Configuring outbound dynamic NAT for SSL VPN IP access
About this task
When the device installs with multiple security modules, you must configure outbound dynamic NAT on the interface connected to the internal server to translate source IP addresses to ensure that the forward and return packets of a data flow are forwarded to the same security module.
If no source address translation is performed, the forward and return packets of a data flow might be redirected to different security modules because of the following:
· When the SSL VPN gateway receives a user packet that accesses the internal server, it uses the source IP address of the packet (the IP address of the physical NIC of the user host) to select a security module through hash computation.
· When the SSL VPN gateway receives the return packet, it uses the destination IP address of the return packet (the IP address of the vitual NIC of the user host) to select a security module through hash computation.
· The security modules selected by the two hash computations might be different.
In this case, configure NAT to translate the source IP address of the packets between the SSL VPN gateway and the internal server and generate OpenFlow entries to ensure the forward and return packets of a data flow are redirected to the same security module.
For more information about NAT, see the NAT configuration in Layer 3—IP Services Configuration Guide.
Restrictions and guidelines
Configure outbound dynamic NAT on the interface connected to the internal server to translate source IP addresses.
Make sure the IP addresses in the NAT address group are in the same subnet as the interface where NAT is configured.
Configure NAT source address translation for the IP address of the IP client (virtual NIC).
Procedure
1. Enter system view.
system-view
2. Create a NAT address group and enter NAT address group view.
nat address-group group-id [ name group-name ]
3. Add an address range to the address group.
address start-address end-address
You can repeat this command to add multiple address ranges to an address group.
Make sure the address ranges in the same address group or different address groups do not overlap.
4. Return to system view.
quit
5. Enter interface view.
interface interface-type interface-number
6. Configure outbound dynamic NAT.
nat outbound [ ipv4-acl-number | name ipv4-acl-name ] address-group { group-id | name group-name } [ vpn-instance vpn-instance-name ] no-pat [ reversible ] [ rule rule-name ] [ priority priority ] [ disable ] [ counting ] [ description text ]
By default, no outbound dynamic NAT rules exist.
Configuring SSL VPN access for mobile clients
SSL VPN access for mobile clients tasks at a glance
To configure SSL VPN access for mobile clients, perform the following tasks:
1. Specifying an EMO server for mobile clients
2. (Optional.) Specifying a message server for mobile clients
Specifying an EMO server for mobile clients
About this task
An EMO server provides services for mobile clients. After you specify an EMO server for mobile clients, the SSL VPN gateway issues the EMO server information to the clients. The clients can access available service resources through the EMO server.
Procedure
1. Enter system view.
system-view
2. Enter SSL VPN context view.
sslvpn context context-name
3. Specify an EMO server for mobile clients.
emo-server address { host-name | ipv4-address } port port-number
By default, no EMO server is specified for mobile clients.
Specifying a message server for mobile clients
About this task
A message server provides services for mobile clients. After you specify a message server for mobile clients, the SSL VPN gateway issues the message server information to the clients. The clients can access the message server.
Procedure
1. Enter system view.
system-view
2. Enter SSL VPN context view.
sslvpn context context-name
3. Specify a message server for mobile clients.
message-server address { host-name | ipv4-address } port port-number
By default, no message server is specified for mobile clients.
Configuring shortcuts
About this task
To provide quick access to resources on internal servers, configure shortcuts for these resources. A shortcut provides the access link to a protected resource on the SSL VPN Web page. Users can click a shortcut name on the SSL VPN Web page to access the associated resource.
Procedure
1. Enter system view.
system-view
2. Enter SSL VPN context view.
sslvpn context context-name
3. Create a shortcut and enter its view.
shortcut shortcut-name
By default, no shortcuts exist.
4. (Optional.) Configure a description for the shortcut.
description text
By default, no description is configured for a shortcut.
5. Configure a resource link for the shortcut.
execution script
By default, no resource link is configured for a shortcut.
6. Return to SSL VPN context view.
quit
7. Create a shortcut list and enter its view.
shortcut-list list-name
8. Assign the shortcut to the shortcut list.
resources shortcut shortcut-name
By default, a shortcut list does not contain shortcuts.
9. Return to SSL VPN context view.
quit
10. Enter SSL VPN policy group view.
policy-group group-name
11. Assign the shortcut list to the SSL VPN policy group.
resources shortcut-list list-name
By default, an SSL VPN policy group does not contain a shortcut list.
Configuring redirect resources
About this task
By default, a user enters the SSL VPN webpage after logging in to the SSL VPN gateway. To provide quick access to the specified Web resource on internal servers, configure the resource as a redirect resource. Users will directly enter the specified redirect resource after a short stay on the SSL VPN Web page.
Procedure
1. Enter system view.
system-view
2. Enter SSL VPN context view.
sslvpn context context-name
3. Enter SSL VPN policy group view.
policy-group group-name
4. Configure the Web resource for SSL VPN users to access after login.
redirect-resource { shortcut | url-item } resource-name
By default, after logging in to the SSL VPN gateway, a user directly enters the SSL VPN webpage, and no redirection is performed.
Configuring HTTP redirection
About this task
An SSL VPN gateway communicates with users through HTTPS. To allow HTTP to access the SSL VPN gateway, you must configure HTTP redirection.
HTTP redirection enables an SSL VPN gateway to perform the following operations:
1. Listen to an HTTP port.
2. Redirect HTTP requests with the port number to the port used by HTTPS.
3. Send redirection packets to clients.
Procedure
1. Enter system view.
system-view
2. Enter SSL VPN gateway view.
sslvpn gateway gateway-name
3. Enable HTTP redirection.
http-redirect [ port port-number ]
By default, HTTP redirection is disabled. An SSL VPN gateway does not process HTTP traffic.
Configuring the default policy group for an SSL VPN context
About this task
If the AAA server or custom authentication server does not authorize a policy group to a user after the user logs in, the SSL VPN gateway authorizes the default policy group to the user. If no default policy group is configured, the SSL VPN gateway denies all access requests from the user.
Procedure
1. Enter system view.
system-view
2. Enter SSL VPN context view.
sslvpn context context-name
3. Create an SSL VPN policy group and enter SSL VPN policy group view.
policy-group group-name
4. Configure accessible resources in the policy group:
¡ Configure Web access resources.
resources url-list url-list-name
By default, no URL list is specified in a policy group.
¡ Configure TCP access resources.
resources port-forward port-forward-name
By default, no port forwarding list is specified in a policy group.
¡ Configure IPv4 access resources.
ip-tunnel access-route { ip-address { mask-length | mask } | force-all | ip-route-list list-name }
By default, no IPv4 route entries are configured in a policy group.
¡ Configure IPv6 access resources.
ip-tunnel ipv6 access-route { ipv6-address prefix-length | ipv6-route-list ipv6-list-name }
By default, no IPv6 route entries are configured in a policy group.
¡ Force forward all IPv6 traffic of a client to the SSL VPN gateway.
ip-tunnel ipv6 access-route force-all
By default, force forwarding of all IPv6 client traffic to the SSL VPN gateway is not configured.
5. (Optional.) Specify the ACLs for Web access filtering:
¡ Specify an advanced ACL for Web access filtering.
filter web-access [ ipv6 ] acl advanced-acl-number
¡ Specify a URI ACL for Web access filtering.
filter web-access uri-acl uri-acl-name
By default, users can access only the Web resources authorized to them through the URL list.
6. (Optional.) Specify the ACLs for TCP access filtering:
¡ Specify an advanced ACL for TCP access filtering.
filter tcp-access [ ipv6 ] acl advanced-acl-number
¡ Specify a URI ACL for TCP access filtering.
filter tcp-access uri-acl uri-acl-name
By default, users can access only the TCP resources authorized to them through the TCP port forwarding list.
7. (Optional.) Specify the ACLs for IP access filtering:
¡ Specify an advanced ACL for IP access filtering.
filter ip-tunnel [ ipv6 ] acl advanced-acl-number
¡ Specify a URI ACL for IP access filtering.
filter ip-tunnel uri-acl uri-acl-name
By default, an SSL VPN gateway permits all IP access requests.
8. Return to SSL VPN context view.
quit
9. Specify the policy group as the default policy group for the SSL VPN context.
default-policy-group group-name
By default, no default policy group is specified for an SSL VPN context.
Configuring VRF-aware SSL VPN
Associating an SSL VPN context with a VPN instance
About this task
You can associate different SSL VPN contexts with different VPN instances on the SSL VPN gateway. Users in an SSL VPN context can access only the resources in the VPN instance associated with the SSL VPN context. VRF-aware SSL VPN contexts also allow server addresses to overlap.
Prerequisites
Before you configure this feature, complete the following tasks:
· Create the VPN instance.
· Associate the SSL VPN gateway's interface connected to the internal server with the VPN instance.
· (Required for IP access.) Associate the SSL VPN AC interface specified by the ip-tunnel interface command with the VPN instance.
For more information about VPN instances, see VPN Instance Configuration Guide.
Procedure
1. Enter system view.
system-view
2. Enter SSL VPN context view.
sslvpn context context-name
3. Associate the SSL VPN context with a VPN instance.
vpn-instance vpn-instance-name
By default, an SSL VPN context is associated with the public network.
Specifying a VPN instance for an SSL VPN gateway
About this task
After you specify a VPN instance for an SSL VPN gateway, only users in the specified VPN can access the SSL VPN gateway. The VRF-aware SSL VPN gateway prevents the internal server resources from leaking into the public network or other VPNs.
Prerequisites
Before you configure this feature, complete the following tasks:
· Create the VPN instance.
· Associate the VPN instance with the SSL VPN gateway's interface connected to the user.
· Bind the SSL VPN AC interface to
For more information
Procedure
1. Enter system view.
system-view
2. Enter SSL VPN gateway view.
sslvpn gateway gateway-name
3. Specify a VPN instance for the gateway.
vpn-instance vpn-instance-name
By default, an SSL VPN gateway belongs to the public network.
Configuring online SSL VPN user control
About this task
Perform this task to configure the SSL VPN user login control features, such as the force logout feature, the maximum number of concurrent logins for each account, and the maximum number of connections allowed per session.
Procedure
1. Enter system view.
system-view
2. Enter SSL VPN context view.
sslvpn context context-name
3. Force online users to log out.
force-logout [ all | session session-id | user user-name ]
4. Set the maximum number of concurrent logins for each account.
max-onlines number
By default, the maximum number of concurrent logins for each account is 32.
5. Enable the force logout feature.
force-logout max-onlines enable
By default, the force logout feature is disabled. A user cannot log in if the number of logins using the account reaches the maximum.
When a login is attempted but logins using the account reach the maximum, this feature logs out the user with the longest idle time to allow the new login.
6. Set the maximum number of connections allowed per session.
session-connections number
By default, a maximum of 64 connections are allowed per session.
If the number of connections in a session has reached the maximum, new connection requests for the session will be rejected with a 503 Service Unavailable message.
Configuring SSL VPN session rate limit
About this task
Perform this task to set a rate limit for SSL VPN session upstream and downstream traffic, respectively. If the SSL VPN session upstream or downstream traffic exceeds the rate limit, subsequent upstream or downstream traffic will be discarded.
Procedure
1. Enter system view.
system-view
2. Enter SSL VPN context view.
sslvpn context context-name
3. Set a rate limit for SSL VPN session upstream or downstream traffic.
rate-limit { downstream | upstream } value
By default, no rate limit is set for SSL VPN session upstream or downstream traffic.
Configuring SSL VPN cracking prevention
About this task
This feature reduces the risk of brute-force cracking of user login information by limiting the number of login attempts from the same IP address.
If the number of consecutive login failures of the same IP address reaches the specified number, the IP address will be frozen for the specified period of time. During the freeze period, the IP address is prohibited from logging in to the SSL VPN context. When the freeze period expires, the frozen IP address will be unfrozen automatically. To unfreeze the frozen IP address immediately, execute the prevent-cracking unfreeze-ip command.
Procedure
1. Enter system view.
system-view
2. Enter SSL VPN context view.
sslvpn context context-name
3. Enable IP address freezing for cracking prevention.
prevent-cracking freeze-ip enable
By default, IP address freezing for cracking prevention is disabled.
4. (Optional.) Specify the maximum number of consecutive login failures allowed for an IP address and the period of time to freeze an IP address for cracking prevention.
prevent-cracking freeze-ip login-failures login-failures freeze-time freeze-time
By default, the maximum number of consecutive login failures allowed for an IP address is 64, and the period of time to freeze an IP address is 30 seconds.
5. Enable code verification for cracking prevention.
prevent-cracking verify-code enable
By default, code verification for cracking prevention is disabled.
6. (Optional.) Specify the maximum number of consecutive login failures allowed for an IP address before performing code verification to prevent cracking.
prevent-cracking verify-code login-failures login-failures
By default, a maximum of five consecutive login failures are allowed for an IP address before performing code verification.
7. (Optional.) Unfreeze frozen IP addresses.
prevent-cracking unfreeze-ip { all | { ipv4 | ipv6 } ip-address }
Configuring SSL VPN SSO login
About configuring SSL VPN SSO login
SSO allows a user to use one set of login credentials (such as username and password) to access multiple trusted systems. With SSO, SSL VPN Web access users can gain access to internal servers without entering the login credentials for the internal servers. The device supports the following methods for SSO login:
· Auto-build method (automatically build login requests)
Use a packet capture tool to obtain internal server login requests, and then configure SSO login settings based on the login requests to automatically build login requests to the internal servers. SSO login settings include the HTTP request method, login request encoding method, login parameters, and login data encryption file.
· Basic authentication method
Basic authentication is a simple HTTP authentication scheme, which requires a Web client to enter a username and password to access the server. The server authenticates the client based on the username and password.
To implement SSO in the basic authentication method, the SSL VPN gateway acts as a Web client and automatically enters a username and password to perform HTTP basic authentication. The entered username and password can be SSL VPN username and password or custom username and password.
The basic authentication SSO method is applicable only for logging in to the internal servers that support basic authentication.
Restrictions and guidelines
For the auto-build SSO method, the following requirements must be met:
· SSO login is available only for SSL VPN Web access users.
· If a user group name is specified as the SSO login parameter, only remote users are supported.
· SSO login is available only for accessing resources by clicking the URL links on the SSL VPN Web interface. SSO does not work if you access the resources by entering the URLs in a browser address bar or a URL input box.
· SSO login is not available for Web resources that require graphic verification codes.
· SSO login is not available for Web resources that require two-factor authentication or script invocation.
Configuring SSO login in auto-build method
1. Enter system view.
system-view
2. Enter SSL VPN context view.
sslvpn context context-name
3. Create a URL item and enter its view.
url-item name
4. Specify the resource URL in the URL item.
url url
By default, no resource URL is specified in a URL item.
If you do not specify a protocol type in the resource URL, the default protocol (HTTP) is used.
5. Enable Web access SOO and specify the auto-build method.
sso method auto-build
By default, Web access SSO login is disabled.
6. Specify the HTTP request method for sending SSO login requests.
sso auto-build request-method { get | post }
By default, the GET request method is used for sending SSO login requests.
7. Specify an encoding method for SSO login requests.
sso auto-build code { gb18030 | utf-8 }
By default, UTF-8 encoding is used for SSO login requests.
8. Configure a login parameter for automatic building of SSO login requests.
sso auto-build login-parameter { cert-fingerprint | cert-serial | cert-title | custom-password | custom-username | login-name | login-password | mobile-num | user-group } name parameter-name [ encrypt ]
By default, no login parameter is configured for automatic building of SSO login requests.
9. Configure a custom login parameter for automatic building of SSO login requests.
sso auto-build custom-login-parameter name parameter-name value value [ encrypt ]
By default, no custom parameter is configured for automatic building of SSO login requests.
10. Specify an encryption file to encrypt the values of parameters in SSO login requests.
sso auto-build encrypt-file filename
By default, no encryption file is specified.
Configuring SSO login through basic authentication
1. Enter system view.
system-view
2. Enter SSL VPN context view.
sslvpn context context-name
3. Create a URL item and enter its view.
url-item name
4. Specify the resource URL in the URL item.
url url
By default, no resource URL is specified in a URL item.
If you do not specify a protocol type in the resource URL, the default protocol (HTTP) is used.
5. Enable Web access SSO and specify the SSO method as basic authentication.
sso method basic
By default, Web access SSO login is disabled.
6. (Optional.) Enable using a custom username and password for SSO login through basic authentication.
sso basic custom-username-password enable
By default, SSL VPN login username and password are used for SSO login through basic authentication.
Configuring WeChat Work authentication
About WeChat Work authentication
WeChat Work (or WeCom) authentication allows the device to obtain user information in a company from WeChat Work and uses the user information for user authentication and authorization. This feature is transparent to users in the company.
As shown in Figure 11, WeChat Work authentication operates as follows:
1. A user in a company uses the WeChat Work client to access an internal resource. The client sends the resource access request to the WeChat open platform.
2. The WeChat open platform redirects the request to the SSL VPN gateway for the gateway to protect the internal resource.
Make sure the redirect link has been configured on the WeChat open platform.
3. On receiving the packet redirected from the WeChat Work server, the SSL VPN gateway sends a request to the WeChat Work API server to obtain the user ID.
4. The WeChat Work API server returns the user ID.
5. The SSL VPN gateway uses the user ID to further obtain the organization information of the user from the WeChat Work API server.
The organization information corresponds to the authorization policy group name configured on the SSL VPN gateway.
6. The WeChat Work API server returns the organization information.
7. Based on the obtained user information, the SSL VPN gateway performs authentication for the user and authorizes the user to access the internal resource.
8. The SSL VPN gateway constructs a login request with parameters that carry the user information, and sends the request to the internal server.
9. The internal server returns the response to the SSL VPN gateway.
10. The SSL VPN gateway forwards the response to the WeChat Work client. The user then can access the internal resource through the client.
Figure 11 WeChat Work authentication mechanism

Restrictions and guidelines
The self-signed certificate on the device does not support WeChat Work authentication. To use WeChat Work authentication, install a trusted SSL certificate first.
To enable WeChat Work authentication for an SSL VPN context, you must associate the SSL VPN context to an SSL VPN gateway exclusively.
Prerequisites
Before configuring WeChat Work authentication, you must configure the app homepage redirect link and the trusted domain name of the SSL VPN gateway for each app on the WeChat Work management platform.
Configuring the app homepage redirect link for an app
1. Enter https://work.weixin.qq.com in the browser.
2. Use the WeChat Work client to scan the QR code to log in to the WeChat Work management platform.
3. On the WeChat Work management platform, click App Management and select an app.
4. In the Workplace App Management area, click Enabled to configure the app homepage redirect link in the format of https://open.weixin.qq.com/connect/oauth2/authorize?appid=CORPID&redirect_uri=https://gateway.com:port/_proxywx/http/80/www.resources.com/?ctx=contextName&response_type=code&scope=snsapi_base&agentid=AGENTID&connect_redirect=1#wechat_redirect.
¡ CORPID—Company ID. To view the company ID, go to My Company > Company Information.
¡ gateway.com:port—Domain name and port number of the SSL VPN gateway.
¡ www.resources.com—Domain name of the internal resource.
¡ contextName—SSL VPN context name.
¡ AGENTID—App ID. To view the app ID of an app, select the app on the App Management page, and view the Agentid field.
You must encode https://gateway.com:port/_proxywx/http/80/www.resources.com/?ctx=contextName to the URL encoding format.
Configuring the trusted domain name of the SSL VPN gateway for an app
1. Enter https://work.weixin.qq.com in the browser.
2. Use the WeChat Work client to scan the QR code to log in to the WeChat Work management platform.
3. On the WeChat Work management platform, click App Management and select an app.
4. In the Web Authorization and JS-SDK area, click Apply for domain name verification. In the window that opens, enter the domain name and port number of the SSL VPN gateway in the format of gateway.com:port in the Trustable Domain Names field.
5. Click Domain name to be verified and download the verification file as instructed. Then, upload the verification file on the SSL VPN Web interface.
6. Select The domain name ownership verification file has been uploaded., and then click Confirm.
Procedure
1. Enter system view.
system-view
2. Enter SSL VPN context view.
sslvpn context context-name
3. Enable WeChat Work authentication.
wechat-work-authentication enable
By default, WeChat Work authentication is disabled.
4. Specify the URL of the WeChat Work API server.
wechat-work-authentication url url
By default, no WeChat Work API server URL is configured.
5. Specify the WeChat Work authentication timeout.
wechat-work-authentication timeout seconds
By default, the WeChat Work authentication timeout is 15 seconds.
6. Specify the company ID for WeChat Work authentication.
wechat-work-authentication corp-id corp-id
By default, no company ID is specified for WeChat Work authentication.
7. Specify the app secret key for WeChat Work authentication.
wechat-work-authentication app-secret app-secret
By default, no app secret key is specified for WeChat Work authentication.
8. Specify the user ID field name for the SSL VPN gateway to access the internal server.
wechat-work-authentication userid-field userid-field
By default, no user ID field name is configured for the SSL VPN gateway to access the internal server.
9. Specify the name of the authorization policy group field.
wechat-work-authentication authorize-field authorize-field
By default, no authorization policy group field name is specified for WeChat Work authentication.
10. Specify the WeChat open platform URL.
wechat-work-authentication open-platform-url { pre-defined | user-defined user-defined-url }
By default, no WeChat open platform URL is specified.
Configuring denied SSL VPN client types
About this task
To deny users to use some types of client software to log in to the SSL VPN gateway, perform this task to specify the denied SSL VPN client software types.
Restrictions and guidelines
After browsers are denied, existing users and new users cannot use browsers to access the SSL VPN gateway. After browsers are restored permissions to SSL VPN access, users must refresh the login page to log in. The deny of other client types takes effect only on new users. Existing users are not affected.
Procedure
1. Enter system view.
system-view
2. Enter SSL VPN context view.
sslvpn context context-name
3. Configure the client types that are denied access to the SSL VPN.
access-deny-client { browser | mobile-inode | pc-inode } *
By default, no client types are denied access to the SSL VPN.
Customizing SSL VPN webpages
Restrictions and guidelines
If a user-defined webpage template is specified in an SSL VPN context, all other webpage customization settings are invalid for the SSL VPN context.
Customizing SSL VPN webpage elements
About this task
You can customize the following elements on the SSL VPN webpage:
· Login message.
· Password input box displaying.
· Title.
· Logo.
· Notification message on the SSL VPN gateway login page and resource page.
· Files for users to download on the SSL VPN resource page.
· Password complexity description.
· Server reply message rewriting.
Procedure
1. Enter system view.
system-view
2. Enter SSL VPN context view.
sslvpn context context-name
3. Configure a login message.
login-message { chinese chinese-message | english english-message }
By default, the login message is Welcome to SSL VPN.
4. Hide the password input box on the SSL VPN Web login page.
password-box hide
By default, the password input box is displayed on the SSL VPN Web login page.
5. Configure a title.
title { chinese chinese-title | english english-title }
By default, the title is SSL VPN.
6. Specify a logo.
logo { file file-name | none }
By default, the H3C logo is displayed.
7. Configure the notification message to be displayed on the SSL VPN gateway login page or resource page.
notify-message { login-page | resource-page } { chinese chinese-message | english english-message }
By default, no notification message is configured.
8. Specify a file for users to download on the SSL VPN gateway resource page.
resources-file { chinese chinese-filename | english english-filename }
By default, no file is provided for users to download.
9. Configure the password complexity message to be displayed on the SSL VPN password modification page.
password-complexity-message { chinese chinese-message | english english-message }
By default, no password complexity message is configured.
10. Rewrite a server reply message.
rewrite server-response-message server-response-message { chinese chinese-message | english english-message }
By default, no server reply message is rewritten.
Specifying an SSL VPN webpage template
About this task
This task allows you to customize SSL VPN webpages by specifying an SSL VPN webpage template. An SSL VPN webpage template defines the style of the SSL VPN gateway login page and resource page.
You can specify a webpage template in system view and in SSL VPN context view.
· The webpage template set in system view is the global SSL VPN webpage template, which is applicable to all SSL VPN contexts.
· The webpage template set in SSL VPN context view is applicable only to the current SSL VPN context.
Prerequisites
Upload the user-defined webpage templates to the file system of the device from the webpage.
Restrictions and guidelines for SSL VPN webpage customization
The SSL VPN webpage template specified in SSL VPN context view takes precedence over that in system view.
Specifying an SSL VPN webpage template in system view
1. Enter system view.
system-view
2. Specify the global SSL VPN webpage template.
sslvpn webpage-customize template-name
By default, no global SSL VPN webpage template is specified. SSL VPN uses the system default SSL VPN webpages.
Specifying an SSL VPN webpage template in an SSL VPN context
1. Enter system view.
system-view
2. Enter SSL VPN context view.
sslvpn context context-name
3. Specify an SSL VPN webpage template.
webpage-customize template-name
By default, no SSL VPN webpage template is specified for an SSL VPN context. An SSL VPN context uses the global SSL VPN webpage template.
Configuring an SSL VPN SNAT address pool
About this task
SNAT address pools are used for the SSL VPN gateway to direct traffic to corresponding security modules for processing.
The SSL VPN gateway assigns addresses in the pools to security modules and uses the addresses to generate route entries and OpenFlow flow entries.
When the TCP or Web access service establishes a connection to a remote server, SSL VPN gateway associates the security module of the service with an assigned address. The SSL VPN gateway uses this address as the source address of the request sent to the server. The server uses this address as the destination address of the reply packet sent to the gateway.
After receiving the reply packet from the server, the SSL VPN gateway uses the destination address to find a matching OpenFlow flow entry and route entry. The SSL VPN gateway uses the matching entries to find the corresponding security module and forward the packet of the server to that security module for processing.
You can specify an IPv4 address range, IPv6 address range, or both for an SNAT address pool.
A SNAT address pool can contain a maximum of 256 IPv4 addresses and 65535 IPv6 addresses. No overlapping addresses are allowed in different SNAT address pools.
In an SSL VPN gateway VRRP group associated with HA, bind the VRRP group to an SNAT address pool if the address pool and the server-side interface belong to the same network segment. If you do not configure the binding, the SNAT address pool function will fail.
For more information about HA configuration, see High Availability Configuration Guide.
Restrictions and guidelines
SNAT address pools must be configured if there are more than one security module on the SSL VPN gateway device.
The SSL VPN gateway cannot use SNAT address pools to direct IPv6 traffic to security modules.
The addresses in the address range are equally assigned to all security modules. The number of addresses in the address range must be greater than or equal to the number of security modules.
Procedure
1. Enter system view.
system-view
2. Create an SSL VPN SNAT address pool and enter its view.
sslvpn snat-pool pool-name
3. Specify an IPv4 address range for the pool.
ip range start-ipv4-address end-ipv4-address
By default, no IPv4 address range is specified for an SSL VPN SNAT address pool.
4. Specify an IPv6 address range for the pool.
ipv6 range start-ipv6-address end-ipv6-address
By default, no IPv6 address range is specified for an SSL VPN SNAT address pool.
5. (Optional.) Bind a VRRP group to the SSL VPN SNAT address pool.
vrrp vrid virtual-router-id
By default, no VRRP group is bound to an SSL VPN address pool.
6. Return to system view.
quit
7. Enter SSL VPN context view.
sslvpn context context-name
8. Specify the SNAT address pool for the context.
resources snat-pool snat-pool-name
By default, no SNAT address pool is specified for an SSL VPN context.
Enabling flow redirection for SSL VPN IP access
About this task
This feature ensures that the forward and return packets of a data flow are processed on the same security module. If the return packets are forwarded to a different security module than the forward packets, this feature transparently forwards the return packets to the security module where the forward packets are processed.
By default, the device uses the hardware OpenFlow entries issued by the NAT module to ensure that the forward and return packets of an SSL VPN IP access data flow are forwarded to the same security module for processing. If NAT OpenFlow entry deployment is disabled (by using the undo nat outbound command), enable SSL VPN IP access flow redirection to ensure normal processing of the SSL VPN service.
Restrictions and guidelines
This feature takes effect only in SSL VPN IP access mode.
This feature takes effect only if the session flow redirection feature is enabled. For more information about session flow redirection, see "Managing sessions."
Procedure
1. Enter system view.
system-view
2. Enable flow redirection for SSL VPN IP access.
sslvpn flow-redirect enable
By default, flow redirection for SSL VPN IP access is disabled. SSL VPN IP access flows are redirected by hardware OpenFlow entries of the NAT module.
Enabling SSL VPN logging
About this task
Logs generated by SSL VPN logging are sent to the information center of the device. For the logs to be output correctly, you must also configure the information center on the device. For more information about the information center, see Network Management and Monitoring Configuration Guide.
Procedure
1. Enter system view.
system-view
2. Enable the SSL VPN global logging feature.
sslvpn log enable
By default, the SSL VPN global logging feature is disabled.
3. Enter SSL VPN context view.
sslvpn context context-name
4. Enable logging for user login and logoff events.
log user-login enable
By default, logging for user login and logoff events is disabled.
5. Enable logging for resource accesses of users.
log resource-access enable [ brief | filtering ] *
By default, resource access logging is disabled.
6. Enable logging for IP access connection close events.
ip-tunnel log connection-close
By default, logging for IP access connection close events is disabled.
7. Enable logging for IP access packet drop events.
ip-tunnel log packet-drop
By default, logging for IP access packet drop events is disabled.
8. Enable logging for IP address allocations and releases for the VNIC of the IP access client.
ip-tunnel log address-alloc-release
By default, logging is disabled for IP address allocations and releases for the VNIC of the IP access client.
Display and maintenance commands for SSL VPN
|
|
IMPORTANT: Non-default vSystems do not support some of the display and maintenance commands. For information about vSystem support for these commands, see the SSL VPN command reference. |
Execute display commands in any view and reset commands in user view.
|
Task |
Command |
|
Display SSL VPN AC interface information. |
display interface sslvpn-ac [ interface-number ] [ brief [ description | down ] ] |
|
Display SSL VPN context information. |
display sslvpn context [ brief | name context-name ] |
|
Display SSL VPN gateway information. |
display sslvpn gateway [ brief | name gateway-name ] |
|
Display packet statistics for IP access users. |
display sslvpn ip-tunnel statistics [ context context-name ] [ user user-name ] |
|
Display SSL VPN policy group information. |
display sslvpn policy-group group-name [ context context-name ] |
|
Display TCP port forwarding connection information. |
In standalone mode: display sslvpn port-forward connection [ context context-name ] [ slot slot-number [ cpu cpu-number ] ] In IRF mode: display sslvpn port-forward connection [ context context-name ] [ chassis chassis-number slot slot-number [ cpu cpu-number ] ] |
|
Display information about IP addresses frozen for cracking prevention. |
display sslvpn prevent-cracking frozen-ip { statistics | table } [ context context-name ] |
|
Display SSL VPN session information. |
display sslvpn session [ context context-name ] [ user user-name | verbose ] |
|
Display SSL VPN webpage template information. |
display sslvpn webpage-customize template |
|
Clear SSL VPN AC interface statistics. |
reset counters interface [ sslvpn-ac [ interface-number ] ] |
|
Clear packet statistics for IP access users. |
reset sslvpn ip-tunnel statistics [ context context-name [ session session-id ] ] |
SSL VPN configuration examples
Example: Configuring Web access
Network configuration
As shown in Figure 12, the device acts as the SSL VPN gateway that connects the public network and private networks Nework 1 and Network 2. Server A and Server B are internal Web servers. Server A uses HTTP over port 80. Server B uses HTTPS over port 443.
The device uses a CA-signed SSL server certificate. If no SSL server policy is applied to the device, the device uses a self-signed SSL server certificate.
Configure SSL VPN Web access on the device to allow the user to access Server A in Nework 1 and Server B in Nework 2.
Configure the device to perform local authentication and authorization for the user.
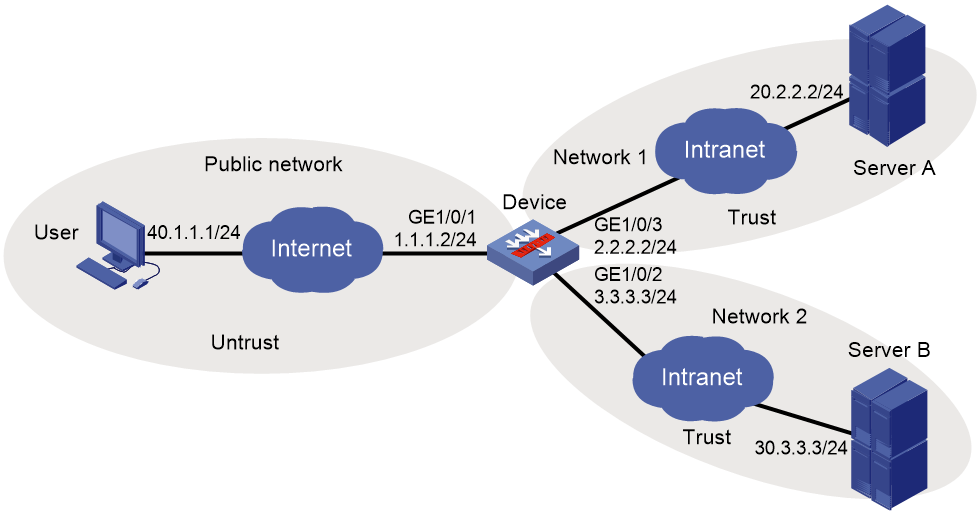
Procedure
1. Obtain CA certificate file ca.cer and local certificate file server.pfx for the device. (Details not shown.)
2. Assign IP addresses to interfaces:
# Assign an IP address to interface GigabitEthernet 1/0/1.
<Device> system-view
[Device] interface gigabitethernet 1/0/1
[Device-GigabitEthernet1/0/1] ip address 1.1.1.2 255.255.255.0
[Device-GigabitEthernet1/0/1] quit
# Assign IP addresses to other interfaces in the same way. (Details not shown.)
3. Configure settings for routing.
This example configures static routes, and the next hop in the routes is 2.2.2.3 to Server A, 3.3.3.4 to Server B, and 1.1.1.3 to the user.
[Device] ip route-static 20.2.2.2 24 2.2.2.3
[Device] ip route-static 30.3.3.3 24 3.3.3.4
[Device] ip route-static 40.1.1.1 24 1.1.1.3
4. Add interfaces to security zones.
[Device] security-zone name untrust
[Device-security-zone-Untrust] import interface gigabitethernet 1/0/1
[Device-security-zone-Untrust] quit
[Device] security-zone name trust
[Device-security-zone-Trust] import interface gigabitethernet 1/0/2
[Device-security-zone-Trust] import interface gigabitethernet 1/0/3
[Device-security-zone-Trust] quit
5. Configure rules in a security policy to permit the traffic between the Untrust and Local security zones for the user to access the SSL VPN gateway:
# Configure a rule named sslvpnlocalout1 to permit the packets from the device to the user.
[Device] security-policy ip
[Device-security-policy-ip] rule name sslvpnlocalout1
[Device-security-policy-ip-1-sslvpnlocalout1] source-zone local
[Device-security-policy-ip-1-sslvpnlocalout1] destination-zone untrust
[Device-security-policy-ip-1-sslvpnlocalout1] source-ip-host 1.1.1.2
[Device-security-policy-ip-1-sslvpnlocalout1] destination-ip-host 40.1.1.1
[Device-security-policy-ip-1-sslvpnlocalout1] action pass
[Device-security-policy-ip-1-sslvpnlocalout1] quit
# Configure a rule named sslvpnlocalin1 to permit the packets from the user to the device.
[Device-security-policy-ip] rule name sslvpnlocalin1
[Device-security-policy-ip-2-sslvpnlocalin1] source-zone untrust
[Device-security-policy-ip-2-sslvpnlocalin1] destination-zone local
[Device-security-policy-ip-2-sslvpnlocalin1] source-ip-host 40.1.1.1
[Device-security-policy-ip-2-sslvpnlocalin1] destination-ip-host 1.1.1.2
[Device-security-policy-ip-2-sslvpnlocalin1] action pass
[Device-security-policy-ip-2-sslvpnlocalin1] quit
# Configure a rule named sslvpnlocalout2 to permit the packets from the device to Server A or Server B.
[Device-security-policy-ip] rule name sslvpnlocalout2
[Device-security-policy-ip-3-sslvpnlocalout2] source-zone local
[Device-security-policy-ip-3-sslvpnlocalout2] destination-zone trust
[Device-security-policy-ip-3-sslvpnlocalout2] source-ip-host 2.2.2.2
[Device-security-policy-ip-3-sslvpnlocalout2] source-ip-host 3.3.3.3
[Device-security-policy-ip-3-sslvpnlocalout2] destination-ip-host 20.2.2.2
[Device-security-policy-ip-3-sslvpnlocalout2] destination-ip-host 30.3.3.3
[Device-security-policy-ip-3-sslvpnlocalout2] action pass
[Device-security-policy-ip-3-sslvpnlocalout2] quit
# Configure a rule named sslvpnlocalin2 to permit the packets from Server A and Server B to the device.
[Device-security-policy-ip] rule name sslvpnlocalin2
[Device-security-policy-ip-4-sslvpnlocalin2] source-zone trust
[Device-security-policy-ip-4-sslvpnlocalin2] destination-zone local
[Device-security-policy-ip-4-sslvpnlocalin2] source-ip-host 20.2.2.2
[Device-security-policy-ip-4-sslvpnlocalin2] source-ip-host 30.3.3.3
[Device-security-policy-ip-4-sslvpnlocalin2] destination-ip-host 2.2.2.2
[Device-security-policy-ip-4-sslvpnlocalin2] destination-ip-host 3.3.3.3
[Device-security-policy-ip-4-sslvpnlocalin2] action pass
[Device-security-policy-ip-4-sslvpnlocalin2] quit
[Device-security-policy-ip] quit
6. Configure a PKI domain named sslvpn and certificate-related parameters.
[Device] pki domain sslvpn
[Device-pki-domain-sslvpn] public-key rsa general name sslvpn
[Device-pki-domain-sslvpn] undo crl check enable
[Device-pki-domain-sslvpn] quit
[Device] pki import domain sslvpn der ca filename ca.cer
[Device] pki import domain sslvpn p12 local filename server.pfx
7. Create an SSL server policy named ssl and specify PKI domain sslvpn for the policy.
[Device] ssl server-policy ssl
[Device-ssl-server-policy-ssl] pki-domain sslvpn
[Device-ssl-server-policy-ssl] quit
8. Configure the SSL VPN gateway for user access. Configure the IP address for SSL VPN gateway gw as 1.1.1.2 and port number as 2000, and then apply server policy ssl to the gateway.
[Device] sslvpn gateway gw
[Device-sslvpn-gateway-gw] ip address 1.1.1.2 port 2000
[Device-sslvpn-gateway-gw] ssl server-policy ssl
[Device-sslvpn-gateway-gw] service enable
[Device-sslvpn-gateway-gw] quit
9. Configure SSL VPN contexts to provide Web access service:
# Create SSL VPN context ctx1, specify gateway gw and domain domain1 for the context, and then associate the context with VPN instance VPN1.
[Device] sslvpn context ctx1
[Device-sslvpn-context-ctx1] gateway gw domain domain1
[Device-sslvpn-context-ctx1] vpn-instance VPN1
[Device-sslvpn-context-ctx1] url-item urlitem
[Device-sslvpn-context-ctx1-url-item-urlitem] url http://20.2.2.2
[Device-sslvpn-context-ctx1-url-item-urlitem] quit
[Device-sslvpn-context-ctx1] url-list urllist
[Device-sslvpn-context-ctx1-url-list-urllist] heading web
[Device-sslvpn-context-ctx1-url-list-urllist] resources url-item urlitem
[Device-sslvpn-context-ctx1-url-list-urllist] quit
[Device-sslvpn-context-ctx1] policy-group pgroup
[Device-sslvpn-context-ctx1-policy-group-pgroup] resources url-list urllist
[Device-sslvpn-context-ctx1-policy-group-pgroup] quit
[Device-sslvpn-context-ctx1] default-policy-group pgroup
[Device-sslvpn-context-ctx1] service enable
[Device-sslvpn-context-ctx1] quit
# Create SSL VPN context ctx2, specify gateway gw and domain domain2 for the context, and then associate the context with VPN instance VPN2.
[Device] sslvpn context ctx2
[Device-sslvpn-context-ctx2] gateway gw domain domain2
[Device-sslvpn-context-ctx2] vpn-instance VPN2
[Device-sslvpn-context-ctx2] url-item urlitem
[Device-sslvpn-context-ctx2-url-item-urlitem] url https://30.3.3.3
[Device-sslvpn-context-ctx2-url-item-urlitem] quit
[Device-sslvpn-context-ctx2] url-list urllist
[Device-sslvpn-context-ctx2-url-list-urllist] heading web
[Device-sslvpn-context-ctx2-url-list-urllist] resources url-item urlitem
[Device-sslvpn-context-ctx2-url-list-urllist] quit
[Device-sslvpn-context-ctx2] policy-group pgroup
[Device-sslvpn-context-ctx2-policy-group-pgroup] resources url-list urllist
[Device-sslvpn-context-ctx2-policy-group-pgroup] quit
[Device-sslvpn-context-ctx2] default-policy-group pgroup
[Device-sslvpn-context-ctx2] service enable
[Device-sslvpn-context-ctx2] quit
10. Create a local user named sslvpn, set the password to 123456, service type to sslvpn, and user role to network-operator. Authorize the user to use policy group pgroup.
[Device] local-user sslvpn class network
[Device-luser-network-sslvpn] password simple 123456
[Device-luser-network-sslvpn] service-type sslvpn
[Device-luser-network-sslvpn] authorization-attribute user-role network-operator
[Device-luser-network-sslvpn] authorization-attribute sslvpn-policy-group pgroup
[Device-luser-network-sslvpn] quit
Verifying the configuration
# Verify that SSL VPN gateway gw is up on the device.
[Device] display sslvpn gateway
Gateway name: gw
Operation state: Up
IP: 1.1.1.2 Port: 2000
SSL server policy configured: ssl
SSL server policy in use: ssl
Front VPN instance: Not configured
# Verify that SSL VPN contexts ctx1 and ctx2 are up on the device.
[Device] display sslvpn context
Context name: ctx1
Operation state: Up
AAA domain: Not specified
Certificate authentication: Disabled
Password authentication: Enabled
Authentication use: All
SMS auth type: Not configured
Urlmasking: Disabled
Code verification: Disabled
Default policy group: pgroup
Associated SSL VPN gateway: gw
Domain name: domain1
SSL client policy configured: ssl
SSL client policy in use: ssl
Maximum users allowed: 1048575
VPN instance: Not configured
Idle timeout: 30 min
Authentication server-type: aaa
Password changing: Enabled
Context name: ctx2
Operation state: Up
AAA domain: Not specified
Certificate authentication: Disabled
Password authentication: Enabled
Authentication use: All
SMS auth type: Not configured
Urlmasking: Disabled
Code verification: Disabled
Default policy group: pgroup
Associated SSL VPN gateway: gw
Domain name: domain2
SSL client policy configured: ssl
SSL client policy in use: ssl
Maximum users allowed: 1048575
VPN instance: Not configured
Idle timeout: 30 min
Authentication server-type: aaa
Password changing: Enabled
# On the user PC, enter https://1.1.1.2:2000/ in the browser address bar to open the domain list page.
Figure 13 Domain list page
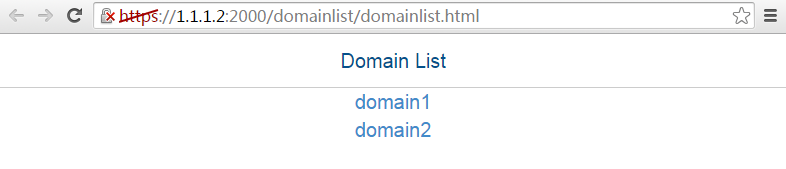
# Select domain1 to enter the login page.
# On the login page, enter username sslvpn and password 123456, and then click Login.
Figure 14 Login page

# Display SSL VPN session information on the device after the user logged in.
[Device] display sslvpn session context ctx1
SSL VPN context: ctx1
Users: 1
Username Connections Idle time Created User IP
sslvpn 6 0/00:12:05 0/00:04:14 40.1.1.1
# On the SSL VPN gateway home page, click the serverA link in the BookMark area to open the webpage of Server A. The URL https://1.1.1.2:2000/_proxy2/http/80/20.2.2.2/ is displayed in the browser address bar.
Figure 15 SSL VPN gateway home page

# Log out and restart the browser. Enter https://1.1.1.2:2000/ to enter the domain list page, and then select domain2 to enter the login page. On the login page, enter username sslvpn and password 123456, and then click Login. (Details not shown.)
# Display SSL VPN session information on the device after the user logged in.
[Device] display sslvpn session context ctx2
SSL VPN context: ctx2
Users: 1
Username Connections Idle time Created User IP
sslvpn 6 0/00:02:05 0/00:01:11 40.1.1.1
# On the SSL VPN gateway home page, click the serverB link in the BookMark area to open the webpage of Server B. The URL https://1.1.1.2:2000/_proxy2/https/443/30.3.3.3/ is displayed in the browser address bar.
Figure 16 SSL VPN gateway home page

Example: Configuring TCP access
Network configuration
As shown in Figure 17, the device acts as an SSL VPN gateway that connects the public network and private network.
The device uses a CA-signed SSL server certificate. If no SSL server policy is applied to the device, the device uses a self-signed SSL server certificate.
Configure SSL VPN TCP access on the device to allow the user to access the internal Telnet server in the private network.
Configure the device to perform local authentication and local authorization for the user.
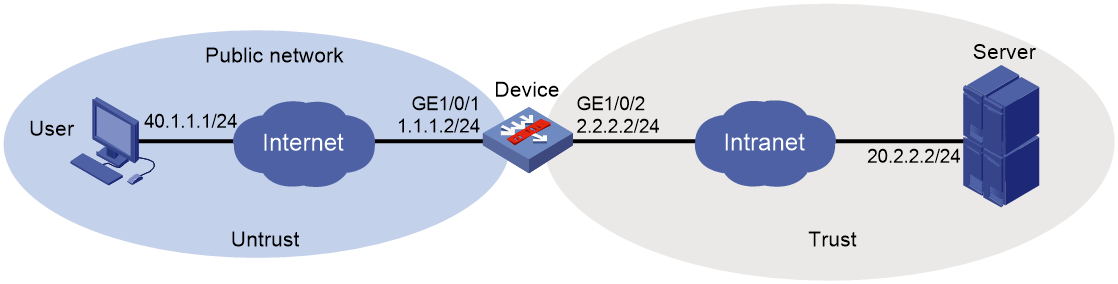
Prerequisites
Before using the user's PC to access the SSL VPN gateway (the device), make sure a Java running environment is installed on the PC.
Procedure
1. Obtain CA certificate file ca.cer and local certificate file server.pfx for the device. (Details not shown.)
2. Assign IP addresses to interfaces:
# Assign an IP address to interface GigabitEthernet 1/0/1.
<Device> system-view
[Device] interface gigabitethernet 1/0/1
[Device-GigabitEthernet1/0/1] ip address 1.1.1.2 255.255.255.0
[Device-GigabitEthernet1/0/1] quit
# Assign IP addresses to other interfaces in the same way. (Details not shown.)
3. Configure settings for routing.
This example configures static routes, and the next hop in the routes is 2.2.2.3 to the server, and 1.1.1.3 to the user.
[Device] ip route-static 20.2.2.2 24 2.2.2.3
[Device] ip route-static 40.1.1.1 24 1.1.1.3
4. Add interfaces to security zones.
[Device] security-zone name untrust
[Device-security-zone-Untrust] import interface gigabitethernet 1/0/1
[Device-security-zone-Untrust] quit
[Device] security-zone name trust
[Device-security-zone-Trust] import interface gigabitethernet 1/0/2
[Device-security-zone-Trust] quit
5. Configure rules in a security policy to permit the traffic between the Untrust and Local security zones for the user to access the SSL VPN gateway:
# Configure a rule named sslvpnlocalout1 to permit the packets from the device to the user.
[Device] security-policy ip
[Device-security-policy-ip] rule name sslvpnlocalout1
[Device-security-policy-ip-1-sslvpnlocalout1] source-zone local
[Device-security-policy-ip-1-sslvpnlocalout1] destination-zone untrust
[Device-security-policy-ip-1-sslvpnlocalout1] source-ip-host 1.1.1.2
[Device-security-policy-ip-1-sslvpnlocalout1] destination-ip-host 40.1.1.1
[Device-security-policy-ip-1-sslvpnlocalout1] action pass
[Device-security-policy-ip-1-sslvpnlocalout1] quit
# Configure a rule named sslvpnlocalin1 to permit the packets from the user to the device.
[Device-security-policy-ip] rule name sslvpnlocalin1
[Device-security-policy-ip-2-sslvpnlocalin1] source-zone untrust
[Device-security-policy-ip-2-sslvpnlocalin1] destination-zone local
[Device-security-policy-ip-2-sslvpnlocalin1] source-ip-host 40.1.1.1
[Device-security-policy-ip-2-sslvpnlocalin1] destination-ip-host 1.1.1.2
[Device-security-policy-ip-2-sslvpnlocalin1] action pass
[Device-security-policy-ip-2-sslvpnlocalin1] quit
# Configure a rule named sslvpnlocalout2 to permit the packets from the device to the server.
[Device-security-policy-ip] rule name sslvpnlocalout2
[Device-security-policy-ip-3-sslvpnlocalout2] source-zone local
[Device-security-policy-ip-3-sslvpnlocalout2] destination-zone trust
[Device-security-policy-ip-3-sslvpnlocalout2] source-ip-host 2.2.2.2
[Device-security-policy-ip-3-sslvpnlocalout2] destination-ip-host 20.2.2.2
[Device-security-policy-ip-3-sslvpnlocalout2] action pass
[Device-security-policy-ip-3-sslvpnlocalout2] quit
# Configure a rule named sslvpnlocalin2 to permit the packets from the server to the device.
[Device-security-policy-ip] rule name sslvpnlocalin2
[Device-security-policy-ip-4-sslvpnlocalin2] source-zone trust
[Device-security-policy-ip-4-sslvpnlocalin2] destination-zone local
[Device-security-policy-ip-4-sslvpnlocalin2] source-ip-host 20.2.2.2
[Device-security-policy-ip-4-sslvpnlocalin2] destination-ip-host 2.2.2.2
[Device-security-policy-ip-4-sslvpnlocalin2] action pass
[Device-security-policy-ip-4-sslvpnlocalin2] quit
[Device-security-policy-ip] quit
6. Configure a PKI domain named sslvpn and certificate-related parameters.
<Device> system-view
[Device] pki domain sslvpn
[Device-pki-domain-sslvpn] public-key rsa general name sslvpn
[Device-pki-domain-sslvpn] undo crl check enable
[Device-pki-domain-sslvpn] quit
[Device] pki import domain sslvpn der ca filename ca.cer
[Device] pki import domain sslvpn p12 local filename server.pfx
7. Create an SSL server policy named ssl and specify PKI domain sslvpn for the policy.
[Device] ssl server-policy ssl
[Device-ssl-server-policy-ssl] pki-domain sslvpn
[Device-ssl-server-policy-ssl] quit
8. Configure the SSL VPN gateway for user access. Configure the IP address for SSL VPN gateway gw as 1.1.1.2 and port number as 2000, and then apply server policy ssl to the gateway.
[Device] sslvpn gateway gw
[Device-sslvpn-gateway-gw] ip address 1.1.1.2 port 2000
[Device-sslvpn-gateway-gw] ssl server-policy ssl
[Device-sslvpn-gateway-gw] service enable
[Device-sslvpn-gateway-gw] quit
9. Create an SSL VPN context named ctx, specify gateway gw for the context, and then associate the context with VPN instance VPN1.
[Device] sslvpn context ctx
[Device-sslvpn-context-ctx] gateway gw
[Device-sslvpn-context-ctx] vpn-instance VPN1
[Device-sslvpn-context-ctx] port-forward-item pfitem1
[Device-sslvpn-context-ctx-port-forward-item-pfitem1] local-port 2323 local-name 127.0.0.1 remote-server 20.2.2.2 remote-port 23 description telnet
[Device-sslvpn-context-ctx-port-forward-item-pfitem1] quit
[Device-sslvpn-context-ctx] port-forward plist
[Device-sslvpn-context-ctx-port-forward-plist] resources port-forward-item pfitem1
[Device-sslvpn-context-ctx-port-forward-plist] quit
[Device-sslvpn-context-ctx] policy-group pgroup
[Device-sslvpn-context-ctx-policy-group-pgroup] resources port-forward plist
[Device-sslvpn-context-ctx-policy-group-pgroup] quit
[Device-sslvpn-context-ctx] service enable
[Device-sslvpn-context-ctx] quit
10. Create a local user named sslvpn, set the password to 123456, service type to sslvpn, and user role to network-operator. Authorize the user to use policy group pgroup.
[Device] local-user sslvpn class network
[Device-luser-network-sslvpn] password simple 123456
[Device-luser-network-sslvpn] service-type sslvpn
[Device-luser-network-sslvpn] authorization-attribute user-role network-operator
[Device-luser-network-sslvpn] authorization-attribute sslvpn-policy-group pgroup
[Device-luser-network-sslvpn] quit
Verifying the configuration
# Verify that SSL VPN gateway gw is up on the device.
[Device] display sslvpn gateway
Gateway name: gw
Operation state: Up
IP: 1.1.1.2 Port: 2000
SSL server policy configured: ssl
SSL server policy in use: ssl
Front VPN instance: Not configured
# Verify that SSL VPN context ctx is up on the device.
[Device] display sslvpn context
Context name: ctx
Operation state: Up
AAA domain: Not specified
Certificate authentication: Disabled
Password authentication: Enabled
Authentication use: All
SMS auth type: Not configured
Urlmasking: Disabled
Code verification: Disabled
Default policy group: Not configured
Associated SSL VPN gateway: gw
SSL client policy configured: ssl
SSL client policy in use: ssl
Maximum users allowed: 1048575
VPN instance: Not configured
Idle timeout: 30 min
Authentication server-type: aaa
Password changing: Enabled
# On the user PC, enter https://1.1.1.2:2000/ in the browser address bar to enter login page.
# On the login page, enter username sslvpn and password 123456, and then click Login.
Figure 18 Login page
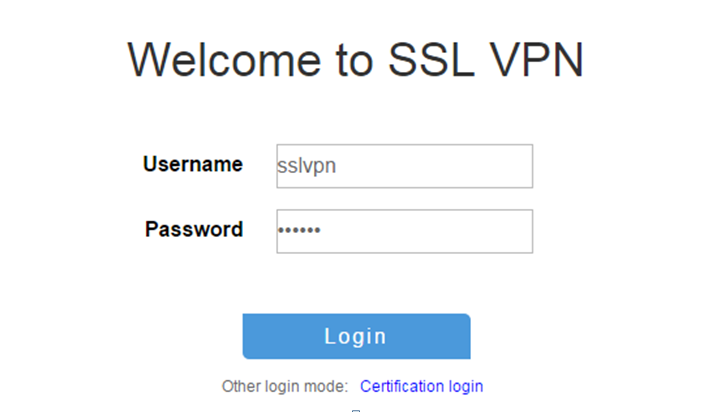
# On the SSL VPN home page that opens, click Start to download the TCP client application and start the application.
# Telnet to the local address (127.0.0.1) and local port (2323) on the PC. The user can remotely access the server. (Details not shown.)
# Display SSL VPN session information on the device.
[Device] display sslvpn session context ctx
SSL VPN context: ctx
Users: 1
Username Connections Idle time Created User IP
sslvpn 6 0/00:12:05 0/00:04:14 40.1.1.1
# Display SSL VPN port forwarding connection information on the device.
[Device] display sslvpn port-forward connection
SSL VPN context : ctx
Client address : 40.1.1.1
Client port : 50788
Server address : 20.2.2.2
Server port : 23
State : Connected
Example: Configuring IP access
Network configuration
As shown in Figure 19, the device acts as an SSL VPN gateway that connects the public network and the private network.
The device uses a CA-signed SSL server certificate. If no SSL server policy is applied to the device, the device uses a self-signed SSL server certificate.
Configure SSL VPN IP access on the device to allow the user to access the internal server in the private network.
Configure the device to perform local authentication and authorization for the user.
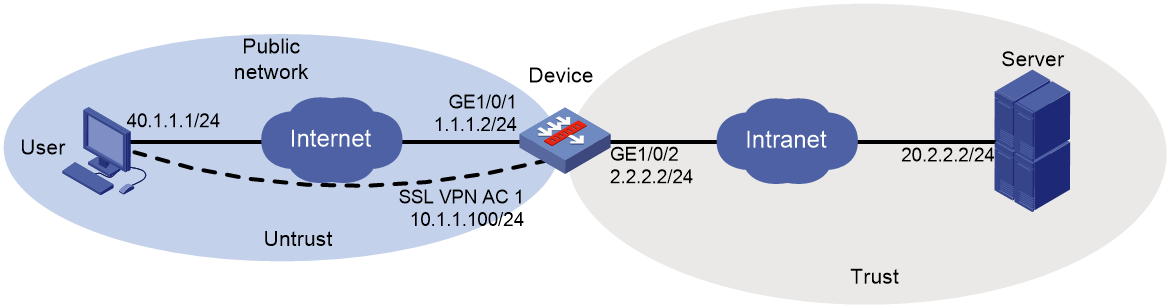
Prerequisites
Before configuring IP access, make sure the server has a route to 10.1.1.0/24.
Procedure
1. Obtain CA certificate file ca.cer and local certificate file server.pfx for the device. (Details not shown.)
2. Assign IP addresses to interfaces:
# Assign an IP address to interface GigabitEthernet 1/0/1.
<Device> system-view
[Device] interface gigabitethernet 1/0/1
[Device-GigabitEthernet1/0/1] ip address 1.1.1.2 255.255.255.0
[Device-GigabitEthernet1/0/1] quit
# Assign IP addresses to other interfaces in the same way. (Details not shown.)
3. Create SSL VPN AC interface AC 1 and configure the IP address as 10.1.1.100/24 for the interface.
[Device] interface sslvpn-ac 1
[Device-SSLVPN-AC1] ip address 10.1.1.100 24
[Device-SSLVPN-AC1] quit
4. Configure settings for routing.
This example configures static routes, and the next hop in the routes is 2.2.2.3 to the server, and 1.1.1.3 to the user.
[Device] ip route-static 20.2.2.2 24 2.2.2.3
[Device] ip route-static 40.1.1.1 24 1.1.1.3
5. Add interfaces to security zones.
[Device] security-zone name untrust
[Device-security-zone-Untrust] import interface gigabitethernet 1/0/1
[Device-security-zone-Untrust] import interface sslvpn-ac 1
[Device-security-zone-Untrust] quit
[Device] security-zone name trust
[Device-security-zone-Trust] import interface gigabitethernet 1/0/2
[Device-security-zone-Trust] quit
6. Configure rules in a security policy to permit the traffic between the Untrust and Local security zones for the user to access the SSL VPN gateway:
# Configure a rule named sslvpnlocalout1 to permit the packets from the device to the user.
[Device] security-policy ip
[Device-security-policy-ip] rule name sslvpnlocalout1
[Device-security-policy-ip-1-sslvpnlocalout1] source-zone local
[Device-security-policy-ip-1-sslvpnlocalout1] destination-zone untrust
[Device-security-policy-ip-1-sslvpnlocalout1] source-ip-host 1.1.1.2
[Device-security-policy-ip-1-sslvpnlocalout1] destination-ip-host 40.1.1.1
[Device-security-policy-ip-1-sslvpnlocalout1] action pass
[Device-security-policy-ip-1-sslvpnlocalout1] quit
# Configure a rule named sslvpnlocalin1 to permit the packets from the user to the device.
[Device-security-policy-ip] rule name sslvpnlocalin1
[Device-security-policy-ip-2-sslvpnlocalin1] source-zone untrust
[Device-security-policy-ip-2-sslvpnlocalin1] destination-zone local
[Device-security-policy-ip-2-sslvpnlocalin1] source-ip-host 40.1.1.1
[Device-security-policy-ip-2-sslvpnlocalin1] destination-ip-host 1.1.1.2
[Device-security-policy-ip-2-sslvpnlocalin1] action pass
[Device-security-policy-ip-2-sslvpnlocalin1] quit
# Configure a rule named sslvpnlocalout2 to permit the packets from the device to the server.
[Device-security-policy-ip] rule name sslvpnlocalout2
[Device-security-policy-ip-3-sslvpnlocalout2] source-zone local
[Device-security-policy-ip-3-sslvpnlocalout2] destination-zone trust
[Device-security-policy-ip-3-sslvpnlocalout2] source-ip-host 2.2.2.2
[Device-security-policy-ip-3-sslvpnlocalout2] destination-ip-host 20.2.2.2
[Device-security-policy-ip-3-sslvpnlocalout2] action pass
[Device-security-policy-ip-3-sslvpnlocalout2] quit
# Configure a rule named sslvpnlocalin2 to permit the packets from the server to the device.
[Device-security-policy-ip] rule name sslvpnlocalin2
[Device-security-policy-ip-4-sslvpnlocalin2] source-zone trust
[Device-security-policy-ip-4-sslvpnlocalin2] destination-zone local
[Device-security-policy-ip-4-sslvpnlocalin2] source-ip-host 20.2.2.2
[Device-security-policy-ip-4-sslvpnlocalin2] destination-ip-host 2.2.2.2
[Device-security-policy-ip-4-sslvpnlocalin2] action pass
[Device-security-policy-ip-4-sslvpnlocalin2] quit
# Configure a rule named untrust-trust to allow the user to access the server through the SSL VPN AC interface.
[Device-security-policy-ip] rule name untrust-trust
[Device-security-policy-ip-5-untrust-trust] source-zone untrust
[Device-security-policy-ip-5-untrust-trust] destination-zone trust
[Device-security-policy-ip-5-untrust-trust] source-ip-subnet 10.1.1.0 24
[Device-security-policy-ip-5-untrust-trust] destination-ip-host 20.2.2.2
[Device-security-policy-ip-5-untrust-trust] action pass
[Device-security-policy-ip-5-untrust-trust] quit
# Configure a rule named trust-untrust to permit the packets from the server to the user through the SSL VPN AC interface.
[Device-security-policy-ip] rule name trust-untrust
[Device-security-policy-ip-6-trust-untrust] source-zone trust
[Device-security-policy-ip-6-trust-untrust] destination-zone untrust
[Device-security-policy-ip-6-trust-untrust] source-ip-host 20.2.2.2
[Device-security-policy-ip-6-trust-untrust] destination-ip-subnet 10.1.1.0 24
[Device-security-policy-ip-6-trust-untrust] action pass
[Device-security-policy-ip-6-trust-untrust] quit
[Device-security-policy-ip] quit
7. Create ACL 3000. Add a rule to permit the packets sourced from subnet 10.1.1.0/24 and destined for 20.2.2.0/24.
[Device] acl advanced 3000
[Device-acl-ipv4-adv-3000] rule permit ip source 10.1.1.0 0.0.0.255 destination 20.2.2.0 0.0.0.255
[Device-acl-ipv4-adv-3000] quit
8. Configure a PKI domain named sslvpn and certificate-related parameters.
<Device> system-view
[Device] pki domain sslvpn
[Device-pki-domain-sslvpn] public-key rsa general name sslvpn
[Device-pki-domain-sslvpn] undo crl check enable
[Device-pki-domain-sslvpn] quit
[Device] pki import domain sslvpn der ca filename ca.cer
[Device] pki import domain sslvpn p12 local filename server.pfx
9. Create an SSL server policy named ssl and specify PKI domain sslvpn for the policy.
[Device] ssl server-policy ssl
[Device-ssl-server-policy-ssl] pki-domain sslvpn
[Device-ssl-server-policy-ssl] quit
10. Configure the SSL VPN gateway for user access. Configure the IP address for SSL VPN gateway gw as 1.1.1.2 and port number as 4430, and then apply SSL server policy ssl to the gateway.
<Device> system-view
[Device] sslvpn gateway gw
[Device-sslvpn-gateway-gw] ip address 1.1.1.2 port 4430
[Device-sslvpn-gateway-gw] ssl server-policy ssl
[Device-sslvpn-gateway-gw] service enable
[Device-sslvpn-gateway-gw] quit
11. Create an IP access address pool named sslvpnpool and specify the address range as 10.1.1.1 to 10.1.1.10.
[Device] sslvpn ip address-pool sslvpnpool 10.1.1.1 10.1.1.10
12. Create SSL VPN context ctxip, and then specify gateway gw and domain domainip for the context.
[Device] sslvpn context ctxip
[Device-sslvpn-context-ctxip] gateway gw domain domainip
[Device-sslvpn-context-ctxip] ip-tunnel interface sslvpn-ac 1
[Device-sslvpn-context-ctxip] ip-route-list rtlist
[Device-sslvpn-context-ctxip-route-list-rtlist] include 20.2.2.0 24
[Device-sslvpn-context-ctxip-route-list-rtlist] quit
[Device-sslvpn-context-ctxip] ip-tunnel address-pool sslvpnpool mask 24
[Device-sslvpn-context-ctxip] policy-group resourcegrp
[Device-sslvpn-context-ctxip-policy-group-resourcegrp] ip-tunnel access-route ip-route-list rtlist
[Device-sslvpn-context-ctxip-policy-group-resourcegrp] filter ip-tunnel acl 3000
[Device-sslvpn-context-ctxip-policy-group-resourcegrp] quit
[Device-sslvpn-context-ctxip] service enable
[Device-sslvpn-context-ctxip] quit
13. Create a local user named sslvpnuser, set the password to 123456, service type to sslvpn, and user role to network-operator. Authorize the user to use policy group resourcegrp.
[Device] local-user sslvpnuser class network
[Device-luser-network-sslvpnuser] password simple 123456
[Device-luser-network-sslvpnuser] service-type sslvpn
[Device-luser-network-sslvpnuser] authorization-attribute sslvpn-policy-group resourcegrp
[Device-luser-network-sslvpnuser] authorization-attribute user-role network-operator
[Device-luser-network-sslvpnuser] quit
Verifying the configuration
# Verify that SSL VPN gateway gw is up on the device.
[Device] display sslvpn gateway
Gateway name: gw
Operation state: Up
IP: 1.1.1.2 Port: 4430
Front VPN instance: Not configured
# Verify that SSL VPN context ctxip is up on the device.
[Device] display sslvpn context
Context name: ctxip
Operation state: Up
AAA domain: Not specified
Certificate authentication: Disabled
Password authentication: Enabled
Authentication use: All
SMS auth type: Not configured
Urlmasking: Disabled
Code verification: Disabled
Default policy group: Not configured
Associated SSL VPN gateway: gw
Domain name: domainip
Maximum users allowed: 1048575
VPN instance: Not configured
Idle timeout: 30 min
Authentication server-type: aaa
Password changing: Enabled
# On the user PC, enter https://1.1.1.2:4430/ in the browser address bar to open the domain list page.
Figure 20 Domain list page

# Select domainip to access the login page.
# On the login page, enter username sslvpnuser and password 123456, and then click Login.
Figure 21 Login page
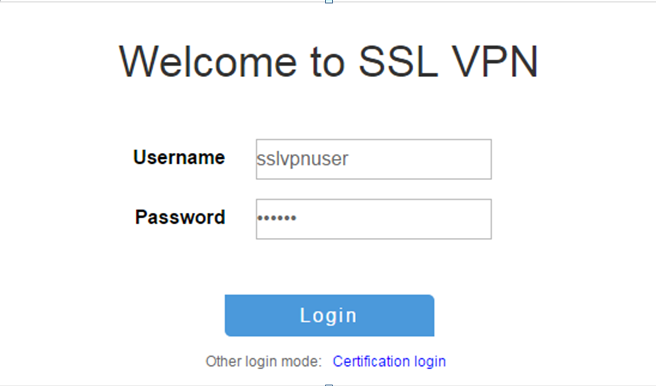
# On the SSL VPN home page that opens, click Start to download the IP client application and install the application, as shown in Figure 22.
Figure 22 IP access client software
After the IP client application is installed, start the iNode client, as shown in Figure 23.
Figure 23 Starting the iNode client
# Click Connect to log in to the SSL VPN client, as shown in Figure 24.
Figure 24 Logging in to the SSL VPN client
# Verify that the user can ping the server.
C:\>ping 20.2.2.2
Pinging 20.2.2.2 with 32 bytes of data:
Reply from 20.2.2.2: bytes=32 time=31ms TTL=254
Reply from 20.2.2.2: bytes=32 time=18ms TTL=254
Reply from 20.2.2.2: bytes=32 time=15ms TTL=254
Reply from 20.2.2.2: bytes=32 time=16ms TTL=254
Ping statistics for 20.2.2.2:
Packets: Sent = 4, Received = 4, Lost = 0 (0% loss),
Approximate round trip times in milli-seconds:
Minimum = 15ms, Maximum = 31ms, Average = 20ms
# Display SSL VPN session information on the device.
[Device] display sslvpn session user sslvpnuser
User : sslvpnuser
Context : ctxip
Policy group : resourcegrp
Idle timeout : 30 min
Created at : 16:38:48 UTC Wed 07/26/2017
Lastest : 16:47:41 UTC Wed 07/26/2017
User IPv4 address : 172.16.1.16
Allocated IP : 10.1.1.1
Session ID : 14
Web browser/OS : Windows
Example: Configuring RADIUS authentication and authorization
Network configuration
As shown in Figure 25, the device acts as an SSL VPN gateway that connects the public network and private network.
The device uses a CA-signed SSL server certificate. If no SSL server policy is applied to the device, the device uses a self-signed SSL server certificate.
Configure SSL VPN IP access on the device to allow the user to access the internal server in the private network.
Configure the device to perform remote authentication and authorization (through the remote RADIUS server) for the user.

Prerequisites
Before configuring IP access, perform the following tasks:
· Make sure the server has a route to 10.1.1.0/24.
· Configure the RADIUS server to provide authentication and authorization for the user.
Procedure
1. Obtain CA certificate file ca.cer and local certificate file server.pfx for the device. (Details not shown.)
2. Make sure the server has a route to 10.1.1.0/24. (Details not shown.)
3. Assign IP addresses to interfaces:
# Assign an IP address to interface GigabitEthernet 1/0/1.
<Device> system-view
[Device] interface gigabitethernet 1/0/1
[Device-GigabitEthernet1/0/1] ip address 1.1.1.2 255.255.255.0
[Device-GigabitEthernet1/0/1] quit
# Assign IP addresses to other interfaces in the same way. (Details not shown.)
4. Create SSL VPN AC interface AC 1 and configure the IP address as 10.1.1.100/24 for the interface.
[Device] interface sslvpn-ac 1
[Device-SSLVPN-AC1] ip address 10.1.1.100 24
[Device-SSLVPN-AC1] quit
5. Configure settings for routing.
This example configures static routes, and the next hop in the routes is 2.2.2.3 to the server, and 1.1.1.3 to the user.
[Device] ip route-static 20.2.2.2 24 2.2.2.3
[Device] ip route-static 40.1.1.1 24 1.1.1.3
6. Add interfaces to security zones.
[Device] security-zone name untrust
[Device-security-zone-Untrust] import interface gigabitethernet 1/0/1
[Device-security-zone-Untrust] import interface sslvpn-ac 1
[Device-security-zone-Untrust] quit
[Device] security-zone name trust
[Device-security-zone-Trust] import interface gigabitethernet 1/0/2
[Device-security-zone-Trust] import interface gigabitethernet 1/0/3
[Device-security-zone-Trust] quit
7. Configure rules in a security policy to permit the traffic between the Untrust and Local security zones for the user to access the SSL VPN gateway:
# Configure a rule named sslvpnlocalout1 to permit the packets from the device to the user.
[Device] security-policy ip
[Device-security-policy-ip] rule name sslvpnlocalout1
[Device-security-policy-ip-1-sslvpnlocalout1] source-zone local
[Device-security-policy-ip-1-sslvpnlocalout1] destination-zone untrust
[Device-security-policy-ip-1-sslvpnlocalout1] source-ip-host 1.1.1.2
[Device-security-policy-ip-1-sslvpnlocalout1] source-ip-host 10.1.1.100
[Device-security-policy-ip-1-sslvpnlocalout1] destination-ip-host 40.1.1.1
[Device-security-policy-ip-1-sslvpnlocalout1] destination-ip-subnet 10.1.1.0 24
[Device-security-policy-ip-1-sslvpnlocalout1] action pass
[Device-security-policy-ip-1-sslvpnlocalout1] quit
# Configure a rule named sslvpnlocalin1 to permit the packets from the user to the device.
[Device-security-policy-ip] rule name sslvpnlocalin1
[Device-security-policy-ip-2-sslvpnlocalin1] source-zone untrust
[Device-security-policy-ip-2-sslvpnlocalin1] destination-zone local
[Device-security-policy-ip-2-sslvpnlocalin1] source-ip-host 40.1.1.1
[Device-security-policy-ip-2-sslvpnlocalin1] source-ip-host subnet 10.1.1.0 24
[Device-security-policy-ip-2-sslvpnlocalin1] destination-ip-host 1.1.1.2
[Device-security-policy-ip-2-sslvpnlocalin1] destination-ip-host 10.1.1.100
[Device-security-policy-ip-2-sslvpnlocalin1] action pass
[Device-security-policy-ip-2-sslvpnlocalin1] quit
# Configure a rule named sslvpnlocalout2 to permit the packets from the device to the server.
[Device-security-policy-ip] rule name sslvpnlocalout2
[Device-security-policy-ip-3-sslvpnlocalout2] source-zone local
[Device-security-policy-ip-3-sslvpnlocalout2] destination-zone trust
[Device-security-policy-ip-3-sslvpnlocalout2] source-ip-host 2.2.2.2
[Device-security-policy-ip-3-sslvpnlocalout2] source-ip-host 3.3.3.1
[Device-security-policy-ip-3-sslvpnlocalout2] destination-ip-host 20.2.2.2
[Device-security-policy-ip-3-sslvpnlocalout2] destination-ip-host 3.3.3.2
[Device-security-policy-ip-3-sslvpnlocalout2] action pass
[Device-security-policy-ip-3-sslvpnlocalout2] quit
# Configure a rule named sslvpnlocalin2 to permit the packets from the server to the device.
[Device-security-policy-ip] rule name sslvpnlocalin2
[Device-security-policy-ip-4-sslvpnlocalin2] source-zone trust
[Device-security-policy-ip-4-sslvpnlocalin2] destination-zone local
[Device-security-policy-ip-4-sslvpnlocalin2] source-ip-host 20.2.2.2
[Device-security-policy-ip-4-sslvpnlocalin2] source-ip-host 3.3.3.2
[Device-security-policy-ip-4-sslvpnlocalin2] destination-ip-host 2.2.2.2
[Device-security-policy-ip-4-sslvpnlocalin2] destination-ip-host 3.3.3.1
[Device-security-policy-ip-4-sslvpnlocalin2] action pass
[Device-security-policy-ip-4-sslvpnlocalin2] quit
# Configure a rule named untrust-trust to allow the user to access the server through the SSL VPN AC interface.
[Device-security-policy-ip] rule name untrust-trust
[Device-security-policy-ip-5-untrust-trust] source-zone untrust
[Device-security-policy-ip-5-untrust-trust] destination-zone trust
[Device-security-policy-ip-5-untrust-trust] source-ip-subnet 10.1.1.0 24
[Device-security-policy-ip-5-untrust-trust] destination-ip-host 20.2.2.2
[Device-security-policy-ip-5-untrust-trust] action pass
[Device-security-policy-ip-5-untrust-trust] quit
# Configure a rule named trust-untrust to permit the packets from the server to the user through the SSL VPN AC interface.
[Device-security-policy-ip] rule name trust-untrust
[Device-security-policy-ip-6-trust-untrust] source-zone trust
[Device-security-policy-ip-6-trust-untrust] destination-zone untrust
[Device-security-policy-ip-6-trust-untrust] source-ip-host 20.2.2.2
[Device-security-policy-ip-6-trust-untrust] destination-ip-subnet 10.1.1.0 24
[Device-security-policy-ip-6-trust-untrust] action pass
[Device-security-policy-ip-6-trust-untrust] quit
[Device-security-policy-ip] quit
8. Configure a PKI domain named sslvpn and certificate-related parameters.
<Device> system-view
[Device] pki domain sslvpn
[Device-pki-domain-sslvpn] public-key rsa general name sslvpn
[Device-pki-domain-sslvpn] undo crl check enable
[Device-pki-domain-sslvpn] quit
[Device] pki import domain sslvpn der ca filename ca.cer
[Device] pki import domain sslvpn p12 local filename server.pfx
9. Create an SSL server policy named ssl and specify PKI domain sslvpn for the policy.
[Device] ssl server-policy ssl
[Device-ssl-server-policy-ssl] pki-domain sslvpn
[Device-ssl-server-policy-ssl] quit
10. Configure the SSL VPN gateway for user access. Configure the IP address for SSL VPN gateway gw as 1.1.1.2 and port number as 2000, and then apply server policy ssl to the gateway.
[Device] sslvpn gateway gw
[Device-sslvpn-gateway-gw] ip address 1.1.1.2 port 2000
[Device-sslvpn-gateway-gw] ssl server-policy ssl
[Device-sslvpn-gateway-gw] service enable
[Device-sslvpn-gateway-gw] quit
11. Create an IP access address pool named ippool and specify the address range as 10.1.1.1 to 10.1.1.10.
[Device] sslvpn ip address-pool ippool 10.1.1.1 10.1.1.10
12. Configure RADIUS settings:
# Create a RADIUS scheme named rscheme. Specify the primary authentication server and primary accounting server as 3.3.3.2. Set the keys for communication with the servers to 123456.
[Device] radius scheme rscheme
[Device-radius-rscheme] primary authentication 3.3.3.2
[Device-radius-rscheme] primary accounting 3.3.3.2
[Device-radius-rscheme] accounting-on enable
[Device-radius-rscheme] key authentication simple 123456
[Device-radius-rscheme] key accounting simple 123456
# Exclude the domain name from the username sent to the RADIUS server.
[Device-radius-rscheme] user-name-format without-domain
[Device-radius-rscheme] quit
13. Create a user group named group1 and authorize the user group to use SSL VPN policy group pgroup.
[Device] user-group group1
[Device-ugroup-group1] authorization-attribute sslvpn-policy-group pgroup
[Device-ugroup-group1] quit
14. Configure ISP domain domain1:
# Create an ISP domain named domain1 and authorize the domain to use user group group1.
[Device] domain domain1
[Device-isp-domain1] authorization-attribute user-group group1
# Configure the ISP domain to use RADIUS scheme rscheme for AAA of users.
[Device-isp-domain1] authentication sslvpn radius-scheme rscheme
[Device-isp-domain1] authorization sslvpn radius-scheme rscheme
[Device-isp-domain1] accounting sslvpn radius-scheme rscheme
[Device-isp-domain1] quit
15. Create an SSL VPN context named ctx, specify gateway gw for the context, and then associate the context with VPN instance VPN1.
[Device] sslvpn context ctx
[Device-sslvpn-context-ctx] gateway gw
[Device-sslvpn-context-ctx] vpn-instance VPN1
[Device-sslvpn-context-ctx] aaa domain domain1
[Device-sslvpn-context-ctx] ip-route-list rtlist
[Device-sslvpn-context-ctx-route-list-rtlist] include 20.2.2.0 255.255.255.0
[Device-sslvpn-context-ctx-route-list-rtlist] quit
[Device-sslvpn-context-ctx] uri-acl uriacl
[Device-sslvpn-context-ctx-uri-acl-uriacl] rule 1 permit uri icmp://20.2.2.0
[Device-sslvpn-context-ctx-uri-acl-uriacl] quit
[Device-sslvpn-context-ctx] ip-tunnel interface sslvpn-ac 1
[Device-sslvpn-context-ctx] ip-tunnel address-pool ippool mask 255.255.255.0
[Device-sslvpn-context-ctx] policy-group pgroup
[Device-sslvpn-context-ctx-policy-group-pgroup] ip-tunnel access-route ip-route-list rtlist
[Device-sslvpn-context-ctx-policy-group-pgroup] filter ip-tunnel uri-acl uriacl
[Device-sslvpn-context-ctx-policy-group-pgroup] quit
[Device-sslvpn-context-ctx] service enable
[Device-sslvpn-context-ctx] quit
Verifying the configuration
# Verify that SSL VPN gateway gw is up on the device.
[Device] display sslvpn gateway
Gateway name: gw
Operation state: Up
IP: 1.1.1.2 Port: 2000
SSL server policy configured: ssl
SSL server policy in use: ssl
Front VPN instance: Not configured
# Verify that SSL VPN context ctx is up on the device.
[Device] display sslvpn context
Context name: ctx
Operation state: Up
AAA domain: domain1
Certificate authentication: Disabled
Password authentication: Enabled
Authentication use: All
SMS auth type: Not configured
Urlmasking: Disabled
Code verification: Disabled
Default policy group: Not configured
Associated SSL VPN gateway: gw
SSL client policy configured: ssl
SSL client policy in use: ssl
Maximum users allowed: 1048575
VPN instance: Not configured
Idle timeout: 30 min
Authentication server-type: aaa
Password changing: Enabled
# On the user PC, launch the IP access client software, and then enter the address 1.1.1.2, port number 2000, username sslvpn, and password 123456 to log in to the SSL VPN gateway. (Details not shown.)
# Display SSL VPN session information on the device.
[Device] display sslvpn session context ctx
SSL VPN context: ctx
Users: 1
Username Connections Idle time Created User IP
sslvpn 6 0/00:02:05 0/00:03:14 40.1.1.1
# On the user PC, display IPv4 routing table to verify that the user has a route to the server.
|
|
NOTE: The address 40.1.1.1/24 is the address of the local NIC, and 10.1.1.1/24 is the address that the SSL VPN gateway allocates to the user. |
>route -4 print
IPv4 Route Table
===========================================================================
Active Routes:
Network Destination Netmask Gateway Interface Metric
10.1.1.0 255.255.255.0 On-link 10.1.1.1 276
10.1.1.1 255.255.255.255 On-link 10.1.1.1 276
10.1.1.255 255.255.255.255 On-link 10.1.1.1 276
20.2.2.0 255.255.255.0 On-link 10.1.1.1 276
20.2.2.255 255.255.255.255 On-link 10.1.1.1 276
40.1.1.0 255.255.255.0 On-link 40.1.1.1 276
40.1.1.1 255.255.255.255 On-link 40.1.1.1 276
40.1.1.255 255.255.255.255 On-link 40.1.1.1 276
===========================================================================
# Verify that the user can ping the server.
C:\>ping 20.2.2.2
Pinging 20.2.2.2 with 32 bytes of data:
Reply from 20.2.2.2: bytes=32 time=197ms TTL=254
Reply from 20.2.2.2: bytes=32 time=1ms TTL=254
Reply from 20.2.2.2: bytes=32 time=1ms TTL=254
Reply from 20.2.2.2: bytes=32 time=186ms TTL=254
Ping statistics for 20.2.2.2:
Packets: Sent = 4, Received = 4, Lost = 0 (0% loss),
Approximate round trip times in milli-seconds:
Minimum = 1ms, Maximum = 197ms, Average = 96ms
Example: Configuring LDAP authentication and authorization
Network configuration
As shown in Figure 26, the device acts as an SSL VPN gateway. The SSL VPN gateway IP address is 1.1.1.2 and the service port number is 8080.
The device uses a CA-signed SSL server certificate. If no SSL server policy is applied to the device, the device uses a self-signed SSL server certificate.
Use an LDAP server to perform authentication and authorization for SSL VPN users. The LDAP server runs Microsoft Windows Server 2008 R2 Active Directory and uses domain ldap.com. The server assigns an SSL VPN policy group named pgroup to an SSL VPN user after the user passes authentication. The policy group specifies the Web resources that the user can access.
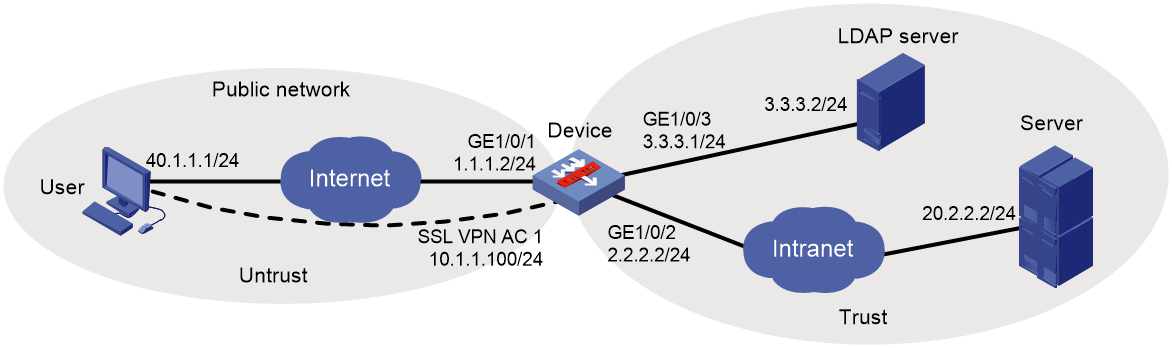
Configuring the LDAP server
1. Add an organizational unit named sslvpn_usergroup:
a. On the LDAP server, select Start > Bandizip > Administrative Tools.
b. Double-click Active Directory Users and Computers.
The Active Directory Users and Computers window opens.
c. From the navigation tree, right-click ldap.com.
d. Select New > Organizational Unit from the menu to display the dialog box for adding an organizational unit.
e. Enter organizational unit name sslvpn_usergroup and click OK.
Figure 27 Adding organizational unit sslvpn_usergroup
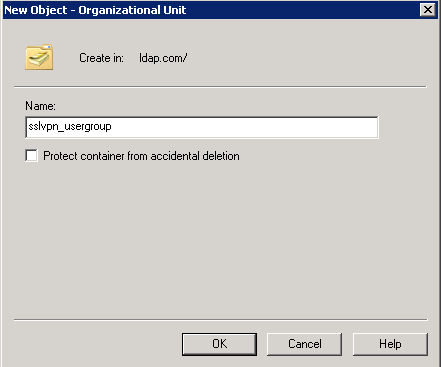
2. Add a user named sslvpn under organizational unit sslvpn_usergroup and set the password to ldap!123456:
a. From the navigation tree, right-click sslvpn_usergroup.
b. Select New > User from the menu to display the dialog box for adding a user.
c. Enter logon name sslvpn and click Next.
Figure 28 Adding user sslvpn
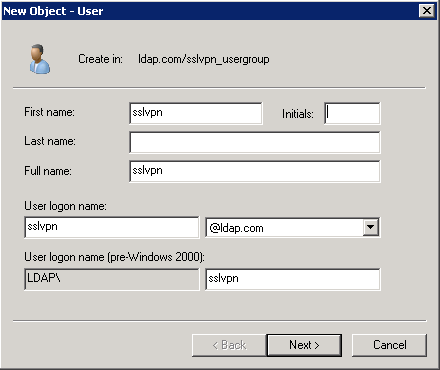
a. In the dialog box, enter password ldap!123456, select options as needed, and click Next.
Figure 29 Setting the user's password
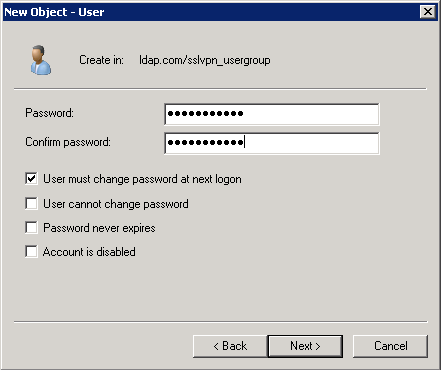
a. Click Next.
3. Add user sslvpn to group Users:
a. From the navigation tree, click sslvpn_usergroup.
b. In the right pane, right-click user sslvpn and select Properties.
c. In the dialog box, click the Member Of tab and click Add.
Figure 30 Modifying user properties
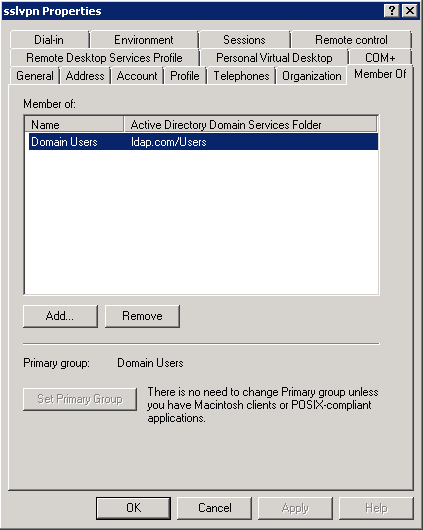
a. In the Select Groups dialog box, enter Users in the Enter the object names to select field, and click OK.
User sslvpn is added to group Users.
Figure 31 Adding user sslvpn to group Users
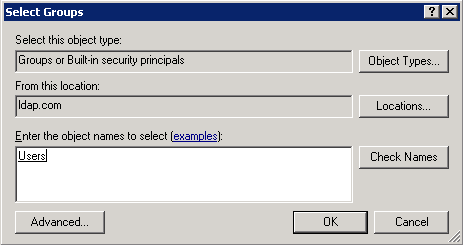
Configuring the device
1. Obtain CA certificate file ca.cer and local certificate file server.pfx for the device. (Details not shown.)
2. Assign IP addresses to interfaces:
# Assign an IP address to interface GigabitEthernet 1/0/1.
<Device> system-view
[Device] interface gigabitethernet 1/0/1
[Device-GigabitEthernet1/0/1] ip address 1.1.1.2 255.255.255.0
[Device-GigabitEthernet1/0/1] quit
# Assign IP addresses to other interfaces in the same way. (Details not shown.)
3. Create SSL VPN AC interface AC 1 and configure the IP address as 10.1.1.100/24 for the interface.
[Device] interface sslvpn-ac 1
[Device-SSLVPN-AC1] ip address 10.1.1.100 24
[Device-SSLVPN-AC1] quit
4. Configure settings for routing.
This example configures static routes, and the next hop in the routes is 2.2.2.3 to the server, and 1.1.1.3 to the user.
[Device] ip route-static 20.2.2.2 24 2.2.2.3
[Device] ip route-static 40.1.1.1 24 1.1.1.3
5. Add interfaces to security zones.
[Device] security-zone name untrust
[Device-security-zone-Untrust] import interface gigabitethernet 1/0/1
[Device-security-zone-Untrust] import interface sslvpn-ac 1
[Device-security-zone-Untrust] quit
[Device] security-zone name trust
[Device-security-zone-Trust] import interface gigabitethernet 1/0/2
[Device-security-zone-Trust] import interface gigabitethernet 1/0/3
[Device-security-zone-Trust] quit
6. Configure rules in a security policy to permit the traffic between the Untrust and Local security zones for the user to access the SSL VPN gateway:
# Configure a rule named sslvpnlocalout1 to permit the packets from the device to the user.
[Device] security-policy ip
[Device-security-policy-ip] rule name sslvpnlocalout1
[Device-security-policy-ip-1-sslvpnlocalout1] source-zone local
[Device-security-policy-ip-1-sslvpnlocalout1] destination-zone untrust
[Device-security-policy-ip-1-sslvpnlocalout1] source-ip-host 1.1.1.2
[Device-security-policy-ip-1-sslvpnlocalout1] source-ip-host 10.1.1.100
[Device-security-policy-ip-1-sslvpnlocalout1] destination-ip-host 40.1.1.1
[Device-security-policy-ip-1-sslvpnlocalout1] destination-ip-subnet 10.1.1.0 24
[Device-security-policy-ip-1-sslvpnlocalout1] action pass
[Device-security-policy-ip-1-sslvpnlocalout1] quit
# Configure a rule named sslvpnlocalin1 to permit the packets from the user to the device.
[Device-security-policy-ip] rule name sslvpnlocalin1
[Device-security-policy-ip-2-sslvpnlocalin1] source-zone untrust
[Device-security-policy-ip-2-sslvpnlocalin1] destination-zone local
[Device-security-policy-ip-2-sslvpnlocalin1] source-ip-host 40.1.1.1
[Device-security-policy-ip-2-sslvpnlocalin1] source-ip-host subnet 10.1.1.0 24
[Device-security-policy-ip-2-sslvpnlocalin1] destination-ip-host 1.1.1.2
[Device-security-policy-ip-2-sslvpnlocalin1] destination-ip-host 10.1.1.100
[Device-security-policy-ip-2-sslvpnlocalin1] action pass
[Device-security-policy-ip-2-sslvpnlocalin1] quit
# Configure a rule named sslvpnlocalout2 to permit the packets from the device to the server.
[Device-security-policy-ip] rule name sslvpnlocalout2
[Device-security-policy-ip-3-sslvpnlocalout2] source-zone local
[Device-security-policy-ip-3-sslvpnlocalout2] destination-zone trust
[Device-security-policy-ip-3-sslvpnlocalout2] source-ip-host 2.2.2.2
[Device-security-policy-ip-3-sslvpnlocalout2] source-ip-host 3.3.3.1
[Device-security-policy-ip-3-sslvpnlocalout2] destination-ip-host 20.2.2.2
[Device-security-policy-ip-3-sslvpnlocalout2] destination-ip-host 3.3.3.2
[Device-security-policy-ip-3-sslvpnlocalout2] action pass
[Device-security-policy-ip-3-sslvpnlocalout2] quit
# Configure a rule named sslvpnlocalin2 to permit the packets from the server to the device.
[Device-security-policy-ip] rule name sslvpnlocalin2
[Device-security-policy-ip-4-sslvpnlocalin2] source-zone trust
[Device-security-policy-ip-4-sslvpnlocalin2] destination-zone local
[Device-security-policy-ip-4-sslvpnlocalin2] source-ip-host 20.2.2.2
[Device-security-policy-ip-4-sslvpnlocalin2] source-ip-host 3.3.3.2
[Device-security-policy-ip-4-sslvpnlocalin2] destination-ip-host 2.2.2.2
[Device-security-policy-ip-4-sslvpnlocalin2] destination-ip-host 3.3.3.1
[Device-security-policy-ip-4-sslvpnlocalin2] action pass
[Device-security-policy-ip-4-sslvpnlocalin2] quit
# Configure a rule named untrust-trust to allow the user to access the server through the SSL VPN AC interface.
[Device-security-policy-ip] rule name untrust-trust
[Device-security-policy-ip-5-untrust-trust] source-zone untrust
[Device-security-policy-ip-5-untrust-trust] destination-zone trust
[Device-security-policy-ip-5-untrust-trust] source-ip-subnet 10.1.1.0 24
[Device-security-policy-ip-5-untrust-trust] destination-ip-host 20.2.2.2
[Device-security-policy-ip-5-untrust-trust] action pass
[Device-security-policy-ip-5-untrust-trust] quit
# Configure a rule named trust-untrust to permit the packets from the server to the user through the SSL VPN AC interface.
[Device-security-policy-ip] rule name trust-untrust
[Device-security-policy-ip-6-trust-untrust] source-zone trust
[Device-security-policy-ip-6-trust-untrust] destination-zone untrust
[Device-security-policy-ip-6-trust-untrust] source-ip-host 20.2.2.2
[Device-security-policy-ip-6-trust-untrust] destination-ip-subnet 10.1.1.0 24
[Device-security-policy-ip-6-trust-untrust] action pass
[Device-security-policy-ip-6-trust-untrust] quit
[Device-security-policy-ip] quit
7. Configure a PKI domain named sslvpn and certificate-related parameters.
[Device] pki domain sslvpn
[Device-pki-domain-sslvpn] public-key rsa general name sslvpn
[Device-pki-domain-sslvpn] undo crl check enable
[Device-pki-domain-sslvpn] quit
[Device] pki import domain sslvpn der ca filename ca.cer
[Device] pki import domain sslvpn p12 local filename server.pfx
8. Create an SSL server policy named ssl and specify PKI domain sslvpn for the policy.
[Device] ssl server-policy ssl
[Device-ssl-server-policy-ssl] pki-domain sslvpn
[Device-ssl-server-policy-ssl] quit
9. Configure the SSL VPN gateway for user access. Configure the IP address for SSL VPN gateway gw as 1.1.1.2 and port number as 2000, and then apply server policy ssl to the gateway.
[Device] sslvpn gateway gw
[Device-sslvpn-gateway-gw] ip address 1.1.1.2 port 2000
[Device-sslvpn-gateway-gw] ssl server-policy ssl
[Device-sslvpn-gateway-gw] service enable
[Device-sslvpn-gateway-gw] quit
10. Create an IP access address pool named ippool and specify the address range as 10.1.1.1 to 10.1.1.10.
[Device] sslvpn ip address-pool ippool 10.1.1.1 10.1.1.10
11. Configure LDAP settings for SSL VPN user authentication.
[Device] ldap server ldap1
[Device-ldap-server-ldap1] ip 3.3.3.2
[Device-ldap-server-ldap1] login-dn cn=admin,cn=users,dc=ldap,dc=com
[Device-ldap-server-ldap1] login-password simple admin!123456
[Device-ldap-server-ldap1] search-base-dn dc=ldap,dc=com
[Device-ldap-server-ldap1] quit
[Device] ldap attribute-map test
[Device-ldap-attr-map-test] map ldap-attribute memberof prefix cn= delimiter , aaa-attribute user-group
[Device-ldap-attr-map-test] quit
[Device] ldap scheme shml
[Device-ldap-shml] authentication-server ldap1
[Device-ldap-shml] authorization-server ldap1
[Device-ldap-shml] attribute-map test
[Device-ldap-shml] quit
12. Create an ISP domain named bbb and configure the authentication, authorization, and accounting methods for SSL VPN users.
[Device] domain bbb
[Device-isp-bbb] authentication sslvpn ldap-scheme shml
[Device-isp-bbb] authorization sslvpn ldap-scheme shml
[Device-isp-bbb] accounting sslvpn none
[Device-isp-bbb] quit
13. Create an SSL VPN context named ctx, specify gateway gw for the context, and then associate the context with VPN instance VPN1.
[Device] sslvpn context ctx
[Device-sslvpn-context-ctx] gateway gw
[Device-sslvpn-context-ctx] vpn-instance VPN1
[Device-sslvpn-context-ctx] aaa domain bbb
[Device-sslvpn-context-ctx] ip-route-list rtlist
[Device-sslvpn-context-ctx-route-list-rtlist] include 20.2.2.0 255.255.255.0
[Device-sslvpn-context-ctx-route-list-rtlist] quit
[Device-sslvpn-context-ctx] uri-acl uriacl
[Device-sslvpn-context-ctx-uri-acl-uriacl] rule 1 permit uri icmp://20.2.2.0
[Device-sslvpn-context-ctx-uri-acl-uriacl] quit
[Device-sslvpn-context-ctx] ip-tunnel interface sslvpn-ac 1
[Device-sslvpn-context-ctx] ip-tunnel address-pool ippool mask 255.255.255.0
[Device-sslvpn-context-ctx] policy-group pgroup
[Device-sslvpn-context-ctx-policy-group-pgroup] ip-tunnel access-route ip-route-list rtlist
[Device-sslvpn-context-ctx-policy-group-pgroup] filter ip-tunnel uri-acl uriacl
[Device-sslvpn-context-ctx-policy-group-pgroup] quit
[Device-sslvpn-context-ctx] service enable
[Device-sslvpn-context-ctx] quit
14. Create a user group named users and authorize the user group to use SSL VPN policy group pgroup.
[Device] user-group users
[Device-ugroup-users] authorization-attribute sslvpn-policy-group pgroup
[Device-ugroup-users] quit
Verifying the configuration
# Verify that SSL VPN gateway gw is up on the device.
[Device] display sslvpn gateway
Gateway name: gw
Operation state: Up
IP: 1.1.1.2 Port: 2000
SSL server policy configured: ssl
SSL server policy in use: ssl
Front VPN instance: Not configured
# Verify that SSL VPN context ctx is up on the device.
[Device] display sslvpn context
Context name: ctx
Operation state: Up
AAA domain: domain1
Certificate authentication: Disabled
Password authentication: Enabled
Authentication use: All
SMS auth type: Not configured
Urlmasking: Disabled
Code verification: Disabled
Default policy group: Not configured
Associated SSL VPN gateway: gw
SSL client policy configured: ssl
SSL client policy in use: ssl
Maximum users allowed: 1048575
VPN instance: Not configured
Idle timeout: 30 min
Authentication server-type: aaa
Password changing: Enabled
# On the user PC, launch the IP access client software, and then enter the address 1.1.1.2, port number 2000, username sslvpn, and password 123456 to log in to the SSL VPN gateway. (Details not shown.)
# Display SSL VPN session information on the device.
[Device] display sslvpn session context ctx
SSL VPN context: ctx
Users: 1
Username Connections Idle time Created User IP
sslvpn 6 0/00:02:05 0/00:03:14 40.1.1.1
# On the user PC, display IPv4 routing table to verify that the user has a route to the server.
|
|
NOTE: The address 40.1.1.1/24 is the address of the local NIC, and 10.1.1.1/24 is the address that the SSL VPN gateway allocates to the user. |
>route -4 print
IPv4 Route Table
===========================================================================
Active Routes:
Network Destination Netmask Gateway Interface Metric
10.1.1.0 255.255.255.0 On-link 10.1.1.1 276
10.1.1.1 255.255.255.255 On-link 10.1.1.1 276
10.1.1.255 255.255.255.255 On-link 10.1.1.1 276
20.2.2.0 255.255.255.0 On-link 10.1.1.1 276
20.2.2.255 255.255.255.255 On-link 10.1.1.1 276
40.1.1.0 255.255.255.0 On-link 40.1.1.1 276
40.1.1.1 255.255.255.255 On-link 40.1.1.1 276
40.1.1.255 255.255.255.255 On-link 40.1.1.1 276
===========================================================================
# Verify that the user can ping the server.
C:\>ping 20.2.2.2
Pinging 20.2.2.2 with 32 bytes of data:
Reply from 20.2.2.2: bytes=32 time=197ms TTL=254
Reply from 20.2.2.2: bytes=32 time=1ms TTL=254
Reply from 20.2.2.2: bytes=32 time=1ms TTL=254
Reply from 20.2.2.2: bytes=32 time=186ms TTL=254
Ping statistics for 20.2.2.2:
Packets: Sent = 4, Received = 4, Lost = 0 (0% loss),
Approximate round trip times in milli-seconds:
Minimum = 1ms, Maximum = 197ms, Average = 96ms
Example: Configuring IP access with USB key certificate authentication
Network configuration
As shown in Figure 32, the device acts as an SSL VPN gateway that connects the public network and the private network.
Configure SSL VPN IP access on the device to allow a user on the public network to access the internal server on the private network securely.
Configure the device to perform certificate-based identity authentication for the user and authorize the user to access the internal server after the user passes the authentication.
The user uses a USB key to log in to the SSL VPN gateway.
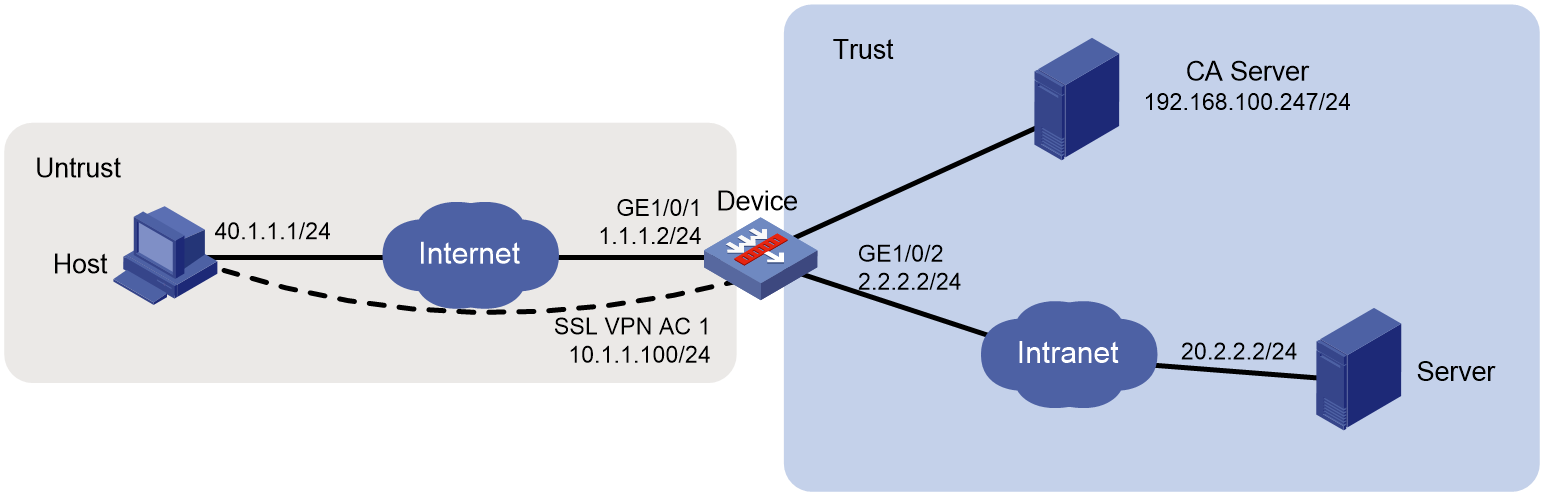
Restrictions and guidelines
The device can use a self-signed SSL server certificate or a CA-signed SSL server certificate.
· Self-signed SSL server certificate—Factory default server certificate on the device. If the device uses a self-signed SSL server certificate, no SSL server policy is needed.
· CA-signed SSL server certificate—User requested server certificate. If the device uses a CA-signed SSL server certificate, you must specify an SSL server policy.
Because the self-signed SSL server certificate is not secure, use it only for a functional test. In practice, please use a CA-signed SSL server certificate.
Prerequisites
Before configuring SSL VPN, make sure of the following:
· The device has obtained CA certificate ca.cer and server certificate server.pfx. The USB key has installed certificates. The certificates in the USB key and those on the device are issued by the same CA.
· The specified attribute (CN attribute by default) in the client certificate of the USB key is the same as the username of the SSL VPN user.
· Install the driver for the USB key to ensure availability of the USB key.
Configuring the SSL VPN gateway device
1. Assign IP addresses to interfaces:
# Assign an IP address to interface GigabitEthernet 1/0/1.
<Device> system-view
[Device] interface gigabitethernet 1/0/1
[Device-GigabitEthernet1/0/1] ip address 1.1.1.2 255.255.255.0
[Device-GigabitEthernet1/0/1] quit
# Create an SSL VPN AC interface and assign an IP address to it to forward the IP access traffic.
[Device] interface sslvpn-ac 1
[Device-SSLVPN-AC1] ip address 10.1.1.100 24
[Device-SSLVPN-AC1] quit
# Assign IP addresses to other interfaces in the same way. (Details not shown.)
2. Add interfaces to security zones.
[Device] security-zone name untrust
[Device-security-zone-Untrust] import interface gigabitethernet 1/0/1
[Device-security-zone-Untrust] import interface sslvpn-ac 1
[Device-security-zone-Untrust] quit
[Device] security-zone name trust
[Device-security-zone-Trust] import interface gigabitethernet 1/0/2
[Device-security-zone-Trust] quit
3. Configure settings for routing.
This example configures static routes, and the next hop in the route to the server is 2.2.2.3, and the next hop in the route to the host is 1.1.1.3.
[Device] ip route-static 20.2.2.2 24 2.2.2.3
[Device] ip route-static 40.1.1.1 24 1.1.1.3
4. Configure security policy rules to permit traffic between security zones, so the user can access the SSL VPN gateway and the server.
# Configure a rule named sslvpnlocalout1 to allow the SSL VPN gateway to send packets to the user.
[Device] security-policy ip
[Device-security-policy-ip] rule name sslvpnlocalout1
[Device-security-policy-ip-1-sslvpnlocalout1] source-zone local
[Device-security-policy-ip-1-sslvpnlocalout1] destination-zone untrust
[Device-security-policy-ip-1-sslvpnlocalout1] source-ip-host 1.1.1.2
[Device-security-policy-ip-1-sslvpnlocalout1] destination-ip-host 40.1.1.1
[Device-security-policy-ip-1-sslvpnlocalout1] action pass
[Device-security-policy-ip-1-sslvpnlocalout1] quit
# Configure a rule named sslvpnlocalin1 to allow the user to send packets to the SSL VPN gateway.
[Device-security-policy-ip] rule name sslvpnlocalin1
[Device-security-policy-ip-2-sslvpnlocalin1] source-zone untrust
[Device-security-policy-ip-2-sslvpnlocalin1] destination-zone local
[Device-security-policy-ip-2-sslvpnlocalin1] source-ip-host 40.1.1.1
[Device-security-policy-ip-2-sslvpnlocalin1] destination-ip-host 1.1.1.2
[Device-security-policy-ip-2-sslvpnlocalin1] action pass
[Device-security-policy-ip-2-sslvpnlocalin1] quit
# Configure a rule named sslvpnlocalout2 to allow the SSL VPN gateway to send packets to the server.
[Device-security-policy-ip] rule name sslvpnlocalout2
[Device-security-policy-ip-3-sslvpnlocalout2] source-zone local
[Device-security-policy-ip-3-sslvpnlocalout2] destination-zone trust
[Device-security-policy-ip-3-sslvpnlocalout2] source-ip-host 2.2.2.2
[Device-security-policy-ip-3-sslvpnlocalout2] destination-ip-host 20.2.2.2
[Device-security-policy-ip-3-sslvpnlocalout2] action pass
[Device-security-policy-ip-3-sslvpnlocalout2] quit
# Configure a rule named sslvpnlocalin2 to allow the server to send packets to the SSL VPN gateway.
[Device-security-policy-ip] rule name sslvpnlocalin2
[Device-security-policy-ip-4-sslvpnlocalin2] source-zone trust
[Device-security-policy-ip-4-sslvpnlocalin2] destination-zone local
[Device-security-policy-ip-4-sslvpnlocalin2] source-ip-host 20.2.2.2
[Device-security-policy-ip-4-sslvpnlocalin2] destination-ip-host 2.2.2.2
[Device-security-policy-ip-4-sslvpnlocalin2] action pass
[Device-security-policy-ip-4-sslvpnlocalin2] quit
# Configure a rule named untrust-trust to allow the user to access the server through the SSL VPN AC interface.
[Device-security-policy-ip] rule name untrust-trust
[Device-security-policy-ip-5-untrust-trust] source-zone untrust
[Device-security-policy-ip-5-untrust-trust] destination-zone trust
[Device-security-policy-ip-5-untrust-trust] source-ip-subnet 10.1.1.0 24
[Device-security-policy-ip-5-untrust-trust] destination-ip-host 20.2.2.2
[Device-security-policy-ip-5-untrust-trust] action pass
[Device-security-policy-ip-5-untrust-trust] quit
# Configure a rule named trust-untrust to allow the server to send packets to the user through the SSL VPN AC interface.
[Device-security-policy-ip] rule name trust-untrust
[Device-security-policy-ip-6-trust-untrust] source-zone trust
[Device-security-policy-ip-6-trust-untrust] destination-zone untrust
[Device-security-policy-ip-6-trust-untrust] source-ip-host 20.2.2.2
[Device-security-policy-ip-6-trust-untrust] destination-ip-subnet 10.1.1.0 24
[Device-security-policy-ip-6-trust-untrust] action pass
[Device-security-policy-ip-6-trust-untrust] quit
[Device-security-policy-ip] quit
5. Configure certificates for the device, which are used by the SSL VPN client to authenticate the SSL VPN gateway.
# Configure a PKI domain to import the certificates.
[Device] pki domain sslvpn
[Device-pki-domain-sslvpn] public-key rsa general name sslvpn
[Device-pki-domain-sslvpn] undo crl check enable
[Device-pki-domain-sslvpn] quit
[Device] pki import domain sslvpn der ca filename ca.cer
[Device] pki import domain sslvpn p12 local filename server.pfx
# Configure an SSL VPN server policy, specify the PKI domain, and enable client authentication in the policy.
[Device] ssl server-policy ssl
[Device-ssl-server-policy-ssl] pki-domain sslvpn
[Device-ssl-server-policy-ssl] client-verify enable
[Device-ssl-server-policy-ssl] quit
6. Configure SSL VPN:
# Configure the SSL VPN gateway.
[Device] sslvpn gateway gw
[Device-sslvpn-gateway-gw] ip address 1.1.1.2 port 4430
[Device-sslvpn-gateway-gw] ssl server-policy ssl
[Device-sslvpn-gateway-gw] service enable
[Device-sslvpn-gateway-gw] quit
# Create an SSL VPN client pool, which is used to assign IP addresses to IP access users.
[Device] sslvpn ip address-pool sslvpnpool 10.1.1.1 10.1.1.10
# Create an ACL to filter IP access traffic.
[Device] acl advanced 3000
[Device-acl-ipv4-adv-3000] rule permit ip source 10.1.1.0 0.0.0.255 destination 20.2.2.0 0.0.0.255
[Device-acl-ipv4-adv-3000] quit
# Configure an SSL VPN context, enable certificate authentication for users, and provide SSL VPN IP access services to users.
[Device] sslvpn context ctxip
[Device-sslvpn-context-ctxip] gateway gw
[Device-sslvpn-context-ctxip] certificate-authentication enable
[Device-sslvpn-context-ctxip] ip-tunnel interface sslvpn-ac 1
[Device-sslvpn-context-ctxip] ip-route-list rtlist
[Device-sslvpn-context-ctxip-route-list-rtlist] include 20.2.2.0 24
[Device-sslvpn-context-ctxip-route-list-rtlist] quit
[Device-sslvpn-context-ctxip] ip-tunnel address-pool sslvpnpool mask 24
[Device-sslvpn-context-ctxip] policy-group resourcegrp
[Device-sslvpn-context-ctxip-policy-group-resourcegrp] ip-tunnel access-route ip-route-list rtlist
[Device-sslvpn-context-ctxip-policy-group-resourcegrp] filter ip-tunnel acl 3000
[Device-sslvpn-context-ctxip-policy-group-resourcegrp] quit
[Device-sslvpn-context-ctxip] service enable
[Device-sslvpn-context-ctxip] quit
7. Configure an SSL VPN user, which is used to access the SSL VPN gateway.
# Create a local SSL VPN user named sslvpnuser, specify the password as 123456TESTplat&!, user role as network-operator, and the SSL VPN policy group authorized as resourcegrp.
[Device] local-user sslvpnuser class network
[Device-luser-network-sslvpnuser] password simple 123456TESTplat&!
[Device-luser-network-sslvpnuser] service-type sslvpn
[Device-luser-network-sslvpnuser] authorization-attribute sslvpn-policy-group resourcegrp
[Device-luser-network-sslvpnuser] authorization-attribute user-role network-operator
[Device-luser-network-sslvpnuser] quit
Configuring the server
Make sure the server has a route to subnet 10.1.1.0/24.
Verifying the configuration
1. Display SSL VPN information on the device:
# Display SSL VPN gateway information. The output shows that the SSL VPN gateway is in UP state.
[Device] display sslvpn gateway
Gateway name: gw
Operation state: Up
IP: 1.1.1.2 Port: 4430
Front VPN instance: Not configured
# Display SSL VPN context information. The output shows that the SSL VPN context is in UP state.
[Device] display sslvpn context
Context name: ctxip
Operation state: Up
AAA domain: Not specified
Certificate authentication: Enabled
Password authentication: Enabled
Authentication use: All
SMS auth type: Not configured
Urlmasking: Disabled
Code verification: Disabled
Default policy group: Not configured
Associated SSL VPN gateway: gw
Maximum users allowed: 1048575
VPN instance: Not configured
Idle timeout: 30 min
Authentication server-type: aaa
Password changing: Enabled
# After the user logs in to the SSL VPN gateway, display SSL VPN session information on the device. The output shows the session information of SSL VPN user sslvpnuser.
[Device] display sslvpn session user sslvpnuser
User : sslvpnuser
Context : ctxip
Policy group : resourcegrp
Idle timeout : 30 min
Created at : 16:38:48 UTC Wed 07/26/2017
Lastest : 16:47:41 UTC Wed 07/26/2017
User IPv4 address : 172.16.1.16
Allocated IP : 10.1.1.1
Session ID : 14
Web browser/OS : Windows
2. Install a USB key on the host.
Obtain the USB key from the administrator, and install the USB key on the host. For information about how to make a USB key, see the appendix in the following section.
3. Log in to the SSL VPN gateway from the host:
# On the host, type the gateway address https://1.1.1.2:4430/ in the address bar of a browser, and then press Enter. The following page opens:
Figure 33 Selecting a certificate
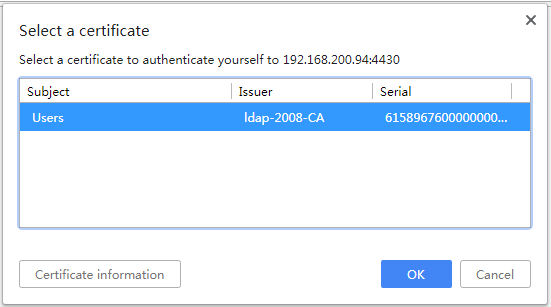
# Select a certificate, and then click OK. The SSL VPN login page opens.
Figure 34 Login page
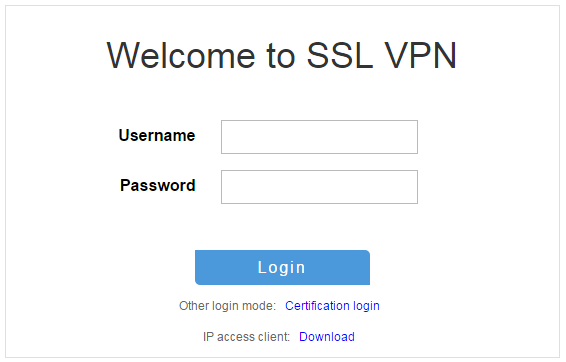
# Enter username sslvpnuser and password 123456TESTplat&!, and then click Login.
Figure 35 Application list

# In the application list, click Start to download the IP client application and install the application.
# Launch the installed IP client and configure it as follows:
Figure 36 iNode client

# Click the icon next the Password box. In the dialog box that opens, select the client certificate in the USB key, and then click OK.
Figure 37 Selecting the client certificate
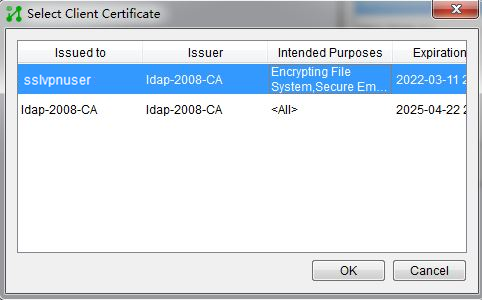
# Click Connect on the iNode client. You log in to the SSL VPN gateway successfully.
Figure 38 Logging into the SSL VPN gateway successfully
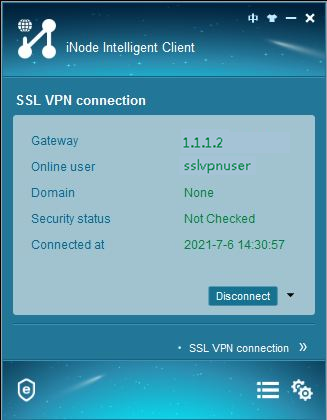
# After the SSL VPN user logs in, the user can ping the server IP address 20.2.2.2 from the host.
C:\>ping 20.2.2.2
Pinging 20.2.2.2 with 32 bytes of data:
Reply from 20.2.2.2: bytes=32 time=31ms TTL=254
Reply from 20.2.2.2: bytes=32 time=18ms TTL=254
Reply from 20.2.2.2: bytes=32 time=15ms TTL=254
Reply from 20.2.2.2: bytes=32 time=16ms TTL=254
Ping statistics for 20.2.2.2:
Packets: Sent = 4, Received = 4, Lost = 0 (0% loss),
Approximate round trip times in milli-seconds:
Minimum = 15ms, Maximum = 31ms, Average = 20ms
Appendix—Making a USB key
Make a USB key in the following procedure:
1. Configure an IP address and gateway on the administrator's PC to ensure the PC can reach the CA server. This example uses Windows 2008 server as the CA server.
Figure 39 Network diagram
2. Request the USB key client certificate:
# Enter http://192.168.100.247/certsrv in the address bar of a browser to open the certificate service page.
Figure 40 Certificate services
# Click Request a certificate. The certificate request page opens.
Figure 41 Requesting a certificate

# Click advanced certificate request. On the page that opens, select Create and submit a request to this CA to request a client certificate.
# Configure the client certificate request parameters, and then click Submit at the bottom of the page.
# In the dialog box that opens, enter the USB key password, and then log in.
# Click Install this certificate to install the client certificate to the USB key.
Figure 42 Installing the client certificate to the USB key
# After a possible conflict warning about installing a certificate, click Yes to install the client certificate into the USB key.
The USB key is made successfully.
