- Table of Contents
-
- 13-User Access and Authentication Configuration Guide
- 00-Preface
- 01-WLAN authentication configuration
- 02-WLAN IP snooping configuration
- 03-AAA configuration
- 04-802.1X configuration
- 05-802.1X client configuration
- 06-MAC authentication configuration
- 07-Port security configuration
- 08-Portal configuration
- Related Documents
-
| Title | Size | Download |
|---|---|---|
| 05-802.1X client configuration | 106.88 KB |
Contents
Restrictions and guidelines: 802.1X client configuration
802.1X client tasks at a glance
Enabling the 802.1X client feature
Configuring an 802.1X client username and password
Specifying an 802.1X client EAP authentication method
Configuring an 802.1X client anonymous identifier
802.1X client configuration examples
Example: Configuring the 802.1X client
Configuring an 802.1X client
About 802.1X clients
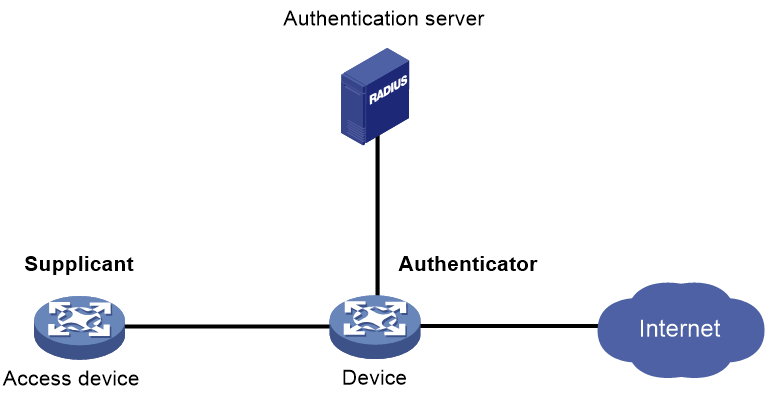
As shown in Figure 1, the 802.1X client feature allows the access device to act as the supplicant in the 802.1X architecture. For information about the 802.1X architecture, see "802.1X overview."
Figure 1 802.1X client network diagram
Restrictions and guidelines: 802.1X client configuration
Disable the 802.1X client feature with caution. The operation will log off all online users.
802.1X client tasks at a glance
To configure an 802.1X client, perform the following tasks:
1. Enabling the 802.1X client feature
2. Configuring an 802.1X client username and password
3. Specifying an 802.1X client EAP authentication method
4. (Optional.) Configuring an 802.1X client anonymous identifier
Enabling the 802.1X client feature
1. Enter system view.
system-view
2. Create a manual AP and enter AP view.
wlan ap ap-name [ model model-name ]
You must specify the model name when you create an AP.
3. Enable AP preprovisioning and enter AP provision view.
provision
By default, AP preprovisioning is disabled.
4. Enable the 802.1X client feature.
dot1x supplicant enable
By default, the 802.1X client feature is disabled.
Configuring an 802.1X client username and password
Restrictions and guidelines
To ensure successful authentication, make sure the username and password configured on the device is consistent with the username and password configured on the authentication server.
Procedure
1. Enter system view.
system-view
2. Create a manual AP and enter AP view.
wlan ap ap-name [ model model-name ]
3. Enable AP preprovisioning and enter AP provision view.
provision
4. Configure an 802.1X client username.
dot1x supplicant username username
By default, no 802.1X client username is configured.
5. Set an 802.1X client password.
dot1x supplicant password { cipher | simple } string
By default, no 802.1X client password is configured.
Specifying an 802.1X client EAP authentication method
About this task
The following EAP authentication methods are available for the 802.1X client feature:
· MD5-Challenge.
· PEAP-MSCHAPv2.
· PEAP-GTC.
· TTLS-MSCHAPv2.
· TTLS-GTC.
Restrictions and guidelines
· The following matrix shows the restrictions for the selection of authentication methods on the 802.1X client and the authenticator:
|
Authentication method specified on the 802.1X client |
Packet exchange method specified on the authenticator |
|
MD5-Challenge |
· CHAP · EAP |
|
· PEAP-MSCHAPv2 · PEAP-GTC · TTLS-MSCHAPv2 · TTLS-GTC |
EAP |
For information about 802.1X packet exchange methods, see "Configuring 802.1X."
· Make sure the specified 802.1X client EAP authentication method is supported by the authentication server.
Procedure
1. Enter system view.
system-view
2. Create a manual AP and enter AP view.
wlan ap ap-name [ model model-name ]
3. Enable AP preprovisioning and enter AP provision view.
provision
4. Specify an 802.1X client EAP authentication method.
dot1x supplicant eap-method { md5 | peap-gtc | peap-mschapv2 | ttls-gtc | ttls-mschapv2 }
By default, the 802.1X client-enabled device uses the MD5-Challenge EAP authentication.
Configuring an 802.1X client anonymous identifier
About this task
At the first authentication phase, packets sent to the authenticator are not encrypted. The use of an 802.1X client anonymous identifier prevents the 802.1X client username from being disclosed at the first phase. The 802.1X client-enabled device sends the anonymous identifier to the authenticator instead of the 802.1X client username. The 802.1X client username will be sent to the authenticator in encrypted packets at the second phase.
If no 802.1X client anonymous identifier is configured, the device sends the 802.1X client username at the first authentication phase.
The configured 802.1X client anonymous identifier takes effect only if one of the following EAP authentication methods is used:
· PEAP-MSCHAPv2.
· PEAP-GTC.
· TTLS-MSCHAPv2.
· TTLS-GTC.
If the MD5-Challenge EAP authentication is used, the configured 802.1X client anonymous identifier does not take effect. The device uses the 802.1X client username at the first authentication phase.
Restrictions and guidelines
Do not configure the 802.1X client anonymous identifier if the vendor-specific authentication server cannot identify anonymous identifiers.
Procedure
1. Enter system view.
system-view
2. Create a manual AP and enter AP view.
wlan ap ap-name [ model model-name ]
3. Enable AP preprovisioning and enter AP provision view.
provision
4. Configure an 802.1X client anonymous identifier.
dot1x supplicant anonymous identify identifier
By default, no 802.1X client anonymous identifier is configured.
802.1X client configuration examples
Example: Configuring the 802.1X client
Network configuration
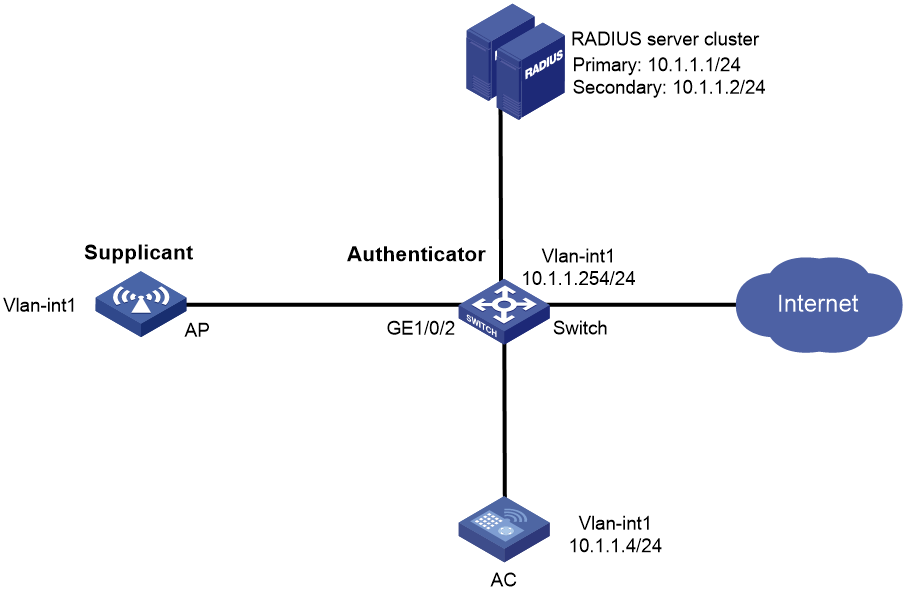
As shown in Figure 2, the switch acts as the authenticator to perform 802.1X authentication for the AP that connects to the port GigabitEthernet 1/0/2.
Perform the following tasks on the AC:
· Enable the 802.1X client feature for the AP.
· Set the following 802.1X client parameters for the AP:
¡ Configure the authentication username as aaa.
¡ Set the password to 123456 in plaintext form.
¡ Specify PEAP-MSCHAPv2 as the EAP authentication method.
· Save the 802.1X client settings to the configuration file on the AP.
Configure the switch to meet the following requirements:
· Use RADIUS servers to perform authentication and authorization for the AP.
· Enable EAP relay for the switch to communicate with the RADIUS servers.
· Assign the AP to ISP domain bbb.
· Set the shared key to name for secure communication between the switch and the RADIUS servers.
· Implement 802.1X port-based access control for the AP.
Configuring the AC
1. Assign an IP address to each interface. (Details not shown.)
2. Configure the 802.1X client feature:
# Create manual AP ap1, and specify the AP model and serial ID.
<AC> system-view
[AC] wlan ap ap1 model WA6320
[AC-wlan-ap-ap1] serial-id 219801A28N819CE0002T
[AC-wlan-ap-ap1] quit
# Enable AP preprovisioning and enter AP provision view.
[AC-wlan-ap-ap1] provision
# Specify PEAP-MSCHAPv2 as the 802.1X client EAP authentication method.
[AC-wlan-ap-ap1-prvs] dot1x supplicant eap-method peap-mschapv2
# Configure the 802.1X client username as aaa, and set the password to 123456 in plaintext form.
[AC-wlan-ap-ap1-prvs] dot1x supplicant username aaa
[AC-wlan-ap-ap1-prvs] dot1x supplicant password simple 123456
# Configure the 802.1X client anonymous identifier as bbb.
[AC-wlan-ap-ap1-prvs] dot1x supplicant anonymous identify bbb
# Enable the 802.1X client feature.
[AC-wlan-ap-ap1-prvs] dot1x supplicant enable
# Save the 802.1X client configuration in AP provision view to configuration file wlan_ap_prvs.xml on AP ap1.
[AC-wlan-ap-ap1-prvs] save wlan ap provision name ap1
[AC-wlan-ap-ap1-prvs] quit
[AC-wlan-ap-ap1] quit
Configuring the switch
This section contains commands for configuring RADIUS. For more information about these commands, see AAA commands in User Access and Authentication Command Reference.
1. Configure the RADIUS servers, add user accounts, and make sure the authentication and authorization services can function correctly. (Details not shown.)
2. Assign an IP address to each interface. (Details not shown.)
3. Configure a RADIUS scheme:
# Create a RADIUS scheme named radius1 and enter RADIUS scheme view.
<Switch> system-view
[Switch] radius scheme radius1
# Specify the IP address of the primary authentication RADIUS server.
[Switch-radius-radius1] primary authentication 10.1.1.1
# Specify the IP address of the secondary authentication RADIUS server.
[Switch-radius-radius1] secondary authentication 10.1.1.2
# Specify the shared key between the switch and the authentication RADIUS servers.
[Switch-radius-radius1] key authentication simple name
4. Configure the ISP domain:
# Create an ISP domain named bbb and enter ISP domain view.
[Switch] domain name bbb
# Perform authentication and authorization for 802.1X clients in ISP domain bbb based on RADIUS scheme radius1.
[Switch-isp-bbb] authentication lan-access radius-scheme radius1
[Switch-isp-bbb] authorization lan-access radius-scheme radius1
[Switch-isp-bbb] accounting lan-access none
[Switch-isp-bbb] quit
5. Configure 802.1X:
# Enable EAP relay.
[Switch] dot1x authentication-method eap
# Enable port-based access control on the port GigabitEthernet 1/0/2.
[Switch] interface gigabitethernet 1/0/2
[Switch-GigabitEthernet1/0/2] dot1x port-method portbased
# Specify ISP domain bbb as the mandatory domain.
[Switch-GigabitEthernet1/0/2] dot1x mandatory-domain bbb
# Enable 802.1X on GigabitEthernet 1/0/2.
[Switch-GigabitEthernet1/0/2] dot1x
[Switch-GigabitEthernet1/0/2] quit
# Enable 802.1X globally.
[Switch] dot1x
Verifying the configuration
# Display online 802.1X client information.
[Switch] display dot1x connection
Total connections: 1
User MAC address: 70f9-6dd7-d1e0
Access interface: GigabitEthernet1/0/2
Username: aaa
Authentication domain: bbb
Authentication method: EAP
Initial VLAN: 1
Authorization untagged VLAN: N/A
Authorization tagged VLAN list: N/A
Authorization ACL ID: N/A
Authorization user profile: N/A
Termination action: N/A
Session timeout period: N/A
Online from: 2015/06/16 19:10:32
Online duration: 0h 1m 1s