- Table of Contents
- Related Documents
-
| Title | Size | Download |
|---|---|---|
| 01-WLAN authentication configuration | 723.17 KB |
Contents
Configuring WLAN authentication
WLAN authentication tasks at a glance
Prerequisites for WLAN authentication
Configuring global WLAN authentication parameters
Setting OUIs for OUI authentication
Enabling EAP relay or EAP termination for 802.1X authentication
Specifying 802.1X-supported domain name delimiters
Setting the maximum number of 802.1X authentication request attempts
Setting the 802.1X authentication timers
Configuring the MAC authentication user account format
Specifying a global MAC authentication domain
Setting the MAC authentication timers
Enabling the clear-previous-connection feature
Configuring service-specific WLAN authentication parameters
Setting the authentication mode
Specifying the authenticator for WLAN clients
Specifying an EAP mode for 802.1X authentication
Configuring the online user handshake feature
Configuring the online user handshake security feature
Specifying an 802.1X authentication domain
Setting the maximum number of concurrent 802.1X clients
Enabling the periodic online user reauthentication feature
Setting the maximum number of concurrent MAC authentication clients
Specifying a service-specific MAC authentication domain
Ignoring 802.1X or MAC authentication failures
Configuring a WLAN Auth-Fail VLAN
Configuring a WLAN critical VLAN
Ignoring authorization information from the server
Enabling the authorization-fail-offline feature
Configuring intrusion protection
Configuring the accounting-start trigger feature
Configuring the accounting-update trigger feature
Configuring the accounting-restart trigger feature
Including the client IP snooping method in RADIUS packets
Enabling fast-connect for MAC authenticated intra-AC roaming clients
Configuring a modifier to optimize WLAN authentication statistics
Enabling the BYOD authorization trigger
Configuring authentication fail-permit
About authentication fail-permit
Authentication fail-permit tasks at a glance
Enabling fail-permit for authentication clients
Specifying an authentication fail-permit service template
Configuring 5G radio silence fail-permit
Display and maintenance commands for WLAN authentication
WLAN authentication configuration examples
Example: Configuring 802.1X CHAP local authentication
Example: Configuring 802.1X EAP-PEAP RADIUS authentication
Example: Configuring RADIUS-based MAC authentication
Configuring WLAN authentication
About WLAN authentication
This chapter describes implementation of WLAN authentication on the device. WLAN authentication performs MAC-based network access control for WLAN clients to ensure access security.
WLAN authentication includes the following authentication methods:
· 802.1X authentication—Uses Extensible Authentication Protocol (EAP) to transport authentication information for the client, the authenticator, and the authentication server.
· MAC authentication—Controls network access by authenticating source MAC addresses. The feature does not require any client software. Clients do not have to enter usernames or passwords for network access. The authenticator initiates a MAC authentication process when it detects an unknown source MAC address. If the MAC address passes authentication, the client can access authorized network resources. If the authentication fails, the authenticator marks the MAC address as a silent MAC address and rejects the client's access.
· OUI authentication—Examines the OUIs in the MAC addresses of clients. A client passes OUI authentication if the client's OUI matches one of the OUIs configured for the authenticator.
|
|
NOTE: An OUI is a 24-bit number that uniquely identifies a vendor, manufacturer, or organization. In MAC addresses, the first three octets are the OUI. |
Authentication modes
|
Authentication mode |
Working mechanism |
Whether intrusion protection can be triggered |
|
bypass (the default) |
Does not perform authentication. A client can access the network without being authenticated. |
No |
|
dot1x |
Performs 802.1X authentication only. A client must pass 802.1X authentication before they can access the network. |
Yes |
|
mac |
Performs MAC authentication only. A client must pass MAC authentication before they can access the network. |
Yes |
|
mac-then-dot1x |
Performs MAC authentication first, and then 802.1X authentication if MAC authentication fails. A client can access the network if it passes either MAC authentication or 802.1X authentication. |
Yes |
|
dot1x-then-mac |
Performs 802.1X authentication first, and then MAC authentication if 802.1X authentication fails. A client can access the network if it passes either 802.1X authentication or MAC authentication. |
Yes |
|
oui-then-dot1x |
Performs OUI authentication first, and then 802.1X authentication if OUI authentication fails. A client can access the network if it passes either OUI authentication or 802.1X authentication. |
Yes |
|
mac-and-dot1x |
Performs MAC authentication first, and then 802.1X authentication. A client can access the network only if it passes both MAC authentication and 802.1X authentication. |
Yes |
802.1X authentication
For more information about 802.1X architecture, EAP relay, EAP termination, and EAP packet encapsulation, see "802.1X overview" and "Configuring 802.1X."
Authentication methods
You can perform 802.1X authentication on the authenticator (local authentication) or through a RADIUS server. For information about RADIUS authentication and local authentication, see "Configuring AAA."
Authenticator
The authenticator authenticates the client to control access to the WLAN.
In an AC+fit AP network, either the AC or AP can be specified as the authenticator by using the client-security authentication-location command.
EAP packet encapsulation
802.1X defines EAP over LAN (EAPOL) for passing EAP packets between the client and the authenticator over a WLAN. Between the authenticator and the authentication server, 802.1X delivers authentication information by using one of the following methods:
· Encapsulates EAP packets in RADIUS by using EAP over RADIUS (EAPOR), as described in "EAP relay."
· Extracts authentication information from the EAP packets and encapsulates the information in standard RADIUS packets, as described in "EAP termination."
For information about EAP packet encapsulation, see "802.1X overview."
EAP relay
In this mode, the authenticator uses EAPOR packets to send authentication information to the RADIUS server. The RADIUS server must support the EAP-Message and Message-Authenticator attributes.
Figure 1 shows the basic 802.1X authentication process in EAP relay mode. In this example, EAP-MD5 is used.
|
|
NOTE: If the AP is specified as the authenticator, it uses the same authentication process as Figure 1 except that the AP handles the EAP and RADIUS packets. |
Figure 1 802.1X authentication process in EAP relay mode (AC+fit AP network)
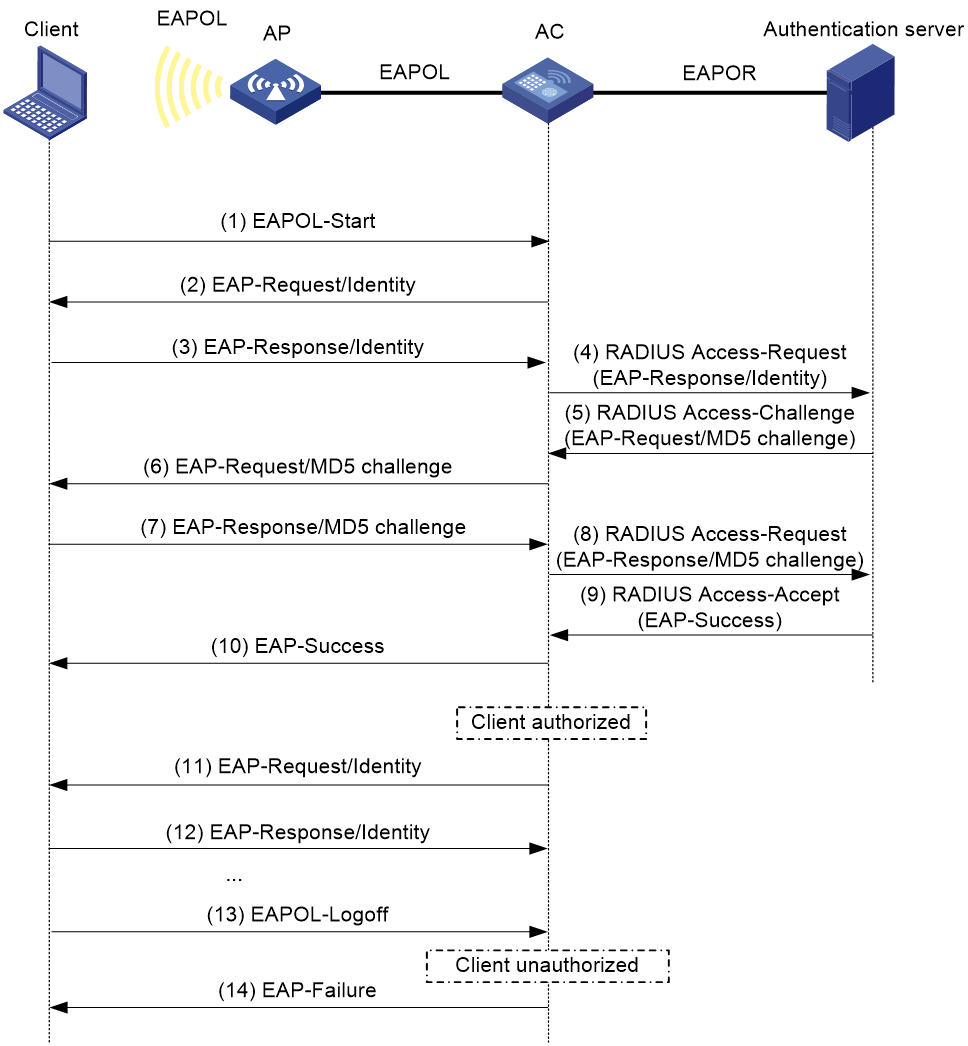
The following steps describe the 802.1X authentication process:
1. When a user launches the 802.1X client and enters a registered username and password, the 802.1X client sends an EAPOL-Start packet to the authenticator.
For information about the client and AP association, see "Configuring WLAN security."
2. The authenticator responds with an EAP-Request/Identity packet to request for the username.
3. The client sends the username in an EAP-Response/Identity packet to the authenticator.
4. The authenticator relays the EAP-Response/Identity packet in a RADIUS Access-Request packet to the authentication server.
6. The authenticator transmits the EAP-Request/MD5-Challenge packet to the client.
7. The client uses the received challenge to encrypt the password, and sends the encrypted password in an EAP-Response/MD5-Challenge packet to the authenticator.
8. The authenticator relays the EAP-Response/MD5-Challenge packet in a RADIUS Access-Request packet to the authentication server.
9. The authentication server compares the received encrypted password with the encrypted password it generated at step 5. If the two passwords are identical, the server considers the client valid and sends a RADIUS Access-Accept packet to the authenticator.
10. Upon receiving the RADIUS Access-Accept packet, the authenticator allows the client to access the network.
11. After the client comes online, the authenticator periodically sends handshake requests to examine whether the client is still online.
12. Upon receiving a handshake request, the client returns a response. If the client fails to return a response after a number of consecutive handshake attempts (two by default), the authenticator logs off the client. This handshake mechanism enables timely release of the network resources used by 802.1X clients that have abnormally gone offline.
13. The client sends an EAPOL-Logoff packet to request a logoff from the authenticator.
14. In response to the EAPOL-Logoff packet, the authenticator sends an EAP-Failure packet to the client.
EAP termination
In this mode, the authenticator performs the following operations:
1. Terminates the EAP packets received from the client.
2. Encapsulates the client authentication information in standard RADIUS packets.
3. Uses PAP or CHAP to communicate with the RADIUS server.
Figure 2 shows the basic 802.1X authentication process in EAP termination mode. In this example, CHAP authentication is used.
|
|
NOTE: If the AP is specified as the authenticator, it uses the same authentication process as Figure 2 except that the AP handles the EAP and RADIUS packets. |
Figure 2 802.1X authentication process in EAP termination mode (AC+fit AP network)
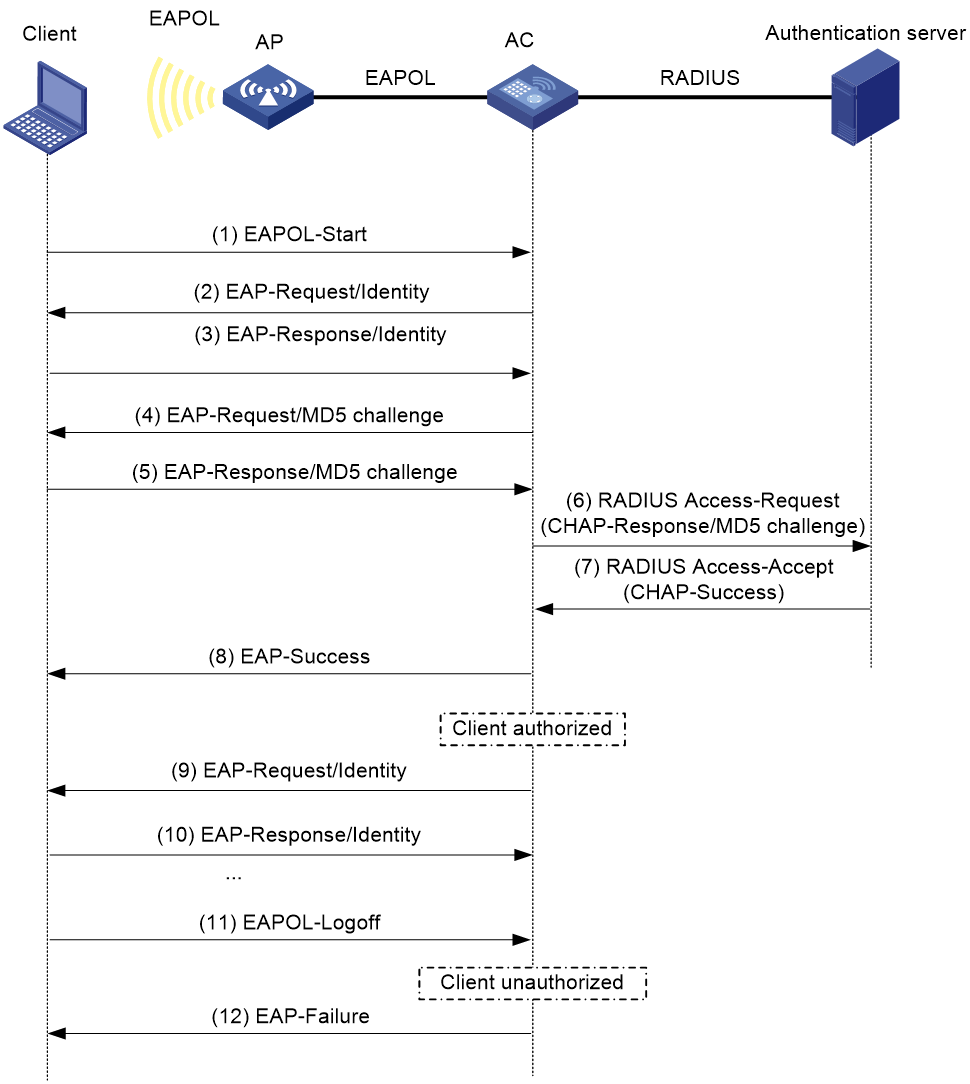
In EAP termination mode, the authentication device rather than the authentication server generates an MD5 challenge for password encryption. The authentication device then sends the MD5 challenge together with the username and encrypted password in a standard RADIUS packet to the RADIUS server.
802.1X authentication initiation
Both the client and the authenticator can initiate 802.1X authentication.
· Client initiation—After the client is associated with the authenticator, it sends an EAPOL-Start packet to the authenticator to initiate 802.1X authentication.
· Authenticator initiation—After the client is associated with the authenticator, the authenticator sends an EAP-Request/Identity packet to initiate the authentication. The authenticator retransmits the packet if no response has been received within the client timeout timer.
MAC authentication
Authentication methods
You can perform MAC authentication on the authenticator (local authentication) or through a RADIUS server. For information about RADIUS authentication and local authentication, see "Configuring AAA."
Authenticator
The authenticator authenticates the client to control access to the WLAN.
In an AC+fit AP network, either the AC or AP can be specified as the authenticator by using the client-security authentication-location command.
User account policies
User accounts are required for identifying clients. MAC authentication supports the following user account policies:
· One MAC-based user account for each client. The authenticator uses the unknown source MAC addresses in packets as the usernames and passwords of clients for MAC authentication.
· One shared user account for all clients. You specify one username and password, which are not necessarily a MAC address, for all MAC authentication clients on the authenticator. The username is a case-sensitive string of 1 to 55 characters which cannot include the at sign (@). The password can be a plaintext string of 1 to 63 characters or ciphertext string of 1 to 117 characters.
MAC authentication procedures
RADIUS authentication:
· MAC-based accounts—The authenticator sends the source MAC address of the packet as the username and password to the RADIUS server for authentication.
· A shared account—The authenticator sends the shared account username and password to the RADIUS server for authentication.
Local authentication:
· MAC-based accounts—The authenticator uses the source MAC address of the packet as the username and password to search the local account database for a match.
· A shared account—The authenticator uses the shared account username and password to search the local account database for a match.
Intrusion protection
When the authenticator detects an association request from a client that has failed authentication, intrusion protection is triggered. The feature takes one of the following predefined actions on the BSS where the request is received:
· temporary-block (default)—Adds the source MAC address of the request to the blocked MAC address list and drops the request packet. The client at a blocked MAC address cannot establish connections with the AP within a period. To set the period, use the client-security intrusion-protection timer temporary-block command.
· service-stop—Stops the BSS where the request is received until the BSS is enabled manually on the radio interface.
· temporary-service-stop—Stops the BSS where the request is received for a period. To set the period, use the client-security intrusion-protection timer temporary-service-stop command.
|
|
NOTE: Intrusion protection action is not supported in bypass mode. |
WLAN VLAN manipulation
VLAN authorization
You can specify authorization VLANs for a WLAN client to control the client's access to network resources. When the client passes 802.1X or MAC authentication, the authentication server assigns the authorization VLAN information to the authenticator. When the device acts as the authenticator, it can resolve server-assigned VLANs of the following formats:
· VLAN ID.
· VLAN name.
The VLAN name represents the VLAN description on the access device.
· VLAN group name.
For more information about VLAN groups, see VLAN configuration in Network Connectivity Configuration Guide.
· Combination of VLAN IDs and VLAN names.
In the string, some VLANs are represented by their IDs, and some VLANs are represented by their names.
If the server assigns a group of VLANs, the access device selects and assigns a VLAN according to the VLAN ID format. Table 1 describes the VLAN selection and assignment rules for a group of authorization VLANs.
Table 1 VLAN selection and assignment for a group of authorization VLANs
|
Types of authorized VLANs |
VLAN selection and assignment rules |
|
· VLANs by IDs · VLANs by names · Combination of VLAN IDs and VLAN names |
The device selects the VLAN with the lowest ID from the group of VLANs. |
|
VLAN group name |
1. The device selects the VLAN that has the fewest number of online users. 2. If multiple VLANs have the same number of online 802.1X users, the device selects the VLAN with the lowest ID. |
|
|
NOTE: The device converts VLAN names and VLAN group names into VLAN IDs before it assigns a VLAN to the client. |
The device fails VLAN authorization for a client in the following situations:
· The device fails to resolve the authorization VLAN information.
· The server assigns a VLAN name to the device, but the device does not have any VLAN using the name.
· The server assigns a VLAN group name to the device, but the VLAN group does not exist or the VLAN group has not been assigned any VLAN.
Authorization VLAN information is used to control data forwarding, so they must be assigned by the device that forwards data traffic. VLAN assignment can be local VLAN assignment or remote VLAN assignment, depending on whether the authenticator and the forwarding device are the same device.
· Local VLAN assignment—The authenticator and the forwarding device are the same device. After the authenticator obtains the authorization VLAN information, it resolves the information and assigns the VLAN.
· Remote VLAN assignment—The authenticator and the forwarding device are different devices. After the authenticator obtains the authorization VLAN information, it sends the information to the remote forwarding device. The forwarding device then resolves the information and assigns the VLAN.
Auth-Fail VLAN
The WLAN Auth-Fail VLAN accommodates clients that have failed WLAN authentication because of the failure to comply with the organization security strategy. For example, the VLAN accommodates clients that have entered wrong passwords or usernames. The Auth-Fail VLAN does not accommodate WLAN clients that have failed authentication for authentication timeouts or network connection issues.
Clients in the Auth-Fail VLAN can access a limited set of network resources.
Clients that use RSNA cannot be assigned to the Auth-Fail VLAN after they fail 802.1X authentication. The authenticator directly logs off the clients.
The Auth-Fail VLAN feature takes precedence over intrusion protection. When a client fails authentication, the Auth-Fail VLAN setting applies first. If no Auth-Fail VLAN is configured, the intrusion protection feature takes effect. If neither feature is configured, the authenticator directly logs off the client.
Critical VLAN
The WLAN critical VLAN accommodates clients that have failed WLAN authentication because all RADIUS servers in their ISP domains are unreachable. Clients in the critical VLAN can access a limited set of network resources depending on the configuration.
The authenticator reauthenticates a client in the critical VLAN at the interval of 30 seconds.
· If the client passes the reauthentication, the authenticator assigns the client to the authorization VLAN. If no authorization VLAN is configured, the client is assigned to the initial VLAN.
· If the client fails the reauthentication because all the RADIUS servers are unreachable, the client is still in the critical VLAN.
· If the client fails the reauthentication for any reason other than unreachable servers, the device assigns the client to the Auth-Fail VLAN. If no Auth-Fail VLAN is configured, the device handles the client depending on the intrusion protection setting. If the intrusion protection feature is not configured, the device logs off the client.
The critical VLAN feature does not take effect on clients that use RSNA. When these clients fail authentication because all the RADIUS servers are unreachable, the authenticator directly logs off the clients.
ACL assignment
You can specify an ACL for an 802.1X or MAC authentication client to control the client's access to network resources. After the client passes authentication, the authentication server assigns the ACL to the client for filtering traffic for this client. The authentication server can be on the local device that acts as the authenticator or on a RADIUS server. In either case, you must configure rules for the ACL on the authenticator. If the AP acts as the authenticator, you must configure the ACL rules on the AC.
To change the access control criteria for the client, you can use one of the following methods:
· Modify the ACL rules on the authenticator.
· Specify another ACL for the client on the authentication server.
User profile assignment
You can specify a user profile for a WLAN client to control the client's access to network resources. After the client passes 802.1X or MAC authentication, the authentication server assigns the user profile to the client for filtering traffic. The authentication server can be on the local device that acts as the authenticator or on a RADIUS server. In either case, you must configure the user profile on the authenticator. If the AP acts as the authenticator, you must configure the user profile on the AC.
To change the client's access permissions, you can use one of the following methods:
· Modify the user profile configuration on the authenticator.
· Specify another user profile for the client on the authentication server.
CAR attribute assignment
The device can use the CAR attributes assigned through RADIUS extended attributes to control the access rates of authenticated online 802.1X or MAC authentication users. For information about extended RADIUS attributes, see "Configuring AAA."
The following CAR attributes are available:
· Input-Average-Rate—Average rate of inbound traffic in bps.
· Output-Average-Rate—Average rate of outbound traffic in bps.
BYOD access control
This feature allows the RADIUS server to push different register pages and assign different authorization attributes to clients on different endpoint devices.
|
|
NOTE: This feature supports only IMC servers to act as the RADIUS server at the current version. |
The following process illustrates the BYOD access control for a WLAN client that passes 802.1X or MAC authentication:
1. The authenticator performs the following operations:
a. Obtains the Option 55 attribute from DHCP packets.
b. Delivers the Option 55 attribute to the RADIUS server.
On an IMC server, the Option 55 attribute will be delivered to UAM.
2. The BYOD-capable RADIUS server performs the following operations:
a. Uses the Option 55 attribute to identify endpoint device information including endpoint type, operating system, and vendor.
b. Sends a register page and assigns authorization attributes to the client according to the device information.
WLAN authentication tasks at a glance
To configure WLAN authentication, perform the following tasks:
· Configuring global WLAN authentication parameters
· Configuring service-specific WLAN authentication parameters
· Enabling the BYOD authorization trigger
· Configuring the fail-permit feature
¡ Configuring authentication fail-permit
¡ Configuring 5G radio silence fail-permit
Prerequisites for WLAN authentication
Prerequisites for 802.1X
Before you configure 802.1X authentication, complete the following tasks:
· Configure an ISP domain and AAA scheme (local or RADIUS authentication) for 802.1X users. For more information, see "Configuring AAA."
· If RADIUS authentication is used, create user accounts on the RADIUS server.
· If local authentication is used, create local user accounts on the access device and set the service type to lan-access.
Prerequisites for MAC authentication
Before you configure MAC authentication, configure an ISP domain and specify an AAA method.
· For local authentication, you must also create local user accounts (including usernames and passwords) and specify the lan-access service for local users.
· For RADIUS authentication, make sure the device and the RADIUS server can reach each other and create user accounts on the RADIUS server. If you are using MAC-based accounts, make sure the username and password for each account are the same as the MAC address of each MAC authentication user.
Configuring global WLAN authentication parameters
Setting OUIs for OUI authentication
About this task
Perform this task only for the oui-then-dot1x authentication mode.
Restrictions and guidelines
The device supports a maximum of 16 OUIs.
Procedure
1. Enter system view.
system-view
2. Set OUI values for OUI authentication.
port-security oui index index-value mac-address oui-value
By default, no OUI values are set for OUI authentication.
For more information about this command, see port security commands in User Access and Authentication Command Reference.
Enabling EAP relay or EAP termination for 802.1X authentication
Restrictions and guidelines
If EAP relay mode is used, the following restrictions and guidelines apply:
· The user-name-format command in RADIUS scheme view does not take effect. The device sends the authentication data from the client to the server without any modification. For information about the user-name-format command, see AAA commands in User Access and Authentication Command Reference.
· Make sure the RADIUS server use the same authentication method as the client. For the authenticator, you only need to use the dot1x authentication-method eap command to enable EAP relay.
Procedure
1. Enter system view.
system-view
2. Enable EAP relay or EAP termination.
dot1x authentication-method { chap | eap | pap }
By default, the device performs EAP termination and uses CHAP to communicate with the RADIUS server.
For more information about this command, see 802.1X commands in User Access and Authentication Command Reference.
Specifying 802.1X-supported domain name delimiters
1. Enter system view.
system-view
2. Specify a set of domain name delimiters for 802.1X clients.
dot1x domain-delimiter string
By default, the domain delimiter for 802.1X users is the at sign (@).
For more information about this command, see 802.1X commands in User Access and Authentication Command Reference.
Setting the maximum number of 802.1X authentication request attempts
1. Enter system view.
system-view
2. Set the maximum number of attempts for sending an 802.1X authentication request.
dot1x retry retries
The default setting is 2.
For more information about this command, see 802.1X commands in User Access and Authentication Command Reference.
Setting the 802.1X authentication timers
About this task
802.1X uses the following timers to control interactions with the client and the RADIUS server:
· Client timeout timer—Starts when the device sends an EAP-Request/MD5-Challenge or EAP-Request/Identity packet to a client. If the device does not receive a response when this timer expires, it retransmits the request to the client. If the device has made the maximum transmission attempts without receiving a response, the client fails authentication. To set the maximum attempts, use the dot1x retry command.
· Server timeout timer—Starts when the device sends a RADIUS Access-Request packet to the authentication server. If the device does not receive a response when this timer expires, the device retransmits the request to the server.
· Handshake timer—Starts after a client passes authentication when the online user handshake is enabled. The device sends handshake messages to the client at every handshake interval. The device logs off the client if it does not receive any response from the client after the maximum handshake attempts. To set the maximum attempts, use the dot1x retry command.
· Periodic reauthentication timer—Starts after a client passes authentication when periodic online user reauthentication is enabled. The device reauthenticates the client at the configured interval. Any change to the timer takes effect only on clients that come online after the change.
Restrictions and guidelines
In most cases, the default settings are sufficient. You can edit the timers, depending on the network conditions. The following are two examples:
· In a low-speed network, increase the client timeout timer.
· In a network with authentication servers of different performances, adjust the server timeout timer.
Procedure
1. Enter system view.
system-view
2. Set the client timeout timer.
dot1x timer supp-timeout supp-timeout-value
The default setting is 30 seconds.
For more information about this command, see 802.1X commands in User Access and Authentication Command Reference.
3. Set the server timeout timer.
dot1x timer server-timeout server-timeout-value
The default setting is 100 seconds.
For more information about this command, see 802.1X commands in User Access and Authentication Command Reference.
4. Set the handshake timer.
dot1x timer handshake-period handshake-period-value
The default setting is 15 seconds.
For more information about this command, see 802.1X commands in User Access and Authentication Command Reference.
5. Set the periodic reauthentication timer.
dot1x timer reauth-period reauth-period-value
The default setting is 3600 seconds.
For more information about this command, see 802.1X commands in User Access and Authentication Command Reference.
Configuring the MAC authentication user account format
1. Enter system view.
system-view
2. Configure the MAC authentication user account format.
Choose one option as needed:
¡ Use one MAC-based user account for each client.
mac-authentication user-name-format mac-address [ { with-hyphen [ six-section | three-section ] | without-hyphen } [ lowercase | uppercase ] ]
¡ Use one shared user account for all clients.
mac-authentication user-name-format fixed [ account name ] [ password { cipher | simple } password ]
By default, the device uses the MAC address of a user as the username and password for MAC authentication. The MAC address is in the hexadecimal notation without hyphens, and letters are in lower case.
For more information about this command, see MAC authentication commands in User Access and Authentication Command Reference.
Specifying a global MAC authentication domain
About this task
MAC authentication chooses an ISP domain for WLAN clients in the following order:
1. The domain specified on the service template.
2. The global MAC authentication domain specified in system view.
3. The default domain.
Procedure
1. Enter system view.
system-view
2. Specify an ISP domain for MAC authentication clients.
mac-authentication domain domain-name
By default, no ISP domain is specified for MAC authentication clients in system view.
Setting the MAC authentication timers
About this task
MAC authentication uses the following timers:
· Offline detect timer—Sets the interval that the device waits for traffic from a user before the device determines that the user is idle. If the device has not received traffic from a user before the timer expires, the device logs off that user and requests the accounting server to stop accounting for the user.
· Quiet timer—Sets the interval that the device must wait before the device can perform MAC authentication for a user that has failed MAC authentication. All packets from the MAC address are dropped during the quiet time. This quiet mechanism prevents repeated authentication from affecting system performance.
· Server timeout timer—Sets the interval that the device waits for a response from a RADIUS server before the device determines that the RADIUS server is unavailable. If the timer expires during MAC authentication, the user cannot access the network.
Procedure
1. Enter system view.
system-view
2. Configure MAC authentication timers.
mac-authentication timer { offline-detect offline-detect-value | quiet quiet-value | server-timeout server-timeout-value }
By default, the offline detect timer is 300 seconds, the quiet timer is 60 seconds, and the server timeout timer is 100 seconds.
For more information about this command, see MAC authentication commands in User Access and Authentication Command Reference.
Enabling the clear-previous-connection feature
About this task
Some RADIUS servers reject to authenticate a client if they have an online user entry for that client. If they fail to remove the online user entry for a client that has gone offline incorrectly, that client will be unable to get authenticated and come online again.
To resolve this issue, use the clear-previous-connection feature.
With this feature, the device checks the local online user entries before it sends an authentication request to the RADIUS server for an 802.1X or MAC authentication client. If an entry is found, the device removes the entry and sends a stop-accounting request to the RADIUS server. Upon receipt of the stop-accounting request, the RADIUS server removes the online user entry. Then, the client can be authenticated correctly.
Restrictions and guidelines
When this feature is enabled, the 802.1X reauthentication, WLAN Auth-Fail VLAN, and WLAN critical VLAN features cannot take effect.
Procedure
1. Enter system view.
system-view
2. Enable the clear-previous-connection feature.
wlan client-security authentication clear-previous-connection
By default, this feature is disabled.
Configuring service-specific WLAN authentication parameters
Tasks at a glance
To configure service-specific WLAN authentication parameters, perform the following tasks:
1. Setting the authentication mode
2. (Optional.) Specifying the authenticator for WLAN clients
3. (Optional.) Configure 802.1X authentication parameters
¡ Specifying an EAP mode for 802.1X authentication
¡ Configuring the online user handshake feature
¡ Configuring the online user handshake security feature
¡ Specifying an 802.1X authentication domain
¡ Setting the maximum number of concurrent 802.1X clients
¡ Enabling the periodic online user reauthentication feature
4. (Optional.) Configure MAC authentication parameters
¡ Setting the maximum number of concurrent MAC authentication clients
¡ Specifying a service-specific MAC authentication domain
5. (Optional.) Configuring advanced features for WLAN authentication
¡ Ignoring 802.1X or MAC authentication failures
¡ Configuring a WLAN Auth-Fail VLAN
¡ Configuring a WLAN critical VLAN
¡ Ignoring authorization information from the server
¡ Enabling the authorization-fail-offline feature
¡ Configuring intrusion protection
¡ Configuring the accounting-start trigger feature
¡ Configuring the accounting-update trigger feature
¡ Configuring the accounting-restart trigger feature
¡ Including the client IP snooping method in RADIUS packets
¡ Enabling fast-connect for MAC authenticated intra-AC roaming clients
¡ Configuring a modifier to optimize WLAN authentication statistics
Setting the authentication mode
1. Enter system view.
system-view
2. Enter service template view.
wlan service-template service-template-name
3. Set the authentication mode for WLAN clients.
client-security authentication-mode { dot1x | dot1x-then-mac | mac | mac-and-dot1x | mac-then-dot1x | oui-then-dot1x }
By default, the bypass mode applies. The device does not perform authentication. Clients can access the device directly.
Specifying the authenticator for WLAN clients
About this task
You can specify the AC or AP to act as the authenticator to perform local or RADIUS-based authentication for WLAN clients.
Restrictions and guidelines
For a successful authentication, the authenticator cannot be the AP if the AC is configured to forward client data traffic. For information about specifying the device for forwarding client data traffic, see WLAN access configuration in WLAN Access Configuration Guide.
Procedure
1. Enter system view.
system-view
2. Enter service template view.
wlan service-template service-template-name
3. Specify the authenticator for WLAN clients.
client-security authentication-location { ac | ap }
By default, the AC acts as the authenticator to authenticate WLAN clients.
Specifying an EAP mode for 802.1X authentication
About this task
The EAP mode determines the EAP protocol provisions and packet format that the device uses to interact with clients.
802.1X supports the following EAP modes:
· extended—Requires the device to interact with clients according to the provisions and packet format defined by the H3C proprietary EAP protocol.
· standard—Requires the device to interact with clients according to the provisions and packet format defined by the standard EAP protocol.
Restrictions and guidelines
Perform this task only when an IMC server is used as the RADIUS server. Specify the extended mode for iNode clients, and specify the standard mode for other clients.
Procedure
1. Enter system view.
system-view
2. Enter service template view.
wlan service-template service-template-name
3. Specify an EAP mode for 802.1X authentication.
dot1x eap { extended | standard }
By default, the EAP mode is standard for 802.1X authentication.
Configuring the online user handshake feature
About this task
The online user handshake feature examines the connectivity status of online 802.1X clients. The device sends handshake messages to online clients at the interval specified by the dot1x timer handshake-period command. If the device does not receive any responses from an online client after it has made the maximum handshake attempts, the device sets the client to offline state.
Restrictions and guidelines
The device does not respond to the handshake responses from clients. Some clients might initiate reauthentication or go offline if they do not receive the device's responses to their handshake responses. If your network has such clients, disable the online user handshake feature.
Procedure
1. Enter system view.
system-view
2. Enter service template view.
wlan service-template service-template-name
3. Enable the online user handshake feature.
dot1x handshake enable
By default, this feature is disabled.
Configuring the online user handshake security feature
About this task
The online user handshake security feature adds authentication information in the handshake messages. This feature can prevent illegal clients from forging legal 802.1X clients to exchange handshake messages with the device. With this feature, the device compares the authentication information in the handshake response message from a client with that assigned by the authentication server. If no match is found, the device logs off the client.
Restrictions and guidelines
To use the online user handshake security feature, make sure the online user handshake feature is enabled.
The online user handshake security feature protects only online authenticated 802.1X clients.
Procedure
1. Enter system view.
system-view
2. Enter service template view.
wlan service-template service-template-name
3. Enable the online user handshake feature.
dot1x handshake enable
By default, this feature is disabled.
4. Enable the online user handshake security feature.
dot1x handshake secure enable
By default, this feature is disabled.
Specifying an 802.1X authentication domain
About this task
802.1X authentication chooses an ISP domain for WLAN clients in the following order:
· The domain specified on the service template.
· The domain specified by username.
· The default domain.
Procedure
1. Enter system view.
system-view
2. Enter service template view.
wlan service-template service-template-name
3. Specify an 802.1X authentication domain for the service template.
dot1x domain domain-name
By default, no 802.1X authentication domain is specified for the service template.
Setting the maximum number of concurrent 802.1X clients
About this task
Perform this task to limit the number of concurrent 802.1X clients that a service template allows on a radio.
This setting takes effect on a per-radio basis. If the number of 802.1X clients of a service template reaches the limit on a radio, no additional 802.1X clients can access the network through the service template on that radio.
Procedure
1. Enter system view.
system-view
2. Enter service template view.
wlan service-template service-template-name
3. Set the maximum number of concurrent 802.1X clients that the service template supports on a radio.
dot1x max-user count
The default setting is 512.
Enabling the periodic online user reauthentication feature
About this task
Periodic online user reauthentication tracks the connection status of online clients, and updates the authorization attributes assigned by the server. The attributes include the ACL, VLAN, and user profile-based QoS. The reauthentication interval is user configurable.
The server-assigned session timeout timer (Session-Timeout attribute) and termination action (Termination-Action attribute) can affect the periodic online user reauthentication feature. To display the server-assigned Session-Timeout and Termination-Action attributes, use the display dot1x connection command.
· If the termination action is Default (logoff), periodic online user reauthentication on the device takes effect only when the periodic reauthentication timer is shorter than the session timeout timer.
· If the termination action is Radius-request, the periodic online user reauthentication configuration on the device does not take effect. The device reauthenticates the online 802.1X clients after the session timeout timer expires.
Support for the assignment of Session-Timeout and Termination-Action attributes depends on the server model.
Procedure
1. Enter system view.
system-view
2. Enter service template view.
wlan service-template service-template-name
3. Enable periodic online user reauthentication.
dot1x re-authenticate enable
By default, this feature is disabled.
Setting the maximum number of concurrent MAC authentication clients
About this task
Perform this task to limit the number of concurrent MAC authentication clients that a service template supports on a radio.
This setting takes effect on a per-radio basis. If the number of MAC authentication clients of a service template reaches the limit on a radio, no additional MAC authentication clients can access the network through the service template on that radio.
Procedure
1. Enter system view.
system-view
2. Enter service template view.
wlan service-template service-template-name
3. Set the maximum number of concurrent MAC authentication clients that the service template supports on a radio.
mac-authentication max-user count
The default setting is 4096.
Specifying a service-specific MAC authentication domain
About this task
MAC authentication chooses an ISP domain for WLAN clients in the following order:
· The domain specified on the service template.
· The global MAC authentication domain specified in system view.
· The default domain.
Procedure
1. Enter system view.
system-view
2. Enter service template view.
wlan service-template service-template-name
3. Specify an ISP domain for MAC authentication clients.
mac-authentication domain domain-name
By default, no ISP domain is specified for MAC authentication clients.
Ignoring 802.1X or MAC authentication failures
About this task
This feature applies to the following clients:
· Clients that use 802.1X authentication.
This feature enables the device to ignore the 802.1X authentication failures and allow clients that have failed 802.1X authentication to come online.
· Clients that use both RADIUS-based MAC authentication and portal authentication.
Typically, a WLAN client must pass MAC authentication and portal authentication in turn to access network resources. The client provides username and password each time portal authentication is performed.
This feature simplifies the authentication process for a client as follows:
¡ If the RADIUS server already records the client's MAC authentication information, the client passes MAC authentication. The device allows the client to access network resources without performing portal authentication.
¡ If the RADIUS server does not record the client's MAC authentication information, the client fails MAC authentication. The device ignores the MAC authentication failure and performs portal authentication for the client. If the client passes portal authentication, it can access network resources. The MAC address of the portal authenticated client will be recorded as MAC authentication information on the RADIUS server.
Restrictions and guidelines
For 802.1X clients that use RSN to roam to a new AP, do not configure this feature.
Procedure
1. Enter system view.
system-view
2. Enter service template view.
wlan service-template service-template-name
3. Configure the device to ignore 802.1X or MAC authentication failures.
client-security ignore-authentication
By default, the device does not ignore the authentication failures for wireless clients that perform 802.1X authentication or perform RADIUS-based MAC authentication.
Configuring a WLAN Auth-Fail VLAN
About this task
The authenticator reauthenticates a client in the Auth-Fail VLAN at the interval of 30 seconds.
· If the client passes the reauthentication, the authenticator assigns the client to the authorization VLAN. If no authorization VLAN is configured, the client is assigned to the initial VLAN.
· If the client fails the reauthentication, the client is still in the Auth-Fail VLAN.
Procedure
1. Enter system view.
system-view
2. Enter service template view.
wlan service-template service-template-name
3. Configure a WLAN Auth-Fail VLAN.
client-security authentication fail-vlan vlan-id
By default, no WLAN Auth-Fail VLAN exists.
You can configure only one Auth-Fail VLAN for the service template.
Configuring a WLAN critical VLAN
1. Enter system view.
system-view
2. Enter service template view.
wlan service-template service-template-name
3. Configure a WLAN critical VLAN.
client-security authentication critical-vlan vlan-id
By default, no WLAN critical VLAN exists.
You can configure only one critical VLAN for the service template.
Ignoring authorization information from the server
About this task
You can configure the device to ignore the authorization information received from the server (local or remote) after a client passes 802.1X or MAC authentication. Authorization information includes VLAN, ACL, and user profile information.
Procedure
1. Enter system view.
system-view
2. Enter service template view.
wlan service-template service-template-name
3. Ignore the authorization information received from the authentication server.
client-security ignore-authorization
By default, authorization information received from the authentication server is used.
Enabling the authorization-fail-offline feature
About this task
The authorization-fail-offline feature logs off WLAN clients that have failed ACL or user profile authorization.
A client fails ACL or user profile authorization in the following situations:
· The device or server fails to authorize the specified ACL or user profile to the client.
· The authorized ACL or user profile does not exist.
Restrictions and guidelines
This feature does not apply to clients that have failed VLAN authorization. The device always logs off these clients.
Procedure
1. Enter system view.
system-view
2. Enter service template view.
wlan service-template service-template-name
3. Enable the authorization-fail-offline feature.
client-security authorization-fail offline
By default, this feature is disabled. The device does not log off clients that have failed ACL or user profile authorization, and it outputs system logs.
Configuring intrusion protection
About this task
This feature enables the device to take the predefined action on the BSS where an association request is received from a client that has failed authentication. For more information, see "Intrusion protection."
Procedure
1. Enter system view.
system-view
2. Enter service template view.
wlan service-template service-template-name
3. Enable the intrusion protection feature.
client-security intrusion-protection enable
By default, intrusion protection is disabled.
4. (Optional.) Configure the intrusion protection action.
client-security intrusion-protection action { service-stop | temporary-block | temporary-service-stop }
By default, temporary-block is used.
5. (Optional.) Set the blocking period for illegal clients.
client-security intrusion-protection timer temporary-block time
The default setting is 180 seconds.
6. (Optional.) Set the silence period during which the BSS remains disabled.
client-security intrusion-protection timer temporary-service-stop time
The default setting is 20 seconds.
Configuring the accounting-start trigger feature
About this task
The accounting-start trigger specifies the condition for the device to send a start-accounting request after a client passes 802.1X or MAC authentication.
The accounting-start trigger can be IP-based or non-IP-based.
· If you specify an IP-based accounting-start trigger, the device sends a start-accounting request if an 802.1X or MAC authenticated client uses an IP address of the specified type.
· If you specify the non-IP-based accounting-start trigger, the device sends a start-accounting request when a client passes authentication without examining its IP address type.
In conjunction with an IP-based accounting-start trigger, you can set an accounting delay timer. The accounting delay timer specifies the maximum interval for the device to learn the IP address of an 802.1X or MAC authenticated client before it takes the specified action.
The delay timer starts when a client passes 802.1X or MAC authentication. If the device has failed to learn an IP address that matches the IP-based accounting-start trigger before the accounting delay timer expires, the device takes either of the following actions:
· Sends a start-accounting request immediately if the no-ip-logoff action is not specified.
· Logs off the client if the no-ip-logoff action is specified.
If the delay timer is not set, the device sends a start-accounting request for a client only when the device learns the IP address of that client. For more information about accounting, see "Configuring AAA."
Restrictions and guidelines
If the trigger is IP address type based, you must enable learning IP addresses of that type. For information about wireless client IP address learning, see "Configuring WLAN IP snooping."
The trigger takes effect only on clients that come online after the trigger is configured.
Configure the accounting delay timer depending on the typical amount of time for the device to learn the IP address of a client. As a best practice, increase the delay timer on a low-performance network.
Procedure
1. Enter system view.
system-view
2. Enter service template view.
wlan service-template service-template-name
3. Configure the accounting-start trigger for clients.
client-security accounting-start trigger { ipv4 | ipv4-ipv6 [ separate ] | ipv6 | none }
By default, the accounting-start trigger is based on IPv4 address type.
4. (Optional.) Set the accounting delay timer.
client-security accounting-delay time time [ no-ip-logoff ]
By default, the device sends a start-accounting request for a client only when the device learns the IP address of that client.
Configuring the accounting-update trigger feature
About this task
Use this feature to specify an event-based accounting-update trigger. This feature enables the device to send an update-accounting request when the IP address of an online 802.1X or MAC authenticated client changes.
Restrictions and guidelines
Use accounting-update trigger in conjunction with the accounting-start trigger. The accounting-update trigger can take effect only if you have configured the accounting-start trigger by using the client-security accounting-start trigger command.
In addition to the event-based accounting-update trigger, you can set a regular accounting-update interval by using the timer realtime-accounting command.
The accounting-update trigger takes effect only on clients that come online after the trigger is configured.
Procedure
1. Enter system view.
system-view
2. Enter service template view.
wlan service-template service-template-name
3. Specify an event-based accounting-update trigger.
client-security accounting-update trigger { ipv4 | ipv4-ipv6 | ipv6 }
By default, no event-based accounting-update trigger is configured. The device sends update-accounting requests to the accounting server only regularly at server-assigned or user-defined real-time accounting intervals. For more information about the RADIUS real-time accounting interval, see "Configuring AAA."
Configuring the accounting-restart trigger feature
About this task
The IPv4 address-based accounting-restart trigger applies to 802.1X and MAC authentication clients.
This trigger restarts accounting for a client by sending a stop-accounting request and then a start-accounting request to the accounting server when the IPv4 address of the client changes.
The delay between the stop-accounting and start-accounting requests is configurable.
Restrictions and guidelines
The IPv4 address-based accounting-restart trigger has higher priority than the accounting-update trigger configured for IPv4 by using the client-security accounting-update trigger command.
Prerequisites
Before you can configure this feature in a service template, you must disable that service template.
Procedure
1. Enter system view.
system-view
2. Enter service template view.
wlan service-template service-template-name
3. Enable the IPv4 address-based accounting-restart trigger.
client-security accounting-restart trigger ipv4 [ delay interval ]
By default, the IPv4 address-based accounting-restart trigger is disabled.
Including the client IP snooping method in RADIUS packets
About this task
The device can obtain the IP address of a client by snooping packets such as DHCP and ARP packets. To help the RADIUS server determine whether the IP address of an 802.1X or MAC authentication client is assigned by a DHCP server, send the IP snooping method in RADIUS packets to the server.
The IP snooping method is encapsulated in the H3c-Ip-Source-Mod attribute (an extended RADIUS attribute with ID 221).
To identify the IP snooping method, the RADIUS server must support extended RADIUS attributes with a vendor ID of 25506. For more information, see "Configuring AAA."
Prerequisites
Before you can configure this feature in a service template, you must disable that service template.
Procedure
1. Enter system view.
system-view
2. Enter service template view.
wlan service-template service-template-name
3. Include the client IP snooping method in RADIUS packets.
client-security aaa attribute ip-snooping-method
By default, RADIUS packets do not include the client IP snooping method.
Enabling fast-connect for MAC authenticated intra-AC roaming clients
About this task
This feature allows a MAC authentication roaming client that has been authenticated once on the AC to come online from any APs attached to the AC without re-authentication.
Restrictions and guidelines
This feature applies only to MAC authentication wireless clients whose authentication location and association location are both on the AC.
This feature affects the displayed roaming state of inter-AC roaming clients that use MAC authentication and requires special configuration for them.
· If a client has roamed between ACs, its roaming state is N/A in the output from the display wlan client verbose command.
· If the inter-AC roaming clients belong to different VLANs, you must make sure the upstream ports of all the ACs in the same roaming group permit traffic from these VLANs to pass through.
Prerequisites
Before you can configure this feature in a service template, you must disable that service template.
Procedure
1. Enter system view.
system-view
2. Enter service template view.
wlan service-template service-template-name
3. Enable fast-connect for MAC authenticated intra-AC roaming clients.
mac-authentication fast-connect enable
By default, fast-connect is disabled for MAC authenticated intra-AC roaming clients.
Configuring a modifier to optimize WLAN authentication statistics
About WLAN authentication statistics optimization
The authentication success ratio is the ratio of the number of authentication success times to the total number of authentication times. The abnormal offline ratio is calculated by using the following formula: abnormal offline ratio = number of times that clients go offline abnormally ÷ (number of authentication success times + number of current online users).
WLAN authentication statistics optimization uses a modifier to adjust the authentication success ratio and abnormal offline ratio of 802.1X authentication, MAC authentication, and Layer 2 portal authentication.
Restrictions and guidelines
The modifier takes effect only on RADIUS-based 802.1X authentication, MAC authentication, and Layer 2 portal authentication.
Procedure
1. Enter system view.
system-view
2. Configure a modifier to adjust the authentication success ratio and abnormal offline ratio of 802.1X authentication, MAC authentication, and Layer 2 portal authentication.
wlan authentication optimization value
By default, the modifier is 0. The device does not adjust the authentication success ratio and abnormal offline ratio for 802.1X authentication, MAC authentication, and Layer 2 portal authentication.
Enabling the BYOD authorization trigger
About this task
This feature enables the access device to trigger BYOD authorization for an authenticated client after the device obtains that client's BYOD information, including its IP address. When BYOD authorization is triggered, the session-timeout timer assigned to the client restarts, extending the amount of time that the client can stay online before a reauthentication is required. On a low performance network, it might take so much time for the device to obtain the IP address of a client that the client's extended amount of online time becomes undesirable.
As a best practice to avoid this undesirable issue, use this feature only if BYOD authorization is required and make sure the network performance is good. For more information about BYOD authorization, see "Configuring AAA."
Prerequisites
Before you can configure this feature in a service template, you must disable that service template.
Procedure
1. Enter system view.
system-view
2. Enter service template view.
wlan service-template service-template-name
3. Enable the BYOD authorization trigger.
client-security authorization trigger byod
By default, the BYOD authorization trigger is disabled.
Configuring authentication fail-permit
About authentication fail-permit
Authentication fail-permit (also called fail-open) allows 802.1X, MAC authentication, and Bypass clients to access the network after the AC disconnects from the RADIUS server or the AP. When either event occurs, the AP continues to provide access services and forward traffic for those clients.
The impact of an authentication fail-permit event on clients differs depending on their authentication method and depending on whether a fail-permit service template has been configured.
· Bypass clients:
¡ If a fail-permit service template has been configured, the Bypass clients will be logged off. To access the network, the Bypass clients must manually reconnect to the SSID in the preconfigured fail-permit service template.
¡ If no fail-permit service template has been configured, the Bypass clients can continue to access the network with the existing service template without interruption.
· MAC authentication clients:
¡ If a fail-permit service template has been configured, the MAC authentication clients will be logged off. To access the network, the MAC authentication clients must manually reconnect to the SSID in the preconfigured fail-permit service template.
¡ If no fail-permit service template has been configured, the MAC authentication clients can continue to access the network with the existing service template after a transient interruption. In this situation, the clients will be logged off and then automatically connected to the network.
· The 802.1X clients will be logged off. To access the network, the 802.1X clients must manually reconnect to the SSID in a preconfigured fail-permit service template.
Authentication fail-permit tasks at a glance
To configure authentication fail-permit, perform the following tasks:
1. Enabling fail-permit for authentication clients
2. Specifying an authentication fail-permit service template
Enabling fail-permit for authentication clients
About this task
Perform this task to enable fail-permit in the service-template for the authentication clients.
Restrictions and guidelines
This feature is configurable when the service template is disabled, and it takes effect after the service template is enabled.
Prerequisites
For authentication fail-permit to take effect, perform the following steps:
1. Execute the radius-server test-profile command to configure a RADIUS test profile to test the reachability of the RADIUS server.
In the profile, set the interval for sending detection packets as needed. The shorter the interval is, the quicker the response to the change will be.
2. Apply the profile to the RADIUS server in the RADIUS scheme for the authentication ISP domain.
Fail-permit will occur when the RADIUS server is determined to be unreachable.
For more information about configuring RADIUS test profiles, see "Configuring AAA."
Procedure
1. Enter system view.
system-view
2. Enter service template view.
wlan service-template service-template-name
3. Enable fail-permit.
fail-permit enable [ keep-online ]
By default, fail-permit is disabled.
Specifying an authentication fail-permit service template
About this task
If you enable fail-permit in one service template, you can specify another service template as a fail-permit service template for that service template. The fail-permit service template ensures that the clients in the protected service template can reconnect to the network after the AC disconnects from the RADIUS server or the AP.
For more information about the authentication fail-permit feature, see "About authentication fail-permit."
Restrictions and guidelines
If you enable fail-permit in one service template that has 802.1X clients, you must specify another service template as a fail-permit service template for the 802.1X clients. This requirement is optional for other types of authentication clients.
The fail-permit template command is mutually exclusive with the fail-permit enable command in the same service template.
The fail-permit template command is configurable when the service template is disabled, and it takes effect after the service template is enabled.
To ensure a successful fail-permit for clients:
· Set the AKM mode to PSK or do not specify any AKM mode in the fail-permit service template.
· Enable APs to forward client data traffic in the fail-permit service template by using the client forwarding-location command.
· If APs are configured as the authenticator in a service template by using the client-security authentication-location command, the authenticator in the fail-permit service template of this service template must also be APs.
As a best practice, specify only one fail-permit service template for clients on an AP. If you configure multiple fail-permit service templates, only the one that is first bound to a radio on the AP will take effect.
Procedure
1. Enter system view.
system-view
2. Enter service template view.
wlan service-template service-template-name
3. Specify the service template as a fail-permit template.
fail-permit template
By default, no service template is specified as a fail-permit service template.
Configuring 5G radio silence fail-permit
About this task
This feature allows an AP to automatically move the clients of a service template on a 5G radio to a different radio for network access when radio silence is imposed on the former radio.
To enable automatic movement between radios for 5G clients:
1. Configure a 5G radio silence fail-permit service template for each 5G service template on a 5G radio.
2. Bind the fail-permit service template to a different radio.
When radio silence is imposed on the 5G radio of the protected template, the AP moves the clients of that template to the radio bound with the fail-permit service template.
Restrictions and guidelines
Specify one 5G silence fail-permit service template for each 5G service template on a 5G radio. These 5G silence fail-permit service templates must contain the same settings as their protected 5G service templates except that the protected 5G service templates cannot contain the fail-permit template command.
To ensure a successful fail-permit for clients:
· Enable APs to forward client data traffic in the fail-permit service template by using the client forwarding-location command.
· If APs are configured as the authenticator in a service template by using the client-security authentication-location command, the authenticator in the fail-permit service template of this service template must also be APs.
Procedure
1. Configure a fail-permit service template for protection of a 5G service template on a 5G radio:
a. Enter system view.
system-view
b. Create a service template and enter service template view.
wlan service-template service-template-name
c. Configure the service template with the same settings as the protected service template. (Details not shown.)
d. Specify the service template as a fail-permit template.
fail-permit template
By default, no service template is specified as a fail-permit service template.
2. Bind the new service template to a different radio than the protected template on the same AP. (Details not shown.)
Display and maintenance commands for WLAN authentication
Execute display commands in any view and reset commands in user view.
|
Task |
Command |
|
Display 802.1X session connection information, statistics, or configuration information. |
display dot1x [ sessions | statistics ] [ ap ap-name [ radio radio-id ] | interface interface-type interface-number ] |
|
Display online 802.1X client information. |
display dot1x connection [ ap ap-name [ radio radio-id ] | interface interface-type interface-number | user-mac mac-address | user-name name-string ] |
|
Display MAC authentication information. |
display mac-authentication [ ap ap-name [ radio radio-id ] | interface interface-type interface-number ] |
|
Display MAC authentication connections. |
display mac-authentication connection [ ap ap-name [ radio radio-id ] | interface interface-type interface-number | user-mac mac-address | user-name name-string ] |
|
Display blocked MAC address information. |
display wlan client-security block-mac [ ap ap-name [ radio radio-id ] ] |
|
Display RADIUS accounting packet statistics about wireless clients. |
display wlan statistics accounting |
|
Clear 802.1X statistics. |
reset dot1x statistics [ ap ap-name [ radio radio-id ] | interface interface-type interface-number ] |
|
Clear MAC authentication statistics. |
reset mac-authentication statistics [ ap ap-name [ radio radio-id ] | interface interface-type interface-number ] |
|
|
NOTE: For more information about the display dot1x connection, display dot1x, and reset dot1x statistics commands, see 802.1X commands in User Access and Authentication Command Reference. For more information about the display mac-authentication connection, display mac-authentication, and reset mac-authentication statistics commands, see MAC authentication commands in User Access and Authentication Command Reference. |
WLAN authentication configuration examples
Example: Configuring 802.1X CHAP local authentication
Network configuration
As shown in Figure 3, configure the AC to use CHAP to perform 802.1X local authentication for the client.

Procedure
This example provides only basic AAA settings, including local users. For more information about AAA commands, see User Access and Authentication Command Reference.
1. Configure 802.1X and the local client:
# Configure the AC to perform EAP termination and use CHAP.
[AC] dot1x authentication-method chap
# Add a local network access user with username chap1 and password 123456TESTplat&! in plain text.
[AC] local-user chap1 class network
[AC-luser-network-chap1] password simple 123456TESTplat&!
# Set the service type to lan-access.
[AC-luser-network-chap1] service-type lan-access
[AC-luser-network-chap1] quit
2. Configure AAA methods for the ISP domain:
# Create an ISP domain named local.
[AC] domain local
# Configure the ISP domain to use local authentication, local authorization, and local accounting for LAN clients.
[AC-isp-local] authentication lan-access local
[AC-isp-local] authorization lan-access local
[AC-isp-local] accounting lan-access local
[AC-isp-local] quit
3. Configure a service template:
# Create a service template named wlas_local_chap.
[AC] wlan service-template wlas_local_chap
# Set the authentication mode to 802.1X.
[AC-wlan-st-wlas_local_chap] client-security authentication-mode dot1x
# Specify ISP domain local for the service template.
[AC-wlan-st-wlas_local_chap] dot1x domain local
# Set the SSID to wlas_local_chap.
[AC-wlan-st-wlas_local_chap] ssid wlas_local_chap
# Enable the service template.
[AC-wlan-st-wlas_local_chap] service-template enable
[AC-wlan-st-wlas_local_chap] quit
4. Configure manual AP ap1, and bind the service template to the AP radio:
# Create ap1, and specify the AP model and serial ID.
[AC] wlan ap ap1 model WA6330
[AC-wlan-ap-ap1] serial-id 219801A28N819CE0002T
# Configure channel 149 as the working channel for radio 1 of the AP, and enable radio 1.
[AC-wlan-ap-ap1-radio-1] channel 149
[AC-wlan-ap-ap1-radio-1] radio enable
# Bind service template wlas_local_chap to radio 1.
[AC-wlan-ap-ap1-radio-1] service-template wlas_local_chap
[AC-wlan-ap-ap1-radio-1] quit
[AC-wlan-ap-ap1] quit
Verifying the configuration
# Verify the 802.1X configuration.
[AC] display wlan service-template
[AC] display dot1x
# Display the client connection information after an 802.1X client passes authentication.
[AC] display dot1x connection
Example: Configuring 802.1X EAP-PEAP RADIUS authentication
Network configuration
As shown in Figure 4, configure the AC to perform 802.1X RADIUS authentication for the client by using EAP-PEAP.

Procedure
This example provides only basic AAA settings, including RADIUS. For more information about AAA commands, see User Access and Authentication Command Reference.
a. Configure 802.1X and the RADIUS scheme:
# Configure the AC to use EAP relay to authenticate 802.1X clients.
[AC] dot1x authentication-method eap
# Create a RADIUS scheme.
[AC] radius scheme imcc
# Specify the primary authentication server and the primary accounting server.
[AC-radius-imcc] primary authentication 10.18.1.88 1812
[AC-radius-imcc] primary accounting 10.18.1.88 1813
# Set the shared key for secure communication with the server to 12345678 in plain text.
[AC-radius-imcc] key authentication simple 12345678
[AC-radius-imcc] key accounting simple 12345678
# Exclude domain names in the usernames sent to the RADIUS server.
[AC-radius-imcc] user-name-format without-domain
[AC-radius-imcc] quit
b. Configure AAA methods for the ISP domain:
# Create an ISP domain named imc.
[AC] domain imc
# Configure the ISP domain to use RADIUS scheme imcc for authentication, authorization, and accounting of LAN clients.
[AC-isp-imc] authentication lan-access radius-scheme imcc
[AC-isp-imc] authorization lan-access radius-scheme imcc
[AC-isp-imc] accounting lan-access radius-scheme imcc
[AC-isp-imc] quit
c. Configure a service template:
# Create a service template named wlas_imc_peap.
[AC] wlan service-template wlas_imc_peap
# Set the authentication mode to 802.1X.
[AC-wlan-st-wlas_imc_peap] client-security authentication-mode dot1x
# Specify ISP domain imc for the service template.
[AC-wlan-st-wlas_imc_peap] dot1x domain imc
# Set the SSID to wlas_imc_peap.
[AC-wlan-st-wlas_imc_peap] ssid wlas_imc_peap
# Set the AKM mode to 802.1X.
[AC-wlan-st-wlas_imc_peap] akm mode dot1x
# Set the CCMP cipher suite.
[AC-wlan-st-wlas_imc_peap] cipher-suite ccmp
# Enable the RSN-IE in the beacon and probe responses.
[AC-wlan-st-wlas_imc_peap] security-ie rsn
# Enable the service template.
[AC-wlan-st-wlas_imc_peap] service-template enable
[AC-wlan-st-wlas_imc_peap] quit
d. Configure manual AP ap1, and bind the service template to an AP radio:
# Create ap1, and specify the AP model and serial ID.
[AC] wlan ap ap1 model WA6330
[AC-wlan-ap-ap1] serial-id 219801A28N819CE0002T
# Configure channel 149 as the working channel for radio 1 of the AP, and enable radio 1.
[AC-wlan-ap-ap1] radio 1
[AC-wlan-ap-ap1-radio-1] channel 149
[AC-wlan-ap-ap1-radio-1] radio enable
# Bind service template wlas_imc_peap to radio 1.
[AC-wlan-ap-ap1-radio-1] service-template wlas_imc_peap
[AC-wlan-ap-ap1-radio-1] quit
[AC-wlan-ap-ap1] quit
2. Configure the RADIUS server:
In this example, the RADIUS server runs IMC PLAT 7.1 and IMC UAM 7.1, and the EAP-PEAP certificate has been installed.
# Add an access device:
a. Click the User tab.
b. From the navigation tree, select User Access Policy > Access Device Management > Access Device.
c. Click Add.
The Add Access Device page appears.
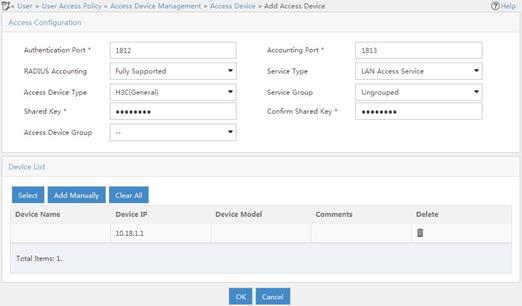
d. In the Access Configuration area, configure the following parameters, as shown in Figure 5:
- Enter 12345678 in the Shared Key and Confirm Shared Key fields.
- Use the default values for other parameters.
e. In the Device List area, click Select or Add Manually to add the device at 10.18.1.1 as an access device.
f. Click OK.
Figure 5 Adding an access device
# Add an access policy:
a. Click the User tab.
b. From the navigation tree, select User Access Policy > Access Policy.
c. Click Add.
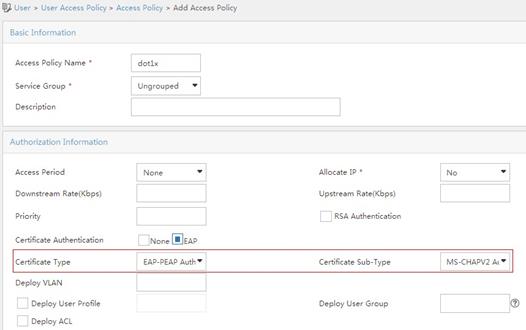
d. On the Add Access Policy page, configure the following parameters, as shown in Figure 6:
- Enter dot1x in the Access Policy Name field.
- Select EAP for the Certificate Authentication field.
- Select EAP-PEAP Auth from the Certificate Type list, and select MS-CHAPV2 Auth from the Certificate Sub-Type list.
The certificate sub-type on the IMC server must be the same as the identity authentication method configured on the client.
e. Click OK.
Figure 6 Adding an access policy
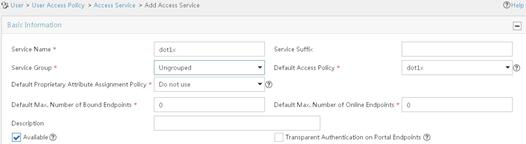
# Add an access service:
a. Click the User tab.
b. From the navigation tree, select User Access Policy > Access Service.
c. Click Add.
d. On the Add Access Service page, configure the following parameters, as shown in Figure 7:
- Enter dot1x in the Service Name field.
- Select dot1x from the Default Access Policy list.
e. Click OK.
Figure 7 Adding an access service
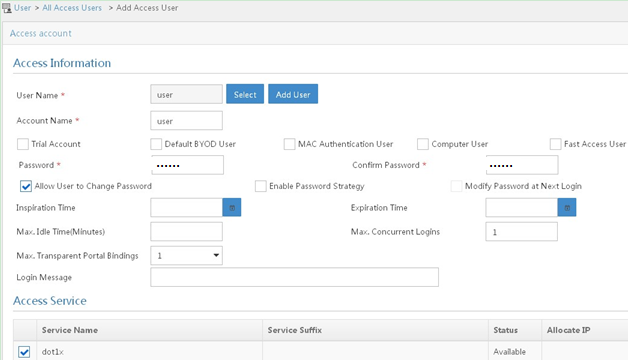
# Add an access user:
a. Click the User tab.
b. From the navigation tree, select Access User > All Access Users.
The access user list appears.
c. Click Add.
The Add Access User page appears.
d. In the Access Information area, configure the following parameters, as shown in Figure 8:
- Click Select or Add User to associate the user with IMC Platform user user.
- Enter user in the Account Name field.
- Enter dot1x in the Password and Confirm Password fields.
e. In the Access Service area, select dot1x from the list.
f. Click OK.
Figure 8 Adding an access user account
3. Configure the WLAN client:
The WLAN client has been installed with the EAP-PEAP certificate.
To configure the WLAN client, perform the following tasks (details not shown):
¡ Select PEAP for identity authentication.
¡ Disable the client from verifying the server certificate.
¡ Disable the client from automatically using the Windows login name and password.
Verifying the configuration
1. On the client, verify that you can use username user and password dot1x to access the network. (Details not shown.)
2. On the AC, perform the following tasks to verify that the user has passed authentication and come online:
# Display online 802.1X client information.
[AC] display dot1x connection
User MAC address : 0023-8933-2090
AP name : ap1
Radio ID : 1
SSID : wlas_imc_peap
BSSID : 000f-e201-0003
User name : user
Authentication domain : imc
Authentication method : EAP
Initial VLAN : 1
Authorization VLAN : N/A
Authorization ACL number : N/A
Authorization user profile : N/A
Authorization CAR :N/A
Authorization URL : http://oauth.h3c.com
Termination action : Default
Session timeout period : 6001 s
Online from : 2014/04/18 09:25:18
Online duration : 0h 1m 1s
Total connections: 1.
# Display WLAN client information.
[AC] display wlan client
Total number of clients : 1
MAC address Username AP name R IP address VLAN
0023-8933-2090 user ap1 1 10.18.1.100 1
Example: Configuring RADIUS-based MAC authentication
Network configuration
As shown in Figure 9, configure the AC to use the RADIUS server to perform MAC authentication for the client.
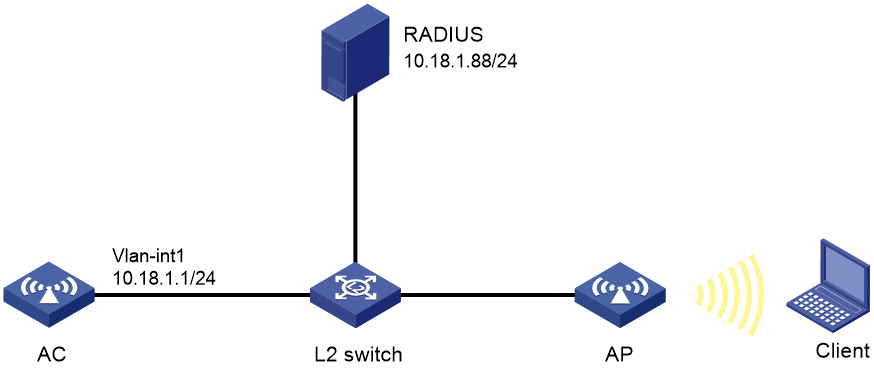
Procedure
Make sure the RADIUS server, AC, AP, and client can reach each other. (Details not shown.)
1. Configure the AC:
a. Configure the RADIUS scheme:
# Create a RADIUS scheme.
<AC> system-view
[AC] radius scheme imcc
# Specify the primary authentication server and the primary accounting server.
[AC-radius-imcc] primary authentication 10.18.1.88 1812
[AC-radius-imcc] primary accounting 10.18.1.88 1813
# Set the shared key for secure communication with the server to 12345678 in plain text.
[AC-radius-imcc] key authentication simple 12345678
[AC-radius-imcc] key accounting simple 12345678
# Exclude domain names in the usernames sent to the RADIUS server.
[AC-radius-imcc] user-name-format without-domain
[AC-radius-imcc] quit
b. Configure AAA methods for the ISP domain:
# Create an ISP domain named imc.
[AC] domain imc
# Configure the ISP domain to use RADIUS scheme imcc for authentication, authorization, and accounting of LAN clients.
[AC-isp-imc] authentication lan-access radius-scheme imcc
[AC-isp-imc] authorization lan-access radius-scheme imcc
[AC-isp-imc] accounting lan-access radius-scheme imcc
[AC-isp-imc] quit
c. Specify username 123 and password aaa_maca in plain text for the account shared by MAC authentication clients.
[AC] mac-authentication user-name-format fixed account 123 password simple aaa_maca
d. Configure a service template:
# Create a service template named maca_imc.
[AC] wlan service-template maca_imc
# Set the SSID to maca_imc.
[AC-wlan-st-maca_imc] ssid maca_imc
# Set the authentication mode to MAC authentication.
[AC-wlan-st-maca_imc] client-security authentication-mode mac
# Specify ISP domain imc for the service template.
[AC-wlan-st-maca_imc] mac-authentication domain imc
# Enable the service template.
[AC-wlan-st-maca_imc] service-template enable
[AC-wlan-st-maca_imc] quit
e. Configure manual AP ap1, and bind the service template to an AP radio:
# Create a manual AP named ap1, and specify the AP model and serial ID.
[AC] wlan ap ap1 model WA6330
[AC-wlan-ap-ap1] serial-id 219801A28N819CE0002T
# Configure channel 149 as the working channel for radio 1 of the AP, and enable radio 1.
[AC-wlan-ap-ap1] radio 1
[AC-wlan-ap-ap1-radio-1] channel 149
[AC-wlan-ap-ap1-radio-1] radio enable
# Bind service template maca_imc to radio 1.
[AC-wlan-ap-ap1-radio-1] service-template maca_imc
[AC-wlan-ap-ap1-radio-1] quit
[AC-wlan-ap-ap1] quit
2. Configure the RADIUS server:
In this example, the RADIUS server runs IMC PLAT 7.1 and IMC UAM 7.1.
# Add an access device:
a. Click the User tab.
b. From the navigation tree, select User Access Policy > Access Device Management > Access Device.
c. Click Add.
The Add Access Device page appears.
d. In the Access Configuration area, configure the following parameters, as shown in Figure 10:
- Enter 12345678 in the Shared Key and Confirm Shared Key fields.
- Use the default values for other parameters.
e. In the Device List area, click Select or Add Manually to add the device at 10.18.1.1 as an access device.
f. Click OK.
Figure 10 Adding an access device

# Add an access policy:
a. Click the User tab.
b. From the navigation tree, select User Access Policy > Access Policy.
c. Click Add.
d. On the Add Access Policy page, configure the following parameters, as shown in Figure 11:
- Enter aaa_maca in the Access Policy Name field.
- Use the default values for other parameters.
e. Click OK.
Figure 11 Adding an access policy
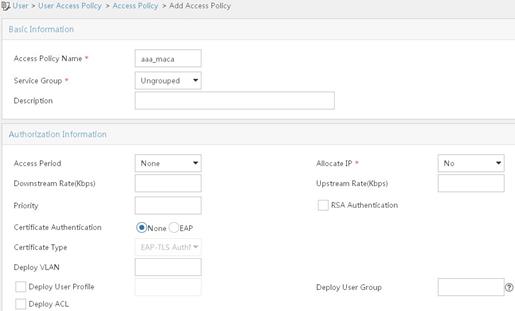
# Add an access service:
a. Click the User tab.
b. From the navigation tree, select User Access Policy > Access Service.
c. Click Add.
d. On the Add Access Service page, configure the following parameters, as shown in Figure 12:
- Enter aaa_maca in the Service Name field.
- Select aaa_maca from the Default Access Policy list.
e. Click OK.
Figure 12 Adding an access service
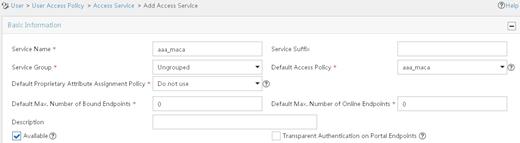
# Add an access user:
a. Click the User tab.
b. From the navigation tree, select Access User > All Access Users.
The access user list appears.
c. Click Add.
The Add Access User page appears.
d. In the Access Information area, configure the following parameters, as shown in Figure 13:
- Click Select or Add User to associate the user with IMC Platform user 123.
- Enter 123 in the Account Name field.
- Enter aaa_maca in the Password and Confirm Password fields.
e. In the Access Service area, select aaa_maca from the list.
f. Click OK.
Figure 13 Adding an access user account
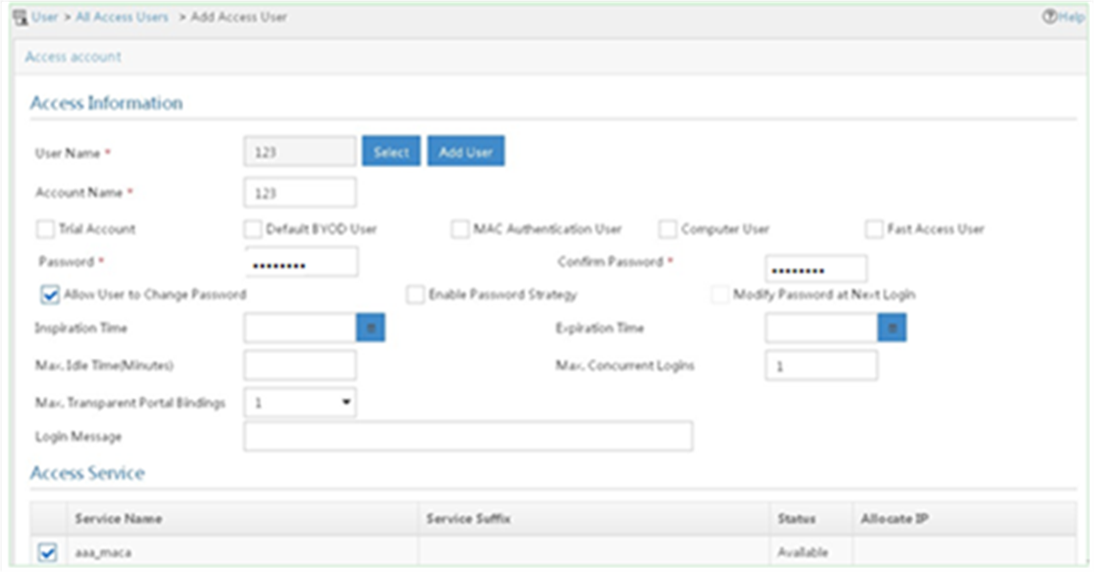
Verifying the configuration
1. On the client, verify that you can use username 123 and password aaa_maca to access the network. (Details not shown.)
2. On the AC, perform the following tasks to verify that the user has passed authentication and come online:
# Display online MAC authentication client information.
[AC] display mac-authentication connection
User MAC address : 0023-8933-2098
AP name : ap1
Radio ID : 1
SSID : maca_imc
BSSID : 000f-e201-0001
User name : 123
Authentication domain : imc
Initial VLAN : 1
Authorization VLAN : N/A
Authorization ACL number : N/A
Authorization user profile : N/A
Authorization CAR :N/A
Authorization URL : http://oauth.h3c.com
Termination action : Default
Session timeout period : 6001 s
Online from : 2014/04/17 17:21:12
Online duration : 0h 0m 30s
Total connections: 1.
# Display WLAN client information.
[AC] display wlan client
Total number of clients : 1
MAC address Username AP name R IP address VLAN
0023-8933-2098 123 ap1 1 10.18.1.100 1