- Table of Contents
-
- 01-Fundamentals Configuration Guide
- 00-Preface
- 01-CLI configuration
- 02-RBAC configuration
- 03-Login management configuration
- 04-FTP and TFTP configuration
- 05-File system management configuration
- 06-Configuration file management configuration
- 07-Software upgrade configuration
- 08-ISSU configuration
- 09-Emergency shell configuration
- 10-Automatic configuration
- 11-Preprovisioning feature configuration
- 12-Device management configuration
- 13-Tcl configuration
- 14-Python configuration
- 15-License management
- Related Documents
-
| Title | Size | Download |
|---|---|---|
| 08-ISSU configuration | 229.87 KB |
Restrictions: Hardware compatibility with ISSU
Restrictions and guidelines: ISSU
Logging in to the device through the console port
Identifying availability of ISSU and licensing requirements
Verifying the device operating status
Verifying the device configuration
Determining the upgrade procedure
Adjusting and saving the running configuration
Performing an ISSU in one step
Performing an ISSU step by step by using issu commands
Performing a compatible upgrade on a multichassis IRF fabric
Performing an incompatible upgrade on a multichassis IRF fabric
Performing an incremental upgrade on a single-chassis IRF fabric
Performing a reboot or incompatible upgrade on a single-chassis IRF fabric
Performing an ISSU by using install commands
Installing and upgrading software images
Rolling back the running software images
Aborting a software activate or deactivate operation
Deleting inactive software images
Terminating the ongoing ISSU process forcibly
Display and maintenance commands for ISSU
Examples of using issu commands for ISSU
Example: Upgrading a feature to a compatible version
Example: Upgrading a feature to an incompatible version
Example: Rolling back a feature
Examples of using install commands for ISSU
Example: Rolling back a feature
Performing an ISSU
About ISSU
The In-Service Software Upgrade (ISSU) feature upgrades the Comware software with a minimum amount of downtime.
Unless otherwise stated, the term "upgrade" refers to both software upgrade and downgrade in ISSU.
ISSU advantages
The Comware software includes the boot image, the system image, and feature images. ISSU supports upgrading the images individually.
When you use ISSU to upgrade a feature, only the related feature images are affected. Other features can continue to provide services.
ISSU supports installing patch images to fix system bugs without a system reboot.
ISSU methods
ISSU methods are determined at software release depending on the compatibility between software versions.
ISSU supports the following upgrade types:
· Compatible upgrade—The new software version is compatible with the running software version. This upgrade type supports the ISSU methods in Table 1.
· Incompatible upgrade—The new software version is incompatible with the running software version. The two versions cannot run concurrently.
This upgrade type supports only one upgrade method (also called incompatible upgrade). This method requires a cold reboot to upgrade both control and data planes. Incompatible upgrade disrupts service if hardware redundancy is not available.
For information about identifying the ISSU method, see "Identifying the ISSU methods."
Table 1 ISSU methods for compatible upgrade
|
ISSU method |
Description |
|
Incremental upgrade: · Service Upgrade · File Upgrade |
Upgrades only user mode processes that have differences between the new and old software versions. Backup processes and a main/backup process switchover are required for service continuity. · Service upgrade—Upgrades service features. The upgrade does not affect the operation of the features that are not being upgraded. · File upgrade—Upgrades hidden system program files. The system can provide services during the upgrade. |
|
Reboot |
The Reboot method disrupts service if hardware redundancy is not available. As a best practice, schedule the downtime carefully to minimize the upgrade impact on the services. Reboots member devices to complete the software upgrade. While one member device is rebooting, the other member devices can provide services. |
ISSU commands
ISSU includes the install and issu command sets. After you identify the recommended ISSU method, use Table 2 to choose the command set you want to use.
You can use the issu one-step command to perform an ISSU in one step, or use other ISSU commands to perform an ISSU step by step.
· During a one-step ISSU, you cannot perform a rollback.
· During a multi-step ISSU, you can display the device status, abort the ISSU, or perform a rollback.
Table 2 Command set comparison
|
Item |
issu commands |
install commands |
|
Upgrade types |
· Compatible. · Incompatible. |
Compatible. |
|
Impact on the system |
Large. |
Small. |
|
Technical skill requirements |
Low. As a best practice, use this command set. |
High. Administrators must have extensive system knowledge and understand the impact of each upgrade task on the network. |
|
One-step ISSU |
Supported. |
Not supported. |
|
Step-by-step ISSU |
Supported. |
Supported. |
Restrictions: Hardware compatibility with ISSU
Because of memory limitations, S6800 switches labeled with the following product codes cannot run R27XX or later correctly:
· LS-6800-54QF.
· LS-6800-54QF-H1.
· LS-6800-54QT.
· LS-6800-54QT-H1.
Use R26XX or earlier on these switches.
You cannot use ISSU to upgrade software for PEXs in an IRF 3.1 fabric. For information about software upgrade methods, see "Upgrading software."
Restrictions and guidelines: ISSU
|
|
IMPORTANT: · For a successful ISSU, you must remove all commands that the new version does not support and save the running configuration. To identify the feature changes between the current version and the new version, read the release notes for the device. · To ensure correct system operation, you must remove the commands configured for features to be uninstalled and save the running configuration before uninstalling the features. |
During an ISSU, follow these restrictions and guidelines:
· Do not perform any of the following tasks:
¡ Reboot member devices.
¡ Perform tasks that are irrelevant to the ISSU, such as modifying the configuration and displaying information.
¡ Modify, delete, or rename image files.
· You cannot use both install and issu commands for the same ISSU.
· For better service continuity, strictly follow the recommended ISSU procedure unless you are performing an ISSU in one step. Make sure a step is completed before you proceed to the next step.
· Before executing the following commands, use the display system stable state command to verify that the system is stable:
¡ issu commands—issu one-step, issu load, issu run switchover, and issu commit.
¡ install commands—install activate and install deactivate.
If the System State field displays Stable, the system is stable.
· You may use issu commands to upgrade all or some of the software images. If you are upgrading only some of the images, make sure the new images are compatible with the images that are not to be upgraded. The upgrade will fail if a conflict exists.
· You can install up to 32 .bin files on the device, including one boot image file, one system image file, and up to 30 feature and patch image files.
· A patch image file can be incremental or non-incremental. You can install up to 30 incremental patch image files by using a single command. Because each boot, system, or feature image can have one non-incremental patch image file, you can install up to 16 non-incremental patch image files by using a single command. For more information about incremental and non-incremental patch image files, see "Upgrading software."
· In an IRF deployment, use the irf link-delay to set the IRF link down report delay to 0. For more information about this command, see IRF commands in Virtual Technologies Command Reference.
· In a VCFC deployment, make sure the VCFC will not deploy configurations to the device during the upgrade or disconnect the device from the VCFC before the upgrade.
After an ISSU, you must log in to the device again before you can use the changed or added commands.
Prerequisites for ISSU
To perform a successful ISSU, make sure all the preparation requirements are met.
Logging in to the device through the console port
Log in to the device through the console port. If you use Telnet or SSH, you might be disconnected from the device before the ISSU is completed.
In a multiuser environment, make sure no other administrators access the device while you are performing the ISSU.
Identifying availability of ISSU and licensing requirements
Read the software release notes to identify the following items:
· Support of the device for ISSU between the current software version and the new software version.
· Licensing requirements for the upgrade software images. If the upgrade software images require licenses, make sure the device has the required licenses. For more information about license installation, see "Managing licenses."
Verifying the device operating status
Use the display device command to verify that all components are operating correctly.
Preparing the upgrade images
1. Use the dir command to verify that every file system has sufficient free storage space for the upgrade images. If the storage space is not sufficient, delete unused files by using the delete /unreserved file-url command. If the files to be deleted will be used, back up the files before deleting them. You will be unable to restore a deleted file if the /unreserved keyword is used. For more information, see "Managing file systems."
2. Use FTP or TFTP to transfer upgrade image files (in .bin or .ipe) to the root directory of a file system on the master device.
Identifying the ISSU methods
1. Execute the display version comp-matrix file command to identify the recommended ISSU methods.
¡ For a compatible upgrade, check the Upgrade Way field to identify the recommended ISSU methods.
¡ For an incompatible upgrade, check the end of command output for the Incompatible upgrade string.
For more information about ISSU methods, see Table 1.
Verifying the device configuration
For a successful ISSU reboot or incompatible upgrade and the IRF fabric integrity during the ISSU, a set of features must have the same configuration as expected after the upgrade. The following are the features and the commands for you to change and verify feature settings:
· System operating mode.
system-working-mode
display system-working-mode
· Hardware resource operating mode.
hardware-resource tcam
display hardware-resource tcam
· Maximum number of ECMP routes.
max-ecmp-num
display max-ecmp-num
· IPv4 enhanced ECMP mode.
ecmp mode enhanced
display ecmp mode
· Support for IPv6 routes with prefixes longer than 64 bits.
hardware-resource routing-mode ipv6-128
display hardware-resource routing-mode
· Packet loss prevention for OpenFlow forwarding.
openflow lossless enable
display current-configuration
· VXLAN hardware resource mode.
hardware-resource vxlan
display hardware-resource vxlan
For more information about system operating mode and hardware resource operating mode, see device management in Fundamentals Configuration Guide.
For more information about ECMP routes, IPv6 routes with prefixes longer than 64 bits, and IPv4 enhanced ECMP mode, see basic IP routing configuration in Layer 3—IP Routing Configuration Guide.
For more information about packet loss prevention for OpenFlow forwarding, see OpenFlow Configuration Guide.
For more information about VXLAN hardware resource mode, see VXLAN Configuration Guide.
Verifying feature status
For service continuity during an ISSU, configure the following feature settings:
|
Feature |
Setting requirements |
|
GR and NSR |
Enable GR or NSR for protocols including LDP, RSVP, OSPF, ISIS, BGP, and FSPF. |
|
BFD |
Disable BFD for protocols including LDP, RSVP, OSPF, ISIS, RIP, BGP, VRRP, and NQA. |
|
Ethernet link aggregation |
Use the long LACP timeout interval (the lacp period short command is not configured) on all member ports in dynamic aggregation groups. |
|
IRF |
Before performing an incompatible upgrade for the IRF fabric, verify that IRF MAD is disabled. To use IRF MAD, enable IRF MAD after finishing the upgrade. Configure IRF bridge MAC persistence as follows: · Compatible upgrade—Configure the irf mac-address persistent timer or irf mac-address persistent always command. · Incompatible upgrade—Configure the irf mac-address persistent always command if the bridge MAC address is the MAC address of the device for which you want to execute the issu load command. |
Determining the upgrade procedure
1. Use Table 2 to choose an upgrade command set, depending on the ISSU method.
2. Identify the hardware redundancy condition.
ISSU can maintain service continuity only when the following conditions are met:
¡ The IRF fabric has multiple members and uses the ring topology.
|
|
IMPORTANT: If hardware redundancy is not available, service discontinuity is not avoidable during a reboot upgrade or an incompatible upgrade. Make sure you understand the impact of the upgrade on the network. |
3. Perform one of the following tasks:
¡ Choose one-step ISSU to start and finish an ISSU by using a single command, as described in "Performing an ISSU in one step."
¡ Choose the correct procedure from the procedures described in "Performing an ISSU step by step by using issu commands" or "Performing an ISSU by using install commands."
Adjusting and saving the running configuration
1. Remove all commands that the new software version does not support from the running configuration. To identify all feature changes between the current version and the new version, read the release notes for the device.
2. To uninstall a feature image, remove the commands configured for the feature.
3. Use the save command to save the running configuration.
Performing an ISSU in one step
Restrictions and guidelines
During a one-step upgrade, you cannot perform a rollback or any other tasks.
If the IRF fabric has multiple member devices, follow these guidelines:
· Make sure both the current software version and the new software version support one-step ISSU.
· For a compatible upgrade, specify one subordinate member for the command. The member device will become the master device after the ISSU.
· For an incompatible upgrade, specify one or more subordinate members for the command. If you specify one subordinate member, the member will become the master device after the ISSU. If you specify multiple subordinate members, the system automatically selects one of the subordinate members as the master device after the ISSU. As a best practice on a ring-topology IRF fabric, specify half of the subordinate members for the command. Make sure the specified subordinate members are directly connected by physical links.
Procedure
To perform an ISSU in one step, execute one of the following commands in user view:
· Use .bin files:
issu one-step file { boot filename | system filename | feature filename&<1-30> | patch filename&<1-30> } * [ slot slot-number&<1-9> ] [ reboot ]
· Use an .ipe file:
issu one-step file ipe ipe-filename [ patch filename&<1-30> ] slot slot-number&<1-9> [ reboot ]
Performing an ISSU step by step by using issu commands
Performing a compatible upgrade on a multichassis IRF fabric
Restrictions and guidelines
Upgrade a subordinate member device first. Then, upgrade the remaining member devices, including the original master.
Procedure
1. (Optional.) Configure automatic rollback:
a. Enter system view.
system-view
b. Set the automatic rollback timer.
issu rollback-timer minutes
By default, the automatic rollback timer is set to 45 minutes.
The automatic rollback timer starts when you execute the issu run switchover command.
c. Return to user view.
quit
2. Verify that the system is stable.
display system stable state
The system is stable if the System State field displays Stable. For a successful ISSU, you must make sure the system is stable before you proceed to the next step.
3. Load the upgrade images as startup images on a subordinate member.
¡ Use .bin files:
issu load file { boot filename | system filename | feature filename&<1-30> | patch filename&<1-30> } * slot slot-number&<1-9> [ reboot ]
¡ Use an .ipe file:
issu load file ipe ipe-filename [ patch filename&<1-30> ] slot slot-number&<1-9> [ reboot ]
4. Verify that the system is stable.
display system stable state
The system is stable if the System State field displays Stable. For a successful ISSU, you must make sure the system is stable before you proceed to the next step. If the system reported an error in the previous step, verify that the system is stable and then use the issu rollback command to roll back the upgrade.
5. Perform an ISSU switchover.
issu run switchover
This command also starts the automatic rollback timer. When the timer expires, the system automatically rolls back to the original software images.
6. (Optional.) Accept the upgrade and delete the automatic rollback timer.
issu accept
Execute this command before the automatic rollback timer expires.
7. Verify that the system is stable.
display system stable state
The system is stable if the System State field displays Stable. For a successful ISSU, you must make sure the system is stable before you proceed to the next step. If the system reported an error in the previous two steps, verify that the system is stable and then use the issu rollback command to roll back the upgrade.
8. Upgrade the remaining members to complete the ISSU.
issu commit slot slot-number
Execute this command before the automatic rollback timer expires. After using this command for one member, wait for the member to restart and join the IRF fabric. Then, repeat the previous step and this step to upgrade the remaining member devices one by one, including the original master.
9. Verify that the ISSU is finished.
display issu state
If the ISSU state field displays Init, the ISSU is finished.
Performing an incompatible upgrade on a multichassis IRF fabric
Restrictions and guidelines
Upgrade one or more subordinate member devices first. Then, upgrade the remaining member devices, including the original master.
Procedure
To perform an incompatible upgrade on a multichassis IRF fabric, execute the following commands in user view:
1. Verify that the system is stable.
display system stable state
The system is stable if the System State field displays Stable. For a successful ISSU, you must make sure the system is stable before you proceed to the next step.
2. Load the upgrade images as startup images on subordinate members.
¡ Use .bin files:
issu load file { boot filename | system filename | feature filename&<1-30> | patch filename&<1-30> } * slot slot-number&<1-9> [ reboot ]
¡ Use an .ipe file:
issu load file ipe ipe-filename [ patch filename&<1-30> ] slot slot-number&<1-9> [ reboot ]
As a best practice on a ring-topology IRF fabric, specify half of the subordinate members for this command to reduce service interruption. Make sure the specified subordinate members are physically connected.
3. Verify that the system is stable.
display system stable state
The system is stable if the System State field displays Stable. For a successful ISSU, you must make sure the system is stable before you proceed to the next step. If the system reported an error in the previous step, verify that the system is stable and then use the issu rollback command to roll back the upgrade.
4. Perform an ISSU switchover to complete the ISSU process.
issu run switchover
This command upgrades the remaining members.
5. Verify that the ISSU is finished.
display issu state
If the ISSU state field displays Init, the ISSU is finished.
Performing an incremental upgrade on a single-chassis IRF fabric
To perform an incremental upgrade on a single-chassis IRF fabric, execute the following commands in user view:
1. Verify that the system is stable.
display system stable state
The system is stable if the System State field displays Stable. For a successful ISSU, you must make sure the system is stable before you proceed to the next step.
2. Load the upgrade images as startup images.
¡ Use .bin files:
issu load file { boot filename | system filename | feature filename&<1-30> | patch filename&<1-30> } * slot slot-number [ reboot ]
¡ Use an .ipe file:
issu load file ipe ipe-filename [ patch filename&<1-30> ] slot slot-number [ reboot ]
3. Verify that the system is stable.
display system stable state
The system is stable if the System State field displays Stable. For a successful ISSU, you must make sure the system is stable before you proceed to the next step. If the system reported an error in the previous step, verify that the system is stable and then use the issu rollback command to roll back the upgrade.
4. Complete the ISSU process.
issu commit slot slot-number
5. Verify that the ISSU is finished.
display issu state
If the ISSU state field displays Init, the ISSU is finished.
Performing a reboot or incompatible upgrade on a single-chassis IRF fabric
1. Verify that the system is stable.
display system stable state
The system is stable if the System State field displays Stable. For a successful ISSU, you must make sure the system is stable before you proceed to the next step.
2. Load the parent device's upgrade images as startup images on subordinate members.
¡ Use .bin files:
issu load file { boot filename | system filename | feature filename&<1-30> | patch filename&<1-30> } * slot slot-number [ reboot ]
¡ Use an .ipe file:
issu load file ipe ipe-filename [ patch filename&<1-30> ] slot slot-number [ reboot ]
3. Verify that the ISSU is finished.
display issu state
If the ISSU state field displays Init, the ISSU is finished.
Performing an ISSU by using install commands
ISSU tasks at a glance
1. (Optional.) Decompressing an .ipe file
2. Installing and upgrading software images
3. (Optional.) Deactivating software images
4. (Optional.) Rolling back the running software images
5. (Optional.) Aborting a software activate or deactivate operation
6. (Optional.) Verifying software images
7. Committing software changes
8. (Optional.) Deleting inactive software images
Decompressing an .ipe file
1. (Optional.) Identify images that are included in the .ipe file.
display install ipe-info
2. Decompress the .ipe file.
install add ipe-filename filesystem
Installing and upgrading software images
About software image installation and upgrade
Use this task to install new feature and patch images or upgrade the boot, system, or feature images.
Software image installation and upgrade methods
Use one of the following methods to install or upgrade software images:
· Slot by slot—Activate all the images on one slot, and then move to the next slot.
· Image by image—Activate one image on all slots before moving to another image. Before using this method, read the release notes to make sure the upgrade images are compatible with the current images. If the upgrade images are not compatible with the current images, the upgrade might fail.
Restrictions and guidelines
To install an image, you must begin with the master device. To upgrade an image, you must begin with a subordinate device.
Installing or upgrading boot, system, and feature images
To install or upgrade boot, system, or feature images, execute the following commands in user view:
1. Verify that the system is stable.
display system stable state
The system is stable if the System State field displays Stable. For a successful ISSU, you must make sure the system is stable before you proceed to the next step.
2. (Optional.) Identify the recommended ISSU method and the possible impact of the upgrade.
install activate { boot filename | system filename | feature filename&<1-30> } * slot slot-number test
3. Activate images.
install activate { boot filename | system filename | feature filename&<1-30> } * slot slot-number
Installing patch images
To install patch images, execute the following commands in user view:
1. Verify that the system is stable.
display system stable state
The system is stable if the System State field displays Stable. For a successful installation, you must make sure the system is stable before you proceed to the next step.
2. Install patch images.
install activate patch filename { all | slot slot-number }
You can specify only one patch image file for this command at a time. However, you can execute this command multiple times to install multiple patch image files.
The install activate patch filename all command installs the specified patch images on all hardware and the images can survive a reboot. You do not need to execute the install commit command for the installation.
Deactivating software images
Restrictions and guidelines
You can deactivate only feature and patch images.
The deactivate operation only removes images from the current software image list. For the image changes to take effect after a reboot, you must perform a commit operation to remove the images from the main startup image list.
Deactivated images are still stored on the storage medium. To permanently delete the images, execute the install remove command. For more information, see "Deleting inactive software images."
Deactivating feature images
To deactivate feature images, execute the following commands in user view:
1. Verify that the system is stable.
display system stable state
The system is stable if the System State field displays Stable. For a successful deactivate operation, you must make sure the system is stable before you proceed to the next step.
2. Deactivate feature images.
install deactivate feature filename&<1-30> slot slot-number
Deactivating patch images
To deactivate patch images, execute the following commands in user view:
1. Verify that the system is stable.
display system stable state
The system is stable if the System State field displays Stable. For a successful deactivate operation, you must make sure the system is stable before you proceed to the next step.
2. Deactivate patch images.
install deactivate patch filename { all | slot slot-number }
You can specify only one patch image file for this command at a time. However, you can execute this command multiple times to deactivate multiple patch image files.
The install deactivate patch filename all command deactivates the specified patch images on all hardware and the image changes can survive a reboot. You do not need to execute the install commit command for the deactivation.
Rolling back the running software images
About software image rollback
During an incremental upgrade, the system creates a rollback point for each activate or deactivate operation of a boot, system, or feature image. The system can maintain a maximum of 50 rollback points. If this limit has been reached when a rollback point is created, the system removes the earliest rollback point. You can roll back the software to any of the rollback points.
During a reboot or ISSU reboot upgrade, the system does not create rollback points. After an ISSU reboot or reboot upgrade, you can roll back the software only to the status before any activate or deactivate operations were performed.
Restrictions and guidelines
You can perform this task only before committing software changes. A commit operation deletes all rollback points.
For an incremental upgrade rollback to take effect after a reboot, you must perform a commit operation to update the main startup image list.
Procedure
To roll back the running software images, execute the following commands in user view:
1. (Optional.) Display available rollback points.
display install rollback
2. Roll back the software.
install rollback to { point-id | original }
Aborting a software activate or deactivate operation
About aborting a software activate or deactivate operation
While the system is activating or deactivating a software image for a service upgrade or file upgrade, you can abort the activate or deactivate operation. After an operation is aborted, the system runs with the software images that it was running with before the operation.
Procedure
To abort a software activate or deactivate operation, use one of the following methods:
· Execute the install abort [ job-id ] command in user view.
· Press Ctrl+C.
Committing software changes
About committing software changes
When you activate or deactivate images for an incremental upgrade, or activate or deactivate patch images, the main startup image list does not update with the changes. The software changes are lost at reboot. For the changes to take effect after a reboot, you must commit the changes.
Procedure
To commit software changes, execute the following command in user view:
install commit
Verifying software images
About software image verification
Perform this task to verify the following items:
· Integrity—Verify that the boot, system, and feature images are integral.
· Consistency—Verify that the same active images are running across the entire system.
· Software commit status—Verify that the active images are committed as needed.
Procedure
To verify software images, execute the following commands in user view:
1. Verify software images.
install verify
2. Activate or deactivate images as required.
install { activate | deactivate }
3. Commit the software changes.
install commit
Deleting inactive software images
About deleting inactive software images
After completing an ISSU, you can use this task to delete old image files permanently.
Restrictions and guidelines
This task deletes image files permanently. You cannot use the install rollback to command to revert the operation, or use the install abort command to abort the operation.
Procedure
To delete inactive software image files, execute the following command in user view:
install remove [ slot slot-number ] { filename | inactive }
Terminating the ongoing ISSU process forcibly
About terminating the ongoing ISSU process forcibly
Use this feature to terminate the ISSU process if one of the following exceptions occurs and you cannot perform an upgrade or rollback:
· The ISSU status is not Init but the upgrade has stopped.
· The ISSU status is Init but the upgrade has not completed.
Procedure
1. Enter system view.
system-view
2. Terminate the ongoing ISSU process forcibly.
issu quit
Display and maintenance commands for ISSU
Unless otherwise stated, the display and reset commands can be used during an ISSU, regardless of whether the install or issu commands are used.
Execute display commands in any view and reset commands in user view.
|
Task |
Command |
Remarks |
|
Display active software images. |
display install active [ slot slot-number ] [ verbose ] |
N/A |
|
Display backup startup software images. |
display install backup [ slot slot-number ] [ verbose ] |
N/A |
|
Display main startup software images. |
display install committed [ slot slot-number ] [ verbose ] |
N/A |
|
Display inactive software images in the root directories of file systems. |
display install inactive [ slot slot-number ] [ verbose ] |
N/A |
|
Display the software images included in an .ipe file. |
display install ipe-info ipe-filename |
N/A |
|
Display ongoing ISSU activate, deactivate, and rollback operations. |
display install job |
N/A |
|
Display ISSU log entries. |
display install log [ log-id ] [ verbose ] |
N/A |
|
Display software image file information. |
display install package { filename | all } [ verbose ] |
N/A |
|
Display rollback point information. |
display install rollback [ point-id ] |
The system does not record rollback points during an ISSU that uses issu commands. |
|
Display the software image file that includes a specific component or file. |
display install which { component name | file filename } [ slot slot-number ] |
N/A |
|
Display automatic rollback timer information. |
N/A |
|
|
Display ISSU status information. |
display issu state |
This command applies only to an ISSU that uses issu commands. |
|
Display the ISSU methods. |
display version comp-matrix file { boot filename | system filename | feature filename&<1-30> | patch filename&<1-30> } * display version comp-matrix file ipe ipe-filename [ patch filename&<1-30> ] |
N/A |
|
Clear ISSU log entries. |
reset install log-history oldest log-number |
N/A |
|
Clear ISSU rollback points. |
reset install rollback oldest point-id |
N/A |
Examples of using issu commands for ISSU
Example: Upgrading a feature to a compatible version
Upgrade requirements
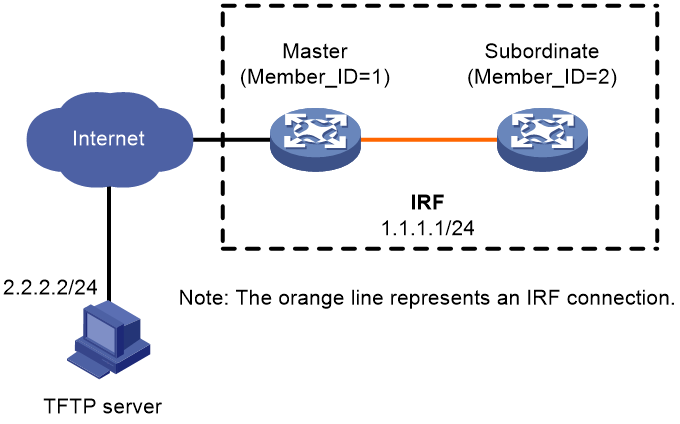
As shown in Figure 1, the IRF fabric has two members.
Upgrade the Feature1 feature from T0001015 to T0001016. The two versions are compatible.
Upgrade procedure
# Download the image file that contains the T0001016 Feature1 feature from the TFTP server.
<Sysname> tftp 2.2.2.2 get feature1-t0001016.bin
% Total % Received % Xferd Average Speed Time Time Time Current
Dload Upload Total Spent Left Speed
100 256 100 256 0 0 764 0 --:--:-- --:--:-- --:--:-- 810
Writing file...Done.
# Display active software images.
<Sysname> display install active
Active packages on slot 1:
flash:/boot-t0001015.bin
flash:/system-t0001015.bin
flash:/feature1-t0001015.bin
Active packages on slot 2:
flash:/boot-t0001015.bin
flash:/system-t0001015.bin
flash:/feature1-t0001015.bin
# Identify the recommended ISSU methods and possible impact of the upgrade.
<Sysname> display version comp-matrix file feature flash:/feature1-t0001016.bin
Verifying the file flash:/feature1-t0001016.bin on slot 1...Done.
Slot Upgrade Way
1 Service Upgrade
2 Service Upgrade
Influenced service according to following table on slot 1:
flash:/feature1-t0001016.bin
Feature1
Influenced service according to following table on slot 2:
flash:/feature1-t0001016.bin
Feature1
The output shows that an incremental upgrade is recommended and the Feature1 module will be rebooted during the upgrade.
# Upgrade the Feature1 feature on the subordinate member.
· Method 1: Use the recommended method.
<Sysname> issu load file feature flash:/feature1-t0001016.bin slot 2
This operation will delete the rollback point information for the previous upgrade and maybe get unsaved configuration lost. Continue? [Y/N]:y
Verifying the file flash:/feature1-t0001016.bin on slot 1...Done.
Copying file flash:/feature1-t0001016.bin to slot2#flash:/feature1-t0001016.bin......Done.
Verifying the file flash:/feature1-t0001016.bin on slot 2...Done.
Identifying the upgrade methods...Done.
Upgrade summary according to following table:
flash:/feature1-t0001016.bin
Running Version New Version
Test 0001015 Test 0001016
Slot Upgrade Way
2 Service Upgrade
Upgrading software images to compatible versions. Continue? [Y/N]:y
This operation might take several minutes, please wait...Done.
· Method 2: Use the reboot method.
<Sysname> issu load file feature flash:/feature1-t0001016.bin slot 2 reboot
This operation will delete the rollback point information for the previous upgrade and maybe get unsaved configuration lost. Continue? [Y/N]:y
Verifying the file flash:/feature1-t0001016.bin on slot 1...Done.
Copying file flash:/feature1-t0001016.bin to slot2#flash:/feature1-t0001016.bin......Done.
Verifying the file flash:/feature1-t0001016.bin on slot 2...Done.
Identifying the upgrade methods...Done.
Upgrade summary according to following table:
flash:/feature1-t0001016.bin
Running Version New Version
Test 0001015 Test 0001016
Slot Upgrade Way
2 Reboot
Upgrading software images to compatible versions. Continue? [Y/N]:y
This operation might take several minutes, please wait...Done.
# Perform a main/backup Feature1 process switchover.
<Sysname> issu run switchover
Verifying the file flash:/feature1-t0001016.bin on slot 1...Done.
Upgrade summary according to following table:
flash:/feature1-t0001016.bin
Running Version New Version
Test 0001015 Test 0001016
Slot Switchover Way
1 Active standby process switchover
Upgrading software images to compatible versions. Continue? [Y/N]:y
This operation might take several minutes, please wait...Done.
# Upgrade the feature on the original master.
· If the upgrade used the recommended method:
<Sysname> issu commit slot 1
Verifying the file flash:/feature1-t0001016.bin on slot 1...Done.
Upgrade summary according to following table:
flash:/feature1-t0001016.bin
Running Version New Version
Test 0001015 Test 0001016
Slot Upgrade Way
1 Service Upgrade
Upgrading software images to compatible versions. Continue? [Y/N]:y
This operation might take several minutes, please wait...Done.
· If the upgrade used the reboot method:
<Sysname> issu commit slot 1
Upgrade summary according to following table:
flash:/feature1-t0001016.bin
Running Version New Version
Test 0001015 Test 0001016
Slot Upgrade Way
1 Reboot
Upgrading software images to compatible versions. Continue? [Y/N]:y
This operation might take several minutes, please wait...Done.
# Verify that both members are running the new Feature1 image.
<Sysname> display install active
Active packages on slot 1:
flash:/boot-t0001015.bin
flash:/system-t0001015.bin
flash:/feature1-t0001016.bin
Active packages on slot 2:
flash:/boot-t0001015.bin
flash:/system-t0001015.bin
flash:/feature1-t0001016.bin
Example: Upgrading a feature to an incompatible version
Upgrade requirements
As shown in Figure 2, the IRF fabric has two members.
Upgrade the Feature1 feature from T0001015 to T0001016, which is an incompatible version.

Upgrade procedure
# Download the image file that contains the T0001016 Feature1 feature from the TFTP server.
<Sysname> tftp 2.2.2.2 get feature1-t0001016.bin
% Total % Received % Xferd Average Speed Time Time Time Current
Dload Upload Total Spent Left Speed
100 256 100 256 0 0 764 0 --:--:-- --:--:-- --:--:-- 810
Writing file...Done.
# Display active software images.
<Sysname> display install active
Active packages on slot 1:
flash:/boot-t0001015.bin
flash:/system-t0001015.bin
flash:/feature1-t0001015.bin
Active packages on slot 2:
flash:/boot-t0001015.bin
flash:/system-t0001015.bin
flash:/feature1-t0001015.bin
# Identify the recommended ISSU methods and possible impact of the upgrade.
<Sysname> display version comp-matrix file feature flash:/feature1-t0001016.bin
Verifying the file flash:/feature1-t0001016.bin on slot 1...Done.
Incompatible upgrade.
The output shows that the two versions are incompatible. The cards will be rebooted for the upgrade.
# Upgrade the Feature1 feature on the subordinate member.
<Sysname> issu load file feature flash:/feature1-t0001016.bin slot 2
This operation will delete the rollback point information for the previous upgrade and maybe get unsaved configuration lost. Continue? [Y/N]:y
Verifying the file flash:/feature1-t0001016.bin on slot 1...Done.
Copying file flash:/feature1-t0001016.bin to slot2#flash:/feature1-t0001016.bin......Done.
Verifying the file flash:/feature1-t0001016.bin on slot 2...Done.
Identifying the upgrade methods...Done.
Upgrade summary according to following table:
flash:/feature1-t0001016.bin
Running Version New Version
Test 0001015 Test 0001016
Slot Upgrade Way
2 Reboot
Upgrading software images to incompatible versions. Continue? [Y/N]:y
This operation might take several minutes, please wait...Done.
# Upgrade the Feature1 feature on the original master.
<Sysname> issu run switchover
Upgrade summary according to following table:
flash:/feature1-t0001016.bin
Running Version New Version
Test 0001015 Test 0001016
Slot Upgrade Way
1 Reboot
Upgrading software images to incompatible versions. Continue? [Y/N]:y
This operation might take several minutes, please wait...Done.
# Verify that both members are running the new Feature1 image.
<Sysname> display install active
Active packages on slot 1:
flash:/boot-t0001015.bin
flash:/system-t0001015.bin
flash:/feature1-t0001016.bin
Active packages on slot2:
flash:/boot-t0001015.bin
flash:/system-t0001015.bin
flash:/feature1-t0001016.bin
Example: Rolling back a feature
Rollback requirement
As shown in Figure 3, the IRF fabric has two members.
Roll back the Feature1 feature from T0001016 to T0001015 after upgrading it from T0001015 to T0001016. T0001016 and T0001015 are compatible.

Rollback procedure
# Download the image file that contains the T0001016 Feature1 feature from the TFTP server.
<Sysname> tftp 2.2.2.2 get feature1-t0001016.bin
% Total % Received % Xferd Average Speed Time Time Time Current
Dload Upload Total Spent Left Speed
100 256 100 256 0 0 764 0 --:--:-- --:--:-- --:--:-- 810
Writing file...Done.
# Display active software images.
<Sysname> display install active
Active packages on slot 1:
flash:/boot-t0001015.bin
flash:/system-t0001015.bin
flash:/feature1-t0001015.bin
Active packages on slot 2:
flash:/boot-t0001015.bin
flash:/system-t0001015.bin
flash:/feature1-t0001015.bin
# Identify the recommended ISSU methods and possible impact of the upgrade.
<Sysname> display version comp-matrix file feature flash:/feature1-t0001016.bin
Verifying the file flash:/feature1-t0001016.bin on slot 1...Done.
Slot Upgrade Way
1 Service Upgrade
2 Service Upgrade
Influenced service according to following table on slot 1:
flash:/feature1-t0001016.bin
Feature1
Influenced service according to following table on slot 2:
flash:/feature1-t0001016.bin
Feature1
The output shows that an incremental upgrade is recommended and the Feature1 module will be rebooted during the upgrade.
# Upgrade the Feature1 feature on the subordinate member.
<Sysname> issu load file feature flash:/feature1-t0001016.bin slot 2
This operation will delete the rollback point information for the previous upgrade and maybe get unsaved configuration lost. Continue? [Y/N]:y
Verifying the file flash:/feature1-t0001016.bin on slot 1...Done.
Copying file flash:/feature1-t0001016.bin to slot2#flash:/feature1-t0001016.bin......Done.
Verifying the file flash:/feature1-t0001016.bin on slot 2...Done.
Identifying the upgrade methods...Done.
Upgrade summary according to following table:
flash:/feature1-t0001016.bin
Running Version New Version
Test 0001015 Test 0001016
Slot Upgrade Way
2 Service Upgrade
Upgrading software images to compatible versions. Continue? [Y/N]:y
This operation might take several minutes, please wait...Done.
# Perform a main/backup Feature1 process switchover.
<Sysname> issu run switchover
Upgrade summary according to following table:
flash:/feature1-t0001016.bin
Running Version New Version
Test 0001015 Test 0001016
Slot Switchover Way
1 Active standby process switchover
Upgrading software images to compatible versions. Continue? [Y/N]:y
This operation might take several minutes, please wait...Done.
# Display active software images.
<Sysname> display install active
Active packages on slot 1:
flash:/boot-t0001015.bin
flash:/system-t0001015.bin
flash:/feature1-t0001015.bin
Active packages on slot 2:
flash:/boot-t0001015.bin
flash:/system-t0001015.bin
flash:/feature1-t0001016.bin
# Roll back the Feature1 feature to T0001015.
<Sysname> issu rollback
This command will quit the ISSU process and roll back to the previous version. Continue? [Y/N]:Y
# Verify that both members are running the old Feature1 image.
<Sysname> display install active
Active packages on slot 1:
flash:/boot-t0001015.bin
flash:/system-t0001015.bin
flash:/feature1-t0001015.bin
Active packages on slot 2:
flash:/boot-t0001015.bin
flash:/system-t0001015.bin
flash:/feature1-t0001015.bin
Examples of using install commands for ISSU
Example: Upgrading a feature
Upgrade requirements
As shown in Figure 4, the IRF fabric has two members.
Upgrade the Feature1 feature from T0001015 to T0001016. The two versions are compatible.

Upgrade procedure
# Download the .ipe file that contains the T0001016 Feature1 feature image from the TFTP server.
<Sysname> tftp 2.2.2.2 get feature1-t0001016.ipe
% Total % Received % Xferd Average Speed Time Time Time Current
Dload Upload Total Spent Left Speed
100 256 100 256 0 0 764 0 --:--:-- --:--:-- --:--:-- 810
Writing file...Done.
# Decompress the .ipe file.
<Sysname> install add flash:/feature1-t0001016.ipe flash:
Verifying the file flash:/feature1-t0001016.ipe on slot 1...Done.
Decompressing file feature1-t0001016.bin to flash:/feature1-t0001016.bin.......................Done.
# Display active software images.
<Sysname> display install active
Active packages on slot 1:
flash:/boot-t0001015.bin
flash:/system-t0001015.bin
flash:/feature1-t0001015.bin
Active packages on slot 2:
flash:/boot-t0001015.bin
flash:/system-t0001015.bin
flash:/feature1-t0001015.bin
# Identify the recommended ISSU methods and possible impact of the upgrade.
<Sysname> install activate feature flash:/feature1-t0001016.bin slot 2 test
Copying file flash:/feature1-t0001016.bin to slot2#flash:/feature1-t0001016.bin......Done.
Verifying the file flash:/feature1-t0001016.bin on slot 2...Done.
Upgrade summary according to following table:
flash:/feature1-t0001016.bin
Running Version New Version
Test 0001015 Test 0001016
Slot Upgrade Way
2 Service Upgrade
Influenced service according to following table on slot 2:
flash:/feature1-t0001016.bin
Feature1
<Sysname> install activate feature flash:/feature1-t0001016.bin slot 1 test
Verifying the file flash:/feature1-t0001016.bin on slot 1...Done.
Upgrade summary according to following table:
flash:/feature1-t0001016.bin
Running Version New Version
Test 0001015 Test 0001016
Slot Upgrade Way
1 Service Upgrade
Influenced service according to following table on slot 1:
flash:/feature1-t0001016.bin
Feature1
The output shows that both members need a service upgrade and the Feature1 module will be rebooted during the upgrade.
# Activate the new Feature1 image to upgrade the Feature1 feature.
<Sysname> install activate feature flash:/feature1-t0001016.bin slot 2
Verifying the file flash:/feature1-t0001016.bin on slot 1...Done.
flash:/feature1-t0001016.bin already exists on slot 2.
Overwrite it?[Y/N]:y
Copying file flash:/feature1-t0001016.bin to slot2#flash:/feature1-t0001016.bin......Done.
Verifying the file flash:/feature1-t0001016.bin on slot 2...Done.
Upgrade summary according to following table:
flash:/feature1-t0001016.bin
Running Version New Version
Test 0001015 Test 0001016
Slot Upgrade Way
2 Service Upgrade
Upgrading software images to compatible versions. Continue? [Y/N]:y
This operation might take several minutes, please wait...Done.
<Sysname> install activate feature flash:/feature1-t0001016.bin slot 1
Verifying the file flash:/feature1-t0001016.bin on slot 1...Done.
Upgrade summary according to following table:
flash:/feature1-t0001016.bin
Running Version New Version
Test 0001015 Test 0001016
Slot Upgrade Way
1 Service Upgrade
Upgrading software images to compatible versions. Continue? [Y/N]:y
This operation might take several minutes, please wait...Done.
# Display active software images.
<Sysname> display install active
Active packages on slot 1:
flash:/boot-t0001015.bin
flash:/system-t0001015.bin
flash:/feature1-t0001016.bin
Active packages on slot 2:
flash:/boot-t0001015.bin
flash:/system-t0001015.bin
flash:/feature1-t0001016.bin
# Commit the software changes.
<Sysname> install commit
This operation will take several minutes, please wait...........................Done.
The current software images have been saved as the startup software images.
Current software images on slot 1:
flash:/boot-t0001015.bin
flash:/system-t0001015.bin
flash:/feature1-t0001016.bin
Current software images on slot 2:
flash:/boot-t0001015.bin
flash:/system-t0001015.bin
flash:/feature1-t0001016.bin
Example: Rolling back a feature
Rollback requirement
As shown in Figure 4, the IRF fabric has two members. The Feature1 feature has been upgraded from T0001015 to T0001016. However, the software change has not been committed.
Roll back the Feature1 feature from T0001016 to T0001015.
Rollback procedure
# Display active software images.
<Sysname> display install active
Active packages on slot 1:
flash:/boot-t0001015.bin
flash:/system-t0001015.bin
flash:/feature1-t0001016.bin
Active packages on slot2:
flash:/boot-t0001015.bin
flash:/system-t0001015.bin
flash:/feature1-t0001016.bin
# Display available rollback points.
<Sysname> display install rollback
Install rollback information 1 on slot 1:
Updating from flash:/feature1-t0001015.bin
to flash:/feature1-t0001016.bin.
Install rollback information 2 on slot 2:
Updating from flash:/feature1-t0001015.bin
to flash:/feature1-t0001016.bin.
# Roll back the Feature1 feature to T0001015.
<Sysname> install rollback to original
This operation might take several minutes, please wait...Done.
# Verify that the IRF members are running the old Feature1 image.
<Sysname> display install active
Active packages on slot 1:
flash:/boot-t0001015.bin
flash:/system-t0001015.bin
flash:/feature1-t0001015.bin
Active packages on slot 2:
flash:/boot-t0001015.bin
flash:/system-t0001015.bin
flash:/feature1-t0001015.bin
# Commit the software changes.
<Sysname> install commit
This operation will take several minutes, please wait...........................Done.
The current software images have been saved as the startup software images.
Current software images on slot 0:
flash:/boot-t0001015.bin
flash:/system-t0001015.bin
flash:/feature1-t0001015.bin
Current software images on slot 1:
flash:/boot-t0001015.bin
flash:/system-t0001015.bin
flash:/feature1-t0001015.bin
