- Table of Contents
-
- 12-WLAN Advanced Features Configuration Guide
- 00-Preface
- 01-Bonjour gateway configuration
- 02-Hotspot 2.0 configuration
- 03-WLAN mesh configuration
- 04-Wireless location configuration
- 05-WLAN process maintenance configuration
- 06-WLAN fast forwarding configuration
- 07-WLAN optimization configuration
- 08-AC hierarchy configuration
- 09-WSA configuration
- 10-WLAN probe configuration
- Related Documents
-
| Title | Size | Download |
|---|---|---|
| 08-AC hierarchy configuration | 400.25 KB |
Contents
AC hierarchy operating mechanism
Restrictions: Hardware compatibility with AC hierarchy
Configuring and managing local ACs on the central AC
Setting the priority for tunnel establishment to a local AC
Specifying a backup central AC
Configuring master CAPWAP tunnel preemption
Configuring firmware upgrade for a local AC
Setting the echo interval for a local AC
Configuring central AC request retransmission
Enabling client roaming with the central AC as the authenticator
Managing the files on a local AC
Configuring parameters for local AC and central AC communication on a local AC
Configuring access right management on the central AC
Creating a location identifier
Assigning location identifiers
Display and maintenance commands for AC hierarchy
AC hierarchy configuration examples
Example: Configuring AC hierarchy
Example: Configuring access right management
Configuring AC hierarchy
About AC hierarchy
AC hierarchy provides a centralized management method for ACs that run the Comware 7 software version. This simplifies WLAN maintenance and improves WLAN expandability.
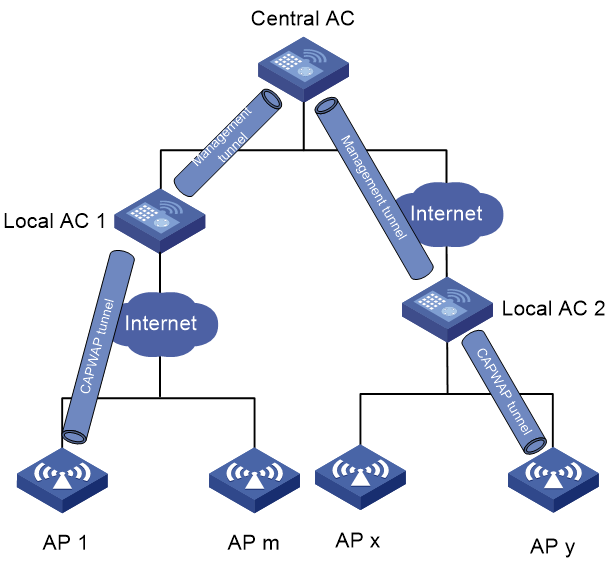
AC hierarchy architecture
An AC hierarchy network contains a central AC, local ACs, and APs. The central AC manages all local ACs, and local ACs provide network access to APs and process client traffic.
AC hierarchy uses the following tunnels for local AC and AP management:
· Tunnels between the central AC and local ACs—The central AC sends AP configuration over this tunnel to the local ACs, and the local ACs report AP and client information to the central AC.
· CAPWAP tunnels between local ACs and APs—Local ACs send AP configuration to the APs over this tunnel.
Figure 1 AC hierarchy architecture
AC hierarchy operating mechanism
Figure 2 AC hierarchy operating mechanism
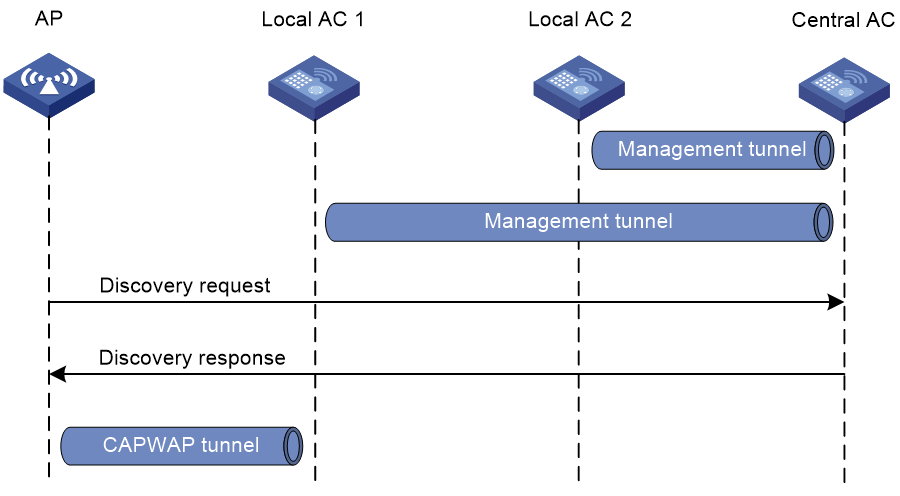
As shown in Figure 2, AC hierarchy operates as follows:
1. Each local AC establishes a management tunnel with the central AC.
2. The AP sends a discovery request to the central AC.
3. The central AC sends a discovery response to the AP. The response contains the IP address of the local AC that has the lowest workload.
4. The AP sends a discovery request to the assigned local AC to establish a CAPWAP tunnel with the local AC.
During tunnel establishment, the local AC requests for AP validity from the central AC and it establishes a tunnel with the AP only when the AP is valid. The AP is valid if the central AC has the manual AP setting for the AP or auto AP is enabled on the central AC. For more information, see "Managing APs."
5. The local AC reports the AP up event to the central AC.
Data forwarding
In an AC hierarchy network, you can configure either local ACs or APs to perform data forwarding.
For more information about data forwarding, see "Configuring WLAN access."
Roaming
The roaming method for a client in an AC hierarchy network depends on the authenticator of the client. If the local AC to which the client is associated is the authenticator, the roaming method is the same as that in an AC + fit AP network. If the central AC is the authenticator, roaming entries are generated on both the central AC and the local AC. Then, the client can perform intra- or inter-local AC roaming.
For more information about the client authenticator, see "Configuring WLAN authentication." For more information about roaming, see "Configuring WLAN roaming."
Access right management
Access right management allows you to assign different rights to administrators for the central AC and local ACs by configuring location identifiers for service templates, AP groups, and RRM holddown groups.
An administrator can view and manage only service templates, AP groups, or RRM holddown groups whose location identifiers are accessible to his or her user role from both the CLI and the Web interface. The super user named admin can manage all service templates, AP groups, and RRM holddown groups. The default location identifier default-location is accessible to all user roles and cannot be deleted.
Restrictions: Hardware compatibility with AC hierarchy
|
Hardware series |
Model |
Product code |
Local AC role compatibility |
Central AC role compatibility |
|
WX1800H series |
WX1804H |
EWP-WX1804H-PWR-CN |
Yes |
No |
|
WX2500H series |
WX2508H-PWR-LTE WX2510H WX2510H-F WX2540H WX2540H-F WX2560H |
EWP-WX2508H-PWR-LTE EWP-WX2510H-PWR EWP-WX2510H-F-PWR EWP-WX2540H EWP-WX2540H-F EWP-WX2560H |
Yes |
No |
|
WX3000H series |
WX3010H WX3010H-X WX3010H-L WX3024H WX3024H-L WX3024H-F |
EWP-WX3010H EWP-WX3010H-X-PWR EWP-WX3010H-L-PWR EWP-WX3024H EWP-WX3024H-L-PWR EWP-WX3024H-F |
Yes |
No |
|
WX3500H series |
WX3508H WX3510H WX3520H WX3520H-F WX3540H |
EWP-WX3508H EWP-WX3510H EWP-WX3520H EWP-WX3520H-F EWP-WX3540H |
Yes |
Yes |
|
WX5500E series |
WX5510E WX5540E |
EWP-WX5510E EWP-WX5540E |
Yes |
Yes |
|
WX5500H series |
WX5540H WX5560H WX5580H |
EWP-WX5540H EWP-WX5560H EWP-WX5580H |
Yes |
Yes |
|
Access controller modules |
LSUM1WCME0 EWPXM1WCME0 LSQM1WCMX20 LSUM1WCMX20RT LSQM1WCMX40 LSUM1WCMX40RT EWPXM2WCMD0F EWPXM1MAC0F |
LSUM1WCME0 EWPXM1WCME0 LSQM1WCMX20 LSUM1WCMX20RT LSQM1WCMX40 LSUM1WCMX40RT EWPXM2WCMD0F EWPXM1MAC0F |
No |
Yes |
|
Hardware series |
Model |
Product code |
Local AC role compatibility |
Central AC role compatibility |
|
WX1800H series |
WX1804H WX1810H WX1820H WX1840H |
EWP-WX1804H-PWR EWP-WX1810H-PWR EWP-WX1820H EWP-WX1840H-GL |
No |
No |
|
WX3800H series |
WX3820H WX3840H |
EWP-WX3820H-GL EWP-WX3840H-GL |
No |
No |
|
WX5800H series |
WX5860H |
EWP-WX5860H-GL |
No |
No |
Configuring and managing local ACs on the central AC
Central AC tasks at a glance
To configure and manage local ACs on the central AC, perform the following tasks:
· (Optional.) Configuring advanced central AC functions:
¡ Setting the priority for tunnel establishment to a local AC
¡ Specifying a backup central AC
¡ Configuring master CAPWAP tunnel preemption
¡ Configuring firmware upgrade for a local AC
¡ Setting the echo interval for a local AC
¡ Configuring central AC request retransmission
¡ Enabling client roaming with the central AC as the authenticator
¡ Managing the files on a local AC
Creating a local AC
About this task
A central AC can manage only local ACs created on the central AC. Creating a local AC on a common AC changes the role of the common AC to central.
Procedure
1. Enter system view.
system-view
2. Create a local AC and enter its view.
wlan local-ac name local-ac-name [ model model-name ]
Specify the AC model when you create a local AC.
3. Specify the serial ID for the local AC.
serial-id serial-id
By default, no serial ID is specified for a local AC.
Enabling AC rediscovery
About this task
This feature enables the central AC to send the IP address of the local AC that has the lowest workload to an AP. For more information about AC rediscovery, see "Managing APs."
You can also specify a local AC for an AP to configure the AP to associate with the specified local AC.
Procedure
1. Enter system view.
system-view
2. Enter AP view, AP group view, or global configuration view.
¡ Enter AP view.
wlan ap ap-name
¡ Enter AP group view.
wlan ap-group group-name
¡ Enter global configuration view.
wlan global-configuration
3. Enable AC rediscovery.
control-address enable
¡ In AP view, an AP uses the configuration in AP group view. If no setting is configured in AP group view, the AP uses the configuration in global configuration view.
¡ In AP group view, an AP uses the configuration in global configuration view.
¡ In global configuration view, AC rediscovery is disabled.
4. (Optional.) Specify a local AC for the AP.
control-address { ip ipv4-address | ipv6 ipv6-address }
By default:
¡ In AP view, an AP uses the configuration in AP group view. If no setting is configured in AP group view, the AP uses the configuration in global configuration view.
¡ In AP group view, an AP uses the configuration in global configuration view.
¡ In global configuration view, no local AC is specified for APs.
Setting the priority for tunnel establishment to a local AC
About this task
The priority will be carried in the discovery response for a local AC to select a central AC for CAPWAP tunnel establishment.
Procedure
1. Enter system view.
system-view
2. Enter local AC view.
wlan local-ac name local-ac-name
By default, no local AC exists.
3. Set the priority for tunnel establishment to the local AC.
priority priority
By default, the connection priority is 4.
Specifying a backup central AC
About this task
To achieve high availability, you can configure two central ACs to back up each other. The central AC with a higher tunnel establishment priority becomes the master AC. Local ACs establish CAPWAP tunnels with both central ACs, and the backup central AC takes over services when the master central AC fails.
Procedure
1. Enter system view.
system-view
2. Enter local AC view.
wlan local-ac name local-ac-name
3. Specify a backup central AC.
backup-ac { ip ipv4-address | ipv6 ipv6-address }
By default, no backup central AC is specified.
Configuring master CAPWAP tunnel preemption
About this task
By default, the backup central AC becomes the master central AC and takes over services only when the master central AC fails. This feature enables the backup central AC to become the master central AC as long as the backup AC has a higher priority.
Procedure
1. Enter system view.
system-view
2. Enter local AC view.
wlan local-ac name local-ac-name
3. Enable or disable master CAPWAP tunnel preemption.
wlan tunnel-preempt { disable | enable }
By default, master CAPWAP tunnel preemption is disabled.
Configuring firmware upgrade for a local AC
About this task
This feature enables the central AC to examine the software version of a local AC while establishing a CAPWAP tunnel with the local AC. The local AC upgrades its firmware if it uses a different software version from the version stored in the APDB and then establishes a CAPWAP tunnel with the central AC. When this feature is disabled, the central AC does not examine the software version of the local AC and directly establishes a CAPWAP tunnel with the local AC.
Procedure
1. Enter system view.
system-view
2. Enter local AC view.
wlan local-ac name local-ac-name
3. Configure firmware upgrade.
firmware-upgrade { disable | enable }
By default, firmware upgrade is enabled.
Setting the echo interval for a local AC
About this task
A local AC sends echo requests to the central AC at the specified echo intervals to identify whether the CAPWAP tunnel is operating correctly. If the local AC does not receive any echo responses from the AC before the keepalive timer expires, the local AC terminates the connection. If the central AC does not receive any echo requests before the keepalive timer expires, the central AC terminates the connection.
The keepalive time is the echo interval multiplied by three, the maximum number of echo request transmission attempts.
Restrictions and guidelines
Setting the echo interval to 0 seconds disables a local AC from sending echo requests. This setting is for test use only. For correct local AC and central AC communication, do not set the echo interval to 0 seconds.
Procedure
1. Enter system view.
system-view
2. Enter local AC view.
wlan local-ac name local-ac-name
3. Set the interval for the local AC to send echo requests.
echo-interval interval
The default setting is 10 seconds.
Configuring central AC request retransmission
About this task
The central AC retransmits a request to a local AC at the retransmission interval until the maximum number of request retransmission attempts is reached or a response is received.
Procedure
1. Enter system view.
system-view
2. Enter local AC view.
wlan local-ac name local-ac-name
3. Set the maximum number of request retransmission attempts.
retransmit-count value
The default setting is 3.
4. Set the interval at which a central AC request is retransmitted.
retransmit-interval interval
The default setting is 5 seconds.
Enabling client roaming with the central AC as the authenticator
About this task
This feature enables both the central AC and local ACs to generate client roaming entries when the central AC works as the authenticator so that clients can perform wireless roaming.
If this feature is disabled and the central AC works as the authenticator, roaming entries are generated only on the central AC, and client roaming is not supported.
Restrictions and guidelines
When the central AC performs client authentication, RSN + 802.1X clients cannot perform fast roaming even if this feature is enabled. For more information about fast roaming, see "Configuring WLAN roaming."
Procedure
1. Enter system view.
system-view
2. Create a service template and enter its view.
wlan service-template service-template-name
By default, no service template exists.
3. Enable client roaming when the central AC acts as the authenticator.
roam central-ac-auth enable
By default, client roaming is enabled when the central AC acts as the authenticator.
Managing the files on a local AC
About this task
You can perform the following tasks on the central AC to manage files for a local AC after the central AC establishes a CAPWAP tunnel with the local AC:
· Display file information for the local AC.
· Delete a file from the local AC.
· Download an image file from the central AC to the local AC.
Restrictions and guidelines
You can manage the files on a local AC only when the local AC has established a CAPWAP tunnel with the central AC.
Procedure
1. Display information about files or file folders on a local AC.
display wlan local-ac name local-ac-name files
2. Enter system view.
system-view
3. Enter local AC view.
wlan local-ac name local-ac-name
4. Manage the file system of a local AC.
¡ Delete a file from the local AC.
delete file filename
¡ Download an image file to the local AC.
download file file-name
Configuring parameters for local AC and central AC communication on a local AC
About this task
Perform this task to configure an AC as a local AC to establish a management tunnel with the specified central AC.
Restrictions and guidelines
You can specify a maximum of three IPv4 addresses and three IPv6 addresses of central ACs.
Procedure
1. Enter system view.
system-view
2. Enable local AC.
wlan local-ac enable
By default, local AC is disabled.
3. Specify a central AC for the local AC.
wlan central-ac { ip ipv4-address | ipv6 ipv6-address }
By default, no central AC is specified for a local AC.
4. Specify a VLAN that the local AC uses to establish a tunnel with the central AC.
wlan local-ac capwap source-vlan vlan-id
By default, a local AC uses VLAN 1 to establish a tunnel with the central AC.
Configuring access right management on the central AC
Creating a location identifier
About this task
By default, the system-defined location identifier default-location exists and the identifier is assigned to all newly-created AP groups, RRM holddown groups, and service templates. The default location identifier is accessible to all user roles and cannot be deleted.
Restrictions and guidelines
You can create a maximum of 512 location identifiers.
Procedure
1. Enter system view.
system-view
2. Create a location identifier.
wlan location location-name
By default, the system-defined location identifier default-location exists.
Configuring user roles
Restrictions and guidelines
The assigned user role takes effect only after the default user role is deleted.
Deny the access of the created user roles to the write commands of feature or feature group wlanglobalcfg.
Procedure
To configure user roles, first create user roles and specify location identifiers accessible to the user roles, and then assign user roles to users as the authorized user roles.
For more information about creating user roles and specifying location identifiers, see Configuring RBAC in Fundamentals Configuration Guide. For more information about assigning user roles, see Configuring AAA in Security Configuration Guide.
Assigning location identifiers
About this task
Perform this task to assign location identifiers to service templates, AP groups, or RRM holddown groups.
An administrator can view and manage only service templates, AP groups, or RRM holddown groups whose location identifiers are accessible to his or her user role from both the CLI and the Web interface.
Procedure
1. Enter system view.
system-view
2. Enter service template view, AP group view, or RRM holddown group view.
¡ Enter service template view.
wlan service-template service-template-name
¡ Enter AP group view.
wlan ap-group group-name
By default, the default AP group default-group exists.
¡ Enter RRM holddown group view.
wlan rrm-calibration-group group-id
3. Assign a location identifier to the service template, AP group, or RRM holddown group.
location location-name
By default, the system-defined location identifier default-location is assigned to a service template, AP group, or RRM holddown group.
Display and maintenance commands for AC hierarchy
Execute display commands in any view.
|
Task |
Command |
|
Display the current AC role. |
display wlan ac-role |
|
Display client information. |
display wlan client distributed-sys [ verbose ] In IRF mode: display wlan client distributed-sys [ slot slot-number ] [ verbose ] |
|
Display local AC information on the local AC. |
display wlan local-ac |
|
Display information about local ACs managed by the central AC. |
display wlan local-ac { all | name local-ac-name } [ address | verbose ] |
|
Display local AC connection records on the central AC. |
display wlan local-ac { all | name local-ac-name } connection-record |
|
Display information about files and folders on a local AC. |
display wlan local-ac name local-ac-name files |
|
Display local AC model information on the central AC. |
display wlan local-ac model { all | name model-name } |
|
Display the online duration of an online local AC on the central AC. |
display wlan local-ac { all | name local-ac-name } online-time |
|
Reboot the specified local AC or all local ACs. |
reset wlan local-ac { all | name ac-name } |
AC hierarchy configuration examples
Example: Configuring AC hierarchy
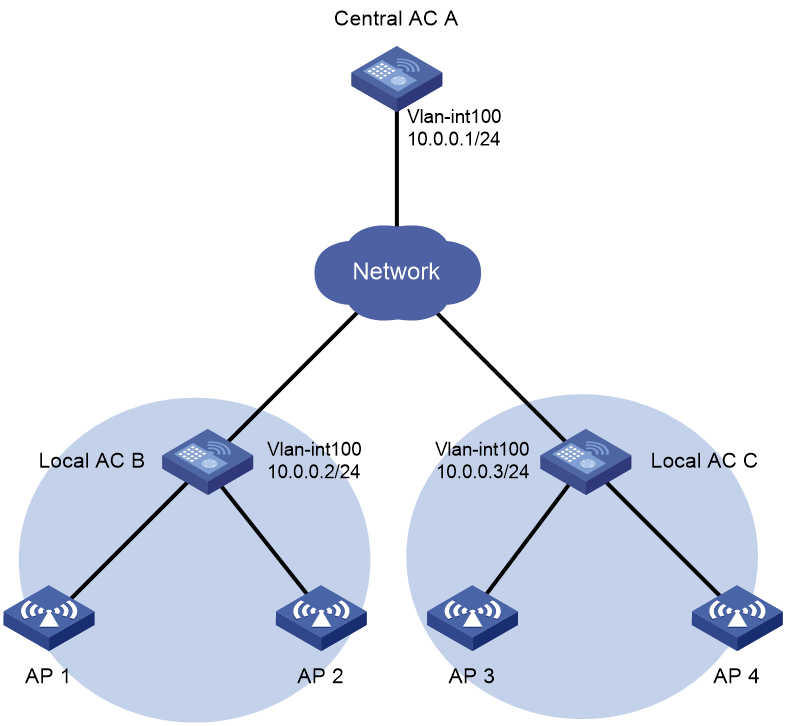
Network configuration
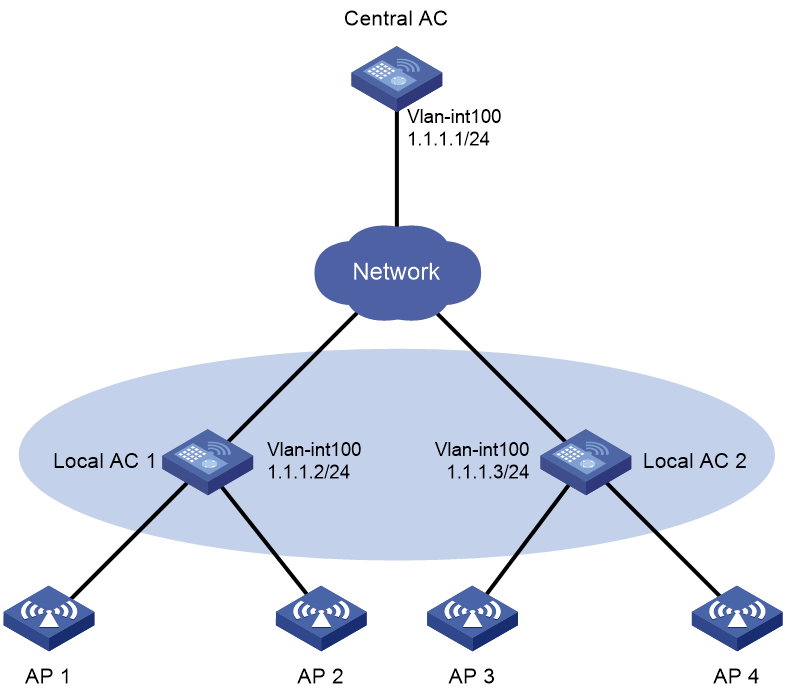
As shown in Figure 3, configure AC hierarchy to enable the central AC to perform client authentication and the local ACs to forward client traffic.
Procedure
1. Configure DHCP on local ACs to assign the central AC's IP address and APs' IP addresses to APs. (Details not shown.)
2. Configure the central AC:
# Create local AC localac1.
<CentralAC> system-view
[CentralAC] wlan local-ac name localac1 model WX3540H
[CentralAC-wlan-local-ac-localac1] serial-id 210235A1BSC123000050
[CentralAC-wlan-local-ac-localac1] quit
# Create local AC localac2.
[CentralAC] wlan local-ac name localac2 model WX3540H
[CentralAC-wlan-local-ac-localac2] serial-id 210235A1BSC124000060
[CentralAC-wlan-local-ac-localac2] quit
# Create manual AP ap1, and specify the AP model and serial ID.
[CentralAC] wlan ap ap1 model WA4320i-ACN
[CentralAC-wlan-ap-ap1] serial-id 219801A0CNC125002329
# Enable AC rediscovery.
[CentralAC-wlan-ap-ap1] control-address enable
[CentralAC-wlan-ap-ap1] quit
# Create manual AP ap2, and specify the AP model and serial ID.
[CentralAC] wlan ap ap2 model WA4320i-ACN
[CentralAC-wlan-ap-ap2] serial-id 219801A0CNC125002328
# Enable AC rediscovery.
[CentralAC-wlan-ap-ap2] control-address enable
[CentralAC-wlan-ap-ap2] quit
# Create manual AP ap3, and specify the AP model and serial ID.
[CentralAC] wlan ap ap3 model WA4320i-ACN
[CentralAC-wlan-ap-ap3] serial-id 219801A0CNC125002327
# Enable AC rediscovery.
[CentralAC-wlan-ap-ap3] control-address enable
[CentralAC-wlan-ap-ap3] quit
# Create manual AP ap4, and specify the AP model and serial ID.
[CentralAC] wlan ap ap4 model WA4320i-ACN
[CentralAC-wlan-ap-ap4] serial-id 219801A0CNC125002326
# Enable AC rediscovery.
[CentralAC-wlan-ap-ap4] control-address enable
[CentralAC-wlan-ap-ap4] quit
# Create VLAN-interface 100 and assign an IP address to it.
[CentralAC] interface vlan-interface 100
[CentralAC-Vlan-interface100] ip address 1.1.1.1 24
[CentralAC-Vlan-interface100] quit
3. Configure local AC 1:
# Create VLAN-interface 100, and assign an IP address to it.
<LocalAC1> system-view
[LocalAC1] interface vlan-interface 100
[LocalAC1-Vlan-interface100] ip address 1.1.1.2 24
[LocalAC1-Vlan-interface100] quit
# Enable local AC.
[LocalAC1] wlan local-ac enable
# Specify a central AC for the local AC.
[LocalAC1] wlan central-ac ip 1.1.1.1
4. Configure local AC 2:
# Create VLAN-interface 100, and assign an IP address to it.
<LocalAC2> system-view
[LocalAC2] interface vlan-interface 100
[LocalAC2-Vlan-interface100] ip address 1.1.1.3 24
[LocalAC2-Vlan-interface100] quit
# Enable local AC.
[LocalAC2] wlan local-ac enable
# Specify a central AC for the local AC.
[LocalAC2] wlan central-ac ip 1.1.1.1
Verifying the configuration
# On the central AC, verify that each local AC has established a CAPWAP tunnel with the central AC.
[CentralAC] display wlan local-ac all
Total number of local ACs: 2
Total number of connected local ACs: 2
Local AC Information
State : I = Idle, J = Join, JA = JoinAck, IL = ImageLoad
C = Config, DC = DataCheck, R = Run
AC name ACID State Model Serial ID
localac1 1 R WX3540H 210235A1BSC123000050
localac2 2 R WX3540H 210235A1BSC124000060
# On local AC 1, verify that local AC 1 has established a CAPWAP tunnel with the central AC.
[LocalAC1] display wlan local-ac
Local AC Information:
Model : WX3540H
Serial ID : 210235A1BSC123000050
MAC address : 5866-BA20-6E60
Local AC address : 1.1.1.2
H/W version : Ver.A
S/W version : c5419
Static central AC IPv4 address: 1.1.1.1
Static central AC IPv6 address: Not configured
Central AC Information:
Central AC address : 1.1.1.1
State : Run
Sent control packets : 6088
Received control packets : 6092
# On local AC 2, verify that local AC 2 has established a CAPWAP tunnel with the central AC. (Details not shown.)
# Verify that AP 1, AP 2, AP 3, and AP 4 have come online.
[CentralAC] display wlan ap all
Total number of APs: 1
Total number of connected APs: 1
Total number of connected configured APs: 1
Total number of connected auto APs: 0
Total number of connected anchor APs: 0
Maximum supported APs: 3072
Remaining APs: 3071
Fit APs activated by license: 128
Remaining fit APs: 127
WTUs activated by license: 0
Remaining WTUs: 0
AP information
State : I = Idle, J = Join, JA = JoinAck, IL = ImageLoad
C = Config, DC = DataCheck, R = Run, M = Master, B = Backup
AP name APID State Model Serial ID
ap1 1 R/M WA4320i-ACN 219801A0CNC125002329
Example: Configuring access right management
Network configuration
As shown in Figure 4, configure access right management to meet the following requirements:
· The administrators for local AC B and local AC C can manage the APs in areas B and C, respectively.
· The administrator for the central AC can manage all APs.
Procedure
1. Configure DHCP on the local ACs to assign the central AC's IP address and APs' IP addresses to the APs. (Details not shown.)
2. Configure the central AC:
# Enable the Telnet server and AAA authentication.
<CentralAC> system-view
[CentralAC] telnet server enable
[CentralAC] line vty 0 5
[CentralAC-line-vty0-5] authentication-mode scheme
[CentralAC-line-vty0-5] quit
# Create local AC localac-b, and specify the AC model and serial ID.
[CentralAC] wlan local-ac name localac-b model WX3520H
[CentralAC-wlan-local-ac-localac-b] serial-id 210235A1BSC123000050
[CentralAC-wlan-local-ac-localac-b] quit
# Create local AC localac-c, and specify the AC model and serial ID.
[CentralAC] wlan local-ac name localac-c model WX3520H
[CentralAC-wlan-local-ac-localac-c] serial-id 210235A1BSC123000051
[CentralAC-wlan-local-ac-localac-c] quit
# Create manual AP ap1, and specify the AP model and serial ID.
[CentralAC] wlan ap ap1 model WA4320i-ACN
[CentralAC-wlan-ap-ap1] serial-id 210235A29G007C000020
# Enable AC rediscovery.
[CentralAC-wlan-ap-ap1] control-address enable
[CentralAC-wlan-ap-ap1] quit
# Configure AP 2, AP 3, and AP 4 in the same way AP 1 is configured. (Details not shown.)
# Create VLAN-interface 100 and assign an IP address to it.
[CentralAC] interface vlan-interface 100
[CentralAC-Vlan-interface100] ip address 10.0.0.1 24
[CentralAC-Vlan-interface100] quit
# Create location identifiers areab and areac.
[CentralAC] wlan location areab
[CentralAC] wlan location areac
# Create user role b.
[CentralAC] role name b
# Configure an XML element rule and a Web menu rule.
[CentralAC-role-b] rule 1 permit read write execute xml-element
[CentralAC-role-b] rule 2 permit read write execute web-menu
# Configure location identifier areab to be accessible to user role b.
[CentralAC-role-b] location policy deny
[CentralAC-role-b-locationpolicy] permit location areab
[CentralAC-role-b-locationpolicy] quit
[CentralAC-role-b] quit
# Create user role c.
[CentralAC] role name c
# Configure an XML element rule and a Web menu rule.
[CentralAC-role-c] rule 1 permit read write execute xml-element
[CentralAC-role-c] rule 2 permit read write execute web-menu
# Configure location identifier areac to be accessible to user role c.
[CentralAC-role-c] location policy deny
[CentralAC-role-c-locationpolicy] permit location areac
[CentralAC-role-c-locationpolicy] quit
[CentralAC-role-c] quit
# Add local user admin.
[CentralAC] local-user admin
# Authorize user admin to use HTTP and HTTPS services.
[CentralAC-luser-manage-admin] service-type http https
[CentralAC-luser-manage-admin] quit
# Add local user b-admin.
[CentralAC] local-user b-admin
# Authorize user b-admin to use HTTP and HTTPS services.
[CentralAC-luser-manage-b-admin] service-type http https
# Configure a password for the user.
[CentralAC-luser-manage-b-admin] password simple badmin
# Assign user role b to user b-admin as the authorized user role.
[CentralAC-luser-manage-b-admin] authorization-attribute user-role b
# Delete the default user role.
[CentralAC-luser-manage-b-admin] undo authorization-attribute user-role network-operator
[CentralAC-luser-manage-b-admin] quit
# Add local user c-admin.
[CentralAC] local-user c-admin
# Authorize user c-admin to use HTTP and HTTPS services.
[CentralAC-luser-manage-c-admin] service-type http https
# Configure a password for the user.
[CentralAC-luser-manage-c-admin] password simple cadmin
# Assign user role c to user c-admin.
[CentralAC-luser-manage-c-admin] authorization-attribute user-role c
# Delete the default user role.
[CentralAC-luser-manage-c-admin] undo authorization-attribute user-role network-operator
[CentralAC-luser-manage-c-admin] quit
# Create AP group groupb, and add AP 1 and AP 2 to the AP group.
[CentralAC] wlan ap-group groupb
[CentralAC-wlan-ap-group-groupb] ap ap1 ap2
# Specify location identifier areab for the AP group.
[CentralAC-wlan-ap-group-groupb] location areab
[CentralAC-wlan-ap-group-groupb] quit
# Create AP group groupc, and add AP 3 and AP 4 to the AP group.
[CentralAC] wlan ap-group groupc
[CentralAC-wlan-ap-group-groupc] ap ap3 ap4
# Specify location identifier areac for the AP group.
[CentralAC-wlan-ap-group-groupc] location areac
[CentralAC-wlan-ap-group-groupc] quit
3. Configure local AC B:
# Create VLAN-interface 100, and assign an IP address to it.
<LocalAC-B> system-view
[LocalAC-B] interface vlan-interface 100
[LocalAC-B-Vlan-interface100] ip address 10.0.0.2 24
[LocalAC-B-Vlan-interface100] quit
# Enable local AC.
[LocalAC-B] wlan local-ac enable
# Specify a central AC for the local AC.
[LocalAC-B] wlan central-ac ip 10.0.0.1
4. Configure local AC C:
# Create VLAN-interface 100, and assign an IP address to it.
<LocalAC-C> system-view
[LocalAC-C] interface vlan-interface 100
[LocalAC-C-Vlan-interface100] ip address 10.0.0.3 24
[LocalAC-C-Vlan-interface100] quit
# Enable local AC.
[LocalAC-C] wlan local-ac enable
# Specify a central AC for the local AC.
[LocalAC-C] wlan central-ac ip 10.0.0.1
Verifying the configuration
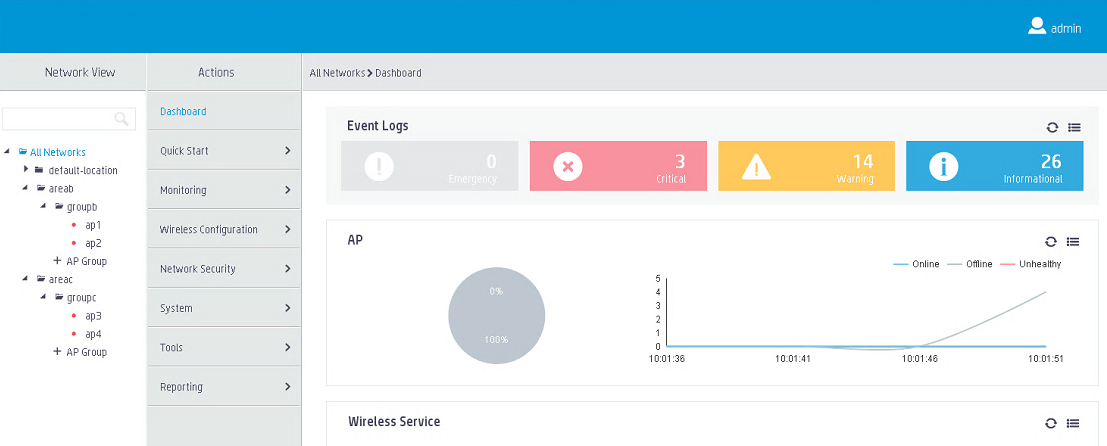
# Use super username admin to log in to the central AC from the Web interface through Telnet.
# Verify that you can view and manage all APs.
Figure 5 Super user page view
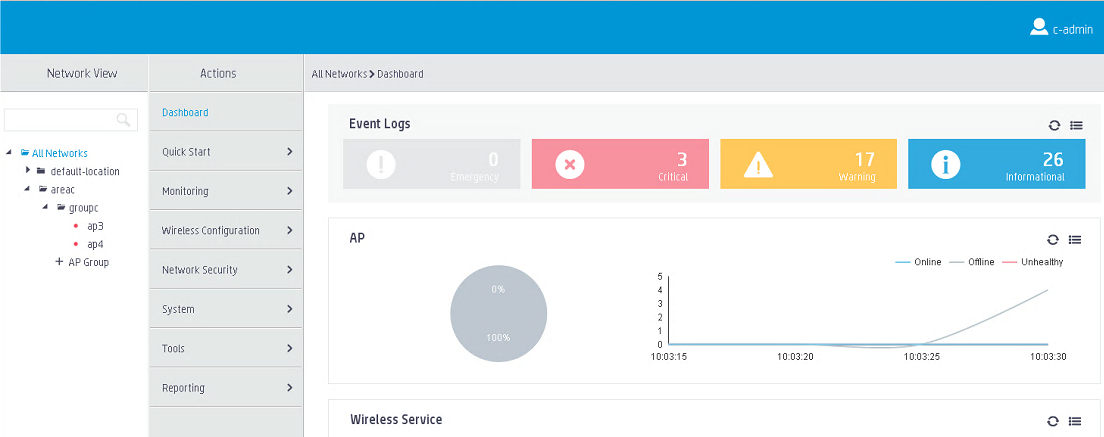
# Use local username c-admin to log in to the central AC from the Web interface.
# Verify that you can view and manage only APs in area C.
Figure 6 User c-admin page view
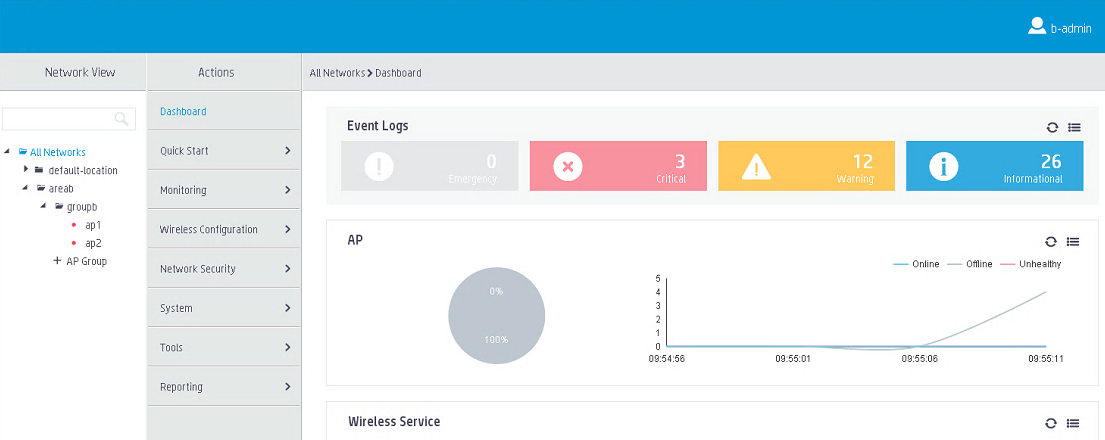
# Use local username b-admin to log in to the central AC from the Web interface.
# Verify that you can view and manage only APs in area B.
Figure 7 User b-admin page view