- Table of Contents
-
- 11-Security Configuration Guide
- 00-Preface
- 01-AAA Configuration
- 02-802.1X_Configuration
- 03-MAC Authentication Configuration
- 04-Portal Configuration
- 05-Password Control Configuration
- 06-Public Key Configuration
- 07-IPsec Configuration
- 08-SSH Configuration
- 09-Blacklist Configuration
- 10-TCP and ICMP Attack Protection Configuration
- 11-IP Source Guard Configuration
- 12-ARP Attack Protection Configuration
- 13-ND Attack Defense Configuration
- 14-URPF Configuration
- 15-PKI Configuration
- 16-SSL Configuration
- Related Documents
-
| Title | Size | Download |
|---|---|---|
| 07-IPsec Configuration | 144.97 KB |
Contents
IPsec for IPv6 routing protocols
Configuring IPsec for IPv6 routing protocols
Displaying and maintaining IPsec
IPsec for RIPng configuration example
|
|
NOTE: The term “router” in this document refers to both routers and Layer 3 switches. |
IPsec overview
IP Security (IPsec) is a security framework defined by the Internet Engineering Task Force (IETF) for securing IP communications. It is a Layer 3 virtual private network (VPN) technology that transmits data in a secure tunnel established between two endpoints.
IPsec guarantees the confidentiality, integrity, and authenticity of data and provides anti-replay service at the IP layer in an insecure network environment.
· Confidentiality—The sender encrypts packets before transmitting them over the Internet.
· Data integrity—The receiver verifies the packets received from the sender to make sure they are not tampered with during transmission.
· Data origin authentication—The receiver verifies the authenticity of the sender.
· Anti-replay—The receiver examines packets and drops outdated and duplicate packets.
IPsec delivers these benefits:
· Reduced key negotiation overheads and simplified maintenance by supporting the Internet Key Exchange (IKE) protocol. IKE provides automatic key negotiation and automatic IPsec security association (SA) setup and maintenance.
· Good compatibility. You can apply IPsec to all IP-based application systems and services without modifying them.
· Encryption on a per-packet rather than per-flow basis. Per-packet encryption allows for flexibility and greatly enhances IP security.
IPsec comprises a set of protocols for IP data security, including Authentication Header (AH), Encapsulating Security Payload (ESP), and algorithms for authentication and encryption. AH and ESP provides security services.
IPsec provides two security mechanisms: authentication and encryption. The authentication mechanism allows the receiver of an IP packet to authenticate the sender and check if the packet has been tampered. The encryption mechanism ensures data confidentiality and protects the data from being eavesdropped en route.
Basic concepts of IPsec
Security protocols
IPsec comes with two security protocols:
· AH (protocol 51), which provides data origin authentication, data integrity, and anti-replay services. For these purposes, an AH header is added to each IP packet. AH is suitable for transmitting non-critical data because it cannot prevent eavesdropping even though it works fine in preventing data tampering. AH supports authentication algorithms such as Message Digest (MD5) and Secure Hash Algorithm (SHA-1).
· ESP (protocol 50), which provides data encryption in addition to origin authentication, data integrity, and anti-replay services. ESP works by inserting an ESP header and an ESP trailer in IP packets. Unlike AH, ESP encrypts data before encapsulating the data to ensure data confidentiality. ESP supports the encryption algorithms including Data Encryption Standard (DES), 3DES, and Advanced Encryption Standard (AES), and authentication algorithms such as MD5 and SHA-1 algorithms. The authentication function is optional to ESP.
Both AH and ESP provide authentication services. However, the authentication service provided by AH is stronger than that provided by ESP. In practice, you can choose either or both security protocols as required. When both AH and ESP are used, an IP packet is encapsulated first by ESP and then by AH. For IPsec packet format information, see Figure 1.
Security association
A security association is an agreement negotiated between communicating parties called IPsec peers. It comprises a set of parameters for data protection, including security protocols, encapsulation mode, authentication and encryption algorithms, and privacy keys and their lifetime. SAs can be set up manually or through IKE. Current, the switch supports only the manual mode.
An SA is unidirectional. Therefore, at least two SAs are needed to protect data flows in a bidirectional communication. Moreover, if two peers want to use both AH and ESP to protect data flows between them, they construct an independent SA for each protocol.
An SA is uniquely identified by a triplet, which consists of the security parameter index (SPI), destination IP address, and security protocol (AH or ESP).
An SPI is a 32-bit number for uniquely identifying an SA. It is transmitted in the AH/ESP header. A manually configured SA requires an SPI to be specified manually for it and never ages out.
Encapsulation modes
IPsec supports two IP packet encapsulation modes:
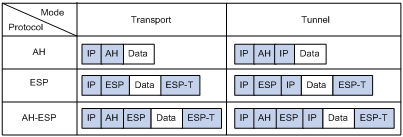
· Tunnel mode—IPsec protects the entire IP packet (the IP header and the payload). It uses the entire IP packet to calculate an AH or ESP header and then encapsulates the original IP packet and the AH or ESP header with a new IP header. If you use ESP, the payload is encrypted and an ESP trailer is also encapsulated. Tunnel mode is typically used for protecting gateway-to-gateway communications.
· Transport mode—IPsec protects only the IP payload. It uses only the IP payload to calculate the AH or ESP header, and inserts the calculated header between the original IP header and data. If you use ESP, the data is encrypted and an ESP trailer is also encapsulated. The transport mode is typically used for protecting host-to-host or host-to-gateway communications.
Figure 1 illustrates how IPsec uses different security protocols to encapsulate an IP packet in different encapsulation modes. The term data refers to the transport layer payload.
Figure 1 Encapsulation by security protocols in different modes
Authentication algorithms and encryption algorithms
· Authentication algorithms
IPsec uses hash algorithms to perform authentication. A hash algorithm produces a fixed-length digest for an arbitrary-length message. IPsec peers respectively calculate message digests for each packet. If the resulting digests are identical, the packet is considered intact.
IPsec supports two hash algorithms for authentication:
¡ MD5, which takes a message of arbitrary length as input and produces a 128-bit message digest.
¡ SHA-1, which takes a message of a maximum length less than the 64th power of 2 in bits as input and produces a 160-bit message digest.
Compared with SHA-1, MD5 is faster but less secure.
· Encryption algorithms
IPsec mainly uses symmetric encryption algorithms, which encrypt and decrypt data by using the same keys. Three encryption algorithms are available for IPsec on the switch:
¡ Data Encryption Standard (DES), which encrypts a 64-bit plaintext block with a 56-bit key. DES is the least secure but the fastest algorithm. It is sufficient for general security requirements.
¡ Triple DES (3DES), which encrypts plaintext data with three 56-bit DES keys. The key length totals up to 168 bits. It provides moderate security strength and is slower than DES.
¡ Advanced Encryption Standard (AES), which encrypts plaintext data with a 128-bit, 192-bit, or 256-bit key. AES provides the highest security strength and is slower than 3DES.
Negotiation modes
The switch supports the SA negotiation mode of manual. In this mode, all information that an SA needs must be configured manually. The configuration is relatively complex but this mode implements IPsec independently of IKE.
IPsec tunnel
An IPsec tunnel is a bidirectional channel created between two peers. An IPsec tunnel comprises one or more pairs of SAs.
IPsec for IPv6 routing protocols
You can use IPsec to protect routing information and defend attacks for these IPv6 routing protocols: OSPFv3, IPv6 BGP, and RIPng. IPsec enables these IPv6 routing protocols to encapsulate outbound protocol packets and de-encapsulate inbound protocol packets with the AH or ESP protocol. If an inbound protocol packet is not IPsec protected, or fails to be de-encapsulated, for example, due to decryption or authentication failure, the routing protocol discards that packet.
You must manually configure SA parameters in a security policy for IPv6 routing protocols. The IKE key exchange mechanism is applicable only to one-to-one communications. IPsec cannot implement automatic key exchange for one-to-many communications on a broadcast network, where switches must use the same SA parameters (SPI and key) to process packets for a routing protocol.
Protocols and standards
· RFC 2401 Security Architecture for the Internet Protocol
· RFC 2402 IP Authentication Header
· RFC 2406 IP Encapsulating Security Payload
· RFC 4552 Authentication/Confidentiality for OSPFv3
Configuring IPsec
There are several methods for configuring IPsec. The switch supports only application-based IPsec, which allows you to bind an IPsec policy to an application to protect the packets of that application. No ACL or route is required for identifying the data flows to be protected.
The switch supports configuring application-based IPsec for IPv6 routing protocols. By applying a manual IPsec policy to a certain IPv6 routing protocol, the packets of that protocol are IPsec protected. For configuration information, see “Configuring IPsec for IPv6 routing protocols.”
To configure IPsec, you must:
· Configure IPsec proposals to specify the security protocols, authentication and encryption algorithms, and encapsulation mode.
· Configure IPsec policies to associate data flows with IPsec proposal and specify the SA negotiation mode, required keys, and SA lifetime.
Complete the following tasks to configure IPsec:
|
Task |
Remarks |
|
Required |
|
|
Required |
Configuring an IPsec proposal
An IPsec proposal, part of an IPsec policy or an IPsec profile, defines the security parameters for IPsec SA negotiation, including the security protocol, encryption/authentication algorithms, and encapsulation mode.
To configure an IPsec proposal:
|
Step |
Command |
Remarks |
|
1. Enter system view. |
system-view |
N/A |
|
2. Create an IPsec proposal and enter its view. |
ipsec proposal proposal-name |
By default, no IPsec proposal exists. |
|
3. Specify the security protocol for the proposal. |
transform { ah | ah-esp | esp } |
Optional. ESP by default. |
|
4. Specify the security algorithms. |
· Specify the encryption algorithm for ESP: · Specify the authentication algorithm for ESP: · Specify the authentication algorithm for AH: |
Optional. By default, the encryption algorithm for ESP is DES, the authentication algorithm for ESP is MD5, and the authentication algorithm for AH is MD5. |
|
5. Set the IP packet encapsulation mode. |
encapsulation-mode { transport | tunnel } |
Optional. Tunnel mode by default. If the source and destination addresses are the end addresses of the IPsec tunnel, the encapsulation mode must be transport. For an IPsec proposal to be used by an IPsec policy to protect an IPv6 routing protocol, the encapsulation mode must be transport. |
|
|
NOTE: · Changes to an IPsec proposal affect only SAs negotiated after the changes. To apply the changes to existing SAs, execute the reset ipsec sa command to clear the SAs so that they can be set up using the updated parameters. · Only when a security protocol is selected, can you configure security algorithms for it. For example, you can specify the ESP-specific security algorithms only when you select ESP as the security protocol. ESP supports three IP packet protection schemes: encryption only, authentication only, or both encryption and authentication. · You can configure up to 10000 IPsec proposals in the system. |
Configuring an IPsec policy
IPsec policies define which IPsec proposals should be used to protect which data flows. An IPsec policy is uniquely identified by its name and sequence number. The switch supports only manual IPsec policies, and you must manually configure IPsec policy parameters, such as the keys and SPIs.
To ensure successful SA negotiations, follow these guidelines when configuring manual IPsec policies at the two ends of an IPsec tunnel:
· The IPsec policies at the two ends must have IPsec proposals that use the same security protocols, security algorithms, and encapsulation mode.
· The remote IP address configured on the local end must be the same as the IP address of the remote end.
· At each end, configure parameters for both the inbound SA and the outbound SA and make sure that different SAs use different SPIs.
· The local inbound SA must use the same SPI and keys as the remote outbound SA. The same is true of the local outbound SA and the remote inbound SA
· The keys for the local and remote inbound and outbound SAs must be in the same format. For example, if the local inbound SA uses a key in characters, the local outbound SA and remote inbound and outbound SAs must use keys in characters.
Follow the following guidelines when configuring an IPsec policy for an IPv6 protocol:
· All SAs (both inbound and outbound) within the routed network scope must use the same SPI and keys.
· Within a certain routed network scope, the IPsec proposals used by the IPsec policies on all routers must have the same security protocols, security algorithms, and encapsulation mode. For OSPFv3, the scope can be directly connected neighbors or an OSPFv3 area. For RIPng, the scope can be directly connected neighbors or a RIPng process. For IPv6 BGP, the scope can be directly connected neighbors or a neighbor group.
To configure a manual IPsec policy:
|
Step |
Command |
Remarks |
|
1. Enter system view. |
system-view |
N/A |
|
2. Create a manual IPsec policy and enter its view. |
ipsec policy policy-name seq-number manual |
By default, no IPsec policy exists. |
|
3. Assign IPsec proposals to the IPsec policy. |
proposal proposal-name |
By default, an IPsec policy references no IPsec proposal. |
|
4. Configure the SPIs for the SAs. |
sa spi { inbound | outbound } { ah | esp } spi-number |
N/A |
|
5. Configure keys for the SAs |
· Configure an authentication key in hexadecimal for AH: · Configure an authentication key in characters for AH: · Configure a key in characters for ESP: · Configure an authentication key in hexadecimal for ESP: · Configure an encryption key in hexadecimal for ESP: |
Configure a key for AH or ESP as needed. If you configure a key in characters for ESP, the switch automatically generates an authentication key and an encryption key for ESP. |
|
|
NOTE: · For manual SAs, an IPsec policy can reference only one IPsec proposal. To change an IPsec proposal for an IPsec policy, you must remove the proposal reference first. · Be sure to configure parameters for both the inbound SA and the outbound SA. · If you configure a key in two modes: string and hexadecimal, only the last configured one will be used. |
Configuring IPsec for IPv6 routing protocols
The following is the generic configuration procedure for configuring IPsec for IPv6 routing protocols:
1. Configure an IPsec proposal to specify the security protocols, authentication and encryption algorithms, and encapsulation mode.
2. Configure a manual IPsec policy to specify the keys and SPI.
3. Apply the IPsec policy to an IPv6 routing protocol.
Complete the following tasks to configure IPsec for IPv6 routing protocols:
|
Task |
Remarks |
|
Required. |
|
|
Required. ACLs and IPsec tunnel addresses are not needed. |
|
|
Applying an IPsec policy to an IPv6 routing protocol |
Required. See Layer 3—IP Routing Configuration Guide. |
Displaying and maintaining IPsec
|
Task |
Command |
Remarks |
|
Display IPsec policy information. |
display ipsec policy [ brief | name policy-name [ seq-number ] ] [ | { begin | exclude | include } regular-expression ] |
Available in any view |
|
Display IPsec proposal information. |
display ipsec proposal [ proposal-name ] [ | { begin | exclude | include } regular-expression ] |
Available in any view |
|
Display IPsec SA information. |
display ipsec sa [ brief | policy policy-name [ seq-number ] ] [ | { begin | exclude | include } regular-expression ] |
Available in any view |
|
Display IPsec packet statistics. |
display ipsec statistics [ tunnel-id integer ] [ | { begin | exclude | include } regular-expression ] |
Available in any view |
|
Clear SAs. |
reset ipsec sa [ policy policy-name [ seq-number ] ] |
Available in user view |
|
Clear IPsec statistics. |
reset ipsec statistics |
Available in user view |
IPsec for RIPng configuration example
|
|
NOTE: The IPsec configuration procedures for protecting OSPFv3 and IPv6 BGP are similar. For more information about RIPng, OSPFv3, and IPv6 BGP, see Layer 3—IP Routing Configuration Guide. |
Network requirements
As shown in Figure 2, Switch B connects Switch A and Switch C. These switches learn IPv6 routing information through RIPng. RIPng packets between any two switches must be transmitted through an IPsec tunnel that uses the security protocol ESP, encryption algorithm DES, and authentication algorithm SHA1-HMAC-96.

Configuration considerations
To meet the requirements, you must perform the following configurations:
· Configure basic RIPng parameters.
· Configure a manual IPsec policy.
· Apply the IPsec policy to a RIPng process to protect RIPng packets in this process or to an interface to protect RIPng packets traveling through the interface.
Configuration procedure
|
|
NOTE: For information about RIPng configuration, see Layer 3—IP Routing Configuration Guide. |
1. Configure Switch A.
# Assign an IPv6 address to each interface. (Details not shown)
# Create a RIPng process and enable it on VLAN-interface 100.
<SwitchA> system-view
[SwitchA] ripng 1
[SwitchA-ripng-1] quit
[SwitchA] interface vlan-interface 100
[SwitchA-Vlan-interface100] ripng 1 enable
[SwitchA-Vlan-interface100] quit
# Create an IPsec proposal named tran1, and set the encapsulation mode to transport mode, the security protocol to ESP, the encryption algorithm to DES, and authentication algorithm to SHA1-HMAC-96.
[SwitchA] ipsec proposal tran1
[SwitchA-ipsec-proposal-tran1] encapsulation-mode transport
[SwitchA-ipsec-proposal-tran1] transform esp
[SwitchA-ipsec-proposal-tran1] esp encryption-algorithm des
[SwitchA-ipsec-proposal-tran1] esp authentication-algorithm sha1
[SwitchA-ipsec-proposal-tran1] quit
# Create an IPsec policy named policy001, specify the manual mode for it, and set the SPIs of the inbound and outbound SAs to 123456, and the keys for the inbound and outbound SAs using ESP to abcdefg.
[SwitchA] ipsec policy policy001 10 manual
[SwitchA-ipsec-policy-manual-policy001-10] proposal tran1
[SwitchA-ipsec-policy-manual-policy001-10] sa spi outbound esp 123456
[SwitchA-ipsec-policy-manual-policy001-10] sa spi inbound esp 123456
[SwitchA-ipsec-policy-manual-policy001-10] sa string-key outbound esp abcdefg
[SwitchA-ipsec-policy-manual-policy001-10] sa string-key inbound esp abcdefg
[SwitchA-ipsec-policy-manual-policy001-10] quit
# Apply IPsec policy policy001 to the RIPng process.
[SwitchA] ripng 1
[SwitchA-ripng-1] enable ipsec-policy policy001
[SwitchA-ripng-1] quit
2. Configure Switch B
# Assign an IPv6 address to each interface. (Details not shown)
# Create a RIPng process and enable it on VLAN-interface 100 and VLAN-interface 200.
<SwitchB> system-view
[SwitchB] ripng 1
[SwitchB-ripng-1] quit
[SwitchB] interface vlan-interface 200
[SwitchB-Vlan-interface200] ripng 1 enable
[SwitchB-Vlan-interface200] quit
[SwitchB] interface vlan-interface 100
[SwitchB-Vlan-interface100] ripng 1 enable
[SwitchB-Vlan-interface100] quit
# Create an IPsec proposal named tran1, and set the encapsulation mode to transport mode, the security protocol to ESP, the encryption algorithm to DES, and authentication algorithm to SHA1-HMAC-96.
[SwitchB] ipsec proposal tran1
[SwitchB-ipsec-proposal-tran1] encapsulation-mode transport
[SwitchB-ipsec-proposal-tran1] transform esp
[SwitchB-ipsec-proposal-tran1] esp encryption-algorithm des
[SwitchB-ipsec-proposal-tran1] esp authentication-algorithm sha1
[SwitchB-ipsec-proposal-tran1] quit
# Create an IPsec policy named policy001, specify the manual mode for it, and configure the SPIs of the inbound and outbound SAs to 123456, and the keys for the inbound and outbound SAs using ESP to abcdefg.
[SwitchB] ipsec policy policy001 10 manual
[SwitchB-ipsec-policy-manual-policy001-10] proposal tran1
[SwitchB-ipsec-policy-manual-policy001-10] sa spi outbound esp 123456
[SwitchB-ipsec-policy-manual-policy001-10] sa spi inbound esp 123456
[SwitchB-ipsec-policy-manual-policy001-10] sa string-key outbound esp abcdefg
[SwitchB-ipsec-policy-manual-policy001-10] sa string-key inbound esp abcdefg
[SwitchB-ipsec-policy-manual-policy001-10] quit
# Apply IPsec policy policy001 to the RIPng process.
[SwitchB] ripng 1
[SwitchB-ripng-1] enable ipsec-policy policy001
[SwitchB-ripng-1] quit
3. Configure Switch C
# Assign an IPv6 address to each interface. (Details not shown)
# Create a RIPng process and enable it on VLAN-interface 200.
<SwitchC> system-view
[SwitchC] ripng 1
[SwitchC-ripng-1] quit
[SwitchC] interface vlan-interface 200
[SwitchC-Vlan-interface200] ripng 1 enable
[SwitchC-Vlan-interface200] quit
# Create an IPsec proposal named tran1, and set the encapsulation mode to transport mode, the security protocol to ESP, the encryption algorithm to DES, and authentication algorithm to SHA1-HMAC-96.
[SwitchC] ipsec proposal tran1
[SwitchC-ipsec-proposal-tran1] encapsulation-mode transport
[SwitchC-ipsec-proposal-tran1] transform esp
[SwitchC-ipsec-proposal-tran1] esp encryption-algorithm des
[SwitchC-ipsec-proposal-tran1] esp authentication-algorithm sha1
[SwitchC-ipsec-proposal-tran1] quit
# Create an IPsec policy named policy001, specify the manual mode for it, and configure the SPIs of the inbound and outbound SAs to 123456, and the keys for the inbound and outbound SAs using ESP to abcdefg.
[SwitchC] ipsec policy policy001 10 manual
[SwitchC-ipsec-policy-manual-policy001-10] proposal tran1
[SwitchC-ipsec-policy-manual-policy001-10] sa spi outbound esp 123456
[SwitchC-ipsec-policy-manual-policy001-10] sa spi inbound esp 123456
[SwitchC-ipsec-policy-manual-policy001-10] sa string-key outbound esp abcdefg
[SwitchC-ipsec-policy-manual-policy001-10] sa string-key inbound esp abcdefg
[SwitchC-ipsec-policy-manual-policy001-10] quit
# Apply IPsec policy policy001 to the RIPng process.
[SwitchC] ripng 1
[SwitchC-ripng-1] enable ipsec-policy policy001
[SwitchC-ripng-1] quit
4. Verify the configuration
After the configuration, Switch A, Switch B, and Switch C learns IPv6 routing information through RIPng. SAs are set up successfully, and the IPsec tunnel between two peers is up for protecting the RIPng packets.
Using the display ripng command on Switch A, you will see the running status and configuration information of the specified RIPng process. The output shows that IPsec policy policy001 is applied to this process successfully.
<SwitchA> display ripng 1
Public vpn-instance name :
RIPng process : 1
Preference : 100
Checkzero : Enabled
Default Cost : 0
Maximum number of balanced paths : 16
Update time : 30 sec(s) Timeout time : 180 sec(s)
Suppress time : 120 sec(s) Garbage-Collect time : 120 sec(s)
Number of periodic updates sent : 0
Number of trigger updates sent : 0
IPsec policy name: policy001, SPI: 123456
Using the display ipsec sa command on Switch A, you will see the information about the inbound and outbound SAs.
<SwitchA> display ipsec sa
===============================
Protocol: RIPng
===============================
-----------------------------
IPsec policy name: "policy001"
sequence number: 10
mode: manual
-----------------------------
connection id: 1
encapsulation mode: transport
perfect forward secrecy:
tunnel:
flow:
[inbound ESP SAs]
spi: 123456 (0x3039)
proposal: ESP-ENCRYPT-DES ESP-AUTH-SHA1
No duration limit for this sa
[outbound ESP SAs]
spi: 123456 (0x3039)
proposal: ESP-ENCRYPT-DES ESP-AUTH-SHA1
No duration limit for this sa
Similarly, you can view the information on Switch B and Switch C. (Details not shown)