| Title | Size | Downloads |
|---|---|---|
| H3C CAS CVM Stateful Failover Configuration Guide-5W102-book.pdf | 274.42 KB |
- Table of Contents
- Related Documents
-
|
|
|
H3C CAS |
|
CVM Stateful Failover Configuration Guide |
|
|
|
|
Document version: 5W102-20211126
Copyright © 2019-2021 New H3C Technologies Co., Ltd. All rights reserved.
No part of this manual may be reproduced or transmitted in any form or by any means without prior written consent of New H3C Technologies Co., Ltd.
Except for the trademarks of New H3C Technologies Co., Ltd., any trademarks that may be mentioned in this document are the property of their respective owners.
The information in this document is subject to change without notice.
Contents
Configuring CVM stateful failover
Local synchronization partition
Stateful failover system setup time
Setting up a stateful failover system
Configuring a VNC proxy server
Managing CVM stateful failover
Manually recovering a failed CVM host
Modifying the IQN of a VM template pool
Running the ms_recovery.sh script
Managing the stateful failover service
About the scripts of the stateful failover service
Verifying service states on the CVM stateful failover system
Verifying DRBD split-brain failure
Deleting the local synchronization partition
About CVM stateful failover
For high availability, you can set up a stateful failover system for CVM with two hosts to prevent hardware or software failure from interrupting services. In the stateful failover system, one host is placed in primary state to provide services, and the other host is placed in backup state as a standby. The hosts synchronize data in real time to maintain configuration consistency. When the primary host fails, the backup host takes over automatically to ensure service continuity for CVM.
Mechanisms
A CVM stateful failover system relies on data replication through Distributed Replicated Block Device (DRBD) to synchronize data between the primary and backup CVM hosts in the system. When the primary CVM host has data changes, the backup CVM host synchronizes its data with the primary CVM host in real time to ensure management data consistency.
In E0523 and later, the CVM master slave daemon (CMSD) controls primary/backup switchover. The major functions of CMSD include the following:
· Cluster communication by using Corosync, Pacemaker, and Glue.
Corosync is part of the cluster management suite. When transmitting data, Corosync defines how and by using what protocol data is transmitted in a simple configuration file.
Pacemaker is an open source high-availability cluster resource manager located in the resource manager and resource agent tier of the HA cluster architecture. Pacemaker works as the communication layer to offer relation management, heartbeat engine, and heartbeat detection services.
· Management of the stateful failover service, such as enabling or disabling this service or performing primary/backup switchover.
· Automatic service failover upon network or host failure.
|
|
NOTE: The stateful failover mechanisms in a CVM software version earlier than E0523 are different than E0523 and later. If you upgrade the stateful failover system from a version earlier than E0523 to E0523 or later, the stateful failover mechanisms are not upgraded with the software. |
Quorum modes
If the primary and backup CVM hosts fail to communicate with each other but have reachability to external networks, the quorum mechanism operates to handle the issue. CVM supports the following quorum modes:
· Advanced quorum—A host installed with CMSD acts as a quorum host. Typically, the quorum host is a CVK host managed by the CAS platform that manages the stateful failover system. The primary and backup CVM hosts send their status to the quorum host, and the quorum host determines their roles based on the status information and sends the result back to them.
· Ping quorum—Two IP addresses are specified as quorum IP addresses. The primary and backup CVM hosts ping the quorum IP addresses simultaneously to test network connectivity. If a CVM host fails to ping both quorum IP addresses, it changes its role to backup.
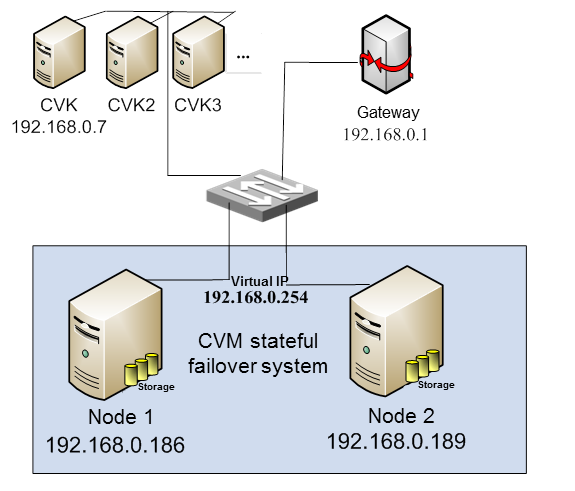
Network diagram
Figure 1 shows a typical stateful failover system network.
· Node 1 and Node 2 are the CVM hosts that form the stateful failover system.
· CAS runs on multiple CVK hosts and the stateful failover system.
Figure 1 Stateful failover system
In E0523 and later, the stateful failover system contains the following nodes:
· Primary and backup nodes with CMSD installed.
· Quorum nodes.
¡ For advanced quorum, the quorum node is a CVK host managed by the CAS platform that runs on the primary and backup nodes or a node with CMSD installed.
¡ For ping quorum, the quorum nodes are switches or routers pingable to the primary and backup nodes.
Configuring CVM stateful failover
Prerequisites
The hosts to form the stateful failover system must meet the following requirements:
· The database partition is on the /vms partition. On each host, assign a minimum of 30 GB space to the /vms partition during CVM installation. Use the following formula to determine the minimum capacity of the /vms partition:
Database partition size = (estimated number of hosts ×10 MB + estimated number of VMs × 15 MB) × 15 / 1024 MB +10 GB.
As a best practice, assign as much as space to the /vms partition without sacrificing the capacity of other partitions.
· The management network of the CVM hosts is a 10 Gigabit network if the database partition size exceeds 200 GB.
· The hosts have never been managed as CVK hosts or are not managing CVK hosts.
· The hosts only have default storage pools isopool and defaultpool.
· The hosts are installed with the same version of CAS and same CAS components.
· The hosts have the same system boot method and boot drive for operating system installation.
· The hosts have connectivity over the management network.
The quorum nodes must meet the following requirements:
· The CAS software versions of the quorum host and primary and backup CVM hosts must be the same.
· As a best practice, use the CVK hosts managed by the same CAS platform for advanced quorum.
CVM host management
In E0523 and later, you can assign the CVM hosts to the host pools managed by themselves. However, the CVM hosts cannot act as CVK hosts after you create a local synchronization partition, and you cannot create a local synchronization partition after you assign the CVM hosts as CVK hosts to host pools.
In software versions earlier than E0523, you cannot manage the CVM hosts as CVK hosts. The CVM hosts cannot act as CVK hosts even if you upgrade the stateful failover system to E0523 or later.
You cannot assign the CVM hosts as service hosts to another CAS system.
VM template pool selection
CVM supports the following VM template pools:
· FC or iSCSI shared directory.
· Local synchronization partition.
As a best practice, use FC or iSCSI shared directories as VM template pools. If no LUNs of shared storage are available to the hosts in the stateful failover system, use a local synchronization partition as a VM template pool. For example, if you set up a stateful failover system with two VMs that cannot access shared storage, you can create a local synchronization partition for VM template synchronization between the VMs. You can create one local synchronization partition as a VM template pool.
If you use both types of VM template pools, configure local synchronization partitions before you mount LUNs of FC or iSCSI storage.
Local synchronization partition
You can create a local synchronization partition with a local disk on each CVM host after you set up the stateful failover system. Before you create the local synchronization partition, make sure the primary and backup CVM hosts meet the following requirements:
· They are not added to CAS as CVK hosts.
· They only have default storage pools.
· They cannot access LUNs on FC or iSCSI storage devices. As a best practice, remove the cables connected to FC or iSCSI storage devices.
· Their local disks are the same size and use the same device name, /dev/sd* for example.
Stateful failover system setup time
You can set up a stateful failover system on one CVM platform. Setting up a stateful failover system might take a long time, because the local and peer disk partitions must be initialized during the setup process. The time it takes to set up a stateful failover system depends on the disk size and network speed. For example, it requires about 20 minutes to initialize 100 GB of disk space over a Gigabit network, and using a 10 Gigabit network can speed up initialization.
Restrictions and guidelines
When you set up a stateful failover system, follow these restrictions and guidelines:
· Use stateful failover if your service system has a low tolerance to service interruption or provides criterial services.
· Connect CVK hosts to CVM hosts by using Gigabit links or faster links.
· You can assign the primary and backup nodes as CVK hosts to the host pools managed by themselves.
· You cannot split a stateful failover system into two independent CVM platforms.
· You can set up a stateful failover system only when deploying CVM. You cannot set up a stateful failover system for deployed CVM because data of deployed CVM is cleared in stateful failover system setup.
· For successful stateful failover system setup, configure simple host names for the member hosts in the stateful failover system. For example, use host names that contain only letters and digits (the first character is not a digit). If the host names contain special characters such as dots, stateful failover system setup might fail.
· You can set up a stateful failover system only in root login mode.
· Transient service interruption might occur in primary/backup switchover.
· If the stateful failover system splits because of network anomalies, the nodes in the system automatically elect the primary node after the network recovers. If CVK hosts are sending performance statistics to the backup node when the split-brain failure occurs, the hosts will still send performance statistics to the backup node after the stateful failover system recovers, which causes data loss on the primary node. To resolve this issue, you must connect the CVK hosts to the primary CVM platform.
· When stateful failover system setup or creation of the local synchronization partition is in progress, do not restart or shut down servers. If you do so, you must redeploy the stateful failover system.
· A server does not support stateful failover system setup if it uses one of the following disks as the system disk:
¡ Disk with software RAID configured.
¡ NVMe disk.
¡ Disk with VROC configured.
If one of the above disks is used, the drive letter of the system disk is not in the sdX format.
Procedures
Selecting a deployment scheme
You can use one of the following deployment schemes, which are listed in descending order of priority:
· Physical CVM hosts with advanced quorum.
· Physical CVM hosts with ping quorum.
· VM CVM hosts with advanced quorum.
· VM CVM hosts with ping quorum.
Installing CVM
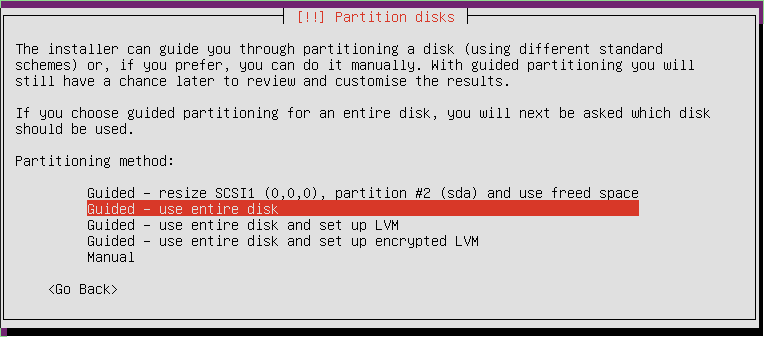
1. Install the same CVM version on the CVM hosts, using guided partitioning during installation as shown in Figure 2.
2. Execute the date command to verify that the system time of the CVM hosts is consistent.
If system time inconsistency exists, modify the system time manually or configure an NTP server to synchronize them. For more information about system time configuration, see the user manuals for the CVM hosts.
3. Execute the hwclock –w command to set the hardware clock to the current system time.
4. (Optional.) Modify the hostnames and IP addresses of the CVM hosts from the xsconsole.
|
|
CAUTION: Do not modify the hostnames and IP addresses of the CVM hosts if stateful failover has been enabled. |
5. Execute the lsblk command to verify that the CVM hosts have the same partition numbers and mount points for their system disks.
Setting up a stateful failover system
1. From the left navigation pane, select System > Stateful Failover.
2. Click Set Up Stateful Failover System.
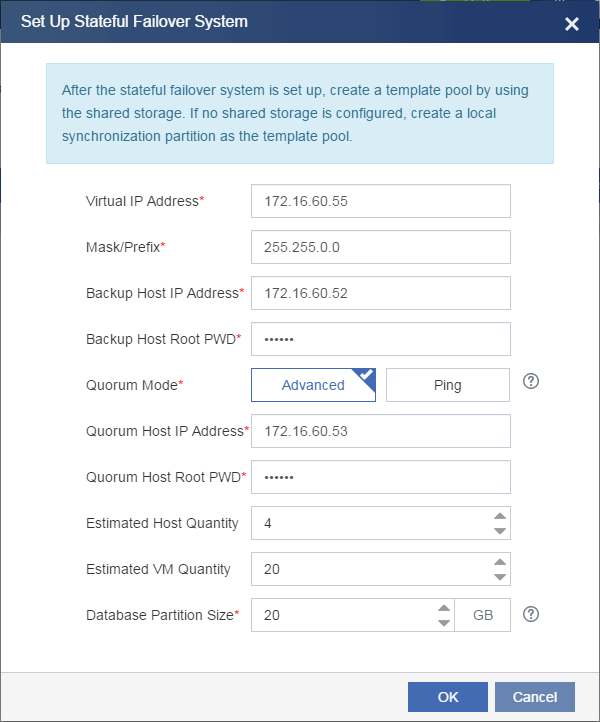
3. Configure the parameters used for setting up the stateful failover system as follows, and then click OK.
Figure 3 Configuring stateful failover parameters
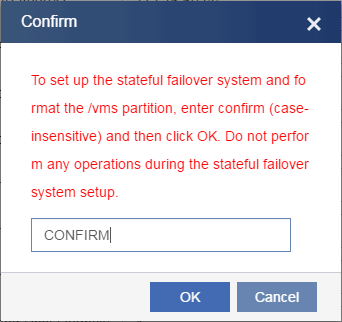
4. On the dialog box than opens, enter confirm and then click OK.
Figure 4 Confirming stateful failover system setup
5. CVM starts setting up the stateful failover system.
¡ If errors occur, modify incorrect parameters and re-set up the stateful failover system. Detailed information about the errors is saved in /var/log/cvm_master.log and /var/log/cvm_master_slave.log.
¡ If the stateful failover system is set up successfully, you will be redirected to the CAS login page.
Creating a VM template pool
After the stateful failover system is set up, the system requires you to configure a template pool when you log in to CVM for the first time.
To create a template pool:
1. Click Create Now.
Alternatively, you can skip this step and create VM template pools later.
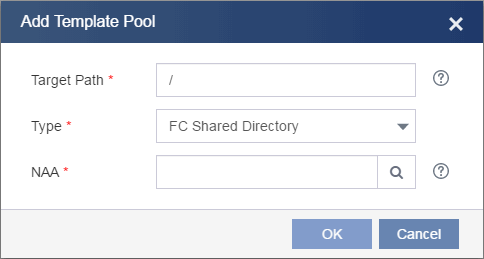
2. Configure the template pool parameters, and then click OK.
As a best practice, use an FC or iSCSI shared directory as a template pool.
Figure 5 Configuring a VM template pool
Configuring a VNC proxy server
If VNC proxy is required to log in to VMs, configure VNC proxy server parameters as follows:
1. From the left navigation pane, select System > Parameters.
2. Click the System Parameters tab.
3. Configure the VNC proxy server parameters.
For the stateful failover system to provide VNC proxy services correctly, follow these restrictions:
¡ Configure a VNC proxy server on both the primary and backup nodes and configure the virtual IP address of CVM as the IP address of the VNC proxy servers.
¡ Configure the same root password for the primary and backup nodes.
Figure 6 Configuring VNC proxy server parameters

Registering licenses
If you use local licensing, you must obtain the host information files for both the primary and backup CVM hosts to register licenses for the stateful failover system. The licensing procedure varies by software version. For more information, see local licensing in H3C CAS Registration Guide.
|
Software version |
Procedure |
|
Earlier than E0703 |
1. Log in to CVM at the virtual IP address and download the host information file for the primary CVM host. 2. From the left navigation pane, select System > Stateful Failover. 3. Click Primary/Backup Switchover, and then click OK. 4. Log in to CVM and download the host information file for the primary CVM host (former backup CVM host). 5. Access http://www.h3c.com/en/Support/Online_Help/License_Service/ and obtain stateful failover activation files by using the host information files. 6. Log in to CVM. 7. Register the license for the primary CVM host by using its stateful failover activation file. 8. Perform a primary/backup switchover. 9. Log in to CVM. 10. Register the license for the primary CVM host (former backup CVM host) by using its stateful failover activation file. |
|
E0703 to E0706 (E0706 not included) |
1. Obtain the host information file for the primary CVM host. 2. Perform a primary/backup switchover. 3. Obtain the host information file for the new primary CVM host. 4. Register the licenses on the new primary CVM host. |
|
E0706 and later |
1. Obtain the host information files for the primary and backup CVM hosts from the primary CVM host. 2. Register the licenses on the primary CVM host. |
If you use a license server, register the licenses only on the primary CVM host. For more information, see remote licensing in H3C CAS Registration Guide.
Managing CVM stateful failover
Manually recovering a failed CVM host
Perform this task if a CVM host must be replaced or must have its system reinstalled because of hardware failure.
Prerequisites
To replace a failed CVM host, make sure the CVM version of the replacement host is the same as the failed CVM host. You must enable root login permission on the replacement host by using the sudo su root command.
To replace the disk of a failed CVM host or replace a failed CVM host, make sure the size of the new disk or the disk size of the replacement host is the same as the disk size of the failed CVM host.
Restrictions and guidelines
For successful data synchronization, recover a failed CVM host while the other CVM host is providing services correctly.
A replacement host must have the same hostname and IP address as the failed CVM host. You can modify the hostname and IP address of the replacement host from the xsconsole after CVM is installed.
Installing CVM
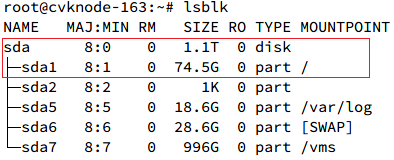
1. Identify whether the primary CVM host has the /boot/efi mount point. If this mount point exists, the host is booted in UEFI mode. If not, the host is booted in BIOS mode.
Figure 7 UEFI boot mode
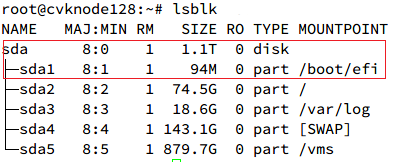
Figure 8 BIOS boot mode
2. Install CVM on a replacement host by using the same boot mode as that of the primary CVM host.
3. Select a partitioning method based on the CAS version.
¡ In E0523 and later, you can use automatic partitioning. Make sure the /vms partition is larger than the database partition. If the primary CVM host has a local synchronization partition disk, add a disk with the same size and name as the local synchronization partition disk to the replacement host.
Figure 9 Partitioning in E0523 and later
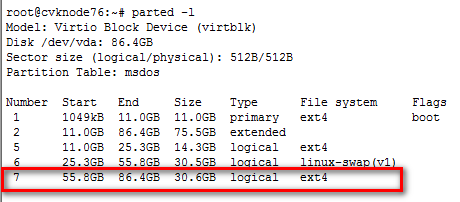
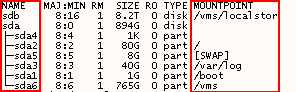
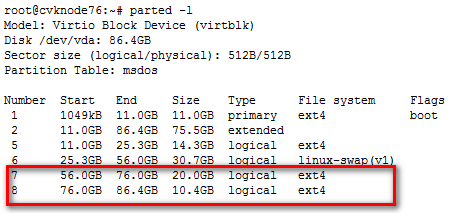
¡ In software versions earlier than E0523, use manual partitioning to ensure that the /vms partition of the replacement host is at least 200 MB larger than the total capacity of the two highest numbered partitions on the primary CVM host.
Figure 10 Two highest numbered partitions on the primary CVM host
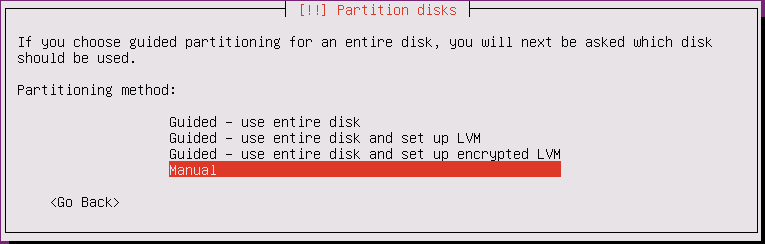
As a best practice, select manual partitioning to ensure partition size consistency among different CAS versions. For more information about partitioning, see H3C CAS Installation Guide.
Figure 11 Manual partitioning
4. Execute the date command to verify that the system time of the CVM hosts is consistent.
If system time inconsistency exists, modify the system time manually or configure an NTP server to synchronize them. For more information about system time configuration, see the user manuals for the CVM hosts.
5. Execute the hwclock –w command to set the hardware clock to the current system time.
Modifying the IQN of a VM template pool
If you have created a VM template pool on iSCSI shared storage, perform the following tasks:
1. Log in to CVM on the recovered CVM host or replacement host.
2. Change the IQN of the VM template pool to the original IQN assigned to the VM template pool.
If you do not have the IQN of the VM template pool, contact Technical Support.
Running the ms_recovery.sh script
Restrictions and guidelines
To ensure successful stateful failover system setup, do not interrupt execution of the ms_recovery.sh script.
For the script to be executed correctly, enclose each ampersand sign with quotation marks (") if the password contains ampersand signs (&). For example, if the root password of the peer host is 123&456, execute the ms_recovery.sh 172.16.60.51 123”&”456 123456 command to run the script.
Running the script might take a long period of time, because the local disk partitions must be initialized and synchronized during the setup process. The time it takes to initialize and synchronize the local disk partitions depends on the disk size and network speed. For example, it takes about 20 minutes to initialize 100 GB of disk space over a Gigabit network, and using a 10 Gigabit network can speed up initialization.
Parameters
Table 1 lists the parameters in the ms_recovery.sh script.
Table 1 Parameters in the ms_ recovery.sh script
|
Number |
Parameter |
Description |
|
$1 |
peer-node-ip |
Enter the management network IP address of the peer CVM host (replacement host). |
|
$2 |
peer-node-root-password |
Enter the root user password of the peer CVM host. |
|
$3 |
controller-root-password |
Enter the root user password of the quorum host. Do not set this parameter if you use ping quorum. |
Procedure
1. Log in to the primary CVM host as the root user.
2. Run the ms_recovery.sh script, and then enter yes.
root@cvknode1:~# ms_recovery.sh 172.16.60.51 123456 123456
Please confirm to recovery 172.16.60.51 and format peer's /vms partition [yes/no]:
yes
------------------------Ip address Check------------------
3. Verify the script execution result.
¡ If the CVM Master/Slave Restore Success message is displayed, the CVM stateful failover system has been recovered.
¡ If error messages are displayed, the host has aborted the execution of the script because of errors. You can check the /var/log/cvm_master.log and /var/log/cvm_master_slave.log files for detailed error information.
4. Log in to CVM.
5. If the CVK hosts managed by CVM (non-CVM hosts) are in abnormal state, reconnect to the CVK hosts.
Reregistering a CVM host
You must reregister a CVM host after its disk is replaced by using the activation file you have used to register the CVM host. When you reregister the CVM host, make sure it is the primary CVM host.
You must register a replacement host as described in "Registering licenses." Reregistration is not required to recover failures such as power outages and network interruptions.
Managing the stateful failover service
About the scripts of the stateful failover service
CVM provides the ms_resource_stop.sh and ms_resource_start.sh scripts for you to stop the stateful failover service for maintenance purposes.
|
|
NOTE: In software versions earlier than E0523, those scripts are used for primary/backup switchover. |
· ms_resource_stop.sh—Stops the stateful failover service. This script does not contain any parameters.
· ms_resource_start.sh—Starts the stateful failover service. This script contains an optional parameter:
|
Number |
Parameter |
Description |
|
$1 |
master node |
Enter the host name of the primary CVM host. By default, the host where this script runs is the primary CVM host. |
Restrictions and guidelines
Do not interrupt execution of the scripts. Do not restart or shut down the CVM hosts during script execution.
The stateful failover system does not split when the stateful failover service is stopped. You cannot use the CVM hosts as CVK hosts or independent CVM platforms.
Procedure
To stop the stateful failover service, execute the following command as a root user on one of the CVM hosts:
root@cvknode01:/#ms_resource_stop.sh
To start the stateful failover service and optionally specify the primary CVM host, execute the following command as a root user on one of the CVM hosts:
root@cvknode01:/#ms_resource_start.sh
Verifying service states on the CVM stateful failover system
· Verify that the stateful failover system is operating correctly.
root@cvknode1:~# crm status
master : cvknode1 (Online)
slave : cvknode2 (Online)
quorum : [controller] cvknode3 (Online)
-------------------------------------------
webip : [172.16.60.55] Started cvknode1
Master/Slave Set: [/var/lib/mysql-share]
Master: [cvknode1]
Slave : [cvknode2]
mysql : Started cvknode1
tomcat: Started cvknode1
-------------------------------------------
· Verify that the stateful failover service is running correctly after a CVM host failure.
root@cvknode2:~# crm status
master : cvknode2 (Online)
slave : cvknode1 (Offline)
quorum : [controller] cvknode3 (Online)
-------------------------------------------
webip : [172.16.60.55] Started cvknode2
Master/Slave Set: [/var/lib/mysql-share]
Master: [cvknode2]
Slave : [Unknown]
mysql : Started cvknode2
tomcat: Started cvknode2
-------------------------------------------
· Verify that stateful failover system setup has failed.
root@cvknode1:~# crm status
cmsadm: failed to connect to cmsd
Verifying DRBD split-brain failure
Execute the drbd-overview command and verify that the StandAlone state exists.
root@cvknode1:~# drbd-overview
0:r0/0 StandAlone Secondary/Unknow UpToDate/DUnknown r-----
0:r1/0 Connected Secondary/Primary UpToDate/UpToDate C r-----
Deleting the local synchronization partition
Restrictions and guidelines
You can delete the local synchronization partition only from the CLI. As a best practice, delete the local synchronization partition only when necessary.
Procedure
1. Execute the ms_rm_sync_partion.sh r1 command on the primary CVM host, and then enter yes.
root@cvknode1:~# ms_rm_sync_partition.sh r1
Please confirm to delete r1 sync partition [yes/no]:
yes
Success to delete sync r1.
2. Verify that the output from the drbd-overview command contains only the line that starts with r0/0.
root@cvknode2:~# drbd-overview
0:r0/0 Connected Primary/Secondary UpToDate/UpToDate C r----- /var/lib/mysql-share ext4 19G 91M 18G 1%
