| Title | Size | Downloads |
|---|---|---|
| H3C EWPM1WBCE0ENT Multiservice Access Controller Module Installation Guide-5W101-book.pdf | 1.51 MB |
- Related Documents
-
| Title | Size | Download |
|---|---|---|
| book | 1.51 MB |
H3C EWPM1WBCE0ENT Multiservice Access Controller Module Installation Guide -5W101
About the module
H3C EWPM1WBCE0ENT is a multiservice access controller module (hereinafter referred to as WBC module) that provides network management, intelligent O&M, authentication, and ISSU features. It can be used on WX3800X access controllers in small and medium-sized campus scenarios.
Figure 1 EWPM1WBCE0ENT multiservice access controller module
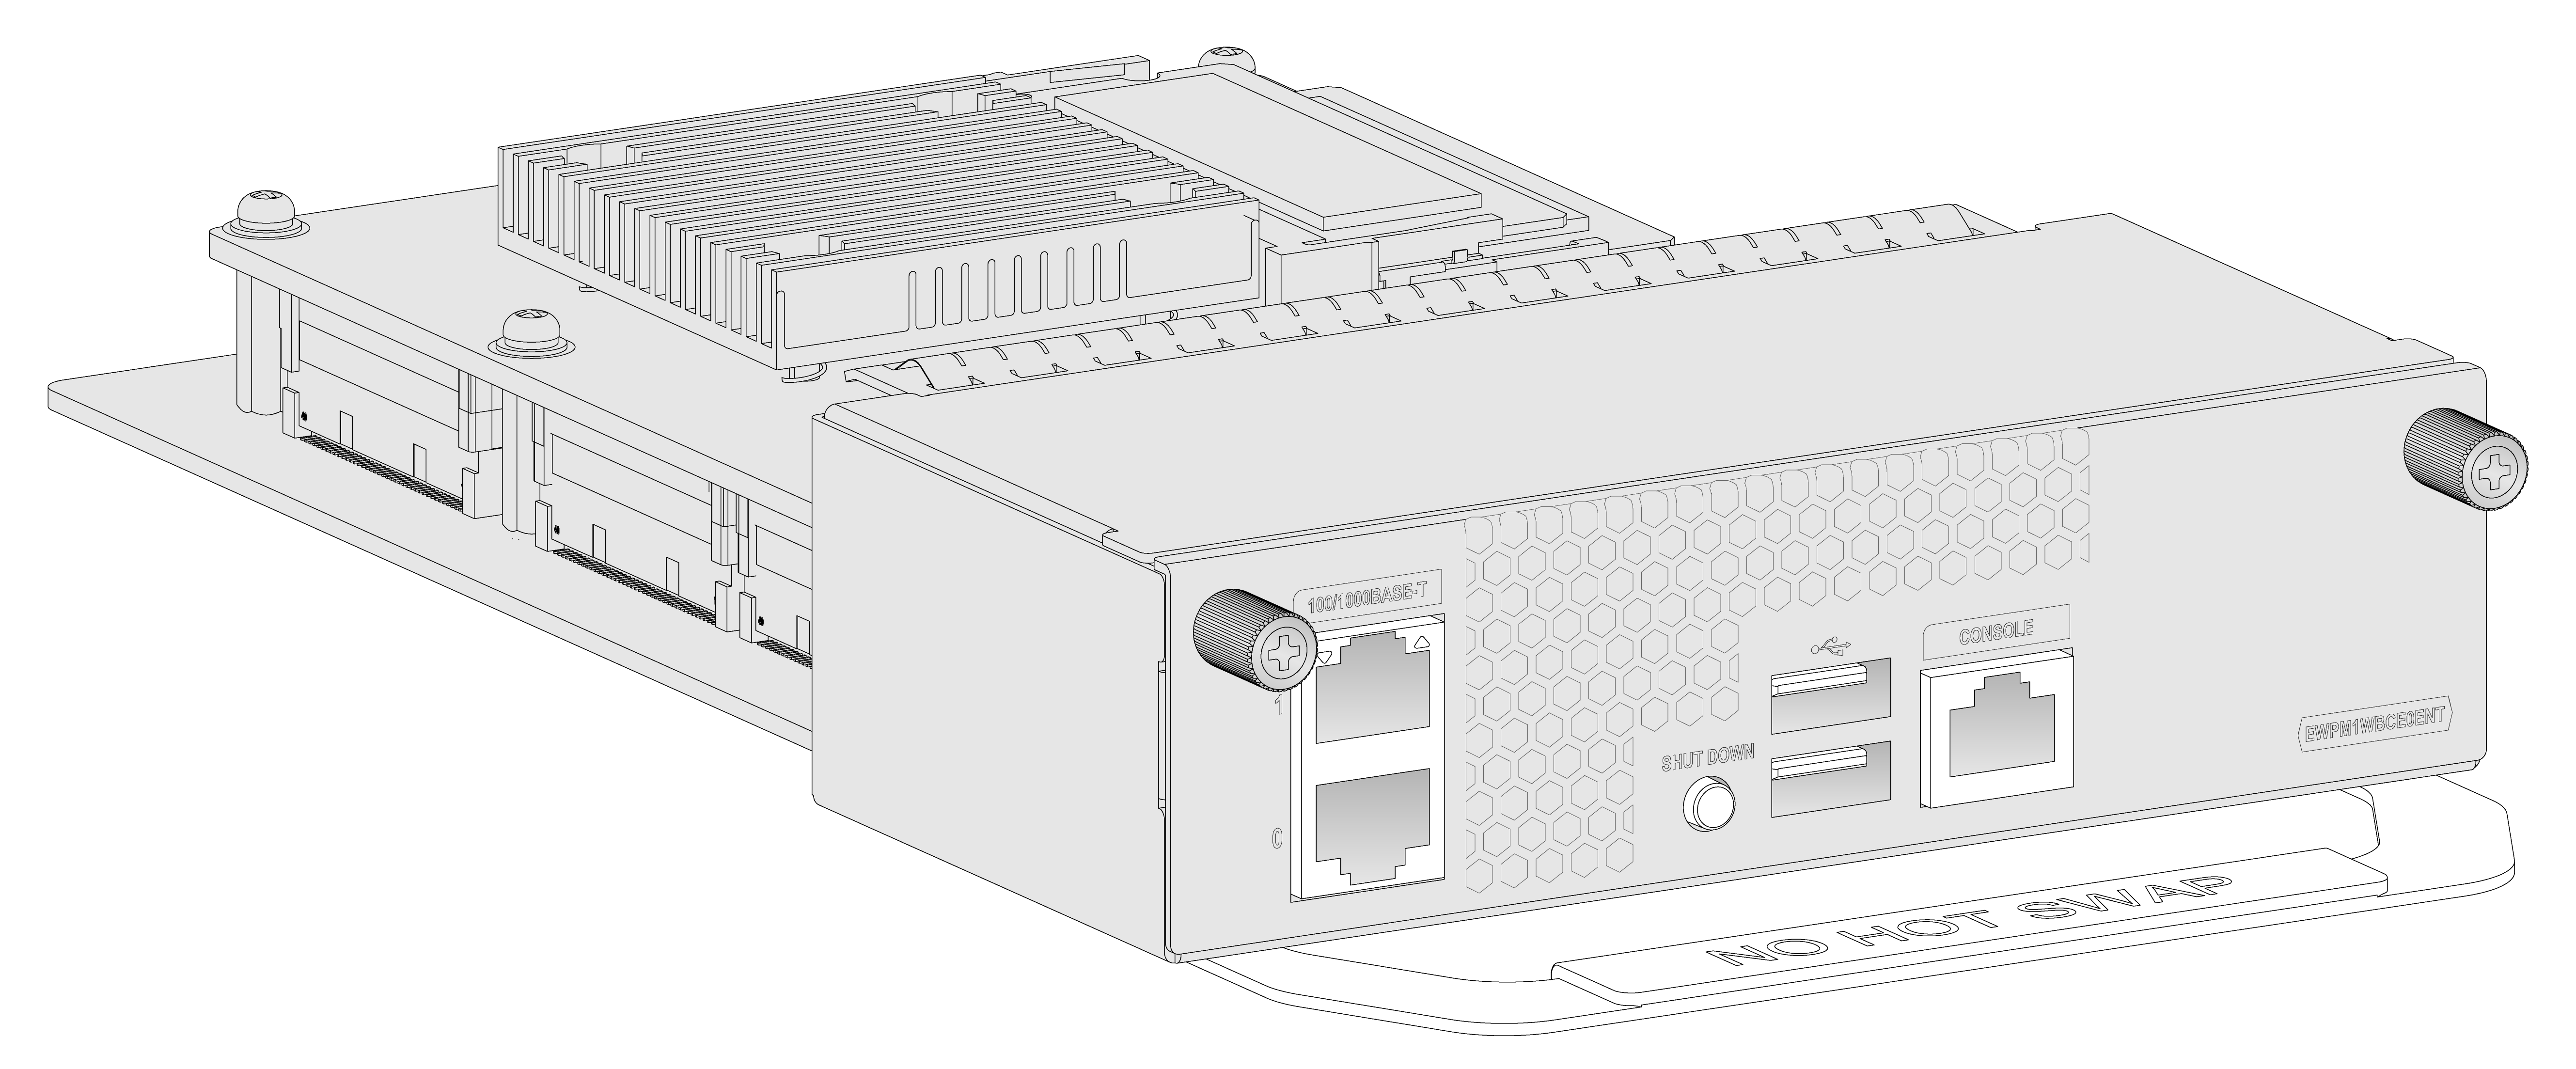
Interfaces
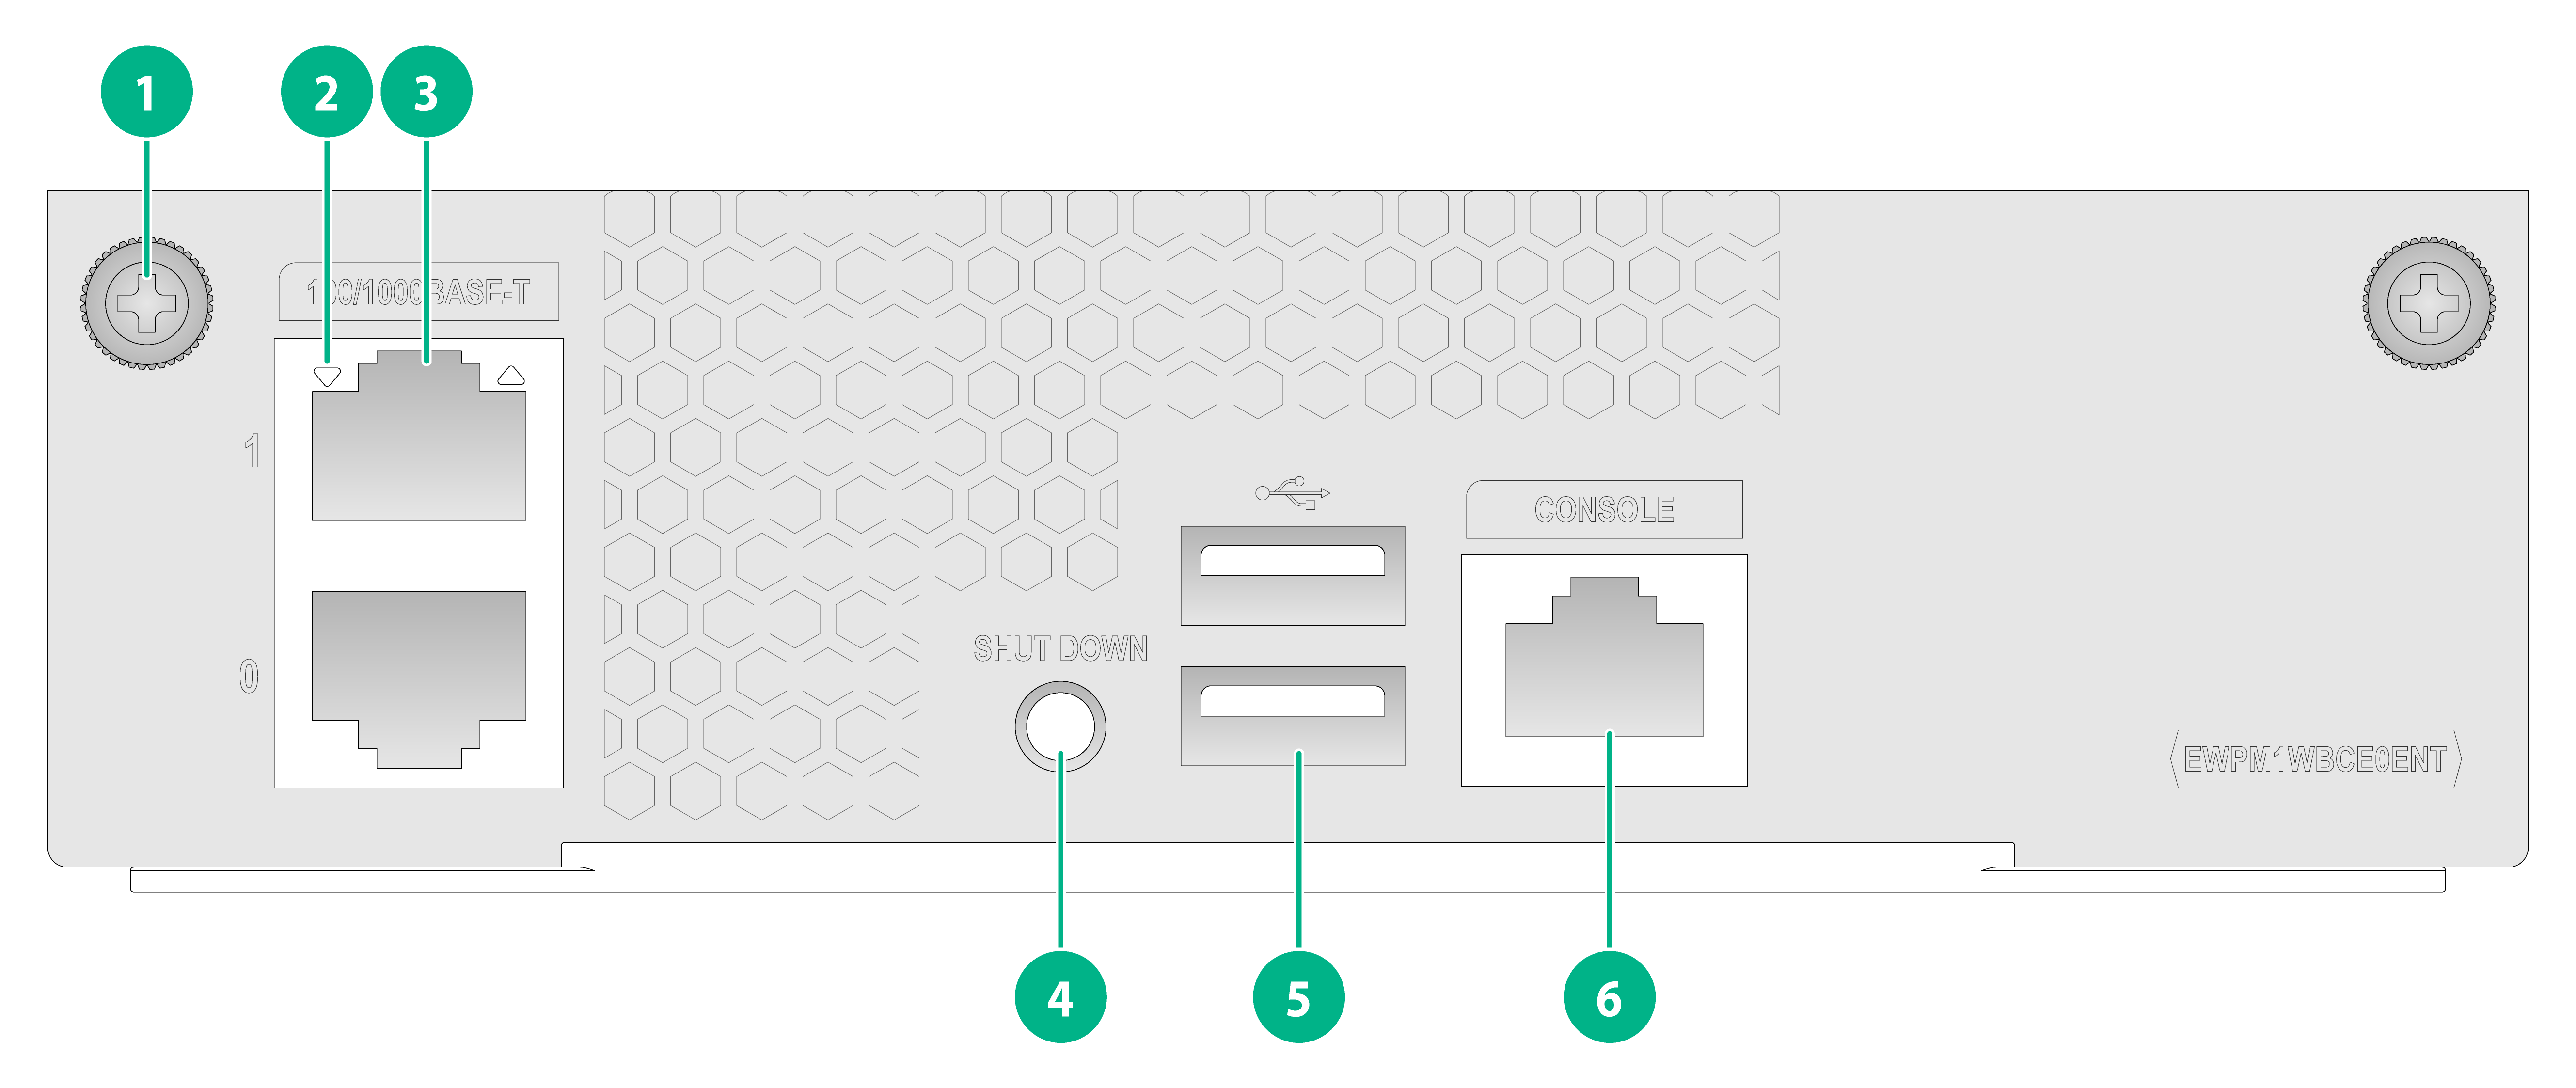
Figure 2 Front panel
|
(1) Captive screw |
|
|
(2) 100/1000BASE-T management copper port LED |
|
|
(3) 100/1000BASE-T management copper port |
|
|
(4) Power button |
|
|
(5) USB port |
(6) Console port |
Table 1 100/1000BASE-T copper port specifications
|
Item |
Specification |
|
Connector |
RJ-45 |
|
Port rate |
1000 Mbps, full duplex |
|
Cable type |
CAT5e or above twisted pair cable |
|
Maximum transmission distance |
100 m (328.08 ft) |
|
Compliant standard |
IEEE 802.3i, IEEE 802.3u, IEEE 802.3ab |
|
Services |
Connect to a computer or a remote network management workstation for software upgrade or network management. |
Table 2 Console port specifications
|
Item |
Specification |
|
Connector |
RJ-45 |
|
Port standard |
RS-232 |
|
Baud rate |
9600 bps (default) to 11520 bps |
|
Cable type |
Common asynchronous serial port cable |
|
Maximum transmission distance |
15 m (49.21 ft) |
|
Services |
· Connect to a character terminal. · Connect to a serial port on a local PC that runs a terminal emulation program. · Access the CLI |
Table 3 USB port specifications
|
Item |
Specification |
|
Port type |
USB 2.0 |
|
Port standard |
xHCI |
|
Services |
Transfer files, for example, software images or configuration files. |
LEDs
Table 4 100/1000BASE-T management copper port LED description
|
LED status |
Description |
|
Steady green |
A link is present on the port, and the port is operating at 100/1000 Mbps. |
|
Flashing green |
The port is sending or receiving data at 100/1000 Mbps. |
|
Off |
No link is present on the port. |
Installing and removing the module
|
|
CAUTION: · Do not use excessive force when installing or removing the module. · Do not touch the components on the module directly with your hand. |
Before installing the module, prepare an ESD wrist strap and tools that might be used.
Installing the module
|
|
CAUTION: · Keep the removed filler panel secure for future use. · The module cannot be hot swapped. Before installing or removing the module, first power off the device. |
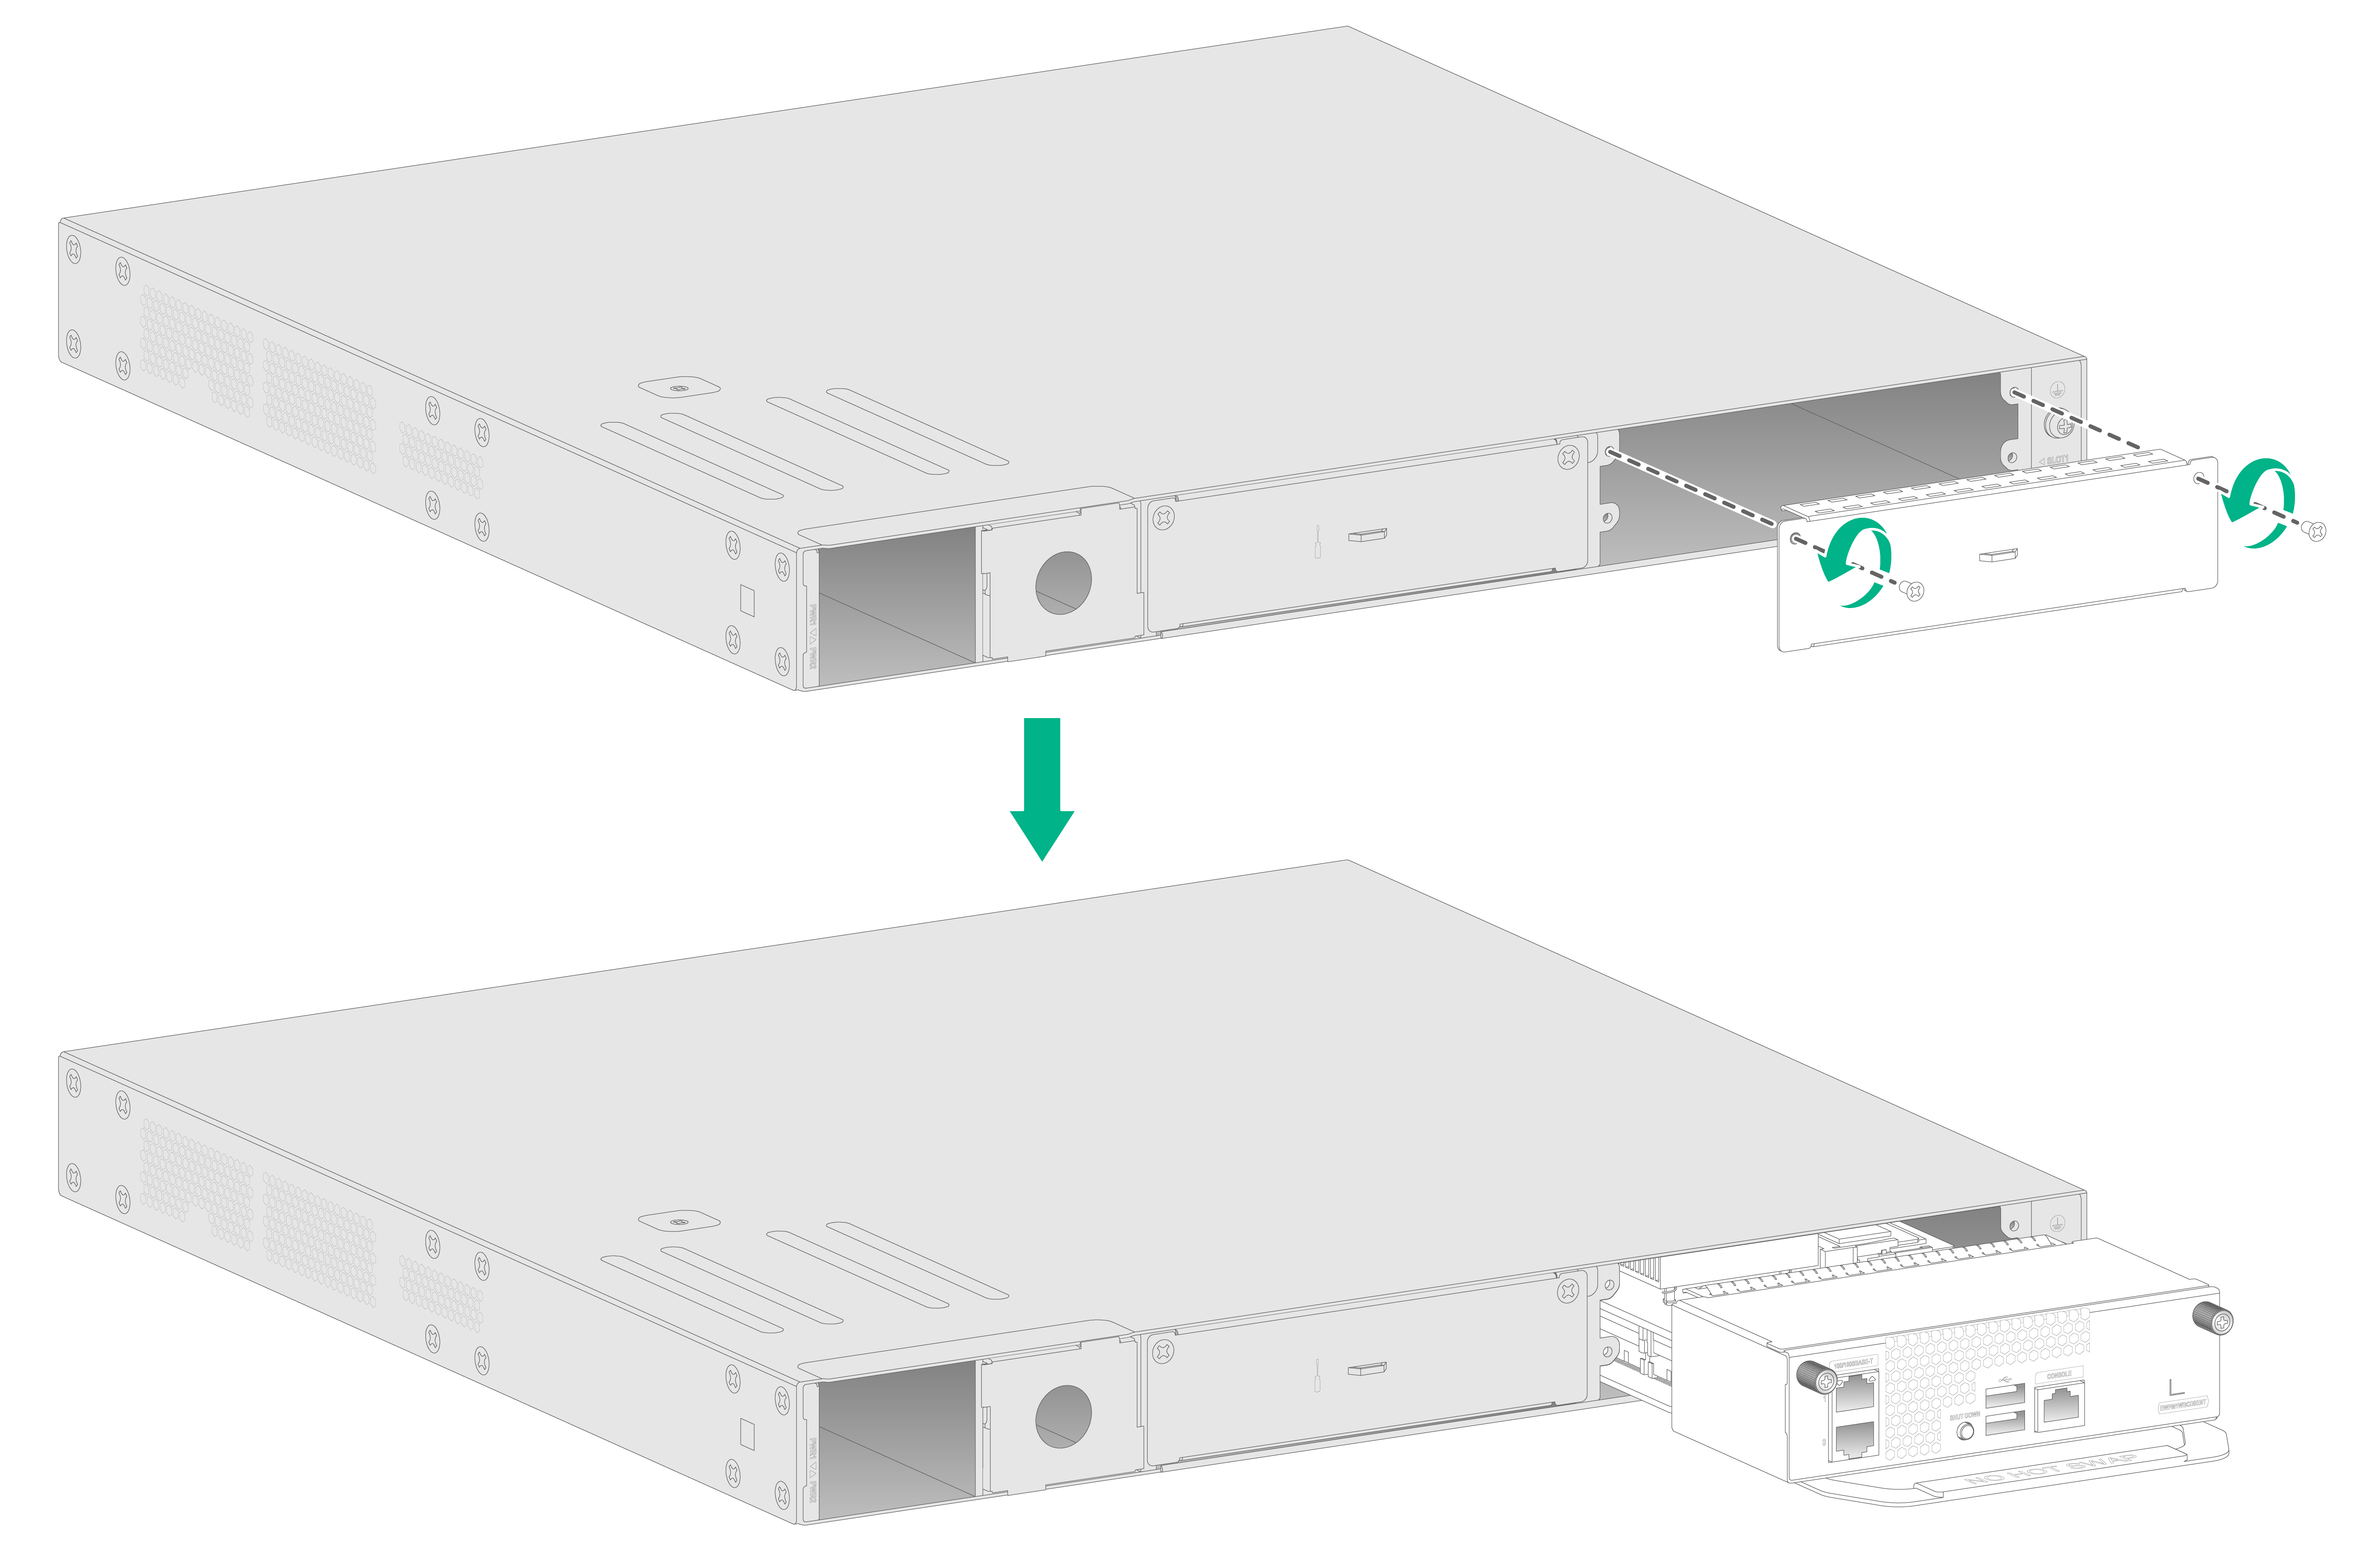
To install the module:
1. Wear an ESD wrist strap and make sure the strap makes good skin contact and is reliably grounded.
2. Unpack the module.
3. Loosen the screws on the filler panel, and then remove the filler panel.
4. Insert the module into the slot, and then fasten the captive screws.
Figure 3 Installing the module
Removing the module
|
|
CAUTION: If you are not to install a new module after removing the original one, install a filler panel in the slot. |
1. Wear an ESD wrist strap and make sure the strap makes good skin contact and is reliably grounded.
2. Loosen the captive screws on the module.
3. Pull the module out of the slot slowly.
Logging in from the module
As a best practice, use one of the following browsers on the PC to access the Cloudnet platform:
· Internet Explorer 11 or higher.
· Mozilla Firefox 45.0.2 or higher.
· Google Chrome 50.0.2661.87 or higher.
· Safari 6.0 or higher.
To ensure successful Web access, make sure the browser in use can accept first-party cookies (cookies from the site of the Web interface) and is enabled with active scripting (or JavaScript). The names and configuration methods for the features might differ in different browsers.
If an Internet Explorer is used, make sure the following features are enabled:
· Script ActiveX controls marked safe for scripting.
· Run ActiveX controls and plug-ins.
Logging in to the WBC monitoring platform
You can log in to the WBC monitoring platform from a management port or the internal service port on the module.
Logging in to the WBC monitoring platform from a management port on the module
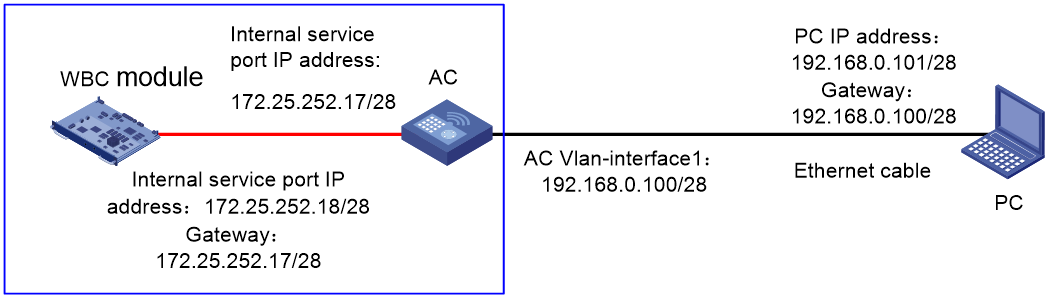
1. Set up the network environment as shown in the following figure. Configure IP settings to ensure the connectivity between the PC and the front management port on the WBC module.
Figure 4 Setting up the network environment
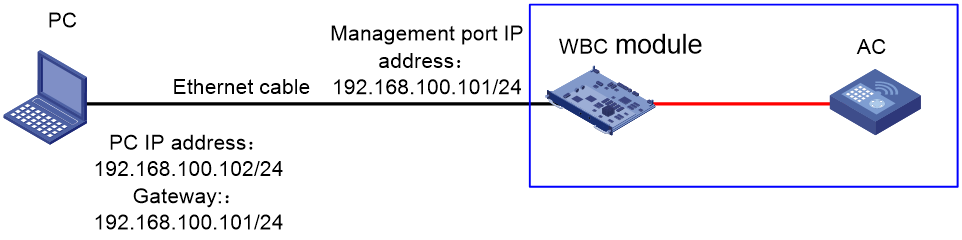
2. Use an Ethernet cable to connect the PC to the management port on the module. Enter https://x.x.x.x:9999 in a browser to access the WBC monitoring platform login page. x.x.x.x represents the IP address of the management port, which is 192.168.100.101 by default.
Figure 5 WBC monitoring platform login page
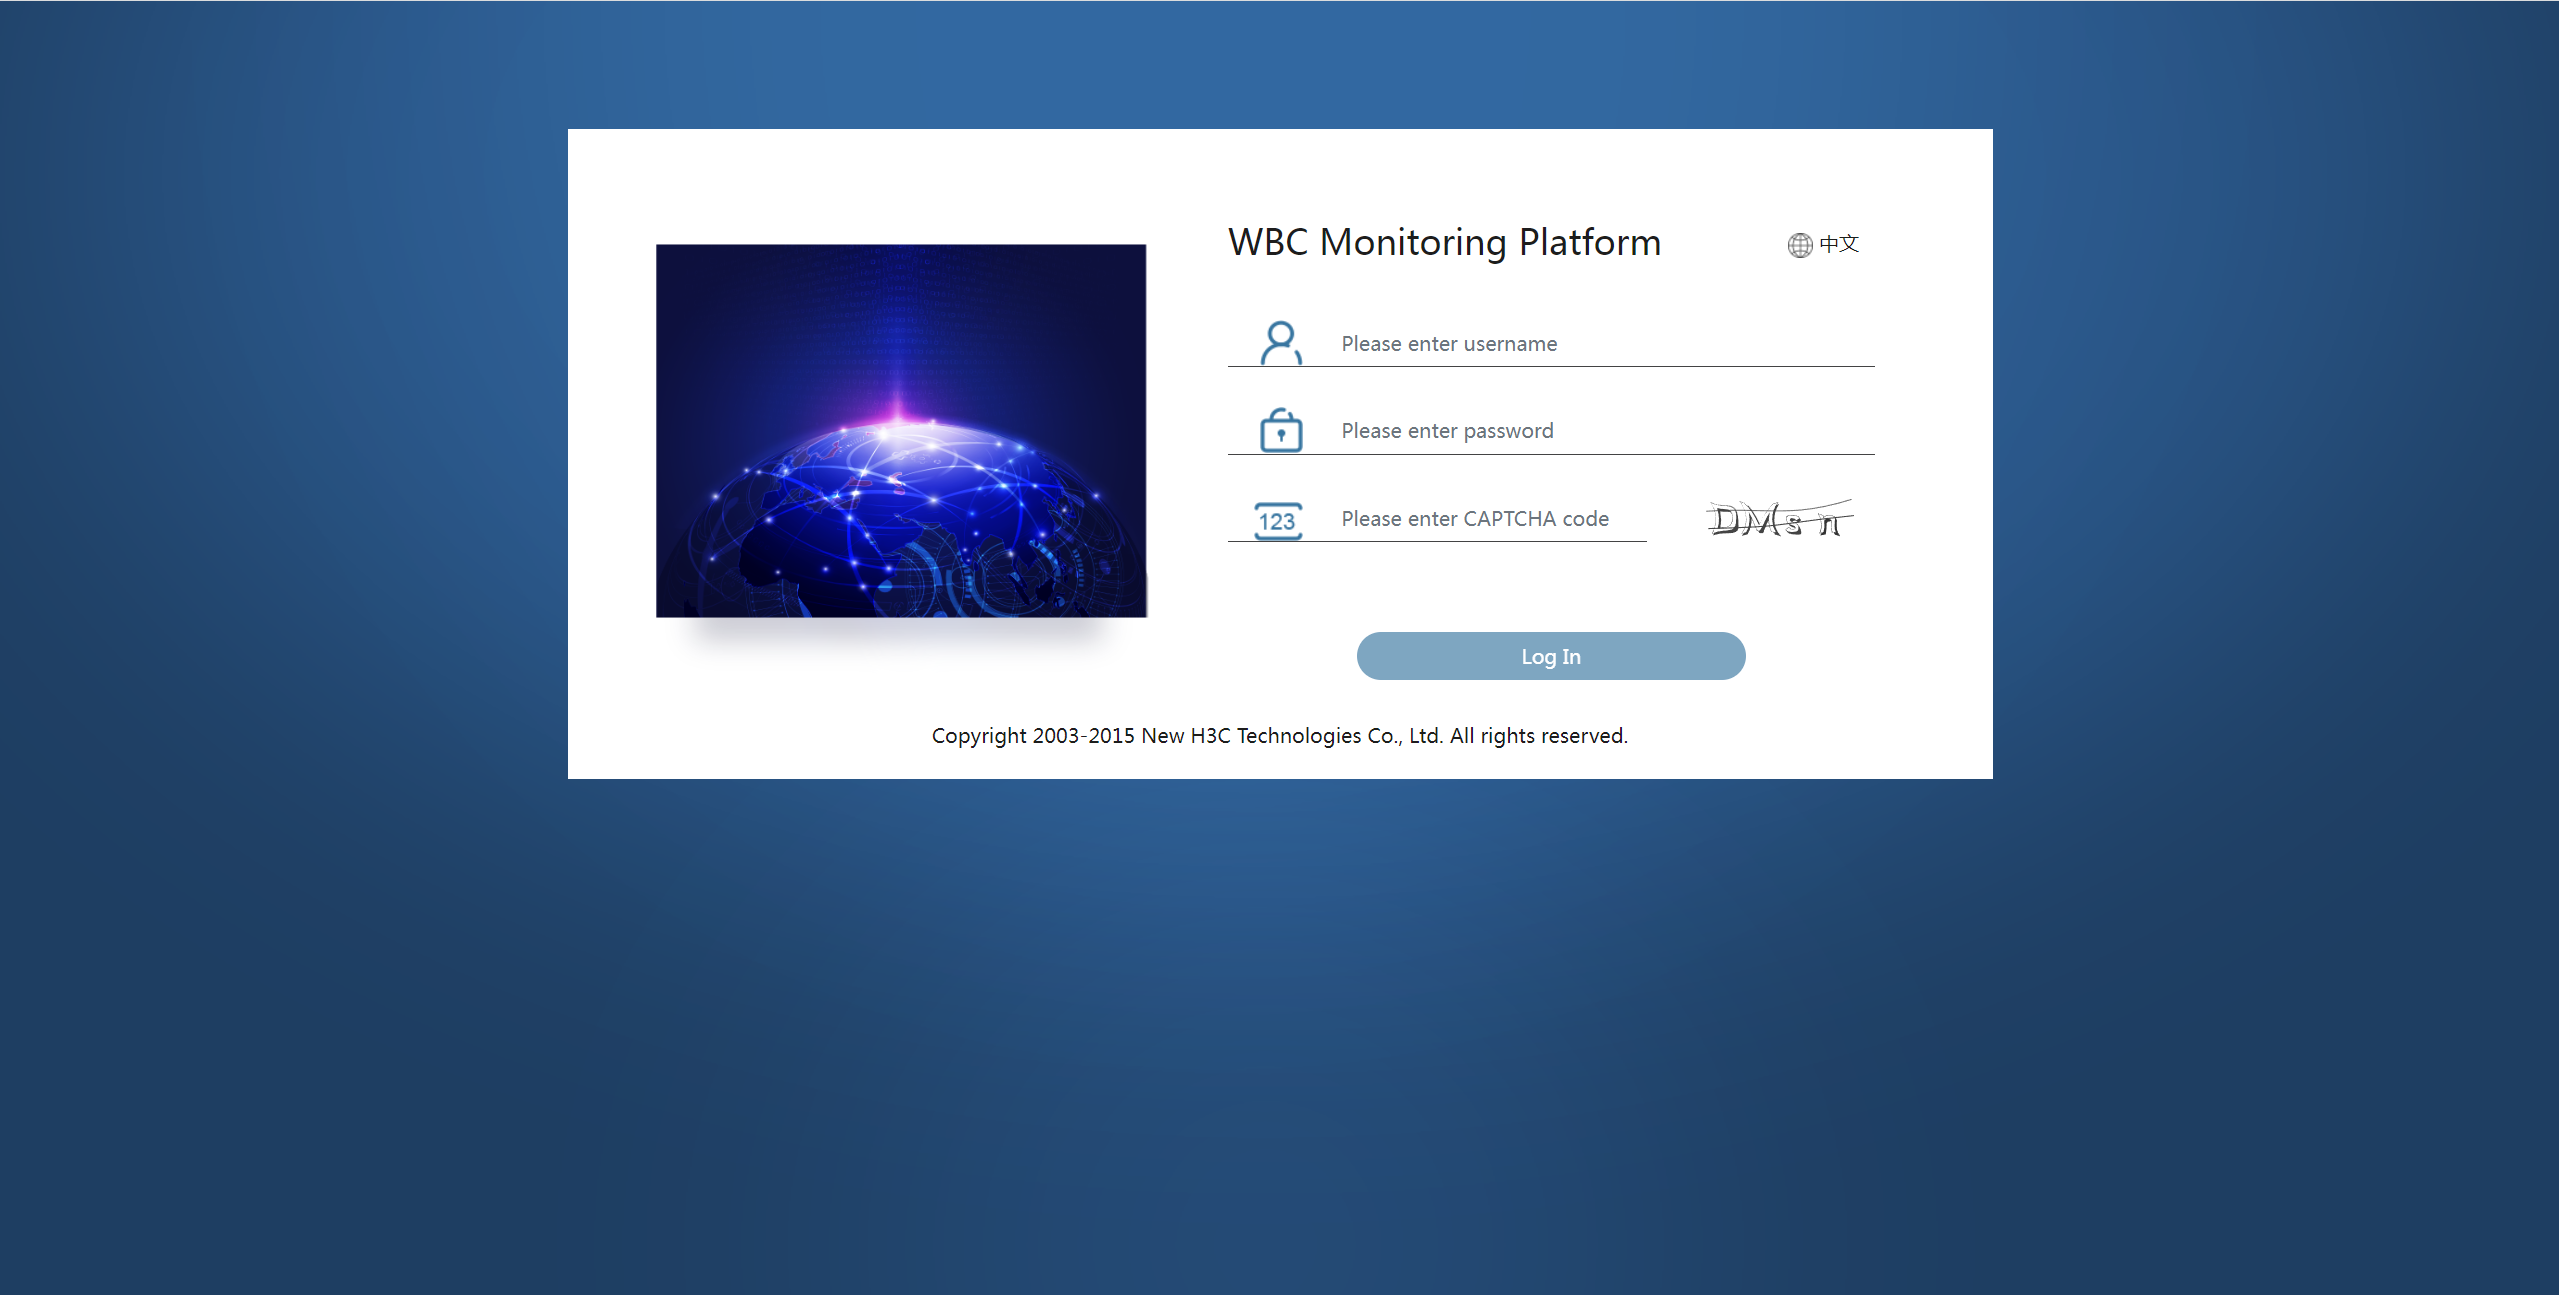
3. Enter the username, password, and CAPTCHA code. The default username and password are admin and admin.Default.0506, respectively. Then, click the login button.
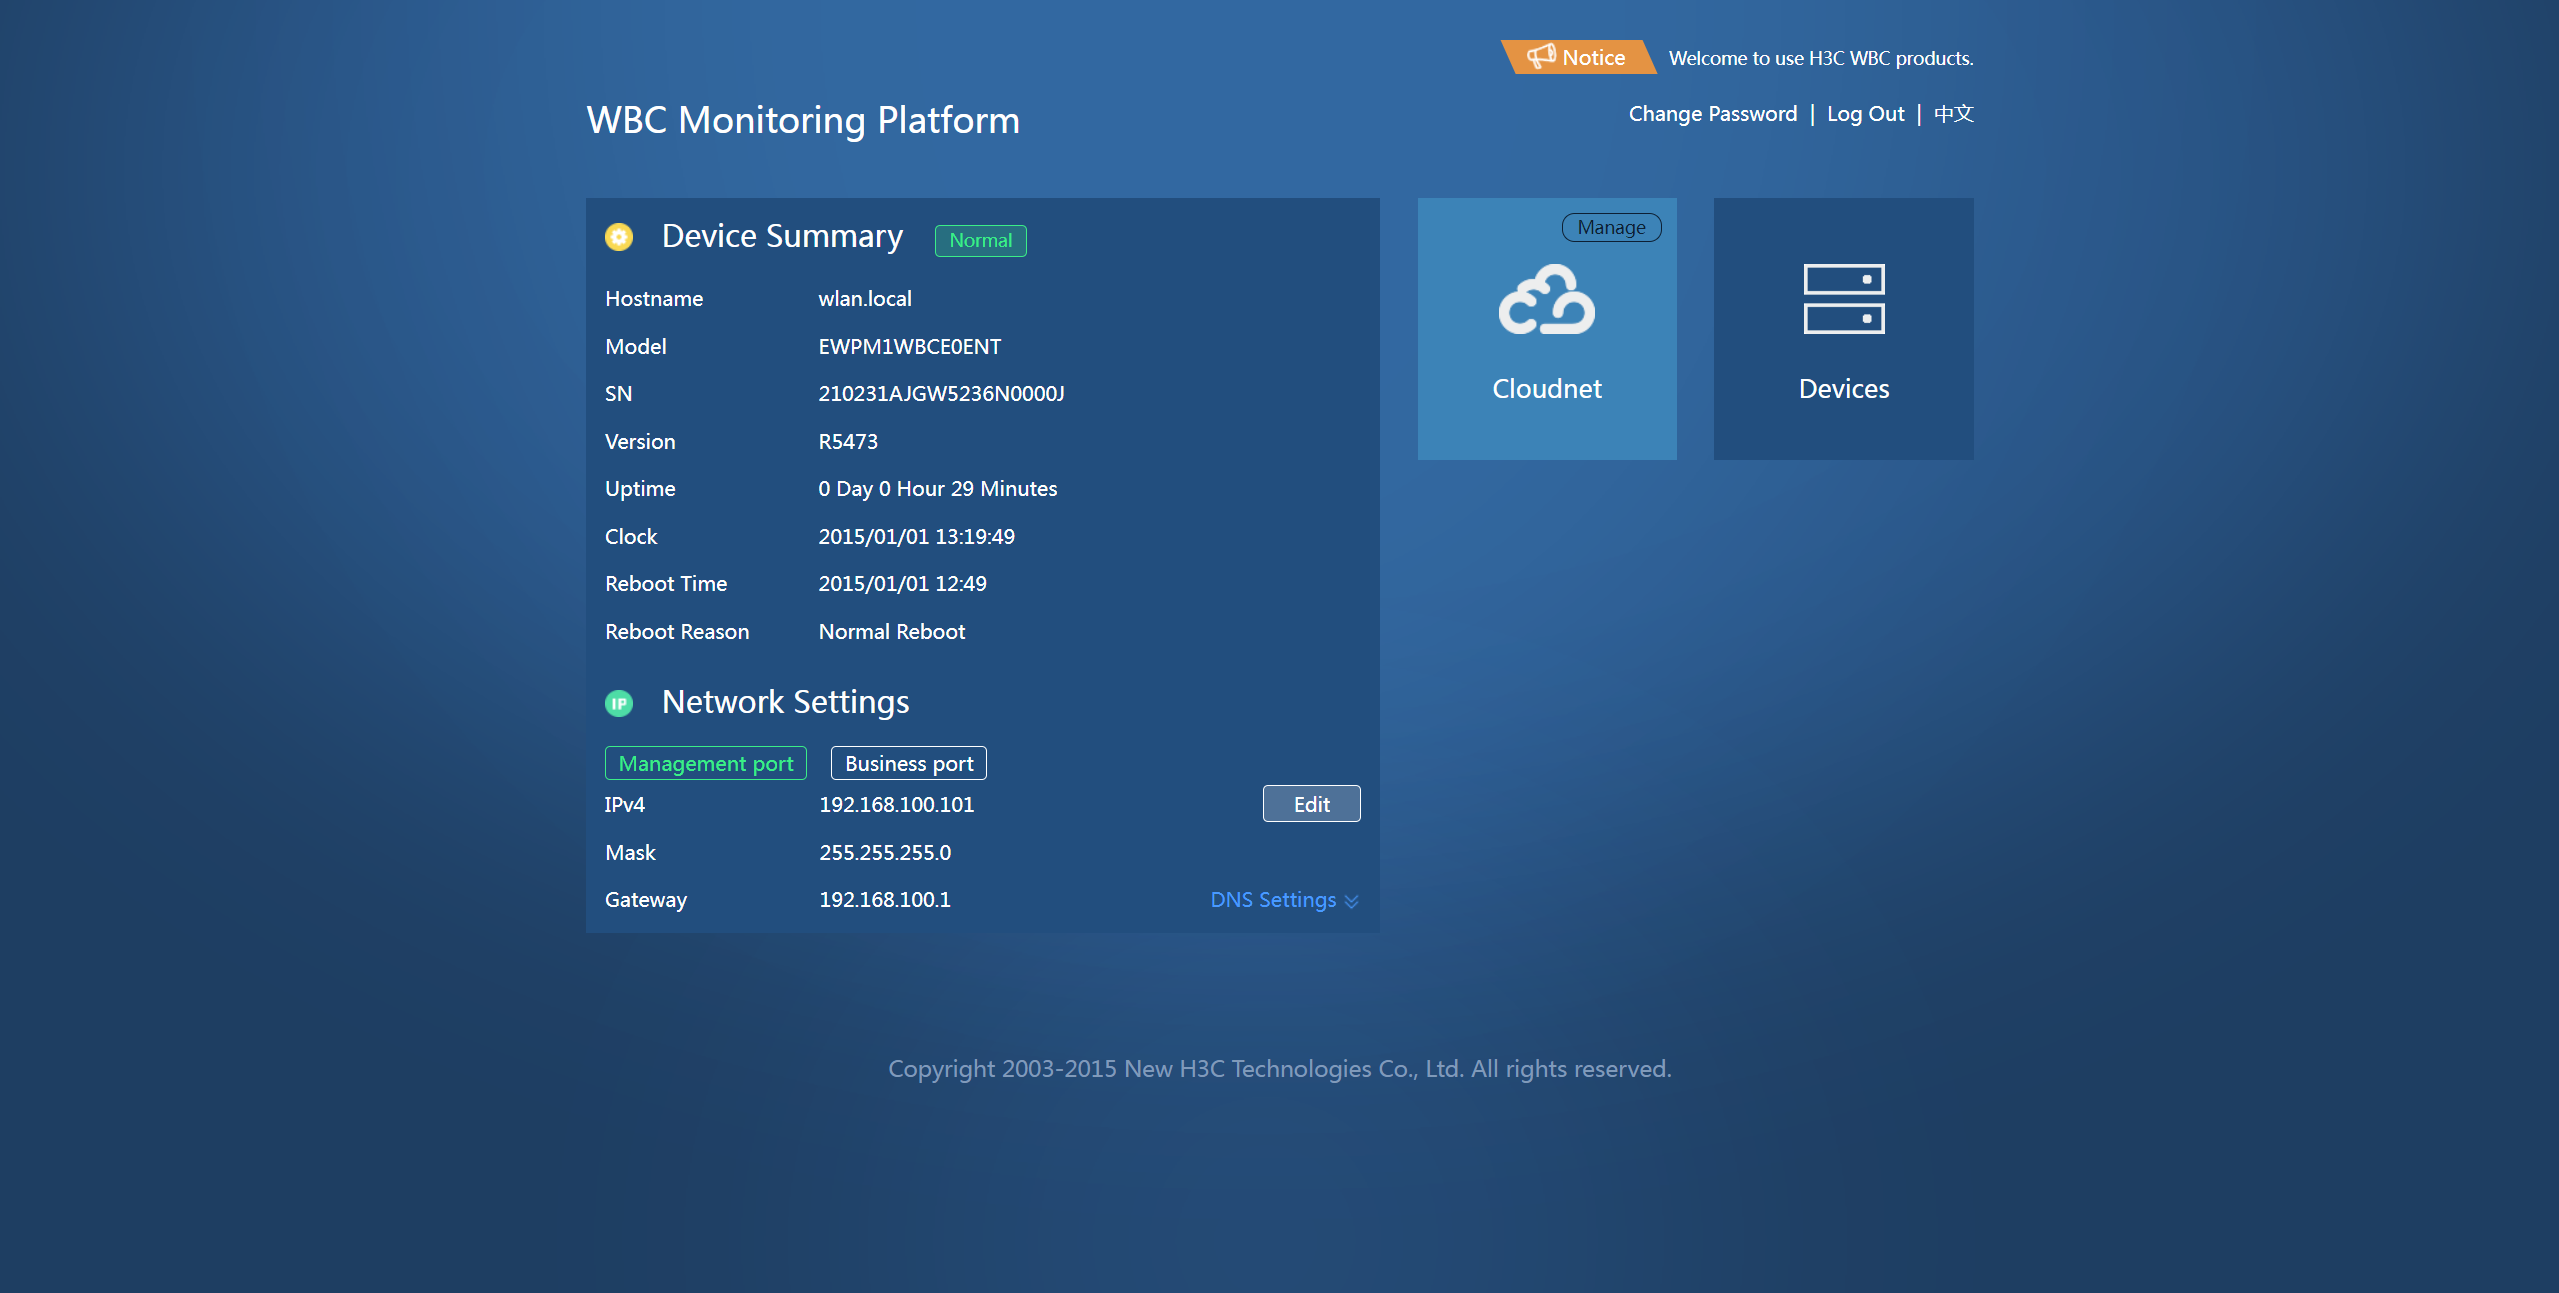
4. Edit the IP address of the management port as needed.
Figure 6 Editing the IP address of the management port

Logging in to the WBC monitoring platform from the service port on the module
1. Set up the network environment as shown in the following figure. Configure IP settings to ensure the connectivity between the PC and the internal service port on the WBC module.
|
|
NOTE: · When you install the module in slot 1 on the rear panel of the AC, the corresponding internal service port is GE1/0/17. · When you install the module in slot 2 on the rear panel of the AC, the corresponding internal service port is GE1/0/18. |
Figure 7 Setting up the network environment
2. Use an Ethernet cable to connect the PC to a Layer 2 Ethernet port on the AC. Configure IP settings for the PC, AC, and WBC module and make sure they have connectivity to each other.
3. Enter https://x.x.x.x:9999 in the address bar of a browser. x.x.x.x represents the IP address of the service port on the module, which is 172.25.252.18 by default. Enter the username and password on the login page. The default username and password are admin and admin.Default.0506, respectively. Then, click the login button.
Figure 8 WBC monitoring platform
Logging in to the Cloudnet platform
The WBC module comes with a built-in localized Cloudnet platform, supporting device management, client statistics, flexible authentication, and unified O&M.
To log in to the Cloudnet platform:
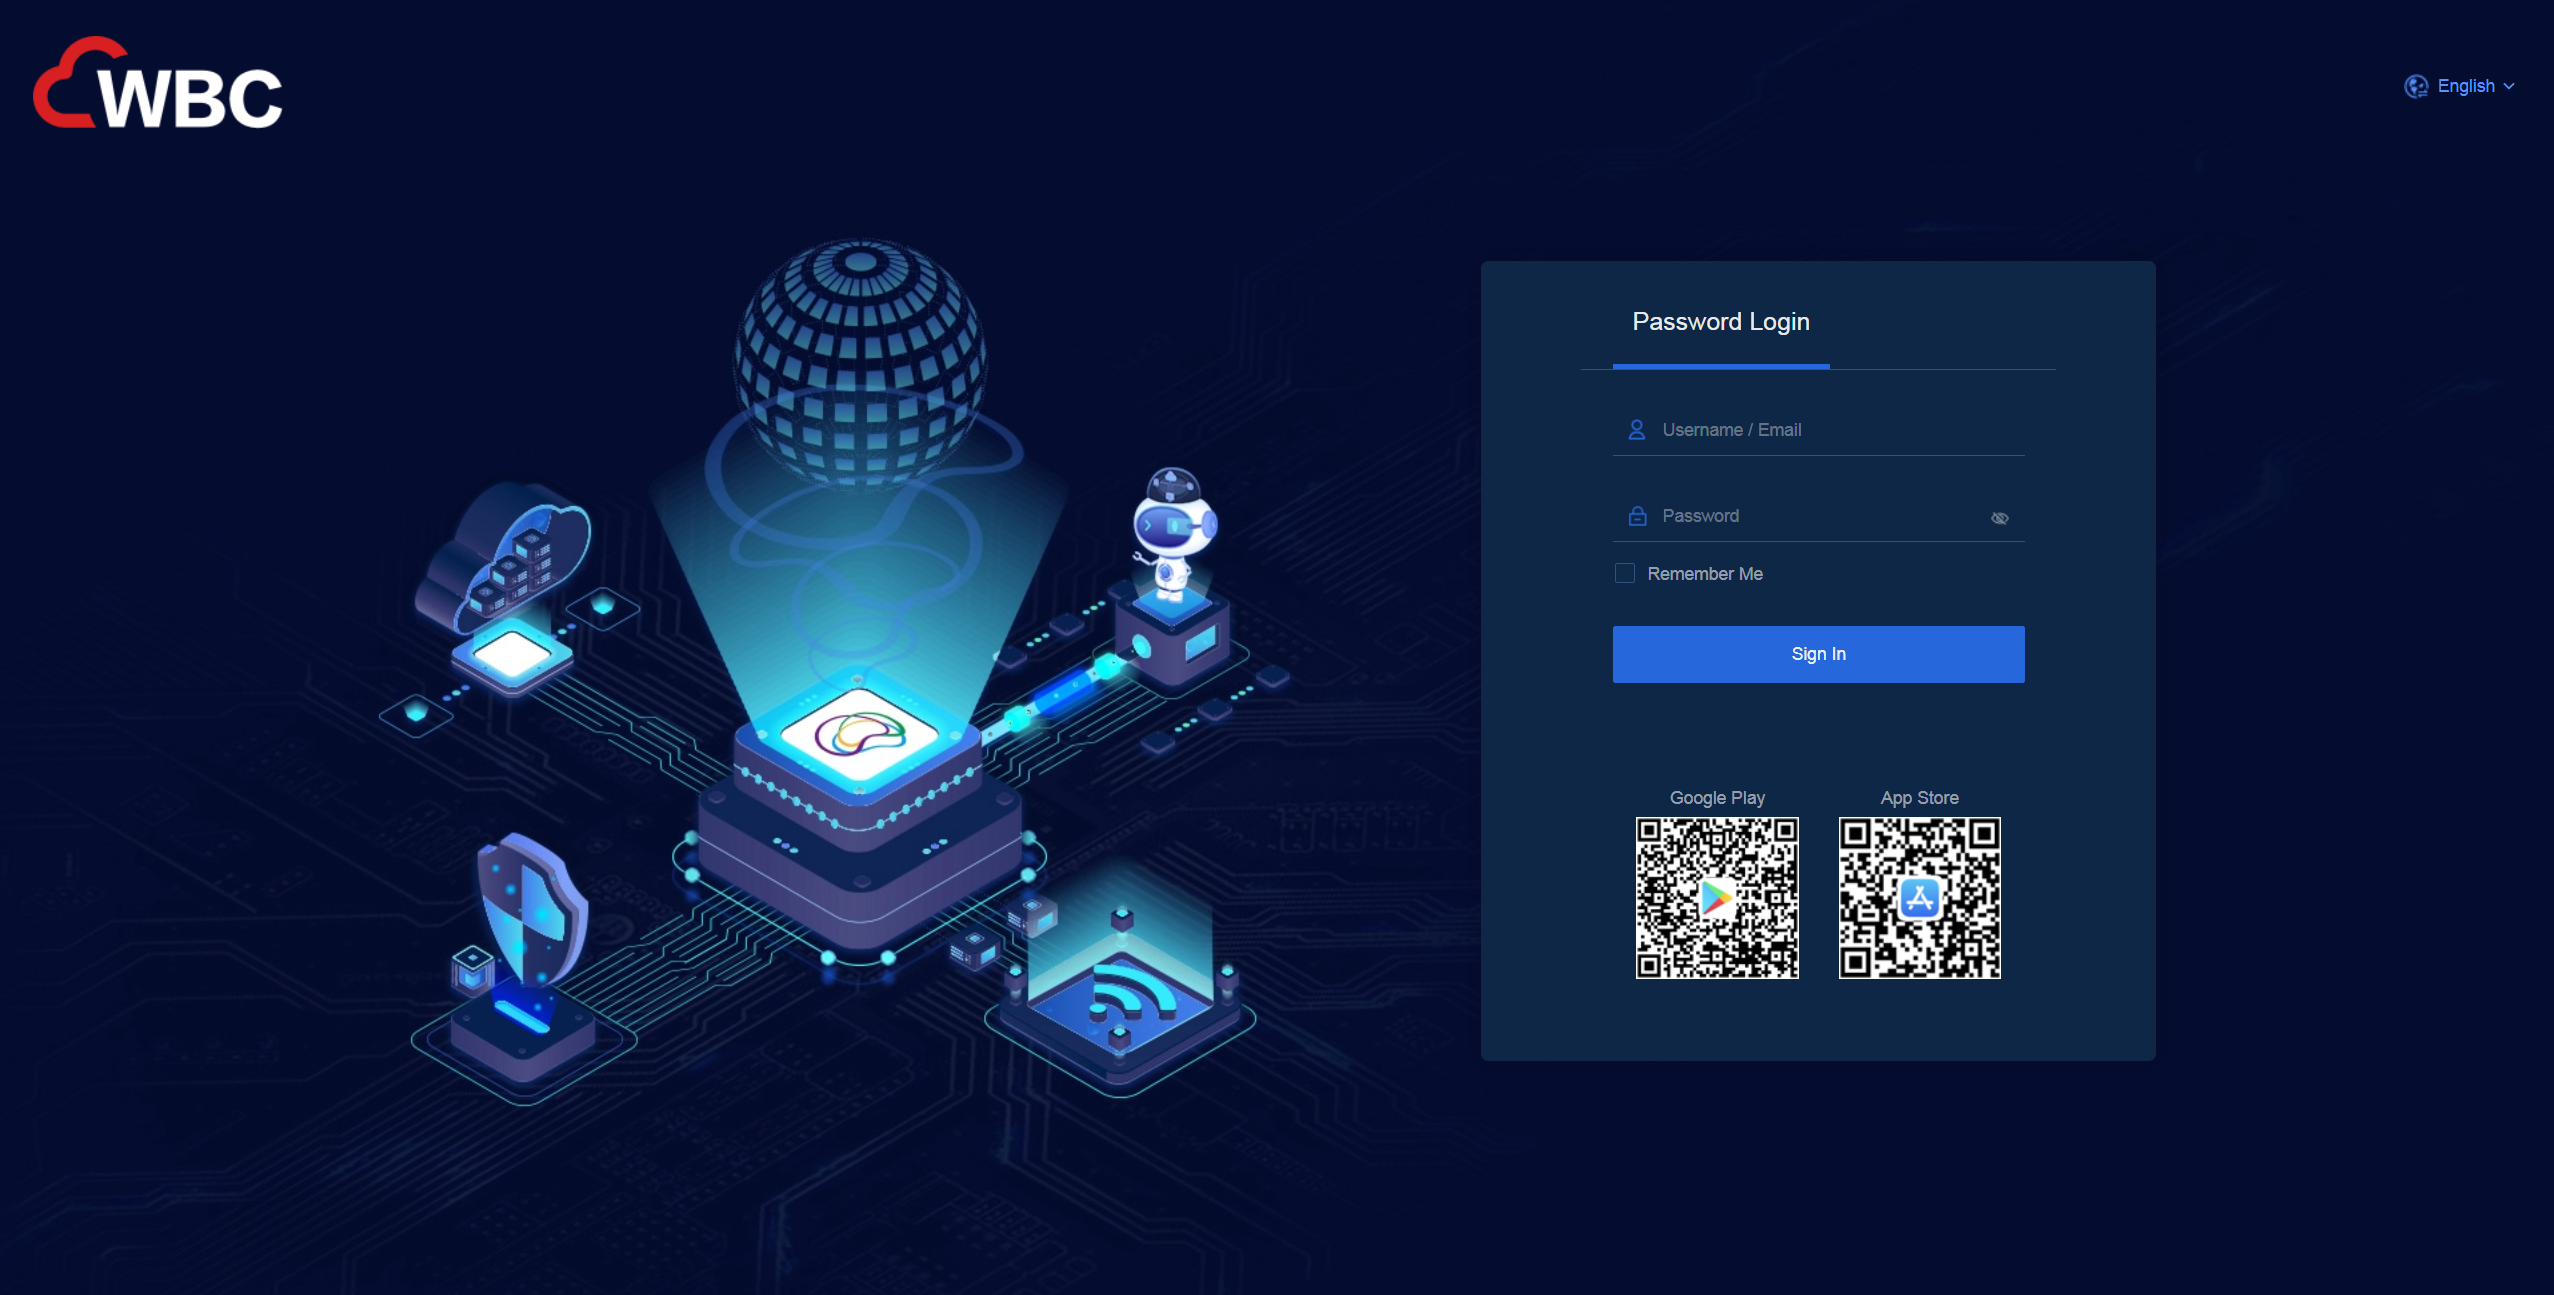
1. Access the Cloudnet platform login page by using either of the following methods:
¡ Click the Cloudnet icon on the WBC monitoring platform.
¡ Enter https://x.x.x.x:31443 in the address bar of a browser. x.x.x.x represents the IP address of the Cloudnet platform, which is 172.25.252.18 by default.
2. Enter the username and password, and then click the login button. Both the default username and password are wbcadmin.
Figure 9 Cloudnet platform login page
Technical Support
New H3C Technology Co., Ltd. provides customers with a full range of technical support.
If you purchase a product from a sales representative of New H3C, contact the sales representative or H3C Support for service support.
