| Title | Size | Downloads |
|---|---|---|
H3C UIS Hyper-Converged Infrastructure Node Shutdown Configuration Guide-5W101-book.pdf  |
2.81 MB |
- Related Documents
-
|
|
|
H3C UIS Hyper-Converged Infrastructure Node Shutdown Configuration Guide |
|
|
|
|
Document version: 5W101-20230417
Copyright © 2023 New H3C Technologies Co., Ltd. All rights reserved.
No part of this manual may be reproduced or transmitted in any form or by any means without prior written consent of New H3C Technologies Co., Ltd.
Except for the trademarks of New H3C Technologies Co., Ltd., any trademarks that may be mentioned in this document are the property of their respective owners.
The information in this document is subject to change without notice.
Contents
Shutting down and powering off all nodes in a cluster
Checking host route information
Checking the RAID controller power status
Placing hosts into maintenance mode
Shutting down and powering off servers
Starting servers and checking the network
Removing hosts from maintenance mode
Shutting down a single node online
Checking the cluster service load
Checking the switch configuration
Checking host route information
Checking the RAID controller power status
Checking the NTP configuration
Placing the host in maintenance mode
Shutting down and powering off the server
Starting the server and checking the network
Removing the host from maintenance mode
Waiting for the cluster to restore
Migrating VMs back to the host
Shutting down UIS-Cloud component VMs
Shutting down the component VMs
Shutting down the component VM
Overview
This document helps you shut down servers on UIS Manager and UIS-Cloud component VMs.
The procedure of shutting down servers is similar for servers that use file storage, object storage, and block storage. This document uses block storage as an example.
Before you shut down a server, read this document carefully. If you have any questions, contact Technical Support.
Shutting down and powering off all nodes in a cluster
Use this section to shut down all nodes in a cluster after you stop services.
Checking the cluster health
1. Log in to UIS Manager. On the Dashboard page, verify that all hosts and VMs are in Running state and no alarm messages are displayed at the upper right corner of the page. If a VM is shut down, contact the customer and record it. If an alarm has occurred or a host is abnormal, wait for the cluster to restore automatically or resolve the issue first. If the issue persists, contact Technical Support.

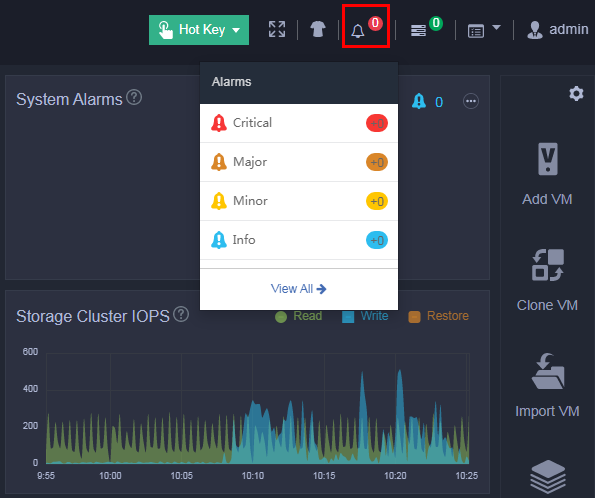
2. At the CLI of any node in the cluster, execute the watch ceph –s command to observe the cluster health state for about one minute. If the cluster is healthy, the health field displays Health_OK. If the health field does not display Health_OK, contact Technical Support.

Checking the configuration
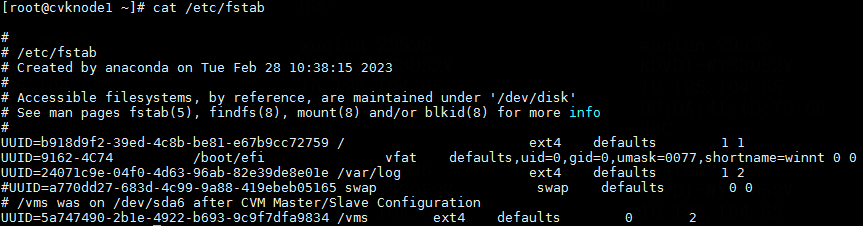
Checking the fstab file
Checking the fstab file
Typically, partitions are identified by their UUIDs in the fstab file. If the partitions are identified by drive letters, the drive letters might change after you reboot the host, causing serious issues.
To avoid such an issue, perform the following tasks at the CLI of each host:
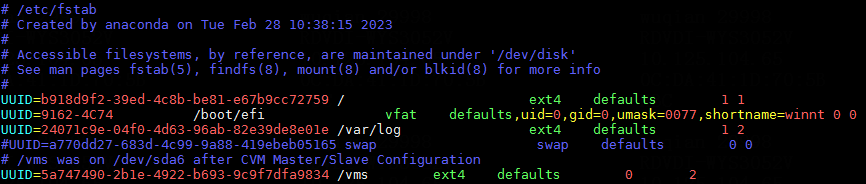
1. Execute the cat /etc/fstab command to verify that partitions are identified by their UUIDs in the fstab file.
Figure 1 Checking the fstab file
2. Execute the mount –a command to verify that no error is reported.
Figure 2 Verifying that no error is reported
![]()
Common errors
The following shows the common errors that might be reported after you execute the mount –a command.
· The file system or mount point does not exist.
Figure 3 Nonexistent file system
![]()
Figure 4 Nonexistent mount point
![]()
· Incorrect file system type.
Figure 5 Incorrect file system type

Solution
Perform the following tasks on the host on which an error has occurred:
1. Execute the df –hT command to obtain the mount points and file system types.
Figure 6 Obtaining the mount points and file system types

2. Execute the blkid command to obtain the UUIDs. Match the mount points you have obtained against the UUIDs.
Figure 7 Obtaining the UUIDs

3. Execute the vim /etc/fstab command to correct the error in the fstab file and save the configuration.
Figure 8 Editing the fstab file

4. Execute the mount –a command again to verify that no error is reported.
Checking host route information
Execute the route –n command at the CLI of each host to verify that the host route information is the same as that configured on the Web interface.

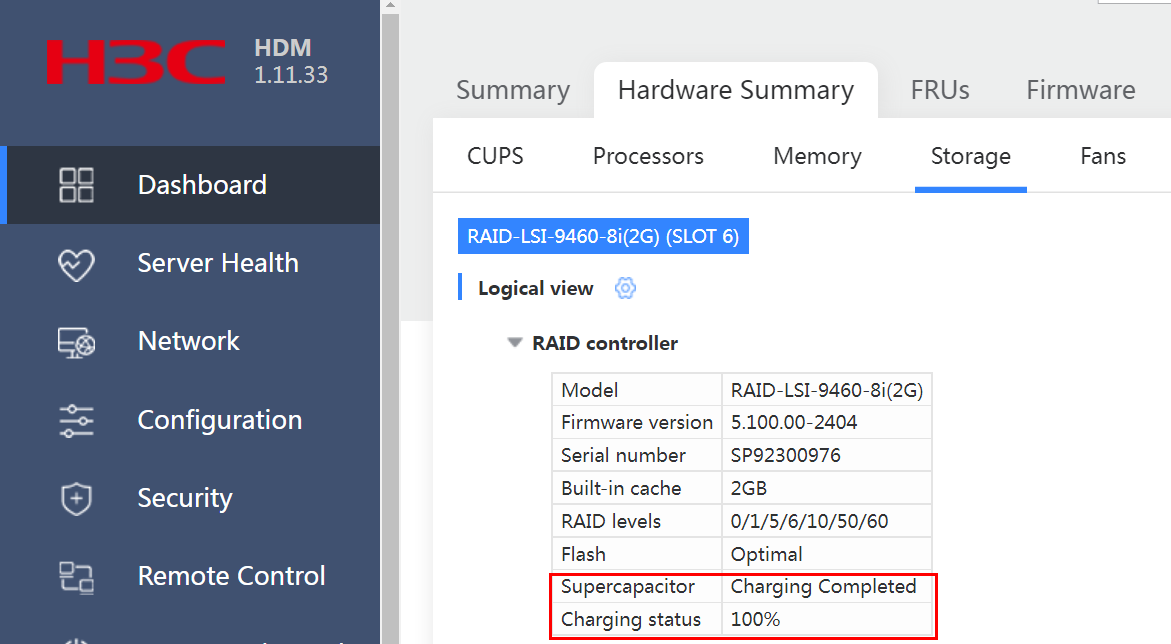
Checking the RAID controller power status
Log in to the HDM or iLO page to verify that the supercapacitor of the RAID controller is normal and is fully charged.

Checking drive caching
Perform the tasks in this section at the CLI of each server in the storage cluster. If the check result is not as expected, edit drive (disk) caching settings as shown in Table 1.
Table 1 Drive caching settings
|
Caching type |
SSD system drives |
HDD system drives |
SSD cache drives |
HDD data drives |
SSD data drives |
|
Drive caching |
Disabled |
Disabled |
Disabled |
Disabled |
Disabled |
|
RAID controller read caching |
Disabled |
Enabled (disabled for UIS in E0721 or a later version) |
Disabled |
Enabled (disabled for UIS in E0721 or a later version) |
Disabled |
|
RAID controller write caching |
Disabled |
Enabled |
Disabled |
Enabled |
Disabled |
Verifying RAID controller types supported by UIS HCI products
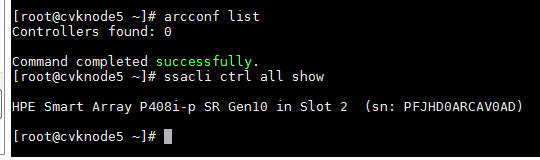
1. Verify Adaptec RAID controllers:
a. Execute the following command:
[root@cvknode5 ~]# lspci|grep Adaptec
5c:00.0 Serial Attached SCSI controller: Adaptec Smart Storage PQI 12G SAS/PCIe 3 (rev 01)
b. Execute the arcconf list command to obtain information about the RAID controller. If you fail to obtain the information, execute the ssacli ctrl all show command. If you can obtain the information, the RAID controller is an HPE RAID controller.
2. Verify LSI RAID controllers:
Execute the following command:
[root@cvknode6 ~]# lspci |grep -i "lsi"
18:00.0 RAID bus controller: LSI Logic / Symbios Logic MegaRAID SAS-3 3108 [Invader] (rev 02)
3. Verify HPE RAID controllers:
a. Execute the Lspci | grep "Hewlett-Packard Company Smart Array" command. The result is not empty or is as shown in the figure.

b. P408i or P816i RAID controllers are also identified as HPE RAID controllers.

Configuring RAID controller caching
1. Configure caching for an Adaptec RAID controller:
a. Adaptec RAID controllers supported by UIS HCI products include PMC 8060 RAID controllers and P460 RAID controllers (P460-B4, P460-M4, P4408, and P2404).
To identify whether an Adaptec RAID controller is a PMC 8060 or P460 RAID controller, execute the arcconf list command to obtain the RAID controller information.
- For a P460-B4 RAID controller, the information is as shown in the figure.

- For a PMC 8060 RAID controller, the information is as shown in the figure.

b. Verify that the RAID controller is in Optimal state.

c. Execute the arcconf getconfig 1 ld command to obtain the logical drive information. Replace 1 with the RAID controller ID.
- For a P460 RAID controller, the information is as shown in the figure.
- For a PMC 8060 RAID controller, the information is as shown in the figure.
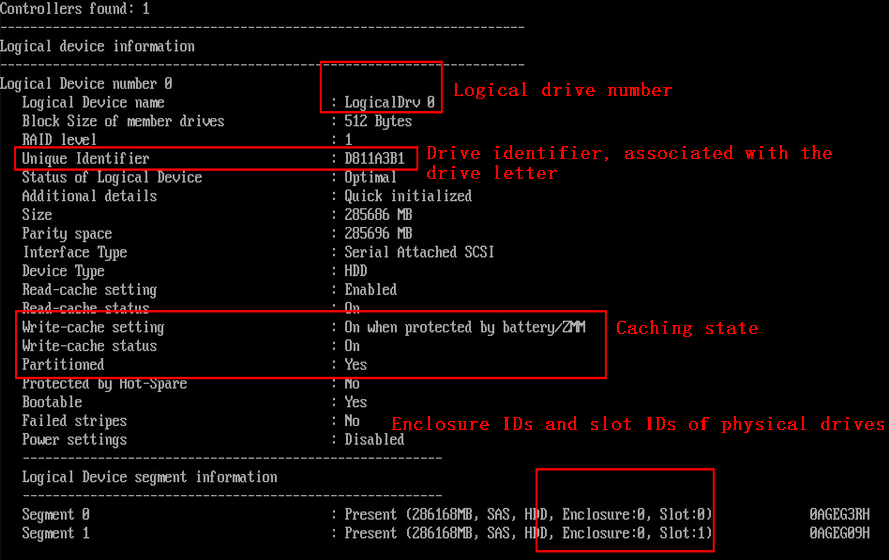
To obtain the drive letter of a PMC 8060 RAID controller, execute the command as shown in the figure. Replace sda with the names of all cache drives one by one. Compare the output with the drive identifier until a match is found.

d. Configure logical drive caching:
- For P460 RAID controllers:
# To obtain the logical drive caching state, execute the arcconf getconfig 1 ld |grep "Caching" command. Replace 1 with the RAID controller ID.
# To enable caching for the logical drive, execute the arcconf setcache 1 logicaldrive 0 con command. Replace 1 with the RAID controller ID and 0 with the logical drive number.
# To disable caching for the logical drive, execute the arcconf setcache 1 logicaldrive 0 coff command. Replace 1 with the RAID controller ID and 0 with the logical drive number.
- For PMC 8060 RAID controllers:
# To obtain the logical drive caching state, execute the arcconf getconfig 1 ld |grep "Write-cache status" command. Replace 1 with the RAID controller ID.
# To enable caching for the logical drive, execute the arcconf setcache 1 logicaldrive 0 wbb command. Replace 1 with the RAID controller ID and 0 with the logical drive number.
# To disable caching for the logical drive, execute the arcconf setcache 1 logicaldrive 0 wt command. Replace 1 with the RAID controller ID and 0 with the logical drive number.
e. Configure physical drive caching:
- For P460 RAID controllers:
# Obtain the physical drive caching state. A value of Default or Disable indicates that caching is disabled.

# To disable physical drive caching, execute the arcconf setcache 1 drivewritecachepolicy configured 2 command
Available values for the second argument: 0 (default value), 1 (enabling physical drive caching), and 2 (disabling physical drive caching).
configured indicates a configured drive and unconfigured indicates a drive that is not configured.
# To enable physical drive caching, execute the arcconf setcache 1 drivewritecachepolicy configured 1 command.
- For PMC 8060 RAID controllers:
# To obtain the physical drive caching state, execute the arcconf getconfig 1 pd | grep "Write Cache" command.
# To disable physical drive caching, execute the arcconf setcache 1 deviceall disable noprompt command.
# To enable physical drive caching, execute the arcconf setcache 1 deviceall enable noprompt command.
2. Configure caching for an LSI RAID controller.
a. Obtain the RAID controller ID. In this example, the RAID controller ID is 0.
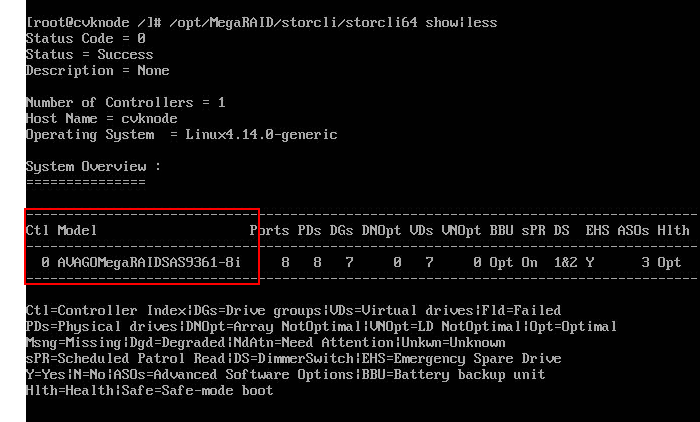
b. Verify that the RAID controller is in Optimal state.
![]()
c. Execute the following command to obtain the logical drive information:
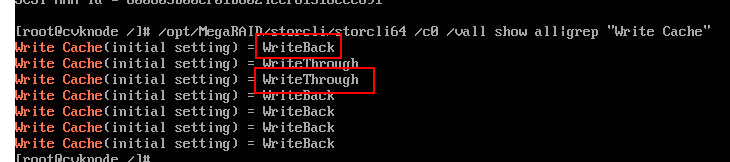
[root@cvknode6 ~]# /opt/MegaRAID/storcli/storcli64 /c0 /vall show all
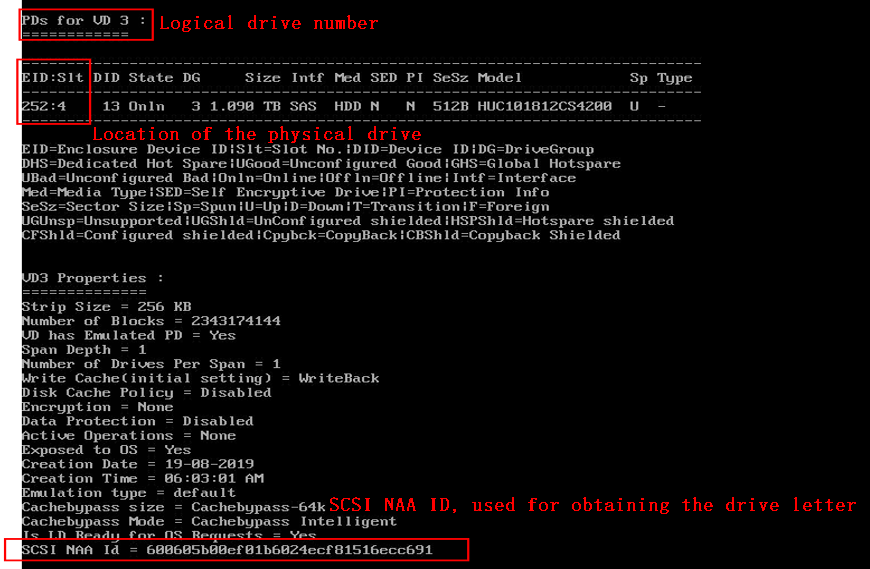
d. Execute the /lib/udev/scsi_id –g –u /dev/sdd command to obtain the drive letter of the physical drive. Replace sdd with the names of all cache drives one by one. Compare the output with the SCSI NAA ID value until a match is found.

e. Obtain the logical drive information.
f. Configure logical drive caching:
- To enable logical drive caching, execute the /opt/MegaRAID/storcli/storcli64 /c0 /v0 set wrcache=wb command. Replace the first 0 with the RAID controller ID and the second 0 with the logical drive number. wb indicates enabling caching.
- To disable logical drive caching, execute the /opt/MegaRAID/storcli/storcli64 /c0 /v0 set wrcache= wt command. Replace the first 0 with the RAID controller ID and the second 0 with the logical drive number. wt indicates disabling caching.
g. Configure physical drive caching.
- To obtain the physical drive caching information, execute the /opt/MegaRAID/storcli/storcli64 /c0/eall/sall show all | grep "Write cache" command.
- To disable physical drive caching, execute the /opt/MegaRAID/storcli/storcli64 /c0/vall set pdcache=off command.
- To enable physical drive caching, execute the /opt/MegaRAID/storcli/storcli64 /c0/vall set pdcache=on command.
3. Configure caching for an HPE RAID controller.
a. Verify that the RAID controller is in OK state. If the RAID controller is not in OK state, you might have failed to configure caching.
![]()
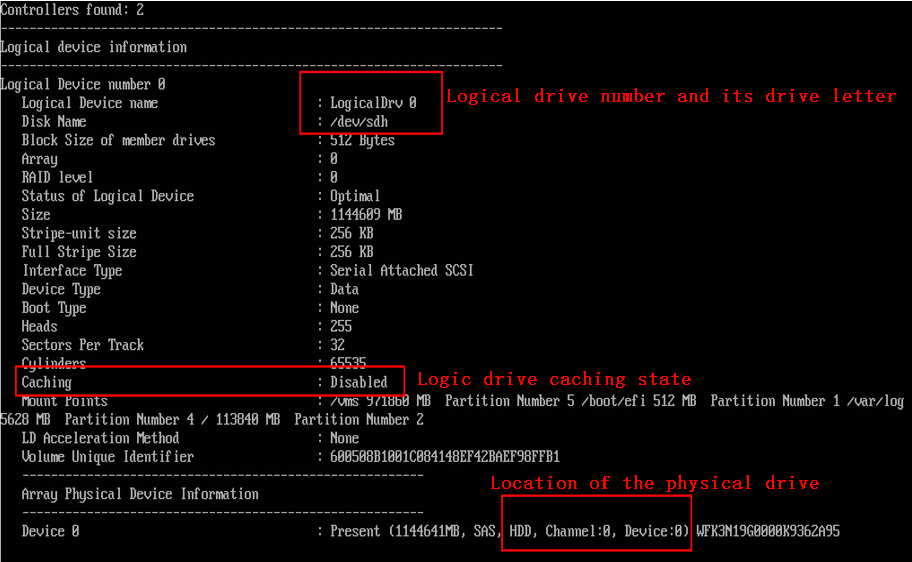
b. Obtain the drive information.
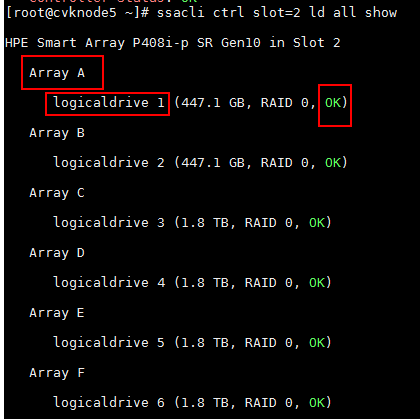
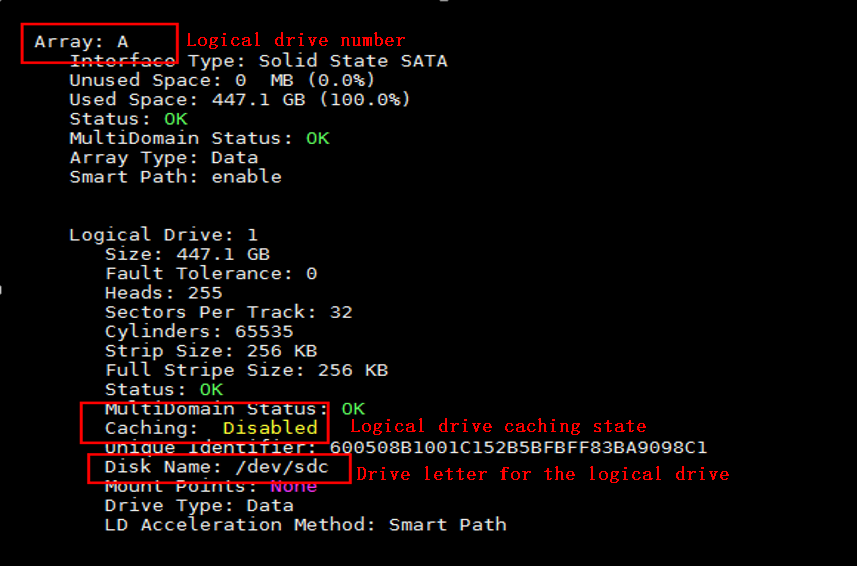
c. Verify that the logical drive is in OK state and obtain the caching information for the logical drive. As shown in the figures, you can obtain the logical drive number, drive letter, and logical drive caching state.

d. Configure physical drive caching. Make sure physical drive caching is disabled.
- Obtain the physical drive caching state.

- To disable physical drive caching, execute the ssacli ctrl slot=2 modify drivewritecache=disable forced command.
- To enable physical drive caching, execute the ssacli ctrl slot=2 modify drivewritecache=enable forced command.
e. Configure logical drive caching:
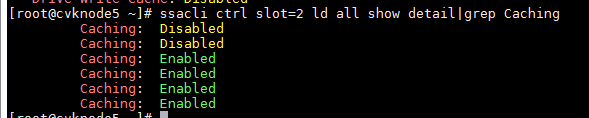
- Obtain the logical drive caching state.
- To enable logical drive caching, execute the ssacli ctrl slot=2 logicaldrive 1 modify caching=enable command. Replace 1 with the logical drive number.
- To disable logical drive caching, execute the ssacli ctrl slot=2 logicaldrive 1 modify caching=disable command. Replace 1 with the logical drive number.
Stopping upper-level services
Stop all applications that use UIS storage and shut down all VMs.
To shut down a VM, choose one of the options as needed:
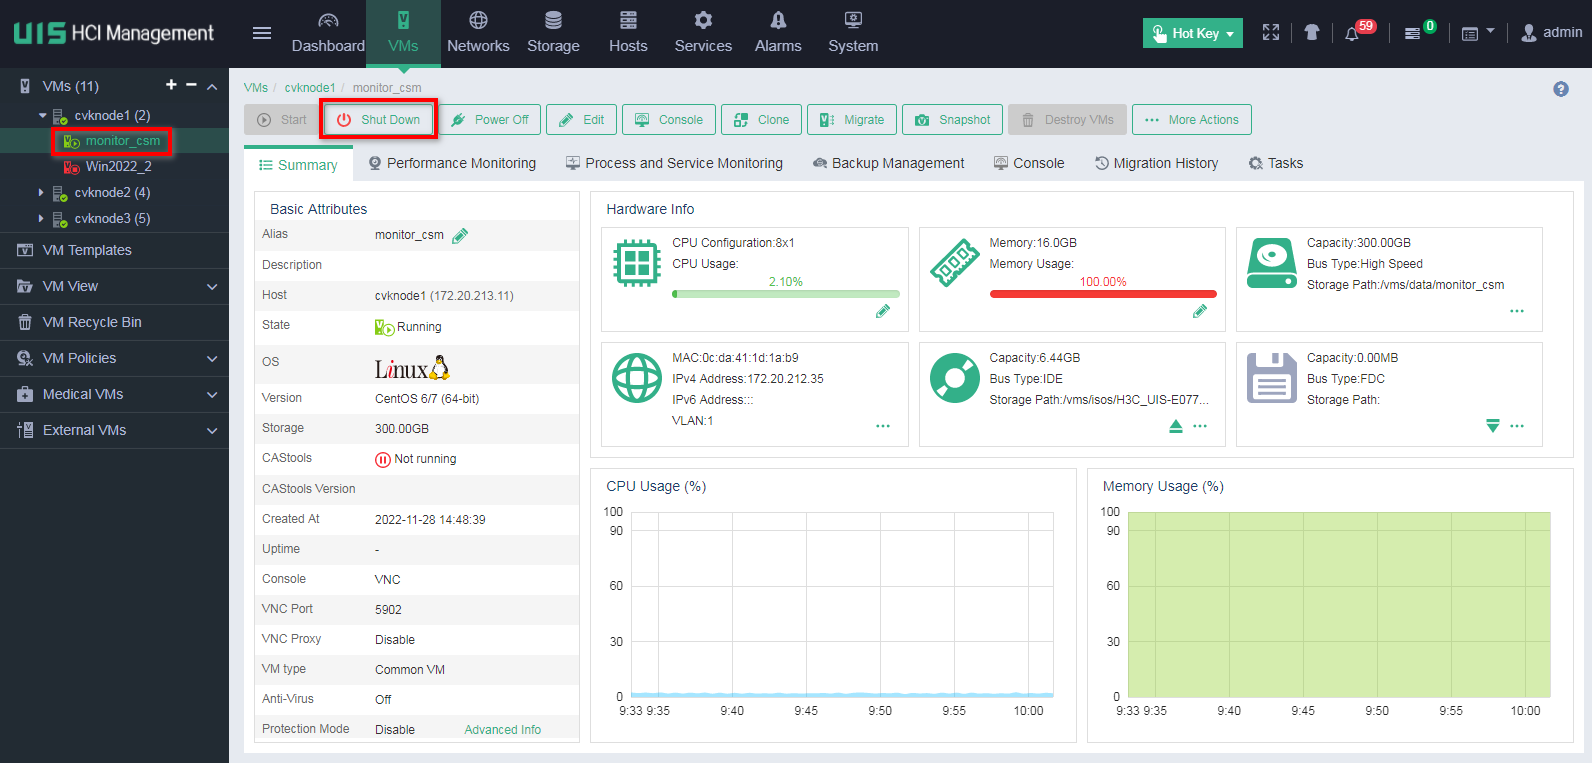
· Click VMs on the top navigation bar. Select the VM from the navigation pane to access the VM overview page, and then click Shut Down.
· Access the VM operating system and shut down the VM in the operating system.
Suspending storage
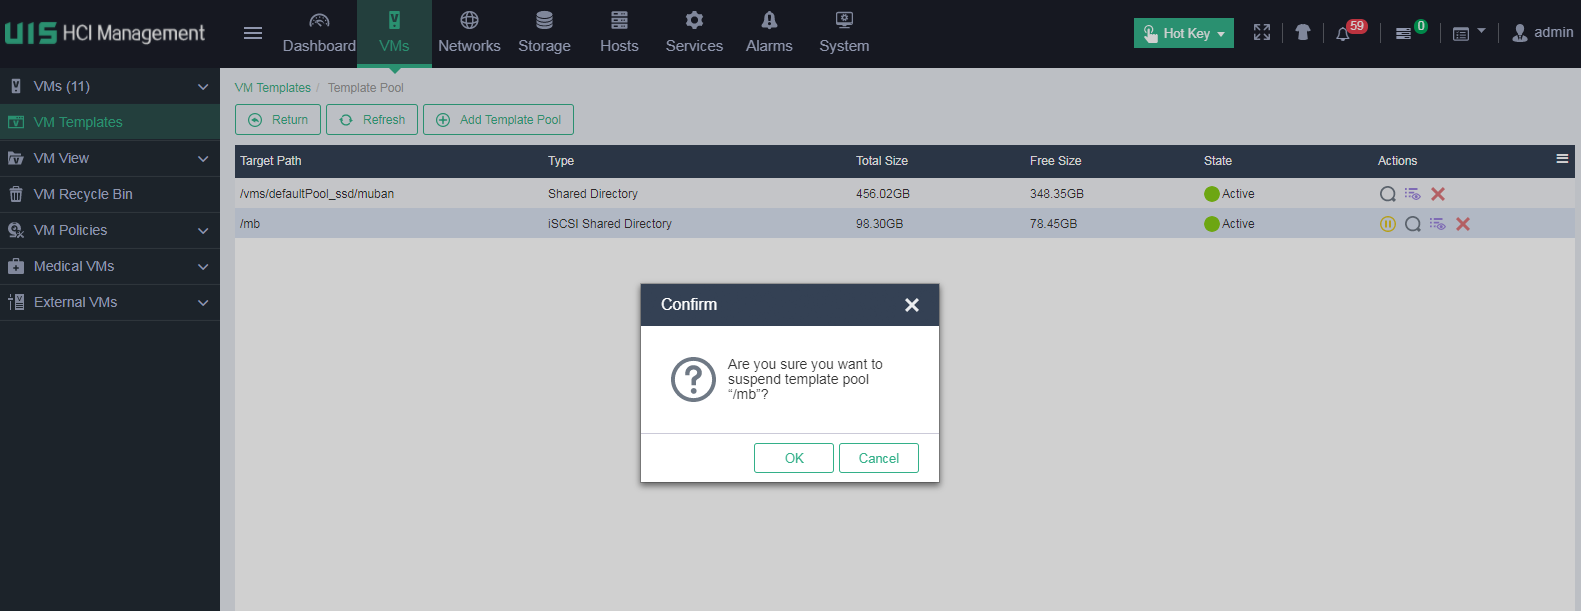
1. Click Hosts on the top navigation bar. Select the host from the navigation pane, and then click the Storage tab. On the page that opens, click the Suspend Storage Pool icon in the Actions column for each storage pool in Active state. Repeat this procedure to suspend storage for all hosts in the cluster.

2. On the top navigation bar, click VMs, and then select VM Templates from the navigation pane. On the page that opens, click Template Pool. Click the Suspend Template Pool icon for the template pool in Active state. In the dialog box that opens, click OK.
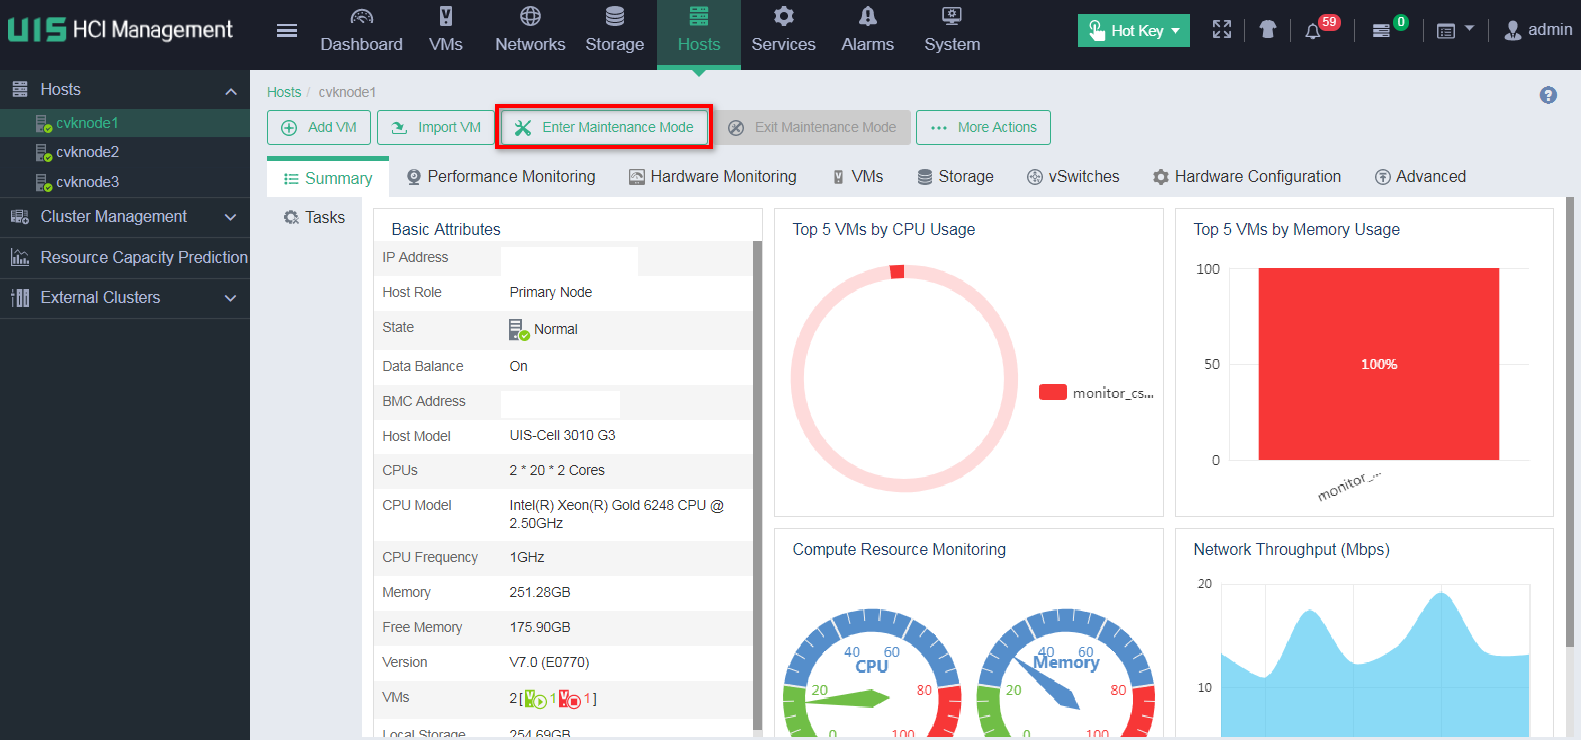
Placing hosts into maintenance mode
1. On the top navigation bar, select Hosts. From the left navigation pane, select a target host. On the page that opens, click Enter Maintenance Mode. Repeat this procedure to place the other hosts in the cluster into maintenance mode.


2. For UIS in a version that supports selecting Disable Data Balancing, select Disable Data Balancing in the dialog box that opens. For a compute host, skip this step.
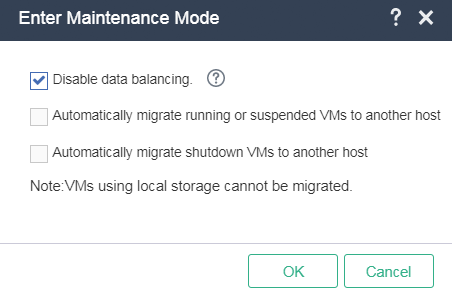
3. For UIS in a version that does not support selecting Disable Data Balancing, perform the following tasks:
a. Access the CLI of any node in the cluster.
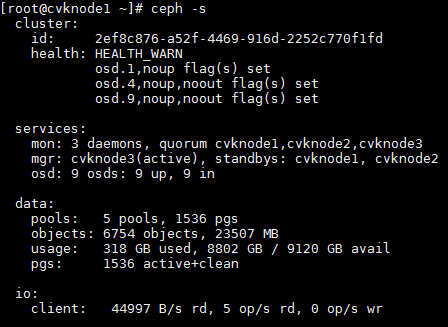
b. Execute the ceph osd set noout and ceph osd set noup commands.
c. Execute the ceph -s command to verify that the value for the health field is Health_WARN and the system prompts noup,noout flag(s) set.

Shutting down and powering off servers
1. If you have configured stateful failover, shut down the backup node first, and then shut down the primary node.
2. As a best practice to avoid current fluctuations, do not shut down the nodes in the cluster simultaneously.
3. Execute the sync command to write the data in the memory buffer to drives.
4. Execute the hwclock –w command to synchronize time to hardware.
5. Execute the shutdown -h now command to shut down the nodes.
6. Before you power off a server, make sure the server power status is Off on the HDM page or the system power LED on the server indicates that the system is in standby state.
Starting servers
Starting servers and checking the network
1. Start all servers in the cluster.
2. After all servers start up, execute the ip addr command at the CLI of each node in the cluster to verify that network ports are up for the management, service, storage front-end, and storage back-end networks.
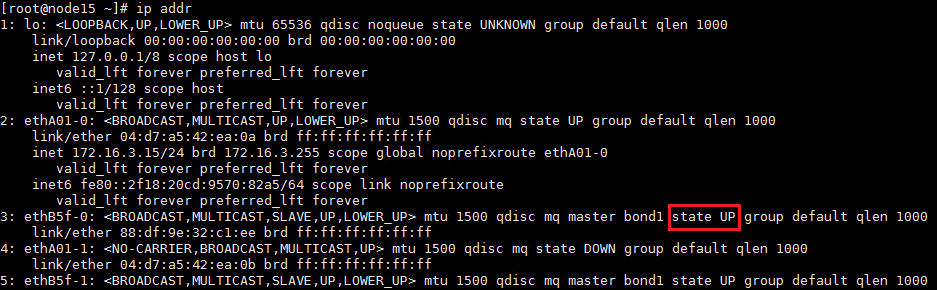
3. Verify that nodes in the cluster can ping each other successfully.
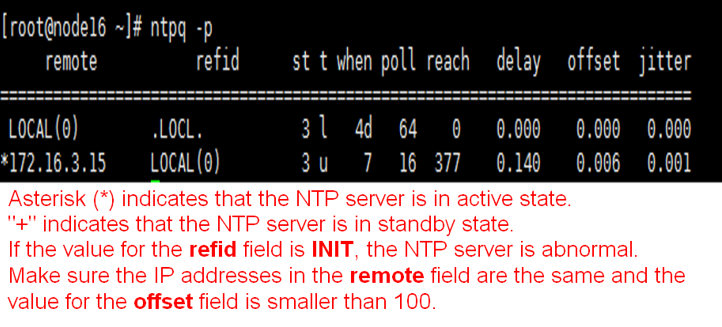
Checking the NTP state
Execute the ntpq -p command at the CLI of each node in the cluster. Make sure the IP addresses in the remote field are the same, the value for the refid field is not INIT, and the value for the offset field is smaller than 100.

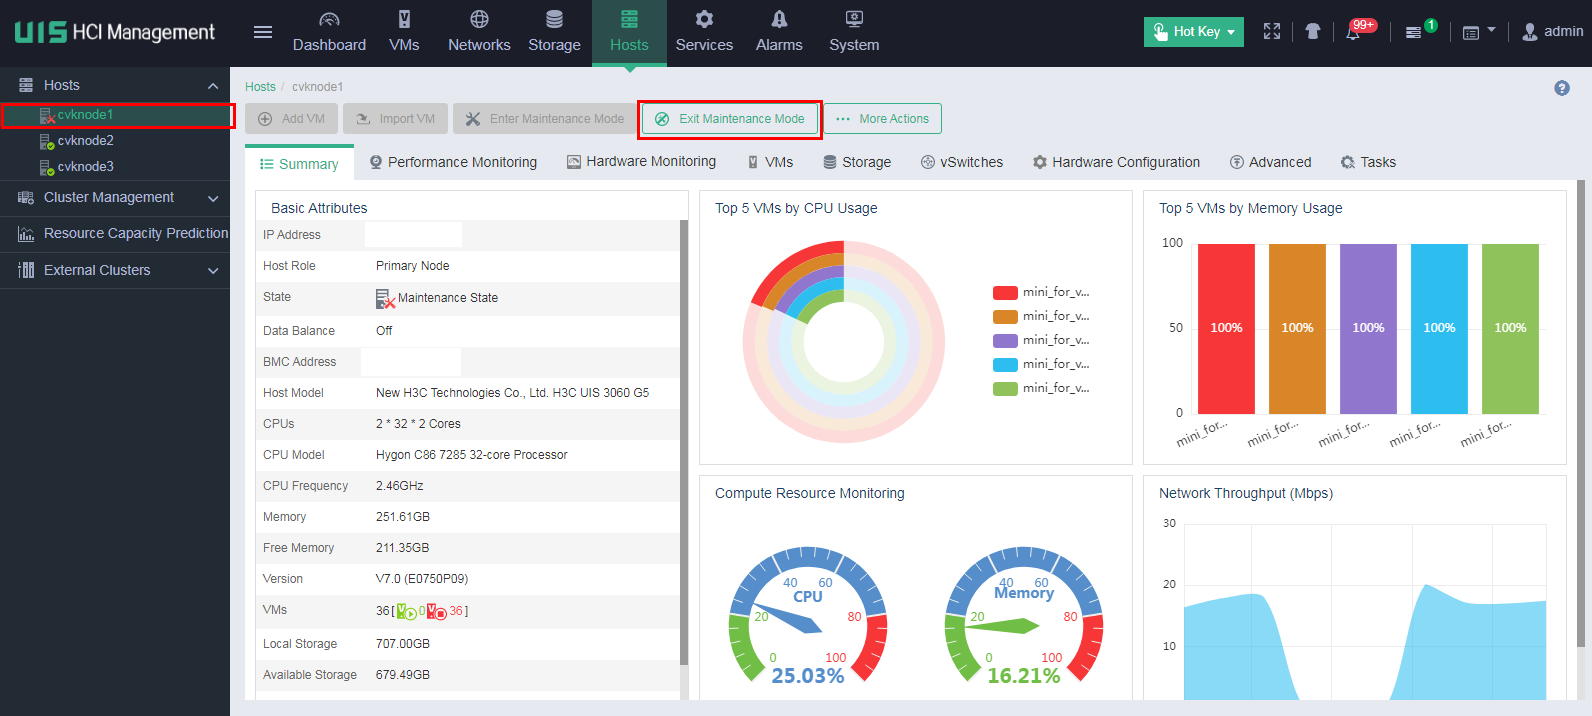
Removing hosts from maintenance mode
For UIS in E0709 or a later version
1. Remove all hosts in the cluster from maintenance mode on UIS Manager.
|
|
NOTE: For compute hosts, skip the following steps. |
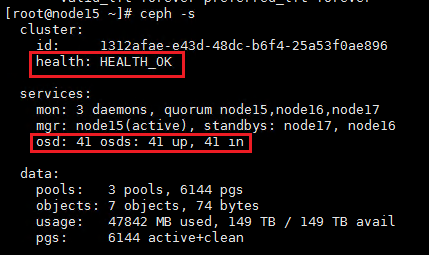
2. Execute the ceph –s command to verify the cluster health state. If the cluster is healthy, the health field displays Health_OK and all OSDs are up and in.

3. Execute the ceph –s command to identify whether the maintenance mode flags still exist. If the flags still exist, execute the ceph osd unset-osd noout 1 and ceph osd unset-osd noup 1 commands to remove each OSD from maintenance mode on the related node. Replace 1 with the OSD number.
For UIS in a version earlier than E0709
1. Access the CLI of any node in the cluster, and then execute the ceph osd unset noup and ceph osd unset noout commands.
2. Wait for about five minutes, and then execute the ceph -s command to verify the cluster health state. If the cluster is healthy, the health field displays Health_OK and all OSDs are up and in.
3. Execute the ceph –s command to identify whether the maintenance mode flags still exist. If the flags still exist, execute the ceph osd unset-osd noout 1 and ceph osd unset-osd noup 1 commands to remove each OSD from maintenance mode on the related node. Replace 1 with the OSD number.

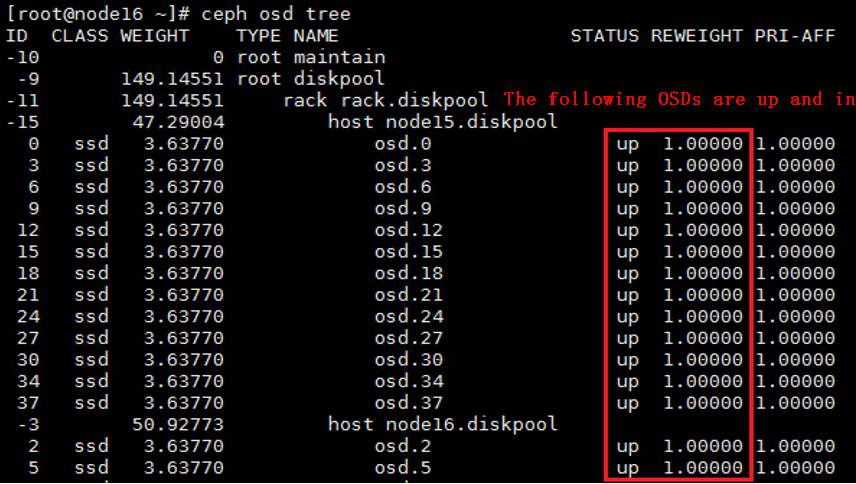
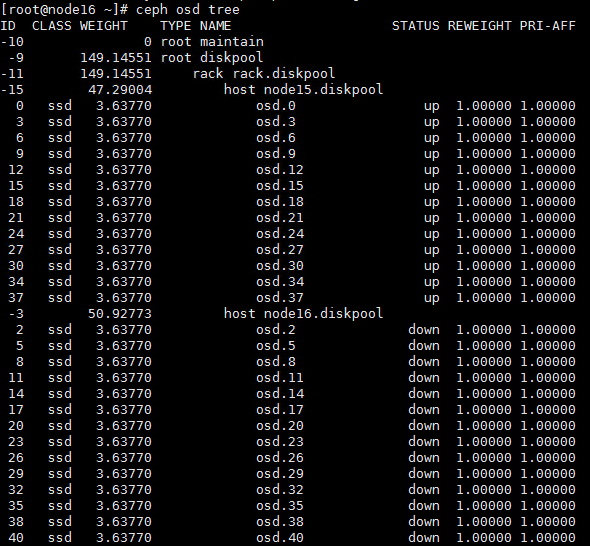
4. If some OSDs are still down, execute the ceph osd tree command to identify the hosts to which the OSDs belong. Execute the ceph-disk activate-all command on the hosts to activate the OSDs. Wait for about 5 minutes, and then execute the ceph -s command to verify that all OSDs are up and in.
5. Remove all hosts in the cluster from maintenance mode on UIS Manager.

Restoring services
Enable the storage pools for all hosts and make sure they are in Active state. Start the VMs and the services will restore.
Shutting down a single node online
Use this section to shut down a single node online. You can shut down only one node without service interruption at a time. To shut down multiple nodes simultaneously, you must first stop the services. For more information, see "Shutting down and powering off all nodes in a cluster."
When a single node is being shut down online, do not create VMs or add nodes to the cluster. To shut down multiple nodes online, shut them down one by one by performing the tasks in this section. After you shut down a node, wait for the cluster to restore and then operate another node.
Checking cluster states
Checking the cluster health
1. Log in to UIS Manager. On the Dashboard page, verify that all hosts and VMs are in Running state and no alarm messages are displayed at the upper right corner of the page. If a VM is shut down, contact the customer and record it. If an alarm has occurred or a host is abnormal, wait for the cluster to restore automatically or resolve the issue first. If the issue persists, contact Technical Support.

2. At the CLI of any node in the cluster, execute the watch ceph –s command to observe the cluster health state for about one minute. If the cluster is healthy, the health field displays Health_OK. If the health field does not display Health_OK, contact Technical Support.
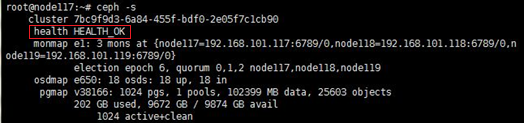
Checking the cluster service load
Checking the I/O statistics
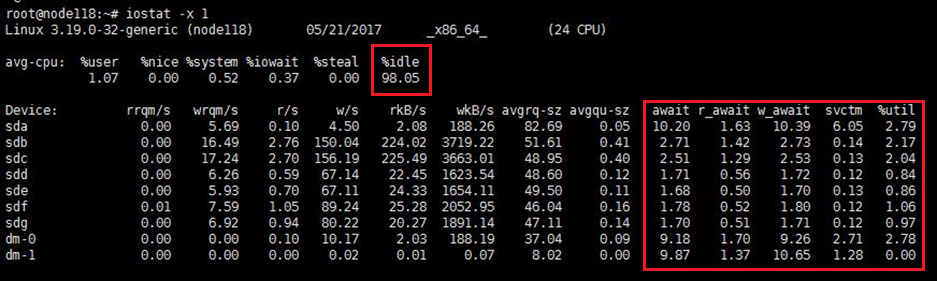
Access the CLI of each node in the cluster through SSH, and then execute the iostat -x 1 command to observe the CPU usage and drive load. This command updates I/O statistics per second. As a best practice, observe the I/O statistics about each node for about two minutes.
In normal state, the I/O statistics are as follows:
· %idle—Percentage of time that the CPU was idle. The value is larger than 50.
· %util—Percentage of CPU time during which I/O requests were issued to the node. The value is smaller than 40.
· svctm—Average service time (in milliseconds) for each I/O request. The value is smaller than 20.
· await—Average waiting time (in milliseconds) for each I/O request. The value is smaller than 20.
· r_await—Average wait time (in milliseconds) for each read request. The value is smaller than 20.
· w_await—Average wait time (in milliseconds) for each write request. The value is smaller than 20.
It is normal that the value of a field exceeds the upper limit or drops below the lower limit occasionally. If the value keeps higher than the upper limit or lower than the lower limit, wait for the service load to decrease or suspend some services.
Checking the memory usage
Access the CLI of each node in the cluster through SSH, and then execute the free –m command to verify that the memory usage is lower than 60%. If the memory usage of a node is higher than 60%, execute the sync;echo 3 > /proc/sys/vm/drop_caches command to clear the memory cache. Wait for about one minute, and then verify the memory usage again.
|
|
NOTE: The memory usage is the ratio of the used memory size to the total memory size. |
![]()
Checking the configuration
Checking the fstab file
Checking the fstab file
Typically, partitions are identified by their UUIDs in the fstab file. If the partitions are identified by drive letters, the drive letters might change after you reboot the host, causing serious issues.
To avoid such an issue, perform the following tasks at the CLI of the host:
1. Execute the cat /etc/fstab command to verify that partitions are identified by their UUIDs in the fstab file.
Figure 9 Checking the fstab file

2. Execute the mount –a command to verify that no error is reported.
Figure 10 Verifying that no error is reported
![]()
Common errors
The following shows the common errors that might be reported after you execute the mount –a command.
· The file system or mount point does not exist.
Figure 11 Nonexistent file system
![]()
Figure 12 Nonexistent mount point
![]()
· Incorrect file system type.
Figure 13 Incorrect file system type

Solution
Perform the following tasks on the host on which an error has occurred:
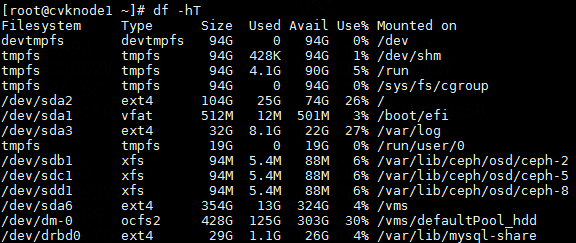
1. Execute the df –hT command to obtain the mount points and file system types.
Figure 14 Obtaining the mount points and file system types
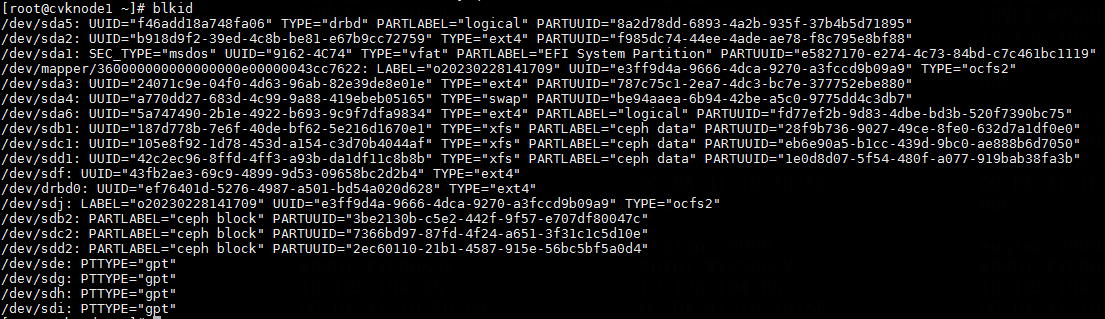
2. Execute the blkid command to obtain the UUIDs. Match the mount points you have obtained against the UUIDs.
Figure 15 Obtaining the UUIDs
3. Execute the vim /etc/fstab command to correct the error in the fstab file and save the configuration.
Figure 16 Editing the fstab file
4. Execute the mount –a command again to verify that no error is reported.
Checking the switch configuration
Identify whether STP is enabled on the storage and service switches. If STP is enabled, verify that the ports connected to the server are configured as edge ports. For more information, see the command reference for the switch.
|
|
NOTE: Before you change the switch configuration, contact Technical Support. |
Checking host route information
Execute the route -n command at the CLI of each host to verify that the host route information is the same as that configured on the Web interface.

Checking the RAID controller power status
Log in to the HDM or iLO page to verify that the supercapacitor of the RAID controller is normal and is fully charged.
Checking drive caching
For more information, see "Checking drive caching."
Checking the NTP configuration
Execute the ntpq -p command at the CLI of each node in the cluster. Make sure the IP addresses in the remote field are the same, the value for the refid field is not INIT, and the value for the offset field is smaller than 100.
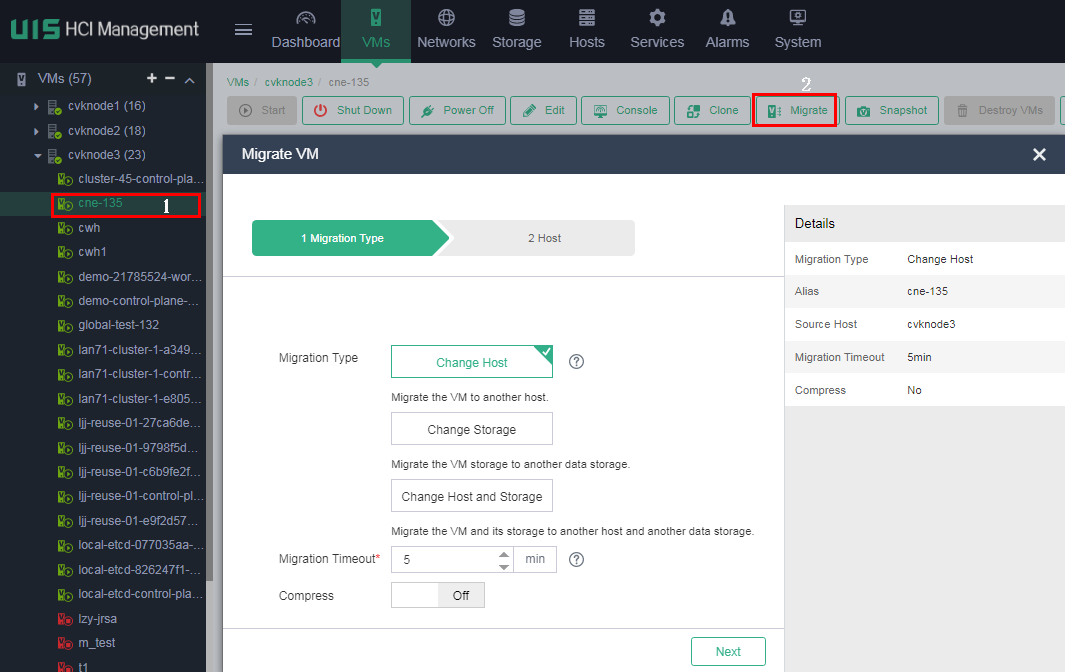
Migrating VMs
Migrate the VMs running on the node to be shut down to other nodes. During migration, observe the compute resource usage of other nodes. As a best practice, migrate the VMs to other nodes evenly. Record the migration for migrating the VMs back later.
Placing the host in maintenance mode
1. On the top navigation bar, select Hosts. From the left navigation pane, select the target host. On the page that opens, click Enter Maintenance Mode.
2. For UIS in a version that supports selecting Disable Data Balancing, select Disable Data Balancing in the dialog box that opens. For a compute host, skip this step.

3. For UIS in a version that does not support selecting Disable Data Balancing, perform the following tasks:
a. Access the CLI of any node in the cluster.
b. Execute the ceph osd set noout and ceph osd set noup commands.
c. Execute the ceph -s command to verify that the value for the health field is Health_WARN and the system prompts noup,noout flag(s) set.

Isolating the node
1. Executing the systemctl stop ceph-osd.target command to stop all OSDs at the CLI of the node to be shut down.
2. Wait for about 30 seconds, and then execute the ceph osd tree command to verify that all OSDs are down.
Shutting down and powering off the server
1. Execute the sync command to write the data in the memory buffer to drives.
2. Execute the hwclock –w command to synchronize time to hardware.
3. Execute the shutdown -h now command to shut down the node.
4. Before you power off the server, make sure the server power status is Off on the HDM page or the system power LED on the server indicates that the system is in standby state.
Starting the server
Starting the server and checking the network
1. Start the server.
2. After the server starts up, execute the ip addr command to verify that network ports are up for the management, service, storage front-end, and storage back-end networks.

3. Verify that the current node is reachable to the other nodes in the cluster.
Checking the NTP state
Execute the ntpq -p command at the CLI of each node in the cluster. Make sure the IP addresses in the remote field are the same, the value for the refid field is not INIT, and the value for the offset field is smaller than 100.

Removing the host from maintenance mode
For UIS in E0709 or a later version
1. Remove the host from maintenance mode on UIS Manager.

|
|
NOTE: For a compute host, skip the following steps. |
2. Execute the ceph –s command to verify the cluster health state. If the cluster is healthy, the health field displays Health_OK and all OSDs are up and in.

3. Execute the ceph –s command to identify whether the maintenance mode flags still exist. If the flags still exist, execute the ceph osd unset-osd noout 1 and ceph osd unset-osd noup 1 commands to remove each OSD from maintenance mode on the related node. Replace 1 with the OSD number.

For UIS in a version earlier than E0709
1. Access the CLI of any node in the cluster, and then execute the ceph osd unset noup and ceph osd unset noout commands.
2. Wait for about five minutes, and then execute the ceph -s command to verify the cluster health state. If the cluster is healthy, the health field displays Health_OK and all OSDs are up and in.

3. Execute the ceph –s command to identify whether the maintenance mode flags still exist. If the flags still exist, execute the ceph osd unset-osd noout 1 and ceph osd unset-osd noup 1 commands to remove each OSD from maintenance mode on the related node. Replace 1 with the OSD number.

4. If some OSDs are still down, execute the ceph osd tree command to identify the hosts to which the OSDs belong. Execute the ceph-disk activate-all command on the hosts to activate the OSDs. Wait for about 5 minutes, and then execute the ceph -s command to verify that all OSDs are up and in.

5. Remove the host from maintenance mode on UIS Manager.

Waiting for the cluster to restore
1. Wait for five minutes, and then execute the ceph –s command to verify the cluster health state. If the cluster is healthy, the health field displays Health_OK and all OSDs are up and in.

2. If some OSDs are still down, execute the ceph osd tree command to identify the hosts to which the OSDs belong. Execute the ceph-disk activate-all command on the hosts to activate the OSDs. Wait for about 5 minutes, and then execute the ceph -s command to verify that all OSDs are up and in.
3. On the Web interface, verify that all hosts are normal and no alarms occur.
Migrating VMs back to the host
Perform a health check by selecting Hot Key > Health Check on the Web interface to verify that services and the cluster are normal, and then migrate the VMs back to the original host.
Shutting down UIS-Cloud component VMs
The UIS-Cloud component runs on VMs on UIS Manager. Use this section to shut down UIS-Cloud component VMs.
Cluster deployment
When you deploy the UIS-Cloud component in cluster mode, perform the following tasks to shut down UIS-Cloud component VMs.
Shutting down the component VMs
1. Log in to the CLI of any component VM.
2. Execute the /opt/bin/shutdown-all command to shut down the three component VMs in the cluster.
Starting the component VMs
1. Start the three component VMs on UIS Manager.
2. After the component VMs start up, log in to the CLI of any component VM and then execute the /opt/bin/start-all command.
3. Wait for a period of time, and then access UIS Cloud.
Standalone deployment
When you deploy the UIS-Cloud component in standalone mode, perform the following tasks to shut down the UIS-Cloud component VM.
Shutting down the component VM
1. Log in to the CLI of the component VM.
2. Execute the /opt/bin/shutdown command.
3. Execute the shutdown +2 command.
Starting the component VM
1. Start the component VM on UIS Manager.
2. After the component VM starts up, log in to the CLI of the component VM and then execute the /opt/bin/start-all command.
3. Wait for a period of time, and then access UIS Cloud.
