H3C Workspace Cloud Desktop Static Desktop Pool Configuration Examples-E1013 Series-5W100-book.pdf  (5.33 MB)
- Released At: 11-08-2023
- Page Views:
- Downloads:
- Table of Contents
- Related Documents
-
|
|
|
H3C Workspace Cloud Desktop |
|
Static Desktop Pool Configuration Examples |
|
|
|
|
Document version: 5W100-20230728
Copyright © 2023 New H3C Technologies Co., Ltd. All rights reserved.
No part of this manual may be reproduced or transmitted in any form or by any means without prior written consent of New H3C Technologies Co., Ltd.
Except for the trademarks of New H3C Technologies Co., Ltd., any trademarks that may be mentioned in this document are the property of their respective owners.
This document provides generic technical information, some of which might not be applicable to your products.
The information in this document is subject to change without notice.
About configuring static desktop pool
Creating an endpoint group and adding endpoints to the group
Creating a domain user and adding it to a security group
Configuring an authentication server and synchronizing OU
Creating a static desktop pool
Authorizing desktops in desktop pools
About configuring static desktop pool
· Big enterprises, in particular, medium and large size enterprises with mass branches have wider physical distribution of office desktops, and maintenance is very difficult in case of breakdowns. Hence, their IT management departments are eager to achieve centralized management and maintenance of office desktops to make IT management simpler and less costly.
· For users, the primary requirements for IT resources are ease of use, shortest fault recovery time, and flexible desktop performance of the office desktop.
This case mainly describes how to perform cloud access to an enterprise's office desktop through static desktop pool and domain user on the Space Console. That is, enterprise's IT administrators can perform centralized management, and users can use the dedicated cloud desktop in different offices.
Prerequisites
· Building the H3C Workspace Cloud Desktop environment includes installing Space Console and completing its initial deployment, enabling the endpoint with the self-developed SpaceOS system to access the network and installing the Workspace Cloud Desktop client. For more information, see H3C Workspace Cloud Desktop Management Software Installation and Deployment Guide.
· After the initial configuration is complete, install License Server on a VM of the Space Console or another physical server, and complete the configuration on the License page of Space Console. For more information, see "License Management" in H3C Workspace Cloud Desktop - User Guide for Management Platform.
· A domain controller server has been set up. Take the Microsoft active directory type domain controller server with the domain name coco.com as an example.
· For E1009 and later versions, upload the client installation package of the corresponding endpoint to the upgrade page of the management platform, and upload the optimization tool zipping package H3C_Workspace-version-OptTools.zip to the image tool page of the management platform.
Restrictions and guidelines
The configuration was created and verified in a lab environment, and all the servers and software were started with the factory default configuration. If the device has been configured, ensure that the existing configuration does not conflict with the configuration in the following example.
Configuration example
Network requirement
A company has two business departments (Department A and Department B), both of which use ordinary PCs with the Windows 10 64-bit OS installed to work. As system maintenance is inconvenient, the company wants to replace the PCs with cloud desktops, with the following requirements:
· The departments use different kinds of common office software.
· Every employee uses one cloud desktop. Employees can store the data on the cloud desktop for a long time and customize the cloud desktop.
· Every department has a leader who needs to have the office desktops of the two departments.
· The company has Building A and Building B for work. Users can access their cloud desktops in any building.
Figure 1 Network diagram

Analysis
This case can be implemented by the static desktop pool.
· The cloud desktop in the static desktop pool can be authorized only to one user for implementing the one-to-one binding between the user and the cloud desktop, and multiple cloud desktops can be authorized to the same user.
· Users can use the cloud desktop for a long time, store personal data on the cloud desktop, and customize personalized settings.
· After the cloud desktop is restarted, the system will not be restored, and user data and settings will be retained.
Figure 2 Static desktop pool

The specific configuration is as follows:
1. Create new endpoint groups for the two departments on the management platform. The endpoint authentication mode is user authentication for registering the endpoints used by the employees from the two departments and downloading the clients.
2. Create the user groups Department A and Department B on the domain controller server by department, and add the corresponding employee's account information.
3. Department A and Department B have different common software. Create different desktop images for the two departments and different static desktop pools through the desktop images. The type of desktop pool users is "domain user", which enables users to use the domain account to log in to the cloud desktop through the endpoint at any office location.
4. Create desktop images VM 1 and VM 2 through the Windows10 64-bit system image, and create the desktop image as a template. During creation, respectively install the common office software of Department A and Department B for the desktop images.
5. Use two desktop images to create static desktop pools Dept A and Dept B respectively. The user type is domain user, and the number of desktops is the number of employees of each department + 1, and each leader has two cloud desktops.
6. Deploy the desktop pools in bulk, with the number of employees of each department + 1.
7. Authorize the cloud desktops in the desktop pool to the user groups of the corresponding departments in one-to-one relation. The two leaders are authorized in the two desktop pools.
Figure
3 Configuration diagram 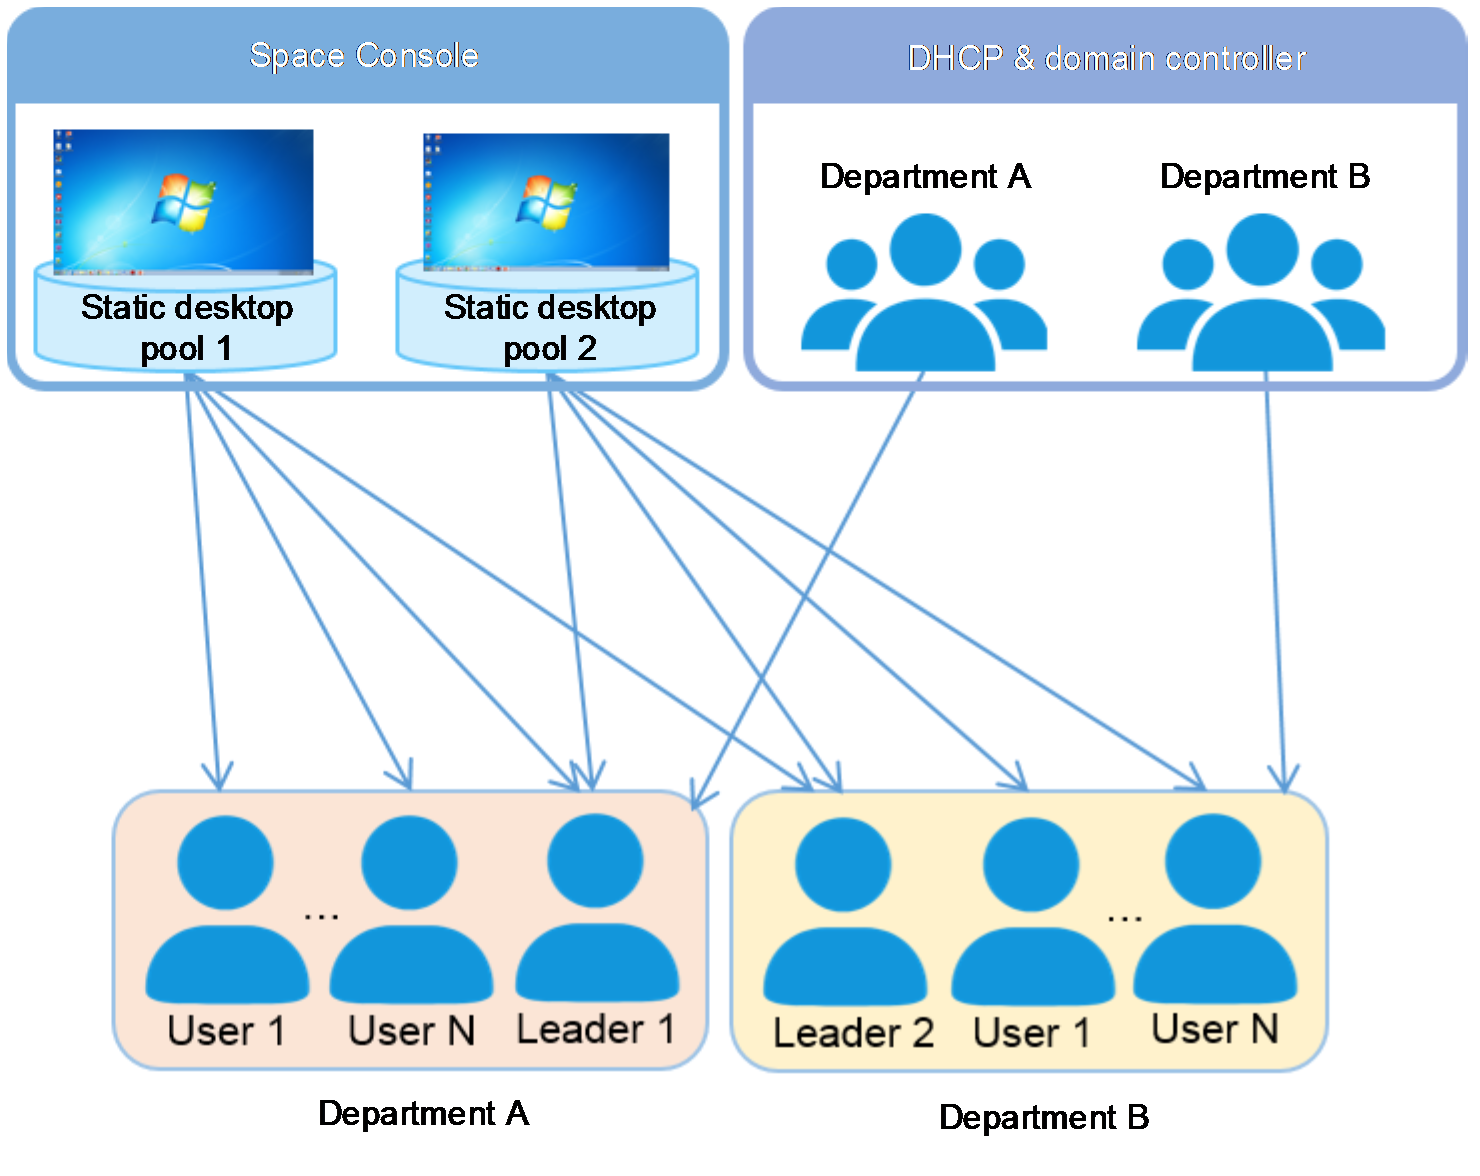
Procedure
Taking E1013P11 for example, this document introduces a typical deployment of static desktop pool. How to operate other versions is subject to the actual situation.
Creating an endpoint group and adding endpoints to the group
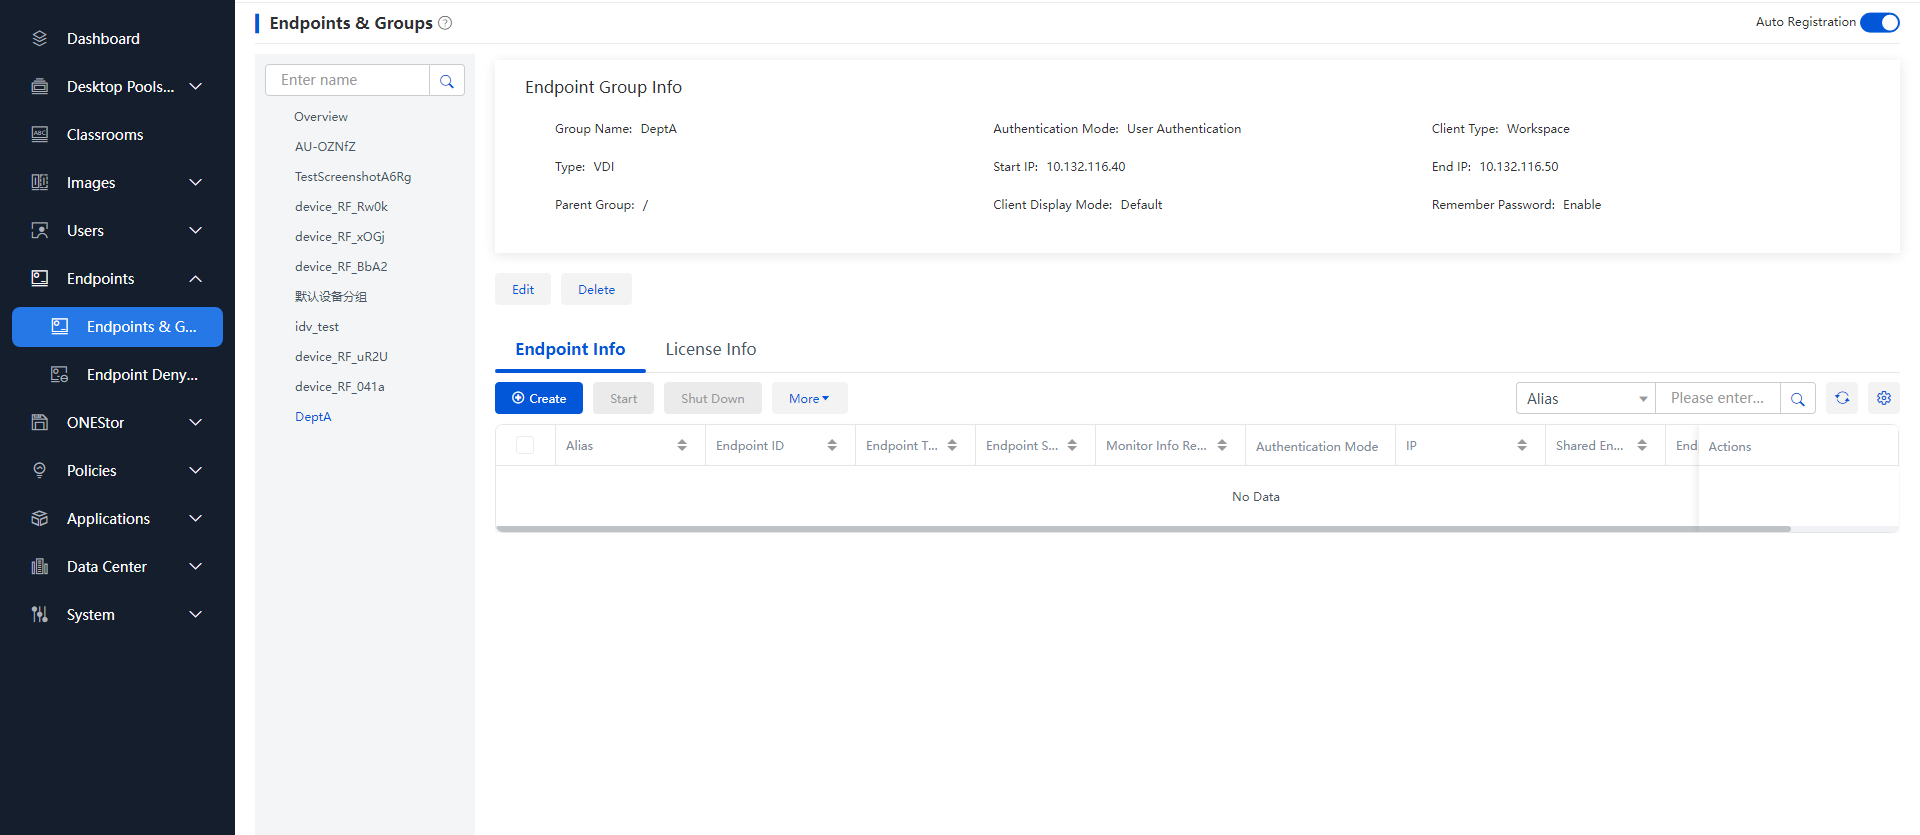
1. Create Department A and Department B on Space Console. Take Department A as an example. From the navigation pane, select Endpoints to enter the endpoint page, and click Create on the Endpoint Groups tab. The endpoint group creating window opens.
Figure 4 Endpoint
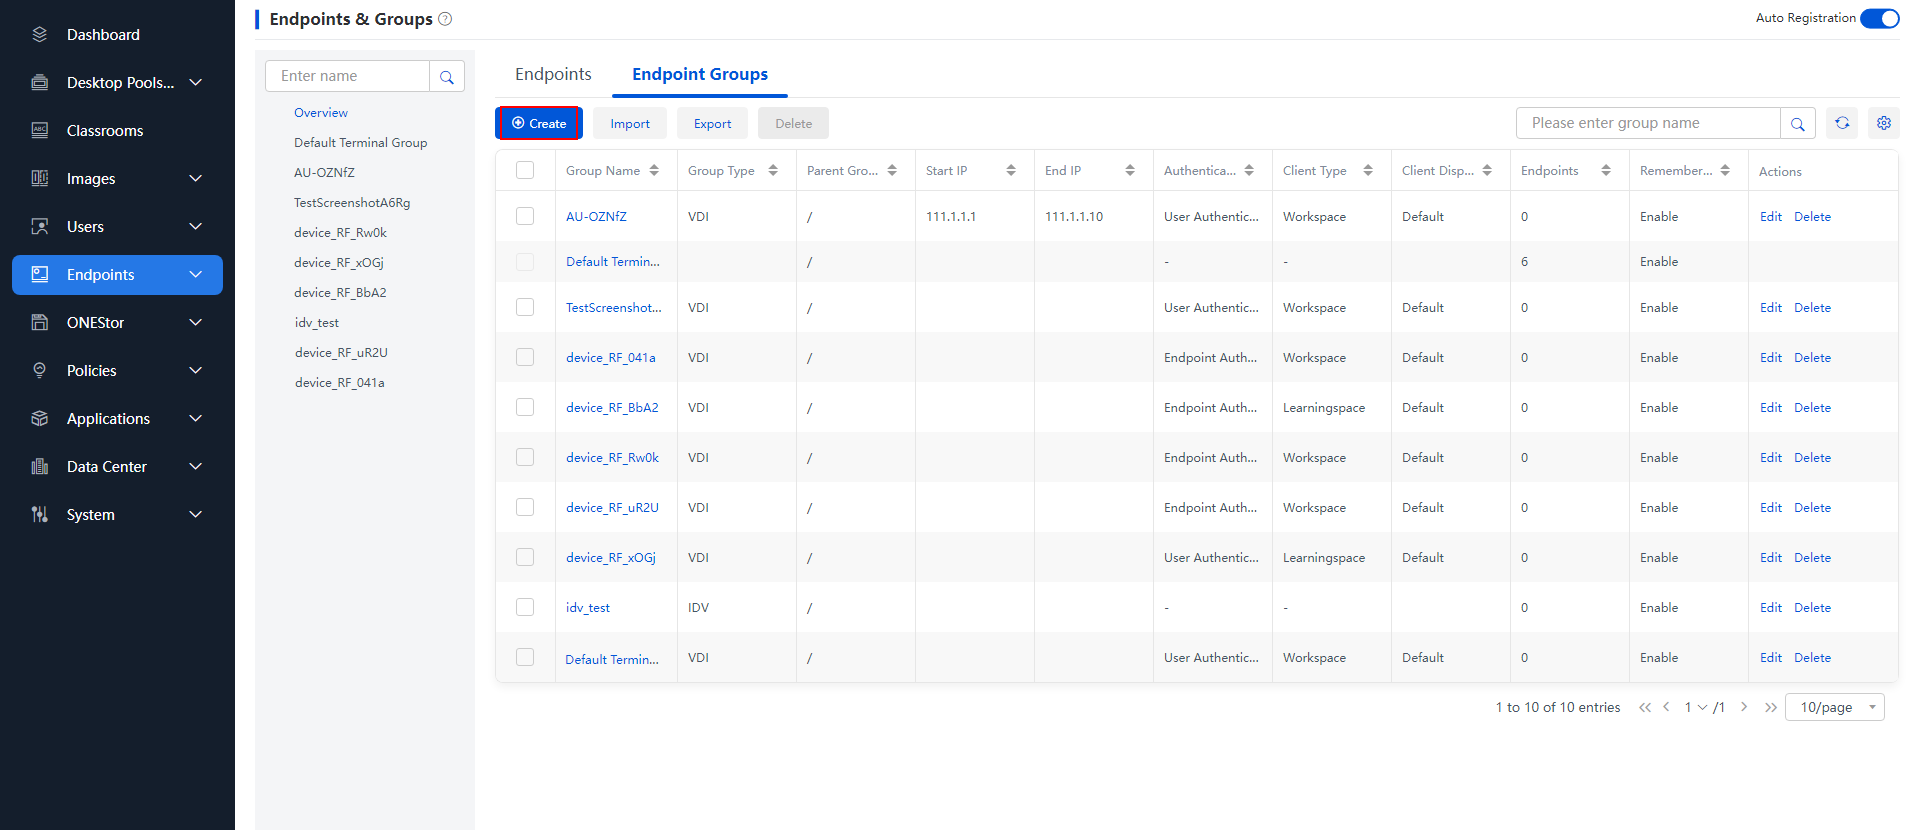
2. In the endpoint group creating window, plan the network, including the IP segment of the endpoint that the employees of Department A use; Authentication Mode: User Authentication; Client Type: Workspace; and Client Display Mode: Default.
Figure 5 Creating an endpoint group

3. Register endpoints to the management platform and add them to the group: After the endpoints are accessed to the network, group root endpoints, automatically register the endpoints to the management platform, and add the endpoint to the corresponding groups. The endpoints automatically download and install the Workspace Cloud Desktop client.
Figure 6 Registering the endpoint to the management platform and adding it to the group
|
|
NOTE: · Authentication Mode: If User Authentication is selected, you need to log in to Workspace client with a username and password. If Endpoint Authentication is selected, you can log in without entering the username and password. If User Authentication is selected, a user needs to use username and password to log in to the client in the office scenario. · Client Type: The corresponding client can be downloaded and installed after selection. Select Workspace in this example. · Client Display Mode: Default, Full Screen and Windowed. You can select Default. When Default is selected, the client automatically chooses a display mode based on the endpoint type. When the endpoint is a SpaceOS, original desktop endpoint or third-party cloud endpoint, the client displays in full screen by default, and the clients installed on other endpoints display in the windows by default. · Remember Password: Enable this feature to allow a VDI desktop to remember the password of a local or domain user or allow an IDV or VOI desktop assigned to a single user to remember the password of the user upon login. · A user can add a device to the endpoint group of Department A or Department B of the management platform by adding a device or importing a device. For more information, see H3C Workspace Cloud Desktop Space Console User Manual. |
Creating a domain user and adding it to a security group
In the domain controller server coco.com, create an organization "TEST", namely OU=TEST.
1. Select Start > Active Directory Users and Computers. The Active Directory Users and Computers window opens.
2. Create an organization: Take "TEST" for example, namely OU=TEST.
3. Creating two security groups: Create Dept A and Dept B in the organization TEST to respectively correspond to Department A and Department B. Take creating the security group - Dept A as an example. Repeat this step to build the security group - Dept B.
4. Creating a user: Create user accounts for employees of Department A and Department B. Take zhangsan as an example. Repeat this step to create multiple users.
5. Adding a user to the security group: Take adding zhangsan to the security group Dept A as an example. You can also select all employees of the two departments, to add them to the corresponding installation groups at one time.
Configuring an authentication server and synchronizing OU
Configure the built authentication server on Space Console, and create and synchronize the OU on the server.
1. From the navigation pane, select System > Advanced Settings > Servers Configuration > Servers to enter the servers page.
Figure 7 Servers

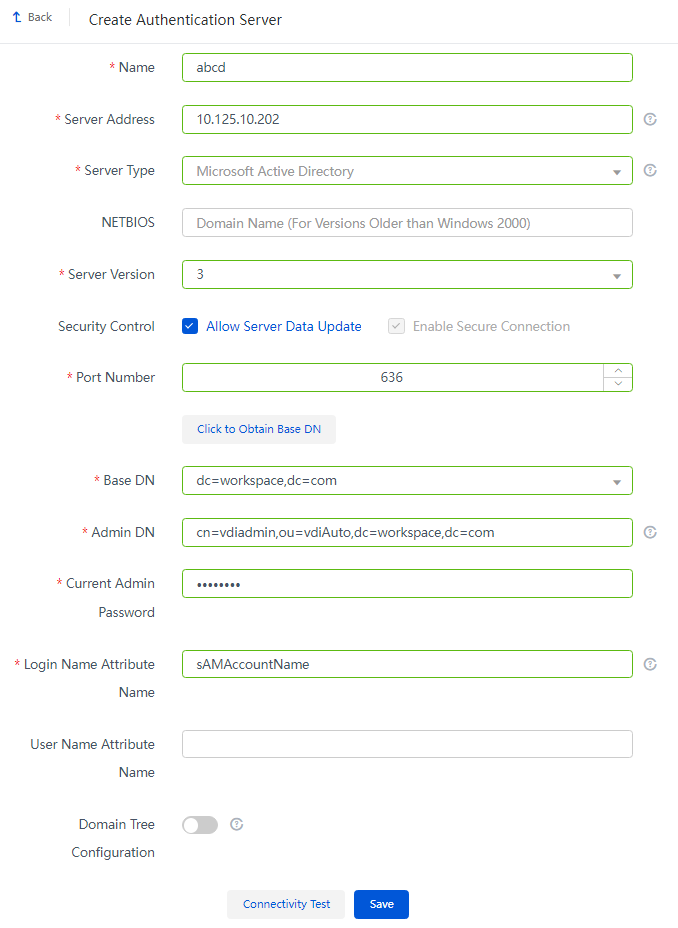
2. Click Create Authentication Server and configure all the parameters.
3. Click Connective Test to ensure the connectivity between the authentication server and the Space Console, then click Save.
Figure 8 Creating an authentication server
|
|
NOTE: The configuration information is the parameters of the built AD domain controller server. |
Table 1 Description of main parameters for creating an authentication server
|
Parameter |
Description |
|
Server Address |
IP address of the LDAP server If the environment is in primary/standby mode or load balancing mode of the Microsoft AD domain, do not configure the IP address. Otherwise, the switching of primary and standby domains and load balancing cannot be implemented. |
|
Server Type |
Select an LDAP server type. Options include Generic LDAP Server and Microsoft Active Directory. Select Microsoft Active Directory here. |
|
NETBIOS |
The domain server earlier than Windows 2000 needs to configure the NetBIOS information. The cloud desktop of Windows XP OS can be added to the domain server successfully. |
|
Server Version |
The authentication server version includes V2 and V3, but V3 is defaulted. |
|
Security Control |
Sets the connecting security of domain server. · Allowing the server data to be updated: Enable security connection by default after this option is enabled, that is, allow the administrator to manage the domain users on the domain server. · Enabling security connection: Uses the SSL protocol to connect the domain server for implementing security communication. |
|
Port Number |
The port number that connects the domain server, with a default value of 389. After the security connection is enabled, the default value of port number is 636. |
|
Base DN |
Base DN attribute used when communicating with the authentication server. After entering the IP address of the server, click Base DN. The system will obtain this parameter automatically from the server. |
|
Admin DN |
Admin DN attribute used when communicating with the authentication server. |
|
Current Admin Password |
Admin password used when communicating with the authentication server. |
|
Login Name Attribute Name |
Name of login name attribute used when obtaining user information from LDAP. Enter the user naming attribute. If you select Generic LDAP Server for the Type parameter, the default user naming attribute is cn. If you select Microsoft Active Directory for the Type parameter, the default user naming attribute is sAMAccountName. |
|
User Name Attribute Name |
Configure the user name attribute for obtaining the user information from the LDAP server. |
|
Domain Tree Configuration |
Select whether to enable domain tree configuration. The default is Disabled. |
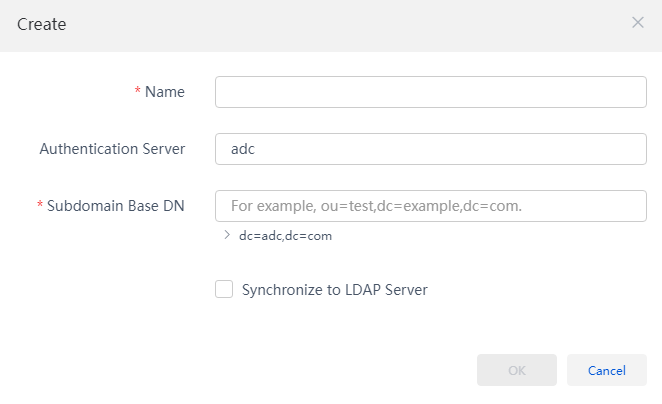
4. From the navigation pane, select System > Advanced Settings > Servers Configuration > OU Sync to enter the synchronous configuration page. Click Create. After the parameters are configured in the pop-up dialog box, click OK.
Figure 9 Creating an OU
|
|
NOTE: The AD domain controller server may have many OUs. Creating an OU is to add the OU designated on the domain controller server to the management platform so that the management platform synchronizes all domain users in the OU. When creating an OU, the parameters are described as follows: · Name: Name of the OU. It is the name of Subdomain Base DN customized by the user. · Authentication server: Selects the authentication server of the OU. |
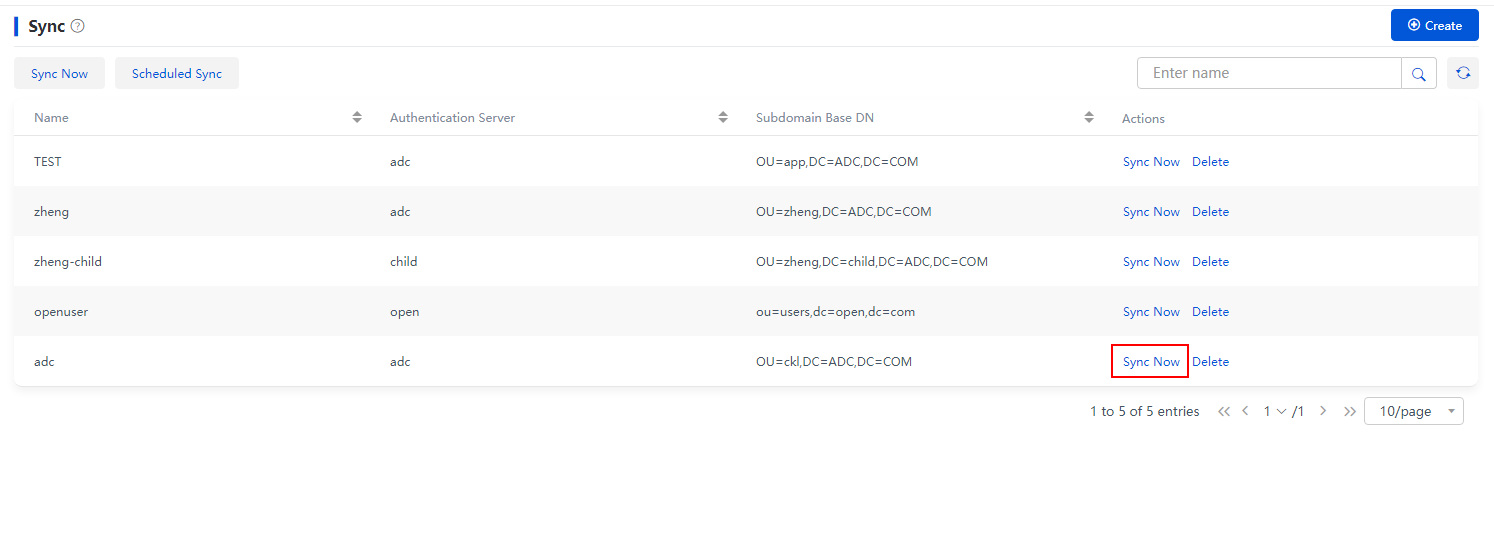
5. Click Sync Now to synchronize the OU on the authentication server.
Figure 10 Synchronous configuration
6. After the synchronization is complete, view the synchronized OUs in the domain user list.
Figure 11 Viewing the synchronized domain users

Uploading a system image
Upload the Windows 10 64-bit ISO system images to Space Console to make an image source VM. If a qualified system image already exists in the system, skip this step.
Figure 12 System image list
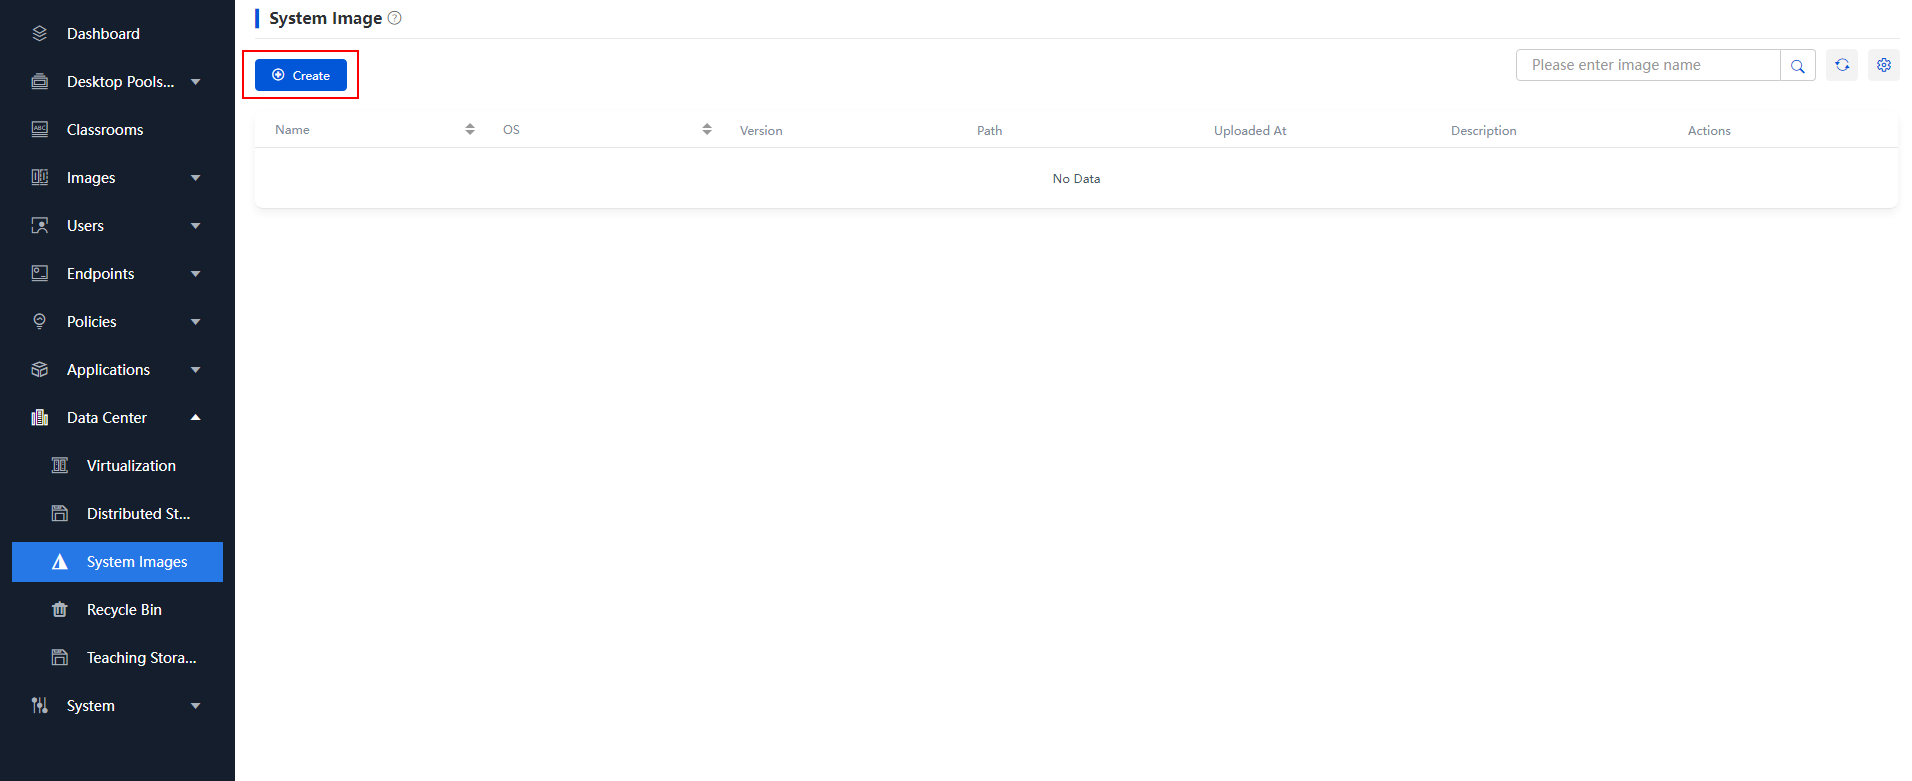
Figure 13 Uploading a system image

|
|
NOTE: In Figure 13, the operating system and its version should be consistent with the uploaded ISO system image. |
Creating a desktop image
Desktop images are VM templates. To create a desktop image, you need to create an image source VM and clone or convert it to a desktop image.
· Create an image source VM: Create an image source VM based on the uploaded system image.
· Build an image source VM: Install the operating system (OS), CAStools, VdiAgent, and other software and optimize the image source VM.
Creating an image source VM
Create images VM 1 and VM 2 for the two departments on Space Console. Take VM 1 as an example.
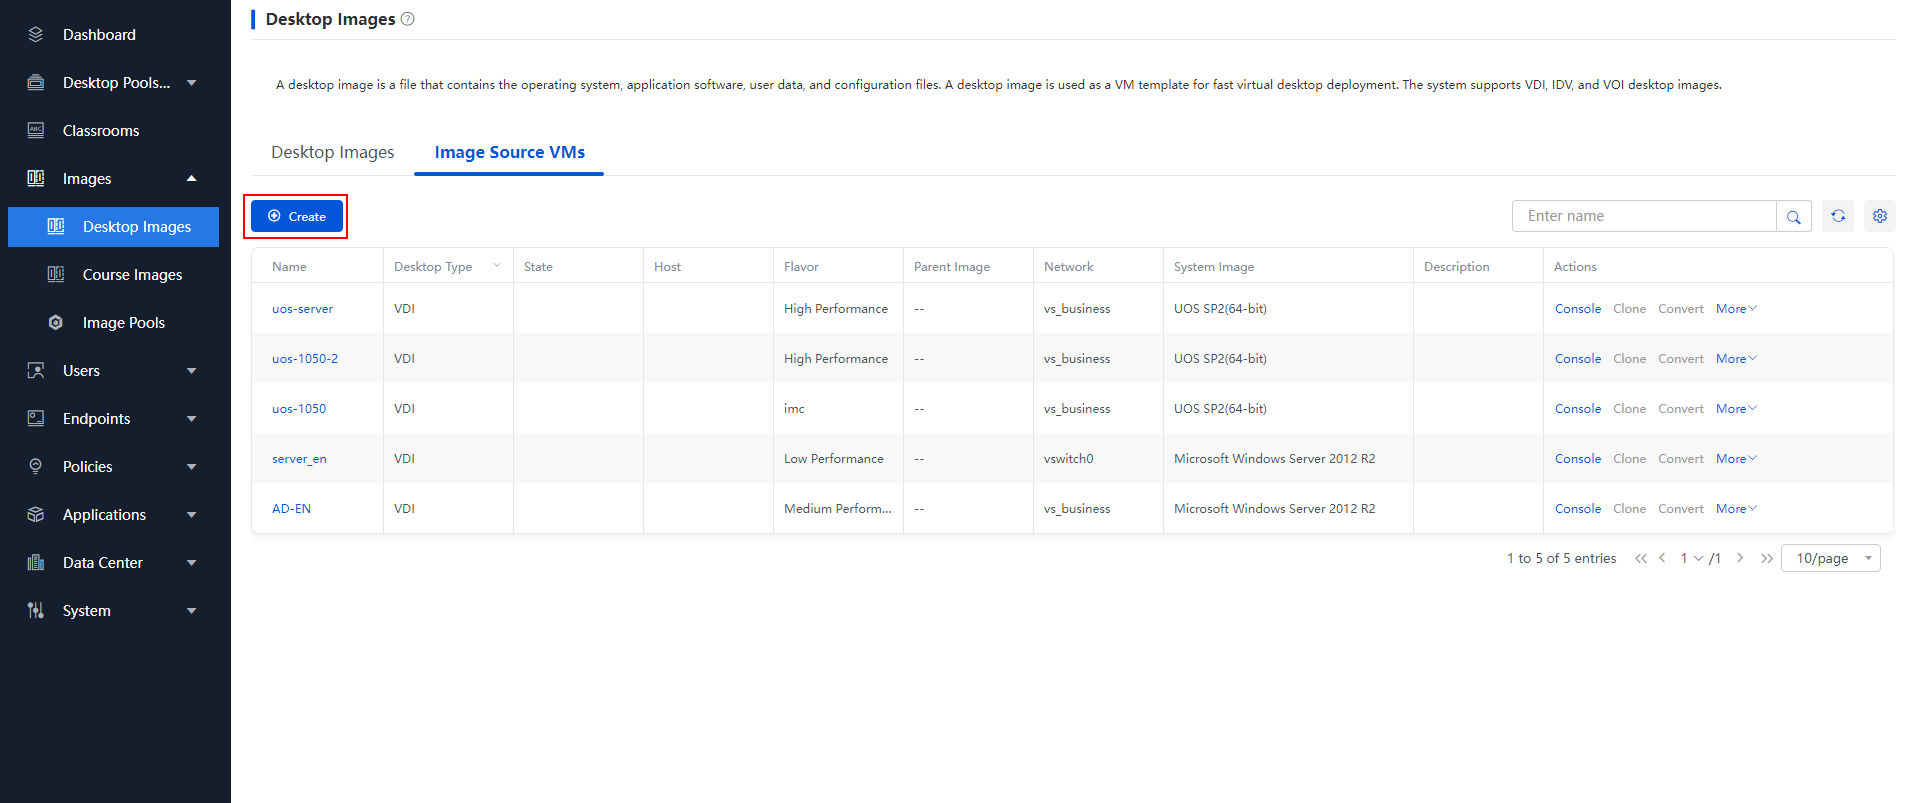
1. From the navigation pane, select Images > Desktop Images. Click the Image Source VMs tab. Click Create.
Figure 14 Desktop images
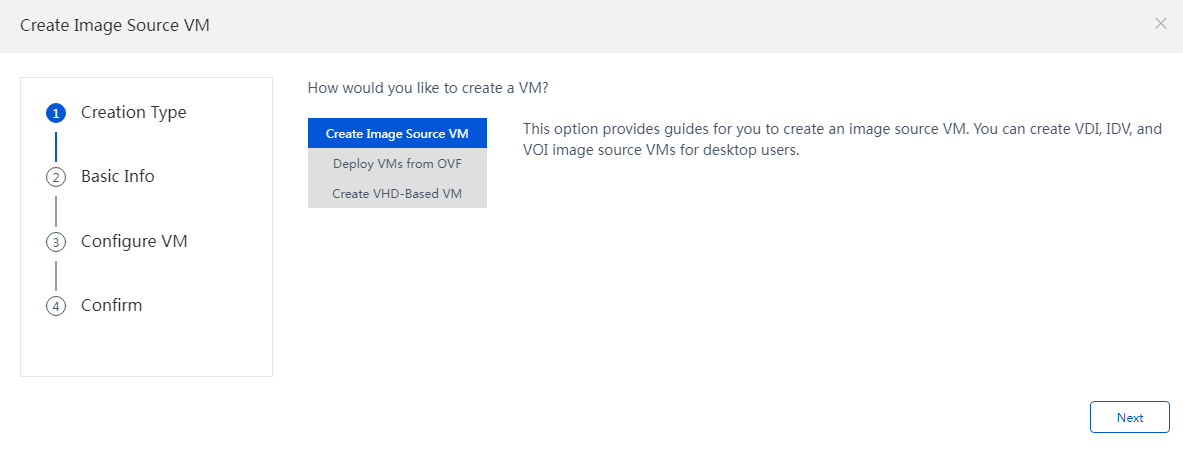
2. In the pop-up dialog box, select Create Image Source VM, and then click Next to configure the basic information.
Figure 15 Creating an image source VM - Creation type
3. On the configuration page, fill in the image name, select the image type VDI, host and the system image you have uploaded, and then click Next.
Figure 16 Creating an image source VM - Basic info

4. On the Basic Info page, click the Basic Settings tab, set path, flavors and network. Click the Advanced Settings tab to configure the CPU operating mode and fill in the file name, and then click Next.
Figure 17 Creating an image source VM - Configure VM
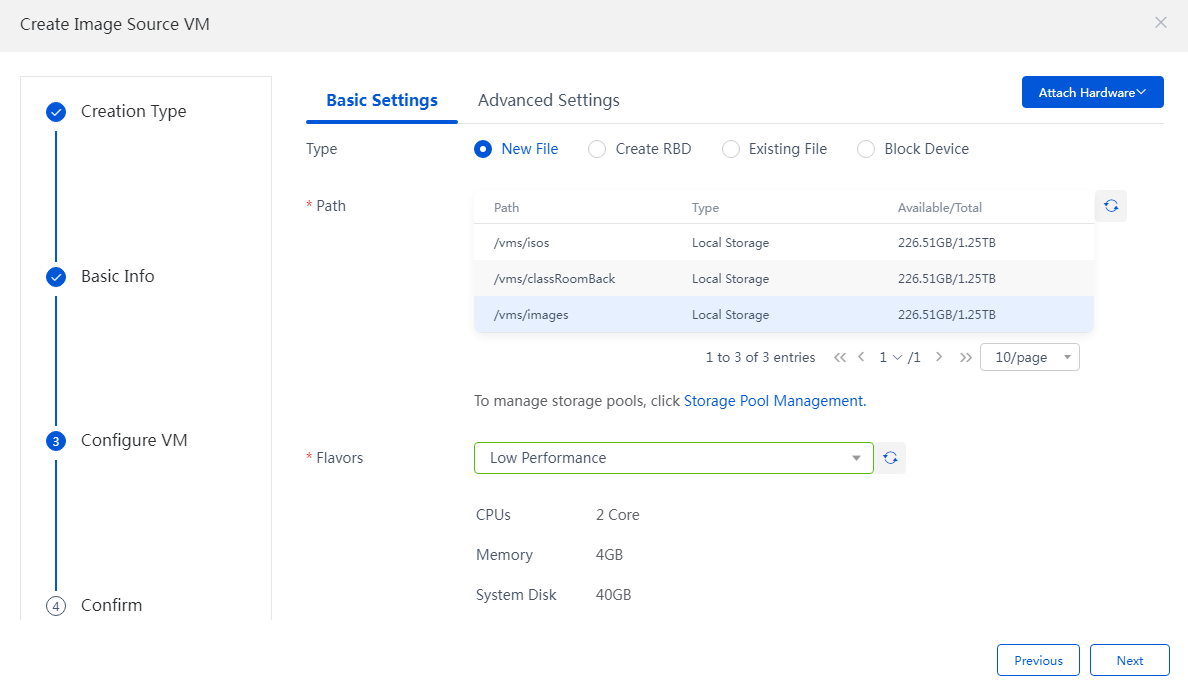
Table 2 Description of main parameters for creating image source VM
|
Parameter |
Description |
|
Host |
Select the host where the image source VM resides. |
|
System Image |
Desktop architecture type to which the image source VM is applicable, including VDI, IDV and VOI. · VDI: The desktop runs on the server and supports roaming with the account. Select VDI here. · IDV: The desktop runs on the endpoint and does not support roaming. · VOI: The desktop runs on the endpoint and does not support roaming. |
|
Type |
Specify a disk type, including New File, Create RBD, Existing File and Block Device. When there is an active RBD storage pool on the host, Create RBD is selected by default. Otherwise, New File is selected. |
|
Path |
The path acts as the storage path for the image source VM file rather than the final desktop image. The /vms/images and /vms/isos paths are local paths. As a best practice, select another path in case that the local directory space is insufficient. |
|
Flavors |
Flavors specifies the CPU, memory, and system disk size for the desktop image. You can select the configuration defined in Flavors. |
|
Operating Mode |
The CPU operating mode includes Compatible, Host Matching, and Passthrough. The Compatible mode is selected by default. If the host matching mode is set, you need also to set whether to enable a physical machine for simulation. |
|
Network |
Select the vSwitch for the image source VM network communication. |
|
System Image |
The system image of the desktop image. Click Data Center > System Images, and select a system image uploaded. |
|
Advanced Settings |
Configure the storage-related parameters for the image source VM, such as File Name, Preallocation Mode, Cluster Size, Bus Type, and Cache Mode. |
|
Attach Hardware |
You can attach hardware devices to the image source VM as needed, for example, NIC, disk, CD-ROM, floppy disk, GPU device, and watchdog. |
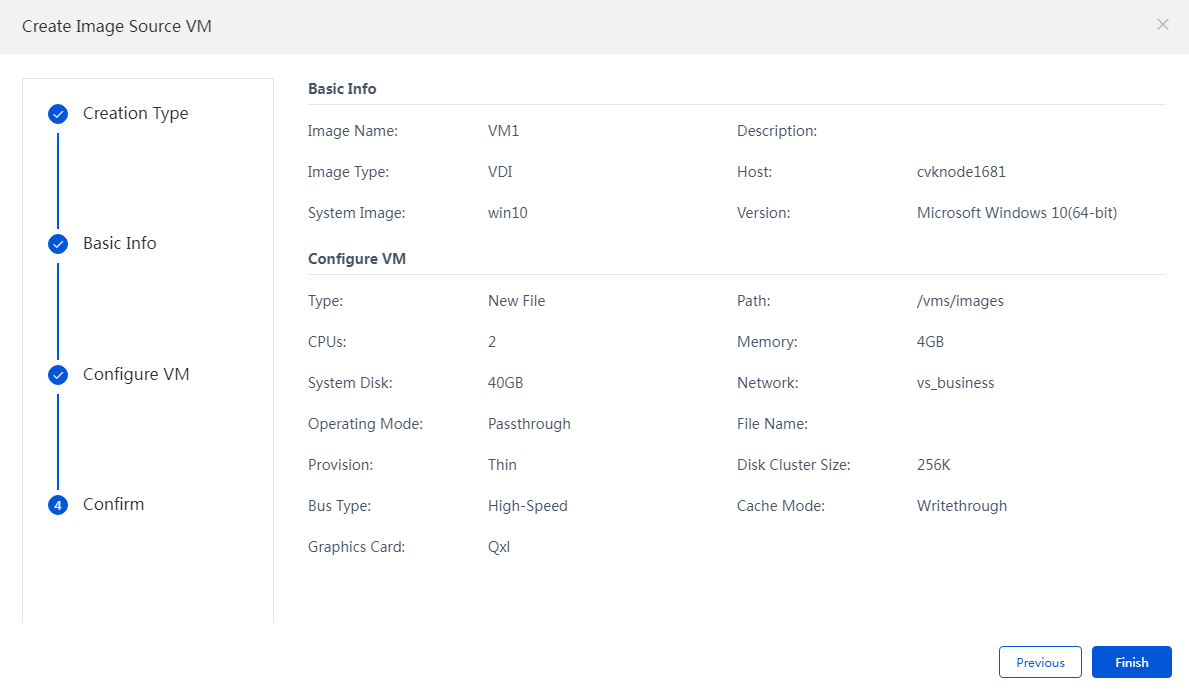
5. Confirm the information, and click Finish.
Figure 18 Creating image source VM - Confirming information
6. On the Images > Image Source VMs page, you can see the newly created VM images.
Figure 19 New VDI image source VM created

|
|
NOTE: The image source VM here is actually a VM without an OS and the required drivers. |
Converting image source VM to the desktop image
1. Installing an OS for the image source VM: Click VM 1 that has been created successfully to enter the control panel, and install the OS as guided. The installation steps are shown in the following figures.
Figure 20 Installing the operating system
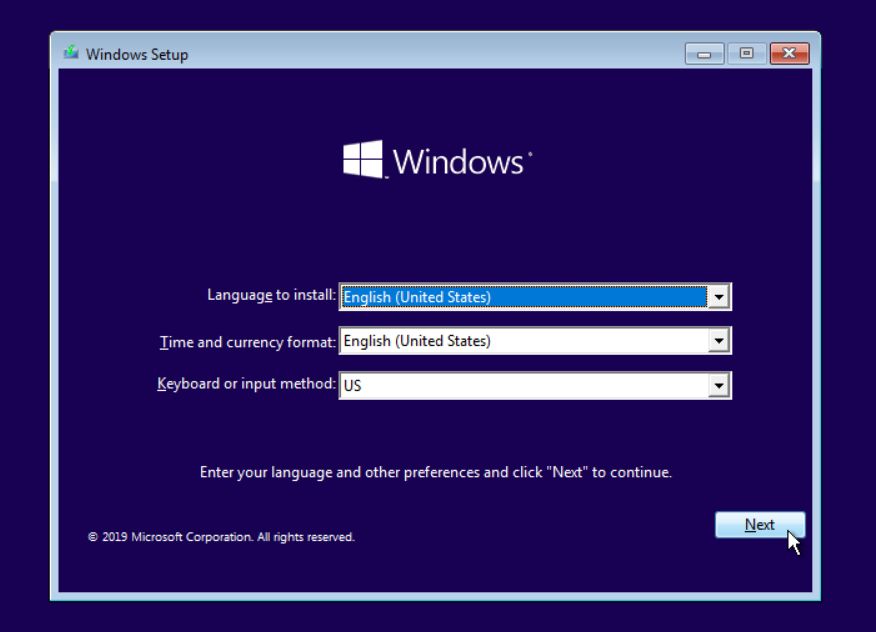
Figure 21 Loading the driver
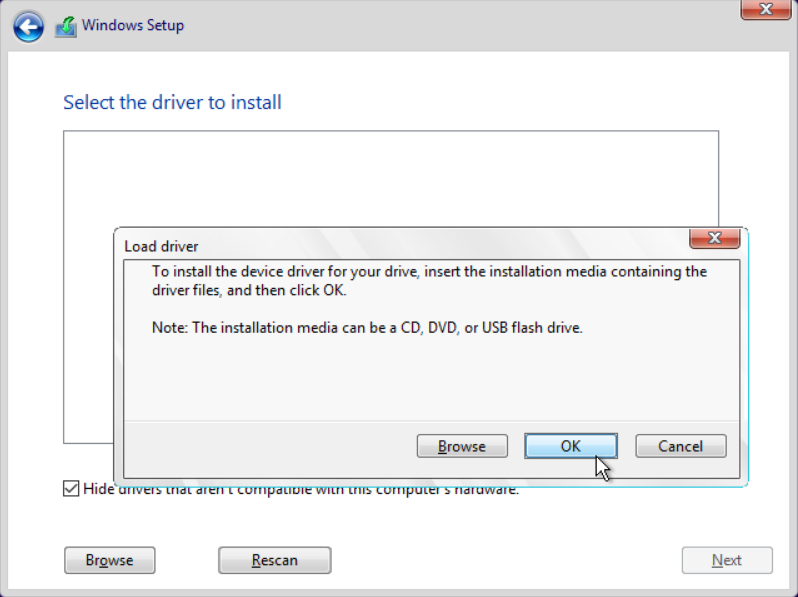
Figure 22 Selecting all drivers

|
|
NOTE: The disk type of the VM is a Virtio driver. You must load the driver to display the disk and install the OS in the designated disk since the disk will not be displayed while installing the VM operating system. |
Figure 23 Selecting the OS version

Figure 24 Accepting the license

Figure 25 Selecting the installation type
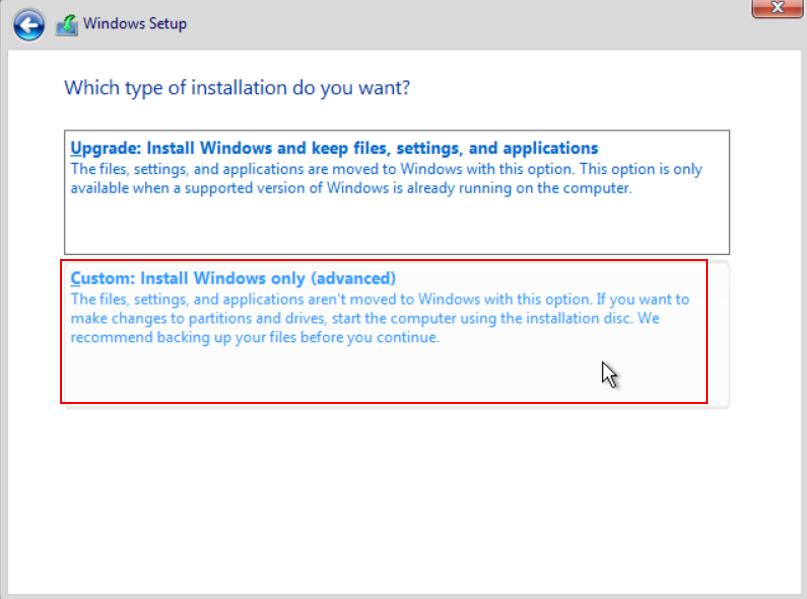
Figure 26 Partitioning as needed

|
|
NOTE: Do not partition the system disk when installing the OS. |
Figure 27 Starting installation
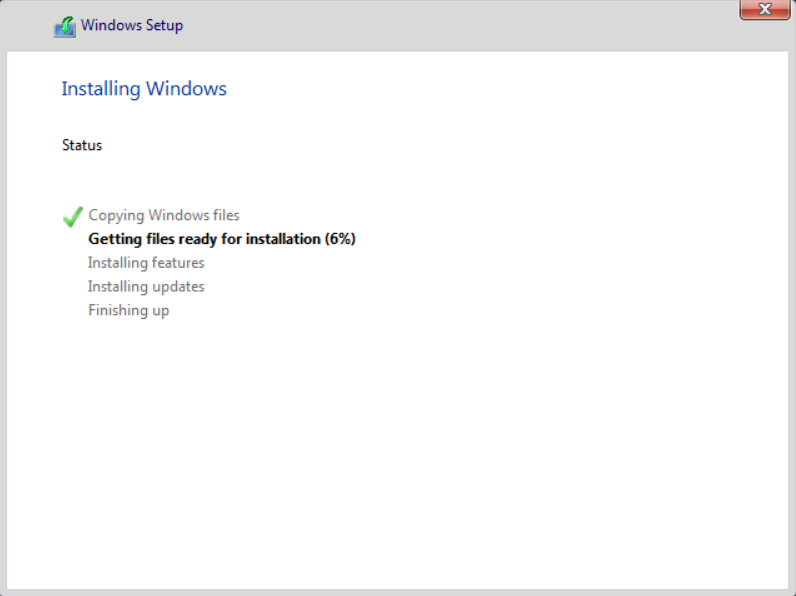
|
|
NOTE: After the OS installation is complete, perform system-related settings, such as keyboard layout, network, and local users. After the configuration is completed, go to the image source VM desktop. |
2. Enable the administrator account: Click Computer Management (Local) > Local Users and Groups > Users, right-click Administrator, and then select Properties to enable the administrator account and specify a password.
Figure 28 Computer management

Figure 29 Enabling the administrator account
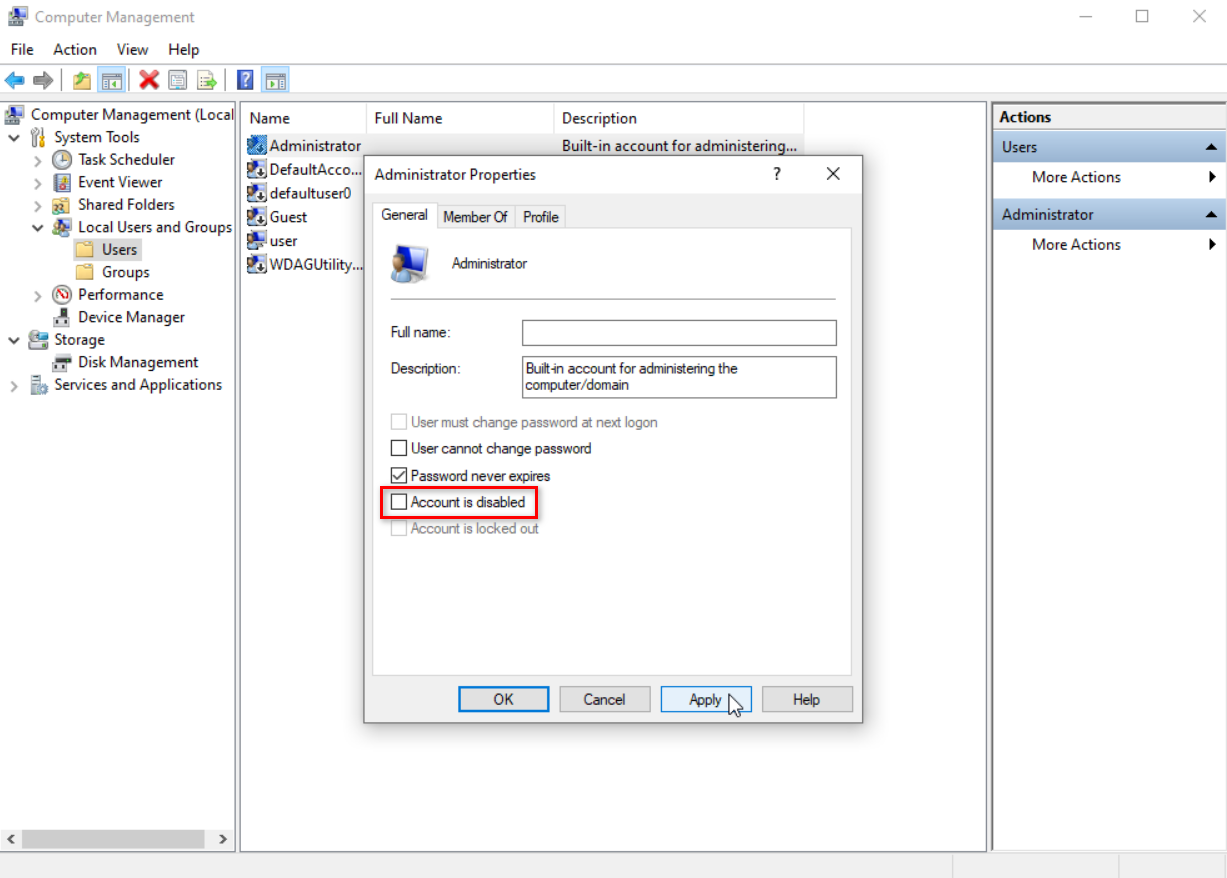
Figure 30 Specifying a password

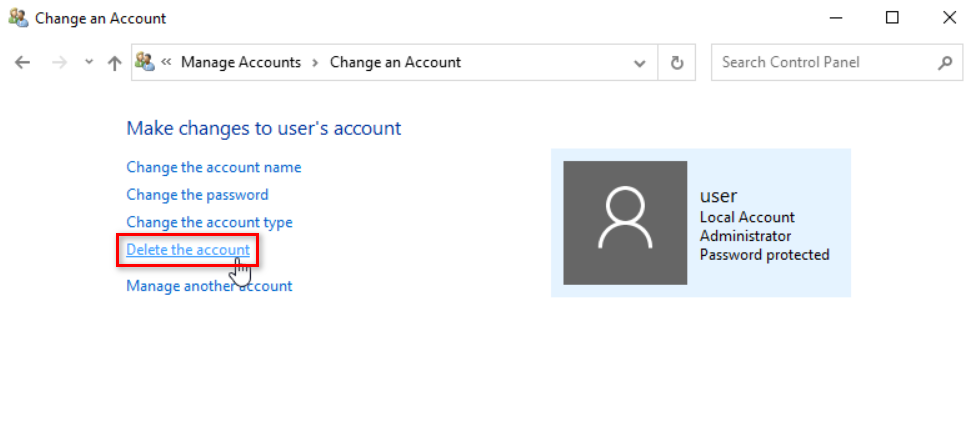
3. Restart the system, log in as the administrator, and enter the system desktop. After logging in, select Control Panel > User > Delete the Account to enter the account administration page. Select the local account created when installing the OS, and enter the account change page shown below to delete the account.
Figure 31 Signing out the current account

Figure 32 Logging in as the administrator

Figure 33 Deleting the account
4. Install CAStools and VdiAgent: CAStools and VdiAgentt are integrated in the agent_tools tool. During the installation process, CAStools will be installed first, followed by VdiAgent.
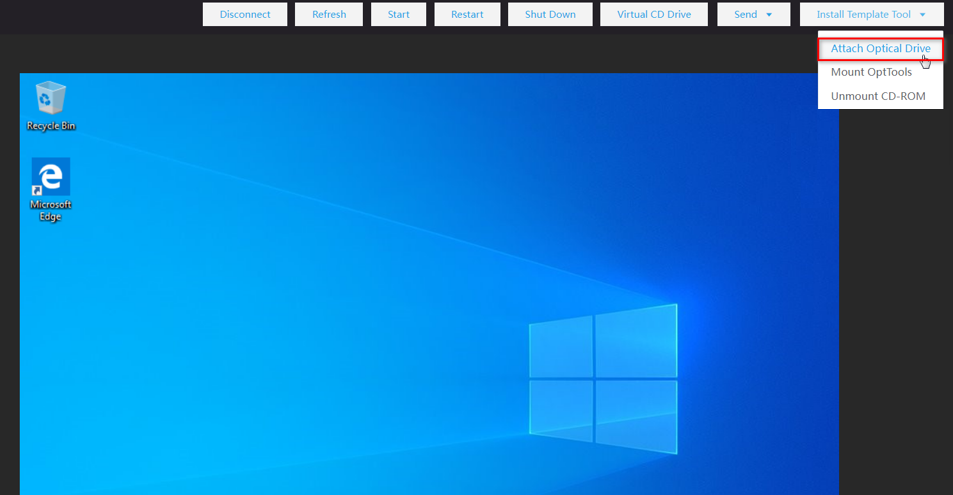
a. On the page for making an image, click Install Template Tool, and select Attach Optical Drive. and click Open folder to view files.
Figure 34 Attaching optical drive
b. In this section, enter the windows folder, run the agent_tools_setup program, and select Run as administrator. In the user account control dialog box that opens, click Yes.
Figure 35 Installing CAStools

c. In the VdiAgent installation dialog box that opens, click Next.
Figure 36 Installing VDIAgent

d. In the communication environment setting dialog box, enter the IP address or domain name of the management node host for Space Console, use the default port setting, and click Next.
Figure 37 Communication environment setting

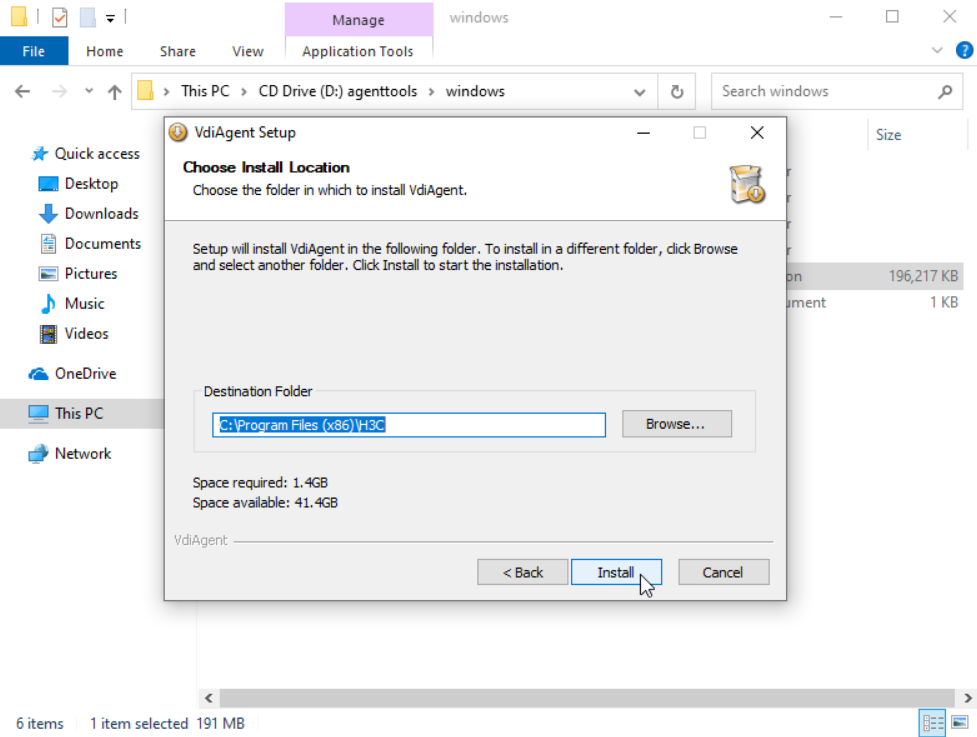
e. Select the target directory for VdiAgent installation, and click Install.
Figure 38 Selecting the target directory
|
|
NOTE: Click OK in the dialog box prompting you that the system must be restarted after CAStools is installed. |
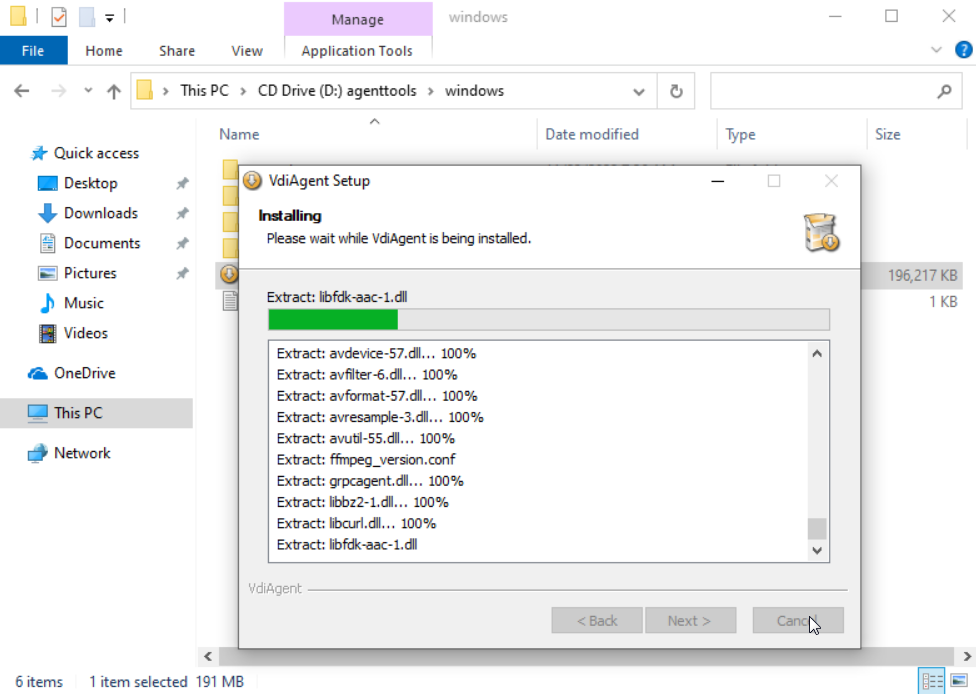
f. After CAStools is installed, click Close. Wait for the VdiAgent installation to complete.
Figure 39 CASTools installation completed

Figure 40 Installing VDIAgent
g. After the VdiAgent installation is completed, click Finish.
Figure 41 VDIAgent installation completed
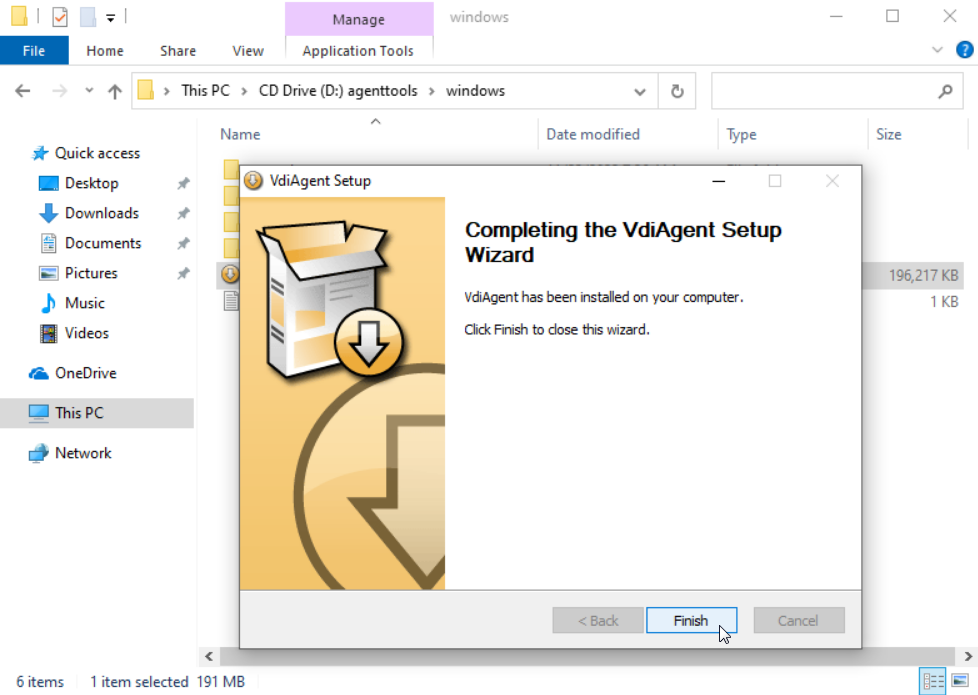
h. Restart the VM.
5. Installing the required office software: Upload the required office software to the image source VM 1 by sharing or using the FTP server, and complete the installation.
6. Optimize the image source VM: Use optimization tools to install the AC97 audio driver, perform system acceleration and optimize display, customize disks for user profiles, and so on.
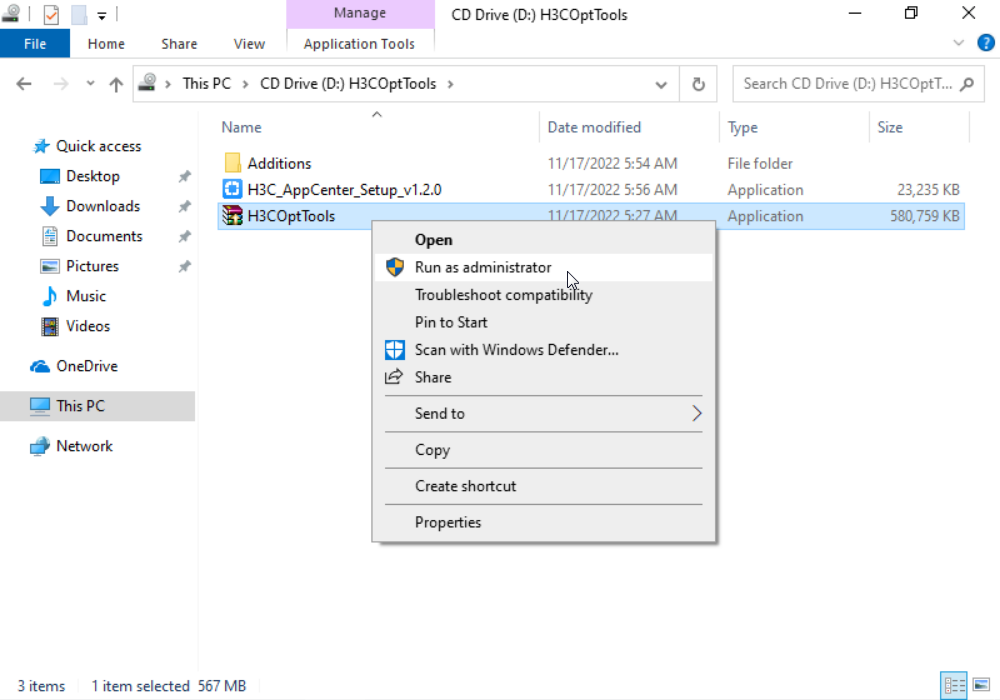
a. On the image source VM console, click Install Template Tool > Mount OptTools in the upper right corner and click Open folder to view files in the dialog box that opens.
Figure 42 Mounting OptTools

Figure 43 Running as the administrator
b. Select Optimization Templates, click OK, and click Cloud Desktop Template Optimization to check the optimized items.
Figure 44 Selecting the items to be optimized

c. After checking, select the items to be optimized and click Optimize to install the AC97 audio driver and cloud disks and optimize the system.
|
|
IMPORTANT: After the check is completed, items that fail the check are marked red. Do not select the Configure vGPU license server option for VMs without vGPUs. |
Figure 45 Checking results

Figure 46 Selecting a disk to save the custom user profile

|
|
IMPORTANT: · If you may enable the desktop system disk rebuilding feature in the future, select an existing disk such as disk E, not the system disk, as the disk for user profiles. · The custom user profile feature cannot be used simultaneously with user data roaming in the policy group. |
Figure 47 Installing a cloud disk

d. After optimization, click OK to restart the image source VM.
Figure 48 Restarting the image source VM

7. Completing conversion: The system supports cloning or converting an image source VM into a desktop image. Taking cloning an image source VM to a desktop image as an example.
a. On the image source VM list page, click Clone as Desktop Image in the Actions column. The Clone as Desktop Image window opens.
Figure 49 Cloning as desktop image

b. Configure the name, and select the image pool. Enable Create Snapshot After Cloning as needed, select Immediate Release, and click OK.
c. After cloning, you can view the generated desktop image in the desktop image list.
Figure 50 Desktop image list

Creating a static desktop pool
On Space Console, create Dept A and Dept B respectively. The number of desktops is the number of employees of the Business Department + 1 respectively (two desktops must be authorized for the leaders). Take Dept A as an example.
1. On the Desktop Pools page, click Create or Create Desktop Pool. The Create Desktop Pool page opens.
Figure 51 Creating a desktop pool

2. Configure the basic information of the desktop pool, and click Next: Login Info. Take setting the name as Dept A, desktop type as VDI, desktop pool type as static desktop pool, max desktops as 10, and desktop prefix as Dept A as an example.
Figure 52 Basic information

Table 3 Creating a desktop pool - Parameters for basic information
|
Parameter |
Description |
|
Desktop Type |
Four desktop types supported: VDI, IDV, VOI and Physical Host. Keep the desktop pool image consistent with the created desktop pool image. |
|
Deployment Location |
Select the location for desktop deployment, including Cluster or Host. If you select this option, the system automatically deploys desktops across hosts in a cluster for optimal resource usage. |
|
Desktop Pool Type |
Includes static, dynamic, manual, shared and application server. The static desktop pool is selected. · Static: To assign each user a dedicated desktop, select this option. A static desktop is persistent. All data and settings of its user will persist through a reboot. · Dynamic: They are dynamically assigned to users in the preauthorization list you configured for the pool. When the system receives a request from a preauthorized user, the system randomly selects a cloud desktop from the dynamic desktop pool for that user. First come, first served. When the user logs out and restarts the cloud desktop, the cloud desktop will be restored to its initial state. Dynamic desktop pools are applicable to scenarios such as public training and teaching, and reading rooms. · Manual: It is a type of dynamic desktop pool without the protection mode. After the user logs out, the desktop pool is not restored to its initial state. You can restore the desktop pool function and restore the VM to the state at a specified time by setting the restore point. · Shared: They save data of multiple users, and their desktop data disks are shared among multiple users. · Application Server Pool: To bulk deploy application servers used for providing virtual applications, select this option. To authorize users to use virtual applications, click Applications > Application Center > Virtual Applications > Application Groups. |
|
Max Desktops |
Set the maximum number of cloud desktops in the desktop pool. |
|
Desktop Prefix |
Specify the prefix in the names of the cloud desktops automatically deployed from the desktop image template. The deployed cloud desktops will be named in prefix-random_number format. |
|
Desktop Pool Group |
Assign the desktop pool to a desktop pool group. |
3. Configure login information, and click Next: Configuration. Select Domain Users. It is unnecessary to set the login account.
Figure 53 Login information
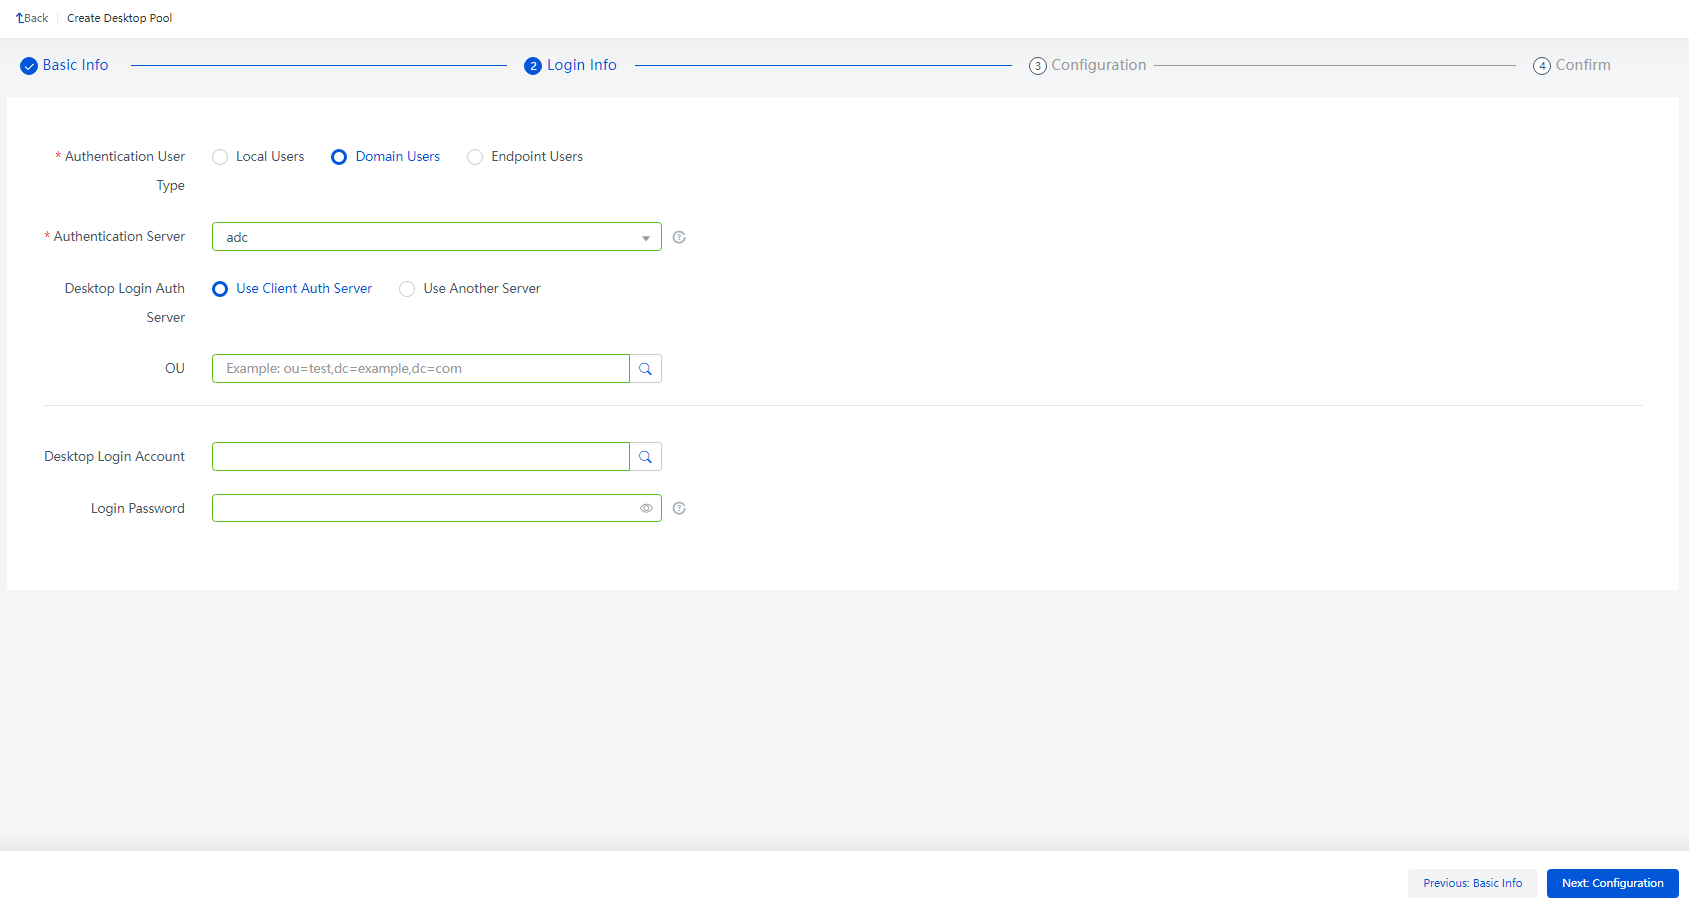
Table 4 Creating a desktop pool - Parameters for login information
|
Parameter |
Description |
|
Authentication User Type |
Three user types supported: Local users, domain users, and endpoint users. · Local Users: To create desktops for users managed in the local database of Space Console, select this option. This option is suitable for user authentication scenarios. · Domain users: User of user account on the Microsoft active directory server. A desktop pool, the user type of which is domain user, can be authorized only to the domain user. · Endpoint users: Applies to the endpoint authentication scenario. The cloud desktop authorizes the endpoint device so that user can log in to the device without inputting the username and password. |
|
Authentication Server |
Name of authentication server on the client. Select the Microsoft active directory type authentication server. (This option needs to be configured when the client user is domain user.) |
|
Desktop Login Auth Server |
Whether the authentication server on the client and the domain controller server added to the domain are the same server. (This option needs to be configured when the desktop pool type is non-share desktop and the client user is domain user.) · Use Client Auth Server: ¡ OU: DN of the OU node to which the domain user belongs on the authentication server of the selected client, with the type as: ou=test, dc=example, and dc=com. That is, the organization in the domain example.com is test. Support manually entering OUs or selecting OUs from the list. If no OU is entered or selected, add the desktop to the computer container of the domain controller server by default. If the authentication server enables the domain tree configuration, but no OU is entered or selected, add the desktop to the tree domain OU by default. · Use Another Server: ¡ Domain controller server added to the domain: Server with the desktop account added to the domain. When the domain user logs in to the desktop, generate the desktop account which is the same as the domain user client account and randomly generate the password, and log in to the desktop. Locking screen on the desktop will automatically disconnect the desktop. Double-click the desktop icon to re-log in to the cloud desktop. ¡ OU: DN of the OU node to which the desktop account belongs on the domain controller server added to the domain, with the type as: ou=test, dc=example, and dc=com. That is, the organization in the domain example.com is test. Support manually entering OUs or selecting OUs from the list. If no OU is entered or selected, add the desktop to the computer container of the domain controller server by default. If the authentication server enables the domain tree configuration, but no OU is entered or selected, add the desktop to the tree domain OU by default. |
|
Desktop Login Account |
Configure the username for logging in to the desktop. By default, no login account is configured. A user logs in to the VM with the user account and password. After configuring the login account, users can log in to the client with the user account, and be connected to the VM with the login account. The two accounts are separated. All users need to use the login account to connect to the VM after logging in to the client. If the login account does not exist in the VM, the account will be created automatically and the password is the user's login password. If the account already exists in the VM, the password is changed to the user's login password. For desktop pools with domain user type, do not configure a login account as a best practice. This item is supported only when the desktop pool type is VDI. |
4. Set the desktop pool configuration information, and click Next: Confirm. Select the desktop image VM-temp for Department A, and select other parameters as needed.
Figure 54 Configuration information

Table 5 Creating a desktop pool - Parameters for configuration information
|
Parameter |
Description |
|
Desktop Images |
It is used to bulk deploy VMs of the same configuration in the desktop pool. |
|
System Disk Storage |
Location of the system disk storage volume of the VM. If cluster-based deployment is selected, make sure the cluster has shared storage accessible to all its hosts. |
|
Initialization Type |
· Options include Fast and Full. · To use full initialization, make sure the desktop image is encapsulated by using Sysprep. Sysprep encapsulation is not required for fast initialization. As a best practice, use full initialization only if each user requires a unique security identifier (SID) on a desktop. In any other situations, use fast initialization. For example, use fast initialization for local users and endpoint users. Select fast initialization or full initialization for domain users depending on the deployment requirements. As a best practice, limit the number of desktops in each bulk deployment or start operation to three if full initialization is used for domain users. Additionally, you must use fast initialization if you are creating the VDI desktop pool for application servers. ARM host does not support full initialization. |
|
Deploy Now |
Select Deploy Now, and click Finish. The Batch Deploy page opens. If you click Finish without selecting Deploy Now, the system returns to the Desktop Pools page. |
5. On the information confirmation page, click Finish to complete the creation of desktop pool of Department A.
Figure 55 Confirming information

6. Repeat the above steps to create Dept B for Department B.
Creating a policy group
Create policy group, and authorize it to Dept A and Dept B. Take Dept A as an example.
1. From the navigation pane, select Policies > Policy Groups to enter the policy groups page. Click Create. The Create Policy Group window opens.
Figure 56 Policy Groups

2. In the Create Policy Group window, configure the basic information, and select VDI. Click Next to enter the VDI architecture policy configuration page.
Figure 57 Creating a policy group - Configuring basic information

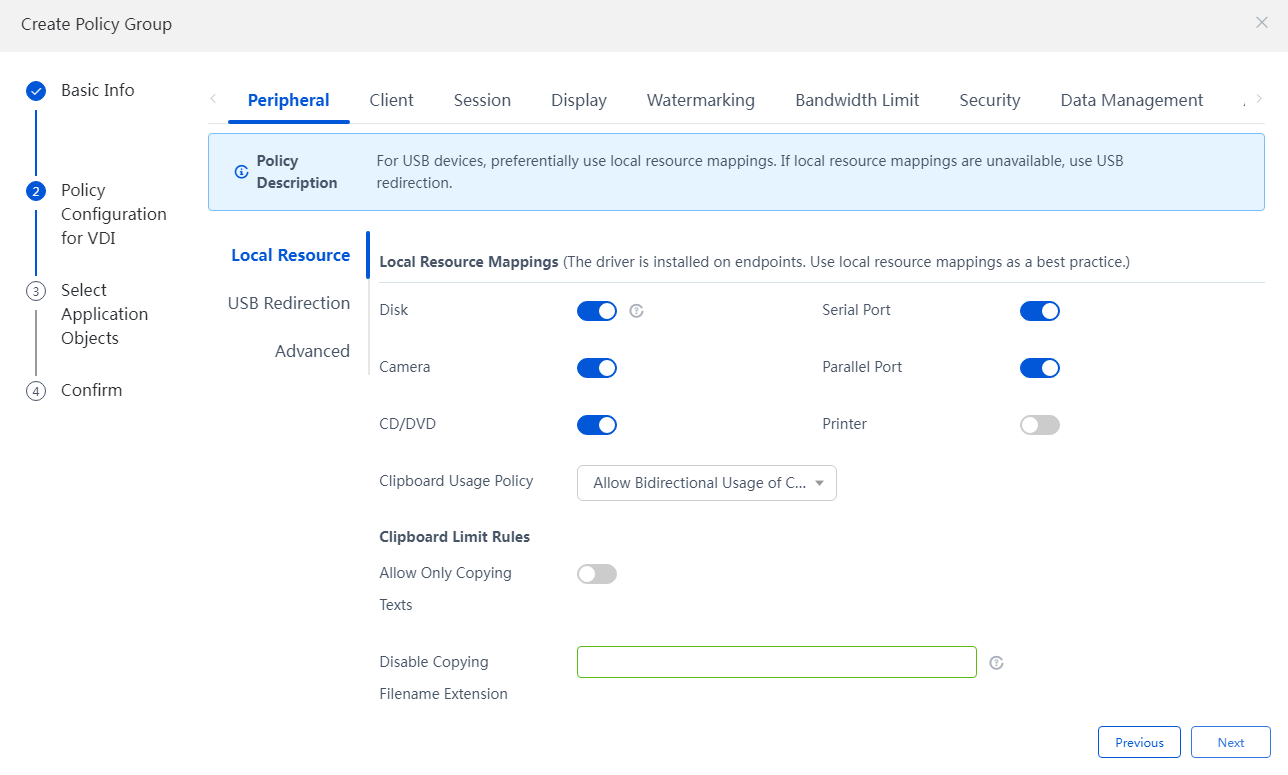
3. In the VDI architecture policy configuration, set peripheral, client, session, display, watermark settings, bandwidth limit, security, personalized data and application acceleration policies as needed. After the setting is complete, click Next to select the application object configurations.
Figure 58 Creating a policy group - Configuring the VDI architecture policy
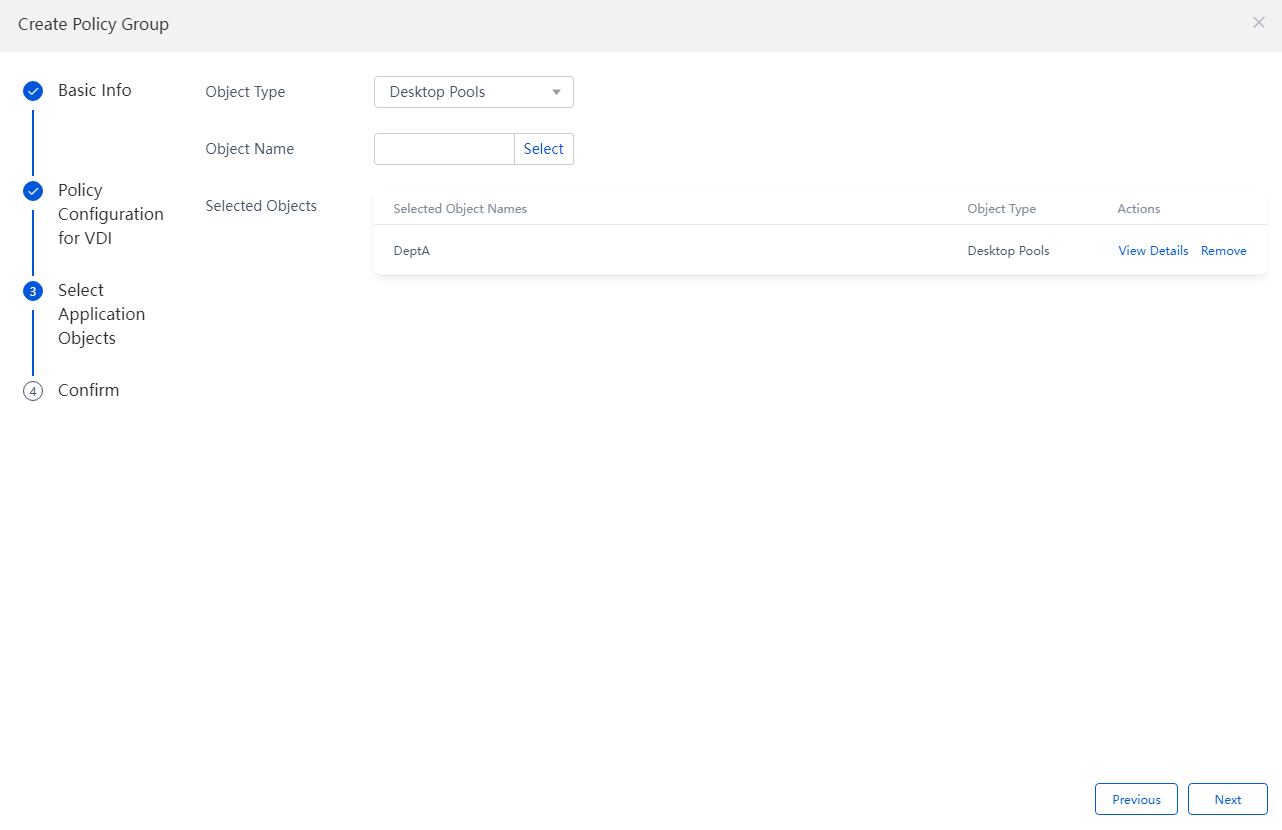
4. Select an application object of the policy group, authorize the policy to Dept A. After the authorization is complete, click Next to confirm the information.
Figure 59 Creating a policy group - Selecting an application object of the policy group
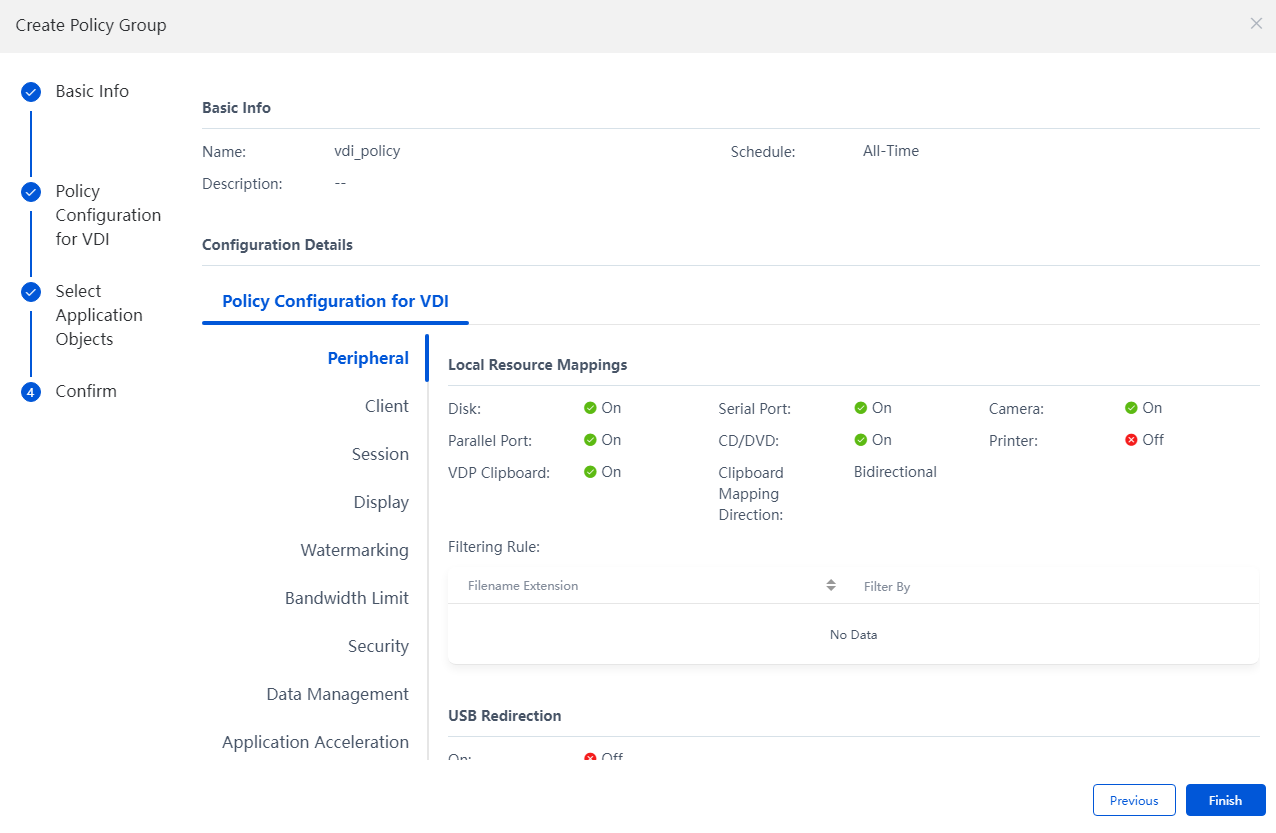
5. Confirm the configuration information. To modify a policy, click Previous to modify the related parameters one by one. Click Finish to complete the creation of a policy group.
Figure 60 Creating a policy group - Confirming information
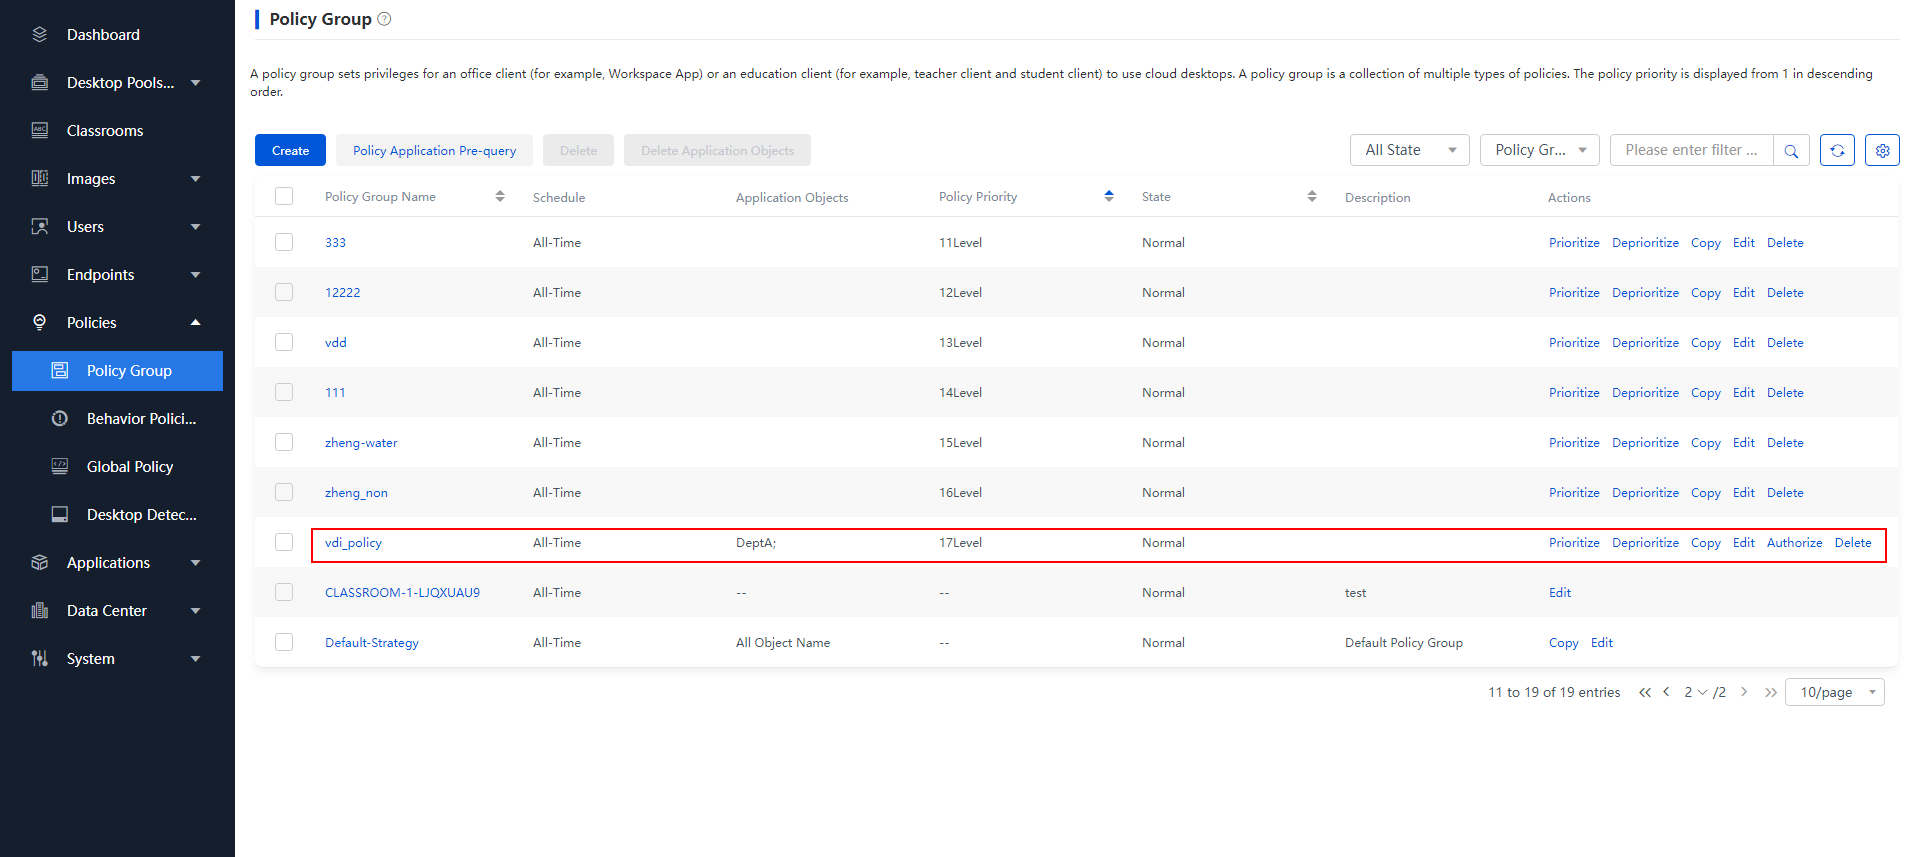
6. View and manage the policy groups in the policy group list.
Figure 61 Completing the creation of a policy group
Bulk deployment
Deploy the desktop pools of the two departments in bulk respectively (The number of desktops = The number of employees in each department + 1).
|
|
NOTE: When the desktop pool-related desktop image is rapidly deployed for the first time, only one desktop can be deployed. After checking that the desktop is available, deploy the remaining required desktops. |
1. From the navigation pane, select Desktop Pools. Select a desktop pool, and then click Batch Deploy. After configuring relevant information according to the wizard, click Finish.
Figure 62 Desktop image page

Figure 63 Page displayed upon the first batch deployment
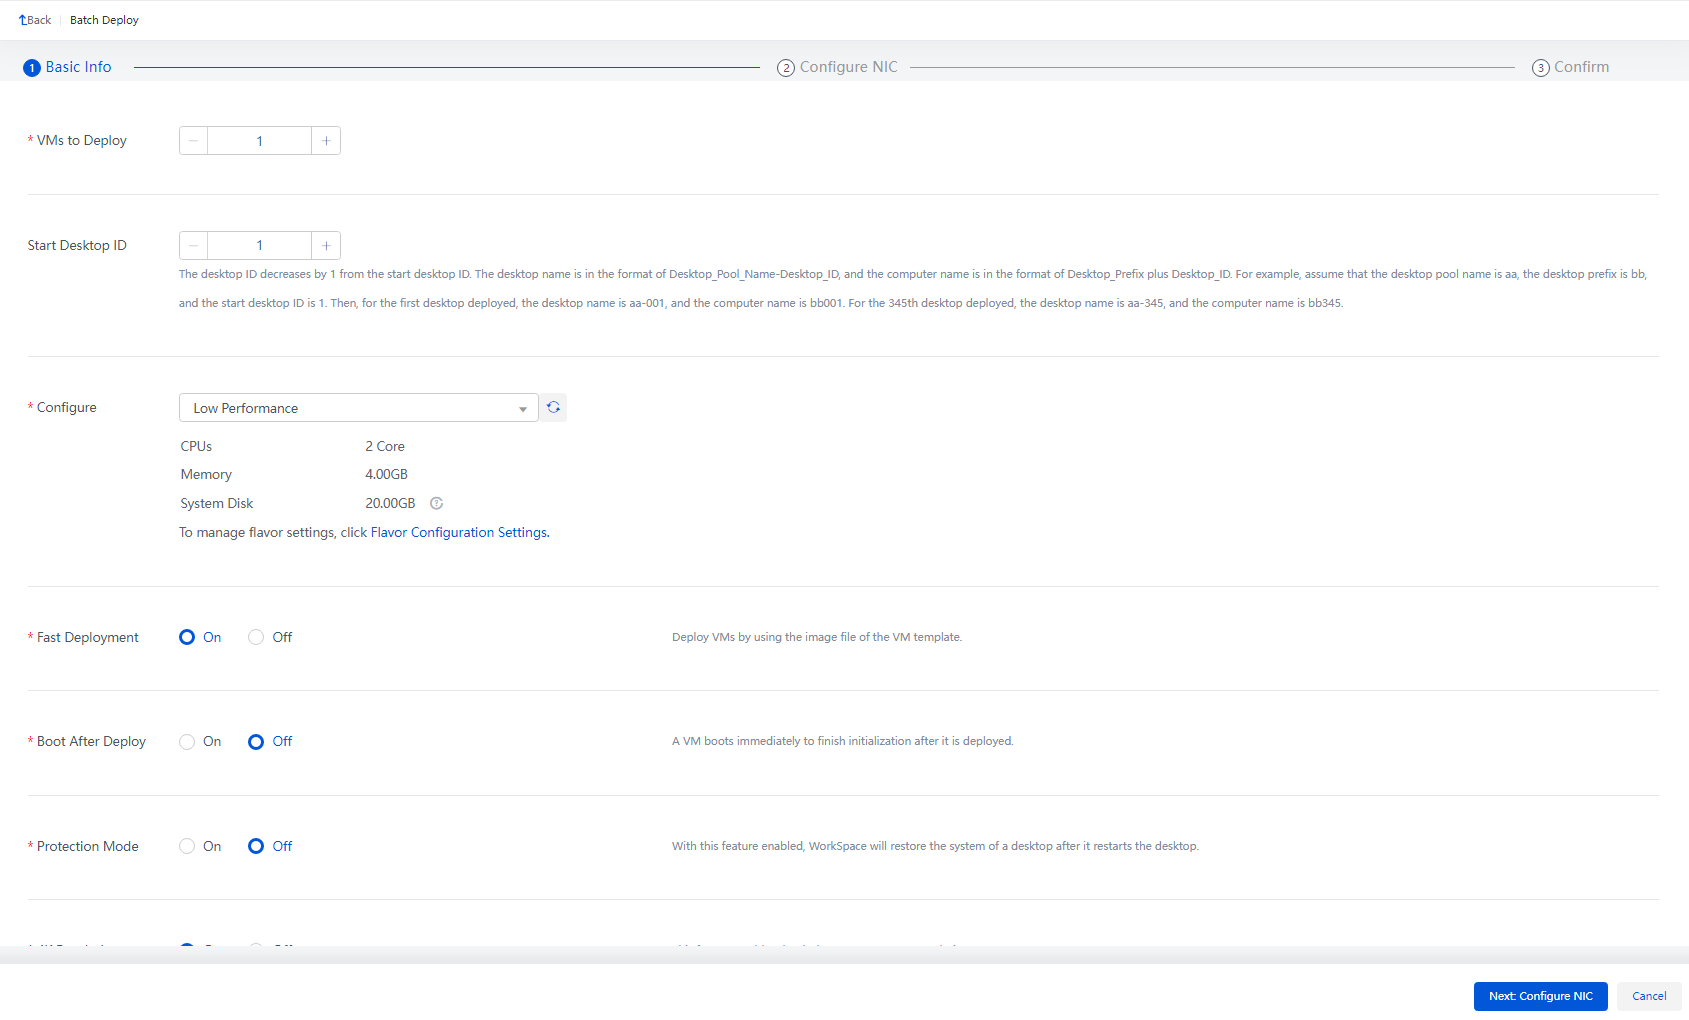
Table 6 Parameters for batch deployment
|
Parameter |
Description |
|
VMs to Deploy |
Specify the number of VMs to be deployed as desktops. This setting cannot exceed the maximum number of desktops allowed in the desktop pool. You can deploy only one VM upon the first fast deployment. |
|
Start Desktop ID |
Start serial number for desktop names and computer names. Assume the desktop pool name is aa, the desktop prefix is bb, and the start desktop ID is 1. Then, for the first desktop deployed, the desktop name is aa-001 and the computer name is bb001. For the 345th desktop deployed, the desktop name is aa-345 and the computer name is bb345. |
|
Configure |
Select a resource flavor for the desktops depending on the required performance. Each flavor represents a set of CPU, memory, and system disk resources for each desktop. You can select the predefined flavor for high, medium, or low performance, or self-define the resources to be provisioned for each desktop. |
|
OU |
If the desktop pool is for domain users, specify the organization (OU) on the domain controller server so as to join desktops to a domain conveniently. |
|
Fast Deployment |
Deploy a VM based on the basic image file of the desktop image template. To enable Fast Deployment, The system will improve the speed of creating the VM, which saves the storage space for the server. |
|
Boot After Deploy |
Initialize the desktops immediately after they are deployed. |
|
Protection Mode |
The VM with the protection mode enabled can protect the incremental files in the disk. Any changes a user made to a desktop in protection mode are lost when the desktop is restarted from Space Console or shut down from the client. |
|
4K Resolution |
To enable 4K display on the desktops, enable this feature. |
|
Bind NUMA Node |
To boost desktop CPU performance, enable this feature for the deployed DVI desktops to be automatically bound to the NUMA nodes of the host. |
|
Resource Pool |
To deploy GPUs for the desktops, select a GPU resource pool. A GPU resource pool can provide GPU or vGPU resources. |
Figure 64 Configuring the network
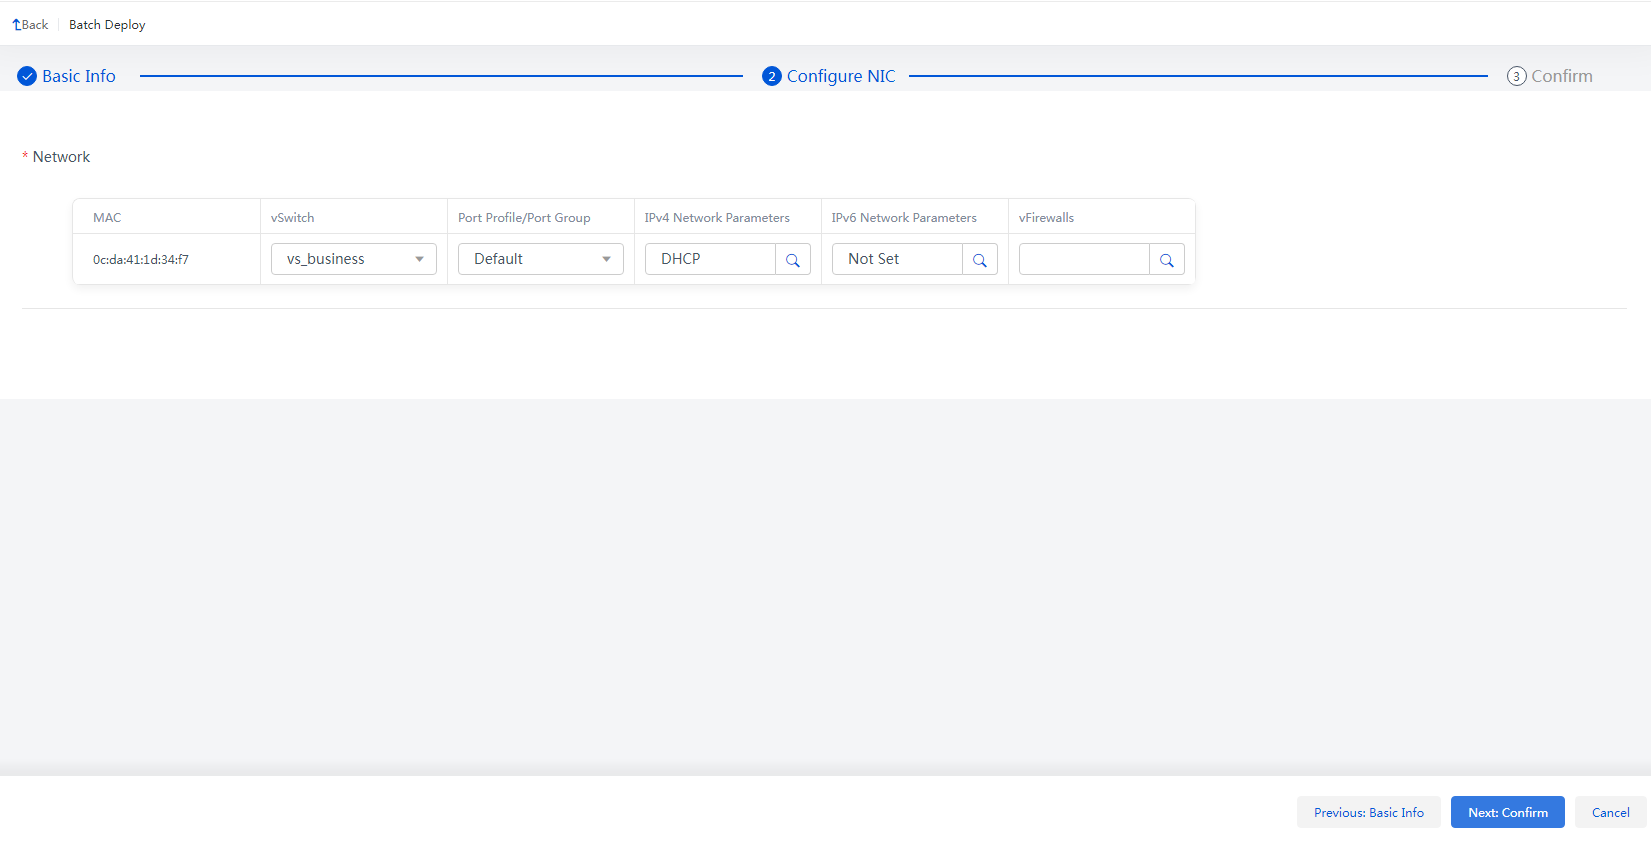
Figure 65 First batch deployment - Confirming information

2. Check whether the desktop deployed for the first time is available. If the desktop is authorized to one domain user, view whether the desktop can be accessed and used normally.
3. Complete the deployment of Dept A and Dept B in bulk. Take the deployment of 10 VMs for Dept A and 6 VMs for Dept B as an example. That is, Department A has 9 employees, Department B has 5 employees. Each leader needs two VMs.
Figure 66 All VMs of Dept A

Authorizing desktops in desktop pools
Authorize the desktops of Dept A and Dept B to the domain users of Department A and Department B. Authorize the remaining cloud desktop in Dept A to the leader of Department B, and authorize the remaining cloud desktop in Dept B to the leader of Department A, to ensure that each leader has two desktops.
Figure 67 Desktop list
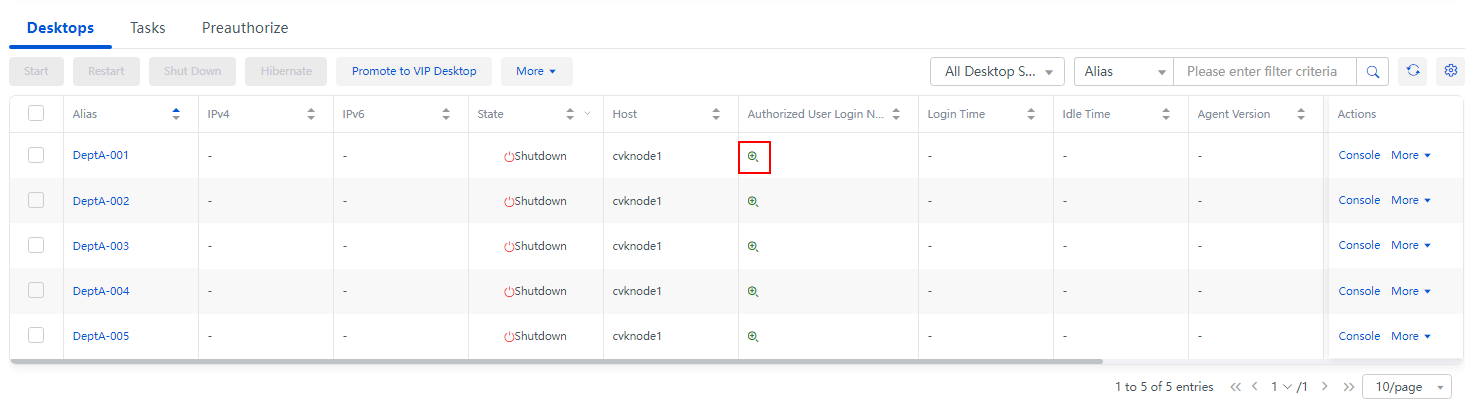
Figure 68 Selecting user groups

|
|
NOTE: The admin can also be employees and leaders of the two departments. Configure the authorization policy to provide different desktop experience, security rules, watermarking configurations, USB redirection or software denylist configurations. For more information about authorization policies, see H3C Workspace Cloud Desktop Space Console User Manual. |
Verification results
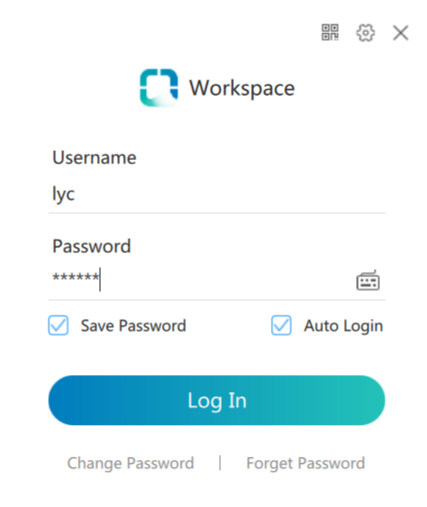
1. Enable the client for general staff. Select the address of management platform which authorizes the desktop to the user as the IP address of the server, and enter username and password to log in to the server.
Figure 69 Configuring a server - General staff
2. After logging in to the client, enter the desktop list. Double-click the desktop to connect and log in to the cloud desktop.
Figure 70 All desktops - General staff

3. Enable a client for the leader, and log in to the client in the same way.
4. In the desktop list, view that the leader has two cloud desktops. Double-click any cloud desktop to log in to the client.
Figure 71 All desktops - Leader

5. In the cloud desktop, perform personalized settings, such as changing the desktop background. The related settings will not be lost after the cloud desktop is restarted.
6. In the cloud desktop, use the office software to work, including file editing. Data can be saved normally, and will not be lost after the cloud desktop is restarted and powered off.
7. Any employee or leader of the two departments can use any endpoint of Building A or Building B to access own cloud desktop through own domain account.
Related documentation
|
Document |
Obtaining method |
|
H3C Workspace Cloud Desktop Space Console User Manual |
|
|
H3C Workspace Desktop Management Software Installation and Deployment Guide |
|
|
H3C Workspace Cloud Desktop Client User Manual (Office Scenario) |
