- Table of Contents
-
- 10-Security Configuration Guide
- 00-Preface
- 01-AAA Configuration
- 02-802.1X Configuration
- 03-MAC Authentication Configuration
- 04-Portal Configuration
- 05-Password Control Configuration
- 06-Public Key Configuration
- 07-IPsec Configuration
- 08-SSH Configuration
- 09-Packet-Filter Firewall Configuration
- 10-ALG Configuration
- 11-Session Management Configuration
- 12-TCP and ICMP Attack Protection Configuration
- 13-IP Source Guard Configuration
- 14-ARP Attack Protection Configuration
- 15-URPF Configuration
- 16-COPS Configuration
- 17-FIPS Configuration
- 18-PKI Configuration
- Related Documents
-
| Title | Size | Download |
|---|---|---|
| 06-Public Key Configuration | 123.62 KB |
Asymmetric key algorithm overview
Asymmetric key algorithm applications
Configuring the local asymmetric key pair
Creating an asymmetric key pair
Displaying or exporting the local RSA or DSA host public key
Destroying an asymmetric key pair
Displaying and maintaining public keys
Public key configuration examples
Configuring a peer public key manually
Importing a peer public key from a public key file
Asymmetric key algorithm overview
Basic concepts
· Algorithm: A set of transformation rules for encryption and decryption.
· Plain text: Information without being encrypted.
· Cipher text: Encrypted information.
· Key: A string of characters that controls the transformation between plain text and cipher text. It is used in both the encryption and decryption.
Key algorithm types
As shown in Figure 1, the information in plain text is encrypted by an algorithm with the help of a key before being sent. The resulting cipher text is transmitted across the network to the receiver, where it is decrypted by the same algorithm also with the help of a key to obtain the original plain text.
Figure 1 Encryption and decryption
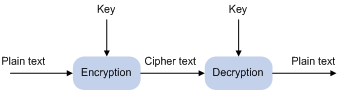
The following types of key algorithms are available, based on whether the keys for encryption and decryption are the same:
· Symmetric key algorithm—The keys for encryption and decryption are the same. Commonly used symmetric key algorithms include Advanced Encryption Standard (AES) and Data Encryption Standard (DES).
· Asymmetric key algorithm—The keys for encryption and decryption are different, one is the public key, and the other is the private key. The information encrypted with the public key can only be decrypted with the corresponding private key, and vice versa. The private key is kept secret, and the public key may be distributed widely. The private key cannot be practically derived from the public key.
Asymmetric key algorithm applications
Asymmetric key algorithms can be used for encryption and digital signature.
· Encryption—The sender uses the public key of the intended receiver to encrypt the information to be sent. Only the intended receiver, the holder of the paired private key, can decrypt the information. This mechanism guarantees confidentiality.
· Digital signature—The sender “signs” the information to be sent by encrypting the information with its own private key. A receiver decrypts the information with the sender's public key and, based on whether the information can be decrypted, determines the authenticity of the information.
The Revest-Shamir-Adleman Algorithm (RSA), the Digital Signature Algorithm (DSA), and the Elliptic Curve Digital Signature Algorithm (ECDSA) are asymmetric key algorithms. RSA can be used for data encryption/decryption and signature, whereas DSA and ECDSA are used for signature only.
Configuring the local asymmetric key pair
You can create and destroy a local asymmetric key pair, and export the host public key of a local asymmetric key pair.
Creating an asymmetric key pair
To create an asymmetric key pair:
|
Step |
Command |
Remarks |
|
1. Enter system view. |
system-view |
N/A |
|
2. Create a local DSA key pair, or RSA key pairs. |
public-key local create { dsa | rsa } |
By default, no key pair is created. |
The public-key local create rsa command generates two key pairs: one server key pair and one host key pair. Each key pair comprises a public key and a private key. The public-key local create dsa command generates only one key pair, the host key pair.
After you enter the command, you are aksed to specify the modulus length. The length of an RAS or DSA key modulus is in the range of 512 to 2048 bits. To achieve higher security, specify a modulus at least 768 bits.
|
|
NOTE: Key pairs created with the public-key local create command are saved automatically and can survive system reboots. |
Displaying or exporting the local RSA or DSA host public key
Display the local RSA or DSA host public key on the screen or export it to a specific file. Then, you can configure the local RSA or DSA host public key on the remote end so that the remote end can use the host public key to authenticate the local end through digital signature.
To display or export the local RSA or DSA host public key:
|
Step |
Command |
Remarks |
|
1. Enter system view. |
system-view |
N/A |
|
2. Display the local RSA or DSA host public key on the screen in a specific format, or export it to a specific file. |
· Display or export the local RSA host public key: · Display or export the local DSA host public key: |
Select a command according to the type of the key to be exported. |
Destroying an asymmetric key pair
You may need to destroy an asymmetric key pair and generate a new pair when an intrusion event has occurred, the storage media of the device is replaced, or the asymmetric key has been used for a long time.
To destroy an asymmetric key pair:
|
Step |
Command |
|
1. Enter system view. |
system-view |
|
2. Destroy an asymmetric key pair. |
public-key local destroy { dsa | rsa } |
Configuring a peer public key
To enable your local device to authenticate a peer device, configure the peer RSA or DSA public key on the local device. The following methods are available:
· Import it from a public key file—Obtain a copy of the peer public key file through FTP or TFTP (in binary mode) first, and then import the public key from the file. During the import process, the system automatically converts the public key to a string in PKCS (Public Key Cryptography Standards) format. H3C recommends that you follow this method to configure the peer public key.
· Configure it manually—If the peer device is an H3C device, you can use the display public-key local public command to view and record its public key. On the local device, input or copy the key data in public key code view. A public key displayed by other methods may not in the PKCS format, and the system cannot save the format-incompliant key.
|
|
NOTE: The router supports up to 20 peer pubic keys. |
To import a peer host public key from the public key file to the local device:
|
Step |
Command |
|
1. Enter system view. |
system-view |
|
2. Import the peer host public key from the public key file. |
public-key peer keyname import sshkey filename |
To configure a peer public key manually:
|
Step |
Command |
Remarks |
|
1. Enter system view. |
system-view |
N/A |
|
2. Specify a name for a peer public key and enter public key view. |
public-key peer keyname |
N/A |
|
3. Enter public key code view. |
public-key-code begin |
N/A |
|
4. Configure the peer server or host public key. |
Type or copy the key |
Spaces and carriage returns are allowed between characters. |
|
5. Return to public key view. |
public-key-code end |
When you exit public key code view, the system automatically saves the public key. |
|
6. Return to system view. |
peer-public-key end |
N/A |
|
|
NOTE: Do not configure a peer RSA server public key for identity authentication in SSH applications. Authentication in SSH applications uses the RSA host public key. For more information about SSH, see the chapter “Configuring SSH.” |
Displaying and maintaining public keys
|
Task |
Command |
Remarks |
|
Display the local public keys. |
display public-key local { dsa | rsa } public [ | { begin | exclude | include } regular-expression ] |
Available in any view |
|
Display the peer public keys. |
display public-key peer [ brief | name publickey-name ] [ | { begin | exclude | include } regular-expression ] |
Available in any view |
Public key configuration examples
Configuring a peer public key manually
Network requirements
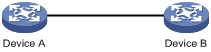
As shown in Figure 2, to prevent illegal access, Device B authenticates Device A through a digital signature. Before configuring authentication parameters on Device B, configure the public key of Device A on Device B.
· Configure Device B to use the asymmetric key algorithm of RSA for identity authentication of Device A.
· Manually configure the host public key of Device A on Device B.
Configuration procedure
1. Configure Device A.
# Create RSA key pairs on Device A.
<DeviceA> system-view
[DeviceA] public-key local create rsa
Warning: The local key pair already exist.
Confirm to replace them? [Y/N]:y
The range of public key size is (512 ~ 2048).
NOTES: If the key modulus is greater than 512,
It will take a few minutes.
Press CTRL+C to abort.
Input the bits of the modulus[default = 1024]:
Generating Keys...
++++++++++++++++++++++++++++++++
++++++++++++++++++++++++++++++++++++++++++++++++++++++++++++++
++++++++++++++++++
++++++++++++++++++++++++++++
# Display the public keys of the created RSA key pairs.
[DeviceA] display public-key local rsa public
=====================================================
Time of Key pair created: 09:50:06 2007/08/07
Key name: HOST_KEY
Key type: RSA Encryption Key
=====================================================
Key code:
30819F300D06092A864886F70D010101050003818D0030818902818100D90003FA95F5A44A2A2CD3F814F9854C4421B57CAC64CFFE4782A87B0360B600497D87162D1F398E6E5E51E5E353B3A9AB16C9E766BD995C669A784AD597D0FB3AA9F7202C507072B19C3C50A0D7AD3994E14ABC62DB125035EA326470034DC078B2BAA3BC3BCA80AAB5EE01986BD1EF64B42F17CCAE4A77F1EF999B2BF9C4A10203010001
=====================================================
Time of Key pair created: 09:50:07 2007/08/07
Key name: SERVER_KEY
Key type: RSA Encryption Key
=====================================================
Key code:
307C300D06092A864886F70D0101010500036B003068026100999089E7AEE9802002D9EB2D0433B87BB6158E35000AFB3FF310E42F109829D65BF70F7712507BE1A3E0BC5C2C03FAAF00DFDDC63D004B4490DACBA3CFA9E84B9151BDC7EECE1C8770D961557D192DE2B36CAF9974B7B293363BB372771C2C1F0203010001
2. Configure Device B.
# Configure the host public key of Device A on Device B. In public key code view, input the host public key of Device A. The host public key is the content of HOST_KEY displayed on Device A using the display public-key local dsa public command.
<DeviceB> system-view
[DeviceB] public-key peer devicea
Public key view: return to System View with "peer-public-key end".
[DeviceB-pkey-public-key] public-key-code begin
Public key code view: return to last view with "public-key-code end".
[DeviceB-pkey-key-code]30819F300D06092A864886F70D010101050003818D0030818902818100D90003FA95F5A44A2A2CD3F814F9854C4421B57CAC64CFFE4782A87B0360B600497D87162D1F398E6E5E51E5E353B3A9AB16C9E766BD995C669A784AD597D0FB3AA9F7202C507072B19C3C50A0D7AD3994E14ABC62DB125035EA326470034DC078B2BAA3BC3BCA80AAB5EE01986BD1EF64B42F17CCAE4A77F1EF999B2BF9C4A10203010001
[DeviceB-pkey-key-code] public-key-code end
[DeviceB-pkey-public-key] peer-public-key end
# Display the host public key of Device A saved on Device B.
[DeviceB] display public-key peer name devicea
=====================================
Key Name : devicea
Key Type : RSA
Key Module: 1024
=====================================
Key Code:
30819F300D06092A864886F70D010101050003818D0030818902818100D90003FA95F5A44A2A2CD3F814F9854C4421B57CAC64CFFE4782A87B0360B600497D87162D1F398E6E5E51E5E353B3A9AB16C9E766BD995C669A784AD597D0FB3AA9F7202C507072B19C3C50A0D7AD3994E14ABC62DB125035EA326470034DC078B2BAA3BC3BCA80AAB5EE01986BD1EF64B42F17CCAE4A77F1EF999B2BF9C4A10203010001
Importing a peer public key from a public key file
Network requirements
As shown in Figure 3, to prevent illegal access, Device B authenticates Device A through a digital signature. Before configuring authentication parameters on Device B, configure the public key of Device A on Device B.
· Configure Device B to use the asymmetric key algorithm of RSA for identity authentication of Device A.
· Import the host public key of Device A from the public key file to Device B.

Configuration procedure
1. Create key pairs on Device A and export the host public key.
# Create RSA key pairs on Device A.
<DeviceA> system-view
[DeviceA] public-key local create rsa
Warning: The local key pair already exist.
Confirm to replace them? [Y/N]:y
The range of public key size is (512 ~ 2048).
NOTES: If the key modulus is greater than 512,
It will take a few minutes.
Press CTRL+C to abort.
Input the bits of the modulus[default = 1024]:
Generating Keys...
+++++
++++++
+++++++++++
+++
# Display the public keys of the created RSA key pairs.
[DeviceA] display public-key local rsa public
=====================================================
Time of Key pair created: 09:50:06 2007/08/07
Key name: HOST_KEY
Key type: RSA Encryption Key
=====================================================
Key code:
30819F300D06092A864886F70D010101050003818D0030818902818100D90003FA95F5A44A2A2CD3F814F9854C4421B57CAC64CFFE4782A87B0360B600497D87162D1F398E6E5E51E5E353B3A9AB16C9E766BD995C669A784AD597D0FB3AA9F7202C507072B19C3C50A0D7AD3994E14ABC62DB125035EA326470034DC078B2BAA3BC3BCA80AAB5EE01986BD1EF64B42F17CCAE4A77F1EF999B2BF9C4A10203010001
=====================================================
Time of Key pair created: 09:50:07 2007/08/07
Key name: SERVER_KEY
Key type: RSA Encryption Key
=====================================================
Key code:
307C300D06092A864886F70D0101010500036B003068026100999089E7AEE9802002D9EB2D0433B87BB6158E35000AFB3FF310E42F109829D65BF70F7712507BE1A3E0BC5C2C03FAAF00DFDDC63D004B4490DACBA3CFA9E84B9151BDC7EECE1C8770D961557D192DE2B36CAF9974B7B293363BB372771C2C1F0203010001
# Export the RSA host public key to a file named devicea.pub.
Warning: The filename has already existed.
Do you want to replace the file? [Y/N]:y
.....
[DeviceA] quit
2. Enable the FTP server function on Device B.
# Enable the FTP server function, create an FTP user with the username ftp, password 123, and user level 3.
<DeviceB> system-view
[DeviceB] ftp server enable
[DeviceB] local-user ftp
[DeviceB-luser-ftp] password simple 123
[DeviceB-luser-ftp] service-type ftp
[DeviceB-luser-ftp] authorization-attribute level 3
[DeviceB-luser-ftp] quit
3. Upload the public key file of Device A to Device B.
# FTP the public key file devicea.pub to Device B with the file transfer mode of binary.
<DeviceA> ftp 10.1.1.2
Trying 10.1.1.2 ...
Press CTRL+K to abort
Connected to 10.1.1.2.
220 FTP service ready.
User(10.1.1.2:(none)):ftp
331 Password required for ftp.
Password:
230 User logged in.
[ftp] binary
200 Type set to I.
[ftp] put devicea.pub
227 Entering Passive Mode (10,1,1,2,5,148).
125 BINARY mode data connection already open, transfer starting for /devicea.pub.
226 Transfer complete.
FTP: 299 byte(s) sent in 0.189 second(s), 1.00Kbyte(s)/sec.
4. Import the host public key of Device A to Device B.
# Import the host public key of Device A from the key file devicea.pub to Device B.
[DeviceB] public-key peer devicea import sshkey devicea.pub
Warning: You have already peer public key named devicea.
Do you really want to replace it? [Y/N]:y
# Display the host public key of Device A saved on Device B.
[DeviceB] display public-key peer name devicea
=====================================
Key Name : devicea
Key Type : RSA
Key Module: 1024
=====================================
Key Code:
30819F300D06092A864886F70D010101050003818D0030818902818100D90003FA95F5A44A2A2CD3F814F9854C4421B57CAC64CFFE4782A87B0360B600497D87162D1F398E6E5E51E5E353B3A9AB16C9E766BD995C669A784AD597D0FB3AA9F7202C507072B19C3C50A0D7AD3994E14ABC62DB125035EA326470034DC078B2BAA3BC3BCA80AAB5EE01986BD1EF64B42F17CCAE4A77F1EF999B2BF9C4A10203010001