- Table of Contents
- Related Documents
-
| Title | Size | Download |
|---|---|---|
| 01-Text | 827.23 KB |
Hardware requirements (deployment on physical server)
Client configuration requirements
Application installation packages
Required Unified Platform application installation packages
NSM application installation packages
Installing NSM on the convergence deployment page of Matrix
Installing the license on the license server
Obtaining the license authorization
Upgrading and uninstalling software
Upgrading the NSM component on the convergence deployment page of Matrix
Uninstalling the NSM component on the convergence deployment page of Matrix
Overview
NSM is a basic network management component that offers basic functions such as network device management, configuration management, performance monitoring, network topology, and asset management. Additionally, NSM offers value-added service functions such as device panel, open programmable framework, automatic device access, VLAN management, SSH proxy login tool, and MIB browser tool.
As a standalone component package, the installation and operation of NSM depend on Unified Platform. This document describes the hardware and software requirements dedicated to NSM. During actual deployment, calculate the total requirements of Unified Platform, NSM, and other service components.
Preparing for installation
Server requirements
Hardware requirements (deployment on physical server)
Operating system requirements
For the specific operating system requirements, see the release notes for the version of Unified Platform you want to install and use. As a best practice, use a 64-bit operating system. For more information about support for operating systems, see H3C Unified Platform Deployment Guide.
Client configuration requirements
The controller is clientless. You can access the controller from a browser.
As a best practice, use Chrome 70 (or higher) or Firefox 78 (or higher), and do not use any other browsers.
Application installation packages
Deploy the application installation packages in this chapter as needed. The application installation packages can be deployed on x86 and ARM servers. Select the application installation packages according to the architecture type. For more information, see H3C Unified Platform Deployment Guide.
In an installation package name, the version parameter represents the software version number and the platform parameter represents the CPU architecture type.
Required Unified Platform application installation packages
When deploying Unified Platform, upload the application packages required by NSM as shown in Table 2.
Table 2 Application packages required by NSM
|
Installation package name |
Description |
Remarks |
Dependencies |
|
UDTP_Middle_version_platform.zip |
Middleware image repository, including databases and message queues. |
Required. |
N/A |
|
UDTP_GlusterFS_version_platform.zip |
Provides local shared storage functionalities, including: · Provides a universal tool for creating storage volumes. · Automatically repairs GFS anomalies caused by node anomalies and brain splits. |
Required. |
N/A |
|
UDTP_Core_version_platform.zip |
Provides portal, unified authentication, user management, service gateway, service data backup & restoration, application deployment management (installation, upgrade, expansion, and uninstallation), help center, permissions, operation groups, roles, role groups, unified resource UUIDs, license query and display, configuration center, and log service. |
Required. |
Middle, GlusterFS |
|
BMP_IMonitor_version_platform.zip |
Provides self-monitoring services, including: · Monitors hosts and containers, monitors the indexes of multiple middleware products, including etcd, GlusterFS, and MySQL, and provides a visual interface. · Provides the index alarm function. After you configure the level 1 and level 2 thresholds of the specified index, an alarm will be sent when the level 1 or level 2 threshold is reached. · Displays the list of K8s workloads, allows you to view basic information of the workloads, and supports multiple search options. |
Required. |
Core |
|
BMP_Report_version_platform.zip |
Provides the report function, allows other components to register report templates, and adds report tasks: · Report templates · Report tasks |
Required. |
N/A |
|
BMP_Alarm_version_platform.zip |
Provides basic alarm services, including receiving traps, upgrading to alarms, and forwarding alarms via SMS, email, WeChat, and WeCom. |
Required. |
Report |
|
BMP_Template_version_platform.zip |
Monitor template feature, which provides monitor setting management and template-based monitor index selection, threshold settings, and collection interval settings. You can select monitor templates in the monitor and auto discovery components. Access parameter template feature, which provides template-based management of the parameters used by the system to access networks, servers, storage devices, virtualization systems, containers, operating systems, databases, middleware products, or other resources. |
Required. |
N/A |
NSM application installation packages
The NSM installation packages are as shown in Table 3.
Table 3 Application installation packages and dependencies
|
Installation package |
Installation package name |
Dependencies |
|
Installation package for network resources |
NSM_FCAPS-Res_version.zip |
Required. |
|
Installation package for network topology |
NSM_FCAPS-Topo_version.zip |
Installation package for network resources |
|
Installation package for network performance monitoring |
NSM_FCAPS-Perf_version.zip |
Installation package for network resources |
|
Installation package for NMS intelligent configuration center |
NSM_FCAPS-ICC_version.zip |
Installation package for network resources |
|
Installation package for network assets |
NSM_FCAPS-Asset_version.zip |
Installation package for network resources |
|
Installation package for device panels |
NSM_FCAPS-Webdm_version.zip |
Installation package for network resources |
|
Installation package for automatic DHCP access |
NSM_VAS-ADA_version.zip |
Installation package for network resources, and installation package for NMS intelligent configuration center |
|
Installation package for open programmable framework |
NSM_VAS-OPF_version.zip |
Installation package for network resources |
|
Installation package for VLAN management |
NSM_VAS-VLAN_version.zip |
Installation package for network resources |
|
Installation package for network management tools |
NSM_Tools_version.zip |
Installation package for network resources |
|
|
NOTE: Support for the x86 and ARM installation packages varies by component and version. For more information, see the release notes. |
Pre-installation checklist
Table 4 Pre-installation checklist
|
Item |
Requirements |
|
|
Server |
Hardware |
The CPU, memory, disk, and NIC requirements are met. Unified Platform deployment is supported. |
|
Software |
The system time settings are configured correctly. As a best practice, configure NTP on each node and specify the same time source for all the nodes. |
|
|
Client |
The browser version meets the requirements. |
|
|
Server and OS compatibility |
To view the compatibility matrix between H3C servers and operating systems, access http://www.h3c.com/en/home/qr/default.htm?id=65 |
|
Software package verification
Before you install the software, execute the following commands to verify the MD5 value of each software package to ensure its integrity and correctness.
1. View the deployed installation packages.
[root@matrix145 ~]# cd /opt/matrix/app/install/packages/
[root@matrix145 packages]# ls
NSM_FCAPS-ICC_E0722_x86.zip NSM_FCAPS-Perf_E0722_x86.zip
……
2. View the MD5 values of the installation packages, for example, NSM_FCAPS-Perf_E0722_x86.zip.
[root@matrix145 packages]# md5sum NSM_FCAPS-Perf_E0722_x86.zip
c9212f2430db72b320161e569ca7ffa8 NSM_FCAPS-Perf_E0722_x86.zip
3. Compare the MD5 value obtained in the preceding steps with the MD5 value of the released software image file. If they match, the software package is correct.
Installation workflow
Installation of this version is based on the installation & deployment feature of Unified Platform, which adds the convergence deployment feature. This version can be installed on the Deploy > Convergence Deployment page of Matrix.
|
|
CAUTION: Before installing this version, first install Unified Platform of the corresponding version. |
The following example illustrates deploying NSM on the convergence deployment page of Matrix. The deployment workflow is shown in Table 5.
Table 5 NSM installation process
|
Step |
Task |
Remarks |
|
Prepare servers |
In standalone deployment mode, prepare one server. In cluster deployment mode, prepare at least three servers. |
Required. For hardware and software requirements, see: Hardware requirements (deployment on physical server) |
|
Deploy Unified Platform |
Deploy the operating system and Matrix |
Required. |
|
Configure Matrix cluster parameters |
||
|
Deploy the Matrix cluster |
||
|
Deploy Unified Platform |
||
|
Deploy NSM |
Required. |
|
|
Required. |
||
|
Required. |
||
|
Optional. |
Deploying Unified Platform
|
|
CAUTION: Before you deploy Unified Platform in a non-root environment, you must execute the following commands to manually create the log directory as the root user and edit the owner: mkdir -p /var/log/ucenter && chown admin:wheel /var/log/ucenter ll -d /var/log/ucenter If the cluster has multiple nodes, perform this operation on all nodes. |
Before deploying the NSM component, you must first deploy Unified Platform of the corresponding version, and then deploy the NSM component on Unified Platform. For the Unified Platform deployment procedure, see H3C Unified Platform Deployment Guide.
Installing NSM on the convergence deployment page of Matrix
Uploading the installation packages
1. Log in to Matrix. On the top navigation bar, click DEPLOY. From the navigation pane, select Convergence Deployment.
2. Obtain the installation packages for NSM, with package name formats as shown in Table 3.
3. Click Install to access the page for uploading installation packages.
4. Click Upload. In the dialog box that opens, click Select Files, and select component installation packages. Then, click Upload to upload the selected component installation packages to the system. After the upload is completed, click Next to access the component selection page.
Figure 1 Uploading installation packages

Selecting applications
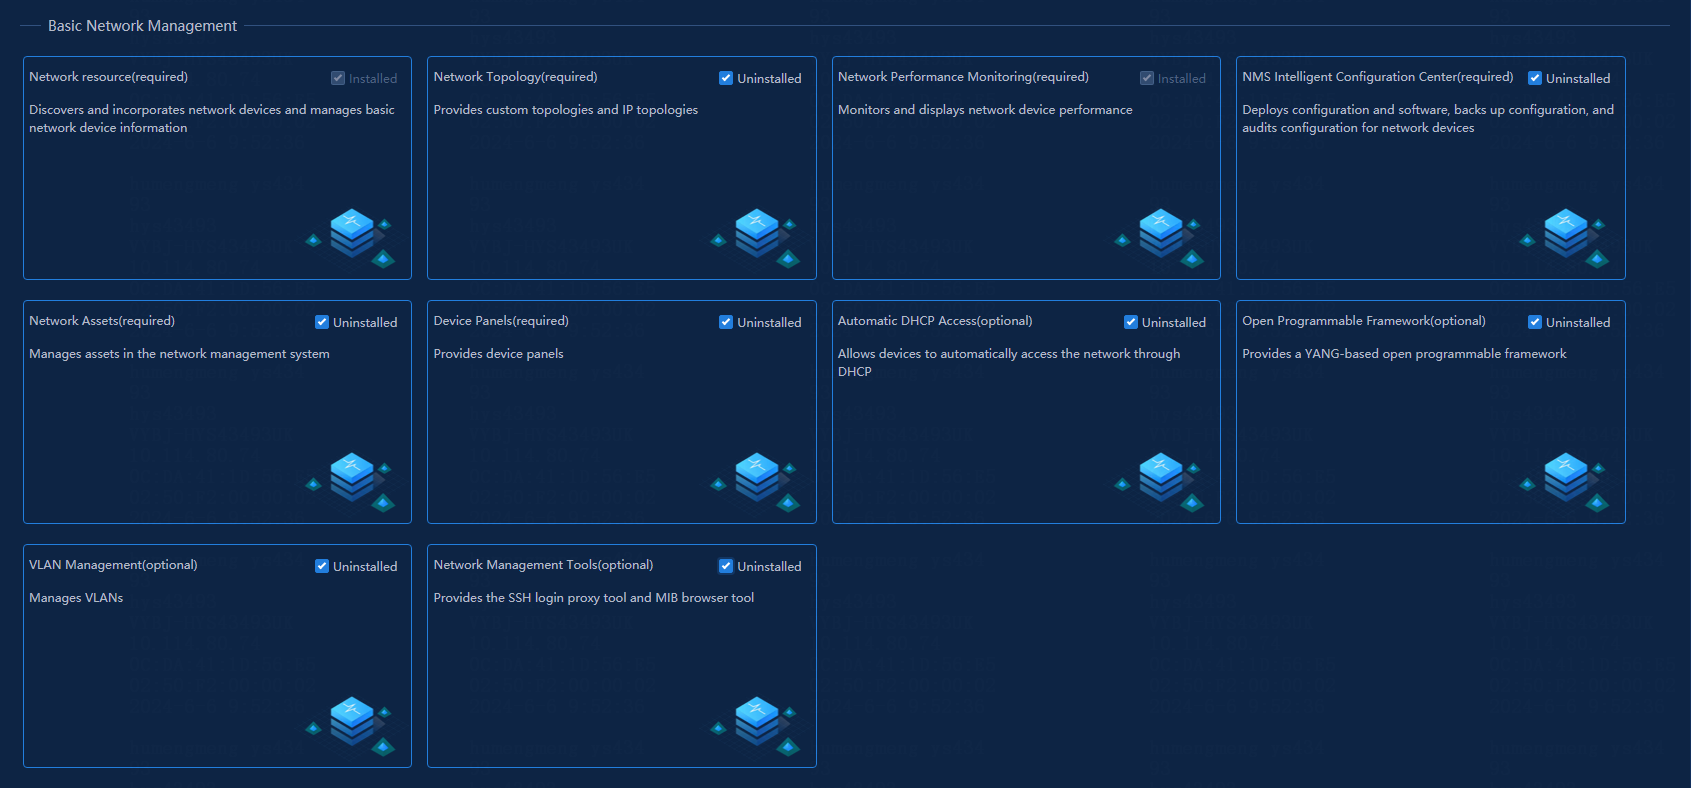
Select the Basic Network Management checkbox, and then select the checkboxes for the components to be installed for basic network management. Click Next.
Figure 2 Selecting Basic Network Management
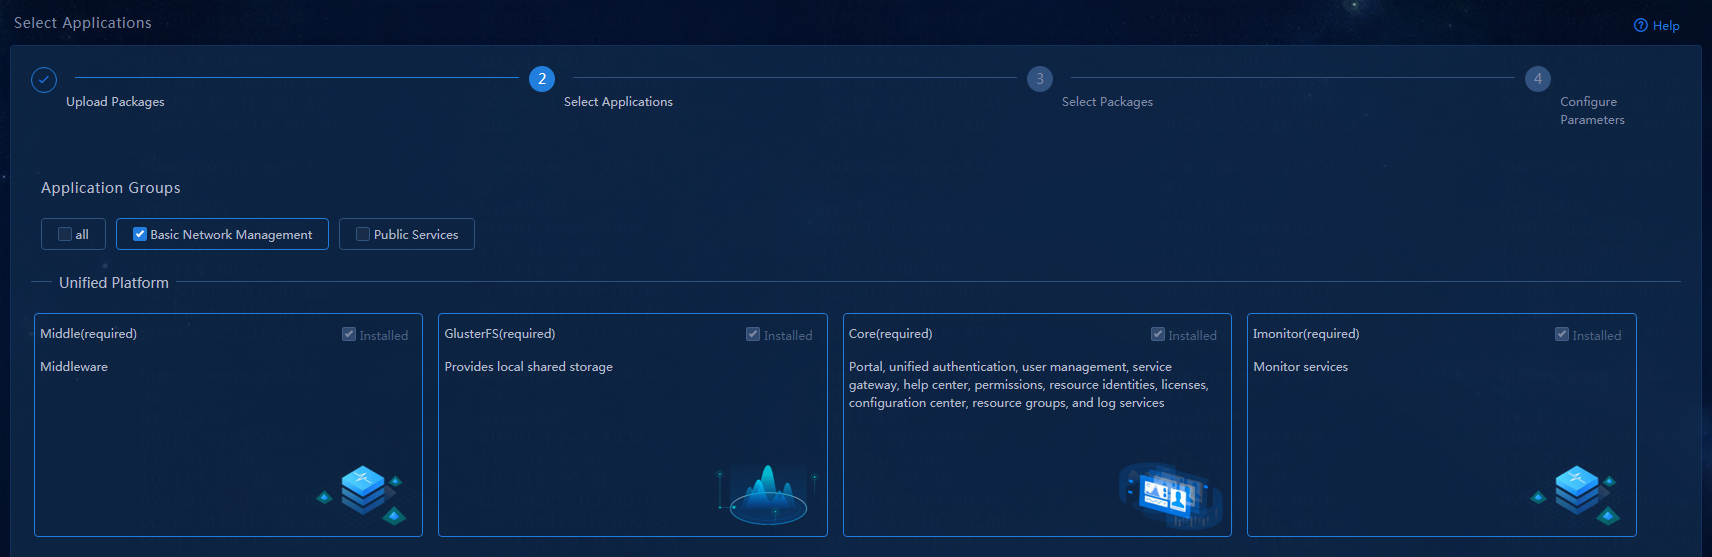
Figure 3 Selecting the checkboxes for components to be installed
Selecting installation packages
On this page, select the version of each component, E0715 in this example. Click Next.
Figure 4 Selecting the component versions

Configuring parameters
On the parameter configuration page, follow the navigation bar to configure the relevant parameters. As from version E0715, you can select the running nodes when installing components. Take the installation of the network management tools component as an example, as shown in Figure 5.
Figure 5 Selecting the nodes to run a component

In the current software version, only the Automatic DHCP Access feature (NSM_VAS-ADA) requires configuring a MACVLAN network at this step. If you have already configured a MACVLAN network when deploying other components, you can reuse the MACVLAN network.
This section describes the steps for setting up a new MACVLAN network.
1. Click Network Settings in the Subnet area. In the dialog box that opens, click Create Network.
Figure 6 Network settings

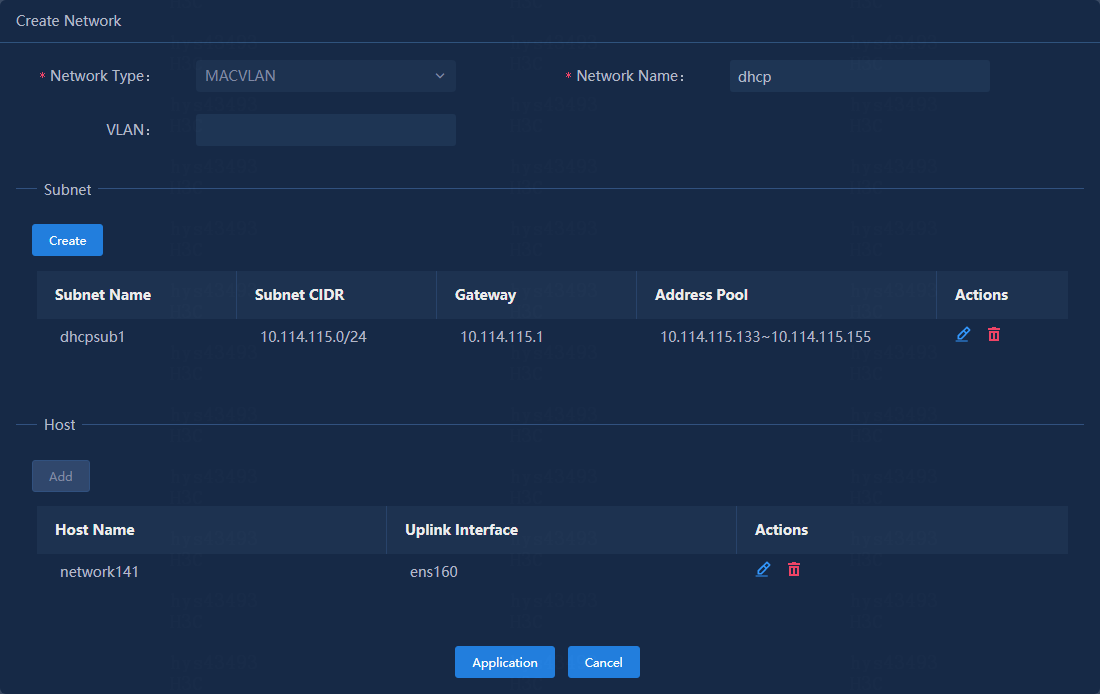
2. In the Create Network dialog box that opens, configure the following settings:
a. Specify a network name. The name can contain 1 to 64 lowercase letters and digits.
b. Create a subnet. Specify the subnet name, subnet CIDR, gateway, and other parameters.
c. In the Host area, the default entry is the current host and its uplink interface. You can add hosts as needed.
d. Click Apply.
Figure 7 Creating a network
3. After configuring the network, select it from the Select Network (IPv4) dropdown list in the Subnet area. Then, the Address Information area will be automatically populated.
Figure 8 Configuring automatic DHCP access

4. Click Deploy to start deploying all selected components.
Logging in to NSM
After you deploy NSM, the related menus will be displayed on Unified Platform. You can use NSM features after logging in to Unified Platform.
To log in to Unified Platform:
1. In the address bar of the browser, enter the login address (the default is http://ip_address:30000/central/index.html) of Unified Platform, and press Enter to access the login page as shown in Figure 9.
¡ The ip_address parameter specifies the northbound service VIP of the Unified Platform cluster.
¡ 30000 is the port number.

2. Enter the username and password to log in to Unified Platform. The default username is admin, and the default password is Pwd@12345. After you successfully log in, the main page opens.
Registering the software
The NSM feature provides the preinstalled license, allowing you to try the NSM feature for free for 90 days and manage up to 50 devices. After 90 days, purchase a license to continue using the NSM feature normally.
|
|
NOTE: The license server version for E0715 is E1208. |
Installing the license on the license server
For more information about requesting and installing the license, see H3C Software Product Remote Licensing Guide.
Obtaining the license authorization
After installing the license for the product on the license server, you only need to connect to the license server from the license management page to obtain the license authorization. To do that, perform the following tasks:
1. Log in to Unified Platform. On the top navigation bar, click System. From the navigation pane, select License Management > License Information.
2. Configure the license server parameters on the page. Table 6 describes each parameter.
|
Parameter |
Description |
|
IP Address |
The IP address is configured on the license server and used for communication among nodes in the cluster. |
|
Port Number |
The default is 5555, which is the same as the port number of the license server authorization service. |
|
Client Name |
Client name set on the license server. |
|
Client Password |
Password for the client set on the license server. |
3. After configuration, click Connect to establish a connection to the license server. After the connection is established successfully, NSM can automatically obtain the license authorization in real time.
Backup and restoration
You can back up and restore components on Unified Platform. For more information, see H3C Unified Platform Deployment Guide.
When backing up and restoring the performance monitoring data, follow these restrictions and guidelines:
· In the scenario with NSM deployed in standalone mode: Before overwriting and installing the operating system on the InfluxDB node, manually back up the /var/lib/ssdata/perfinfluxdb0 directory to save history performance monitoring data. After overwriting and installing the operating system on the node, SSH to the back end and upload the backup files to overwrite the /var/lib/ssdata/perfinfluxdb0 directory.
· In the scenario with NSM deployed in cluster mode: After you overwrite and install the operating system on each InfluxDB node, rebuild the node, and assign it to the cluster, you must execute the /opt/matrix/app/install/metadata/UCENTER/kernel/network/perf/scripts/major2standby.py command on the node to restore the integrity of network monitoring data.
· After you perform the preceding action sequence on InfluxDB node 1 without executing the major2standby.py command, the performance data will be lost if you continue to overwrite and install the operating system and rebuild InfluxDB node 2.
For specific steps, see cluster failure recovery in H3C Unified Platform Deployment Guide.
Upgrading and uninstalling software
This chapter describes the upgrade and uninstallation procedures of the NSM component. For information about the upgrade and uninstallation procedures of Unified Platform, see H3C Unified Platform Deployment Guide.
Upgrading the NSM component on the convergence deployment page of Matrix
|
|
CAUTION: When upgrading components, follow the dependency order. For example, upgrade the network resource component before the network topology component, because the latter depends on the former. For more information about the dependencies, see Table 3. |
1. Log in to Matrix, and access the Deploy > Convergence Deployment page.
2. Click the ![]() icon to the left
of the basic network management component to expand the component information.
icon to the left
of the basic network management component to expand the component information.
3. Click the ![]() icon in the Actions column for the component to be upgraded to access
the upgrade page.
icon in the Actions column for the component to be upgraded to access
the upgrade page.
Figure 10 Clicking the Upgrade icon

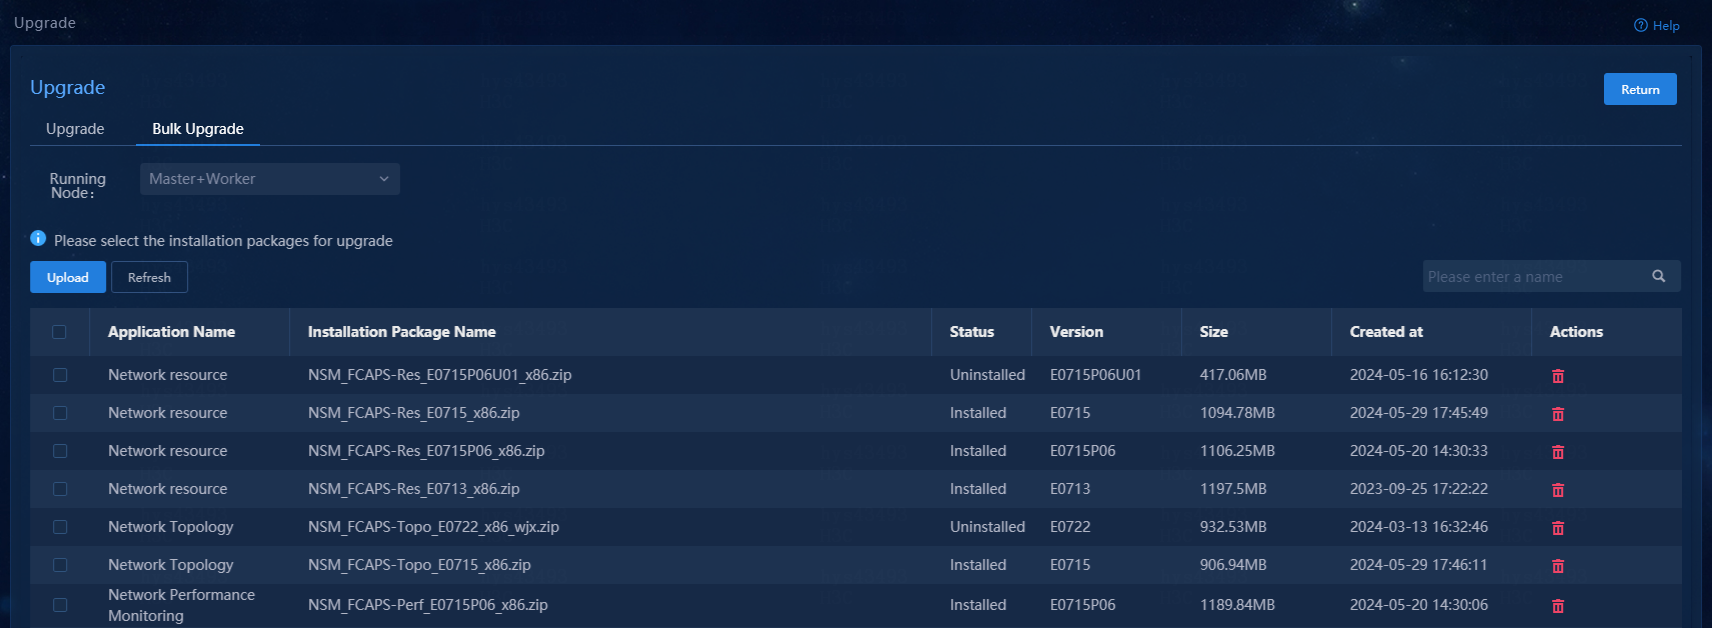
4. NSM supports upgrading a single component and bulk upgrading multiple components. Take bulk upgrade as an example. Click the Upload button. In the dialog box that opens, click the Select Files button. Select the installation packages you want to upgrade. Then, click the Upload button.
5. Select the installation packages to be upgraded, and then click Upgrade to upgrade the corresponding components.
Figure 11 Bulk upgrade
Uninstalling the NSM component on the convergence deployment page of Matrix
|
|
CAUTION: · When uninstalling applications on the application deployment page of Matrix, uninstall applications in the reverse dependency order. For example, because the network topology application depends on the network resource application, first uninstall the former and then the latter. For the dependencies, see Table 3. · When you uninstall an application on the convergence deployment page, other applications that depend on it will also be uninstalled. For example, if you select the network resource application, other applications that depend on it will also be selected. When you uninstall applications, the system will automatically uninstall applications one by one based on their dependencies. For the dependencies, see Table 3. |
1. Log in to Matrix, and access the Deploy > Convergence Deployment page.
2. Select the checkboxes on the left of the components to be uninstalled, and click Uninstall to uninstall the selected components.
Figure 12 Uninstalling components
