- Table of Contents
- Related Documents
-
| Title | Size | Download |
|---|---|---|
| 01-Text | 755.12 KB |
Contents
SeerEngine-DC Neutron plug-ins
SeerEngine-DC Neutron security plug-ins
Installing OpenStack cloud platforms
Installing SeerEngine-DC Neutron plug-ins and patches on OpenStack
Configuring interoperability in the KVM host-based overlay scenario
Installing and configuring plug-ins on the controller node
Installing and configuring plug-ins on a compute node
Configuring interoperability in the KVM network-based overlay scenario
Installing and configuring plug-ins on the controller node
Installing and configuring plug-ins on a compute node
(Optional.) Installing and configuring plug-ins on the DHCP failover node
Configuring interoperability in the network-based overlay with SR-IOV enabled scenario
Installing and configuring plug-ins on the controller node
Installing and configuring plug-ins on a compute node
Editing the configuration file
Configuring interoperability with F5 or third-party load balancers
Installing and configuring plug-ins on the controller node
Installing and configuring plug-ins on a compute node
Configuring interoperability with third-party firewalls
Installing and configuring plug-ins on the controller node
Installing and configuring plug-ins on a compute node
Configuring interoperability with Ironic
Installing and configuring plug-ins on the controller node
Installing and configuring OpenStack plug-ins on the controller node
Installing and configuring OpenStack plug-ins on the compute node
Setting up the environment for the traditional VLAN and VXLAN-based Metadata solution
Installing the SeerEngine-DC Neutron security plug-ins on OpenStack
Installing the security plug-ins on the controller node
Obtaining the installation package
Installing the security plug-ins on the OpenStack controller node
Editing the configuration files on the OpenStack controller node
(Optional.) Upgrading the SeerEngine-DC Neutron security plug-ins
Comparing and synchronizing firewall resource information between the cloud platform and controller
Comparing and synchronizing LB resource information between the cloud platform and controller
Upgrading non-converged plug-ins to converged plug-ins
Comparing and synchronizing resource information between the controller and cloud platform
CLI-based management of VPC connections and floating IP addresses
CLI-based management of VPC connections
CLI-based management of floating IP addresses
The Inter X700 Ethernet network adapter series fails to receive LLDP messages. What should I do?
VM instances fail to be created in a normal environment. What should I do?
Overview
This document describes how to install OpenStack plug-ins for interoperability with OpenStack cloud platforms. Then SeerEngine-DC can process requests from the OpenStack cloud platforms.
OpenStack plug-ins include SeerEngine-DC Neutron plug-ins, Nova patch, openvswitch-agent patch, and DHCP failover components.
SeerEngine-DC Neutron plug-ins
Neutron is a type of OpenStack services used to manage all virtual networking infrastructures (VNIs) in an OpenStack environment. It provides virtual network services to the devices managed by OpenStack computing services.
SeerEngine-DC Neutron plug-ins are developed for SeerEngine-DC based on the OpenStack framework. SeerEngine-DC Neutron plug-ins can obtain network configuration from OpenStack through REST APIs and synchronize the configuration to SeerEngine-DC. They can obtain settings for the tenants' networks, subnets, routers, or ports.
|
|
CAUTION: To avoid service interruptions, do not modify the settings issued by the cloud platform on the controller, such as the virtual link layer network, vRouter, and vSubnet settings after the plug-ins connect to the OpenStack cloud platform. |
Nova patch
Nova is an OpenStack computing software that provides virtual services for users. The virtual services include creating, starting up, shutting down, and migrating virtual machines and setting
configuration information for the virtual machines, such as CPU and memory information.
In specific scenarios (such as a host-based overlay or vCenter network-based overlay scenario), you must install the Nova patch to enable virtual machines created by OpenStack to access networks managed by SeerEngine-DC.
Openvswitch-agent patch
The open source openvswitch-agent process on an OpenStack compute node might fail to deploy VLAN flow tables to open source vSwitches when the following conditions exist:
· The kernel-based virtual machine (KVM) technology is used on the node.
· The hierarchical port binding feature is configured on the node.
To resolve this issue, you must install the openvswitch-agent patch.
DHCP failover components
DHCP component
In the network-based overlay scenario, only a controller is currently allowed to assign addresses to virtual machines or bare metal servers as a DHCP server. When the controller is disconnected from the southbound network, the virtual machines or bare metal servers will not be able to renew and reobtain addresses through DHCP. To resolve the issue, you can install the DHCP component on the DHCP failover node to provide DHCP failover in the network-based overlay scenario. When the controller loses connection to the southbound network, the virtual machines or bare metal servers can renew and reobtain addresses through the independently deployed DHCP server.
Metadata component
In the DHCP failover scenario, you must install a Metadata component on the DHCP failover node to provide the Metadata function for the DHCP component.
SeerEngine-DC Neutron security plug-ins
SeerEngine-DC Neutron security plug-ins are developed for SeerEngine-DC based on the OpenStack framework. SeerEngine-DC Neutron security plug-ins can obtain security configuration from OpenStack through REST APIs and synchronize the configuration to SeerEngine-DC. They can obtain settings for the tenants' FW, LB, or VPN.
Restrictions and guidelines
This document describes interoperability between SeerEngine-DC with one OpenStack platform that contains one controller node. In other scenarios, follow these restrictions and guidelines:
· SeerEngine-DC interoperates with one OpenStack platform that contains multiple controller nodes.
Configure all controller nodes on the OpenStack platform in the same way a single controller is configured, and make sure the configuration on all controller nodes is the same.
· SeerEngine-DC interoperates with multiple OpenStack platforms. Only OpenStack Queens and Rocky are supported.
¡ Install plug-ins on all controller nodes on each OpenStack platform, and configure interoperability parameters, including the cloud_region_name parameter in ml2_conf.ini of the SeerEngine-DC Neutron.
[SDNCONTROLLER]
cloud_region_name = default
cloud_region_name represents the name of the cloud platform. The default value is default. Make sure the value for this parameter is the same as the cloud platform name added on the Automation > Data Center Networks > Virtual Networking > OpenStack page on SeerEngine-DC. Make sure the cloud platform name and VXLAN VNI for each cloud platform and the host name of each node are unique across the OpenStack platforms.
¡ If each OpenStack platform uses an exclusive keystone service, verify that SeerEngine-DC can interoperate with each OpenStack platform and each platform can deploy services to its tenant.
¡ If multiple OpenStack platforms share the same keystone service, verify that SeerEngine-DC can interoperate with each OpenStack platform and all platforms can deploy services to the same tenant.
· Check the OpenStack version and OSs. The following table shows the software requirements for installing the SeerEngine-DC Neutron plug-ins, Nova patch, or openvswitch-agent patch.
|
Item |
Supported versions |
|
OpenStack (deployed on CentOS with YUM) |
· OpenStack Kilo 2015.1 on Ubuntu 14.04 · OpenStack Liberty on Ubuntu 14.04 · OpenStack Mitaka on Ubuntu 14.04 · OpenStack Newton on Ubuntu 14.04 · OpenStack Ocata on Ubuntu 14.04 · OpenStack Pike on Ubuntu 16.04 · OpenStack Queens on Ubuntu 18.04 · OpenStack Rocky on Ubuntu 18.04 · OpenStack Stein on Ubuntu 18.04 · OpenStack Train on Ubuntu 18.04 · OpenStack Ussuri on Ubuntu 20.04 · OpenStack Victoria on Ubuntu 20.04 · OpenStack Yoga on Ubuntu 22.04 |
|
|
IMPORTANT: · OpenStack security plug-ins cannot be installed on OpenStack Victoria or Yoga. · To install OpenStack Pike, the dnsmasq version must be 2.76. You can use the dnsmasq –v command to display the dnsmasq version number. · Make sure your system has a reliable Internet connection before you install the OpenStack plug-ins. |
Installing OpenStack cloud platforms
See the installation guide for the specific OpenStack version on the OpenStack official website to install and deploy OpenStack cloud platforms. Verify that the /etc/hosts file on all nodes has the host name-IP address mappings, and the OpenStack Neutron component has been deployed.
Preconfiguring SeerEngine-DC
SeerEngine-DC preconfiguration provides only basic configuration for SeerEngine-DC. For detailed configuration for different scenarios, see the configuration guides.
Table 2 SeerEngine-DC preconfiguration
|
Configuration |
Path |
|
Fabrics |
Automation > Data Center Networks > Fabrics > Fabrics |
|
VDS |
Automation > Data Center Networks > Common Network Settings > Virtual Distributed Switch |
|
Address pools |
Automation > Data Center Networks > Resource Pools > IP Address Pools |
|
VNID pools (VLANs, VXLANs, and VLAN-VXLAN mappings) |
Automation > Data Center Networks > Resource Pools > VNID Pools > VLANs Automation > Data Center Networks > Resource Pools > VNID Pools > VXLANs [Automation > Data Center Networks > Resource Pools > VNID Pools > VLAN-VXLAN Mappings |
|
Adding access and border devices to a fabric |
Automation > Data Center Networks > Fabrics > Fabrics |
|
L4-L7 physical devices, resource pools, and profiles |
Automation > Data Center Networks > Resource Pools > Devices > Physical Devices Automation > Data Center Networks > Resource Pools > Devices > L4-L7 Physical Resource Pools |
|
Gateway |
Automation > Data Center Networks > Common Network Settings > Gateways |
|
Domains and hosts |
Automation > Data Center Networks > Fabrics > Domains Automation > Data Center Networks > Fabrics > Domains > Hosts |
|
Interoperability with OpenStack |
Automation > Virtual Networking > OpenStack NOTE: · You must specify the cloud platform name. It is case sensitive and must be the same as the value for the cloud_region_name parameter in the ml2_conf.ini file of the Neutron plug-in. · Make the VNI range is the same as the VXLAN VNI range on the cloud platform. |
Installing SeerEngine-DC Neutron plug-ins and patches on OpenStack
The SeerEngine-DC Neutron plug-ins, Nova patch, openvswitch-agent patch, and DHCP failover components can be installed on different OpenStack versions. The installation package varies by OpenStack version. However, you can use the same procedure to install the Neutron plug-ins, Nova patch, or openvswitch-agent patch on different OpenStack versions.
Install the SeerEngine-DC Neutron plug-ins on an OpenStack controller node, the Nova patch and openvswitch-agent patch on an OpenStack compute node, and the DHCP failover components on the DHCP failover node. Before installation, you must install the Python tools on the associated node.
Installing the Python tools
Before installing the plug-ins, first you must download the Python tools online and install them.
To download and install the Python tools:
1. Update the software source list.
sdn@ubuntu:~$ sudo apt-get update
2. Download and install the Python tools.
¡ Ubuntu 20.04 or 22.04 operating system:
sdn@ubuntu:~$ sudo apt-get install python3-pip python3-setuptools
¡ Other Ubuntu operating systems:
sdn@ubuntu:~$ sudo apt-get install python-pip python-setuptools
3. Log in to the controller node to edit the /etc/hosts file:
a. Add the IP and name mappings for all OpenStack hosts on the Automation > Data Center Networks > Fabrics > Domains > Hosts page on SeerEngine-DC.
b. Add the IP and name mappings of all leaf, spine, and boarder devices on the Automation > Data Center Networks > Resource Pools > Devices > Physical Devices page on SeerEngine-DC.
sdn@ubuntu:~$ sudo vi /etc/hosts
127.0.0.1 localhost
::1 localhost localhost.localdomain localhost6 localhost6.localdomain6
99.0.83.75 controller
99.0.83.76 compute1
99.0.83.77 compute2
99.0.83.78 nfs-server
99.0.83.79 compute3
99.0.83.74 compute4
4. Install websocket-client on the controller node. Make sure the version is 0.56. In offline environments, use the offline .whl package for the base environment.
¡ Ubuntu 20.04 or 22.04 operating system:
sdn@ubuntu:~$ sudo pip install websocket-client==0.56
¡ Other Ubuntu operating systems:
sdn@ubuntu:~$ sudo apt-get install python-websocket-client
Configuring interoperability in the KVM host-based overlay scenario
Installing and configuring plug-ins on the controller node
Obtaining the SeerEngine-DC Neutron plug-in installation package
The SeerEngine-DC Neutron plug-ins are included in the SeerEngine-DC OpenStack package. Obtain the SeerEngine-DC OpenStack package of the required version and then save the package to the target installation directory on the server or virtual machine.
Alternatively, transfer the installation package to the target installation directory through a file transfer protocol such as FTP, TFTP, or SCP. Use the binary transfer mode to prevent the software package from being corrupted during transit.
Installing the SeerEngine-DC Neutron plug-ins on the controller node
|
|
CAUTION: The QoS feature will not operate correctly if you configure the database connection in configuration file neutron.conf as follows: This is an open source bug in OpenStack. To prevent this problem, configure the database connection as follows: The three dots (…) in the command line represents the neutron database link information. |
Some parameters must be configured with the required values as described in "Parameters and fields."
To install the SeerEngine-DC Neutron plug-ins:
1. Access the directory where the SeerEngine-DC OpenStack package (an .egg file) is saved, and install the package on the OpenStack controller node. The name of the SeerEngine-DC OpenStack package is SeerEngine_DC_PLUGIN-version-py2.7.egg or SeerEngine_DC_PLUGIN-version-py3-none-any.whl. version represents the version of the package. Select a package to install based on your Python version and operating system.
¡ Ubuntu 20.04 or 22.04 operating system:
sdn@ubuntu:~$ sudo pip install SeerEngine_DC_PLUGIN-E6402-py3-none-any.whl
¡ Ubuntu 18.04 operating system:
sdn@ubuntu:~$ sudo python -m easy_install SeerEngine_DC_PLUGIN-E3608-py2.7.egg
¡ Other Ubuntu operating systems:
sdn@ubuntu:~$ sudo easy_install SeerEngine_DC_PLUGIN-E3608-py2.7.egg
2. Change the user group and permissions of the plug-in file to be consistent with those of the Neutron file.
¡ Ubuntu 20.04 or 22.04 operating system:
sdn@ubuntu:~$ cd /usr/local/lib/python3.x/dist-packages
sdn@ubuntu:~$ sudo chown -R --reference=/usr/lib/python3/dist-packages/neutron *h3c
sdn@ubuntu:~$ sudo chmod -R --reference=/usr/lib/python3/dist-packages/neutron *h3c
sdn@ubuntu:~$ cd /usr/local/bin
sdn@ubuntu:~$ sudo chown -R --reference=/usr/bin/neutron-server h3c*
sdn@ubuntu:~$ sudo chmod -R --reference=/usr/bin/neutron-server h3c*
¡ Other Ubuntu operating systems:
sdn@ubuntu:~$ sudo cd /usr/local/lib/python2.7/dist-packages
sdn@ubuntu:~$ sudo chown -R --reference=/usr/lib/python2.7/dist-packages/neutron SeerEngine*
sdn@ubuntu:~$ sudo chmod -R --reference=/usr/lib/python2.7/dist-packages/neutron SeerEngine*
sdn@ubuntu:~$ sudo cd /usr/bin
sdn@ubuntu:~$ sudo chown -R --reference=neutron-server h3c*
sdn@ubuntu:~$ sudo chmod -R --reference=neutron-server h3c*
3. Install the SeerEngine-DC Neutron plug-ins.
sdn@ubuntu:~$ sudo h3c-sdnplugin controller install
If Neutron is developed based on OpenStack Newton, Pike, or Yoga, execute the following command to install the SeerEngine-DC Neutron plug-ins:
sdn@ubuntu:~$ sudo h3c-sdnplugin controller install --neutron_version version
The version argument can be newton, pike, or yoga.
|
|
IMPORTANT: Before executing the sudo h3c-sdnplugin controller install command, make sure no neutron.conf file exists in the /root directory. If such a file exists, delete it or move it to another location. |
Editing the configuration file
1. Modify the neutron.conf configuration file.
a. Use the vi editor to open the neutron.conf configuration file.
sdn@ubuntu:~$ sudo vi /etc/neutron/neutron.conf
b. Press I to switch to insert mode, and modify the configuration file. For information about the parameters, see "neutron.conf."
For OpenStack Train, Ussuri, Victoria, and Yoga:
[DEFAULT]
core_plugin = ml2
service_plugins = h3c_l3_router,qos,h3c_port_forwarding,h3c_bgp_neighbor,h3c_taas,h3c_trunk
[service_providers]
service_provider= BGP_NEIGHBOR:H3C:networking_h3c.l3_router.h3c_bgp_neighbors_driver.H3CBgpNeighborsDriver:default
service_provider= TAAS:H3C:networking_h3c.l3_router.h3c_tap_services.H3CTapServicesDriver:default
service_provider=EXROUTE:H3C:networking_h3c.l3_router.h3c_exroutes_driver.H3CExroutesDriver:default
For OpenStack Queens, Rocky, and Stein:
[DEFAULT]
core_plugin = ml2
service_plugins = h3c_l3_router,qos,h3c_port_forwarding
For OpenStack Pike:
[DEFAULT]
core_plugin = ml2
service_plugins = h3c_l3_router,qos,h3c_port_forwarding
For OpenStack Mitaka (QoS services deployed in OpenStack):
[DEFAULT]
core_plugin = ml2
service_plugins = h3c_l3_router,qos,h3c_bgp_neighbor,h3c_taas,h3c_trunk
[qos]
notification_drivers = message_queue,qos_h3c
[service_providers]
service_provider= BGP_NEIGHBOR:H3C:networking_h3c.l3_router.h3c_bgp_neighbors_driver.H3CBgpNeighborsDriver:default
service_provider= TAAS:H3C:networking_h3c.l3_router.h3c_tap_services.H3CTapServicesDriver:default
service_provider=EXROUTE:H3C:networking_h3c.l3_router.h3c_exroutes_driver.H3CExroutesDriver:default
For OpenStack Liberty, Newton, and Ocata (QoS services deployed in OpenStack):
[DEFAULT]
core_plugin = ml2
service_plugins = h3c_l3_router,qos
[qos]
notification_drivers = message_queue,qos_h3c
For OpenStack Kilo 2015.1:
[DEFAULT]
core_plugin = ml2
service_plugins = h3c_l3_router
|
|
IMPORTANT: · OpenStack Kilo does not support QoS. You do not need to specify QoS in the service_plugins parameter. · The open source port forwarding software has known issues and is not compatible with the Neutron plug-in L3 Plugin. As a best practice, use h3c_port_forwarding Plugin in the Neutron plug-in, and make sure the Neutron community version has resolved the known BUG #1799135. |
c. Press Esc to quit insert mode, and enter :wq to exit the vi editor and save the neutron.conf file.
|
|
IMPORTANT: OpenStack Mitaka, Pike, Queens, Rocky, Stein, Train, Ussuri, Victoria, and Yoga allow inter-VPC traffic to pass through a firewall, for which you are required to add configuration as shown in the following table to the neutron.conf configuration file. |
|
OpenStack version |
Configuration to add to the neutron.conf configuration file for inter-VPC traffic to pass through the firewall |
|
|
Mitaka |
Network cloud scenario |
|
|
Pike |
Non-network cloud scenario |
If the service_plugins parameter is set to h3c_vpc_connection_pike in the pre-upgrade environment, change the parameter value to h3c_vpc_connection_general as a best practice. The api_extensions_path setting can be obtained as follows: |
|
Queens,Rocky, and Stein |
Non-network cloud scenario |
The api_extensions_path setting can be obtained as follows: |
|
Train, Ussuri, Victoria, and Yoga |
Network cloud scenario |
|
|
Non-network cloud scenario |
The api_extensions_path setting can be obtained as follows: |
|
2. Modify the ml2_conf.ini configuration file.
a. Use the vi editor to open the ml2_conf.ini configuration file.
sdn@ubuntu:~$ sudo vi /etc/neutron/plugins/ml2/ml2_conf.ini
b. Press I to switch to insert mode, and set the parameters in the ml2_conf.ini configuration file. For information about the parameters, see "ml2_conf.ini."
[ml2]
type_drivers = vxlan,vlan
tenant_network_types = vxlan,vlan
mechanism_drivers = ml2_h3c
extension_drivers = ml2_extension_h3c,qos
[ml2_type_vlan]
network_vlan_ranges = physicnet1:1000:2999,port_security
[ml2_type_vxlan]
vni_ranges = 1:500
c. Press Esc to quit insert mode, and enter :wq to exit the vi editor and save the ml2_conf.ini file.
3. Modify the ml2_conf.ini configuration file after the SeerEngine-DC Neutron plug-in is installed.
a. Use the vi editor to open the ml2_conf.ini configuration file.
sdn@ubuntu:~$ sudo vi /etc/neutron/plugins/ml2/ml2_conf.ini
b. Press I to switch to insert mode, and set the following parameters in the ml2_conf.ini configuration file. For information about the parameters, see "ml2_conf_h3c.ini."
[SDNCONTROLLER]
url = http://127.0.0.1:30000
username = admin
password = Pwd@12345
domain = sdn
timeout = 1800
retry = 10
vhostuser_mode = server
white_list = False
use_neutron_credential = False
output_json_log = True
vendor_rpc_topic = VENDOR_PLUGIN
hierarchical_port_binding_physicnets = ANY
hierarchical_port_binding_physicnets_prefix = physicnet
enable_dhcp_hierarchical_port_binding = False
enable_security_group = False
enable_https = False
neutron_plugin_ca_file =
neutron_plugin_cert_file =
neutron_plugin_key_file =
enable_iam_auth = False
sdnc_rpc_url = ws://127.0.0.1:30000
sdnc_rpc_ping_interval = 60
websocket_fragment_size = 102400
enable_l3_router_rpc_notify = False
qos_rx_limit_min = 0
cloud_region_name = default
enable_h3c_l3_exroute = False
neutron_black_list =
black_list_matching =
force_vlan_port_details_qvo = True
neutron_version =
neutron_domain_name =
enable_encrypted_authentication = False
enable_neutron_rpc = True
c. Press Esc to quit insert mode, and enter :wq to exit the vi editor and save the ml2_conf.ini file.
4. If you have set the white_list parameter to True, add an authentication-free user to the controller.
¡ Enter the IP address of the host where the Neutron server resides.
¡ Specify the role as Admin.
5. If you have set the use_neutron_credential parameter to True, perform the following steps:
a. Modify the neutron.conf configuration file.
# Use the vi editor to open the neutron.conf configuration file.
# Press I to switch to insert mode, and add the following configuration. For information about the parameters, see "neutron.conf."
[keystone_authtoken]
admin_user = neutron
admin_password = KEYSTONE_PASS
# Press Esc to quit insert mode, and enter :wq to exit the vi editor and save the neutron.conf file.
b. Add an admin user to the controller.
# Configure the username as neutron.
# Specify the role as Admin.
# Enter the password of the neutron user in OpenStack.
6. Restart the neutron-server service.
sdn@ubuntu:~$ sudo service neutron-server restart
neutron-server stop/waiting
neutron-server start/running, process 4583
Verifying the installation
1. Verify that the SeerEngine-DC OpenStack package is correctly installed. If the correct software and OpenStack versions are displayed, the package is successfully installed.
¡ Ubuntu 20.04 or 22.04 operating system:
sdn@ubuntu:~$ sudo pip3 freeze | grep PLUGIN
SeerEngine-DC-PLUGIN===E6102
¡ Other Ubuntu operating systems:
sdn@ubuntu:~$ sudo pip freeze | grep PLUGIN
SeerEngine-DC-PLUGIN===E3608
2. Verify that the neutron-server service is enabled. The service is enabled if its state is running.
sdn@ubuntu:~$ sudo service neutron-server status
neutron-server start/running, process 1849
Parameters and fields
This section describes parameters in configuration files and fields included in parameters.
neutron.conf
|
Parameter |
Required value |
Description |
|
core_plugin |
ml2 |
Used for loading the core plug-in ml2 to OpenStack. |
|
service_plugins |
h3c_l3_router,qos,h3c_port_forwarding,h3c_vpc_connection |
Used for loading the extension plug-ins to OpenStack. |
|
service_provider |
N/A |
Directory where the extension plug-ins are saved. |
|
notification_drivers |
message_queue,qos_h3c |
Name of the QoS notification driver. |
|
admin_user |
N/A |
Admin username for Keystone authentication in OpenStack, for example, neutron. |
|
admin_password |
N/A |
Admin password for Keystone authentication in OpenStack, for example, 123456. |
ml2_conf.ini
|
Parameter |
Required value |
Description |
|
type_drivers |
vxlan,vlan |
Driver type. vxlan must be specified as the first driver type. |
|
tenant_network_types |
vxlan,vlan |
Type of the networks to which the tenants belong. For intranet, only vxlan is available. For extranet, only vlan is available. · In the host overlay scenario and network overlay with hierarchical port binding scenario, vxlan must be specified as the first network type. · In the network overlay without hierarchical port binding scenario, vlan must be specified as the first network type. · In the host overlay, network overlay with hierarchical port binding, and network overlay without hierarchical port binding hybrid scenario, vxlan must be specified as the first network type. In this scenario, you can create a VLAN only from the background CLI, REST API, or Web administration interface. |
|
mechanism_drivers |
ml2_h3c |
Name of the ml2 driver. To create SR-IOV instances for VLAN networks, set this parameter to sriovnicswitch, ml2_h3c. To create hierarchy-supported instances, set this parameter to ml2_h3c,openvswitch. |
|
extension_drivers |
ml2_extension_h3c,qos |
Names of the ml2 extension drivers. Available names include ml2_extension_h3c, qos, and port_security. If the QoS feature is not enabled on OpenStack, you do not need to specify the value qos for this parameter. To not enable port security on OpenStack, you do not need to specify the port_security value for this parameter (OpenStack Kilo 2015.1, Liberty 2015.2, and Ocata 2017.1 do not support the port_security value.) OpenStack Kilo 2015.1 does not support the QoS driver. |
|
network_vlan_ranges |
N/A |
Value range for the VLAN ID of the extranet, for example, physicnet1:1000:2999. |
|
vni_ranges |
N/A |
Value range for the VXLAN ID of the intranet, for example, 1:500. |
ml2_conf_h3c.ini
|
Parameter |
Description |
|
url |
URL address for logging in to Unified Platform, for example, http://ip_address:30000 or https://ip_address:30000. |
|
username |
Username for logging in to Unified Platform, for example, admin. You do not need to configure a username when the use_neutron_credential parameter is set to True. |
|
password |
Password for logging in to the Unified Platform, for example, Pwd@12345. You do not need to configure a password when the use_neutron_credential parameter is set to True. If the password contains a dollar sign ($), enter a backward slash (\) before the dollar sign. |
|
domain |
Name of the domain where the controller resides, for example, sdn. This parameter has been deprecated. |
|
timeout |
The amount of time that the Neutron server waits for a response from the controller in seconds, for example, 1800 seconds. As a best practice, set the waiting time greater than or equal to 1800 seconds. |
|
retry |
Maximum times for sending connection requests from the Neutron server to the controller, for example, 10. |
|
vif_type |
Default vNIC type: · ovs · vhostuser (applied to the OVS DPDK solution) · None (only supported by Mitaka) You can set the vhostuser_mode parameter when the value of this parameter is vhostuser. For OpenStack Mitaka, if you set the value to None, you must make sure the host name is consistent with the host name of the compute node when you add a compute node on the compute domain page. When the value is None, the vNIC type can be automatically identified in a host-based overlay environment. |
|
vhostuser_mode |
Default DPDK vHost-user mode: · server · client The default value is server. This setting takes effect only when the value of the vif_type parameter is vhostuser. |
|
white_list |
Whether to enable or disable the authentication-free user feature on OpenStack. · True—Enable. · False—Disable. |
|
use_neutron_credential |
Whether to use the OpenStack Neutron username and password to communicate with the controller. · True—Use. · False—Do not use. |
|
output_json_log |
Whether to output REST API messages to the OpenStack operating logs in JSON format for communication between the SeerEngine-DC Neutron plug-ins and the controller. · True—Enable. · False—Disable. |
|
vendor_rpc_topic |
RPC topic of the vendor. This parameter is required when the vendor needs to obtain Neutron data from the SeerEngine-DC Neutron plug-ins. The available values are as follows: · VENDOR_PLUGIN—Default value, which means that the parameter does not take effect. · DP_PLUGIN—RPC topic of DPtech. The value of this parameter must be negotiated by the vendor and H3C. |
|
hierarchical_port_binding_physicnets |
Policy for OpenStack to select a physical VLAN when performing hierarchical port binding. The default value is ANY. · ANY—A VLAN is selected from all physical VLANs for VLAN ID assignment. · PREFIX—A VLAN is selected from all physical VLANs matching the specified prefix for VLAN ID assignment. |
|
hierarchical_port_binding_physicnets_prefix |
Prefix for matching physical VLANs. The default value is physicnet. This parameter is available only when you set the value of the hierarchical_port_binding_physicnets parameter to PREFIX. |
|
enable_dhcp_hierarchical_port_binding |
Whether to enable DHCP hierarchical port binding. The default value is False. · True—Enable. · False—Disable. |
|
enable_security_group |
Whether to deploy OpenStack security group rules to SeerEngine-DC. The default value is False. |
|
enable_https |
Whether to enable HTTPS bidirectional authentication. The default value is False. · True—Enable. · False—Disable. |
|
neutron_plugin_ca_file |
Save location for the CA certificate of the controller, for example, /etc/neutron/ca.crt. As a best practice, save the CA certificate in the /usr/share/neutron directory. |
|
neutron_plugin_cert_file |
Save location for the Cert certificate of the controller, for example, /etc/neutron/sna.pem. As a best practice, save the Cert certificate in the /usr/share/neutron directory. |
|
neutron_plugin_key_file |
Save location for the Key certificate of the controller, for example, /etc/neutron/sna.key. As a best practice, save the Cert certificate in the /usr/share/neutron directory. |
|
enable_iam_auth |
Whether to enable IAM interface authentication. · True—Enable. · False—Disable. When connecting to the Unified Platform, you can set the value to True to use the IAM interface for authentication. The default value is False. Only OpenStack Mitaka and Newton support this parameter. This parameter is obsolete. |
|
sdnc_rpc_url |
RPC interface URL of the controller. Only a WebSocket type interface is supported, for example, ws://127.0.0.1:30000. If the Unified Platform uses an HTTPS URL, the controller must uses the WebSocket Secure (wss) URL scheme. Configure this parameter based on the URL of the Unified Platform. For example, if the URL of the Unified Platform is http://127.0.0.1:30000, set this parameter to ws://127.0.0.1: 30000. |
|
sdnc_rpc_ping_interval |
Interval at which an RPC ICMP echo request message is sent to the controller, in seconds. Int type. The default value is 60 seconds. |
|
websocket_fragment_size |
Size of a WebSocket fragment sent from the plug-in to the controller in the DHCP failover scenario, in bytes. Int type. The value is an integer equal to or larger than 1024. The default value is 102400. If the value is 1024, the message is not fragmented. |
|
enable_l3_router_rpc_notify |
Whether to enable or disable the feature of sending Layer 3 routing events through RPC. · True—Enable. · False—Disable. |
|
qos_rx_limit_min |
Minimum inbound bandwidth, in kbps. If the QoS minimum inbound bandwidth configured on OpenStack is smaller than this parameter value, this parameter value takes effect. Only OpenStack Kilo 2015.1 supports this parameter. |
|
cloud_region_name |
Name of the cloud platform. String type. The default value is default. Make sure the value of this parameter is the same as the cloud platform name configured on the Automation > Data Center Networks > Virtual Networking > OpenStack page on SeerEngine-DC. |
|
enable_h3c_l3_exroute |
Whether to enable routing extension. The default value is False. Only OpenStack Mitaka,Train, Ussuri and Victoria support this parameter. When the value is True, configure the api_extensions_path parameter in the neutron.conf file [DEFAULT] as follows: · Ubuntu 20.04 or 22.04 operating system: [root@controller ~]# python3 >>>from neutron_exroute_h3c import extensions >>>extensions.__path__ ['/usr/local/lib/python3.6/site-packages/SeerEngine_DC_PLUGIN-E6102-py3.6.egg/neutron_exroute_h3c/extensions'] · Other Ubuntu operating systems: [root@controller ~]# python >>>from neutron_exroute_h3c import extensions >>>extensions.__path__ |
|
neutron_black_list |
Neutron network denylist function. This parameter must be used together with the black_list_matching parameter. No default value exists. If the value for this parameter is flat and no denylist matching rule is specified, the denylist feature takes effect only on flat-type internal networks. |
|
black_list_matching |
Denylist matching rule. Options are prefix and suffix. When the value is prefix, the network is added to the denylist if the network name prefix is within the value range for the neutron_black_list parameter. When the value is suffix, the network is added to the denylist if the network name suffix is within the value range for the neutron_black_list parameter. After a network resource is added to the denylist, that network resource will not be deployed to the controller after being created on the cloud platform. The default value is not configured, which means the denylist function is disabled. The denylist function only applies to layer 2 resources, such as networks, subnets, and ports. It cannot be used for layer 3 resources, such as binding a subnet interface to a virtual router. |
|
force_vlan_port_details_qvo |
Whether to forcibly create a qvo-type vPort on the OVS bridge after a VM in a VLAN network comes online. If the value is true, the system forcibly creates a qvo-type vPort. If the value is false, the system automatically creates a tap-type or qvo-type vPort as configured. As a best practice, set the value to false for interoperability with the cloud platform for the first time. |
|
neutron_version |
Neutron version. Options include pike and newton. You can also leave the parameter unconfigured. By default, this parameter is unconfigured. If Neutron is developed based on open source OpenStack Pike or Newton, specify the value as pike or newton. |
|
neutron_domain_name |
If the Neutron permission is insufficient for obtaining the tenant or domain names from Keystone, you can use the current domain name to configure this field for Neutron to obtain sufficient permission. By default, this field is not configured. You can obtain the current domain name from the cloud platform. |
|
enable_encrypted_authentication |
Indicates whether to perform base64 decoding for the username and password of Unified Platform. When set to False, the username and password of Unified Platform will not be decrypted. When set to True, the base64 decoding algorithm is used to decrypt the username and password of Unified Platform, and the username and password must be the encoded base64 values. For example, if the username is admin and the password is Pwd@12345, and the encryption command is echo -n 'password' |base64, the encoded username is YWRtaW4=, and the password is UHdkQDEyMzQ1. |
|
enable_neutron_rpc |
Whether to establish a connection to the neutron message queue. The default value is true. |
Upgrading the SeerEngine-DC Neutron plug-ins
|
|
CAUTION: · Services might be interrupted during the SeerEngine-DC Neutron plug-ins upgrade procedure. · The default parameter settings for SeerEngine-DC Neutron plug-ins might vary by OpenStack version (Kilo 2015.1, Liberty, Mitaka, and Ocata). Modify the default parameter settings for SeerEngine-DC Neutron plug-ins when upgrading the OpenStack version to ensure that the plug-ins have the same configurations before and after the upgrade. |
To upgrade the SeerEngine-DC Neutron plug-ins:
1. Remove the SeerEngine-DC Neutron plug-ins.
sdn@ubuntu:~$ sudo h3c-sdnplugin controller uninstall
Restore config files
Uninstallation complete.
If Neutron is developed based on open source OpenStack Newton, execute the following command to remove the SeerEngine-DC Neutron plug-ins:
sdn@ubuntu:~$ sudo h3c-sdnplugin controller uninstall --neutron_version version
The version argument can be newton, pike, or yoga.
2. Remove the SeerEngine-DC OpenStack package.
¡ Ubuntu 20.04 or 22.04 operating system:
sdn@ubuntu:~$ sudo pip3 uninstall SeerEngine-DC-PLUGIN
Found existing installation: SeerEngine-DC-PLUGIN E6401
Uninstalling SeerEngine-DC-PLUGIN-E6401:
Would remove:
/usr/local/bin/h3c-sdnplugin
/usr/local/bin/h3c-sdnplugin-extension
/usr/local/lib/python3.8/dist-packages/SeerEngine_DC_PLUGIN-E6401.dist-info/*
/usr/local/lib/python3.8/dist-packages/networking_h3c/*
/usr/local/lib/python3.8/dist-packages/neutron_bgp_h3c/*
/usr/local/lib/python3.8/dist-packages/neutron_exroute_h3c/*
/usr/local/lib/python3.8/dist-packages/neutron_taas_h3c/*
/usr/local/lib/python3.8/dist-packages/neutron_trunk_h3c/*
/usr/local/lib/python3.8/dist-packages/neutron_vpc_h3c/*
Proceed (y/n)? y
Successfully uninstalled SeerEngine-DC-PLUGIN-E6401
¡ Other Ubuntu operating systems:
sdn@ubuntu:~$ sudo pip uninstall SeerEngine-DC-PLUGIN
Uninstalling SeerEngine-DC-PLUGIN-E3608
/usr/bin/h3c-sdnplugin
/usr/lib/python2.7/site-packages/SeerEngine_DC_PLUGIN-E3608-py2.7.egg
Proceed (y/n)? y
Successfully uninstalled SeerEngine-DC-PLUGIN-E3608
3. Install plug-ins of the new version. For more information, see "Installing and configuring plug-ins on the controller node."
|
|
NOTE: If you need to upgrade the Neutron security plug-in, skip the “Restart the neutron-server service.” step. After completing the security plug-in upgrade, restart the neutron-server service. To upgrade the Neutron security plug-in, see "Upgrading the SeerEngine-DC Neutron plug-ins." |
The following table describes the configuration changes needed in the neutron.conf file before and after the upgrade.
Table 4 Changes to the neutron.conf file configuration before and after the upgrade
|
Configuration item |
Before the upgrade |
After the upgrade |
Remarks |
|
service_plugins |
port_forwarding |
h3c_port_forwarding |
N/A |
|
service_plugins |
h3c_vpc_connection_pike |
h3c_vpc_connection_general |
N/A |
|
api_extensions_path |
You can obtain the configuration of api_extensions_path as follows: |
You need to re-obtain the configuration each time you upgrade. |
|
Installing and configuring plug-ins on a compute node
You must install the Nova patch only in the following scenarios:
· In KVM host-based overlay or network-based overlay scenario, virtual machines are load balancer members, and the load balancer must be aware of the member status.
· vCenter network-based overlay scenario.
Obtaining the Nova patch installation package
The Nova patch is included in the SeerEngine-DC OpenStack package. Perform the following steps to download the SeerEngine-DC OpenStack package from the H3C website:
1. Obtain the SeerEngine-DC OpenStack package of the required version.
2. Copy the SeerEngine-DC OpenStack package to the installation directory on the server or virtual machine, or upload it to the installation directory through FTP, TFTP, or SCP.
|
|
NOTE: If you decide to upload the SeerEngine-DC OpenStack package through FTP or TFTP, use the binary mode to avoid damage to the package. |
Installing the Nova patch
Based on your network environment, choose one step between step 3 and step 4.
To install the Nova patch on the OpenStack compute node:
1. Access the directory where the SeerEngine-DC OpenStack package (an .egg file) is saved, and install the package on the OpenStack compute node. The name of the SeerEngine-DC OpenStack package is SeerEngine_DC_PLUGIN-version1-py2.7.egg. version represents the version of the package.
In this example, the SeerEngine-DC OpenStack package is saved to the /root directory.
sdn@ubuntu:~$ sudo easy_install SeerEngine_DC_PLUGIN-E3608-py2.7.egg
2. Install the Nova patch.
sdn@ubuntu:~$ sudo h3c-sdnplugin compute install
Install the nova patch
modifying:
/usr/lib/python2.7/dist-packages/nova/virt/vmwareapi/vmops.py
modify success, backuped at: /usr/lib/python2.7/dist-packages/nova/virt/vmwareapi/vmops.py.h3c_bak
|
|
NOTE: The contents below the modifying: line indicate the modified open source Neutron file and the backup path of the file before modification. |
3. Perform the following steps:
a. Stop the neutron-openvswitch-agent service on the compute node and disable the system from starting the service at startup.
sdn@ubuntu:~$ sudo service neutron-openvswitch-agent stop
sdn@ubuntu:~$ sudo systemctl disable neutron-openvswitch-agent.service
b. Execute the neutron agent-list command on the controller node to identify whether the agent of the compute node exists in the database.
- If the agent of the compute node does not exist in the database, go to the next step.
- If the agent of the compute node exists in the database, execute the neutron agent-delete id command to delete the agent. The id argument represents the agent ID.
sdn@ubuntu:~$ sudo neutron agent-list
| id | agent_type | host |
| 25c3d3ac-5158-4123-b505-ed619b741a52 | Open vSwitch agent | compute3
sdn@ubuntu:~$ sudo neutron agent-delete 25c3d3ac-5158-4123-b505-ed619b741a52
Deleted agent: 25c3d3ac-5158-4123-b505-ed619b741a52
c. Use the vi editor on the compute node to open the nova.conf configuration file.
sdn@ubuntu:~$ sudo vi /etc/nova/nova.conf
d. Press I to switch to insert mode, and set the parameters in the nova.conf configuration file as follows. For descriptions of the parameters, see Table 5.
If the hypervisor type of the compute node is KVM, modify the nova.conf configuration file as follows:
[s1020v]
s1020v = False
member_status = True
[neutron]
ovs_bridge = vds1-br
If the hypervisor type of the compute node is VMware vCenter, modify the nova.conf configuration file as follows:
[DEFAULT]
compute_driver = vmwareapi.VMwareVCDriver
[vmware]
host_ip = 127.0.0.1
host_username = sdn
host_password = skyline123
cluster_name = vcenter
insecure = True
[s1020v]
s1020v = False
vds = VDS2
e. Press Esc to quit insert mode, and enter :wq to exit the vi editor and save the nova.conf file.
Table 5 Parameters in the configuration file
|
Parameter |
Description |
|
s1020v |
Whether to use the S1020V vSwitch to forward the traffic between vSwitches and the traffic between the vSwitches and the external network. · True—Use the S1020V vSwitch. · False—Do not use the S1020V vSwitch. This parameter is obsoleted. |
|
member_status |
Whether to enable or disable the feature of modifying the status of members on OpenStack load balancers. · True—Enable. · False—Disable. |
|
vds |
VDS to which the host in the vCenter belongs. In this example, the host belongs to VDS2. In the host-based overlay networking, you can only specify the VDS that the controller synchronizes to the vCenter. In the network-based overlay networking, you can specify an existing VDS on demand. |
|
ovs_bridge |
Name of the bridge for the H3C S1020V vSwitch. Make sure the bridges created on all H3C S1020V vSwitches use the same name. |
|
compute_driver |
Name of the driver used by the compute node for virtualization. |
|
host_ip |
IP address used to log in to the vCenter, for example, 127.0.0.1. |
|
host_username |
Username for logging in to the vCenter, for example, sdn. |
|
host_password |
Password for logging in to the vCenter, for example, skyline123. If the password contains a dollar sign ($), enter a backward slash (\) before the dollar sign. |
|
cluster_name |
Name of the team in the vCenter environment, for example, vcenter. |
|
insecure |
Whether to enable or disable security check. · True—Do not perform security check. · False—Perform security check. This value is not supported in the current software version. |
4. Restart the openstack-nova-compute service.
sdn@ubuntu:~$ sudo service openstack-nova-compute restart
Verifying the installation
# Verify that the SeerEngine-DC OpenStack package is correctly installed. If the correct software and OpenStack versions are displayed, the package is successfully installed.
sdn@ubuntu:~$ sudo pip freeze | grep PLUGIN
SeerEngine-DC-PLUGIN===E3608
# Verify that the openstack-nova-compute service is enabled. The service is enabled if its state is running.
sdn@ubuntu:~$ sudo service openstack-nova-compute status
nova-compute start/running, process 184
Upgrading the Nova patch
|
|
CAUTION: Services might be interrupted during the Nova patch upgrade procedure. |
You must remove the Nova patch before upgrading the Nova patch.
To upgrade the Nova patch:
1. Remove the Nova patch.
sdn@ubuntu:~$ sudo h3c-sdnplugin compute uninstall
Uninstall the nova patch
2. Remove the SeerEngine-DC OpenStack package.
sdn@ubuntu:~$ sudo pip uninstall seerengine-dc-plugin
Uninstalling SeerEngine-DC-PLUGIN-E3608:
/usr/bin/h3c-sdnplugin
/usr/lib/python2.7/dist-packages/SeerEngine_DC_PLUGIN-E368-py2.7.egg
Proceed (y/n)? y
Successfully uninstalled SeerEngine-DC-PLUGIN-E3608
3. Install the new-version Nova patch. For more information, see "Installing and configuring plug-ins on a compute node."
Verifying interoperability
1. Create a VXLAN network and a VM on OpenStack.
2. Log in to SeerEngine-DC, and access the Automation > Data Center Networks > All Tenant Networks > vPorts page to identify whether the vPort exists. If the vPort information is correct and the vPort is up, the interoperation has succeeded.
Configuring interoperability in the KVM network-based overlay scenario
Installing and configuring plug-ins on the controller node
Installing the SeerEngine-DC Neutron plug-ins on the controller node
See "Installing the SeerEngine-DC Neutron plug-ins ."
Editing the configuration file
|
|
IMPORTANT: You must configure a physical network name and VLAN range for all compute nodes in the network_vlan_ranges parameter in the ml2_conf.ini file. Make sure the physical network name in the bridge_mappings parameter in the openvswitch_agent.ini file is unique for a compute node. |
To edit the configuration file:
1. Log in to a controller node as a root user.
2. Edit the network_vlan_ranges parameter in the /etc/neutron/plugins/ml2/openvswitch_agent.ini file. The value to the left of the colon represents the physical network name, and the value to the right of the colon represents the VLAN range.
[ml2]
type_drivers = vxlan,vlan
tenant_network_types = vxlan,vlan
mechanism_drivers = ml2_h3c,openvswitch
[ml2_type_vlan]
network_vlan_ranges = physicnet1:1000:1999,physicnet2:2000:2999
[ml2_type_vxlan]
vni_ranges = 1:500
3. Restart the neutron-server service.
sdn@ubuntu:~$ sudo service neutron-server restart
neutron-server stop/waiting
neutron-server start/running, process 4583
Installing and configuring plug-ins on a compute node
Installing the lldpad service
In a KVM network-based overlay scenario, you are required to install the lldpad service on each compute node.
1. Install and start the lldpad service on the compute node.
sdn@ubuntu:~$ sudo apt-get install lldpad
sdn@ubuntu:~$ sudo service lldpad enable
sdn@ubuntu:~$ sudo service lldpad start
2. Enable the uplink interface to send LLDP messages. eno2 is the uplink interface in this example.
sdn@ubuntu:~$ sudo lldptool set-lldp -i eno2 adminStatus=rxtx
sdn@ubuntu:~$ sudo lldptool -T -i eno2 -V sysName enableTx=yes
sdn@ubuntu:~$ sudo lldptool -T -i eno2 -V portDesc enableTx=yes
sdn@ubuntu:~$ sudo lldptool -T -i eno2 -V sysDesc enableTx=yes
sdn@ubuntu:~$ sudo lldptool -T -i eno2 -V sysCap enableTx=yes
Installing the Nova patch
You must install the Nova patch only in the following scenarios:
· In KVM host-based overlay or network-based overlay scenario, virtual machines are load balancer members, and the load balancer must be aware of the member status.
· vCenter network-based overlay scenario.
For the installation procedure, see "Installing and configuring plug-ins on a compute node."
(Optional.) Installing the openvswitch-agent patch
|
|
IMPORTANT: · The openvswitch-agent patch is applicable only to open-source scenarios. If a third-party cloud modifies the openvswitch-agent patch, openvswitch-agent patch installation is not supported. · OpenStack Rocky and later versions do not require installation of the openvswitch-agent patch. |
To install the openvswitch-agent patch:
1. Access the directory where the SeerEngine-DC OpenStack package (an .egg file) is saved, and install the package on the OpenStack compute node. The name of the SeerEngine-DC OpenStack package is SeerEngine_DC_PLUGIN-version -py2.7.egg. version represents the version of the package.
sdn@ubuntu:~$ sudo easy_install SeerEngine_DC_PLUGIN-E3608-py2.7.egg
2. Install the openvswitch-agent patch.
sdn@ubuntu:~$ sudo h3c-sdnplugin openvswitch install
3. Restart the openvswitch-agent service.
sdn@ubuntu:~$ sudo service neutron-openvswitch-agent restart
Verifying the installation
# Verify that the SeerEngine-DC OpenStack package is correctly installed. If the correct software and OpenStack versions are displayed, the package is successfully installed.
sdn@ubuntu:~$ sudo pip freeze | grep PLUGIN
SeerEngine-DC-PLUGIN===E3608
# Verify that the openvswitch-agent service is enabled. The service is enabled if its state is running.
sdn@ubuntu:~$ sudo service neutron-openvswitch-agent status
Redirecting to /bin/systemctl status neutron-openvswitch-agent.service
neutron-openvswitch-agent.service - OpenStack Neutron Open vSwitch Agent
Loaded: loaded (/usr/lib/systemd/system/neutron-openvswitch-agent.service; enabled; vendor preset: disabled)
Active: active (running) since Mon 2016-12-05 16:58:18 CST; 18h ago
Main PID: 807 (neutron-openvsw)
Upgrading the openvswitch-agent patch
|
|
CAUTION: Services might be interrupted during the openvswitch-agent patch upgrade procedure. |
To upgrade the openvswitch-agent patch, you must remove the current version first, and install a new version.
To upgrade the openvswitch-agent patch:
1. Remove the openvswitch-agent patch.
sdn@ubuntu:~$ sudo h3c-sdnplugin openvswitch uninstall
2. Remove the SeerEngine-DC OpenStack package.
sdn@ubuntu:~$ sudo pip uninstall seerengine-dc-plugin
Uninstalling SeerEngine-DC-PLUGIN-E3608:
/usr/bin/h3c-agent
/usr/bin/h3c-sdnplugin
/usr/lib/python2.7/site-packages/SeerEngine_DC_PLUGIN-E3608-py2.7.egg
Proceed (y/n)? y
Successfully uninstalled SeerEngine-DC-PLUGIN-E3608
3. Install the new patch. For more information, see "(Optional.) Installing the openvswitch-agent patch."
Setting up the environment
|
|
IMPORTANT: Make sure the physical network name in the bridge_mappings parameter in the openvswitch_agent.ini file is unique for a compute node. |
To edit the configuration file:
1. Log in to a controller node as a root user.
2. Edit the bridge_mappings parameter in the /etc/neutron/plugins/ml2/openvswitch_agent.ini file. The value to the left of the colon represents the physical network name, and the value to the right of the colon represents the manually created OVS bridge name.
Make sure the physical network name is the same as the physical network name of the bound NIC.
[ovs]
bridge_mappings = physicnet1:br-ens33
3. Create a bridge named br-ens33.
sdn@ubuntu:~$ sudo ovs-vsctl add-br br-ens33
4. Map the bridge to the physical port.
sdn@ubuntu:~$ sudo ovs-vsctl add-port br-ens33 ens33
5. Verify that the bridge was created successfully.
sdn@ubuntu:~$ sudo ovs-vsctl show
6. Delete the default bridge.
sdn@ubuntu:~$ sudo ovs-vsctl del-br br-tun
7. Edit the /etc/neutron/plugins/ml2/openvswitch_agent.ini file to comment out all tunnel-related parameters.
[agent]
# tunnel_types = vxlan
# vxlan_udp_port = 4789
# l2_population = true
[ovs]
# tunnel_bridge = br-tun
# local_ip = 192.168.1.100
8. Restart the openvswitch-agent and neutron-openvswitch-agent services to verify that the br-tun bridge has been deleted successfully.
sdn@ubuntu:~$ sudo systemctl restart neutron-openvswitch-agent.service
sdn@ubuntu:~$ sudo systemctl restart openvswitch-agent.service
sdn@ubuntu:~$ sudo ovs-vsctl show
(Optional.) Installing and configuring plug-ins on the DHCP failover node
To use DHCP failover in a scenario, use a separate node as the DHCP failover node and install DHCP and Metadata components on the node.
Installing/uninstalling/upgrading the DHCP component
To use DHCP failover in a network-based overlay scenario, install DHCP failover components. For the installation/uninstallation/upgrade method, see H3C SeerEngine-DC Controller Converged OpenStack Plug-Ins Installation Guide for CentOS and Kylin.
|
|
IMPORTANT: · The M-LAG network does not support this configuration solution. · The DHCP failover components can operate only on the CentOS 7.2.1511 operating system with a kernel version of 3.10.0-327.el7.x86_64. If the kernel version does not match that of the S1020V, install the kernel patch first . |
Installing/uninstalling/upgrading the Metadata component
VMs on OpenStack can obtain metadata from network nodes through DHCP or L3 Gateway. The metadata solution of H3C supports obtaining metadata only through DHCP. For information about the H3C metadata solution, see H3C SeerEngine-DC Controller Converged OpenStack Plug-Ins Installation Guide for CentOS and Kylin.
Verifying interoperability
1. Create a VXLAN network and a VM on OpenStack.
2. Log in to SeerEngine-DC, and access the Automation > Data Center Networks > All Tenant Networks > vPorts page to identify whether the vPort exists. If the vPort information is correct and the vPort is up, the interoperation has succeeded.
Configuring interoperability in the network-based overlay with SR-IOV enabled scenario
Installing and configuring plug-ins on the controller node
|
|
IMPORTANT: Because of the restrictions by the OpenStack community, only VLAN but not VXLAN is supported in this scenario. |
For information about installing and configuring plug-ins on the controller node, see "Installing the SeerEngine-DC Neutron plug-ins ."
Installing and configuring plug-ins on a compute node
For information about installing and configuring plug-ins on a compute node, see "Installing and configuring plug-ins on a compute node."
Enabling SR-IOV for a vNIC
For information about enabling SR-IOV for a vNIC, see the SR-IOV configuration guide at the official website of OpenStack.
Editing the configuration file
1. Log in to a controller node as a root user.
2. Edit the mechanism_drivers parameter in the Ml2 conf.ini file.
[ml2]
type_drivers = vxlan,vlan
tenant_network_types = vxlan,vlan
mechanism_drivers = sriovnicswitch,ml2_h3c,openvswitch
3. Restart the neutron-server service.
Verifying interoperability
1. Create a VLAN network and a direct-type port on OpenStack.
2. Create a VM with this type of port.
3. Log in to SeerEngine-DC, and access the Automation > Data Center Networks > All Tenant Networks > vPorts page to identify whether the vPort exists. If the vPort information is correct and the vPort is up, the interoperation has succeeded.
Configuring interoperability with F5 or third-party load balancers
|
|
IMPORTANT: For how to configure interoperability with a third-party load balancer, see the interoperation guide. This section is for reference only. |
Installing and configuring plug-ins on the controller node
See "Installing the SeerEngine-DC Neutron plug-ins ."
Installing and configuring plug-ins on a compute node
Installing the Nova patch
See "Installing and configuring plug-ins on a compute node."
Installing the openvswitch patch
For the VXLAN or network overlay environment, see openvswitch patch installation in "Installing and configuring plug-ins on a compute node."
Setting up the F5 environment
Log in to a controller node as a root user, and place the F5 plug-ins in a directory on the controller node, for example, /var/log/neutron. The installation package is provided by F5. Please contact the corresponding personnel to obtain the F5 installation package.
Installing the git tool kit
To obtain the networking-f5 package, you must install the git tool kit before installing F5 plug-ins and patches. To download and install the git tool kit, execute the sdn@ubuntu:~$ sudo yum install -y git command.
Installing F5 plug-ins
1. Install base F5 packages.
[root@neutron ~]# rpm -ivh f5-icontrol-rest-1.3.9-1.el7.noarch.rpm
[root@neutron ~]# rpm -ivh f5-sdk-3.0.11-1.el7.noarch.rpm
2. Install the F5 LBv2 plugin driver.
[root@neutron ~]# tar xvf f5.tgz -C /usr/lib/python2.7/site-packages/neutron_lbaas/drivers/
3. Install the F5 LBv2 plugin driver.
[root@neutron ~]# tar xvf f5.tgz -C /usr/lib/python2.7/site-packages/neutron_lbaas/drivers/
4. Install the F5 agent.
[root@neutron ~]# rpm -ivh f5-openstack-agent-9.7.0-35.el7.noarch.rpm
5. Install the F5 ML2 Plugin driver f5networks.
[root@neutron ~]# git clone https://github.com/F5Networks/networking-f5.git
[root@neutron ~]# cd networking-f5/
[root@networking-f5 ~]# python setup.py install
Editing the configuration files
1. Edit the /etc/neutron/neutron.conf file.
a. If LBaaSV1 configuration exists in the service_plugins parameter, remove the configuration, and add the LBaaSV2 configuration. Keep other configuration unchanged.
[DEFAULT]
core_plugin = ml2
service_plugins = …,neutron_lbaas.services.loadbalancer.plugin.LoadBalancerPluginv2
b. Configure F5 service_providers.
[service_providers]
service_provider=LOADBALANCERV2:F5Networks:neutron_lbaas.drivers.f5.driver_v2.F5LBaaSV2Driver:default
c. Add the following configuration:
[DEFAULT]
unlegacy_setting_placeholder_driver_side = special_driver_side
debug = true
port_normal_or_baremetal = baremetal
to_delete_last_port = False
2. Edit the /etc/neutron/plugins/ml2/ml2_conf.ini file.
[ml2]
type_drivers = vxlan,vlan
tenant_network_types = vxlan,vlan
mechanism_drivers = ml2_h3c,...,f5networks //Make sure f5networks is to the right of ml2_h3c
[ml2_type_vlan]
//Separate VLAN ranges with commas (,)
network_vlan_ranges = physicnet1:1000:2999,f5network:3000:3200
[ml2_type_vxlan]
vni_ranges = 1:500 //Specify a VXLAN range
3. Edit the /etc/neutron/services/f5/f5-openstack-agent.ini file.
a. Edit the configuration as follows:
[DEFAULT]
debug = True
// F5 HA modes include standalone and pair
f5_ha_type = standalone
// f5network is the network egress. 5.0 is the name of the trunk created on F5
f5_external_physical_mappings = f5network:5.0:True,default:5.0:True
icontrol_hostname = 31.1.1.135 //F5 management interface address
icontrol_username = admin //F5 account
icontrol_password = admin //F5 password
f5_network_segment_physical_network = f5network //F5 network egress
f5_global_routed_mode = False
agent_id = f5_cluster1 //F5 agent host ID
b. Comment out the following configuration:
#f5_vtep_folder = None
#f5_vtep_selfip_name = None
4. Restart the services.
sdn@ubuntu:~$ sudo systemctl enable f5-openstack-agent
sdn@ubuntu:~$ sudo systemctl restart f5-openstack-agent
sdn@ubuntu:~$ sudo systemctl restart neutron-server
Verifying interoperability
1. Create a LoadBalancer v2 resource on OpenStack.
2. Create a VM with this type of port.
3. Log in to SeerEngine-DC, and access the Automation > Data Center Networks > All Tenant Networks > Load Balancing page to identify whether the load balancer exists. If the load balancer information is correct, the interoperation has succeeded.
Configuring interoperability with third-party firewalls
|
|
IMPORTANT: · For more information about interoperability with third-party firewalls, see the interoperation guide. This section uses a DP firewall as an example. · SeerEngine-DC Neutron plug-ins support using callbacks to process router events. Resources used are h3c_router and h3c_router_interface. |
Installing and configuring plug-ins on the controller node
See "Installing the SeerEngine-DC Neutron plug-ins ."
Installing and configuring plug-ins on a compute node
Installing the Nova patch
See "Installing and configuring plug-ins on a compute node."
Installing the openvswitch patch
For the VXLAN or network overlay scenario, see openvswitch patch installation in "Installing and configuring plug-ins on a compute node."
Setting up the environment
Editing the configuration files
1. Configure the basic environment based on the third-party interoperability guide.
2. Log in to a controller node as a root user, and edit the ml2_conf.ini file to load DP RPC topic.
[SDNCONTROLLER]
vendor_rpc_topic = DP_PLUGIN
3. Edit the Neutron firewall configuration file to load DP Driver.
vim /etc/neutron/fwaas_driver.ini
[fwaas]
driver= neutron.services.firewall.drivers.linux.dp_fwaas.FwaasDriver
enabled = True
4. Restart the Neutron server.
sdn@ubuntu:~$ sudo systemctl restart neutron-server
Configuring third-party interoperability on SeerEngine-DC
Enable predeployment of third-party interconnect address through REST API:
nem/v1.0/reserve_option
{
"reserve_option": {
"thirdparty_security_service_option": true
}
}
Verifying interoperability
1. Create a firewall resource on OpenStack and bind it to a router.
2. Create a VM with this type of port.
3. Log in to SeerEngine-DC, and access the Automation > Data Center Networks > All Tenant Networks > Firewalls page to identify whether the firewall exists. If the firewall information is correct, the interoperation has succeeded.
Configuring interoperability with Ironic
|
|
IMPORTANT: This section describes only basic installation and configuration procedures. For more information, see the configuration examples. |
Installing and configuring plug-ins on the controller node
See "Installing the SeerEngine-DC Neutron plug-ins ."
Deploying Ironic
See the relevant Ironic deployment guide.
Metadata solution
Installing and configuring OpenStack plug-ins on the controller node
For the detailed installation procedure, see "Installing and configuring plug-ins on the controller node."
Installing and configuring OpenStack plug-ins on the compute node
(Optional.) Installing the Nova patch
For the detailed installation procedure, see "Installing and configuring plug-ins on a compute node."
(Optional.) Installing the openvswitch patch
For the detailed installation procedure, see "(Optional.) Installing the openvswitch-agent patch."
Setting up the environment for the traditional VLAN and VXLAN-based Metadata solution
Perform the following procedure on all nodes where a DHCP agent resides. The node that hosts a DHCP agent requires three physical interfaces: one for management services, one for VLAN data services, and one for VXLAN data services.
To set up the environment for the traditional VLAN and VXLAN-based metadata solution:
1. Configure an IP address for the VXLAN uplink interface.
ens192: flags=4163<UP,BROADCAST,RUNNING,MULTICAST> mtu 1500
inet 100.101.0.10 netmask 255.255.255.0 broadcast 100.101.0.255
inet6 fe80::250:56ff:fe89:6b8a prefixlen 64 scopeid 0x20<link>
ether 00:50:56:89:6b:8a txqueuelen 1000 (Ethernet)
RX packets 5612 bytes 452681 (442.0 KiB)
RX errors 0 dropped 0 overruns 0 frame 0
TX packets 142 bytes 14443 (14.1 KiB)
TX errors 0 dropped 0 overruns 0 carrier 0 collisions 0
2. Enable all VLAN and VXLAN uplink interfaces to send LLDP messages and assign IP address mngAddr to the uplink interfaces.
# In this example, ens192 is the VXLAN uplink interface and ens193 is the VLAN uplink interface. Configure the same settings for the two uplink interfaces.
sdn@ubuntu:~$ sudo lldptool set-lldp -i ens192 adminStatus=rxtx;
sdn@ubuntu:~$ sudo lldptool -T -i ens192 -V sysName enableTx=yes;
sdn@ubuntu:~$ sudo lldptool -T -i ens192 -V portDesc enableTx=yes;
sdn@ubuntu:~$ sudo lldptool -T -i ens192 -V sysDesc enableTx=yes;
sdn@ubuntu:~$ sudo lldptool -T -i ens192 -V sysCap enableTx=yes;
sdn@ubuntu:~$ sudo lldptool -T -i ens192 -V mngAddr enableTx=yes;
sdn@ubuntu:~$ sudo lldptool -T -i ens192 -V mngAddr ipv4=100.101.0.10 //Configure an IP address for the VXLAN uplink interface.
sdn@ubuntu:~$ sudo lldptool -t -i ens193
sdn@ubuntu:~$ sudo lldptool set-lldp -i ens193 adminStatus=rxtx;
sdn@ubuntu:~$ sudo lldptool -T -i ens193 -V sysName enableTx=yes;
sdn@ubuntu:~$ sudo lldptool -T -i ens193 -V portDesc enableTx=yes;
sdn@ubuntu:~$ sudo lldptool -T -i ens193 -V sysDesc enableTx=yes;
sdn@ubuntu:~$ sudo lldptool -T -i ens193 -V sysCap enableTx=yes;
sdn@ubuntu:~$ sudo lldptool -T -i ens193 -V mngAddr enableTx=yes;
sdn@ubuntu:~$ sudo lldptool -T -i ens193 -V mngAddr ipv4=100.101.0.10 //Configure the IP address for the VLAN uplink interface to be the same as that of the VXLAN interface.
sdn@ubuntu:~$ sudo lldptool -t -i ens193
3. Add the following settings for the neutron openvswitch agent process.
sdn@ubuntu:~$ sudo vi /etc/neutron/plugins/ml2/openvswitch_agent.ini
[agent]
tunnel_types = vxlan
[ovs]
local_ip = 100.101.0.10 //Configure an IP address for the uplink interface.
4. Restart the neutron-openvswitch-agent process.
sdn@ubuntu:~$ sudo systemctl restart neutron-openvswitch-agent
Setting up the environment for the traditional VLAN and VXLAN hierarchical port binding-based Metadata solution
Controller node
1. Modify the ml2_conf.ini file.
sdn@ubuntu:~$ sudo vi /etc/neutron/plugins/ml2/ml2_conf.ini
[SDNCONTROLLER]
enable_dhcp_hierarchical_port_binding = True
2. Restart the service.
sdn@ubuntu:~$ sudo systemctl restart neutron-server.service
Network node
1. Access the /etc/neutron/plugins/ml2/openvswitch_agent.ini file and edit the bridge_mappings parameter for OVS.
¡ The value before the colon is the physical network name bound to the network card.
¡ The value after the colon is the name of the OVS bridge to be created manually. You can define the name as required.
[ovs]
bridge_mappings = physicnet1:br-ens192
2. Create a network bridge.
In this example, the network bridge is named br-ens192.
sdn@ubuntu:~$ sudo ovs-vsctl add-br br-ens192
3. Bind the network bridge to the physical interface.
sdn@ubuntu:~$ sudo ovs-vsctl add-port br-ens192 ens192
4. Verify that the OVS settings are correct.
sdn@ubuntu:~$ sudo ovs-vsctl show
5. Delete the default network bridge.
In this example, the network bridge br-tun is deleted.
sdn@ubuntu:~$ sudo ovs-vsctl del-br br-tun
6. Enable all VLAN uplink interfaces to send LLDP messages and assign IP address mngAddr to the uplink interface.
In this example, the VLAN uplink interface is ens193. You are not required to specify an IP address for it.
sdn@ubuntu:~$ sudo lldptool set-lldp -i ens193 adminStatus=rxtx;
sdn@ubuntu:~$ sudo lldptool -T -i ens193 -V sysName enableTx=yes;
sdn@ubuntu:~$ sudo lldptool -T -i ens193 -V portDesc enableTx=yes;
sdn@ubuntu:~$ sudo lldptool -T -i ens193 -V sysDesc enableTx=yes;
sdn@ubuntu:~$ sudo lldptool -T -i ens193 -V sysCap enableTx=yes;
sdn@ubuntu:~$ sudo lldptool -T -i ens193 -V mngAddr enableTx=yes;
sdn@ubuntu:~$ sudo lldptool -T -i ens193;
7. Access the /etc/neutron/plugins/ml2/openvswitch_agent.ini file to delete all tunnel-related parameters.
[agent]
# tunnel_types = vxlan
# vxlan_udp_port = 4789
# l2_population = true
[ovs]
# tunnel_bridge = br-tun
# local_ip = 192.168.1.100
8. Edit the /etc/neutron/dhcp_agent.ini configuration file.
[DEFAULT]
interface_driver = neutron.agent.linux.interface.OVSInterfaceDriver
dhcp_driver = neutron.agent.linux.dhcp.Dnsmasq
enable_isolated_metadata = true
force_metadata = true
9. Restart the service.
sdn@ubuntu:~$ sudo systemctl restart neutron-dhcp-agent.service
sdn@ubuntu:~$ sudo systemctl restart neutron-openvswitch-agent.service
Installing the SeerEngine-DC Neutron security plug-ins on OpenStack
The SeerEngine-DC Neutron security plug-ins can be installed on multiple OpenStack versions.
The SeerEngine-DC Neutron security plug-ins are installed on the OpenStack controller node. Before installation, set up the base environment on the node.
Installing the security plug-ins on the controller node
Obtaining the installation package
Obtain and copy the security plug-ins installation package of the required version to the target installation directory on the server or virtual machine.
Alternatively, transfer the installation package to the target installation directory through a file transfer protocol such as FTP, TFTP, or SCP.
|
|
IMPORTANT: To avoid damaging the installation packages, select binary mode if you are to transfer the package through FTP or TFTP. |
Installing the security plug-ins on the OpenStack controller node
1. Access the directory where the security plug-ins installation package is saved. The name of installation package is in the SeerEngine_DC_SEC_PLUGIN-version-py2.7.egg or SeerEngine_DC_SEC_PLUGIN-version-py3.6.egg format. Select a package to install based on your Python version and operating system.
In this example, the package is saved in the /root directory.
¡ Ubuntu 20.04 operating system:
sdn@ubuntu:~$ sudo python3 -m easy_install --no-deps SeerEngine_DC_SEC_PLUGIN-E6102-py3.6.egg
¡ Ubuntu 18.04 operating system:
sdn@ubuntu:~$ sudo python -m easy_install SeerEngine_DC_SEC_PLUGIN-E3608-py2.7.egg
¡ Other Ubuntu operating systems:
sdn@ubuntu:~$ sudo easy_install SeerEngine_DC_SEC_PLUGIN-E3608-py2.7.egg
2. Edit the user group and permissions for the plug-ins installation package to be the same as those of the Neutron component installation package.
¡ Ubuntu 20.04 operating system:
sdn@ubuntu:~$ sudo cd /usr/local/lib/python3.6/dist-packages
sdn@ubuntu:~$ sudo chown -R --reference=/usr/lib/python3.6/dist-packages/neutron SeerEngine*
sdn@ubuntu:~$ sudo chmod -R --reference=/usr/lib/python3.6/dist-packages/neutron SeerEngine*
sdn@ubuntu:~$ sudo cd /usr/local/bin
sdn@ubuntu:~$ sudo chown -R --reference=/usr/bin/neutron-server h3c*
sdn@ubuntu:~$ sudo chmod -R --reference=/usr/bin/neutron-server h3c*
¡ Other Ubuntu operating systems:
sdn@ubuntu:~$ sudo cd /usr/local/lib/python2.7/dist-packages
sdn@ubuntu:~$ sudo chown -R --reference=/usr/lib/python2.7/dist-packages/neutron SeerEngine*
sdn@ubuntu:~$ sudo chmod -R --reference=/usr/lib/python2.7/dist-packages/neutron SeerEngine*
sdn@ubuntu:~$ sudo cd /usr/bin
sdn@ubuntu:~$ sudo chown -R --reference=neutron-server h3c*
sdn@ubuntu:~$ sudo chmod -R --reference=neutron-server h3c*
3. Install the SeerEngine-DC Neutron security plug-ins.
¡ If the security plug-in is configured with the agent mode of the firewall plug-in, use the following command:
sdn@ubuntu:~$ sudo h3c-secplugin controller install
¡ If the security plug-in is configured with the agentless mode of the optimized open-source firewall plug-in (firewall_h3c), the installation of the h3c_sec_agent component is not required. In this case, use the following command to install the security plugin:
sdn@ubuntu:~$ sudo h3c-secplugin controller purge_install
|
|
IMPORTANT: Before executing the sudo h3c-secplugin controller install or sudo h3c-secplugin controller purge_install command, make sure no neutron.conf file exists in the /root directory. If such a file exists, delete it or move it to another location. |
Editing the configuration files on the OpenStack controller node
1. Edit the neutron.conf configuration file.
a. Use the vi editor to open the neutron.conf configuration file.
sdn@ubuntu:~$ sudo vi /etc/neutron/neutron.conf
b. Press I to switch to insert mode, and then edit the configuration file. For more information about the parameters, see "neutron.conf."
For OpenStack Pike and Queens, the firewall, fwaas_h3c, and firewall_h3c firewall services are supported. Taking firewall as an example, edit the neutron.conf configuration file as follows:
[DEFAULT]
service_plugins = firewall,h3c_security_core,lbaasv2,vpnaas
[service_providers]
service_provider=FIREWALL:H3C:networking_sec_h3c.fw.h3c_fwplugin_driver.H3CFwaasDriver:default
service_provider=LOADBALANCERV2:H3C:networking_sec_h3c.lb.h3c_lbplugin_driver_v2.H3CLbaasv2PluginDriver:default
service_provider=VPN:H3C:networking_sec_h3c.vpn.h3c_vpnplugin_driver.H3CVpnPluginDriver:default
For OpenStack Rocky, the firewall, fwaas_h3c, firewall_h3c, and firewall_v2 firewall services are supported.
Taking firewall as an example, edit the neutron.conf configuration file as follows:
[DEFAULT]
service_plugins = firewall,h3c_security_core,lbaasv2,vpnaas
[service_providers]
service_provider=FIREWALL:H3C:networking_sec_h3c.fw.h3c_fwplugin_driver.H3CFwaasDriver:default
service_provider=LOADBALANCERV2:H3C:networking_sec_h3c.lb.h3c_lbplugin_driver_v2.H3CLbaasv2PluginDriver:default
service_provider=VPN:H3C:networking_sec_h3c.vpn.h3c_vpnplugin_driver.H3CVpnPluginDriver:default
Taking firewall_v2 as an example, edit the neutron.conf configuration file as follows:
[DEFAULT]
service_plugins = h3c_l3_router,firewall_v2,segments,h3c_security_core
[service_providers]
service_provider=FIREWALL_V2:H3C:networking_sec_h3c.fw2.h3c_fwpluginv2_driver.H3CFwaasV2Driver:default
|
|
IMPORTANT: For OpenStack Pike, when the load balancer supports multiple resource pools of the Context type, you must preprovision a resource pool named dmz or core on the controller, and then change the value of the service provider parameter to LOADBALANCERV2:DMZ:networking_sec_h3c.lb.h3c_lbplugin_driver_v2.H3CLbaasv2PluginDMZDriver:default or LOADBALANCERV2:CORE:networking_sec_h3c.lb.h3c_lbplugin_driver_v2.H3CLbaasv2PluginCOREDriver:default accordingly. |
¡ For OpenStack Kilo2015.1, Liberty, and Mitaka, configure the neutron.conf configuration file as follows when Load balancer V1 is configured in OpenStack:
[DEFAULT]
service_plugins = firewall,lbaas,vpnaas
[service_providers]
service_provider=FIREWALL:H3C:networking_sec_h3c.fw.h3c_fwplugin_driver.H3CFwaasDriver:default
service_provider=LOADBALANCER:H3C:networking_sec_h3c.lb.h3c_lbplugin_driver.H3CLbaasPluginDriver:default
service_provider=VPN:H3C:networking_sec_h3c.vpn.h3c_vpnplugin_ko_driver.H3CVpnPluginDriver:default
¡ For OpenStack Newton and Ocata, you can specify only Load balancer V2 and edit the service_provider parameter for the VPN service as follows:
service_provider=VPN:H3C:networking_sec_h3c.vpn.h3c_vpnplugin_ko_driver.H3CVpnPluginDriver:default
¡ For OpenStack Stein, Train, and Ussuri, the security plug-ins only supports configuring the firewall service firewall_v2. Please configure the neutron.conf configuration file as follows:
[DEFAULT]
service_plugins = firewall_v2
[service_providers]
service_provider=FIREWALL_V2:H3C:networking_sec_h3c.fw2.h3c_fwpluginv2_driver.H3CFwaasV2Driver:default
|
|
IMPORTANT: The service_provider parameter value for the VPN services is different between OpenStack Pike, Queens, and Rocky and OpenStack Kilo2015.1, Liberty, Mitaka, Newton, and Ocata. Be clear about the differences. |
c. Press Esc to quit insert mode, and enter :wq to exit the vi editor and save the neutron.conf file.
2. Edit the local_settings configuration file.
a. Use the vi editor to open the local_settings configuration file.
sdn@ubuntu:~$ sudo vi /etc/openstack-dashboard/local_settings
b. Press I to switch to insert mode. Edit the OPENSTACK_NEUTRON_NETWORK parameter to enable LB, FW, and VPN configuration pages in OpenStack Web.
OPENSTACK_NEUTRON_NETWORK = {
'enable_lb': True,
'enable_firewall': True,
'enable_quotas': True,
'enable_vpn': True,
# The profile_support option is used to detect if an external router can be
# configured via the dashboard. When using specific plugins the
# profile_support can be turned on if needed.
'profile_support': None,
#'profile_support': 'cisco',
}
c. Press Esc to quit insert mode, and enter :wq to exit the vi editor and save the local_settings file.
3. Edit the ml2_sec_conf_h3c.ini configuration file.
a. Use the vi editor to open the ml2_sec_conf_h3c.ini configuration file.
sdn@ubuntu:~$ sudo vi /etc/neutron/plugins/ml2/ml2_sec_conf_h3c.ini
b. Press I to switch to insert mode and configure the parameters in the configuration file as follows. For more information about the parameters, see "ml2_sec_conf_h3c.ini"
[SEC_SDNCONTROLLER]
url = https://127.0.0.1:30000
username = admin
password = Pwd@12345
domain = sdn
timeout = 1800
retry = 10
white_list = False
use_neutron_credential = False
firewall_force_audit = False
sec_output_json_log = False
vendor_rpc_topic = VENDOR_PLUGIN
enable_https = False
neutron_plugin_ca_file =
neutron_plugin_cert_file =
neutron_plugin_key_file =
enable_iam_auth = False
enable_firewall_metadata = False
enable_router_nat_without_firewall = False
enable_firewall_object_group = False
cloud_region_name = default
c. Press Esc to quit insert mode, and enter :wq to exit the vi editor and save the ml2_sec_conf_h3c.ini file.
4. If you have set the white_list parameter to True, perform the following tasks:
¡ Delete the username, password, and domain parameters for SEC_SDNCONTROLLER in the ml2_conf_h3c.ini configuration file.
¡ Add an authentication-free user to the controller.
- Enter the IP address of the host where the Neutron server resides.
- Specify the role as Admin.
5. If you have set the use_neutron_credential parameter to True, perform the following steps:
a. Modify the neutron.conf configuration file.
# Use the vi editor to open the neutron.conf configuration file.
# Press I to switch to insert mode, and add the following configuration. For information about the parameters, see "neutron.conf."
[keystone_authtoken]
admin_user = neutron
admin_password = KEYSTONE_PASS
# Press Esc to quit insert mode, and enter :wq to exit the vi editor and save the neutron.conf file.
b. Add an admin user to the controller.
# Configure the username as neutron.
# Specify the role as Admin.
# Enter the password of the neutron user in OpenStack.
6. Restart the neutron-server service.
sdn@ubuntu:~$ sudo service neutron-server restart
neutron-server stop/waiting
neutron-server start/running, process 4583
7. (Optional.) For the firewall to operate in h3c-sec-agent mode, you can restart the h3c-sec-agent process.
sdn@ubuntu:~$ sudo service h3c-sec-agent restart
h3c-sec-agent stop/waiting
h3c-sec-agent start/running, process 4585
Verifying the installation
1. Verify that the SeerEngine-DC OpenStack security plug-ins is installed correctly. If the version number of the plug-ins is displayed correctly, the installation is successful.
sdn@ubuntu:~$ sudo pip freeze | grep PLUGIN
SeerEngine-DC-SEC-PLUGIN===E3603P01
2. Verify that the neutron-server service has been enabled. If the service is in running state, the service is enabled successfully.
sdn@ubuntu:~$ sudo service neutron-server status
neutron-server start/running, process 1849
3. (Optional.) For the firewall to operate in h3c-sec-agent mode, verify that the h3c-sec-agent service is enabled. If the service is running state, the service is enabled.
sdn@ubuntu:~$ sudo service h3c-sec-agent status
h3c-sec-agent start/running, process 1855
Parameters and fields
This section describes parameters in configuration files and fields included in parameters.
neutron.conf
|
Parameter |
Description |
|
service_plugins |
Extension plug-ins loaded to OpenStack. Options include firewall, LB, and VPN. Add the service plug-ins based on the network and security requirements. The security plug-in supports the following firewall services, and you can change the values as follows: · For the open-source firewall plug-in agent mode, change firewall in the value to firewall. · If deployment of firewall policies and rules takes a long time, change firewall in the value to fwaas_h3c. · For the open-source firewall plug-in not in agent mode, change firewall in the value to firewall_h3c. Executing the h3c-secplugin controller install command will start the h3c-sec-agent process automatically. If you set the value to fwaas_h3c, you must execute the systemctl stop h3c-sec-agent and systemctl disable h3c-sec-agent commands to stop and disable the h3c-sec-agent process. · Based on H3C's self-developed firewall 2.0 service: firewall_v2 (only supports OpenStack Rocky, Stein, Train, and Ussuri). To configure firewall services, add h3c_security_core to the value. |
|
service_provider |
Directory where the extension plug-ins are saved. |
|
admin_user |
Admin username for Keystone authentication in OpenStack, for example, neutron. |
|
admin_password |
Admin password for Keystone authentication in OpenStack, for example, 123456. |
ml2_sec_conf_h3c.ini
|
Parameter |
Description |
|
url |
URL address for accessing the Unified Platform. |
|
username |
Username for logging in to the Unified Platform, for example, admin. You do not need to configure a username when the use_neutron_credential parameter is set to True. |
|
password |
Password for logging in to the Unified Platform, for example, Pwd@12345. You do not need to configure a password when the use_neutron_credential parameter is set to True. If the password contains a dollar sign ($), enter a backward slash (\) before the dollar sign. |
|
domain |
Name of the domain where the controller resides, for example, sdn. This parameter has been deprecated. |
|
timeout |
The amount of time that the Neutron server waits for a response from the controller in seconds, for example, 1800 seconds. As a best practice, set the waiting time greater than or equal to 1800 seconds. |
|
retry |
Times of sending connection requests, for example, 10. |
|
white_list |
Whether to enable or disable the authentication-free user feature on OpenStack. · True—Enable. · False—Disable. |
|
use_neutron_credential |
Whether to use the OpenStack Neutron username and password to communicate with the controller. · True—Use. · False—Do not use. |
|
firewall_force_audit |
Whether to audit firewall policies synchronized to the controller by OpenStack. The default value is True for OpenStack Kilo 2015.1 and False for other OpenStack versions. · True—Audits firewall policies synchronized to the controller by OpenStack. The auditing state of the synchronized policies on the controller is True (audited). · False—Does not audit firewall policies synchronized to the controller by OpenStack. The synchronized policies on the controller retain their previous auditing state. |
|
sec_output_json_log |
Whether to output REST API messages between the SeerEngine-DC Neutron security plugins and controller to the OpenStack operating logs in JSON format. · True—Enable. · False—Disable. |
|
vendor_rpc_topic |
RPC topic of the vendor. This parameter is required when the vendor needs to obtain Neutron data from the SeerEngine-DC Neutron plug-ins. The available values are as follows: · VENDOR_PLUGIN—Default value, which means that the parameter does not take effect. · DP_PLUGIN—RPC topic of DPtech. The value of this parameter must be negotiated by the vendor and H3C. |
|
enable_https |
Whether to enable HTTPS bidirectional authentication. The default value is False. · True—Enable. · False—Disable. Only OpenStack Pike supports this parameter. |
|
neutron_plugin_ca_file |
Save location for the CA certificate of the controller. As a best practice, save the CA certificate in the /usr/share/neutron directory. Only OpenStack Pike supports this parameter. |
|
neutron_plugin_cert_file |
Save location for the Cert certificate of the controller. As a best practice, save the Cert certificate in the /usr/share/neutron directory. Only OpenStack Pike supports this parameter. |
|
neutron_plugin_key_file |
Save location for the Key certificate of the controller. As a best practice, save the Cert certificate in the /usr/share/neutron directory. Only OpenStack Pike supports this parameter. |
|
enable_iam_auth |
Whether to enable IAM interface authentication. · True—Enable. · False—Disable. When connecting to the Unified Platform, you can set the value to True to use the IAM interface for authentication. The default value is False. Only OpenStack Mitaka and Newton support this parameter. This parameter is obsolete. |
|
enable_firewall_metadata |
Whether to allow the CloudOS platform to issue firewall-related fields such as the resource pool name to the controller. This parameter is used only for communication with the CloudOS platform. Only OpenStack Pike supports this parameter. |
|
enable_router_nat_without_firewall |
Whether to enable NAT when no firewall is configured for the tenant. · True—Enable NAT when no firewall is configured. This setting automatically creates default firewall resources to implement NAT if the vRouter has been bound to an external network. · False—Not enable NAT when no firewall is configured. The default value is False. Only OpenStack Pike supports this parameter. |
|
enable_firewall_object_group |
Whether to enable the firewall object group feature of the plug-in. The default value is False. If you set the value to True, a firewall object group can be created on the cloud platform through the plug-in. Only OpenStack Rocky supports this parameter. To use this feature, configure compatibility settings on the cloud platform. For information about how to configure the compatibility settings, contact Technical Support. |
|
cloud_region_name |
If one cloud platform is connected to the controller, you can modify this parameter only when the following requirements are met: · The cloud platform is connected to the controller for the first time after upgrade. · No tenant resources are newly created on the controller. Make sure the value for this parameter is the same as the name configured on the controller and configure the cloud platform as the default platform. If multiple cloud platforms are connected to the controller, the rules for the single cloud platform interoperability scenario applies for the first cloud platform. For the other cloud platforms, you must change the value of this parameter to be the same as the value for these cloud platforms, and make sure they are the same as those configured on the controller. This parameter cannot be modified after the cloud platforms are connected to the controller. |
(Optional.) Upgrading the SeerEngine-DC Neutron security plug-ins
To upgrade the SeerEngine-DC Neutron security plug-ins, first remove the old version and then install the new version.
|
|
CAUTION: Service might be interrupted during the upgrade. Before performing an upgrade, be sure you fully understand its impact on services. |
|
|
IMPORTANT: The default parameter settings vary depending on the version of SeerEngine-DC Neutron security plug-ins. Modify the default parameter settings for SeerEngine-DC Neutron security plug-ins to ensure that the plug-ins have the same parameter settings before and after the upgrade. |
To upgrade SeerEngine-DC Neutron security plug-ins:
1. Uninstall the SeerEngine-DC Neutron security plug-ins.
¡ If the security plug-in is configured with the agent mode of the firewall plug-in, use the following command:
sdn@ubuntu:~$ sudo h3c-secplugin controller uninstall
Restore config files
Uninstallation complete.
¡ If the security plug-in is configured with the agentless mode of the optimized open-source firewall plug-in (firewall_h3c), the h3c_sec_agent component is not installed. In this case, use the following command:
sdn@ubuntu:~$ sudo h3c-secplugin controller purge_uninstall
2. Uninstall the SeerEngine-DC OpenStack software package.
sdn@ubuntu:~$ sudo pip uninstall seerengine-dc-sec-plugin
Uninstalling SeerEngine-DC-SEC-PLUGIN-E3603P01:
/usr/bin/h3c-secplugin
/usr/lib/python2.7/site-packages/SeerEngine_DC_SEC_PLUGIN-E3603P01-py2.7.egg
Proceed (y/n)? y
Successfully uninstalled SeerEngine-DC-SEC-PLUGIN-E3603P01
3. Install the new version of SeerEngine-DC Neutron security plug-ins. For more information, see "Installing the security plug-ins on the controller node."
4. After you upgrade the version of converged plug-ins from E6503 earlier to E6503 and later (or E6601 and later), some parameters in the ml2_sec_conf_h3c.ini configuration file are moved to the Web interface of the controller. After installing the new converged plug-ins version and the new controller version, you must change the values of those parameters to their original values before upgrade.
a. Save the ml2_sec_conf_h3c.ini.bak or ml2_sec_conf_h3c.ini.h3c_bak file in the /etc/neutron/plugins/ml2 directory of the controller node.
b. Log in to the controller, click Automation on the top navigation bar, and then select Virtual Networking > OpenStack from the left navigation pane. Click Add OpenStack-Based Cloud Platform, and then click the Parameter Settings tab to edit the parameters based on the information in the ml2_sec_conf_h3c.ini.bak or ml2_sec_conf_h3c.ini.h3c_bak file. Table 6 shows mappings between parameters on the controller and in the configuration file. Table 7 shows the parameters that become obsolete after upgrade.
|
|
CAUTION: If OpenStack-based cloud platform has been configured on the controller before the upgrade, after upgrading, you need to click Edit in the corresponding Actions section to enter the Edit OpenStack-Based Cloud Platform page. Confirm the parameters under the Security Settings tab, and then click OK. |
Table 6 Mappings between parameters on the controller and in the configuration file
|
Parameters in the ml2_sec_conf_h3c.ini file before upgrade |
Parameters on the Web interface of the controller after upgrade |
|
directly_external: OFF |
Firewall: On for All |
|
directly_external: ANY |
Firewall: Off for All |
|
directly_external: SUFFIX directly_external_suffix: name (The name argument represents the suffix of the name of the vRouter.) |
Firewall: Off for vRouters Matching Suffix |
|
tenant_gw_selection_strategy: match_gateway_name tenant_gateway_name: name (The name argument represents the name of the border gateway.) |
External Connectivity Settings: Single-Segment Tenant Border Gateway Policy: Match Border Gateway Name |
|
enable_multi_gateways: True |
External Connectivity Settings: Single-Segment Tenant Border Gateway Policy: Match Physical Network Name of vRouter External Network |
|
enable_multi_segments: True |
External Connectivity Settings: Multi-Segment Tenant Border Gateway Policy: Match Segmented Physical Network Name of External Network |
|
auto_create_resource: True |
Auto Create Resource: On |
|
resource_mode: CORE_GATEWAY firewall_type: CGSR |
Firewall Resource Type: Service Gateway Firewall Resource Mode: Exclusive |
|
resource_mode: CORE_GATEWAY firewall_type: CGSR_SHARE |
Firewall Resource Type: Service Gateway Firewall Resource Mode: Shared |
|
resource_mode: CORE_GATEWAY firewall_type: NFV_CGSR |
Firewall Resource Type: Service Gateway Firewall Resource Mode: NFV |
|
resource_mode: SERVICE_LEAF firewall_type: ACSR |
Firewall Resource Type: Service Leaf Firewall Resource Mode: Exclusive |
|
resource_mode: SERVICE_LEAF firewall_type: ACSR_SHARE |
Firewall Resource Type: Service Leaf Firewall Resource Mode: Shared |
|
lb_type: CGSR |
LB Resource Mode: Exclusive |
|
lb_type: CGSR_SHARE |
LB Resource Mode: Shared |
|
lb_type: NFV_CGSR |
LB Resource Mode: NFV |
|
resource_share_count: 1 |
Shared Resource Nodes: 1 |
|
lb_resource_mode: SP |
LB Resource Pool Mode: Single Resource Pool |
|
lb_resource_mode: MP |
LB Resource Pool Mode: Multiple Resource Pools |
|
lb_enable_snat: True |
SNAT for Loadbalancer: On |
|
lb_member_slow_shutdown: True |
Real Service Slow Shutdown: On |
|
enable_lb_xff: True |
XFF for Loadbalancer: On |
|
enable_lb_certchain: True |
Send Full Certificate Chain on SSL Server: On |
Table 7 Obsolete parameters after upgrade
|
Parameter |
Description |
|
firewall_type |
Type of the firewalls created on the SeerEngine-DC controller. The following firewall type is no longer supported: CGSR_SHARE_BY_COUNT—Context-based gateway service type firewall, all using the same context when the number of contexts reaches the threshold set by the cgsr_fw_context_limit parameter. This firewall type is available only when the value of the resource_mode parameter is CORE_GATEWAY. Only OpenStack Pike supports this firewall type. |
|
fw_share_by_tenant |
Whether to enable exclusive use of a gateway service type firewall context by a single tenant and allow the context to be shared by service resources of the tenant when the firewall type is CGSR_SHARE or ACSR_SHARE. |
|
cgsr_fw_context_limit |
Context threshold for context-based gateway service type firewalls. The value is an integer. When the threshold is reached, all the context-based gateway service type firewalls use the same context. This parameter takes effect only when the value of the firewall_type parameter is CGSR_SHARE_BY_COUNT. Only OpenStack Pike supports this parameter. |
|
nfv_ha |
Whether the NFV and NFV_SHARE resources support stack. · True—Support. · False—Do not support. |
Comparing and synchronizing firewall resource information between the cloud platform and controller
Only OpenStack Pike supports this task.
To compare and synchronize firewall resource information between the cloud platform and controller:
1. Execute the h3c-secplugin-fw-extension compare --file [absolute path] file name.csv command to compare firewall resource information between the cloud platform and controller.
¡ If you do not specify the --file [absolute path] file name.csv option the comparison result is saved to the /var/log/neutron/compare_sec_data-time.csv file, where time indicates the comparison start time.
¡ If you specify the --file [absolute path] file name.csv option, the comparison result is saved to the specified file. If you do not specify an absolute path, the result is saved to /var/log/neutron/file name.csv.
The comparison result file contains the following fields:
¡ Resource—Resource type.
¡ Name—Resource name.
¡ Id—Resource ID.
¡ Tenant_id—Tenant ID of the resource.
¡ Tenant_name—Tenant name of the resource.
¡ Status—Comparison result.
- lost—Less resources on the controller. You must add resources to the controller.
- different—Different resources on the controller than the cloud platform. You must update resources on the controller.
- surplus—More resources on the controller. You must remove excessive resources from the controller.
2. Execute the h3c-secplugin-fw-extension sync –file comparison result file name.csv command. If the comparison result file is in the /var/log/neutron/ path, enter the file name directly. If the comparison result file is in another path, enter the absolute file path.
After the synchronization is complete, a synchronization result file /var/log/neutron/sync_sec_data-time.csv is generated, where time indicates the synchronization start time.
|
|
CAUTION: Do not add or edit information in the synchronize result file. |
Comparing and synchronizing LB resource information between the cloud platform and controller
Only OpenStack Pike, Queens, and Rocky support this task.
To compare and synchronize LB resource information between the cloud platform and controller:
1. Execute the h3c-secplugin-lb-extension compare --file [absolute path] file name.csv command to compare LB resource information between the cloud platform and controller.
¡ If you do not specify the file [absolute path] file name.csv option, the comparison result is saved to the /var/log/neutron/compare_sec_lbv2_data-time.csv file, where time indicates the comparison start time.
¡ If you specify the file [absolute path] file name.csv option, the comparison result is saved to the specified file. If you do not specify an absolute path, the result is saved to /var/log/neutron/file name.csv.
The comparison result file contains the following fields:
¡ Resource—Resource type.
¡ Name—Resource name.
¡ Id—Resource ID.
¡ Tenant_id—Tenant ID of the resource.
¡ Tenant_name—Tenant name of the resource.
¡ Status—Comparison result.
- lost—Less resources on the controller. You must add resources to the controller.
- different—Different resources on the controller than the cloud platform. You must update resources on the controller.
- surplus—More resources on the controller. You must remove excessive resources from the controller.
2. Execute the h3c-secplugin-lb-extension sync --file comparison result file name.csv command to synchronize LB resource information on the controller with that on the cloud platform. If the comparison result file is in the /var/log/neutron/ path, enter the file name directly. If the comparison result file is in another path, enter the absolute file path.
After the synchronization is complete, a synchronization result file /var/log/neutron/sync_sec_lb_data-time.csv is generated, where time indicates the synchronization start time.
|
|
CAUTION: Do not add or edit information in the synchronization result file. |
Upgrading non-converged plug-ins to converged plug-ins
1. Upgrade the controller to a version that supports converged plug-ins.
2. Remove non-converged plug-ins:
a. Remove the plug-ins on the controller node:
- Versions earlier than E3702
sdn@ubuntu:~$ sudo h3c-vcfplugin controller uninstall
- E3702 and its later versions
sdn@ubuntu:~$ sudo h3c-sdnplugin controller uninstall
b. Remove the plug-ins on the compute node:
- Versions earlier than E3702
sdn@ubuntu:~$ sudo h3c-vcfplugin compute uninstall
sdn@ubuntu:~$ sudo h3c-vcfplugin openvswitch uninstall
- E3702 and its later versions
sdn@ubuntu:~$ sudo h3c-sdnplugin compute uninstall
sdn@ubuntu:~$ sudo h3c-sdnplugin openvswitch uninstall
c. Remove the software packages from all nodes:
Ubuntu 20.04 or 22.04 operating system:
sdn@ubuntu:~$ sudo pip3 uninstall seerengine-dc-plugin
Other Ubuntu operating systems:
sdn@ubuntu:~$ sudo pip uninstall seerengine-dc-plugin
|
|
IMPORTANT: Commands for removing plug-ins vary depending on the software version. |
3. Install converged plug-ins:
a. Install the converged version plug-in and security plug-in.
For more information, see "Installing the SeerEngine-DC Neutron security plug-ins on OpenStack" and "Installing the SeerEngine-DC Neutron security plug-ins on OpenStack."
b. The following table describes the configuration changes needed in the neutron.conf file before and after the upgrade.
Table 8 Changes to the neutron.conf file configuration before and after the upgrade
|
Configuration item |
Before the upgrade |
After the upgrade |
Remarks |
|
service_plugins |
port_forwarding |
h3c_port_forwarding |
N/A |
|
service_plugins |
h3c_vpc_connection_pike |
h3c_vpc_connection_general |
N/A |
|
api_extensions_path |
You can obtain the configuration of api_extensions_path as follows: |
You need to re-obtain the configuration each time you upgrade. |
|
a. Use the vi editor to open the ml2_conf.ini configuration file.
sdn@ubuntu:~$ sudo vi /etc/neutron/plugins/ml2/ml2_conf.ini
b. Press I to switch to insert mode, and set the parameters in the ml2_conf.ini configuration file. Press Esc to quit insert mode, and enter :wq to exit the vi editor and save the ml2_conf.ini file.
[SDNCONTROLLER]
sdnc_rpc_url = ws://127.0.0.1:1080
sdnc_rpc_ping_interval = 60
websocket_fragment_size = 102400
cloud_region_name = default
ml2_conf.ini
|
sdnc_rpc_url |
Set the value to the IP address and WebSocket type interface number of the Unified Platform when Metadata is enabled or DHCP fail-safe is supported. Configure this parameter based on the URL of the Unified Platform. For example, if the URL of the Unified Platform is http://127.0.0.1:30000, set this parameter to ws://127.0.0.1: 30000. |
|
cloud_region_name |
If one cloud platform is connected to the controller, you can modify this parameter when the cloud platform is connected to the controller for the first time after upgrade and no tenant resources are newly created on the controller. Make sure the value of this parameter is the same as the name configured on the controller and configure the cloud platform as the default platform. If multiple cloud platforms are connected to the controller, the rules for the single cloud platform interoperability scenario applies for the first cloud platform. For the other cloud platforms, you must change the value of this parameter to be the same as the value for these cloud platforms, and make sure they are the same as those configured on the controller. This parameter cannot be modified after the cloud platforms are connected to the controller. You must specify different values for the vxlan vni_ranges parameter for different cloud platforms. |
c. Delete the backup files generated for non-converged plug-ins or change their file name suffixes. Those backup files include ml2_conf_h3c.ini.bak and ml2_conf_h3c.ini.h3c_bak. If you do not perform this operation, some parameters of non-converged plug-ins might be modified or initialized upon next-time security plug-in upgrades.
4. Configure parameters on the controller:
Some parameters in the ml2_conf_h3c.ini configuration file for non-converged plug-ins have been moved to the Web interface on the controller. After installing converged plug-ins, you must change the values of the parameters to the values before upgrade.
a. Save the ml2_conf_h3c.ini.bak or ml2_conf_h3c.ini.h3c_bak file in the /etc/neutron/plugins/ml2 directory of the controller node.
b. Log in to the controller, click Automation on the top navigation bar, and then select Virtual Networking > OpenStack from the left navigation pane. Click Add OpenStack-Based Cloud Platform, and then click the Parameter Settings tab to edit the parameters based on the information in the ml2_conf_h3c.ini.bak or ml2_conf_h3c.ini.h3c_bak file.
Table 9 Mapping between parameters on the controller and in the configuration file
|
Parameters in the ml2_conf_h3c.ini file before upgrade |
Parameters on the controller after upgrade |
|
cloud_region_name |
Name |
|
hybrid_vnic |
VLAN to VXLAN Conversion |
|
enable_metadata: True enable_dhcp_hierarchical_port_binding: True |
Network Node Access Policy: VLAN |
|
enable_metadata: True enable_dhcp_hierarchical_port_binding: False |
Network Node Access Policy: VXLAN |
|
enable_metadata: False enable_dhcp_hierarchical_port_binding: False |
Network Node Access Policy: No Access |
|
ip_mac_binding |
IP-MAC Anti-Spoofing |
|
directly_external: OFF |
Firewall: On for All |
|
directly_external: ANY |
Firewall: Off for All |
|
directly_external: SUFFIX directly_external_suffix: name where name represents the suffix of the name of the vRouter. |
Firewall: Off for vRouters Matching Suffix |
|
tenant_gw_selection_strategy: match_gateway_name tenant_gateway_name: name, where name represents the name of the boarder gateway. |
External Connectivity Settings: Single-Segment Tenant Border Gateway Policy: Match Boarder Gateway Name |
|
enable_multi_gateway: True |
External Connectivity Settings: Single-Segment Tenant Border Gateway Policy: Match Physical Network Name of vRouter External Network |
|
enable_bind_router_gateway_with_specified_name:True |
External Connectivity Settings: Single-Segment Tenant Border Gateway Policy: Match External Network Name of vRouter |
|
enable_multi_segments: True |
External Connectivity Settings: Multi-Segment Tenant Border Gateway Policy: Match Physical Network Name of vRouter External Network |
|
deploy_network_resource_gateway |
Preconfigure Border Gateway for External Network |
|
network_force_flat |
Forcibly Convert External Network to Flat Network |
|
enable_network_l3vni: False |
Automatic Allocation of L3VNIs for External Networks: Off |
|
dhcp_lease_time |
DHCP Lease Duration |
|
generate_vrf_based_on_router_name: False |
VRF Name Generation Method on vRouter: Auto |
|
generate_vrf_based_on_router_name: True |
VRF Name Generation Method on vRouter: Use vRouter Name |
|
vds_name |
Default VDS name |
|
auto_create_resource: True |
Auto Create Resource: On |
|
resource_mode: CORE_GATEWAY firewall_type: CGSR |
Firewall Resource Type: Service Gateway Firewall Resource Mode: Exclusive |
|
resource_mode: CORE_GATEWAY firewall_type: CGSR_SHARE |
Firewall Resource Type: Service Gateway Firewall Resource Mode: Shared |
|
resource_mode: CORE_GATEWAY firewall_type: NFV_CGSR |
Firewall Resource Type: Service Gateway Firewall Resource Mode: NFV |
|
resource_mode: SERVICE_LEAF firewall_type: ACSR |
Firewall Resource Type: Service Leaf Firewall Resource Mode: Exclusive |
|
resource_mode: SERVICE_LEAF firewall_type: ACSR_SHARE |
Firewall Resource Type: Service Leaf Firewall Resource Mode: Shared |
|
lb_type: CGSR |
LB Resource Mode: Exclusive (Service Gateway) |
|
resource_mode: CORE_GATEWAY lb_type: CGSR_SHARE |
Resource Type: Service Gateway LB Resource Mode: Shared (Service Gateway) |
|
resource_mode: CORE_GATEWAY lb_type: NFV_CGSR |
Resource Type: Service Gateway LB Resource Mode: NFV (Service Gateway) |
|
resource_share_count: 1 |
Shared Resource Nodes: 1 |
|
lb_resource_mode: SP |
LB Resource Pool Mode: Single Resource Pool |
|
lb_resource_mode: MP |
LB Resource Pool Mode: Multiple Resource Pools |
|
lb_enable_snat: True |
SNAT for Loadbalancer: On |
|
lb_member_slow_shutdown: True |
Real Service Slow Shutdown: On |
|
enable_lb_xff: True |
XFF for Loadbalancer: On |
|
enable_lb_certchain: True |
Send Full Certificate Chain on SSL Server: On |
Table 10 Obsolete parameters after upgrade
|
Parameter |
Description |
|
firewall_type |
Type of the firewalls created on the SeerEngine-DC controller. The following firewall type is no longer supported: CGSR_SHARE_BY_COUNT—Context-based gateway service type firewall, all using the same context when the number of contexts reaches the threshold set by the cgsr_fw_context_limit parameter. This firewall type is available only when the value of the resource_mode parameter is CORE_GATEWAY. Only OpenStack Pike supports this firewall type. |
|
fw_share_by_tenant |
Whether to enable exclusive use of a gateway service type firewall context by a single tenant and allow the context to be shared by service resources of the tenant when the firewall type is CGSR_SHARE or ACSR_SHARE. |
|
cgsr_fw_context_limit |
Context threshold for context-based gateway service type firewalls. The value is an integer. When the threshold is reached, all the context-based gateway service type firewalls use the same context. This parameter takes effect only when the value of the firewall_type parameter is CGSR_SHARE_BY_COUNT. Only OpenStack Pike supports this parameter. |
|
nfv_ha |
Whether the NFV and NFV_SHARE resources support stack. · True—Support. · False—Do not support. |
5. Configure the following settings on the controller page:
a. Configure the VNI range to be same as the vni_ranges parameter value in the ml2_conf.ini configuration file before the upgrade.
b. Make sure a VXLAN pool exists on the controller after the upgrade. The VXLAN pool and the vni_ranges range in the ml2_conf.ini file before the upgrade cannot conflict with each other. As a best practice, make sure the range of the VXLAN pool includes the l3_vni_ranges range in the ml2_conf_h3c.ini file before the upgrade.
|
|
CAUTION: If OpenStack-based cloud platform has been configured on the controller before the upgrade, after upgrading, you need to click Edit in the corresponding Actions section to enter the Edit OpenStack-Based Cloud Platform page. Confirm the parameters under the Security Settings tab, and then click OK. |
6. Restart the neutron-server service.
sdn@ubuntu:~$ sudo service neutron-server restart
Extended functions
Comparing and synchronizing resource information between the controller and cloud platform
|
|
IMPORTANT: This feature is not supported in the following scenarios: · H3C CloudOS network-based overlay VXLAN environment. · Third-party cloud platforms except for the Ericsson cloud and OpenStack. This feature is not applicable to extended resources (vpc-connection, bgpneighbor, exroute, trunk, and taas) except for those provided by H3C proprietary plug-ins and Ericsson cloud plug-ins. |
Before performing this task, navigate to the Automation > Data Center Networks > Virtual Networking > OpenStack page and configure the default cloud platform. OpenStack Kilo and Liberty do not support this feature.
To compare and synchronize resource information between the controller and cloud platform:
1. Execute the h3c-sdnplugin-extension compare --file [absolute path] file name.csv command to compare resource information between the controller and cloud platform.
¡ If you do not specify --file [absolute path] filename.csv, the comparison result is saved to the /var/log/neutron/compare_data-time.csv file, where time indicates the comparison start time.
¡ If you specify --file [absolute path] filename.csv, the comparison result is saved to the specified file. If you do not specify an absolute path, the result is saved to /var/log/neutron/file name.csv.
The comparison result file contains the following fields:
¡ Resource—Resource type.
¡ Name—Resource name.
¡ Id—Resource ID.
¡ Tenant_id—Tenant ID of the resource.
¡ Tenant_name—Tenant name of the resource.
¡ Status—Comparison result.
- lost—Less resources on the controller. You must add resources to the controller.
- different—Different resources on the controller than the cloud platform. You must update resources on the controller.
- surplus—More resources on the controller. You must remove excessive resources from the controller.
2. Execute the h3c-sdnplugin-extension sync --file comparison result file name.csv command. If the comparison result file is in the /var/log/neutron/ path, enter the file name directly. If the comparison result file is in another path, enter the absolute file path.
If you need to specify the synchronization result file storage path, you can use the command h3c-sdnplugin-extension sync --file comparison result file name.csv --sync_result_file synchronization result file name.csv. If you want to save the synchronization result file under /var/log/neutron/, you can directly enter the file name, otherwise please enter the absolute path file name.
After you set the value of the enable_security_group parameter to False, security groups and security groups bound to vPorts might exist on the controller when you perform the comparison operation. To resolve the issue, perform the synchronization twice.
After the command is executed, the system displays resource statistics and prompts for your confirmation to start the synchronization. The system starts the synchronization only after receiving your confirmation for twice.
After synchronization is completed, if the --sync_result_file is specified, the synchronization result will be saved to the specified file in .csv format. Otherwise, the default synchronization result file will be generated: /var/log/neutron/sync_data-time.csv, where time indicating the synchronization start time.
|
|
CAUTION: · Do not add or edit information in the synchronize result file. · To avoid anomaly caused by misoperations, examine and compare the result file and resource statistics carefully. |
CLI-based management of VPC connections and floating IP addresses
This feature allows you to create, update, delete, or view VPC connections and floating IP addresses on the cloud platform.
Restrictions and guidelines
· Before you perform CLI-based management of VPC connections, set the firewall scenario setting to non-network cloud for VPC communication.
· OpenStack Kilo, Liberty, Mitaka, Newton, and Ocata do not support CLI-based management of VPC connections.
CLI-based management of VPC connections
Table 11 shows the commands that can be used for VPC connection management.
Table 11 Commands for VPC connection management
|
Item |
Supported versions |
|
neutron h3c-vpcconnection-list |
Displays all VPC connections. |
|
neutron h3c-vpcconnection-show uuid |
Displays the specified VPC connection. The uuid argument represents the UUID of the desired VPC connection. |
|
neutron h3c-vpcconnection-create |
Creates a VPC connection. |
|
neutron h3c-vpcconnection-update |
Updates a VPC connection. |
|
neutron h3c-vpcconnection-delete uuid |
Deletes a VPC connection. The uuid argument represents the UUID of the desired VPC connection. |
For example, you can create a VPC connection as follows:
root@controller:~# neutron h3c-vpcconnection-create --tenant-id b5450fb690a245edbfdb202ada84cae9 --fw_enabled False --local-subnets b323aa83-83d1-4b21-b81a-4ee243c9da00 --peer-subnets dd275c26-2b33-4884-8fcf-129f7d895d14 --local-cidrs 1.1.1.1/24 --peer-cidrs 3.3.3.3/24 --local-router d331cde9-747b-40f8-b598-b291fddeb306 --peer-router 39a866f3-70a5-4dc4-ab7c-af0cc2d1146f
CLI-based management of floating IP addresses
Table 12 shows the commands that can be used for floating IP address management.
Table 12 Commands for floating IP address management
|
Item |
Supported versions |
|
neutron h3c-floatingip-list |
Displays all floating IP addresses. |
|
neutron h3c-floatingip-show uuid |
Displays the specified floating IP address. The uuid argument represents the UUID of the desired floating IP address. |
|
neutron h3c-floatingip-create |
Creates a floating IP address. |
|
neutron h3c-floatingip-update |
Updates a floating IP address. |
|
neutron h3c-floatingip-delete uuid |
Deletes a floating IP address. The uuid argument represents the UUID of the desired floating IP address. |
|
neutron h3c-floatingip-associate |
Associates a floating IP address with a port. |
|
neutron h3c-floatingip-disassociate |
Disassociates a floating IP address from a port. |
For example, you can create a floating IP address as follows:
root@controller:~# neutron h3c-floatingip-create --port-id b2f2e5bd-0007-4423-9c8e-249ca1712c85 f33ff85a-aad0-4cc2-96f5-1e648b4bc168
Performing plug-in Ops
Health check
Log in to the OpenStack control node and use the h3c-neutron health-check command to check the configuration item status, main process operation, and dependency package installation.
· Check for spelling errors in type_drivers, tenant_network_types, mechanism_drivers, and extension_drivers under [ml2] in /etc/neutron/plugins/ml2/ml2_conf.ini, network_vlan_ranges under [ml2_type_vlan], and vni_ranges under [ml2_type_vxlan].
· Check for spelling errors in the parameters under [SDNCONTROLLER] in /etc/neutron/plugins/ml2/ml2_conf.ini, and print the default and current configured values. Verify the connection status of the network plug-in and controller. Check consistency between the url and sdnc_rpc_url configurations. Provide configuration recommendations for the enable_dhcp_hierarchical_port_binding parameter.
· Identify whether the Neutron service is running correctly.
· Identify whether the websocket-client dependency is installed.
Example:
root@controller:~# h3c-neutron health-check --config-path /etc/neutron/plugins/ml2/ml2_conf.ini /etc/neutron/neutron.conf
Configuration inspection
Log in to the OpenStack control node and use the following command to perform inspections and identify whether the plug-in configurations are consistent.
h3c-neutron config-check --host-ip host-ip --username username --password password --port port --output-name output-name --show-same {y,n} --config-path config-path
Use this command to identify whether the cloud platform configuration of the remote node matches the configuration of the current node.
Table 13 Inspection command parameters
|
Parameter |
Description |
|
host-ip |
Required. IP address of the remote neutron-server node. |
|
username |
Required. Username with permissions to SSH to the remote neutron-server node. |
|
password |
Required. Password for the user with permissions to SSH to the remote neutron-server node. |
|
port |
Optional. Port number of the SSH connection to the remote neutron-server node. The default port number is 22. |
|
output-name |
Optional. Name of the file output by the check operation. After you execute the configuration inspection operation, the results will be output as a .txt file stored in the /var/log/neutron directory. |
|
show-same |
Optional, Specify whether to display records with the same plug-in configuration item. Set the value to n to hide duplicate records and y to display them. The default configuration is n. When the command includes the output-name parameter, the show-same parameter becomes invalid, and all identical configurations will be displayed. |
|
config-path |
Required. Configure the absolute paths of the configuration files to be checked on both local and remote ends. The default paths are /etc/neutron/neutron.conf and /etc/neutron/plugins/ml2/ml2_conf.ini, separated by a space. |
Examples:
· Example 1:
Check whether the configuration of the current node matches that of the remote node at 192.168.247.56, and display the differences directly at the CLI. The username for the remote node is root, and the password is 123456.
h3c-neutron config-check --config-path /etc/neutron/plugins/ml2/ml2_conf.ini /etc/neutron/neutron.conf --host-ip 192.168.247.56 --username root --password 123456
· Example 2:
Identify whether the configuration of the current node matches that of the remote node at 192.168.247.56. Output the results, including differences and similarities, to a text file named test.
h3c-neutron config-check --config-path /etc/neutron/plugins/ml2/ml2_conf.ini /etc/neutron/neutron.conf --host-ip 192.168.247.56 --username root --password 123456 --port 22 --show-same y --output-name test
FAQ
The Python tools cannot be installed using the yum command when a proxy server is used for Internet access. What should I do?
Configure HTTP proxy by performing the following steps:
1. Make sure the server or the virtual machine can correctly access the HTTP proxy server.
2. At the CLI of the Ubuntu, use the vi editor to open the apt.conf configuration file. If the apt.conf configuration file does not exist, this step creates the file.
sdn@ubuntu:~$ sudo vi /etc/apt/apt.conf
3. Press I to switch to insert mode, and provide HTTP proxy information as follows:
¡ If the server does not require authentication, enter HTTP proxy information in the following format:
Acquire::http::proxy = http://yourproxyaddress:proxyport
¡ If the server requires authentication, enter HTTP proxy information in the following format:
Acquire::http::proxy = http:// username:password@yourproxyaddress:proxyport, for example, Acquire::http::proxy "http://sdn:[email protected]:8080
Table 14 describes the arguments in HTTP proxy information.
Table 14 Arguments in HTTP proxy information
|
Field |
Description |
|
username |
Username for logging in to the proxy server, for example, sdn. |
|
password |
Password for logging in to the proxy server, for example, 123456. |
|
yourproxyaddress |
IP address of the proxy server, for example, 172.25.1.1. |
|
proxyport |
Port number of the proxy server, for example, 8080. |
4. Press Esc to quit insert mode, and enter :wq to exit the vi editor and save the apt.conf file.
Live migration of a VM to a specified destination host failed because of a service exception on the destination host. What should I do?
To resolve the issue:
1. View the VM state. If the live migration operation has been rolled back, the VM is in normal state, and services are not affected, you can perform live migration again after the destination host recovers.
2. Compare resource information to identify whether residual configuration exists on the destination host. If residual configuration exists, determine whether services will be affected.
¡ If services will not be affected, retain the residual configuration.
¡ If services will be affected, contact the technical support to delete the residual configuration.
The Inter X700 Ethernet network adapter series fails to receive LLDP messages. What should I do?
Use the following procedure to resolve the issue. An enp61s0f3 Ethernet network adapter is used as an example.
1. View detailed information about the Ethernet network adapter and record the value for the bus-info field.
sdn@ubuntu:~$ ethtool -i enp61s0f3
driver: i40e
version: 2.8.20-k
firmware-version: 3.33 0x80000f0c 1.1767.0
expansion-rom-version:
bus-info: 0000:3d:00.3
supports-statistics: yes
supports-test: yes
supports-eeprom-access: yes
supports-register-dump: yes
supports-priv-flags: yes
2. Use one of the following solutions:
¡ Solution 1. If this solution fails, use solution 2.
# Execute the following command:
sdn@ubuntu:~$ sudo ethtool --set-priv-flags enp61s0f3 disable-fw-lldp on
# Identify whether the value for the disable-fw-lldp field is on.
sdn@ubuntu:~$ ethtool --show-priv-flags enp61s0f3 | grep lldp
disable-fw-lldp : on
If the value is on, the network adapter then can receive LLDP messages. For this command to remain effective after a system restart, you must write this command into the user-defined startup program file.
# Open the self-defined startup program file.
sdn@ubuntu:~$ sudo vi /etc/rc.local
# Press I to switch to insert mode, and add this command to the file. Then press Esc to quit insert mode, and enter :wq to exit the vi editor and save the file.
ethtool --set-priv-flags enp61s0f3 disable-fw-lldp on
Make sure this command line is configured before the exit 0 line.
¡ Solution 2.
# Execute the echo "lldp stop" > /sys/kernel/debug/i40e/bus-info/command command. Enter the recorded bus info value for the network adapter, and add a backslash (\) before each ":".
sdn@ubuntu:~$ sudo -i
sdn@ubuntu:~$ echo "lldp stop" > /sys/kernel/debug/i40e/0000\:3d\:00.3/command
The network adapter can receive LLDP messages after this command is executed. For this command to remain effective after a system restart, you must write this command into the user-defined startup program file.
# Open the self-defined startup program file.
sdn@ubuntu:~$ sudo vi /etc/rc.local
# Press I to switch to insert mode, and add this command to the file. Then Press Esc to quit insert mode, and enter :wq to exit the vi editor and save the file.
echo "lldp stop" > /sys/kernel/debug/i40e/0000\:3d\:00.3/command
Make sure this command line is configured before the exit 0 line.
VM instances fail to be created in a normal environment. What should I do?
1. Identify whether WebSocket client is installed. If WebSocket client is not installed, identify whether the controller cluster has rebooted.
2. If the controller cluster has rebooted, restart the neutron-server service and then create VM instances.
As a best practice, install WebSocket client and enable WebSocket client connection with the controller RPC service to prevent data loss in a controller cluster reboot.
In a Rocky or later OpenStack environment, packet loss occurs during a live migration. What should I do?
Packet loss during a live migration results from a bug in the open source codes. To resolve the issue, you must modify the open source codes. The following procedure uses the Rocky version as an example.
|
|
CAUTION: Back up the codes before your modification. |
To resolve the issue:
1. Perform the following steps on each of the controller nodes:
a. Modify the plugin.py file.
vi /usr/lib/python2.7/site-packages/neutron/plugins/ml2/plugin.py
Press I to switch to insert mode, and then modify the open source codes as shown in the following figure.
Figure 1 Open source codes to be modified on each controller node
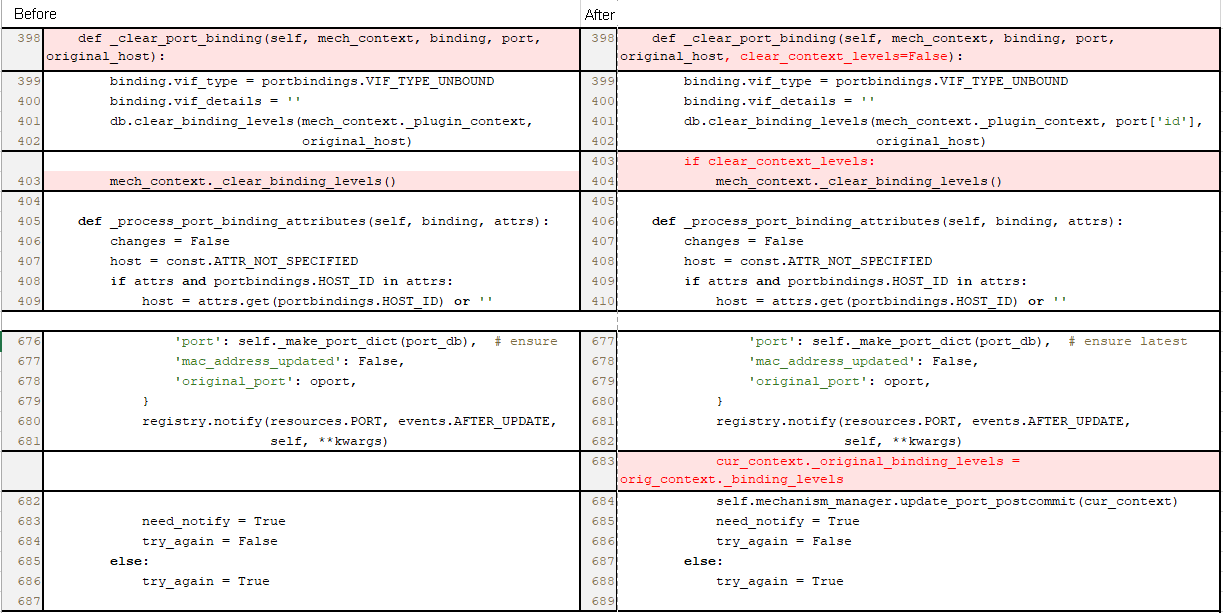
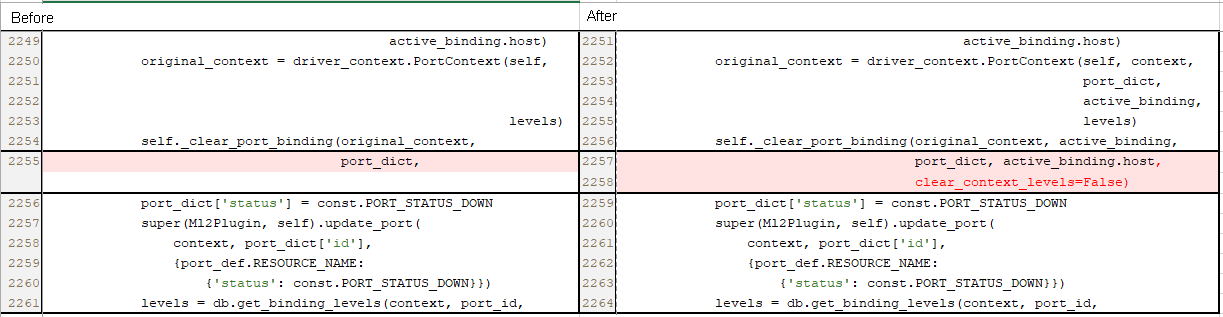
After the modification, press Esc to quit insert mode, and enter :wq to exit the vi editor and save the plugin.py file.
b. Modify the ml2_conf.ini file.
vi /etc/neutron/plugins/ml2/ml2_conf.ini
[securitygroup]
firewall_driver = iptables_hybrid
enable_security_group = true
After the modification, press Esc to quit insert mode, and enter :wq to exit the vi editor and save the ml2_conf.ini file.
c. Restart the neutron-server service.
systemctl restart neutron-server
2. Perform the following steps on each of the compute nodes.
a. Modify the rpc.py file.
vi /usr/lib/python2.7/site-packages/neutron/agent/rpc.py
Press I to switch to insert mode, and then modify the open source codes as shown in the following figure.
Figure 2 Open source codes to be modified on each compute node
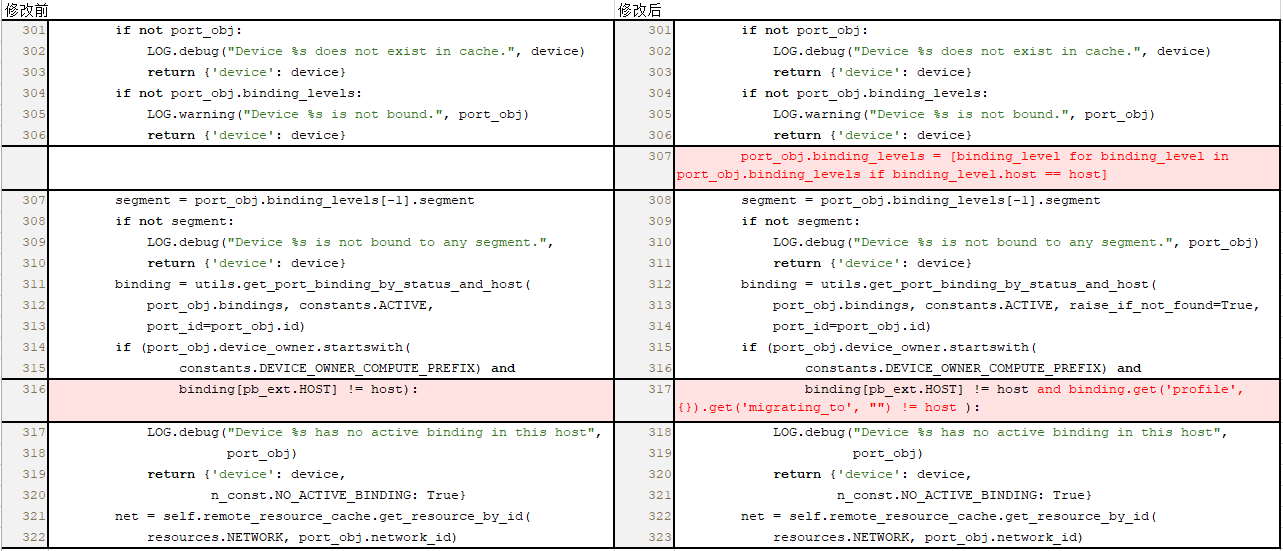
After the modification, press Esc to quit insert mode, and enter :wq to exit the vi editor and save the plugin.py file.
a. Modify the openvswitch_agent.ini file.
vi /etc/neutron/plugins/ml2/openvswitch_agent.ini
Press I to switch to insert mode
[securitygroup]
firewall_driver = iptables_hybrid
enable_security_group = true
After the modification, press Esc to quit insert mode, and enter :wq to exit the vi editor and save the openvswitch_agent.ini file.
b. Restart the neutron-openvswitch-agent service.
systemctl restart neutron-openvswitch-agent
c. Modify the nova.conf file.
vi /etc/nova/nova.conf
Press I to switch to insert mode
[compute]
live_migration_wait_for_vif_plug=true
After the modification, press Esc to quit insert mode, and enter :wq to exit the vi editor and save the nova.conf file.
d. Restart the openstack-nova-compute service.
systemctl restart openstack-nova-compute
When neutron database link information is encrypted, converged plug-ins cannot inherit the portforwardings table because they cannot access the neutron database. What should I do?
1. Uninstall the Neutron plug-ins. For more information, see "Upgrading the SeerEngine-DC Neutron plug-ins."
2. Reinstall the Neutron plug-ins and specify the db_connection parameter when you start Neutron plug-in installation.
sdn@ubuntu:~$ sudo h3c-sdnplugin controller install --db_connection mysql+pymysql://neutron:PASSWORD@controller/neutron
The value for the db_connection parameter is that for the [database] configuration group connection field in the neutron.conf file. The password used for access to the Neutron database is the encrypted password.
connection = mysql+pymysql://neutron:PASSWORD@controller/neutron
