| Title | Size | Downloads |
|---|---|---|
| H3C WX2800X_WX2812X-CMW710-E5811P02 Release Notes (Software Feature Changes).PDF | 2.30 MB | |
| H3C WX2800X_WX2812X-CMW710-E5811P02 Release Notes.PDF | 694.48 KB | |
WX2800X-CMW710-E5811P02.zip  |
652.63 MB |
|
H3C WX2800X_WX2812X-CMW710-E5811P02 Release Notes
|
|
|
Copyright © 2024 New H3C Technologies Co., Ltd. All rights reserved. No part of this manual may be reproduced or transmitted in any form or by any means without prior written consent of New H3C Technologies Co., Ltd. The information in this document is subject to change without notice. |
|
Contents
Hardware and software compatibility matrix· 2
Upgrading restrictions and guidelines· 6
WX2800X_WX2812X-CMW710-E5811P02· 7
WX2800X_WX2812X-CMW710-E5808P08· 7
WX2800X_WX2812X-CMW710-E5808P01· 7
WX2800X_WX2812X-CMW710-E5805P01· 7
WX2800X_WX2812X-CMW710-E5803P01· 7
WX2800X_WX2812X-CMW710-E5800P06· 7
WX2800X_WX2812X-CMW710-E5798P01· 7
Software feature and command updates· 7
WX2800X_WX2812X-CMW710-E5811P02· 8
WX2800X_WX2812X-CMW710-E5808P08· 8
WX2800X_WX2812X-CMW710-E5808P01· 8
WX2800X_WX2812X-CMW710-E5805P01· 8
WX2800X_WX2812X-CMW710-E5803P01· 8
WX2800X_WX2812X-CMW710-E5800P06· 8
WX2800X_WX2812X-CMW710-E5798P01· 8
Registering and installing licenses· 10
Open problems and workarounds· 10
Resolved problems in WX2800X_WX2812X-CMW710-E5811P02· 11
Resolved problems in WX2800X_WX2812X-CMW710-E5808P08· 11
Resolved problems in WX2800X_WX2812X-CMW710-E5808P01· 11
Resolved problems in WX2800X_WX2812X-CMW710-E5805P01· 11
Resolved problems in WX2800X_WX2812X-CMW710-E5803P01· 12
Resolved problems in WX2800X_WX2812X-CMW710-E5800P06· 13
Resolved problems in WX2800X_WX2812X-CMW710-E5798P01· 13
Appendix B Upgrading software· 23
Saving the running configuration and verifying the storage space· 25
Downloading the image file to the device· 26
Specifying the startup image file· 26
Rebooting the device to complete the upgrade· 27
Upgrading from the BootWare menu· 28
Saving the running configuration and formatting the storage device· 28
Using TFTP/FTP to upgrade software through an Ethernet port 30
Managing files from the BootWare menu· 35
Changing the type of a system software image· 36
Appendix C Handling console login password loss· 40
Disabling password recovery capability· 40
Handling console login password loss· 41
Examining the password recovery capability setting· 41
Using the Skip Authentication for Console Login option· 43
Using the Restore to Factory Default Configuration option· 44
This document describes the features, restrictions and guidelines, open problems, and workarounds for version H3C WX2800X_WX2812X-CMW710-E5811P02. Before you use this version in a live network, back up the configuration and test the version to prevent software upgrade from affecting your live network.
Use this document in conjunction with H3C WX2800X_WX2812X-CMW710-E5811P02 Release Notes (Software Feature Changes).
Version information
Version number
WX2800X
Comware Software, Version 7.1.064, ESS 5811P02
Note: This version number can be displayed by using the display version command in any view. Please see Note①.
WX2812X
Comware Software, Version 7.1.064, ESS 5811P02
Note: This version number can be displayed by using the display version command in any view. Please see Note①.
Version history
WX2800X
Table 1 WX2800X version history
Version number | Last version | Release date | Release type | Remarks |
H3C WX2800X_WX2812X-CMW710-E5811P02 | H3C WX2800X_WX2812X-CMW710-E5808P08 | 2024-11-12 | ESS version | None |
H3C WX2800X_WX2812X-CMW710-E5808P08 | H3C WX2800X_WX2812X-CMW710-E5808P01 | 2024-09-21 | ESS version | None |
H3C WX2800X_WX2812X-CMW710-E5808P01 | H3C WX2800X_WX2812X-CMW710-E5805P01 | 2024-08-01 | ESS version | None |
H3C WX2800X_WX2812X-CMW710-E5805P01 | H3C WX2800X_WX2812X-CMW710-E5803P01 | 2024-04-27 | ESS version | None |
H3C WX2800X_WX2812X-CMW710-E5803P01 | H3C WX2800X_WX2812X-CMW710-E5800P06 | 2024-02-29 | ESS version | None |
H3C WX2800X_WX2812X-CMW710-E5800P06 | H3C WX2800X-CMW710-E5798P01 | 2023-11-20 | ESS version | None |
H3C WX2800X-CMW710-E5798P01 | First release | 2023-09-26 | ESS version | None |
WX2812X
Table 2 WX2812X version history
Version number | Last version | Release date | Release type | Remarks |
H3C WX2800X_WX2812X-CMW710-E5811P02 | H3C WX2800X_WX2812X-CMW710-E5808P01 | 2024-11-12 | ESS version | None |
H3C WX2800X_WX2812X-CMW710-E5808P01 | H3C WX2800X_WX2812X-CMW710-E5805P01 | 2024-08-01 | ESS version | None |
H3C WX2800X_WX2812X-CMW710-E5805P01 | H3C WX2800X_WX2812X-CMW710-E5803P01 | 2024-04-27 | ESS version | None |
H3C WX2800X_WX2812X-CMW710-E5803P01 | H3C WX2800X_WX2812X-CMW710-E5800P06 | 2024-02-29 | ESS version | None |
H3C WX2800X_WX2812X-CMW710-E5800P06 | First release | 2023-11-20 | ESS version | None |
Hardware and software compatibility matrix
| IMPORTANT: To avoid an upgrade failure, use Table 3 to verify the hardware and software compatibility before performing an upgrade. |
WX2800X
Table 3 WX2800X hardware and software compatibility matrix
Item | Specifications | |
Model | WX2860X | WX2880X |
Memory | 2 GB | 4 GB |
Flash | 8 GB EMMC | 8 GB EMMC |
Boot ROM version | Basic 1.07 Extend 1.07 (Note: Use the display version command in any view to view the version information. Please see Note②.) | |
CPLD version | 002 | |
Host software | WX2800X_WX2812X-CMW710-E5811P02.ipe MD5:898ae497a3ba3168a1adedff44eacaf1 | |
iMC version(Recommended version) | iMC PLAT 7.3 (E0710P04) iMC ACL 7.3 (E0510) iMC QoSM 7.3 (E0510) iMC WSM 7.3 (E0614P04) iMC EIA 7.3 (E0632) iMC EAD 7.3 (E0632) iMC EIP 7.3 (E0632) iMC IPM 7.3 (E0620) iMC EPS 7.3 (E0609) iMC SHM 7.3 (E0707L06) | |
iNode version | INode PC 7.3 (E0623) | |
AP version | WA5300-CMW710-R2473 WA6300-CMW710-R2478 WA6300A-CMW710-R2478 WA6600-CMW710-R2478 WA6500A-CMW710-R2611P02 WA6500B-CMW710-R2478 WA7300-CMW710-E2611P02 WA7500-CMW710-E2611P02 CPE5100-CMW710-R2611P02 | |
To display the system software version and Boot ROM version of the WX2860X, execute the display version command:
<H3C>dis version
H3C Comware Software, Version 7.1.064, ESS 5811P02------- Note ①
Copyright (c) 2004-2023 New H3C Technologies Co., Ltd. All rights reserved.
H3C WX2860X uptime is 0 weeks, 0 days, 3 hours, 22 minutes
Last reboot reason : User soft reboot
Boot image: flash:/boot.bin
Boot image version: 7.1.064,ESS 5811P02
Compiled Jun 16 2022 15:00:00
System image: flash:/system.bin
System image version: 7.1.064,ESS 5811P02
Compiled Jun 16 2022 15:00:00
with 1 1600MHz Multi-core Processor
2048M bytes DDR4
7456M bytes EMMC Memory
Hardware Version is Ver.A
CPLD Version is 001
Basic Bootrom Version is 1.06------ Note ②
Extend Bootrom Version is 1.06------ Note ②
[Subslot 0]WX2860X Hardware Version is Ver.A
WX2812X
Table 4 WX2812X hardware and software compatibility matrix
Item | Specifications |
Model | WX2812X-PWR |
Memory | 2 GB |
Flash | 4 GB EMMC |
Boot ROM version | Basic 1.11 Extend 1.11 (Note: Use the display version command in any view to view the version information. Please see Note②.) |
CPLD version | 002 |
Host software | WX2800X_WX2812X-CMW710-E5811P02.ipe MD5:616ec966e527c733f8f979c93872032e |
iMC version(Recommended version) | iMC PLAT 7.3 (E0710P04) iMC ACL 7.3 (E0510) iMC QoSM 7.3 (E0510) iMC WSM 7.3 (E0614P04) iMC EIA 7.3 (E0632) iMC EAD 7.3 (E0632) iMC EIP 7.3 (E0632) iMC IPM 7.3 (E0620) iMC EPS 7.3 (E0609) iMC SHM 7.3 (E0707L06) |
iNode version | INode PC 7.3 (E0623) |
AP version | WA5300-CMW710-R2473 WA6300-CMW710-R2478 WA6300A-CMW710-R2478 WA6600-CMW710-R2478 WA6500A-CMW710-R2611P02 WA6500B-CMW710-R2478 WA7300-CMW710-E2611P02 WA7500-CMW710-E2611P02 CPE5100-CMW710-R2611P02 |
To display the system software version and Boot ROM version of the WX2812X-PWR, execute the display version command:
<H3C>dis version
H3C Comware Software, Version 7.1.064, ESS 5811P02------- 注①
Copyright (c) 2004-2023 New H3C Technologies Co., Ltd. All rights reserved.
H3C WX2812X-PWR uptime is 0 weeks, 0 days, 3 hours, 22 minutes
Last reboot reason : User soft reboot
Boot image: flash:/boot.bin
Boot image version: 7.1.064,ESS 5811P02
Compiled Jun 16 2022 15:00:00
System image: flash:/system.bin
System image version: 7.1.064,ESS 5811P02
Compiled Jun 16 2022 15:00:00
with 1 1600MHz Multi-core Processor
2048M bytes DDR4
3776M bytes EMMC Memory
Hardware Version is Ver.A
CPLD Version is 002
Basic Bootrom Version is 1.11------ 注②
Extend Bootrom Version is 1.11------ 注②
[Subslot 0]WX2812X-PWR Hardware Version is Ver.A
Fit AP compatibility
| CAUTION: For AP models supported by the AC, see the table below. |
AP name | Model | Image name | AP image in the same package as AC image? |
H3C WA530X-WW | WA530X-WW | wa5300.ipe | Yes |
H3C WA538-WW | WA538-WW | ||
H3C WA538-JP | WA538-JP | ||
H3C WA536-WW | WA536-WW | ||
H3C WA530-WW | WA530-WW | ||
H3C WA5330 | WA5330 | ||
H3C WA5530X | WA5530X | ||
H3C WA5530i | WA5530i | ||
H3C WA6330 | WA6330 | wa6300.ipe | Yes |
H3C WA6320 | WA6320 | ||
H3C WA6320H | WA6320H | ||
H3C WA6320-JP | WA6320-JP | ||
H3C WA6320H-HI | WA6320H-HI | wa6300a.ipe | Yes |
H3C WA6320H-HI-EG | WA6320H-HI-EG | ||
H3C WA6630X-JP | WA6630X-JP | wa6600.ipe | Yes |
H3C WA6622 | WA6622 | ||
H3C WA6628 | WA6628 | ||
H3C WA6638 | WA6638 | ||
H3C WA6630X | WA6630X | ||
H3C WA6638-JP | WA6638-JP | ||
H3C WA6636 | WA6636 | ||
H3C WA6628X | WA6628X | ||
H3C WA6628E-T | WA6628E-T | ||
H3C WA6620X | WA6620X | ||
H3C WA6620X-EG | WA6620X-EG | ||
H3C WA6622-EG | WA6622-EG | ||
H3C WA6528i | WA6528i | wa6500b.ipe | Yes |
H3C WA6528X-E | WA6528X-E | ||
H3C WA6528i-JP | WA6528i-JP | ||
H3C WA6526E | WA6526E | wa6500a.ipe | Yes |
H3C WA6520 | WA6520 | ||
H3C WA6526 | WA6526 | ||
H3C WA6520H | WA6520H | ||
H3C WA6520H-JP | WA6520H-JP | ||
H3C WA6520-EG | WA6520-EG | ||
H3C WA7539 | WA7539 | wa7500.ipe | No |
H3C WA7539-JP | WA7539-JP | ||
H3C WA7320i | WA7320i | wa7300.ipe | No |
H3C WA7338-HI | WA7338-HI | ||
H3C WA7322H-HI | WA7322H-HI | ||
H3C WA7330X | WA7330X | ||
H3C CPE5100 | CPE5100 | cpe5100.ipe | No |
Upgrading restrictions and guidelines
· Select the following interfaces in descending order for downloading software image files: management Ethernet port, WAN port, and LAN 1 port.
· To manage newly produced products of the following models, please disable the version verification function or modify APDB to designate the AP firmware version.
Model | Version |
WA6620X-EG | B0 |
WA6630X | F0 |
WA6630X-JP | D0 |
Hardware feature updates
WX2800X_WX2812X-CMW710-E5811P02
None.
WX2800X_WX2812X-CMW710-E5808P08
None.
WX2800X_WX2812X-CMW710-E5808P01
None.
WX2800X_WX2812X-CMW710-E5805P01
None.
WX2800X_WX2812X-CMW710-E5803P01
None.
WX2800X_WX2812X-CMW710-E5800P06
WX2812 are supported
WX2800X_WX2812X-CMW710-E5798P01
First release. WX2860X and WX2880X are supported.
Software feature and command updates
For more information about the software feature and command update history, see H3C WX2800X_WX2812X-CMW710-E5811P02 Release Notes (Software Feature Changes).
MIB updates
Item | MIB file | Module | Description |
WX2800X_WX2812X-CMW710-E5612P01 | |||
New | First release | First release | None |
Modified | First release | First release | None |
Operation changes
WX2800X_WX2812X-CMW710-E5811P02
None.
WX2800X_WX2812X-CMW710-E5808P08
None.
WX2800X_WX2812X-CMW710-E5808P01
None.
WX2800X_WX2812X-CMW710-E5805P01
None.
WX2800X_WX2812X-CMW710-E5803P01
None.
WX2800X_WX2812X-CMW710-E5800P06
None.
WX2800X_WX2812X-CMW710-E5798P01
None.
Restrictions and cautions
Restrictions
· In an AC hierarchy network, an AP supports either local forwarding or centralized forwarding, but not both.
· When you configure DPI features for WX2800X related devices, follow these restrictions and guidelines:
¡ When security features are enabled, the recommended WLAN specifications are: APs ≤ 128, clients = 1000, sessions = 50000.
¡ Except for the basic DPI features (application rate limiting and URL filtering), you can configure only one of the other five features (application auditing, data filtering, file filtering, IPS, and AV).
¡ The simple mode web interface supports only application rate limiting and URL filtering configuration. To configure other features, use the CLI or the professional mode web interface.
· To use IMC for management, set the SNMP timeout timer to 60 seconds for the managed devices and disable wireless performance monitoring.
· For user isolation configured for a service template to take effect, do not configure ARP proxy on the Layer 3 interface bound with the service template.
· As a best practice, add the TCP MSS 1452 configuration to the dialer interface if PPPoE is configured.
· In a local forwarding network, the time range deployed through ACL to clients authenticated on the AC does not take effect
· Under the Pakistan region code, when the AP works on the regulatory-supported channel 165, some clients cannot receive Beacon frames. As a best practice, use another channel.
· If you want to use Wifi7 series APs, please upload the AP version file in the AC version compressed package to the root directory of AC.
Cautions
· Use either the web interface or CLI but not both for configuration.
· If the device provides a USB port, only file transmission is supported by using a USB drive, and the file format must be FAT32.
· For a WA6522, WA6520, WA6520-E, WA6530i, WA6530-E, WA6520H, WA6520H-E, WA6520H-SI, WA6520H-HI, WA6520-EG or WA6520H-JP device connected to a switch through a 2.5G/10G transceiver module, when you upgrade the device from a version earlier than 2595P26 to 2595P26 or later, you must remove the speed 2500 configuration from the peer switch, or configure speed 2500 on both ends of the fiber ports. If you do not do so, the link might not work.
· • During a soft reboot of the device or when the PSE chip maintains power supply, the device does not supply power to newly connected PDs for preventing power overload. However, the device cannot control power overload caused by continuous increase in power of PDs that are receiving power.
• During startup or normal operation of the device, the system performs power detection every 2 seconds. Overload protection is provided if a power overload (the maximum PSE power is exceeded) occurs at a timepoint when power detection is being performed. Overload protection is not provided if an overload occurs at a timepoint when power detection is not being performed. These unprotected overload conditions include:
Power surge of a PD within 2 seconds, which will trigger power protection and cause the device to restart.
Multiple PDs are connected to the device simultaneously within 2 seconds when the PSE power consumption is less than the PoE threshold and PoE is enabled on PIs, which triggers the power protection mechanism and cause the device to restart. In actual scenarios, the network cable connection speed is usually not that fast.
• When the PSE power consumption exceeds the PoE threshold, the system does not supply power to newly connected PDs. As a result, the PSE power consumption may not reach the maximum PSE power. The maximum PSE power and PoE threshold of the devices are as follows:
MSG370-8-PWR/WX2510X-PWR-LI/WSG1808X-PWR: The maximum PSE maximum power is 80 W, and the PoE threshold is 70 W.
MSG370-12-PWR/WSG1812X-PWR/WX2812X-PWR: The maximum PSE maximum is 150 W, and the PoE threshold is 140 W.
Licensing
About licensing
H3C offers licensing options for you to deploy features and expand resource capacity on an as needed basis. To use license-based features, purchase licenses from H3C and install the licenses. For more information about the license-based features and licenses available for them, see License Matrixes.
Registering and installing licenses
To register and transfer licenses, access H3C license services at http://www.h3c.com/en/License.
For information about registering licenses, installing activation files, and transferring licenses, see H3C Comware 7 and Comware 9 WLAN Products Local Licensing Guide.
Open problems and workarounds
202111060373
· Symptom: Configure the maximum allowed client number only in service template view.
· Condition: When the number of clients associated with a wireless service on a radio reaches the maximum allowed client number, all wireless services bound with the radio hide their SSIDs.
· Workaround: This symptom might occur if you configure the maximum allowed client number for a radio on an AP.
202304150300
· Symptom: Enable or disable behavior management.
· Condition: The Behavior Mgmt page does not display any data.
· Workaround: This symptom might occur if you enable and disable behavior management repeatedly from the Web interface in standard mode.
202311300321
· Symptom: Inter-VLAN communication is unavailable for clients under the same AP but inter-AP or intra-VLAN communication is normal.
· Condition: If the AP version is 2595P02 to 2595P26, inter-VLAN communication is unavailable for clients under the same AP.
· Workaround: Configure rate limit based on radio or service templates (any rate value is acceptable, it is not recommended to configure without the above issues).
List of resolved problems
Resolved problems in WX2800X_WX2812X-CMW710-E5811P02
202410240064
· Symptom: Optimized the wlan sync-configuration function.
· Condition: None.
Resolved problems in WX2800X_WX2812X-CMW710-E5808P08
202409131493
· Symptom: There is a small chance that memory leakage.
· Condition: Using ELAN function.
202408281093
· Symptom: Support CPE5100.
· Condition: None.
Resolved problems in WX2800X_WX2812X-CMW710-E5808P01
202407310395
· Symptom: A client can successfully come online, but 802.11r roaming fails if you perform the following tasks:
Use the wpa3 enterprise-only-mode command to set the WPA3-Enterprise mandatory mode or the wpa3 enterprise-transition-mode command to set the WPA3-Enterprise transition mode.
Enable 802.11r (FT).
· Condition: This symptom might occur if you use the wpa3 enterprise-only-mode command to set the WPA3-Enterprise mandatory mode or the wpa3 enterprise-transition-mode command to set the WPA3-Enterprise transition mode and enable 802.11r (FT).
Resolved problems in WX2800X_WX2812X-CMW710-E5805P01
202404190183
· Symptom: The portal redirection feature is unavailable for IPv6 users.
· Condition: None
202205240522
· Symptom: It might take a long time for clients to obtain an IP address, which affects online experience.
· Condition: None.
202205200382
· Symptom: Accounting-update packets are sent irregularly after the mac-authentication fast-connect command is executed.
· Condition: This symptom might occur after you execute the mac-authentication fast-connect command.
202403071418
· Symptom: The BSSID might change after device reboot, causing some services that depend on the BSSID to be unusable.
· Condition: This symptom might occur if the device restarts.
202403080222
· Symptom: In a dual-link + virtual AP network, deleting an AP from the backup AC might trigger a failure to join the AP group.
· Condition: This symptom might occur in a dual-link + virtual AP network.
202403160395
· Symptom: Low AP health in AdCampus environment.
· Condition: This symptom might occur in AC dual-link networking.
202403180546
· Symptom: The process xmlcfgd maybe abnamal.
· Condition: This symptom might occur in AdCampus networking.
202201070013
· Symptom: AP disassociation and association might trigger false generation of CFGMAN_CFGCHANGED alarms.
· Condition: None.
Resolved problems in WX2800X_WX2812X-CMW710-E5803P01
202310121789
· Symptom: The type configuration in an AP group's AP model view gets lost.
· Condition: This symptom might occur after you restart the device if a large number of manual APs exist in the AP group.
202312150372
· Symptom: The multicast storm caused by repeated forwarding of mDNS packets by primary and backup AC
· Condition: This symptom might occur the Bonjour function is enabled in a dual-link networking environment.
202311130074
· Symptom: Guest user operations fail from the Web interface.
· Condition: This symptom might occur if the system user role is authorized only with the guest-manager permissions.
202310231709
· Symptom: The maximum transmit power of AP radios is incorrect.
· Condition: This symptom might occur if you switch the antenna type or channel under an overseas region code.
Resolved problems in WX2800X_WX2812X-CMW710-E5800P06
202309280802
· Symptom: Support the new generation web features.
· Condition: None.
202306120722
· Symptom: Resolved the issue that license online activation fail.
· Condition: None.
Resolved problems in WX2800X_WX2812X-CMW710-E5798P01
Troubleshooting resources
To obtain troubleshooting resources for the product:
1. Access Technical Documents at http://www.h3c.com/en/Technical_Documents.
2. Select the device category and model.
3. Select the Maintain or Maintenance menu.
Related documentation
· H3C WX2800X Series Access Controllers Command References
· H3C WX2800X Series Access Controllers Configuration Guides
· H3CWX2800X Series Access Controllers Web-Based Configuration Guide
Technical support
Table 7 WX2860X hardware features
Item | WX2860X |
CPU base frequency | 1.600 GHz |
Flash | 8GB EMMC |
Memory | 2 GB |
Dimensions (H × W ×) | 43.6 × 440 × 250 mm (1.72 × 17.32 × 9.84 in) |
Power consumption | 12.1 W to 29.5 W |
Weight | 3.1 kg (7.28 lb) |
Ports | WAN: 2*2.5G LAN: 8*GE + 2*SFP 1 console |
Operating temperature | 0°C to 45°C (32°F to 113°F) |
Operating humidity (noncondensing) | 5% to 95% |
Power supply | Single power supplies |
Table 8 WX2880X hardware features
Item | WX2880X |
CPU base frequency | 2.200GHz |
Flash | 8GB EMMC |
Memory | 4 GB |
Dimensions (H × W ×) | 43.6 × 440 × 250 mm (1.72 × 17.32 × 9.84 in) |
Power consumption | 14.1 W to 31.3 W |
Weight | 3.3 kg (7.28 lb) |
Ports | WAN: 2*2.5 LAN: 8*GE+2*SFP+ 1 console |
Operating temperature | 0°C to 45°C (32°F to 113°F) |
Operating humidity (noncondensing) | 5% to 95% |
Power supply | Dual power supplies |
Table 9 WX2812X-PWR hardware features
Item | WX2812X-PWR |
CPU base frequency | 2.0 GHz |
Flash | 4GB EMMC |
Memory | 2 GB |
Dimensions (H × W ×) | 43.6 × 220 × 440 mm (1.72 × 8.66 × 17.32 in) |
Power consumption | 11.8W to 173 W (including 150W PoE output) |
Weight | 2.9 kg (6.39 lb) |
Ports | WAN: 2*GE LAN: 2*SFP Puls + 12*GE PoE+ 1 Console |
Operating temperature | 0°C to 45°C (32°F to 113°F) |
Operating humidity (noncondensing) | 5% to 95% |
Power supply | Single power supplies |
Item | Feature | Description |
802.11 MAC | 802.11 protocols | 802.11a/802.11b/802.11d/802.11e(WMM)/802.11g/802.11h/802.11i/802.11n/802.11w/802.11ac/802.11k/802.11r/802.11u/802.11ax/802.11v |
Others | SSID hiding | |
Multiple region codes | ||
Client quantity limit based on SSID | ||
Client quantity limit based on radio | ||
Client online state detection | ||
Local forwarding | ||
Policy-based forwarding | ||
Bandwidth guarantee | ||
Bandwidth limit | ||
VLAN pool | ||
Band navigation | ||
Bonjour gateway | ||
802.11b client forbidding | ||
AP management | AP discovery and previsioning | |
Discovery through DNS | ||
MSM discovery | ||
DHCP Option 43 discovery | ||
MSM DHCP Option 43 discovery | ||
Support for 802.1X clients | ||
AP provisioning | ||
Tunnel | CAPWAP | |
Compatible with LWAPP APs | ||
AC-AP NAT traversal | ||
IPv6 tunneling | ||
Others | AP group | |
AP group-based VLAN assignment to SSIDs | ||
AP LED control | ||
Automatic configuration inheritance from AP group or manual AP | ||
Firmware upgrade by AP group | ||
WLAN mesh | Mesh link | |
Multi-hop mesh | ||
Zero configuration startup | ||
Portal | ||
Branch AP | Remote AP mode | |
AP local authentication | ||
Roaming | Intra-AC Layer 2 roaming | |
Intra-AC Layer 3 roaming | ||
Inter-AC Layer 2 roaming | ||
Inter-AC Layer 3 roaming | ||
Security and access control | Wireless encryption | Shared-Key |
WEP-40 | ||
WEP-104 | ||
WEP-128 | ||
Dynamic WEP | ||
TKIP | ||
CCMP | ||
Authentication protocols | Open system | |
Shared-Key | ||
PSK | ||
Private PSK | ||
802.1X | ||
MAC authentication | ||
Portal authentication | ||
WeChat WiFi | ||
Tencent OAuth2.0 authentication | ||
Oasis Cloud authentication | ||
Other authentication | MAC-based quick portal authentication | |
Centralized portal authentication with local forwarding | ||
Portal fail-permit | ||
Portal server backup | ||
Portal Web server URL | ||
Portal authentication: Permit of the specified URLs by portal, for example, the URLs of WeChat and AppStore | ||
EAP types | EAP-TLS/EAP-TTLS/EAP-PEAP/EAP-MD5/EAP-GTC/EAP-FAST/EAP-SIM/EAP-AKA | |
EAP offload (only TLS/PEAP) | ||
AAA | RADIUS | |
LDAP | ||
HWTACACS | ||
Domain-based AAA server selection | ||
SSID-based AAA server selection | ||
AAA server backup | ||
Duration-based accounting | ||
NAC | H3C EAD | |
User-based access control | User-based access control | |
User-based ACL | ||
User-based bandwidth limit | ||
User and SSID binding | ||
Binding of user and VLAN, ACL, and user profile | ||
Limit of APs or AP groups that users can associate | ||
Others | SSID-based user isolation | |
ARP anti-attack | ||
Local AAA server (local authentication and local portal) | ||
QoS | Priority mapping | |
Layer 2 to Layer 4 traffic identification | ||
Traffic rate limit | ||
Voice traffic optimization | ||
CAC | ||
Spectrum management | RRM | Region code selection |
Region code lock | ||
20M/40M channel auto selection | ||
802.11n protection | ||
Interference detection | ||
Manually specified working channel | ||
Power configuration | ||
Dynamic transmission rate adjustment | ||
Automatic channel selection | ||
Automatic power adjustment | ||
Blackhole detection and prevention | ||
Load balancing | Session-based load balancing | |
Traffic-based load balancing | ||
VPN | L2TP | |
IPsec VPN | ||
NAT | NAT | |
NPAT | ||
NAT ALG | ||
NAT Log | ||
WIPS | Denylist and allowlist | Static denylist |
Dynamic denylist | ||
Allowlist | ||
Rogue AP | SSID-based rogue AP detection | |
BSSID-based rogue AP detection | ||
OUI-based rogue AP detection | ||
Rogue AP countermeasures | ||
Countermeasure | Countermeasures against non-working channels in hybrid mode | |
Countermeasures against ad-hoc networks | ||
Countermeasures against Windows bridges | ||
DoS attack prevention | ||
Attack prevention | Flood attack prevention | |
Spoofing attack prevention | ||
Weak IV attack prevention | ||
Framework | Virtual security zones | |
Support for multiple radios | ||
Independent sensors | ||
Hybrid sensors | ||
Signature | Embedded signatures | |
User-defined signatures | ||
Device detection | Device detection and classification | |
Alarm-ignored device list | ||
Device threat indexes | ||
Automatic device classification | ||
User-defined classification rules | ||
Manual device classification | ||
802.11n/11ac devices | ||
802.11w devices | ||
Prohibited device list | ||
Trusted OUI/SSID list | ||
Rogue device detection | ||
Misconfigured device detection | ||
All-channel scanning | ||
User-defined channel scanning | ||
802.11n greenfield AP mode | ||
Encryption method detection | ||
OUI | OUI import | |
Device OUI information display | ||
Attack detection | Zero-day detection | |
Known DoS attack detection | ||
Unknown DoS attack detection | ||
Disassociation spoofing attack | ||
Deauthentication spoofing attack | ||
Flood attack detection | ||
MITM attack detection | ||
Wireless bridge | ||
Channel change detection | ||
Device entry attack detection | ||
Spoofing attack | MAC address spoofing attack | |
Surveillance | Weak IV detection | |
Detection on rejected client association requests | ||
Malformed packet detection | ||
Management | syslog | |
MIB | ||
WIAA | User-based packet filtering | |
SSID-based packet filtering | ||
URL-based filtering | ||
Spectrum analysis | Hybrid sensor | |
Independent sensor | ||
Bluetooth device detection | ||
Identification of microwave ovens, cordless phones, xBox360 devices, and wireless cameras | ||
BYOD/guest management | Guest management | Web GUI optimization |
Guest password generation in batch | ||
Import, export, and print | ||
User group-based privilege control | ||
Duration-based accounting | ||
Duration-based access limit | ||
BYOD | DHCP fingerprint identification | |
HTTP UA fingerprint identification | ||
OUI identification | ||
Identification policy setting | ||
Tunneling | Inter-AC EVI tunnel | |
Tunnel backup | ||
Prevention of privately DHCP server setting up for EVI tunnels | ||
Layer 2 protocols | Layer 2 protocols | ARP |
802.1p | ||
802.1q | ||
802.1X | ||
LLDP | ||
LACP | ||
Port aggregation | ||
Loopback detection | ||
Loopback test | ||
Broadcast suppression | ||
VLAN | Port-based VLAN | |
SSID-based VLAN | ||
User-based VLAN | ||
IP protocols | IPv4 | TCP/UDPV4 |
ICMPv4 | ||
NTP | ||
ACL | ||
DHCP server | ||
DHCP relay | ||
DHCP snooping | ||
IPv6 | ACL6 | |
DNS6 | ||
Tracert6 | ||
Telnet6 | ||
FTP IPv6 | ||
TFTP IPv6 | ||
DHCPv6 Server | ||
DHCPv6 Relay | ||
SAVI | ||
Ping6 | ||
Routing protocols | Static routing | |
RIP/RIPng | ||
Multicast protocols | MLD snooping | |
IGMP snooping | ||
Multicast optimization (converting multicast packets to unicast packets) | ||
Hardware features | Hardware acceleration for encryption and decryption | |
License | License | |
License pool | ||
High availability | AP dual link | |
N+1 cold backup | ||
Management | Password control | |
Configuration file encryption | ||
SNMP v1/v2/v3 | ||
HTTP/HTTPS | ||
CLI/Telnet/SSH v2.0 | ||
Hierarchical management from the Web interface | ||
RESTful API | ||
NETCONF | ||
TCL/Python/EAA | ||
Restore to AP factory default | ||
Power saving | Green AP | |
Scheduled radio shutdown | ||
Scheduled SSID disabling | ||
Locating | H3C | H3C general-purpose interfaces |
AeroScout | Controller Aeroscout protocol version 6.3 | |
Oasis Platform | Oasis platform location | |
Probing | Wireless probing | |
WLAN comprehensive applications | Network analysis | RF Ping |
Wireless packet capture | ||
Network quality analyzer (NQA) | ||
This section describes how to upgrade system software while the device is operating correctly or when the device cannot correctly start up.
The following software types are available:
· Boot ROM image—A .bin file that contains a basic section and an extended section. The basic section is the minimum code that bootstraps the system. The extended section enables hardware initialization and provides system management menus. You can use these menus to load application software and the startup configuration file or manage files when the device cannot correctly start up.
· Comware image—Includes the following image subcategories:
¡ Boot image—A .bin file that contains the Linux operating system kernel. It provides process management, memory management, file system management, and the emergency shell.
¡ System image—A .bin file that contains the minimum feature modules required for device operation and some basic features, including device management, interface management, and configuration management. To have advanced features, you must purchase feature packages.
¡ Feature package—Includes a set of advanced software features. Users purchase feature packages as needed.
¡ Patch packages—Irregularly released packages for fixing bugs without rebooting the device. A patch package does not add new features or functions.
Comware software images that have been loaded are called "current software images." Comware images specified to load at the next startup are called "startup software images."
Boot ROM image, boot image, and system image are required for the system to work. These images might be released separately or as a whole in one .ipe package file. If an .ipe file is used, the system automatically decompresses the file, loads the .bin boot and system images and sets them as startup software images.
Because of limitation of the AC storage space, the .ipe files of some APs cannot be packed into the AC's ipe file, and will be packed into the compressed file for software release. To view and install AP ipe files:
1. Access the \apimge directory.
<Sysname> cd apimge
2. Execute the dir command to identify whether required files exist.
<Sysname> dir
Directory of flash:/apimge
0 -rw- 14344192 Oct 29 2019 14:59:40 wa4300h.ipe
1 -rw- 14307328 Oct 29 2019 14:57:22 wa4300s.ipe
2 -rw- 21172224 Oct 29 2019 14:59:28 wa5300.ipe
3 -rw- 37281792 Oct 29 2019 14:59:48 wa6500.ipe
4 -rw- 45034496 Oct 29 2019 14:58:10 wt1010.ipe
5 -rw- 56747008 Oct 29 2019 14:58:34 wt1024x.ipe
6 -rw- 40133632 Oct 29 2019 14:59:00 wt2024u.ipe
7 -rw- 40133632 Oct 29 2019 14:59:00 wt1024q.ipe
8-rw- 40133632 Oct 29 2019 14:59:00 wt1024liq.ipe
3. If the files do not exist, access Support > Resource Center > Software Download > Wireless at the H3C website to download the required package, decompress the package, and upload the required files to the \apimge directory.
To upgrade software, you must specify the upgrade files as the startup software images for the device to load at next startup. You can specify two lists of software images: one main and one backup. The device first loads the main startup software images. If the main startup software images are not available, the device loads the backup startup software images.
You can upgrade system software by using one of the following methods:
Upgrade method | Remarks |
Upgrading from the CLI | · You must reboot the device to complete the upgrade. · This method can interrupt ongoing network services. |
Upgrading from the BootWare menu | Use this method when the device cannot correctly start up. |
Preparing for the upgrade
Before you upgrade system software, complete the following tasks:
· Set up the upgrade environment as shown in Figure 1.
· Configure routes to ensure that the device and the file server can reach each other.
· Run a TFTP or FTP server on the file server.
· Log in to the CLI of the device through the console port.
· Copy the upgrade file to the file server and correctly set the working directory on the TFTP or FTP server.
· Make sure the upgrade has minimal impact on the network services. During the upgrade, the device cannot provide any services.
Figure 1 Setting up the upgrade environment
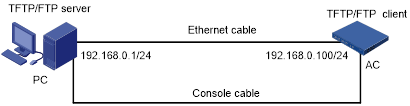
The following uses a WX3520H as an example.
Saving the running configuration and verifying the storage space
1. Save the running configuration.
<Sysname> save
The current configuration will be written to the device. Are you sure? [Y/N]:y
Please input the file name(*.cfg)[cfa0:/startup.cfg]
(To leave the existing filename unchanged, press the enter key):
Validating file. Please wait...
Saved the current configuration to mainboard device successfully.
<Sysname>
2. Display files on the storage medium. Identify the system software image and configuration file names and verify that the flash has sufficient space for the new system software image.
<Sysname> dir
Directory of cfa0:
0 drw- - Jan 01 1980 00:00:00 diagfile
1 drw- - Jan 01 1980 00:00:00 dpi
2 -rw- 735 Jan 01 1980 00:00:00 hostkey
3 drw- - Jan 01 1980 00:00:00 icon
4 -rw- 393 Jun 13 2077 09:08:33 ifindex.dat
5 -rw- 0 Jan 01 1980 00:00:00 lauth.dat
6 drw- - Jan 01 1980 00:00:00 license
7 drw- - Jan 01 1980 00:00:00 logfile
8 drw- - Jan 01 1980 00:00:00 pki
9 drw- - Jan 01 1980 00:00:00 seclog
10 -rw- 591 Jan 01 1980 00:00:00 serverkey
11 -rw- 9388 Jun 13 2077 09:08:34 startup.cfg
12 -rw- 137234 Jun 13 2077 09:08:34 startup.mdb
13 -rw- 309 Jan 01 1980 00:00:00 test.py
14 -rw- 103904256 Jan 01 1980 00:00:00 boot.bin
15 -rw- 64708608 Jan 01 1980 00:00:00 system.bin
4088468 KB total (3724872 KB free)
<Sysname>
Downloading the image file to the device
You can use the TFTP or FTP commands on the device to access the TFTP or FTP server to back up or download files.
Using TFTP
Transfer the configuration file to the file server.
<Sysname> tftp 192.168.0.1 get wx3520h.ipe
Press CTRL+C to abort.
% Total % Received % Xferd Average Speed Time Time Time Current
Dload Upload Total Spent Left Speed
100 160M 100 160M 0 0 816k 0 0:03:21 0:03:21 --:--:-- 807k
<Sysname>
Using FTP
1. From FTP client view, download the system software image file (for example, wx3520h.ipe) to the CF card on the device.
<ftp> get wx3520h.ipe
wx3520h.ipe already exists. Overwrite it? [Y/N]:y
227 Entering passive mode (192,168,0,1,5,20)
125 Using existing data connection
226 Closing data connection; File transfer successful.
37691392 bytes received in 17.7 seconds (2.03 Mbyte/s)
<ftp>
2. Return to user view.
<ftp> quit
221 Service closing control connection
<Sysname>
Specifying the startup image file
1. Specify the wx3520h.ipe file as the main image file for the device at the next reboot.
<Sysname> boot-loader file cfa0:/wx3520h.ipe all main
Verifying the file cfa0:/wx3520h.ipe on slot 1............Done.
H3C WX3520H images in IPE:
boot.bin
system.bin
This command will set the main startup software images. Continue? [Y/N]:y
Add images to slot 1.
Decompressing file boot.bin to cfa0:/boot.bin........................................Done.
Decompressing file system.bin to cfa0:/system.bin.........................Done.
Decompression completed.
You are recommended to delete the .ipe file after you set startup software image
s for all slots.
Do you want to delete cfa0:/wx3520h.ipe now? [Y/N]:
The images that have passed all examinations will be used as the main startup so
ftware images at the next reboot on slot 1.
<Sysname>
2. Verify that the file has been loaded.
<Sysname> display boot-loader
Software images on slot 1:
Current software images:
cfa0:/boot.bin
cfa0:/system.bin
Main startup software images:
cfa0:/boot.bin
cfa0:/system.bin
Backup startup software images:
cfa0:/boot_backup.bin
cfa0:/system_backup.bin
<Sysname>
Rebooting the device to complete the upgrade
1. Reboot the device.
<Sysname> reboot
Start to check configuration with next startup configuration file, please wait.........DONE!
This command will reboot the device. Continue? [Y/N]:y
Now rebooting, please wait...
<Sysname>
System is starting...
2. After the reboot is complete, verify that the system software image is correct.
<Sysname> display version
H3C Comware Software, Version 7.1.064, Release 5223
Copyright (c) 2004-2018 New H3C Technologies Co., Ltd. All rights reserved.
H3C WX3520H uptime is 0 weeks, 0 days, 0 hours, 37 minutes
Last reboot reason : Power on
Boot image: cfa0:/boot.bin
Boot image version: 7.1.064, Release 5223
Compiled May 28 2018 16:00:00
System image: cfa0:system.bin
System image version: 7.1.064, Release 5223
Compiled May 28 2018 16:00:00
Slot 1
Uptime is 0 week, 1 day, 16 hours, 48 minutes
with 1 RMI XLP 416 1000MHz Processor
4064M bytes DDR3
16M bytes NorFlash Memory
4002M bytes CFCard Memory
Hardware Version is Ver.A
CPLD 1 CPLD Version is 004
Basic Bootrom Version is 5.03
Extend Bootrom Version is 5.03
[Subslot 0]H3C WX3520H Hardware Version is Ver.A
<Sysname>
Upgrading from the BootWare menu
Saving the running configuration and formatting the storage device
1. Save the running configuration.
<Sysname> save
The current configuration will be written to the device. Are you sure? [Y/N]:y
Please input the file name(*.cfg)[cfa0:/startup.cfg]
(To leave the existing filename unchanged, press the enter key):
cfa0:/startup.cfg exists, overwrite? [Y/N]:y
Validating file. Please wait...
Saved the current configuration to mainboard device successfully.
2. Transfer the configuration file (for example, startup.cfg) to the file server. This example uses a TFTP server.
<Sysname> tftp 192.168.0.1 put startup.cfg
File will be transferred in binary mode
Sending file to remote TFTP server. Please wait... \
TFTP: 1914 bytes sent in 0 second(s).
File uploaded successfully.
3. Reboot the device.
System is starting...
Press Ctrl+D to access BASIC-BOOTWARE MENU
Press Ctrl+T to start heavy memory test
Booting Normal Extended BootWare
The Extended BootWare is self-decompressing....Done.
****************************************************************************
* *
* H3C WX3520H BootWare, Version 1.10 *
* *
****************************************************************************
Copyright (c) 2004-2018 New H3C Technologies Co., Ltd.
Compiled Date : Apr 23 2018
CPU Type : XLP416
CPU Clock Speed : 1000MHz
Memory Type : DDR3 SDRAM
Memory Size : 4096MB
Memory Speed : 1333MHz
BootWare Size : 768KB
Flash Size : 16MB
cfa0 Size : 4002MB
CPLD1 Version : 004
CPLD2 Version : 000
PCB Version : Ver.A
BootWare Validating...
Press Ctrl+B to access EXTENDED-BOOTWARE MENU...
4. Press Ctrl+B at the prompt to access the extended BootWare menu.
Password recovery capability is enabled.
Note: The current operating device is cfa0
Enter < Storage Device Operation > to select device.
===========================<EXTENDED-BOOTWARE MENU>===========================
|<1> Boot System |
|<2> Enter Serial SubMenu |
|<3> Enter Ethernet SubMenu |
|<4> File Control |
|<5> Restore to Factory Default Configuration |
|<6> Skip Current System Configuration |
|<7> BootWare Operation Menu |
|<8> Skip Authentication for Console Login |
|<9> Storage Device Operation |
|<0> Reboot |
============================================================================
Ctrl+Z: Access EXTENDED ASSISTANT MENU
Ctrl+F: Format File System
Ctrl+C: Display Copyright
Enter your choice(0-9):
Table 11 EXTEND-BOOTWARE menu options
Item | Description |
<1> Boot System | Boot the system software image. |
<2> Enter Serial SubMenu | Access the Serial submenu for upgrading system software through the console port or changing the serial port settings. |
<3> Enter Ethernet SubMenu | Access the Ethernet submenu (see Table 13) for upgrading system software through an Ethernet port or changing Ethernet settings. |
<4> File Control | Access the File Control submenu to retrieve and manage the files stored on the device. |
<5> Restore to Factory Default Configuration | Delete the next-startup configuration files and load the factory-default configuration. |
<6> Skip Current System Configuration | Start the device with the factory default configuration. This is a one-time operation and does not take effect at the next reboot. You use this option when you forget the console login password. |
<7> BootWare Operation Menu | Access the BootWare Operation menu for backing up, restoring, or upgrading BootWare. When you upgrade the system software image, BootWare is automatically upgraded. H3C does not recommend upgrading BootWare separately. This document does not cover using the BootWare Operation menu. |
<8> Skip Authentication for Console Login | Clear all the authentication schemes on the console port. |
<9> Storage Device Operation | Access the Storage Device Operation menu to manage storage devices. Using this option is beyond this chapter. |
<0> Reboot | Restart the device. |
Using TFTP/FTP to upgrade software through an Ethernet port
The device selects the following interfaces in descending order for downloading software image files: management Ethernet port, WAN port, and LAN 1 port.
To use TFTP/FTP to upgrade software through an Ethernet port, perform the following steps:
1. In the main menu, enter 2 to access the serial submenu.
===========================<Enter Serial SubMenu>===========================
|Note:the operating device is cfa0 |
|<1> Download Image Program To SDRAM And Run |
|<2> Update Main Image File |
|<3> Update Backup Image File |
|<4> Download Files(*.*) |
|<5> Modify Serial Interface Parameter |
|<0> Exit To Main Menu |
============================================================================
Enter your choice(0-5):
Table 12 Serial submenu options
Item | Description |
<1> Download Image Program To SDRAM And Run | Download a software image to the SDRAM and run the image. |
<2> Update Main Image File | Upgrade the main system software image. |
<3> Update Backup Image File | Upgrade the backup system software image. |
<4> Download Files(*.*) | Download a system software image to the Flash or CF card. |
<5> Modify Serial Interface Parameter | Modify serial interface settings. |
<0> Exit To Main Menu | Return to the EXTEND-BOOTWARE menu. |
2. In the EXTEND-BOOTWARE menu, enter 3 to access the Ethernet submenu.
==========================<Enter Ethernet SubMenu>==========================
|Note:the operating device is cfa0 |
|<1> Download Image Program To SDRAM And Run |
|<2> Update Main Image File |
|<3> Update Backup Image File |
|<4> Download Files(*.*) |
|<5> Modify Ethernet Parameter |
|<0> Exit To Main Menu |
|<Ensure The Parameter Be Modified Before Downloading!> |
============================================================================
Enter your choice(0-5):
Table 13 Ethernet submenu options
Item | |
<1> Download Image Program To SDRAM And Run | Download a system software image to the SDRAM and run the image. |
<2> Update Main Image File | Upgrade the main system software image. |
<3> Update Backup Image File | Upgrade the backup system software image. |
<4> Download Files(*.*) | Download a system software image to the Flash or CF card. |
<5> Modify Ethernet Parameter | Modify network settings. |
<0> Exit To Main Menu | Return to the EXTEND-BOOTWARE menu. |
3. To change the type of a system software image, retrieve files, or delete files, enter 4 in the EXTEND-BOOTWARE menu.
===============================<File CONTROL>===============================
|Note:the operating device is cfa0 |
|<1> Display All File(s) |
|<2> Set Image File type |
|<3> Set Bin File type |
|<4> Set Configuration File type |
|<5> Delete File |
|<0> Exit To Main Menu |
============================================================================
Enter your choice(0-5):
Table 14 File Control submenu options
Item | Description |
<1> Display All File | Display all files. |
<2> Set Image File type | Change the type of a system software image (.ipe). |
<3> Set Bin File type | Change the type of a system software image (.bin). |
<4> Set Configuration File type | Change the type of a configuration file. |
<5> Delete File | Delete files. |
<0> Exit To Main Menu | Return to the EXTEND-BOOTWARE menu. |
4. Enter 3 to configure the network settings.
=========================<ETHERNET PARAMETER SET>=========================
|Note: '.' = Clear field. |
| '-' = Go to previous field. |
| Ctrl+D = Quit. |
==========================================================================
Protocol (FTP or TFTP) :ftp
Load File Name :wx3520h.ipe
:
Target File Name :wx3520h.ipe
:
Server IP Address :192.168.0.1
Local IP Address :192.168.0.100
Subnet Mask :255.255.255.0
Gateway IP Address :0.0.0.0
FTP User Name :user001
FTP User Password :********
Table 15 Network parameter fields and shortcut keys
Field | Description |
'.' = Clear field | Press a dot (.) and then Enter to clear the setting for a field. |
'-' = Go to previous field | Press a hyphen (-) and then Enter to return to the previous field. |
Ctrl+D = Quit | Press Ctrl + D to exit the Ethernet Parameter Set menu. |
Protocol (FTP or TFTP) | Set the file transfer protocol to FTP or TFTP. |
Load File Name | Set the name of the file to be downloaded. |
Target File Name | Set a file name for saving the file on the device. By default, the target file name is the same as the source file name. |
Server IP Address | Set the IP address of the FTP or TFTP server. If a mask must be set, use a colon (:) to separate the mask length from the IP address. For example, 100.1.1.13:24. |
Local IP Address | Set the IP address of the device. |
Subnet Mask | Subnet Mask of the local IP address. |
Gateway IP Address | Set a gateway IP address if the device is on a different network than the server. |
FTP User Name | Set the username for accessing the FTP server. This username must be the same as configured on the FTP server. This field is not available for TFTP. |
FTP User Password | Set the password for accessing the FTP server. This password must be the same as configured on the FTP server. This field is not available for TFTP. |
5. Select the option 2 or 3 in the Ethernet submenu to upgrade a system software image. For example, enter 2 to upgrade the main system software image.
Loading.....................................................................
............................................................................
............................................................................
.........................................Done.
168620032 bytes downloaded!
The file is exist,will you overwrite it? [Y/N]Y
Image file boot.bin is self-decompressing...
Saving file cfa0:/boot.bin ...........................Done.
Image file system.bin is self-decompressing...
Saving file cfa0:/system.bin .........................Done.
==========================<Enter Ethernet SubMenu>==========================
|Note:the operating device is cfa0 |
|<1> Download Image Program To SDRAM And Run |
|<2> Update Main Image File |
|<3> Update Backup Image File |
|<4> Download Files(*.*) |
|<5> Modify Ethernet Parameter |
|<0> Exit To Main Menu |
|<Ensure The Parameter Be Modified Before Downloading!> |
============================================================================
Enter your choice(0-5):
Enter 0 to return to the EXTEND-BOOTWARE menu
Enter your choice(0-5): 0
===========================<EXTENDED-BOOTWARE MENU>==========================
|<1> Boot System |
|<2> Enter Serial SubMenu |
|<3> Enter Ethernet SubMenu |
|<4> File Control |
|<5> Modify BootWare Password |
|<6> Skip Current System Configuration |
|<7> BootWare Operation Menu |
|<8> Skip Authentication for Console Login |
|<9> Storage Device Operation |
|<0> Reboot |
============================================================================
Ctrl+Z: Access EXTENDED ASSISTANT MENU
Ctrl+F: Format File System
Ctrl+C: Display Copyright
Enter your choice(0-9):
Enter 1 to boot the system.
Enter your choice(0-9): 1
Loading the main image files...
Loading file cfa0:/system.bin...........................Done.
Loading file cfa0:/boot.bin..............Done.
Image file cfa0:/boot.bin is self-decompressing..............Done.
System image is starting...
Press Ctrl+I to enter inter-initiate mode... 0 s
Cryptographic Algorithms Known-Answer Tests are running ...
CPU 0 of slot 1:
Starting Known-Answer tests in the user space.
Known-answer test for SHA1 passed.
Known-answer test for SHA224 passed.
Known-answer test for SHA256 passed.
Known-answer test for SHA384 passed.
Known-answer test for SHA512 passed.
Known-answer test for HMAC-SHA1 passed.
Known-answer test for HMAC-SHA224 passed.
Known-answer test for HMAC-SHA256 passed.
Known-answer test for HMAC-SHA384 passed.
Known-answer test for HMAC-SHA512 passed.
Known-answer test for AES passed.
Known-answer test for RSA(signature/verification) passed.
Known-answer test for RSA(encrypt/decrypt) passed.
Known-answer test for DSA(signature/verification) passed.
Known-answer test for random number generator passed.
Known-Answer tests in the user space passed.
Starting Known-Answer tests in the kernel.
Known-answer test for AES passed.
Known-answer test for HMAC-SHA1 passed.
Known-answer test for SHA1 passed.
Known-answer test for GCM passed.
Known-answer test for GMAC passed.
Known-answer test for random number generator passed.
Known-Answer tests in the kernel passed.
Cryptographic Algorithms Known-Answer Tests passed.
Line con0 is available.
Press ENTER to get started.
Managing files from the BootWare menu
To change the type of a system software image, retrieve files, or delete files, enter 4 in the EXTEND-BOOTWARE menu.
==============================<File CONTROL>==============================
|Note:the operating device is cfa0 |
|<1> Display All File(s) |
|<2> Set Image File type |
|<3> Set Bin File type |
|<4> Set Configuration File type |
|<5> Delete File |
|<0> Exit To Main Menu |
==========================================================================
Enter your choice(0-5):
To display all files, enter 1 in the File Control submenu:
Display all file(s) in cfa0:
'M' = MAIN 'B' = BACKUP 'N/A' = NOT ASSIGNED
============================================================================
|NO. Size(B) Time Type Name |
|1 2048 Jan/01/1980 00:00:00 N/A cfa0:/logfile/logfile1.log |
|2 1027 Jan/01/1980 00:00:00 N/A cfa0:/license/210235a1jnc14b9000|
|31.did |
|3 2406 Jan/01/1980 00:00:00 N/A cfa0:/pki/https-server.p12 |
|4 393 Jan/01/1980 00:00:00 N/A cfa0:/ifindex.dat |
|5 9388 Jan/01/1980 00:00:00 M cfa0:/startup.cfg |
|6 137234 Jan/01/1980 00:00:00 N/A cfa0:/startup.mdb |
|7 309 Jan/01/1980 00:00:00 N/A cfa0:/test.py |
|8 735 Jan/01/1980 00:00:00 N/A cfa0:/hostkey |
|9 591 Jan/01/1980 00:00:00 N/A cfa0:/serverkey |
|10 0 Jan/01/1980 00:00:00 N/A cfa0:/lauth.dat |
|11 87160 Jan/01/1980 00:00:00 N/A cfa0:/dpi/apr/predefined/apr_sig|
|pack_curr.dat |
|12 103904256 Dec/15/2011 09:00:00 M cfa0:/boot.bin |
|13 64708608 Dec/15/2011 09:00:00 M cfa0:/system.bin |
============================================================================
Changing the type of a system software image
System software image file attributes include main (M), and backup (B). You can store only one main image, and one backup image on the device. A system software image can have any combination of the M, and B attributes. If the file attribute you are assigning has been assigned to an image, the assignment removes the attribute from that image. The image is marked as N/A if it has only that attribute.
To change the type of a system software image:
1. Enter 2 in the File Control submenu.
'M' = MAIN 'B' = BACKUP 'N/A' = NOT ASSIGNED
============================================================================
|NO. Size(B) Time Type Name |
|1 168620032 Jun/01/2018 00:00:00 N/A cfa0:/wx3520h.ipe |
|0 Exit |
============================================================================
Enter file No.:1
2. Enter the number of the file you are working with, and press Enter.
Modify the file attribute:
==========================================================================
|<1> +Main |
|<2> +Backup |
|<0> Exit |
==========================================================================
Enter your choice(0-2):
3. Enter a number in the range of 1 to 2 to add or delete a file attribute for the file.
This operation may take several minutes. Please wait....
The file is exist,will you overwrite it? [Y/N]Y
Image file boot.bin is self-decompressing...
Saving file cfa0:/boot.bin ................Done.
Image file system.bin is self-decompressing...
Saving file cfa0:/system.bin ..........Done.
Set the file attribute success!
When storage space is insufficient, you can delete obsolete files to free up storage space.
To delete files:
1. Enter 5 in the File Control submenu.
Deleting the file in cfa0:
'M' = MAIN 'B' = BACKUP 'N/A' = NOT ASSIGNED
============================================================================
|NO. Size(B) Time Type Name |
|1 2048 Jan/01/1980 00:00:00 N/A cfa0:/logfile/logfile1.log |
|2 1027 Jan/01/1980 00:00:00 N/A cfa0:/license/210235a1jnc14b9000|
|31.did |
|3 2406 Jan/01/1980 00:00:00 N/A cfa0:/pki/https-server.p12 |
|4 393 Jan/01/1980 00:00:00 N/A cfa0:/ifindex.dat |
|5 9388 Jan/01/1980 00:00:00 M cfa0:/startup.cfg |
|6 137234 Jan/01/1980 00:00:00 N/A cfa0:/startup.mdb |
|7 309 Jan/01/1980 00:00:00 N/A cfa0:/test.py |
|8 735 Jan/01/1980 00:00:00 N/A cfa0:/hostkey |
|9 591 Jan/01/1980 00:00:00 N/A cfa0:/serverkey |
|10 0 Jan/01/1980 00:00:00 N/A cfa0:/lauth.dat |
|11 87160 Jan/01/1980 00:00:00 N/A cfa0:/dpi/apr/predefined/apr_sig|
|pack_curr.dat |
|12 103904256 Dec/15/2011 09:00:00 M cfa0:/boot.bin |
|13 64708608 Dec/15/2011 09:00:00 M cfa0:/system.bin |
|0 Exit |
============================================================================
Enter file No.:
2. Enter the number of the file to delete.
3. Enter Y at the following prompt.
The file you selected is cfa0:/boot.bin,Delete it?
[Y/N]Y
Deleting...Done.
Using Xmodem to upgrade the BootWare from the console port
Command output information varies by device model.
To use Xmodem to upgrade the BootWare from the console port:
1. Power on the device.
2. Press Ctrl+D immediately after the "Press Ctrl+D to access BASIC-BOOTWARE MENU" message appears.
System is starting...
Press Ctrl+D to access BASIC-BOOTWARE MENU
=====================<BASIC-BOOTWARE MENU (Ver 0.06) >======================
|<1> Modify Serial Interface Parameter |
|<2> Update Extended BootWare |
|<3> Update Full BootWare |
|<4> Boot Extended BootWare |
|<5> Boot Backup Extended BootWare |
|<0> Reboot |
============================================================================
Ctrl+U: Access BASIC ASSISTANT MENU
Ctrl+A: Enter Command Line
Ctrl+C: Display Copyright
Enter your choice(0-5): 1
3. Enter 1 in the BASIC-BOOTWARE menu to access the menu for setting the baud rate of the console port.
===============================<BAUDRATE SET>===============================
|Note:'*'indicates the current baudrate |
| Change The HyperTerminal's Baudrate Accordingly |
|---------------------------<Baudrate Available>---------------------------|
|<1> 9600(Default)* |
|<2> 19200 |
|<3> 38400 |
|<4> 57600 |
|<5> 115200 |
|<0> Exit |
============================================================================
Enter your choice(0-5): 0
4. Select a baud rate.
| IMPORTANT: · If you use a baud rate value other than the default, you must reconnect to the configuration terminal and change its baud rate to be the same as the baud rate selected in the BootWare menu. · Baud rate change is a one-time operation. The baud rate will be restored to the default (9600 bps) at reboot. To set up a console session with the device after a reboot, you must change the baud rate of the configuration terminal back to 9600 bps. |
In this example, enter 0. This option enables you to return to the BASIC-BOOTWARE menu with the default baud rate selected.
=====================<BASIC-BOOTWARE MENU (Ver 0.06) >======================
|<1> Modify Serial Interface Parameter |
|<2> Update Extended BootWare |
|<3> Update Full BootWare |
|<4> Boot Extended BootWare |
|<5> Boot Backup Extended BootWare |
|<0> Reboot |
============================================================================
Ctrl+U: Access BASIC ASSISTANT MENU
Ctrl+A: Enter Command Line
Ctrl+C: Display Copyright
Enter your choice(0-5):
Table 16 BASIC-BOOTWARE menu options
Option | Task |
<1> Modify Serial Interface Parameter | Change the baud rate of the console port. Perform this task before downloading an image through the console port for software upgrade. |
<2> Update Extended BootWare | Upgrade the extended BootWare segment. |
<3> Update Full BootWare | Upgrade the entire BootWare, including the basic segment and the extended segment. |
<4> Boot Extended BootWare | Run the primary extended BootWare segment. |
<5> Boot Backup Extend BootWare | Run the backup extended BootWare segment. |
<0> Reboot | Reboot the device. |
5. Enter 3 in the BASIC-BOOTWARE menu to upgrade the entire BootWare.
Please Start To Transfer File, Press <Ctrl+C> To Exit.
Waiting ...CCCCCCCCCC
6. Launch the terminal, select Xmodem in the menu bar, and select the BootWare image version for upgrade.
Xmodem file transfer might be slow depending on the baud rate you selected.
7. After the file transfer is complete, enter Y to upgrade the BootWare.
Starting xmodem transfer. Press Ctrl+C to cancel.
Transferring 34368_v1.06.btw...
100% 644 KB 0 KB/s 00:12:48 0 Errors
Download successfully!
659456 bytes downloaded!
Updating Basic BootWare? [Y/N]Y
Updating Basic BootWare.........Done.
Updating Extended BootWare? [Y/N]Y
Updating Extended BootWare...........Done.
=====================<BASIC-BOOTWARE MENU (Ver 0.06) >======================
|<1> Modify Serial Interface Parameter |
|<2> Update Extended BootWare |
|<3> Update Full BootWare |
|<4> Boot Extended BootWare |
|<5> Boot Backup Extended BootWare |
|<0> Reboot |
============================================================================
Ctrl+U: Access BASIC ASSISTANT MENU
Ctrl+A: Enter Command Line
Ctrl+C: Display Copyright
Enter your choice(0-5): 0
8. Enter 0 in the BASIC-BOOTWARE menu to reboot the device for the new BootWare to take effect. The device displays information about the new BootWare version.
Appendix C Handling console login password loss
Disabling password recovery capability
Password recovery capability controls console user access to the device configuration and SDRAM from BootWare menus.
If password recovery capability is enabled, a console user can access the device configuration without authentication to configure new passwords.
If password recovery capability is disabled, console users must restore the factory-default configuration before they can configure new passwords. Restoring the factory-default configuration deletes the next-startup configuration files.
To enhance system security, disable password recovery capability.
Table 17 summarizes options whose availability varies with the password recovery capability setting.
Table 17 BootWare options and password recovery capability compatibility matrix
BootWare menu option | Password recovery enabled | Password recovery disabled | Tasks that can be performed |
Download Image Program To SDRAM And Run | Yes | No | Load and run Comware software images in SDRAM. |
Skip Authentication for Console Login | Yes | No | Enable console login without authentication. |
Skip Current System Configuration | Yes | No | Load the factory-default configuration without deleting the next-startup configuration files. |
Restore to Factory Default Configuration | No | Yes | Delete the next-startup configuration files and load the factory-default configuration. |
To configure password recovery capability:
Step | Command | Remarks |
1. Enter system view. | system-view | N/A |
2. Enable password recovery capability. | password-recovery enable | Optional. By default, password recovery capability is enabled. |
3. Disable password recovery capability. | undo password-recovery enable | Optional. |
When password recovery capability is disabled, you cannot downgrade the device software to a version that does not support the capability through the BootWare menus. You can do so at the CLI, but the BootWare menu password configured becomes effective again.
Handling console login password loss
| CAUTION: Handling console login password loss causes service outage. |
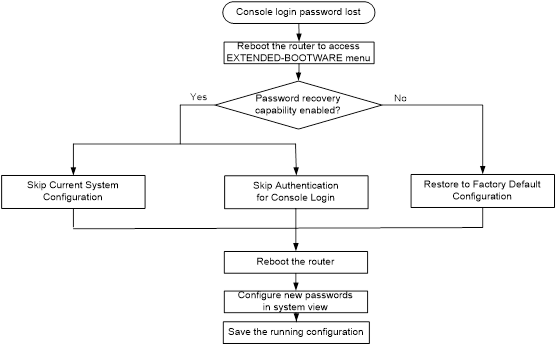
The method for handling console login password loss depends on the password recovery capability setting (see Figure 2).
Figure 2 Handling console login password loss
Examining the password recovery capability setting
1. Reboot the device.
System is starting...
Press Ctrl+D to access BASIC-BOOTWARE MENU
Press Ctrl+T to start heavy memory test
Booting Normal Extended BootWare........
The Extended BootWare is self-decompressing....Done.
****************************************************************************
* *
* H3C WX3520H BootWare, Version 1.10 *
* *
****************************************************************************
Copyright (c) 2004-2018 New H3C Technologies Co., Ltd.
Compiled Date : Apr 23 2018
CPU Type : XLP416
CPU Clock Speed : 1000MHz
Memory Type : DDR3 SDRAM
Memory Size : 4096MB
Memory Speed : 1333MHz
BootWare Size : 768KB
Flash Size : 16MB
cfa0 Size : 4002MB
CPLD1 Version : 004
CPLD2 Version : 000
PCB Version : Ver.A
BootWare Validating...
Press Ctrl+B to access EXTENDED-BOOTWARE MENU...
2. Press Ctrl + B within three seconds after the "Press Ctrl+B to access EXTENDED-BOOTWARE MENU..." prompt message appears.
3. Read the password recovery capability setting information displayed before the EXTEND-BOOTWARE menu.
Password recovery capability is enabled.
Note: The current operating device is cfa0
Enter < Storage Device Operation > to select device.
===========================<EXTENDED-BOOTWARE MENU>=========================
|<1> Boot System |
|<2> Enter Serial SubMenu |
|<3> Enter Ethernet SubMenu |
|<4> File Control |
|<5> Restore to Factory Default Configuration |
|<6> Skip Current System Configuration |
|<7> BootWare Operation Menu |
|<8> Skip Authentication for Console Login |
|<9> Storage Device Operation |
|<0> Reboot |
============================================================================
Ctrl+Z: Access EXTENDED ASSISTANT MENU
Ctrl+F: Format File System
Ctrl+C: Display Copyright
Enter your choice(0-9):
Using the Skip Current System Configuration option
4. Reboot the device to access the EXTEND-BOOTWARE menu, and then enter 6.
Password recovery capability is enabled.
Note: The current operating device is cfa0
Enter < Storage Device Operation > to select device.
===========================<EXTENDED-BOOTWARE MENU>=========================
|<1> Boot System |
|<2> Enter Serial SubMenu |
|<3> Enter Ethernet SubMenu |
|<4> File Control |
|<5> Restore to Factory Default Configuration |
|<6> Skip Current System Configuration |
|<7> BootWare Operation Menu |
|<8> Skip Authentication for Console Login |
|<9> Storage Device Operation |
|<0> Reboot |
============================================================================
Ctrl+Z: Access EXTENDED ASSISTANT MENU
Ctrl+F: Format File System
Ctrl+C: Display Copyright
Enter your choice(0-9): 6
After the configuration skipping flag is set successfully, the following message appears:
Flag Set Success.
5. When the EXTEND-BOOTWARE menu appears again, enter 1 to reboot the device.
The device starts up with the factory-default configuration without deleting the next-startup configuration files.
6. To use the configuration in a next-startup configuration file, load the file in system view.
<Sysname> system-view
[Sysname] configuration replace file cfa0:/startup.cfg
Current configuration will be lost, save current configuration? [Y/N]:n
Info: Now replacing the current configuration. Please wait...
Info: Succeeded in replacing current configuration with the file startup.cfg.
7. Configure a new console login authentication mode and a new console login password.
In the following example, the console login authentication mode is password and the authentication password is 123456. For security purposes, the password is always saved in ciphertext, whether you specify the simple or cipher keyword for the set authentication password command.
<Sysname> system-view
[Sysname] line console 0
[Sysname-line-console0] authentication-mode password
[Sysname-line-console0] set authentication password simple 123456
| NOTE: Use the line console 0 command on a device that has a separate console port. |
8. To have the settings take effect after a reboot, save the running configuration to the next-startup configuration file.
[Sysname-line-console0] save
Using the Skip Authentication for Console Login option
1. Reboot the device to access the EXTEND-BOOTWARE menu, and then enter 8.
Password recovery capability is enabled.
Note: The current operating device is cfa0
Enter < Storage Device Operation > to select device.
===========================<EXTENDED-BOOTWARE MENU>=========================
|<1> Boot System |
|<2> Enter Serial SubMenu |
|<3> Enter Ethernet SubMenu |
|<4> File Control |
|<5> Restore to Factory Default Configuration |
|<6> Skip Current System Configuration |
|<7> BootWare Operation Menu |
|<8> Skip Authentication for Console Login |
|<9> Storage Device Operation |
|<0> Reboot |
============================================================================
Ctrl+Z: Access EXTENDED ASSISTANT MENU
Ctrl+F: Format File System
Ctrl+C: Display Copyright
Enter your choice(0-9): 8
The device deletes the console login authentication configuration commands from the main next-startup configuration file. After the operation is completed, the following message appears:
Clear Image Password Success!
2. When the EXTEND-BOOTWARE menu appears again, enter 1 to reboot the device.
The device starts up with the main next-startup configuration file.
3. Configure a console login authentication mode and a new console login password. See "Configure a new console login authentication mode and a new console login password.."
4. To have the setting take effect after a reboot, save the running configuration to the next-startup configuration file.
[Sysname-line-console0] save
Using the Restore to Factory Default Configuration option
| CAUTION: Using the Restore to Factory Default Configuration option deletes both the main and backup next-configuration files. |
To use the Restore to Factory Default Configuration option:
1. Reboot the device to access the EXTEND-BOOTWARE menu, and enter 5.
Password recovery capability is enabled..
Note: The current operating device is cfa0
Enter < Storage Device Operation > to select device.
===========================<EXTENDED-BOOTWARE MENU>==========================
|<1> Boot System |
|<2> Enter Serial SubMenu |
|<3> Enter Ethernet SubMenu |
|<4> File Control |
|<5> Restore to Factory Default Configuration |
|<6> Skip Current System Configuration |
|<7> BootWare Operation Menu |
|<8> Skip Authentication for Console Login |
|<9> Storage Device Operation |
|<0> Reboot |
============================================================================
Ctrl+Z: Access EXTENDED ASSISTANT MENU
Ctrl+F: Format File System
Ctrl+C: Display Copyright
Enter your choice(0-9): 5
2. At the prompt for confirmation, enter Y.
The device deletes its main and backup next-startup configuration files and restores the factory-default configuration.
Because the password recovery capability is disabled, this operation can
cause the configuration files to be deleted, and the system will start up
with factory defaults. Are you sure to continue?[Y/N]Y
Setting...Done.
3. When the EXTEND-BOOTWARE menu appears again, enter 1 to reboot the device.
The device starts up with the factory-default configuration.
4. Configure a new console login authentication mode and a new console login password. See "Configure a new console login authentication mode and a new console login password.."
5. To have the settings take effect after a reboot, save the running configuration to the next-startup configuration file.
[Sysname] save
