- Table of Contents
- Related Documents
-
| Title | Size | Download |
|---|---|---|
| 01-Text | 795.71 KB |
Configuring the Kubernetes nodes
Configuring a node in host-based overlay model
Configuring a node in network-based overlay model
Installing the SDN CNI plug-in
Loading the CNI plug-in Docker image
Managing log files for the plug-in
Installing the SDN Monitor plug-in
Loading the Docker image of the Monitor plug-in
Load the Docker image of the Monitor plug-in
Installing the Monitor plug-in
Maintaining Monitor plug-in logs
Uninstalling the SDN Monitor plug-in
Upgrading the SDN Monitor plug-in
Upload the plug-in image file.
Configuring Pod network parameters
Configuring Pod network parameters by using the default network
Configuring Pod network parameters by using labels
Configuring Pod network parameters by using annotations
Configuring Pod network parameters by using NetworkConfiguration CRD
Configuring an IP address for the Pod
Specifying a static IP address for the Pod
Configuring an IP address pool
Configuring network, QoS, and security group parameters for a Pod by using definition CRDs
Configuring network parameters for a Pod by using a NetworkAttachmentDefinition CRD
Configuring network QoS parameters for a Pod by using a QoS CRD
Configuring network security group parameters for a Pod by using a security group CRD
Configuring network IP address parameters for a Pod by using a port CRD
Configuring parameters and creating a Pod by using CRDs
Parameter settings in typical configuration scenarios
Configuration for accessing the service ClusterIP and NodePort
Configurations for concurrent Pod deployment performance in a cloud VM environment
Overview
Kubernetes is an open-source container orchestration platform for automated deployment, scaling, and management of containerized applications.
Pods are the smallest deployable units of computing in Kubernetes. A Pod is a group of one or more tightly coupled containers, with shared network resources and file system and specifications for how to run the containers.
Kubernetes typically provides the following plug-ins:
· The SDN CNI plug-in is the network plug-in in compliance with the Kubernetes standards. Installation of the SDN CNI plug-in allows pods in Kubernetes to come online for the controller to monitor traffic, deploy security policies, and provide networking services for the pods.
· The SDN Monitor plug-in is the container network operations and maintenance (O & M) service plug-in. Installation of the SDN Monitor plug-in allows pods in Kubernetes to be displayed in topologies on the controller Web interface for the controller to provide automated O & M services for the pods.
Preparing for installation
Hardware requirements
Table 1 shows the minimum hardware requirements for installing the SDN Kubernetes plug-in on a physical server or virtual machine.
Table 1 Minimum hardware requirements
|
CPU |
Memory size |
Disk size |
|
Quad-core |
8 GB |
50 GB |
Software requirements
Table 2 shows the software requirements for installing the SDN Kubernetes plug-in.
|
Item |
Supported versions |
|
Kubernetes |
Kubernetes 1.9.x to 1.28.1 |
|
vSwitch |
· Host-based overlay—For the vSwitch version information, see the release notes for the controller. · Network-based overlay—Open vSwitch 2.9 and later. For the compatibility between the Open vSwitch and operating system kernel versions, see Table 3. |
Table 3 Compatibility between the Open vSwitch and operating system kernel versions
|
Open vSwitch version |
Linux kernel version |
|
2.9.x |
3.10 to 4.13 |
|
2.10.x |
3.16 to 4.17 |
|
2.11.x |
3.16 to 4.18 |
|
2.12.x |
3.16 to 5.0 |
|
2.13.x |
3.16 to 5.0 |
|
2.14.x |
3.16 to 5.5 |
|
2.15.x |
3.16 to 5.8 |
Configuring the Kubernetes nodes
You must configure basic settings for Kubernetes nodes before installing the SDN Kubernetes plug-in.
Configuring a node in host-based overlay model
1. Install the S1020V vSwitch. For the installation procedure, see the installation guide for the S1020V vSwitch.
2. Configure a VDS on the controller and add the VDS configuration to the node.
The following configuration example uses vds1-br as the vSwitch name, eth1 as the uplink interface, vxlan_vds1-br as the VXLAN tunnel name, and 100.0.100.100 as the VTEP's IP. Make sure the host-based overlay nodes are reachable to each other over VTEP IPs.
$ ovs-vsctl add-br vds1-br
$ ovs-vsctl add-port vds1-br eth1
$ ovs-vsctl add-port vds1-br vxlan_vds1-br -- set interface vxlan_vds1-br type=vxlan options:remote_ip=flow options:local_ip=100.0.100.100 options:key=flow
$ ip link set vds1-br up
$ ip addr add 100.0.100.100/16 dev vds1-br
To avoid loss of the VDS bridge's IP address after a node reboot, configure the IP address for the VDS bridge as follows for a root user:
a. Use the vi editor to open the /etc/profile file, press i to switch to insert mode, and then add the following two lines at the end of the file.
ip link set vds1-br up
ip addr add 100.0.100.100/16 dev vds1-br
b. Press Esc to enter command mode and enter :wq to save the file and quit the vi editor.
For a non-root user to perform this operation, it must have write access to the /etc/profile file and add sudo before the ip link set vds1-br up and ip addr add 100.0.100.100/16 dev vds1-br commands.
3. Configure a KVM-type compute domain on the controller and associate the domain with the VDS.
4. Add the node to the hosts in the compute domain.
5. Configure a static route node, pointing to the Kubernetes ClusterIP.
[root@master ~]# kubectl get service -A -owide
NAMESPACE NAME TYPE CLUSTER-IP EXTERNAL-IP PORT(S) AGE SELECTOR
default kubernetes ClusterIP 10.96.0.1 <none> 443/TCP 3d18h <none>
For example, if the ClusterIP range is 10.96.0.0/12, the node management NIC is ens160, IP address is 10.10.0.11, and gateway is 10.10.0.254, configure the static route as follows:
ip route add 10.96.0.0/12 via 10.10.0.254 dev ens160
Configuring a node in network-based overlay model
1. Install a version of Open vSwitch compatible with the kernel version of the operating system. See Table 3 for the compatibility between the Open vSwitch and operating system kernel versions.
$ yum install -y openvswitch
$ systemctl enable openvswitch.service
$ systemctl start openvswitch.service
2. (Optional.) If Kubernetes is version 1.22 or above, install cfssl, cfssjson, cfssl-certinfo, and jq tools on the Master node to generate Webhook certificates.
$ yum install -y lldpd
$ systemctl enable lldpd.service
$ systemctl start lldpd.service
$ ovs-vsctl add-br br-eno2
$ ovs-vsctl set bridge br-eno2 protocols=OpenFlow13
$ ovs-vsctl set-fail-mode br-eno2 secure
5. Add an uplink interface (eno2 for example) to the Open vSwitch bridge and configure the interface settings.
$ ovs-vsctl add-port br-eno2 eno2
$ ovs-vsctl br-set-external-id br-eno2 uplinkInterface eno2
6. (Optional.) To deploy K8s on a bare metal, add the UUID of the bare metal vPort (coming online on the controller), for example, 1e10786f-f894-533f-838c-23c2766ed1d1, the UUID of the virtual link layer network where the vPort resides, for example, 3c07b72c-4ee8-4b2a-aff2-cacb3d84c8f6, and the management network gateway of the K8s cluster, for example, 10.10.0.254, to the OVS bridge. If the K8s cluster is dual stack, configure the management network gateway (managementNetworkGw) of the cluster with dual-stack IP addresses separated with a comma (,).
$ ovs-vsctl br-set-external-id br-eno2 uplinkNetworkId 3c07b72c-4ee8-4b2a-aff2-cacb3d84c8f6
$ ovs-vsctl br-set-external-id br-eno2 uplinkPortId 1e10786f-f894-533f-838c-23c2766ed1d1
$ ovs-vsctl br-set-external-id br-eno2 managementNetworkGw 10.10.0.254
7. (Optional.) To deploy K8s on a VM created in trunk port mode on OpenStack, perform the following tasks:
a. Add the following settings for the OVS bridge:
- UUID of the trunk port on OpenStack, for example, 1e10786f-f894-533f-838c-23c2766ed1d1.
- UUID of the virtual link layer network where the trunk port resides, for example, 3c07b72c-4ee8-4b2a-aff2-cacb3d84c8f6.
- Management network gateway of the K8s cluster, for example, 10.10.0.254. If the K8s cluster is dual stack, configure the management network gateway (managementNetworkGw) of the K8s cluster with dual-stack IP addresses separated with a comma (,).
- Connected cloud scenario. The value can only be OpenStack.
- Virtualization type. The value can only be KVM.
- Access type. The value can only be netoverlay.
b. Configure lldpd on the host where the VM resides. For the configuration procedure, see step 3.
$ ovs-vsctl br-set-external-id br-eno2 uplinkNetworkId 3c07b72c-4ee8-4b2a-aff2-cacb3d84c8f6
$ ovs-vsctl br-set-external-id br-eno2 uplinkPortId 1e10786f-f894-533f-838c-23c2766ed1d1
$ ovs-vsctl br-set-external-id br-eno2 managementNetworkGw 10.10.0.254
$ ovs-vsctl br-set-external-id br-eno2 cloud openstack
$ ovs-vsctl br-set-external-id br-eno2 virtType kvm
$ ovs-vsctl br-set-external-id br-eno2 accessType netoverlay
8. To deploy K8s in Ironic mode on OpenStack, perform the following tasks:
a. Add the following settings for the OVS bridge:
- UUID of the corresponding uplink port on OpenStack, for example, 1e10786f-f894-533f-838c-23c2766ed1d1.
- UUID of the virtual link layer network where the uplink port resides, for example, 3c07b72c-4ee8-4b2a-aff2-cacb3d84c8f6.
- Management network gateways of the K8s cluster, for example, 10.10.0.254. If the K8s cluster is dual stack, configure the management network gateway (managementNetworkGw) of the K8s cluster with dual-stack IP addresses separated with a comma (,).
- Cloud scenario with which the OVS bridge interoperates. The value can only be OpenStack.
- Virtualization type. The value can only be Ironic.
- Overly mode. The value can only be Netoverlay.
b. Configure the lldpd service for the host where the VM resides. For the configuration procedure, see step 3.
$ ovs-vsctl br-set-external-id br-eno2 uplinkNetworkId 3c07b72c-4ee8-4b2a-aff2-cacb3d84c8f6
$ ovs-vsctl br-set-external-id br-eno2 uplinkPortId 1e10786f-f894-533f-838c-23c2766ed1d1
$ ovs-vsctl br-set-external-id br-eno2 managementNetworkGw 10.10.0.254
$ ovs-vsctl br-set-external-id br-eno2 cloud openstack
$ ovs-vsctl br-set-external-id br-eno2 virtType ironic
$ ovs-vsctl br-set-external-id br-eno2 accessType netoverlay
Installing the SDN CNI plug-in
Loading the CNI plug-in Docker image
Follow these steps to load the plug-in Docker image on the master and nodes, respectively:
1. Obtain the SDN CNI plug-in Docker image package. Then save the package to the installation directory on the server or virtual machine The name of the package is in the SeerEngine_DC_NET_PLUGIN-version.tar format, where version represents the version number.
|
|
CAUTION: Alternatively, you can upload the package to the installation directory through FTP, TFTP, or SFTP. To avoid damaging the package, use the binary mode when you upload the package through FTP or TFTP. |
|
|
IMPORTANT: The image package required depends on the server architecture: · x86_64 server—SeerEngine_DC_NET_PLUGIN-version.tar.gz · ARM server—SeerEngine_DC_NET_PLUGIN-version-ARM64.tar.gz Both Docker and Containerd use Docker images for loading. |
2. Decompress the package to obtain two directories. The CNI plug-in directory is SeerEngine_DC_NET_PLUGIN-version. Change the directory to that of the CNI plug-in.
$ tar -xzvf SeerEngine_DC_NET_PLUGIN-E6402.tar.gz
SeerEngine_DC_NET_PLUGIN-E6402
SeerEngine_DC_SDNC_MONITOR-E6402
$ cd SeerEngine_DC_NET_PLUGIN-E6402
SeerEngine_DC_NET_PLUGIN-E6402.tar
1.21minus/
1.21minus/SeerEngine_DC_NET_PLUGIN-E6402.yaml
1.21minus/SeerEngine_DC_NET_PLUGIN-E6402.crd.yaml
1.21minus/webhook-create-signed-cert.sh
1.22plus
1.22plus/SeerEngine_DC_NET_PLUGIN-E6402.yaml
1.22plus/SeerEngine_DC_NET_PLUGIN-E6402.crd.yaml
1.22plus/webhook-create-signed-cert.sh
vcfc2sdnc.sh
3. Obtain the deployment files for the corresponding CNI plug-in of the Kubernetes version.
¡ If the installed Kubernetes version is 1.22 or above, use the deployment files and scripts in the 1.22plus directory.
¡ If the installed Kubernetes version is below 1.22, use the deployment files and scripts in the 1.21minus directory.
4. Load the Docker image of the CNI plug-in. The package name format is SeerEngine_DC_NET_PLUGIN-version.tar, where version is the version number.
¡ Container runtime as Docker
Load the Docker image for the CNI plug-in
$ docker load -i SeerEngine_DC_NET_PLUGIN-E6402.tar
Verify that the loading is successful
$ docker images
¡ Container runtime as Containerd
Load the Docker image for the CNI plug-in
$ ctr -n k8s.io images import SeerEngine_DC_NET_PLUGIN-E6402.tar
Verify that the loading is successful
$ ctr –n k8s.io images ls
Installing the plug-in
After loading the docker image on the master and nodes, install the CNI plug-in on the master.
To install the plug-in on the master:
1. Upload and execute the preprocessing script to provide a certificate for the webhook service in the sdnc-net-master plug-in.
a. Obtain preprocessing script webhook-create-signed-cert.sh and upload it to the installation directory on the master.
b. Execute the script.
You only need to execute the script on one master when multiple masters exist.
$ sh webhook-create-signed-cert.sh
2. Obtain and copy the configuration files of the SDN CNI plug-in SeerEngine_DC_NET_PLUGIN-version.yaml and SeerEngine_DC_NET_PLUGIN-version.crd.yaml to the installation directory on the master. version in the file names represents the version number.
You only need to perform this task on one master when multiple masters exist.
|
|
CAUTION: Alternatively, you can upload the files to the installation directory through FTP, TFTP, or SFTP. To avoid damaging the files, use the binary mode when you upload the files through FTP or TFTP. |
3. Modify the configuration file.
a. Use the vi editor to open the configuration file.
$ vi SeerEngine_DC_NET_PLUGIN-E6402.yaml
b. Press I to switch to insert mode, and then modify the configuration file. For information about the parameters, see Table 4.
kind: ConfigMap
apiVersion: v1
metadata:
name: sndc-net-plugin
namespace: kube-system
data:
etcd_servers: "https://192.168.0.10:2379,https://192.168.0.11:2379,https://192.168.0.12:2379"
etcd_certfile: "/etc/sndc-net-plugin/etcd.crt"
etcd_keyfile: "/etc/sndc-net-plugin/etcd.key"
etcd_cafile: "/etc/sndc-net-plugin/etcd-ca.crt"
k8s_api_server: "https://192.168.0.20:6443"
k8s_ca: "/etc/sndc-net-plugin/ca.crt"
k8s_key: "/etc/sndc-net-plugin/client.key"
k8s_cert: "/etc/sndc-net-plugin/client.crt"
k8s_token: ""
sdnc_url: " http://192.168.227.175:30000/"
sdnc_domain: "sdn"
sdnc_client_timeout: "1800"
sdnc_client_retry: "10"
sdnc_cert_enable: "false"
sdnc_cafile: ""
sdnc_keyfile: ""
sdnc_certfile: ""
openstack_url: "http://99.0.13.16:5000/v3"
openstack_username: "admin"
openstack_password: "OPENSTACK_PASSWORD"
openstack_projectname: "admin"
openstack_projectdomain: "admin"
openstack_client_timeout: "30"
openstack_client_retry: "10"
default_network_id: ""
log_dir: "/var/log/sdnc-net-plugin/"
log_level: "1"
bridge_mappings: "physnet1:br-physnet1:10:40,physnet2:br-physnet2"
---
kind: ConfigMap
apiVersion: v1
metadata:
name: sndc-net-master
namespace: kube-system
data:
bind_host: "0.0.0.0"
bind_port: "9797"
protocol: "http"
webhook_bind_port: "9898"
cloud_network_vlanmap_preset: “false”
---
apiVersion: v1
kind: Secret
metadata:
name: sdnc-plugin-secret
namespace: kube-system
type: Opaque
data:
username: YWRtaW4=
password: UHdkQDEyMzQ1
---
kind: ConfigMap
apiVersion: v1
metadata:
name: sdnc-net-agent
namespace: kube-system
data:
overlay_mode: "auto"
default_security_policy: "permit"
host_networks: "192.168.10.0/24,192.168.2.0/24"
host_to_container_network: "172.70.0.0/16"
container_to_host_network: "172.60.0.0/16"
node_port_net_id: ""
default_mtu: "0"
sync_flows_interval: “5”
service_strategy: "0"
service_ip_cidr: "10.68.0.0/16"
enable_flows_pre_distribution: "true"
enable_nodeport_normal_forward: "false"
nodeport_local_source_cidr: ""
clusterIp_publish : “false”
cloud_region_name: ""
agent_host: "0.0.0.0"
agent_port: "9090"
sdnc_monitor_support: "false"
netoverlay_vlan_ranges: "node01:1:100,node02:101:200"
node_port_interface_type: "openvswitch_internal"
non_hierarchical_nodeport_vlan: "1024:1025"
ping_gateway_retry: "10"
---
apiVersion: admissionregistration.k8s.io/v1beta1
kind: MutatingWebhookConfiguration
metadata:
name: validation-webhook-cfg
labels:
app: admission-webhook-network
webhooks:
- name: validate.sdnc.io
failurePolicy: Fail
clientConfig:
service:
name: sdnc-net-master-webhook
namespace: kube-system
path: "/v1.0/validate"
caBundle: ""
rules:
- operations: [ "CREATE", "UPDATE", "DELETE" ]
apiGroups: ["sdnc.io"]
apiVersions: ["v1"]
resources: ["ipv4pools","ipv6pools","network-configurations"]
- operations: [ "CREATE", "UPDATE", "DELETE" ]
apiGroups: ["k8s.cni.cncf.io"]
apiVersions: ["v1"]
resources: ["network-attachment-definitions","qos-definitions","security-group-definitions","port-definitions"]
4. Install the CNI plug-in.
|
|
IMPORTANT: Before installing the plug-in, modify the apiVersion parameter for the resources in the configuration files according to the K8s cluster version. |
$ kubectl create -f SeerEngine_DC_NET_PLUGIN-E6402.crd.yaml
$ kubectl create -f SeerEngine_DC_NET_PLUGIN-E6402.yaml
5. Verify the installation. If the Pods are in Running state, the plug-in is installed correctly.
$ kubectl get pods -n
kube-system | grep sndc
sndc-net-agent-mtwkl 1/1 Running 0 5d7h
sndc-net-agent-rt2s6 1/1 Running 0 5d7h
sndc-net-master-79bc68885c-2s9jm 1/1 Running 0 5d7h
The following table describes parameters in the configuration file of the SDN CNI plug-in.
Table 4 Parameters in the configuration file of the SDN CNI plug-in
|
Parameter |
Description |
|
etcd_servers |
etcd service API address. You can configure multiple addresses for an etcd cluster and use commas to separate the addresses. You can configure multiple addresses for an etcd cluster and use commas to separate the addresses. The address can be an HTTP or HTTPS address. To use an HTTPS address (for example, https://192.168.0.10:2379), you must configure the etcd_certfile, etcd_keyfile, and etcd_cafile parameters. In dual stack mode, input only the IPv4 address. |
|
etcd_certfile |
etcd client x509 certificate file. The value is the certificate file path, for example, /etc/sndc-net-plugin/etcd.crt. If the path does not exist, create it and set the permission to 755. This parameter is valid only when the etcd_servers value is an HTTPS address. |
|
etcd_keyfile |
Private key file for the etcd client x509 certificate. The value is the private key file path, for example, /etc/sndc-net-plugin/etcd.key. If the path does not exist, create it and set the permission to 755. This parameter is valid only when the etcd_servers value is an HTTPS address. |
|
etcd_cafile |
etcd client CA file. The value is the CA file path. If the path does not exist, create it and set the permission to 755. This parameter is valid only when the etcd_servers value is an HTTPS address. |
|
k8s_api_server |
K8s API server interface address. In dual stack mode, input only the IPv4 address. |
|
k8s_ca |
Client CA file of the K8s API server. The value is the CA file path, for example, /etc/sndc-net-plugin/ca.crt. If the path does not exist, create it and set the permission to 755. This parameter is valid only when the value of the k8s_api_server parameter is an HTTPS address. |
|
k8s_key |
Client X.509 certificate private key file of the K8s API server. The value is the private key file, for example, /etc/sndc-net-plugin/client.key. If the path does not exist, create it and set the permission to 755. This parameter is valid only when the value of the k8s_api_server parameter is an HTTPS address. It is used together with k8s_cert. This parameter is not required when k8s_token authentication is used. |
|
k8s_cert |
Client X.509 certificate file of the K8s API server. The value is the certificate file path, for example, /etc/sndc-net-plugin/client.crt. If the path does not exist, create it and set the permission to 755. This parameter is valid only when the value of the k8s_api_server parameter is an HTTPS address. This parameter is not required when k8s_key and k8s_cert authentication is used. |
|
k8s_token |
Client authentication token of the K8s API server. This parameter is valid only when the value of the k8s_api_server parameter is an HTTPS address. This parameter is not required when k8s_key and k8s_cert authentication is used. |
|
sdnc_url |
URL address for logging in to the Unified Platform, for example, http://192.168.227.175:30000/. |
|
sdnc_domain |
Name of the domain where the controller resides. |
|
sdnc_client_timeout |
Amount of time waiting for a response from the controller, in seconds. |
|
sdnc_client_retry |
Maximum transmissions of connection requests to the controller. |
|
sdnc_cert_enable |
Whether to enable bidirectional authentication for interoperation with the Unified Platform. · true-Enable. · false-Disable. The default value is false. |
|
sdnc_cafile |
CA file for bidirectional authentication for interoperation with the Unified Platform. By default, no value is configured. This parameter is valid only when the value of the sdnc_cert_enable parameter is true. |
|
sdnc_certfile |
Client certificate for bidirectional authentication for interoperation with the Unified Platform. By default, no value is configured. This parameter is valid only when the value of the sdnc_cert_enable parameter is true. |
|
sdnc_keyfile |
Client key for bidirectional authentication for interoperation with the Unified Platform. By default, no value is configured. This parameter is valid only when the value of the sdnc_cert_enable parameter is true. |
|
openstack_url |
OpenStack Keystone authentication address. |
|
openstack_username |
Username for accessing OpenStack. |
|
openstack_password |
Password for accessing OpenStack. |
|
openstack_projectname |
OpenStack project name. |
|
openstack_projectdomain |
Name of the domain where the OpenStack project resides. |
|
openstack_client_timeout |
Amount of time waiting for a response from OpenStack, in seconds. |
|
openstack_client_retry |
Maximum transmissions of connection requests to OpenStack. |
|
default_network_id |
UUID of the default virtual link layer network where the containers come online. If no virtual link layer network is configured for the containers, the containers come online on the default network. |
|
log_dir |
Log directory. |
|
log_level |
Log level. |
|
bridge_mappings |
· Mappings between physical networks and VLAN network bridges if the plug-in interoperates with an OpenStack bare metal VLAN network. For multiple mappings, use commas to separate them, for example, physnet1:br-physnet1:10:40,physnet2:br-physnet2. In this example value, two mappings are configured: ¡ Mappings between physical network physnet1 and network bridge br-physnet1. If network bridge br-physnet1 is deployed on a K8s cluster node, physical network physnet1 is used. 10:40 represents the VLAN ID range for the physical network. If you do not specify the VLAN ID range, the VLAN ID range is 1 to 4094. ¡ Mappings between physical network physnet2 and network bridge br-physnet2. The VLAN ID range for the physical network is 1 to 4094. · Leave this parameter unconfigured for VXLAN network boarding scenarios. NOTE: By default, the last network bridge displayed in the ovs-vsctl list-br command output is used as the VXLAN network bridge. If you increase a physical network, the matched network bridge cannot be the last one in the ovs-vsctl list-br command output. |
|
bind_host |
Master service API-bound address. |
|
bind_port |
Master service API-bound port number. As a best practice, bind the API to the net_master_port. |
|
protocol |
API protocol. Only HTTP is supported. |
|
webhook_bind_port |
Webhook service port number. As a best practice, set the same value as the webhook-port parameter. |
|
cloud_network_vlanmap_preset |
Parameter for presetting OpenStack VLAN network mappings. The default value is false. To enable the presetting feature, set this parameter to true. To orchestrate the network CRD scenario on OpenStack, set this parameter to true. When you are creating or deleting a VLAN network CRD, the plug-in will automatically update the description of the corresponding network in the VLAN map format on OpenStack. The format is as follows: {"name":"openstack-cloud_region_name","vmVlan":1200,"vswitchVlan":1200,"action":"Add"} |
|
username(sdnc-plugin-secret) |
Username for logging in to the Unified Platform. You must encode and provide the username in its Base64 format by using the echo -n 'username' |base64 command. For example, if the username is admin, provide its Base64 format of YWRtaW4= for this parameter. To decode the YWRtaW4= username, execute the echo -n 'YWRtaW4='|base64 –d command. |
|
password(sdnc-plugin-secret) |
Password for logging in to the Unified Platform. You must encode and provide the password in its Base64 format by using the echo -n 'password' |base64 command. For example, if the password is Pwd@12345, provide its Base64 format of UHdkQDEyMzQ1 for this parameter. To decode the UHdkQDEyMzQ1 password, execute the echo -n 'UHdkQDEyMzQ1'|base64 -d command. |
|
overlay_mode |
Overlay mode of the node: · net—Network-based overlay · host—Host-based overly · auto—Automatic selection of overlay mode based on the open vSwitch configuration |
|
default_security_policy |
Default security policy. This parameter takes effect only in network-based overlay mode. · permit · deny |
|
host_networks |
Network segment where the host is located. For multiple network segments, use commas to separate them. This parameter is no longer maintained. As a best practice, use the default settings. |
|
host_to_container_network |
NAT address network segment used by the host for accessing a container. This network segment cannot conflict with other network segments. You can leave this parameter unconfigured in a bare metal scenario. This parameter is no longer maintained. As a best practice, use the default settings. |
|
container_to_host_network |
NAT address network segment used by a container for accessing the host. This network segment cannot conflict with other network segments. You can leave this parameter unconfigured in a bare metal scenario. This parameter is no longer maintained. As a best practice, use the default settings. |
|
node_port_net_id |
Virtual link layer network UUID for the NodePort function. After the UUID is specified, a vPort will automatically come online for each node to provide NodePort services. You are not required to configure this parameter in the bare metal scenario or if NodePort is not used. |
|
default_mtu |
Default MTU of a container NIC. The value is 0 by default, indicating that the default MTU is 1500. You can set the MTU to 1450 when the controller interoperates with OpenStack. |
|
sync_flows_interval |
Interval at which the plug-in polls the endpoints and member Pods for changes. If a change is detected, the flow table is refreshed. The value is an integer in the range of 1 to 60, in seconds. The default value is 5. The smaller the value, the more frequently the flow table is refreshed. As a best practice, configure the value in the range of 1 to 10. |
|
service_strategy |
Load balancing policy for the ClusterIP service: · 0—IP address-based load balancing policy. · 1—IP address- and port number-based load balancing policy. The default value is 0. The load balancing policy for the ClusterIp service is disabled if flow table flow table pre-distribution is enabled. This parameter is no longer maintained. As a best practice, use the default settings. |
|
service_ip_cidr |
ClusterIp service IP address segment of the K8s cluster. If the K8s cluster is dual stack, set this parameter to dual stack addresses separated by commas (,), such as 10.96.0.0/12, fc00::/108. |
|
enable_flows_pre_distribution |
Whether to enable flow table pre-distribution for Service ClusterIP. The default value is true. When you disable this feature, make sure the number of nodes in the network-based overlay model is greater than one. If the K8s cluster is dual stack or IPv6 only, set this parameter to true. |
|
enable_nodeport_normal_forward |
Whether to enable use of preset normal flow tables for NodePort/Hostport. When you enable use of preset normal flow tables for NodePort, you must set the externaltrafficpolicy parameter to Cluster. The default value is false. If the value is set to true, the value takes effect when the enable_flows_pre_distribution parameter is set to true, and the forwarding performance is improved in this case. |
|
nodeport_local_source_cidr |
Specify the source client CIDRs accessing the NodePort when the externaltrafficpolicy attribute is set to Local for the NodePort. Separate multiple CIDRs with commas (,), for example, "5.0.0.0/32,6::0/64". The default value is empty. This parameter takes effect only when the node_port_interface_type parameter is set to openvswitch_internal and the enable_flows_pre_distribution parameter is set to true. In this case, this parameter improves forwarding performance. NOTE: If you configure the nodeport_local_source_cidr parameter and the Open vSwitch version of the node is later than 2.9, the system will automatically add the openflow15 protocol and set the load algorithm to hash for the target OVS group of the NodePort. To view the protocol family, use the ovs-vsctl get Bridge {bridge-name} protocols command. To view the OVS group, use the ovs-ofctl dump-groups {bridge-name} -O openflow15 command. |
|
clusterIp_publish |
Whether to enable advertisement of ClusterIP routes to the EVPN fabric. The default value is false. If the value is set to true, you are required to bind a vRouter to the uplink interface subnet and bind a routing table to the vRouter. ClusterIP router advertisement to the EVPN fabric is not supported in the following scenarios: · The node_port_interface_type parameter value is set to true. · OpenStack scenario. · The container network uses the host network segment. · Host overlay scenario. ClusterIP routers advertised to the EVPN fabric cannot be IPv6 static routes. If you change the value from true to false, the routing entry already deployed from the controller will not be deleted. |
|
cloud_region_name |
Name of the cloud with which the K8s cluster interoperates. This parameter is used to differentiate K8s clusters. If only one K8s cluster exists, you can leave the parameter unconfigured. By default, the parameter is unconfigured. |
|
agent_host |
Agent service API-bound IP address. |
|
agent_port |
Agent service API-bound port number. |
|
sdnc_monitor_support |
Whether to enable integration with the sdnc_monitor component. The default value is false. To deploy the sdnc_monitor component, set this parameter to true. |
|
netoverlay_vlan_ranges |
VLAN range for the network-based overlay nodes, in the format of Node_name:VLAN_min:VLAN_max. For multiple VLAN ranges, use commas to separate them. If the node_port_interface_type parameter value is host_ip_link_vlan, exclude the uplink interface PVID from the VLAN range. |
|
node_port_interface_type |
NodePort access mode: · host_ip_link_vlan—Adding a VLAN NIC for the uplink interface. For this mode to take effect, configure a UUID from which the vPort comes online on the OVS bridge and a K8s management network gateway and enable Service ClusterIP flow table pre-deployment. · openvswitch_internal—Adding a cniOVSNode for the OVS bridge. The default value is openvswitch_internal. |
|
non_hierarchical_nodeport_vlan |
VLAN range for the NodePort subinterfaces on the OpenStack bare metal VLAN network, in the format of VLAN_min:VLAN_max. The VLAN ID cannot be the PVID of the uplink interface.
The VLAN network (without subnet) must be created in advance on OpenStack. Do not use this network for other services. To avoid conflict with mappings on subinterfaces, does not deploy VLAN-VXLAN mappings on interfaces. |
|
ping_gateway_retry |
Maximum number of retries to ping the gateway after Pod creation when interoperating with the OpenStack bare metal or VMs. |
|
caBundle |
Certificate authorization data of the K8s cluster. You can obtain the value by executing the kubectl config view --raw --flatten -o json command on the master or retrieve the data from the /etc/kubernetes/admin.conf file on the master node. |
|
|
IMPORTANT: · After configuring the etcd_certfile, etcd_keyfile, and etcd_cafile parameters, you must save the etcd client certificate file, client certificate key file, and certificate CA file to the specified path on the master node and copy the path to all nodes. The path depends on the deployment tool and the tool version. For example, the etcd certificate file in the K8s environment set up by using Kubeadm is saved in the /etc/kubernetes/pki/ path. · After configuring the k8s_ca, k8s_key, and k8s_cert parameters, you must save the K8s API server client certificate file, client certificate key file, and certificate CA file to the specified path on the master node and copy the path to all nodes. The path depends on the deployment tool and the tool version. For example, the K8s API server certificate file in the K8s environment set up by using Kubeadm is saved in the /etc/kubernetes/pki/ path. |
|
|
IMPORTANT: When use the parameter "sdnc_url" for logging in to the Unified Platform, there is a conflict between the default port number of the Unified Platform, which is 30000, and the default nodeport port range of K8s, which is 30000-32767. There are two possible ways to resolve this issue: · Do not create a nodeport with port number 30000 on K8s. · Modify the default nodeport port range of K8s. By editing "/etc/kubernetes/manifests/kube-apiserver.yaml" and configuring the "--service-node-port-range" parameter, specify the nodeport range for kube-apiserver, for example: "--service-node-port-range=10000-15000". After the modification is completed, save and exit the file. The kube-apiserver-master pod will automatically load the parameters and restart. During this period, the K8s cluster will be unavailable. |
|
|
IMPORTANT: After the plug-in is installed, modify the MAC address of the uplink interface as needed. The modification command can be written into the startup file to prevent the MAC address from changing after a restart. For example, ifconfig ens256 hw ether 00:50:56:aa:98:3a. After installing the plugin, the hostname of the host is not allowed to be modified. |
Managing log files for the plug-in
The log files for the plug-in are saved in the /var/log/sdnc-net-plugin directory on each node by default. You can delete the log files as needed.
|
|
CAUTION: Do not delete the source and destination files for the soft links in the log directory. If you do so, you must restart the plug-in. |
Removing the SDN CNI plug-in
|
|
IMPORTANT: Before removing the SDN CNI plug-in, remove all Pods created by using the SDN CNI plug-in. |
To remove the SDN CNI plug-in, execute the following commands:
$ kubectl delete -f SeerEngine_DC_NET_PLUGIN-E6402.yaml
$ kubectl delete -f SeerEngine_DC_NET_PLUGIN-E6402.crd.yaml
Upgrading the SDN CNI plug-in
1. Install the plug-in Docker image. For the installation procedure, see "Loading the CNI plug-in Docker image."
2. Upload and modify the plug-in configuration file. For the procedure, see "Installing the plug-in."
3. Upgrade the plug-in.
|
|
CAUTION: · To avoid loss of CRD resources in the cluster, do not replace the .crd.yaml file with a new one when you upgrade the plug-in. · If Kubernetes is upgraded from version 1.21 to 1.22, before upgrading the CNI plugin, you must re-upload and execute the preprocessing script webhook-create-signed-cert.sh. For more information, see "Installing the plug-in." |
$ kubectl delete -f SeerEngine_DC_NET_PLUGIN-E6401.yaml
$ kubectl apply -f SeerEngine_DC_NET_PLUGIN-E6402.crd.yaml
$ kubectl create -f SeerEngine_DC_NET_PLUGIN-E6402.yaml
Installing the SDN Monitor plug-in
Loading the Docker image of the Monitor plug-in
Load the Docker image of the Monitor plug-in
Follow these steps to load the Docker image of the Monitor plug-in on the master and nodes, respectively:
1. Obtain the SDN Monitor plug-in Docker image package. Then save the package to the installation directory on the server or virtual machine. The name of the package is in the SeerEngine_DC_NET_PLUGIN-version.tar format, where version represents the version number.
|
|
IMPORTANT: Alternatively, you can upload the package to the installation directory through FTP, TFTP, or SFTP. To avoid damaging the package, use the binary mode when you upload the package through FTP or TFTP. The image package required depends on the server architecture: • x86_64 server—SeerEngine_DC_NET_PLUGIN-version.tar.gz • ARM server—SeerEngine_DC_NET_PLUGIN-version-ARM64.tar.gz Docker and Containerd both use Docker images for loading. |
2. Decompress the package to obtain two directories. The Monitor plug-in directory is SeerEngine_DC_SDNC_MONITOR-version. Change the directory to that of the Monitor plug-in.
$ tar -xzvf SeerEngine_DC_NET_PLUGIN-E6402.tar.gz
SeerEngine_DC_NET_PLUGIN-E6402
SeerEngine_DC_SDNC_MONITOR-E6402
$ cd SeerEngine_DC_NET_PLUGIN-E6402
SeerEngine_DC_SDNC_MONITOR-E6402.tar
SeerEngine_DC_SDNC_MONITOR-E6402.yaml
sdnc_ca.crt
sdnc_monitor.crt
sdnc_monitor.key
3. Load the Docker image of the Monitor plug-in. The package name format is SeerEngine_DC_SDNC_MONITOR-version.tar, where version is the version number.
¡ Container runtime as Docker
Load the Docker image for the plug-in
$ docker load -i SeerEngine_DC_SDNC_MONITOR-E6402.tar
Verify that the loading is successful
$ docker images
¡ Container runtime as Containerd
Load the Docker image for the plug-in
$ ctr -n k8s.io images import SeerEngine_DC_SDNC_MONITOR-E6402.tar
Verify that the loading is successful
$ ctr–n k8s.io images ls
Installing the Monitor plug-in
Uploading and editing the configuration file
1. Obtain and copy the configuration files of the SDN Monitor plug-in SeerEngine_DC_SDNC_MONITOR-version.yaml to the installation directory on the master, where version in the file name represents the version number. You only need to perform this task on one master when multiple masters exist.
|
|
IMPORTANT: · Alternatively, you can upload the package to the installation directory through FTP, TFTP, or SFTP. To avoid damaging the package, use the binary mode when you upload the package through FTP or TFTP. · Make sure only one detailed route is available to Unified Platform for the node deployed with the Monitor plug-in. |
2. Use the vi editor to open the configuration file.
$ vi SeerEngine_DC_SDNC_MONITOR-E6402.yaml
3. Press I to switch to insert mode, and then edit the configuration file. After modification, press Esc to enter command mode and enter :wq to save the file and quit the vi editor.
kind: ConfigMap
apiVersion: v1
metadata:
name: sdnc-monitor-config
namespace: kube-system
data:
server_bind_host: "0.0.0.0"
server_bind_port: "11443"
server_protocol: "https"
server_cafile: "/etc/sdnc-monitor-config/sdnc_ca.crt"
server_certfile: "/etc/sdnc-monitor-config/sdnc_monitor.crt"
server_keyfile: "/etc/sdnc-monitor-config/sdnc_monitor.key"
k8s_api_server: "https://192.168.0.20:6443"
k8s_ca: "/etc/sdnc-monitor-config/ca.crt"
k8s_key: "/etc/sdnc-monitor-config/apiserver-kubelet-client.key"
k8s_cert: "/etc/sdnc-monitor-config/apiserver-kubelet-client.crt"
k8s_token: ""
sdnc_url: "http://192.168.227.175:30000/"
sdnc_client_timeout: "1800"
sdnc_client_retry: "10"
sdnc_cert_enable: "false"
sdnc_cafile: ""
sdnc_keyfile: ""
sdnc_certfile: ""
sdnc_k8splatname: "k8s"
log_dir: "/var/log/sdnc-monitor/"
log_level: "1"
---
apiVersion: v1
kind: Secret
metadata:
name: sdnc-monitor-secret
namespace: kube-system
type: Opaque
data:
username: YWRtaW4=
password: UHdkQDEyMzQ1
Description of the parameters:
¡ server_bind_host—Address bound to the sdnc monitor service API (0.0.0.0 in this example). For single-replica monitor, you can configure the IP address of the network card on the node connected to Unified Platform. For example, if the northbound service VIP of Unified Platform is 192.168.227.175, and the IP address of the network card on the node connected to Unified Platform is 192.168.227.100, you can configure 192.168.227.100. For multi-replica monitor, you can configure only 0.0.0.0.
¡ server_bind_port—Port number bound to the sdnc monitor service API (11443 in this example).
¡ server protocol—Protocol of the sdnc monitor service (HTTPS in this example).
¡ server_cafile—CA file at the sdnc monitor server end. It takes effect only when server_protocol is set to HTTPS. (Taking /etc/sdnc-monitor-config/sdnc_ca.crt as an example, manually create the path if it does not exist in the environment, and set the permissions to 755.)
¡ server_certfile—X509 certificate file for the sdnc monitor server end. It takes effect only when server_protocol is set to HTTPS. (Taking /etc/sdnc-monitor-config/sdnc_monitor.crt as an example, manually create the path if it does not exist in the environment, and set permissions to 755.)
¡ server_keyfile—X509 certificate key file for the sdnc monitor server end. It takes effect only when server_protocol is set to HTTPS. (Taking /etc/sdnc-monitor-config/sdnc_monitor.key as an example, manually create the path if it does not exist in the environment, and set the permissions to 755.)
¡ k8s_api_server—K8s apiserver address (https://192.168.0.20:6443 in an example).
¡ k8s_ca—K8s apiserver client CA file. It takes effect only when k8s_api_server is set to HTTPS. (Taking /etc/sdnc-net-plugin/ca.crt as an example, manually create the path if it does not exist in the environment, and set the permissions to 755.)
¡ k8s_key—K8s apiserver client x509 certificate private key file. It takes effect only when k8s_api_server is set to an HTTPS address. It is used together with the k8s_cert parameter. The k8s_key parameter is not required when k8s_token is used for authentication. (Taking /etc/sdnc-net-plugin/client.key as an example, manually create the path if it does not exist in the environment, and set the permission to 755.)
¡ k8s_cert—K8s apiserver client x509 certificate file. It takes effect only when k8s_api_server is set to an HTTPS address. The k8s_cert is not required when k8s_token is used for authentication. (Taking /etc/sdnc-net-plugin/client.crt as an example, manually create the path if it does not exist in the environment, and set the permission to 755.)
¡ k8s_token—K8s apiserver client authentication token. It takes effect only when k8s_api_server is set to an HTTPS address. The k8s_token is not required when k8s_key or k8s_cert is used for authentication.
¡ sdnc_url—Login address for Unified Platform (http://192.168.227.175:30000/ in this example).
¡ sdnc_client_timeout—Timeout timer in seconds (1800 in this example) to wait for a response from the controller.
¡ sdnc_client_retry—Number of attempts to send connection requests to the controller (10 in this example).
¡ sdnc_cert_enable—Whether to enable bidirectional authentication when connecting to Unified Platform. To enable bidirectional authentication, set the value to true. By default, the value for this parameter is not set (disabled).
¡ sdnc_cafile—CA root certificate for bidirectional authentication when connecting to Unified Platform. To specify this parameter, first set the value for sdnc_cert_enable to true. By default, the value for this parameter is not set.
¡ sdnc_certfile—Client certificate for bidirectional authentication when connecting to Unified Platform. To specify this parameter, first set the value for sdnc_cert_enable to true. By default, the value for this parameter is not set.
¡ sdnc_keyfile—Client key for bidirectional authentication when connecting to Unified Platform. To specify this parameter, first set the value for sdnc_cert_enable to true. By default, the value for this parameter is not set.
¡ sdnc_k8splatname—Name of the k8s platform defined when connecting to Unified Platform. The Monitor plug-in periodically sends heartbeat packets to the k8s platform of Unified Platform (k8s in this example).
¡ username(sdnc-monitor-secret)—The login username for Unified Platform. Enter the value encrypted with base64. The encryption command is echo -n 'username' |base64. For example, if the username is admin, the encrypted value is YWRtaW4=, and the decryption command is echo -n 'YWRtaW4='|base64 -d.
¡ password (sdnc-monitor-secret)—Username and password for Unified Platform. Enter the value encrypted with base64. The encryption command is echo -n 'password' |base64. For example, if the password is Pwd@12345, the encrypted value is UHdkQDEyMzQ1, and the decryption command is echo -n 'UHdkQDEyMzQ1'|base64 -d.
Installing the Monitor plug-in
|
|
IMPORTANT: Before installing the Monitor plug-in, you need to modify the apiVersion parameter of each resource in the monitor configuration file according to the version of the k8s cluster. |
Install the Monitor plug-in by using the configuration file.
$ kubectl create -f SeerEngine_DC_SDNC_MONITOR-E6402.yaml
Verifying installation of the Monitor plug-in
Verify that the Pod of the plug-in is running correctly. If it is running correctly, Running is displayed.
$ kubectl get pods -n kube-system |
grep sdnc-monitor
sdnc-monitor-569c9b499c-c6d47 1/1 Running 0 5d7h
Maintaining Monitor plug-in logs
By default, the log files of the plug-in are stored in the /var/log/sdnc-monitor directory of the node. You need to delete the files as needed to prevent an excessive number of log files.
|
|
CAUTION: After installing the plug-in, do not delete the symbolic link source and destination files in the log directory. If you do so, the plug-in will need to be restarted. |
Uninstalling the SDN Monitor plug-in
Uninstall the SDN Monitor plug-in.
$ kubectl delete -f SeerEngine_DC_SDNC_MONITOR-E6402.yaml
Upgrading the SDN Monitor plug-in
Upload the plug-in image file.
For more information, see "Load the Docker image of the Monitor plug-in."
Upgrading the Monitor plug-in
Uploading and editing the configuration file
For more information, see "Uploading and editing the configuration file."
Upgrading the Monitor plug-in
$ kubectl delete -f SeerEngine_DC_SDNC_MONITOR-E6401.yaml
$ kubectl create -f SeerEngine_DC_SDNC_MONITOR-E6402.yaml
Configuration example
Configuring Pod network parameters
This section describes the procedure for creating a Pod in Kubernetes and onboarding the Pod onto the controller. As a best practice, use CRDs to create network parameters for a Pod. For the configuration procedure by using CRDs, see "Configuring parameters and creating a Pod by using CRDs."
Configuring Pod network parameters by using the default network
1. Create a tenant, virtual link layer network, subnet, security policy, and network policy on the controller.
2. Identify the default_network_id parameter in the configuration file and specify the default network. For the configuration method, see "Installing the plug-in."
3. Create and edit the Pod configuration file, for example, postgres-pod.yaml, on the master.
$ vi postgres-pod.yaml
apiVersion: v1
kind: Pod
metadata:
name: postgres
annotations:
spec:
containers:
- name: postgres
image: postgres
4. Use the configuration file to create a Pod.
$ kubectl create -f postgres-pod.yaml
5. Verify the Pod online status on the controller vPort page.
Configuring Pod network parameters by using labels
1. Create tenants, virtual link layer networks, subnets, security policies, and network policies on the controller. To deploy a K8s cluster on a VM in network-based overlay model or on an OpenStack bare metal, create tenants, virtual link layer networks, and subnets on OpenStack.
2. Create and edit the Pod configuration file, for example, postgres-pod.yaml, on the master.
$ vi postgres-pod.yaml
apiVersion: v1
kind: Pod
metadata:
name: postgres
labels:
sdnc.io/network_id: 9e9af886-e038-4c94-8573-11b89079196d
sdnc.io/tenant_id: 14ac7fc1-50d4-409a-ad76-4a0c35f429f3
sdnc.io/qos_policy_id: 38b51db9-cc1d-4b07-872e-cf2644bfc057
sdnc.io/security_group_id: 39b70d60-8bfd-4b27-bb4d-4b8f8955a2e6
sdnc.io/epg_id: ac4d830a-7dc4-454c-92f6-c67646fd0dcb
spec:
containers:
- name: postgres
image: postgres
Parameter description:
¡ sdnc.io/network_id—UUID of the controller or OpenStack virtual network. This parameter must be configured.
¡ sdnc.io/tenant_id—UUID of the controller or OpenStack tenant. This parameter must be configured. The tenant UUID on OpenStack is different from that on controller. When the Kubernetes plug-in is integrated with OpenStack, you must specify the tenant UUID on OpenStack for the sdnc.io/tenant_id field. When the Kubernetes plug-in is integrated with controller, you must specify the tenant UUID on controller for the sdnc.io/tenant_id field.
¡ sdnc.io/qos_policy_id—UUID of the controller network policy. This parameter is optional. OpenStack VMs do not support this parameter.
¡ sdnc.io/security_group_id—UUID of the controller security policy. This parameter is optional. OpenStack VMs do not support this parameter.
¡ sdnc.io/epg_id—UUID of the service chain EPG for the controller. This parameter is optional. OpenStack VMs do not support this parameter.
3. Use the configuration file to create a Pod.
$ kubectl create -f postgres-pod.yaml
4. Verify the Pod online status on the controller vPort page.
Configuring Pod network parameters by using annotations
1. Create tenants, virtual link layer networks, subnets, security policies, and network policies on the controller. To deploy a K8s cluster on a VM in network-based overlay model or on an OpenStack bare metal, create tenants, virtual link layer networks, and subnets on OpenStack.
2. Create and edit the Pod configuration file, for example, postgres-pod.yaml, on the master.
$ vi postgres-pod.yaml
apiVersion: v1
kind: Pod
metadata:
name: postgres
annotations:
sdnc.io/network_id: 9e9af886-e038-4c94-8573-11b89079196d
sdnc.io/tenant_id: 14ac7fc1-50d4-409a-ad76-4a0c35f429f3
sdnc.io/qos_policy_id: 38b51db9-cc1d-4b07-872e-cf2644bfc057
sdnc.io/security_group_id: 39b70d60-8bfd-4b27-bb4d-4b8f8955a2e6
sdnc.io/epg_id: ac4d830a-7dc4-454c-92f6-c67646fd0dcb
spec:
containers:
- name: postgres
image: postgres
Parameter description:
¡ sdnc.io/network_id—UUID of the controller or OpenStack virtual network. This parameter must be configured.
¡ sdnc.io/tenant_id—UUID of the controller or OpenStack tenant. This parameter must be configured. The tenant UUID on OpenStack is different from that on controller. When the Kubernetes plug-in is integrated with OpenStack, you must specify the tenant UUID on OpenStack for the sdnc.io/tenant_id field. When the Kubernetes plug-in is integrated with controller, you must specify the tenant UUID on controller for the sdnc.io/tenant_id field.
¡ sdnc.io/qos_policy_id—UUID of the controller network policy. This parameter is optional. OpenStack VMs do not support this parameter.
¡ sdnc.io/security_group_id—UUID of the controller security policy. This parameter is optional. OpenStack VMs do not support this parameter.
¡ sdnc.io/epg_id—UUID of the service chain EPG for the controller. This parameter is optional. OpenStack VMs do not support this parameter.
3. Use the configuration file to create a Pod.
$ kubectl create -f postgres-pod.yaml
4. Verify the Pod online status on the controller vPort page.
Configuring Pod network parameters by using NetworkConfiguration CRD
1. Create tenants, virtual link layer networks, subnets, security policies, and network policies on the controller. To deploy a K8s cluster on a VM in network-based overlay model or on an OpenStack bare metal, create tenants, virtual link layer networks, and subnets on OpenStack.
2. Create network configuration resources on the cluster.
apiVersion: "sdnc.io/v1"
kind: NetworkConfiguration
metadata:
name: example
namespace: default
spec:
config: '{
"network": {
"network_id": "bbdf64ec-73c7-4038-b134-b792cacf43cf"
},
"tenant": {
"tenant_id": "115d0dcc-f5a7-407f-b0d1-9da3431df26b"
},
"qos_policy": {
"qos_policy_id": "bbdf64cc- f5c7-407f-b0d1-9da3431df26b"
},
"security_group": {
"security_group_id": "132d0dec-737f-407f-b0d1-9da3431df26b"
}
}'
Parameter description:
¡ network_id—UUID of the controller or OpenStack virtual network. This parameter must be configured.
¡ tenant_id—UUID of the controller or OpenStack tenant. This parameter must be configured. The tenant UUID on OpenStack is different from that on controller. When the Kubernetes plug-in is integrated with OpenStack, you must specify the tenant UUID on OpenStack for the tenant_id field. When the Kubernetes plug-in is integrated with controller, you must specify the tenant UUID on controller for the tenant_id field.
¡ qos_policy_id—UUID of the controller network policy. This parameter is optional. OpenStack VMs do not support this parameter.
¡ security_group_id—UUID of the controller security policy. This parameter is optional. OpenStack VMs do not support this parameter.
3. Create and edit the Pod configuration file, for example, postgres-pod.yaml on the master.
$ vi postgres-pod.yaml
apiVersion: v1
kind: Pod
metadata:
name: postgres
annotations:
sdnc.io/network_conf: example
spec:
containers:
- name: postgres
image: postgres
4. Use the configuration file to create a Pod.
$ kubectl create -f postgres-pod.yaml
5. Verify the Pod online status on the controller vPort page.
Configuring an IP address for the Pod
After configuring the network parameters, you can specify a static IP address for the Pod or enable the Pod to obtain an IP address automatically from the IP address pool. These methods are exclusive of the method of configuring an IP address for the Pod by using a CRD.
Specifying a static IP address for the Pod
1. Create a tenant, virtual link layer network, subnet, security policy, and network policy on the controller
2. Create and edit the Pod configuration file, for example postgres-pod.yaml on the master.
$ vi postgres-pod.yaml
apiVersion: v1
kind: Pod
metadata:
name: postgres
annotations:
sdnc.io/ipv4addr: 10.10.0.1
sdnc.io/ipv6addr: 201::1
spec:
containers:
- name: postgres
image: postgres
Parameter description:
¡ sdnc.io/ipv4addr—IPv4 address of the Pod. This parameter is optional.
¡ sdnc.io/ipv6addr—IPv6 address of the Pod. This parameter is optional.
3. Use the configuration file to create a Pod.
$ kubectl create -f postgres-pod.yaml
4. Verify the Pod online status on the controller vPort page.
Configuring an IP address pool
1. Create a tenant, virtual link layer network, subnet, security policy, and network policy on the controller
2. Create an IPv4 or IPv6 address pool on the cluster.
¡ IPv4:
apiVersion: sdnc.io/v1
kind: IpV4Pool
metadata:
name: v4-ippool
spec:
network_id: 5a25bc62-c8b4-4645-b194-2fa83bf7d91d
ip_ranges:
- start: 10.10.1.3
end: 10.10.1.10
- start: 10.10.2.3
end: 10.10.2.10
¡ IPv6:
apiVersion: sdnc.io/v1
kind: IpV6Pool
metadata:
name: v6-ippool
spec:
network_id: 5a25bc62-c8b4-4645-b194-2fa83bf7d91d
ip_ranges:
- start: 201::2:1
end: 201::2:5
- start: 201::3:1
end: 201::4:1
Parameter description:
¡ network_id—UUID of the controller virtual link layer network. This parameter must be configured.
¡ ip_ranges—Address segment of the Pod IP address pool.
¡ start—Start IP address of the address segment.
¡ end—End IP address of the address segment
3. Create and edit the Pod configuration file, for example postgres-pod.yaml on the master.
$ vi postgres-pod.yaml
apiVersion: v1
kind: Pod
metadata:
name: postgres
annotations:
sdnc.io/ipv4pool: v4-ippool
sdnc.io/ipv6pool: v6-ippool
spec:
containers:
- name: postgres
image: postgres
4. Use the configuration file to create a Pod.
$ kubectl create -f postgres-pod.yaml
5. View the Pod online status on the controller vPort page and verify that the IP address of the Pod is from the address pool configured for the Pod.
Configuring network, QoS, and security group parameters for a Pod by using definition CRDs
This section describes the procedures for using definition CRDs to configure parameters, create and onboard a Pod in Kubernetes onto the controller.
Configuring network parameters for a Pod by using a NetworkAttachmentDefinition CRD
If you have created tenants, virtual link layer networks, and subnets on the controller or OpenStack, fill in the network ID and subnet ID to the corresponding parameters when creating a network CRD.
1. If you have not created virtual link layer networks or subnets, you can create a network CRD without specifying the network ID and subnet ID. The CNI plug-in will collaborate with the controller or OpenStack to create the corresponding virtual link layer network and subnet. In this method, you can edit or delete the network CRD to edit the corresponding virtual link layer network and subnet.
2. Create a NetworkAttachmentDefinition resource in the cluster.
apiVersion: "k8s.cni.cncf.io/v1"
kind: NetworkAttachmentDefinition
metadata:
name: pod-network
spec:
create_at: openstack
tenant_id: 665cdcaa9b3f4183824bf551c909429c
network_id: cf2be36f-555d-49f7-bb85-a124b068b2bc
physical_network: physnet1
segmentation_id: 305
router_external: false
network_type: vlan
subnets:
- name: pod_sub
subnet_id: 3c6af174-5bcb-45b8-906b-24f23f92adde
gateway_ip:
cidr: 4.0.0.0/24
ip_version: 4
enable_dhcp: true
- name: pod_sub2
subnet_id: d09bc4c8-ba41-4344-9a38-062cd0934727
gateway_ip:
cidr: 212::/16
ip_version: 6
enable_dhcp: true
static_ip: true
release_after: "2h3m6s"
Parameter description:
¡ create_at—The value is written by the plug-in. You are not required to configure it. If the value is kubernetes, configure the parameters for the network CRD and create the CRD. If the value is openstack, configure the parameters for the network CRD based on the settings of the network resources created on OpenStack, and then create the CRD. If the value is sdnc, configure the parameters for the network CRD based on the settings of the network resources created on the controller, and then create the CRD.
¡ name—CRD resource name. The value can contain only lowercase letters and hyphens (-). The name must be unique. The plug-in will verify the name by using the regular expression: [a-z0-9]([-a-z0-9]*[a-z0-9])?(\.[a-z0-9]([-a-z0-9]*[a-z0-9])?)*.
¡ tenant_id—UUID of the controller or OpenStack tenant. This parameter must be configured. The tenant UUID on OpenStack is different from that on the controller. When the Kubernetes plug-in is integrated with OpenStack, you must specify the tenant UUID on OpenStack for the tenant_id field. When the Kubernetes plug-in is integrated with the controller, you must specify the tenant UUID on the controller for the tenant_id field.
¡ network_id—UUID of the controller or OpenStack virtual network, which must be consistent with that on the controller or OpenStack. If you leave this parameter unconfigured, the system will use the CRD to create virtual network layer resources on the controller or OpenStack and the ID of the network will be written to this field.
¡ physical_network—OpenStack bare metal VLAN network name. This parameter is required when the network_type parameter value is vlan.
¡ segmentation_id—OpenStack bare metal segment ID. This parameter is required when the network_type parameter value is vlan.
¡ router_external—Whether the OpenStack bare metal VLAN is an external network. The default value is false.
¡ network_type—Network type. Set the value to vlan when the plug-in interoperates with an OpenStack bare metal VLAN network. Set the value to vxlan or leave it configured for any other scenarios. The default value is vxlan.
¡ subnets—Subnet information, including the name, subnet ID, CIDR, IP version, and DHCP enabling status (the value must be true), which must be consistent with that on the controller or OpenStack. Multiple subnets of the same IP version can be configured.
¡ static_ip—Whether IP address remains unchanged. When the value is true, the IPs keep unchanged for the Pods in a StatefulSet and Pods in migration. After this feature takes effect, you are not allowed to change the value to false.
¡ release_after—Expiration release time for IP address remains unchanged. The format is: *h*m*s, for example, 1h, 1h30m, 1h30m30s. After a period of time (i.e. the expiration release time) when the Pod with IP address remains unchanged is deleted and not restarted, the data of the IP address remains unchanged will be released. This is only effective when static_ip is set to true, otherwise it is invalid.
3. Update the NetworkAttachmentDefinition resource in the cluster.
When a network CRD is created, the CNI plug-in collaborates with the controller or OpenStack to create network resources, and the network_id parameter is empty. Because the network_id and subnet_id fields will be assigned values based on the network resources created by the network CRD, as a best practice, use the kubectl edit command rather than the kubectl apply command to update the latest network CRD resource.
The update rules are as follows:
¡ If the subnet_ ID filed is not configured with a value in the new network CRD resource, a new subnet will be created.
¡ If the subnet ID filed value remains unchanged in the new network CRD, the subnet will be updated.
¡ If the subnet ID filed does not exist in the new network CRD, the subnet will be deleted.
4. Delete the NetworkAttachmentDefinition resource from the cluster.
If you delete the network resource created by using the network CRD, the subnets on the controller or OpenStack will also be deleted.
Configuring network QoS parameters for a Pod by using a QoS CRD
If you have already created QoS rules on the controller or OpenStack, fill in the QoS ID and other attributes to the corresponding parameters when creating a QoS CRD.
1. If you have not created QoS rules in advance, you do not need to specify the QoS ID when creating a QoS CRD. The CNI plug-in collaborates with the controller or OpenStack to create the corresponding QoS resources. In this method, you can edit or delete the QoS CRD to edit the corresponding QoS rule.
2. Create a QosDefinition CRD resource in the cluster.
apiVersion: "k8s.cni.cncf.io/v1"
kind: QosDefinition
metadata:
name: qos1
spec:
create_at: kubernetes
qos_id: 1f45ace0-8a0e-4e8a-8024-79f9eb6f94ab
rules:
- type: bandwidth_limit
max_kbps: 500
max_burst_kbps: 500
direction: ingress
- type: dscp_marking
dscp_mark: “26” //Note: The value is a string. Use double quotes for it.
Parameter description:
¡ name—QoS CRD name. The value can contain only lowercase letters and hyphens (-). The name must be unique. The plug-in will verify the name by using the regular expression: [a-z0-9]([-a-z0-9]*[a-z0-9])?(\.[a-z0-9]([-a-z0-9]*[a-z0-9])?)*.
¡ create_at—The value is written by the plug-in. You are not required to configure it. If the value is kubernetes, configure the parameters for the QoS CRD and then create the CRD. If the value is openstack, configure the parameters for the QoS CRD based on the settings of QoS rules created on OpenStack and then create the CRD. If the value is sdnc, configure the parameters for the QoS CRD based on the settings of QoS rules created on the controller, and then create the CRD.
¡ qos_id—QoS resource ID on the controller or OpenStack, which must be consistent with that on the controller or OpenStack. If you leave this parameter unconfigured, the system will use the CRD to create QoS resources on the controller or OpenStack and write the ID of the created QoS resource to the field.
¡ rules—QoS resource rules. Options include bandwidth_limit and dscp_marking.
3. Update the QosDefinition resource in the cluster.
When a QoS CRD is created, the CNI plug-in collaborates with the controller or OpenStack to create QoS resources, and the qos_id parameter is empty. Because the qos_id and other fields will be assigned values based on the QoS resources created by the QoS CRD, as a best practice, use the kubectl edit command rather than the kubectl apply command to update the latest QoS CRD resource.
The resources are updated as a whole if the plug-in interoperates with the controller.
The update rules are as follows if the plug-in interoperates with OpenStack:
¡ If the rule ID field is not configured with a value in the new QoS CRD, new rules will be create.
¡ If the rule ID field value remains unchanged in the new QoS CRD, the rules will be updated.
¡ If the rule ID field does not exist in the new QoS CRD, the rules will be deleted.
4. Delete the QosDefinition resource from the cluster.
If you delete the QoS resource created by using the QoS CRD, the QoS resources on the controller or OpenStack will also be deleted.
Configuring network security group parameters for a Pod by using a security group CRD
If you have already created security group rules on the controller or OpenStack, fill in the security group ID and security group rule ID attributes to the corresponding parameters when creating a security group CRD.
1. If you have not created a security group in advance, you can create a security group CRD without specifying the security group ID and security group rule ID. The CNI plugin will collaborate with the controller or OpenStack to create the corresponding security group resources. In this method, you can edit or delete the security group CRD to edit the corresponding security group.
2. Create a SecurityGroupDefinition CRD resource.
apiVersion: k8s.cni.cncf.io/v1
kind: SecurityGroupDefinition
metadata:
name: sg-create
spec:
create_at: kubernetes
rules:
- direction: ingress
ethertype: IPv4
id: 18ad1313-0588-4519-86e0-dc47af8f660b
port_range_max: 8080
port_range_min: 8080
protocol: tcp
remote_ip_prefix: 100.0.0.0/16
security_group_id: ff0570ef-eecb-4d7f-a658-4eef43cadc19
tenant_id: e93adb34143c42b8847f009dba9413a7
Parameter description:
¡ name—Security group CRD name. The value can contain only uppercase and lowercase letters and hyphens (-). The name must be unique. The plug-in will verify the name by using the regular expression: [a-z0-9]([-a-z0-9]*[a-z0-9])?(\.[a-z0-9]([-a-z0-9]*[a-z0-9])?)*.
¡ create_at—The value is written by the plug-in. You are not required to configure it. If the value is kubernetes, configure the parameters for the security group CRD and then create the CRD. If the value is openstack, configure the parameters for the security group CRD based on the settings of the security group rules created on OpenStack and then create the CRD. If the value is sdnc, configure the parameters for the security group CRD based on the settings of the security group rules created on the controller and then create the CRD.
¡ tenant_id—UUID of the controller or OpenStack tenant. This parameter must be configured. The tenant UUID on OpenStack is different from that on the controller. When the Kubernetes plug-in is integrated with OpenStack, you must specify the tenant UUID on OpenStack for the tenant_id field. When the Kubernetes plug-in is integrated with the controller, you must specify the tenant UUID on the controller for the tenant_id field.
¡ security_group_id—Security group resource ID on the controller or OpenStack, which must be consistent with that on the controller or OpenStack. If you leave this parameter unconfigured, the system will use the CRD to create security group resources on the controller or OpenStack and write the ID of the created security group resource to the field.
¡ rules—Security group rules. Options of the protocol parameter include icmp, tcp, and udp.
3. Update the SecurityGroupDefinition resource in the cluster.
When a security group CRD is created, the CNI plug-in collaborates with the controller or OpenStack to create security group resources, and the security_group_id parameter is empty. Because the security_group_id and other fields will be assigned values based on the security group resources created by the security group CRD, as a best practice, use the kubectl edit command rather than the kubectl apply command to update the latest security group CRD resource.
The update rules are as follows:
¡ If the security_group_id field is not configured with a value in the new security CRD, new rules will be created.
¡ If the security_group_id field value remains unchanged in the new security group CRD, the rules will be updated. Only the controller supports this operation. To update rules in OpenStack, first delete the old rules, and then add new ones.
¡ If the security_group_id field does not exist in the new security group CRD, the rules will be deleted.
4. Delete the SecurityGroupDefinition resource from the cluster.
If you delete the security group resource created by using the security group CRD, the security group resources on the controller or OpenStack will also be deleted.
Configuring network IP address parameters for a Pod by using a port CRD
You can assign IP addresses to NICs of a Pod by specifying a port CRD for a Pod. Before creating a port CRD, you need to create a network CRD corresponding to the network_id.
To configure network IP address parameters for a Pod by using a port CRD:
1. Create tenants, virtual link layer networks, and subnets on the controller.
To deploy a cluster on OpenStack network-based overlay VMs or in an OpenStack Ironic environment, you must create tenants, virtual link layer networks, and subnets on OpenStack.
2. Create a Port CRD resource from the cluster.
apiVersion: "k8s.cni.cncf.io/v1"
kind: PortDefinition
metadata:
name: port1
spec:
network_id: 9d24145a-7934-4be4-b59e-48bb271094d9
fixed_ips:
- subnet_name: v4-100
ip_address: 100.0.0.0.2
- subnet_name: v6-231
ip_address: 231::6
Parameter description:
¡ network_id—UUID of the controller or OpenStack virtual network.
¡ subnet_name—Subnet name.
Configuring parameters and creating a Pod by using CRDs
|
|
IMPORTANT: If using the IP address remains unchanged release feature, it is necessary to ensure that the system time of all nodes in the K8s cluster is consistent. |
1. Create and modify a Pod configuration file on the master node. The postgres-pod.yaml configuration file is configured and modified in this example.
$ vi postgres-pod.yaml
apiVersion: v1
kind: Pod
metadata:
name: postgres
annotations:
k8s.v1.cni.cncf.io/networks: pod-network1/pod_sub1/pod_sub2,pod-network2/pod_sub1/pod_sub2,pod-network3/pod_sub1/pod_sub2
k8s.v1.cni.cncf.io/static_ip: "true"
k8s.v1.cni.cncf.io/static_ip_release_after: "3h3m4s"
k8s.v1.cni.cncf.io/qoses: qos-create1,,qos-create2
k8s.v1.cni.cncf.io/security-groups: sg-create1/sg-create2,,sg-create3
k8s.v1.cni.cncf.io/ports: port-create1,,port-create3
spec:
containers:
- name: postgres
image: postgres
Parameter description:
¡ k8s.v1.cni.cncf.io/networks—network_crd names and subnets. Use a slash (/) to separate each network and its subnet. If you configure multiple subnets on a network, separate the subnets by using slashes (/). As shown in this example, three NICs will be created for this Pod to use the corresponding subnets.
¡ k8s.v1.cni.cncf.io/static_ip—Whether the Pod IP address remains unchanged. If the value is true, an IP address is assigned to the Pod automatically at its creation and remains unchanged even if the Pod is updated. This configuration takes priority over the IP address remains unchanged configuration used by k8s.v1.cni.cncf.io/networks.
¡ k8s.v1.cni.cncf.io/static_ip_release_after—The expiration release time for the IP address remains unchanged. The format is: *h*m*s, for example, 1h, 1h30m, 1h30m30s. This configuration takes effect when k8s.v1.cni.cncf.io/static_ip is set to true.
¡ k8s.v1.cni.cncf.io/qoses—QoS CRD names, separated by commas for different NICs. If you are not to use QoS for an NIC, leave the name unconfigured for that NIC. The number of the QoS CRD names must be consistent with that of NICs. In this example, the first NIC uses qos-create1, the second NIC does not use QoS, and the third NIC uses qos-create3.
¡ k8s.v1.cni.cncf.io/security-groups—Security group CRD names, separated by commas for different NICs. If a NIC uses multiple security groups, use slashes (/) to separate the security groups. If a NIC does not use a security group, leave the group name unconfigured for that NIC. The number of security groups separated by commas must be consistent with that of the NICs. In this example, the first NIC uses sg-create1 and sg-create2 security groups, the second NIC does not use a security group, and the third NIC uses the sg-create3 security group.
¡ k8s.v1.cni.cncf.io/ports—Port CRD names, separated by commas for different NICs. The number of port CRD names must be consistent with that of NICs. In this example, the first NIC uses qos-create1, the second NIC does not use a port CRD, and the third NIC uses qos-create3.
2. Use the configuration file to create a Pod.
$ kubectl create -f postgres-pod.yaml
3. Verify the vPort online status of the Pod from the virtual port of the controller.
|
|
IMPORTANT: · k8s.v1.cni.cncf.io/static_ip indicates the Pod-level configuration for IP address remains unchanged. It has a higher priority than network_crd, which means when both k8s.v1.cni.cncf.io/static_ip and network_crd have IP address remains unchanged configuration, k8s.v1.cni.cncf.io/static_ip takes effect. · k8s.v1.cni.cncf.io/static_ip_release_after represents the expiration release time for IP address remains unchanged at the Pod level. This configuration only takes effect when k8s.v1.cni.cncf.io/static_ip is set to true. It has a higher priority than network_crd. Therefore, when both configurations exist, k8s.v1.cni.cncf.io/static_ip_release_after will be effective. If this configuration is not used, and k8s.v1.cni.cncf.io/static_ip is set to true, the IP address remains unchanged permanently. If k8s.v1.cni.cncf.io/static_ip is set to false, the IP address will not remain unchanged. · When neither k8s.v1.cni.cncf.io/static_ip nor k8s.v1.cni.cncf.io/static_ip_release_after is used, and multiple network_crds have static_ip set to true, all assigned IP addresses will remain unchanged, and the longest expiration release time among all network_crds will take effect. If all release times are set to default values, the IP addresses will remain unchanged indefinitely. |
Using NetworkPolicies
|
|
IMPORTANT: A NetworkPolicy takes effect only on backend Pods in the container network, and is not effective for backend Pods in the host network. |
A NetworkPolicy specifies how Pods communicate with various network entities over the network. A NetworkPolicy resource uses labels to select Pods and defines the communication rules for the pods. The CNI plug-in supports using NetworPolicies to control Pod traffic.
1. To create a NetworkPolicy resource in the cluster, configure the settings as follows:
apiVersion: networking.k8s.io/v1
kind: NetworkPolicy
metadata:
name: demo-np
namespace: default
spec:
podSelector:
matchLabels:
hello: world
ingress:
- from:
- ipBlock:
cidr: 5.0.0.0/24
egress:
- to:
- ipBlock:
cidr: 5.0.0.0/24
ports:
- port: 8080
protocol: TCP
policyTypes:
- Egress
- Ingress
Parameter description:
¡ name—Name of the NetworkPolicy resource.
¡ namespac—Namespace to which the NetworkPolicy resource belongs.
¡ podSelector—Selects the Pods to which the policy applies.
¡ ingress—Specifies ingress rules.
¡ egress—Specifies egress rules.
¡ policyTypes—Type of the policy, indicating whether or not the policy applies to ingress traffic to selected pods, egress traffic from selected pods, or both.
After the NetworkPolicy is created, the traffic of Pods matching the policy will be controlled by the policy.
Parameter settings in typical configuration scenarios
Configuration for accessing the service ClusterIP and NodePort
Figure 1 Parameter configuration relationship
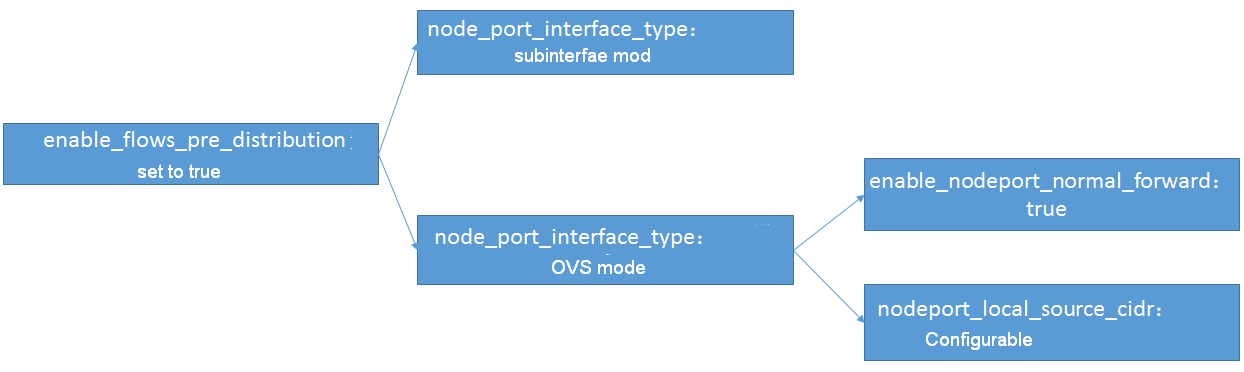
· enable_flows_pre_distribution: Whether to enable predefined flow tables. Once enabled, this parameter will significantly enhance the concurrent access performance of the ClusterIP and NodePort. You must enable this parameter in a production environment.
· node_port_interface_type: Type of the service network interface. Options include subinterface mode (host_ip_link_vlan) and cniOVSNode mode (openvswitch_internal).
¡ host_ip_link_vlan: An interface in this mode uses one VLAN from the node VLAN pool to enhance NodePort inter-node concurrent forwarding performance.
¡ cniOVSNode: In this mode, you can enable the enable_nodeport_normal_forward and nodeport_local_source_cidr parameters to improve the concurrency performance of NodePort inter-node forwarding and local forwarding.
· enable_nodeport_normal_forward: Whether to enable NodePort normal forwarding. If the value is set to true, the concurrent forwarding performance is improved.
· nodeport_local_source_cidr: Whether to enable source CIDR pre-defined flow tables for the NodePort. If the value is set to true, the local node concurrent forwarding performance is improved for the NodePort.
|
|
NOTE: In K8s, NodePort and LoadBalancer services support configuring the externalTrafficPolicy attribute to specify whether the service wants to route external traffic to the backend of the local node or all backends within the cluster. Set the externalTrafficPolicy attribute to either Cluster (default) or Local. Cluster means traffic can be forwarded across nodes, while Local means traffic can be forwarded only in the backend of the local node. |
Configurations for concurrent Pod deployment performance in a cloud VM environment
cloud_network_vlanmap_preset
Whether to enable presetting CloudOS VLAN network mappings. To deploy a large number of Pods in a K8s cluster deployed on CloudOS VMs, use the VLAN network for Pod deployment, enable the cloud_network_vlanmap_preset parameter, and cooperate with the CloudOS and CAS to pre-deploy forwarding rules to help Pods come online quickly.
Application scenarios of container NIC pre-warming
In a K8s cluster deployed on OpenStack VMs, if Pods need rapid, bulk deployment and the Pods require the VXLAN network to break the limitation of 4K VLANs, use the container NIC pre-warming feature. The recommended parameter settings are as follows:
· warm_nic_minimum: Specify the initial number of pre-warmed NICs on each node in the pre-warmed network during integration with OpenStack. Evaluate the number according to the number of Pods using the pre-warmed network.
· warm_nic_target: Specify the number of NICs that the pre-warmed network adds or decreases each time during integration with OpenStack. As a best practice, set this value to 10.
· warm_nic_threshold: Specify the threshold for the pre-warmed network to perform scaling-in/-out during integration with OpenStack. This value must be less than the values for the warm_nic_minimum and warm_nic_target parameters. As a best practice, set this value to 3.
· warm_vlan_ranges: Specify the VLAN range used by the pre-warmed network during integration with OpenStack VMs.
· warm_cool_down_time: Specify the cooldown time for pre-warmed NICs during integration with OpenStack VMs. Specify this parameter depending on the online performance of Pods in the actual environment.
