- Table of Contents
-
- 04-DPI Configuration Guide
- 00-Preface
- 01-DPI overview
- 02-DPI engine configuration
- 03-IPS configuration
- 04-URL filtering configuration
- 05-Data filtering configuration
- 06-File filtering configuration
- 07-Anti-virus configuration
- 08-Data analysis center configuration
- 09-Proxy policy configuration
- 10-WAF configuration
- 11-APT defense configuration
- 12-IP reputation configuration
- 13-Domain reputation configuration
- 14-DLP configuration
- 15-Network asset scan configuration
- 16-DGA detection configuration
- 17-Intelligent service platform configuration
- Related Documents
-
| Title | Size | Download |
|---|---|---|
| 15-Network asset scan configuration | 131.31 KB |
Configuring network asset scan
Security risk protection measures
Configuring network asset scan features
Network asset scan configuration examples
Example: Configuring an asset scan network
Configuring network asset scan
About network asset scan
Network asset scan is a technology used to identify and audit network assets such as hosts, servers, and devices in a network. By probing the specified network, network asset scan can discover online network assets and perform security audits on them. You can obtain network asset information and possible security risks from the results of network asset scan, and then harden the security configuration accordingly.
Network asset scan mechanism
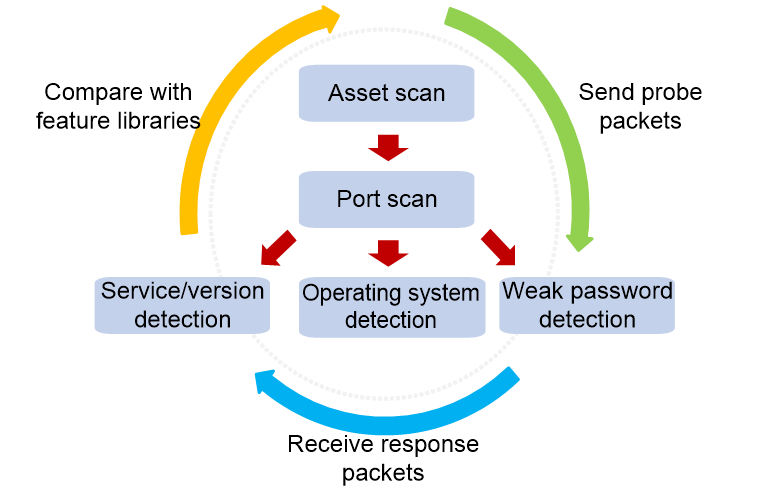
As shown in Figure 1, network asset scan provides the following basic functions: asset scan, port scan, service/version detection, operating system detection, and weak password detection. The basic mechanism of each function is as follows:
· Asset scan—The device sends probe packets of different protocols to all IP addresses in the specified network in turn. If the device receives a response packet from a probe target, it identifies the probe target as a network asset.
· Port scan—The device sends TCP or UDP probe packets to the specified ports of network assets, and identify the open ports according to the TCP or UDP response packets from the target ports.
· Service/version detection—The device sends a series of service detection packets to the open ports of network assets, and compares the response packets from the target ports with the built-in service feature library of the device. In this way, the service type and version information provided by the target ports can be obtained.
· Operating system detection—The device sends a series of TCP or UDP detection packets to the ports (including at least one open port and one closed port) of network assets, and compares the response packets from the target assets with the built-in system feature library of the device. In this way, you can know the operating system running on the target assets.
· Weak password detection—The device uses the specified usernames and the passwords in the weak password dictionary (containing common low-security passwords) to try to log in to the network assets through the specified services. If a login is successful, it means that the password of the user has a low security level and needs to be replaced with a password with higher security.
Figure 1 Network asset scan mechanism
Security risk protection measures
The network asset scan feature can detect the port opening risks, specific service risks, and weak password risks that might exist on network assets. You can configure the network assets and their security gateways to defend against asset security risks, as shown in Table 1.
Table 1 Security protection measures against different risks
|
Risks |
Protection measures |
|
Port opening risk |
· Manually close ports that do not need to be opened on network assets. · Configure security policies on the security gateways to deny accesses to specific ports on network assets. |
|
Specific service risk |
Configure protection policies (such as attack detection and prevention, and IPS) for specific types of services provided by network assets on the security gateways. |
|
Weak password risk |
Replace weak passwords of specific users on network assets with passwords having a higher security level. |
Configuring network asset scan features
About this task
Perform network asset scan to scan the hosts, servers, and devices in the specified IP address ranges to detect risks such as open ports and weak passwords. You can harden the security configuration according to the scanning results.
In the CLI of the device, only automatic asset scan is supported. The device automatically initiates asset scan, port scan, service/version detection, operating system detection, and weak password detection to the target IP address ranges according to the scanning schedule. The scanning results are displayed on the Monitor > Asset Management > Asset Scan page in the Web interface of the device.
In addtion to the scheduled, automatic asset scan, the Web interface also supports immediate asset scan. You can immediately initiate a network asset scan according to the configuration. For more information about network asset scan on the Web interface, see Asset Scan Help.
Restrictions and guidelines
The device must use a Layer 3 interface to initiate network asset scan to the target IP address ranges. Network asset scan does not take effect when the device is connected to the network through a Layer 2 interface.
The security policy rules of the device must permit the packets sent from the local security zone to the security zones where the target IP address ranges are located. Otherwise, the probe packets cannot be sent to the target IP address range, and therefore network asset scan does not take effect.
Procedure
1. Enter system view.
system-view
2. Enter asset scan view.
asset-scan
3. Configure the target IP address ranges for network asset scan.
¡ Configure a target IPv4 address range for network asset scan.
ip { subnet ip-address mask-length | subnet start-address end-address }
By default, no target IPv4 address range for network asset scan exists.
¡ Configure a target IPv6 address range for network asset scan.
ipv6 { subnet ipv6-address prefix-length | subnet start-address end-address }
By default, no target IPv6 address range for network asset scan exists.
4. (Optional.) Configure the target ports for network asset scan.
¡ Configure a target TCP port for network asset scanning.
tcp-port port-number
By default, the target TCP ports are 23, 80, 139, 443, 445, 554, 631, 3389, 3872, 5800, 7080, 8000, 8080, 8088, 8180 and 8443.
¡ Configure a target UDP port for network asset scanning.
udp-port port-number
By default, the target UDP port is 137.
If you configure neither target TCP ports nor target UDP ports for network asset scan, the device scans the default target TCP and UDP ports. If you configure target ports, the device scans only the configured target ports.
5. (Optional.) Configure weak password scan.
¡ Configure a weak password scan mode.
weak-password-scan mode { custom | dict } *
By default, no weak password scan mode is configured.
If you specify both the custom and dict keywords, the device uses both the custom and predefined weak password dictionaries for scanning.
¡ Configure a username for weak password scan.
weak-password-scan user username
By default, no username for weak password scan is configured.
This command is required only when the weak password scan mode is custom.
¡ Configure a custom weak password.
weak-password-scan password password
By default, no custom weak password is configured.
This command is required only when the weak password scan mode is custom.
¡ Configure service types for weak password scan.
weak-password-scan service { ftp | http | mysql | sql-server | ssh } *
By default, no service type for weak password scan is configured.
¡ Enable weak password scan.
weak-password-scan enable
By default, weak password scan is disabled.
6. Configure automatic asset scan:
¡ Configure the automatic asset scan schedule.
schedule every { day start-time | hour start-hour | week week-days start-time }
By default, the device performs asset scans every 12 hours.
¡ Enable automatic asset scan.
auto-scan enable
By default, automatic asset scan is disabled.
Network asset scan configuration examples
Example: Configuring an asset scan network
Network configuration
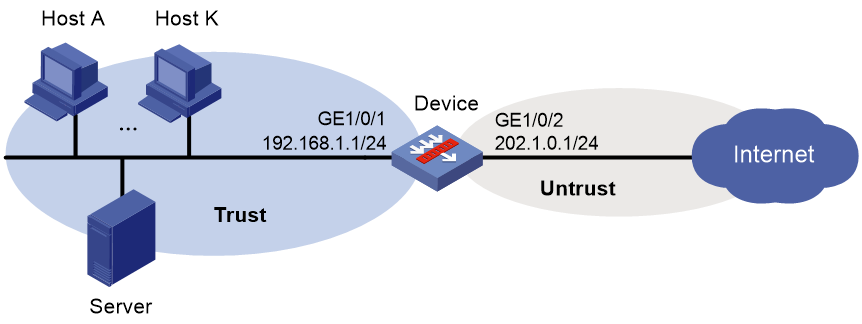
As shown in Figure 2, several hosts and servers are deployed in a company's internal network, and Device is deployed at the network egress as a security gateway to protect the internal network.
Configure the device to scan and audit the internal network assets of the company at 14:00 every Friday to regularly detect the possible security risks on the network assets.
Procedure
1. Assign IP address to interfaces:
# Assign an IP address to GigabitEthernet 1/0/1.
<Device> system-view
[Device] interface gigabitethernet 1/0/1
[Device-GigabitEthernet1/0/1] ip address 192.168.1.1 255.255.255.0
[Device-GigabitEthernet1/0/1] quit
# Assign IP addresses to other interfaces in the same way. (Details not shown.)
2. Add interfaces to security zones.
[Device] security-zone name trust
[Device-security-zone-Trust] import interface gigabitethernet 1/0/1
[Device-security-zone-Trust] quit
[Device] security-zone name untrust
[Device-security-zone-Untrust] import interface gigabitethernet 1/0/2
[Device-security-zone-Untrust] quit
3. Configure a security policy:
# Configure a security policy rule named local-trust to ensue that Device can initiate scanning on network assets in the Trust security zone.
[Device] security-policy ip
[Device-security-policy-ip] rule name local-trust
[Device-security-policy-ip-1-local-trust] source-zone local
[Device-security-policy-ip-1-local-trust] destination-zone trust
[Device-security-policy-ip-1-local-trust] destination-ip-subnet 192.168.1.0 24
[Device-security-policy-ip-1-local-trust] action pass
[Device-security-policy-ip-1-local-trust] quit
[Device-security-policy-ip] quit
4. Configure network asset scan:
# Specify 192.168.1.0/24 as a target IPv4 address range.
[Device] asset-scan
[Device-asset-scan] ip subnet 192.168.1.0 24
# Enable weak password scan, use the predefined scan mode, and specify the service types as FTP, HTTP, MySQL, SQL Server, and SSH.
[Device-asset-scan] weak-password-scan mode dict
[Device-asset-scan] weak-password-scan service ftp http mysql sql-server ssh
[Device-asset-scan] weak-password-scan enable
# Configure an automatic asset scan schedule to start scanning at 14:00 every Friday.
[Device-asset-scan] schedule every week Fri 14:00
[Device-asset-scan] auto-scan enable
Verifying the configuration
# Very that Device performs network asset scan on the internal network at 14:00 every Friday.
