- Table of Contents
- Related Documents
-
| Title | Size | Download |
|---|---|---|
| 04-Ansible configuration | 90.98 KB |
Contents
Using Ansible for automated configuration management
Configuring the device for management with Ansible
Device setup examples for management with Ansible
Example: Setting up the device for management with Ansible
Using Ansible for automated configuration management
About Ansible
Ansible is a configuration tool programmed in Python. It uses SSH to connect to devices.
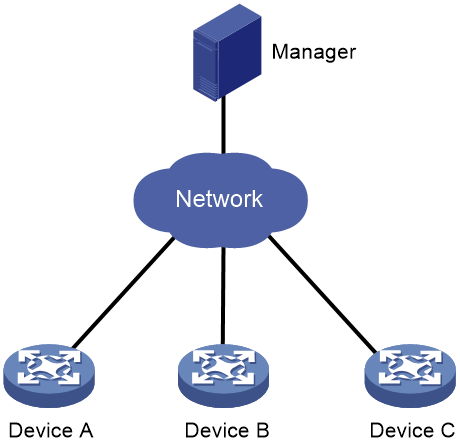
Ansible network architecture
As shown in Figure 1, an Ansible system consists of the following elements:
· Manager—A host installed with the Ansible environment. For more information about the Ansible environment, see Ansible documentation.
· Managed devices—Devices to be managed. These devices do not need to install any agent software. They only need to be able to act as an SSH server. The manager communicates with managed devices through SSH to deploy configuration files.
H3C devices can act as managed devices.
Figure 1 Ansible network architecture
How Ansible works
The following the steps describe how Ansible works:
1. On the manager, create a configuration file and specify the destination device.
2. The manager (SSH client) initiates an SSH connection to the device (SSH server).
3. The manager deploys the configuration file to the device.
4. After receiving a configuration file from the manager, the device loads the configuration file.
Restrictions and guidelines
Not all services modules are configurable through Ansible. To identify the service modules that you can configure by using Ansible, access the Comware 7 Python library.
Configuring the device for management with Ansible
Before you use Ansible to configure the device, complete the following tasks:
· Configure a time protocol (NTP or PTP) or manually configure the system time on the Ansible server and the device to synchronize their system time. For more information about configuring NTP and PTP, see Network Management and Monitoring Configuration Guide.
· Configure the device as an SSH server. For more information about SSH configuration, see Security Configuration Guide.
Device setup examples for management with Ansible
Example: Setting up the device for management with Ansible
Network configuration
As shown in Figure 2, configure the device as an SSH server to communicate with the Ansible manager. In this example, the Ansible manager is running on top of Ubuntu 16.04 and its version is Ansible 2.0.0.2.
Use the Ansible manager to create VLAN 10 and VLAN 20 on the device if the VLANs do not exist. Edit a configuration script on the Ansible manager to perform the following operations:
1. Check the device for VLAN 10.
2. If the VLAN already exists, display ok. If the VLAN does not exist, create the VLAN and display changed.
3. Repeat the previous steps for VLAN 20.
For the purpose of verification, create VLAN 20 on the device before running the Ansible manager to create the VLANs.

Prerequisites
1. Assign IP addresses to the device and manager so you can access the device from the manager.
2. Configure a time protocol (NTP or PTP) or manually configure the system time on both the device and manager so they use the same system time.
Configuring the device
1. Configure the device as an SSH server:
# Create local key pairs. (Details not shown.)
# Create a local user named abc and set the password for the user.
<Device> system-view
[Device] local-user abc
[Device-luser-manage-abc] password simple 123456TESTplat&!
# Assign the network-admin user role to the user and authorize the user to use SSH, HTTP, and HTTPS services.
[Device-luser-manage-abc] authorization-attribute user-role network-admin
[Device-luser-manage-abc] service-type ssh http https
[Device-luser-manage-abc] quit
# Enable scheme authentication for SSH login and assign the network-admin user role to the login users.
[Device] line vty 0 63
[Device-line-vty0-63] authentication-mode scheme
[Device-line-vty0-63] user-role network-admin
[Device-line-vty0-63] quit
# Enable NETCONF over SSH.
[Device] netconf ssh server enable
# Enable the SSH server.
[Device] ssh server enable
# Authorize SSH user abc to use all service types, including SCP, SFTP, Stelnet, and NETCONF. Set the authentication method to password.
[Device] ssh user abc service-type all authentication-type password
# Enable the SFTP server.
[Device] sftp server enable
# Enable the SCP server.
[Device] scp server enable
2. Create VLAN 20:
# Create VLAN 20 on the device.
[Device] vlan 20
[Device-vlan20] quit
# Display VLANs
[Device] display vlan
Total VLANs:2
The VLANS include:
1(default), 20
Configuring the Ansible manager
1. Configure a static DNS entry for the device:
# Edit file /etc/hosts to add the IP address and host name of the device:
192.168.1.1 Device
2. Install Ansible 2.0.0.2 and Python on the host:
# Install Ansible 2.0.0.2.
$ sudo apt-get install ansible
# Download the up-to-date Comware Python library source code.
$ sudo git clone https://github.com/HPENetworking/pyhpecw7
# Install the Python library.
$ cd pyhpecw7-master
$ sudo pip install pyhpecw7
$ sudo chmod 777 setup.py
$ sudo python setup.py install
|
|
NOTE: If a message displays a missing component, use the sudo apt-get install component-name command to install the component. |
# Use the find command to search for file namespaces.py from the root directory. If the file is found and the file path contains pyhpecw7, open the file and use the following contents to replace the existing contents of the file:
HPDATA="http://www.h3c.com/netconf/data:1.0"
HPDATA_C='{'+HPDATA+'}'
NETCONFBASE="urn:ietf:params:xml:ns:netconf:base:1.0"
NETCONFBASE_C='{'+NETCONFBASE+'}'
HPCONFIG="http://www.h3c.com/netconf/data:1.0"
HPCONFIG_C='{'+HPCONFIG+'}'
HPACTION="http://www.h3c.com/netconf/data:1.0"
HPACTION_C='{'+HPACTION+'}'
# Download the Ansible module.
$ sudo git clone https://github.com/HPENetworking/ansible-hpe-cw7
# Edit the ansible-hpe-cw7-master/hosts file. Change the username and password. Change [switches] field to the host name defined in the /etc/hosts file, which is Device in this example.
[all:vars]
username=abc
password=123456TESTplat&!
[switches]
Device
3. Edit the configuration script.
# Create file vlans.yml and add the following lines to the file:
---
- name: VLAN automation with Ansible on Devices
hosts: switches
gather_facts: no
connection: local
tasks:
- name: ensure VLAN 10 exists
comware_vlan: vlanid=10 name=VLAN10 descr=LOCAL_SEGMENT username={{ username }} password={{ password }} hostname={{ inventory_hostname }}
- name: ensure VLAN 20 exists
comware_vlan: vlanid=20 state=present username={{ username }} password={{ password }} hostname={{ inventory_hostname }}
4. Run the configuration script.
# Grant the permission to execute file vlans.yml.
$ sudo chmod 777 vlans.yml
# Execute file vlans.yml.
$ sudo ansible-playbook -i hosts vlans.yml
PLAY [VLAN automation with Ansible on Devices] *********************************
TASK [ensure VLAN 10 exists] ***************************************************
changed: [Device]
TASK [ensure VLAN 20 exists] ***************************************************
ok: [Device]
PLAY RECAP *********************************************************************
Device : ok=2 changed=1 unreachable=0 failed=0
The output shows that the script created VLAN 10 and detected that VLAN 20 already existed.
Verifying the configuration
[Device] display vlan
Total VLANs:3
The VLANS include:
1(default), 10, 20
The output shows that VLAN 10 has been created.