- Table of Contents
- Related Documents
-
| Title | Size | Download |
|---|---|---|
| 01-AAA configuration | 395.96 KB |
User management based on ISP domains and user access types
Authentication, authorization, and accounting methods
Local user configuration tasks at a glance
Configuring attributes for device management users
Configuring user group attributes
Verifying and maintaining local users
Specifying the HWTACACS authentication servers
Specifying the HWTACACS authorization servers
Specifying the HWTACACS accounting servers
Specifying the shared keys for secure HWTACACS communication
Specifying an MPLS L3VPN instance for the scheme
Specifying the source IP address of outgoing HWTACACS packets
Setting the username format and traffic statistics units
Setting the DSCP priority for HWTACACS packets
Specifying the action to take for AAA requests if all HWTACACS servers are blocked
Configuring HWTACACS stop-accounting packet buffering
Verifying and maintaining HWTACACS
Restrictions and guidelines for ISP domain configuration
Specifying the default ISP domain
Specifying an ISP domain for users that are assigned to nonexistent domains
Configuring ISP domain attributes
Configuring authorization attributes for an ISP domain
Including the idle timeout period in the user online duration to be sent to the server
Specifying the user address type in an ISP domain
Configuring AAA methods for an ISP domain
Configuring authentication methods for an ISP domain
Configuring authorization methods for an ISP domain
Configuring accounting methods for an ISP domain
Verifying and maintaining ISP domains
Setting the maximum number of concurrent login users
Enabling password change prompt logging
Configuring user online and offline recording
About user online and offline recording
Restrictions and guidelines for user online and offline recording configuration
Enabling user online failure recording
Enabling user offline recording
Verifying and maintaining user online and offline records
Example: Configuring AAA for SSH users by an HWTACACS server
Configuring AAA
About AAA
AAA implementation
Authentication, Authorization, and Accounting (AAA) provides a uniform framework for implementing network access management. This feature specifies the following security functions:
· Authentication—Identifies users and verifies their validity.
· Authorization—Grants different users different rights, and controls the users' access to resources and services. For example, you can permit office users to read and print files and prevent guests from accessing files on the device.
· Accounting—Records network usage details of users, including the service type, start time, and traffic. This function enables time-based and traffic-based charging and user behavior auditing.
AAA basic network diagram
AAA uses a client/server model. The client runs on the access device, or the network access server (NAS), which authenticates user identities and controls user access. The server maintains user information centrally. See Figure 1.
Figure 1 AAA network diagram
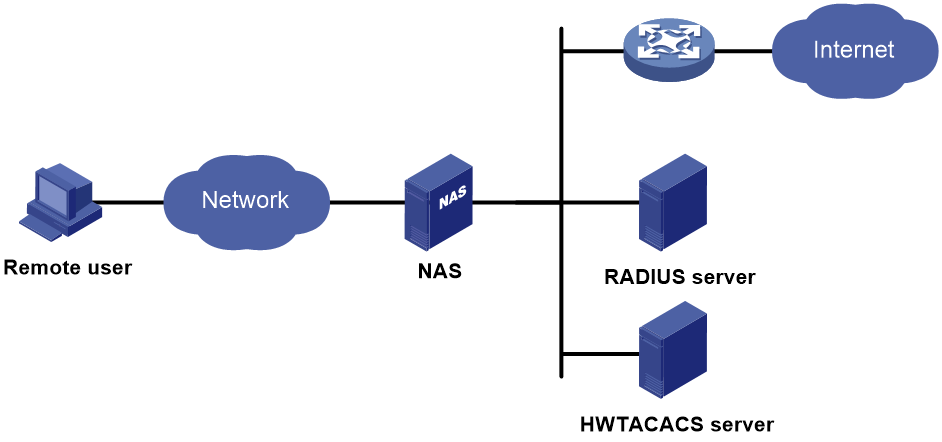
To access networks or resources beyond the NAS, a user sends its identity information to the NAS. The NAS transparently passes the user information to AAA servers and waits for the authentication, authorization, and accounting result. Based on the result, the NAS determines whether to permit or deny the access request.
AAA can be based on HWTACACS.
You can use different servers to implement different security functions.
You can choose the security functions provided by AAA as needed. For example, if your company wants employees to be authenticated before they access specific resources, you would deploy an authentication server. If network usage information is needed, you would also configure an accounting server.
The device performs dynamic password authentication.
HWTACACS
HWTACACS typically provides AAA services for VPDN and terminal users. In a typical HWTACACS scenario, terminal users need to log in to the NAS. Working as the HWTACACS client, the NAS sends users' usernames and passwords to the HWTACACS server for authentication. After passing authentication and obtaining authorized rights, a user logs in to the device and performs operations. The HWTACACS server records the operations that each user performs.
Basic HWTACACS packet exchange process
Figure 2 describes how HWTACACS performs user authentication, authorization, and accounting for a Telnet user.
Figure 2 Basic HWTACACS packet exchange process for a Telnet user

HWTACACS operates using in the following workflow:
1. A Telnet user sends an access request to the HWTACACS client.
2. The HWTACACS client sends a start-authentication packet to the HWTACACS server when it receives the request.
3. The HWTACACS server sends back an authentication response to request the username.
4. Upon receiving the response, the HWTACACS client asks the user for the username.
5. The user enters the username.
6. After receiving the username from the user, the HWTACACS client sends the server a continue-authentication packet that includes the username.
7. The HWTACACS server sends back an authentication response to request the login password.
8. Upon receipt of the response, the HWTACACS client prompts the user for the login password.
9. The user enters the password.
10. After receiving the login password, the HWTACACS client sends the HWTACACS server a continue-authentication packet that includes the login password.
11. If the authentication succeeds, the HWTACACS server sends back an authentication response to indicate that the user has passed authentication.
12. The HWTACACS client sends a user authorization request packet to the HWTACACS server.
13. If the authorization succeeds, the HWTACACS server sends back an authorization response, indicating that the user is now authorized.
14. Knowing that the user is now authorized, the HWTACACS client pushes its CLI to the user and permits the user to log in.
15. The HWTACACS client sends a start-accounting request to the HWTACACS server.
16. The HWTACACS server sends back an accounting response, indicating that it has received the start-accounting request.
17. The user logs off.
18. The HWTACACS client sends a stop-accounting request to the HWTACACS server.
19. The HWTACACS server sends back a stop-accounting response, indicating that the stop-accounting request has been received.
User management based on ISP domains and user access types
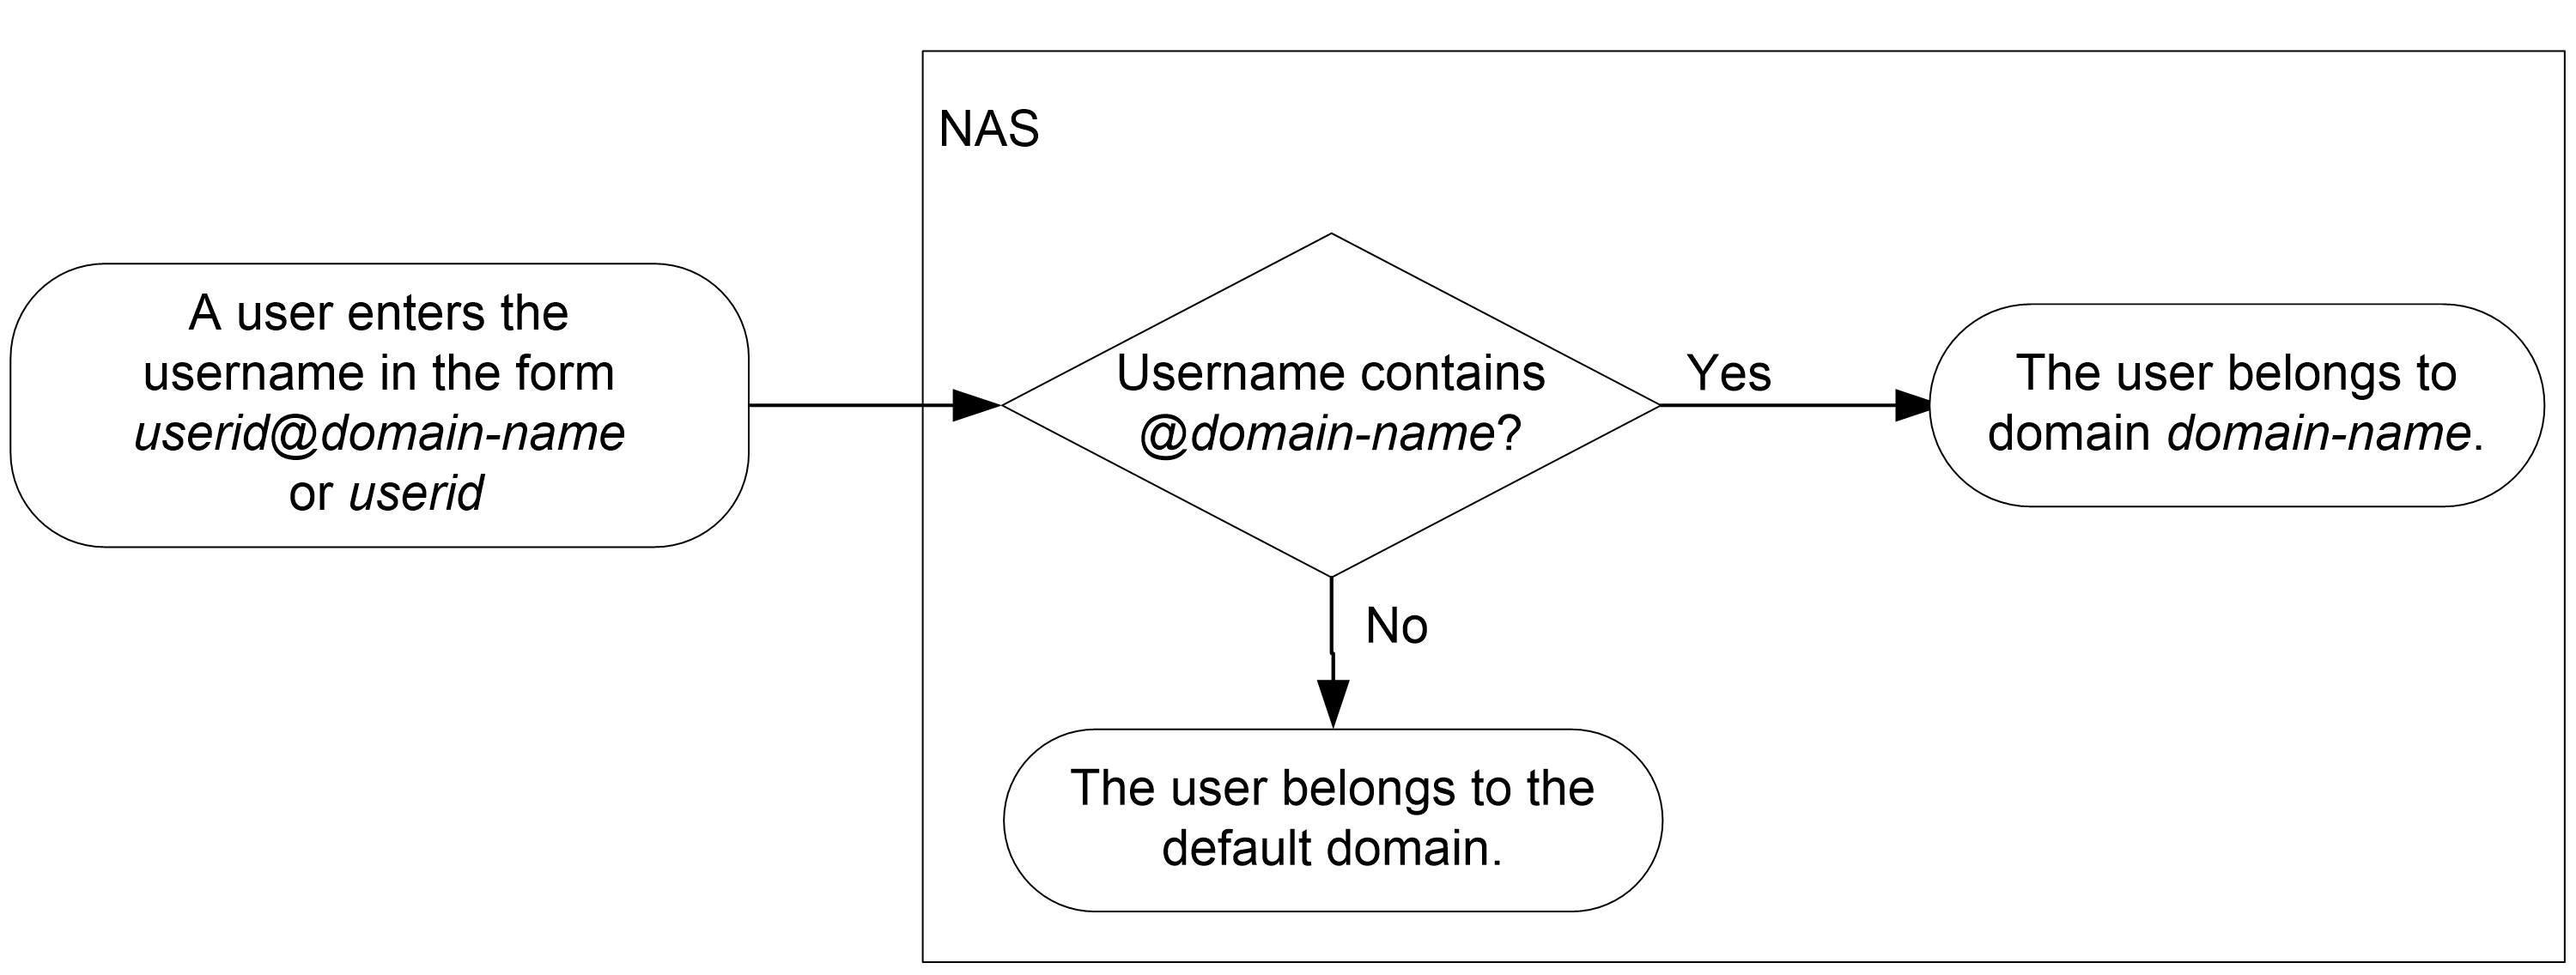
AAA manages users based on the users' ISP domains and access types.
On a NAS, each user belongs to one ISP domain. The NAS determines the ISP domain to which a user belongs based on the username entered by the user at login.
Figure 3 Determining the ISP domain for a user by username
AAA manages users in the same ISP domain based on the users' access types. The device supports the following user access types:
· Login—Login users include SSH, Telnet, FTP, and terminal users that log in to the device. Terminal users can access through a console port.
Authentication, authorization, and accounting methods
AAA supports configuring different authentication, authorization, and accounting methods for different types of users in an ISP domain. The NAS determines the ISP domain and access type of a user. The NAS also uses the methods configured for the access type in the domain to control the user's access.
AAA also supports configuring a set of default methods for an ISP domain. These default methods are applied to users for whom no AAA methods are configured.
Authentication methods
The device supports the following authentication methods:
· No authentication—This method trusts all users and does not perform authentication. For security purposes, do not use this method.
· Local authentication—The NAS authenticates users by itself, based on the locally configured user information including the usernames, passwords, and attributes. Local authentication allows high speed and low cost, but the amount of information that can be stored is limited by the size of the storage space.
· Remote authentication—The NAS works with a remote server to authenticate users. The NAS communicates with the remote server through HWTACACS. The server manages user information in a centralized manner. Remote authentication provides high capacity, reliable, and centralized authentication services for multiple NASs. You can configure backup methods to be used when the remote server is not available.
Authorization methods
The device supports the following authorization methods:
· No authorization—The NAS performs no authorization exchange. The following default authorization information applies after users pass authentication:
¡ Login users obtain the level-0 user role. For more information about the level-0 user role, see RBAC configuration in Fundamentals Configuration Guide.
¡ The working directory for FTP, SFTP, and SCP login users is the root directory of the NAS. However, the users do not have permission to access the root directory.
¡ Non-login users can access the network.
· Local authorization—The NAS performs authorization according to the user attributes locally configured for users.
· Remote authorization—The NAS works with a remote server to authorize users. HWTACACS authorization is separate from authentication, and the authorization information is included in the authorization response after successful authentication. You can configure backup methods to be used when the remote server is not available.
Accounting methods
The device supports the following accounting methods:
· No accounting—The NAS does not perform accounting for the users.
· Local accounting—Local accounting is implemented on the NAS. It counts and controls the number of concurrent users that use the same local user account, but does not provide statistics for charging.
· Remote accounting—The NAS works with a RADIUS server or HWTACACS server for accounting. You can configure backup methods to be used when the remote server is not available.
AAA extended functions
The device provides the following login services to enhance device security:
· Command authorization—Enables the NAS to let the authorization server determine whether a command entered by a login user is permitted. Login users can execute only commands permitted by the authorization server. For more information about command authorization, see controlling user access to the device in Fundamentals Configuration Guide.
· Command accounting—When command authorization is disabled, command accounting enables the accounting server to record all valid commands executed on the device. When command authorization is enabled, command accounting enables the accounting server to record all authorized commands. For more information about command accounting, see controlling user access to the device in Fundamentals Configuration Guide.
· User role authentication—Authenticates each user that wants to obtain another user role without logging out or getting disconnected. For more information about user role authentication, see Fundamentals Configuration Guide.
AAA for VPNs
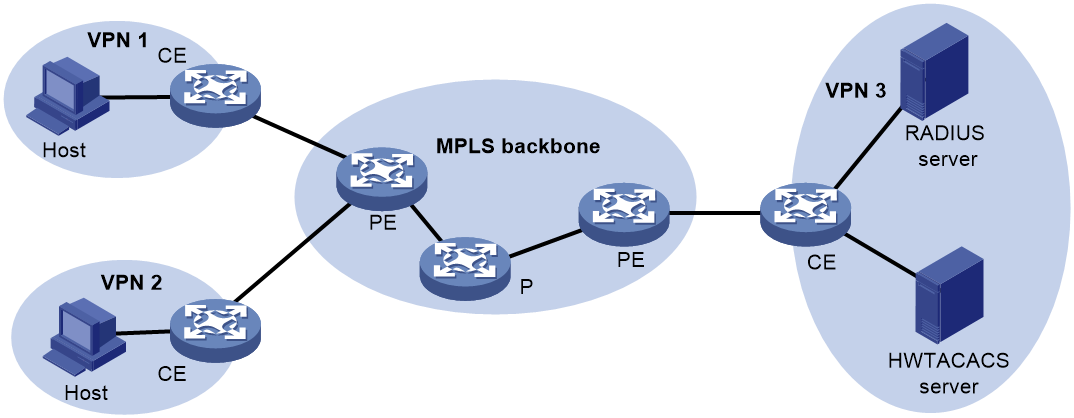
You can deploy AAA across VPNs to enable forwarding of authentication, authorization, and accounting packets across VPNs. For example, as shown in Figure 4, the CE to the left of the MPLS backbone acts as a NAS. The NAS transparently delivers the AAA packets of private users in VPN 1 and VPN 2 to the AAA servers in VPN 3 for centralized authentication. Authentication packets of private users in different VPNs do not affect each other.
Protocols and standards
· RFC 1492, An Access Control Protocol, Sometimes Called TACACS
AAA tasks at a glance
To configure AAA, perform the following tasks:
1. Configuring AAA schemes
If local authentication is used, configure local users and the related attributes. If remote authentication is used, configure the required HWTACACS schemes.
2. Configuring an ISP domain
b. Configuring ISP domain attributes
3. Configuring AAA methods for an ISP domain
Configure authentication, authorization, and accounting methods for an ISP domain as needed. These methods use existing AAA schemes.
¡ Configuring authentication methods for an ISP domain
¡ Configuring authorization methods for an ISP domain
¡ Configuring accounting methods for an ISP domain
4. (Optional.) Configuring advanced AAA features
¡ Setting the maximum number of concurrent login users
¡ Enabling password change prompt logging
¡ Configuring user online and offline recording
Configuring local users
About local users
To implement local authentication, authorization, and accounting, create local users and configure user attributes on the device. The local users and attributes are stored in the local user database on the device. A local user is uniquely identified by the combination of a username and a user type.
The following shows the configurable local user attributes:
· Service type—Services that the user can use. Local authentication checks the service types of a local user. If none of the service types is available, the user cannot pass authentication.
· User state—Whether or not a local user can request network services. There are two user states: active and blocked. A user in active state can request network services, but a user in blocked state cannot.
· Upper limit of concurrent logins using the same user name—Maximum number of users that can concurrently access the device by using the same user name. When the number reaches the upper limit, no more local users can access the device by using the user name.
· User group—Each local user belongs to a local user group and has all attributes of the group. The attributes include the password control attributes and authorization attributes. For more information about local user group, see "Configuring user group attributes."
· Authorization attributes—Authorization attributes indicate the user's rights after it passes local authentication.
Configure the authorization attributes based on the service type of local users.
You can configure an authorization attribute in user group view or local user view. The setting of an authorization attribute in local user view takes precedence over the attribute setting in user group view.
The attribute configured in user group view takes effect on all local users in the user group.
The attribute configured in local user view takes effect only on the local user.
· Password control attributes—Password control attributes help control password security for local users. Password control attributes include password aging time, minimum password length, password composition checking, password complexity checking, and login attempt limit.
You can configure a password control attribute in system view, user group view, or local user view. A password control attribute with a smaller effective range has a higher priority. For more information about password management and global password configuration, see "Configuring password control."
Local user configuration tasks at a glance
To configure local users, perform the following tasks:
1. Configuring attributes for device management users
2. (Optional.) Configuring user group attributes
Configuring attributes for device management users
Restrictions and guidelines
If password control is globally enabled by using the password-control enable command, the device neither displays local user passwords nor retains them in the running configuration. When you globally disable password control, local user passwords are automatically restored to the running configuration. To display the running configuration, use the display current-configuration command.
You can configure authorization attributes and password control attributes in local user view or user group view. The setting in local user view takes precedence over the setting in user group view.
Procedure
1. Enter system view.
system-view
2. Add a device management user and enter device management user view.
local-user user-name [ class manage ]
3. Configure a password for the device management user.
password [ { hash | simple } string ]
A non-password-protected user passes authentication if the user provides the correct username and passes attribute checks. To enhance security, configure a password for each device management user.
4. Assign services to the device management user.
service-type { ftp | ssh | telnet | terminal } * }
By default, no services are authorized to a device management user.
5. (Optional.) Set the status of the device management user.
state { active | block }
By default, a device management user is in active state and can request network services.
6. (Optional.) Set the upper limit of concurrent logins using the device management username.
access-limit max-user-number
By default, the number of concurrent logins is not limited for a device management user.
This command takes effect only when local accounting is configured for device management users. This command does not apply to FTP, SFTP, or SCP users that do not support accounting.
7. (Optional.) Configure authorization attributes for the device management user.
authorization-attribute { idle-cut minutes | user-role role-name | work-directory directory-name } *
The following default settings apply:
¡ The working directory for FTP, SFTP, and SCP users is the root directory of the NAS. However, the users do not have permission to access the root directory.
¡ The network-operator user role is assigned to local users that are created by a network-admin or level-15 user.
8. (Optional.) Configure password control attributes for the device management user. Choose the following tasks as needed:
¡ Set the password aging time.
password-control aging aging-time
¡ Set the minimum password length.
password-control length length
¡ Configure the password composition policy.
password-control composition type-number type-number [ type-length type-length ]
¡ Configure the password complexity checking policy.
password-control complexity { same-character | user-name } check
¡ Configure the maximum login attempts and the action to take if there is a login failure.
password-control login-attempt login-times [ exceed { lock | lock-time time | unlock } ]
By default, a device management user uses password control attributes of the user group to which the user belongs.
9. (Optional.) Assign the device management user to a user group.
group group-name
By default, a device management user belongs to user group system.
Configuring user group attributes
About this task
User groups simplify local user configuration and management. A user group contains a group of local users and has a set of local user attributes. You can configure local user attributes for a user group to implement centralized user attributes management for the local users in the group. Local user attributes that are manageable include authorization attributes.
Procedure
1. Enter system view.
system-view
2. Create a user group and enter user group view.
user-group group-name
By default, a system-defined user group exists. The group name is system.
3. Configure authorization attributes for the user group.
authorization-attribute { idle-cut minutes | work-directory directory-name } *
By default, no authorization attributes are configured for a user group.
4. (Optional.) Configure password control attributes for the user group. Choose the following tasks as needed:
¡ Set the password aging time.
password-control aging aging-time
¡ Set the minimum password length.
password-control length length
¡ Configure the password composition policy.
password-control composition type-number type-number [ type-length type-length ]
¡ Configure the password complexity checking policy.
password-control complexity { same-character | user-name } check
¡ Configure the maximum login attempts and the action to take for login failures.
password-control login-attempt login-times [ exceed { lock | lock-time time | unlock } ]
By default, a user group uses the global password control settings. For more information, see "Configuring password control."
Verifying and maintaining local users
Displaying local user and user group information
Perform display tasks in any view.
· Display the local user configuration and online user statistics.
display local-user [ class manage | idle-cut { disable | enable } | service-type { ftp | ssh | telnet | terminal } | state { active | block } | user-name user-name class manage | vlan vlan-id ]
· Display user group configuration.
display user-group { all | name group-name }
Configuring HWTACACS
HWTACACS tasks at a glance
To configure HWTACACS, perform the following tasks:
1. Creating an HWTACACS scheme
2. Specifying the HWTACACS authentication servers
3. Specifying the HWTACACS authorization servers
4. Specifying the HWTACACS accounting servers
5. Specifying the shared keys for secure HWTACACS communication
Perform this task if no shared keys are specified when configuring HWTACACS servers.
6. Specifying an MPLS L3VPN instance for the scheme
Perform this task if no MPLS L3VPN instances are specified when configuring HWTACACS servers.
7. (Optional.) Setting HWTACACS timers
8. (Optional.) Configuring parameters for HWTACACS packets
¡ Specifying the source IP address of outgoing HWTACACS packets
¡ Setting the username format and traffic statistics units
¡ Setting the DSCP priority for HWTACACS packets
9. (Optional.) Specifying the action to take for AAA requests if all HWTACACS servers are blocked
10. (Optional.) Configuring HWTACACS stop-accounting packet buffering
Creating an HWTACACS scheme
Restrictions and guidelines
You can configure a maximum of 16 HWTACACS schemes. An HWTACACS scheme can be used by multiple ISP domains.
Procedure
1. Enter system view.
system-view
2. Create an HWTACACS scheme and enter HWTACACS scheme view.
hwtacacs scheme hwtacacs-scheme-name
Specifying the HWTACACS authentication servers
About this task
You can specify one primary authentication server and a maximum of 16 secondary authentication servers for an HWTACACS scheme. When the primary server is unreachable, the device searches for the secondary servers in the order they are configured. The first secondary server in active state is used for communication.
Restrictions and guidelines
If redundancy is not required, specify only the primary server.
An HWTACACS server can function as the primary authentication server in one scheme and as the secondary authentication server in another scheme at the same time.
Two HWTACACS authentication servers in a scheme, primary or secondary, cannot have the same combination of VPN instance, host name, IP address, and port number.
Procedure
1. Enter system view.
system-view
2. Enter HWTACACS scheme view.
hwtacacs scheme hwtacacs-scheme-name
3. Specify the primary HWTACACS authentication server.
primary authentication { host-name | ipv4-address | ipv6 ipv6-address } [ port-number | key { cipher | simple } string | single-connection | vpn-instance vpn-instance-name ] *
By default, no primary HWTACACS authentication server is specified.
4. (Optional.) Specify a secondary HWTACACS authentication server.
secondary authentication { host-name | ipv4-address | ipv6 ipv6-address } [ port-number | key { cipher | simple } string | single-connection | vpn-instance vpn-instance-name ] *
By default, no secondary HWTACACS authentication servers are specified.
Specifying the HWTACACS authorization servers
About this task
You can specify one primary authorization server and a maximum of 16 secondary authorization servers for an HWTACACS scheme. When the primary server is not available, the device searches for the secondary servers in the order they are configured. The first secondary server in active state is used for communication.
Restrictions and guidelines
If redundancy is not required, specify only the primary server.
An HWTACACS server can function as the primary authorization server of one scheme and as the secondary authorization server of another scheme at the same time.
Two HWTACACS authorization servers in a scheme, primary or secondary, cannot have the same combination of VPN instance, host name, IP address, and port number.
Procedure
1. Enter system view.
system-view
2. Enter HWTACACS scheme view.
hwtacacs scheme hwtacacs-scheme-name
3. Specify the primary HWTACACS authorization server.
primary authorization { host-name | ipv4-address | ipv6 ipv6-address } [ port-number | key { cipher | simple } string | single-connection | vpn-instance vpn-instance-name ] *
By default, no primary HWTACACS authorization server is specified.
4. (Optional.) Specify a secondary HWTACACS authorization server.
secondary authorization { host-name | ipv4-address | ipv6 ipv6-address } [ port-number | key { cipher | simple } string | single-connection | vpn-instance vpn-instance-name ] *
By default, no secondary HWTACACS authorization servers are specified.
Specifying the HWTACACS accounting servers
About this task
You can specify one primary accounting server and a maximum of 16 secondary accounting servers for an HWTACACS scheme. When the primary server is not available, the device searches for the secondary servers in the order they are configured. The first secondary server in active state is used for communication.
Restrictions and guidelines
If redundancy is not required, specify only the primary server.
An HWTACACS server can function as the primary accounting server of one scheme and as the secondary accounting server of another scheme at the same time.
Two HWTACACS accounting servers in a scheme, primary or secondary, cannot have the same combination of VPN instance, host name, IP address, and port number.
HWTACACS does not support accounting for FTP, SFTP, and SCP users.
Procedure
1. Enter system view.
system-view
2. Enter HWTACACS scheme view.
hwtacacs scheme hwtacacs-scheme-name
3. Specify the primary HWTACACS accounting server.
primary accounting { host-name | ipv4-address | ipv6 ipv6-address } [ port-number | key { cipher | simple } string | single-connection | vpn-instance vpn-instance-name ] *
By default, no primary HWTACACS accounting server is specified.
4. (Optional.) Specify a secondary HWTACACS accounting server.
secondary accounting { host-name | ipv4-address | ipv6 ipv6-address } [ port-number | key { cipher | simple } string | single-connection | vpn-instance vpn-instance-name ] *
By default, no secondary HWTACACS accounting servers are specified.
Specifying the shared keys for secure HWTACACS communication
About this task
The HWTACACS client and server use the MD5 algorithm and shared keys to generate the Authenticator value for packet authentication and user password encryption. The client and server must use the same key for each type of communication.
Perform this task to configure shared keys for servers in an HWTACACS scheme. The keys take effect on all servers for which a shared key is not individually configured.
Restrictions and guidelines
Make sure the shared key configured on the device is the same as the shared key configured on the HWTACACS server.
Procedure
1. Enter system view.
system-view
2. Enter HWTACACS scheme view.
hwtacacs scheme hwtacacs-scheme-name
3. Specify a shared key for secure HWTACACS authentication, authorization, or accounting communication.
key { accounting | authentication | authorization } { cipher | simple } string
By default, no shared key is specified for secure HWTACACS communication.
Specifying an MPLS L3VPN instance for the scheme
About this task
The VPN instance specified for an HWTACACS scheme applies to all servers in that scheme. If a VPN instance is also configured for an individual HWTACACS server, the VPN instance specified for the HWTACACS scheme does not take effect on that server.
Procedure
1. Enter system view.
system-view
2. Enter HWTACACS scheme view.
hwtacacs scheme hwtacacs-scheme-name
3. Specify a VPN instance for the HWTACACS scheme.
vpn-instance vpn-instance-name
By default, an HWTACACS scheme belongs to the public network.
Setting HWTACACS timers
About this task
The device uses the following timers to control communication with an HWTACACS server:
· Server response timeout timer (response-timeout)—Defines the HWTACACS server response timeout timer. The device starts this timer immediately after an HWTACACS authentication, authorization, or accounting request is sent. If the device does not receive a response from the server within the timer, it sets the server to blocked. Then, the device sends the request to another HWTACACS server.
· Real-time accounting timer (realtime-accounting)—Defines the interval at which the device sends real-time accounting packets to the HWTACACS accounting server for online users.
· Server quiet timer (quiet)—Defines the duration to keep an unreachable server in blocked state. If a server is not reachable, the device changes the server status to blocked, starts this timer for the server, and tries to communicate with another server in active state. After the server quiet timer expires, the device changes the status of the server back to active.
The server quiet timer setting affects the status of HWTACACS servers. If the scheme includes one primary HWTACACS server and multiple secondary HWTACACS servers, the device communicates with the HWTACACS servers based on the following rules:
· When the primary server is in active state, the device communicates with the primary server. When the primary server is unreachable, the device researches a secondary server in active status in the order they are configured.
· When one or more servers are in active state, the device tries to communicate with these servers only, even if they are unreachable.
· When all servers are in blocked state, the device only tries to communicate with the primary server.
· If the primary server is unreachable, the device changes the server status to blocked and starts a quiet timer for the server. When the quiet timer of the server expires, the status of the server changes back to active. The device does not check the server again during the authentication, authorization, or accounting process.
· The search process continues until the device finds an available secondary server or has checked all secondary servers in active state. If no server is available, the device considers the authentication, authorization, or accounting attempt a failure.
· When you remove a server in use, communication with the server times out. The device looks for a server in active state by first checking the primary server, and then checking secondary servers in the order they are configured.
· When an HWTACACS server's status changes automatically, the device changes this server's status accordingly in all HWTACACS schemes in which this server is specified.
Restrictions and guidelines
A short real-time accounting interval helps improve accounting precision but requires many system resources. When there are 1000 or more users, set a real-time accounting interval longer than 15 minutes.
Procedure
1. Enter system view.
system-view
2. Enter HWTACACS scheme view.
hwtacacs scheme hwtacacs-scheme-name
3. Set the HWTACACS timers. Choose the following tasks as needed:
¡ Set the HWTACACS server response timeout timer.
timer response-timeout seconds
By default, the HWTACACS server response timeout timer is 5 seconds.
¡ Set the real-time accounting interval.
timer realtime-accounting minutes
By default, the real-time accounting interval is 12 minutes.
¡ Set the server quiet timer.
timer quiet minutes
By default, the server quiet timer is 5 minutes.
Specifying the source IP address of outgoing HWTACACS packets
About this task
The source IP address of HWTACACS packets that a NAS sends must match the IP address of the NAS configured on the HWTACACS server. An HWTACACS server identifies a NAS by IP address. When the HWTACACS server receives a packet, it checks the source IP address of the packet.
· If it is the IP address of a managed NAS, the server processes the packet.
· If it is not the IP address of a managed NAS, the server drops the packet.
Before sending an HWTACACS packet, the NAS selects a source IP address in the following order:
1. The source IP address specified for the HWTACACS scheme.
2. The source IP address specified in system view for the VPN or public network, depending on where the HWTACACS server resides.
3. The IP address of the outbound interface specified by the route.
Restrictions and guidelines for source IP address configuration
You can specify the source IP address for outgoing HWTACACS packets in HWTACACS scheme view or in system view.
· The IP address specified in HWTACACS scheme view applies to one HWTACACS scheme.
· The IP address specified in system view applies to all HWTACACS schemes.
The source IP address of HWTACACS packets that a NAS sends must match the IP address of the NAS that is configured on the HWTACACS server.
As a best practice to avoid HWTACACS packet loss caused by physical port errors, specify a loopback interface address as the source IP address of outgoing HWTACACS packets.
To communicate with the HWTACACS server, the source address of outgoing HWTACACS packets is typically the IP address of an egress interface on the NAS.
You can directly specify a source IP address for outgoing HWTACACS packets or specify a source interface to provide the source IP address for outgoing HWTACACS packets. The source interface configuration and the source IP address configuration overwrite each other.
Specifying a source IP address for outgoing HWTACACS packets in system view
1. Enter system view.
system-view
2. Specify a source IP address for outgoing HWTACACS packets.
hwtacacs nas-ip { interface interface-type interface-number | { ipv4-address | ipv6 ipv6-address } [ vpn-instance vpn-instance-name ] }
By default, the source IP address of an HWTACACS packet sent to the server is the primary IPv4 address or the IPv6 address of the outbound interface.
Specifying a source IP address for outgoing HWTACACS packets in HWTACACS scheme view
1. Enter system view.
system-view
2. Enter HWTACACS scheme view.
hwtacacs scheme hwtacacs-scheme-name
3. Specify a source IP address for outgoing HWTACACS packets.
nas-ip { ipv4-address | interface interface-type interface-number | ipv6 ipv6-address }
By default, the source IP address of an outgoing HWTACACS packet is that configured by using the hwtacacs nas-ip command in system view. If the hwtacacs nas-ip command is not used, the source IP address is the primary IP address of the outbound interface.
Setting the username format and traffic statistics units
About this task
A username is typically in the userid@isp-name format, where the isp-name part represents the user's ISP domain name. By default, the ISP domain name is included in a username. If HWTACACS servers do not recognize usernames that contain ISP domain names, you can configure the device to send usernames without domain names to the servers.
The device reports online user traffic statistics in accounting packets.
Restrictions and guidelines
If two or more ISP domains use the same HWTACACS scheme, configure the HWTACACS scheme to keep the ISP domain name in usernames for domain identification.
For accounting accuracy, make sure the traffic measurement units configured on the device are the same as the traffic measurement units configured on the HWTACACS accounting servers.
Procedure
1. Enter system view.
system-view
2. Enter HWTACACS scheme view.
hwtacacs scheme hwtacacs-scheme-name
3. Set the format of usernames sent to the HWTACACS servers.
user-name-format { keep-original | with-domain | without-domain }
By default, the ISP domain name is included in a username.
4. Set the data flow and packet measurement units for traffic statistics.
data-flow-format { data { byte | giga-byte | kilo-byte | mega-byte } | packet { giga-packet | kilo-packet | mega-packet | one-packet } }*
By default, traffic is counted in bytes and packets.
Setting the DSCP priority for HWTACACS packets
About this task
DSCP priority determines the transmission priority of HWTACACS packets. A larger value represents a higher priority.
DSCP priority is contained in the ToS field of the IPv4 header and in the Traffic Class field of the IPv6 header.
Procedure
1. Enter system view.
system-view
2. Set the DSCP priority for HWTACACS packets.
hwtacacs [ ipv6 ] dscp dscp-value
By default, the DSCP priority is 0 for HWTACACS packets.
Specifying the action to take for AAA requests if all HWTACACS servers are blocked
About this task
If all servers in an HWTACACS scheme are blocked, the device takes one of the following actions upon receiving AAA requests in the domain that uses the scheme:
· attempt—Attempts to connect to the server that has the highest priority in the scheme. (Typically, the highest-priority server is the primary server. If no primary server is specified, it is the firstly configured secondary server.) If the device fails to connect to the server, it turns to the backup method.
· skip—Skips all servers in the scheme and turns to the backup method.
The attempt action gives the device a chance to use the scheme in case the server with the highest priority in the scheme might be available. However, the attempt to communicate with an unavailable server increases the response time for AAA requests. As a best practice, specify the skip action in scenarios that require quick responses to AAA requests.
Procedure
1. Enter system view.
system-view
2. Enter HWTACACS scheme view.
hwtacacs scheme hwtacacs-scheme-name
3. Specify the action to take for AAA requests if all servers in the scheme are blocked.
server-block-action { attempt | skip }
By default, the attempt action applies.
Configuring HWTACACS stop-accounting packet buffering
About this task
The device sends HWTACACS stop-accounting requests when it receives connection teardown requests from hosts or connection teardown commands from an administrator. However, the device might fail to receive a response for a stop-accounting request in a single transmission. Enable the device to buffer HWTACACS stop-accounting requests that have not received responses from the accounting server. The device will resend the requests until responses are received.
To limit the transmission times, set a maximum number of attempts that can be made for transmitting individual HWTACACS stop-accounting requests. When the maximum attempts are made for a request, the device discards the buffered request.
Procedure
1. Enter system view.
system-view
2. Enter HWTACACS scheme view.
hwtacacs scheme hwtacacs-scheme-name
3. Enable buffering of HWTACACS stop-accounting requests to which no responses have been received.
stop-accounting-buffer enable
By default, the buffering feature is enabled.
4. (Optional.) Set the maximum number of transmission attempts for individual HWTACACS stop-accounting requests.
retry stop-accounting retries
The default setting is 100.
Verifying and maintaining HWTACACS
Verifying the HWTACACS scheme configuration
To verify the configuration for all HWTACACS schemes or for the specified HWTACACS scheme, execute the following command in any view:
display hwtacacs scheme [ hwtacacs-scheme-name ]
Displaying and clearing HWTACACS statistics
To display HWTACACS statistics, execute the following command in any view:
display hwtacacs scheme hwtacacs-scheme-name statistics
To clear HWTACACS statistics, execute the following command in user view:
reset hwtacacs statistics { accounting | all | authentication | authorization }
Displaying and clearing information about buffered HWTACACS stop-accounting requests
To display information about buffered HWTACACS stop-accounting requests to which no responses have been received, execute the following command in any view:
display stop-accounting-buffer hwtacacs-scheme hwtacacs-scheme-name
To clear the buffered HWTACACS stop-accounting requests to which no responses have been received, execute the following command in user view:
reset stop-accounting-buffer hwtacacs-scheme hwtacacs-scheme-name
Creating an ISP domain
About ISP domains
In a networking scenario with multiple ISPs, the device can connect to users of different ISPs. These users can have different user attributes, such as different username and password structures, different service types, and different rights. To manage users of different ISPs, configure authentication, authorization, and accounting methods and domain attributes for each ISP domain as needed.
The device supports a maximum of 1024 ISP domains, including the system-defined ISP domain system. You can specify one of the ISP domains as the default domain.
On the device, each user belongs to an ISP domain. If a user does not provide an ISP domain name at login, the device considers the user belongs to the default ISP domain.
Each ISP domain has a set of system-defined AAA methods, which are local authentication, local authorization, and local accounting. If you do not configure any AAA methods for an ISP domain, the device uses the system-defined AAA methods for users in the domain.
The device chooses an authentication domain for each user in the following order:
1. The authentication domain specified for the access module.
2. The ISP domain in the username.
3. The default ISP domain of the device.
If the chosen domain does not exist on the device, the device searches for the ISP domain that accommodates users assigned to nonexistent domains. (Support for the authentication domain configuration depends on the access module.) If no such ISP domain is configured, user authentication fails.
Restrictions and guidelines for ISP domain configuration
An ISP domain cannot be deleted when it is the default ISP domain. Before you use the undo domain command, change the domain to a non-default ISP domain by using the undo domain default enable command.
You can modify the settings of the system-defined ISP domain system, but you cannot delete the domain.
Creating an ISP domain
1. Enter system view.
system-view
2. Create an ISP domain and enter ISP domain view by using one of the following commands:
¡ domain name isp-name
¡ domain isp-name
By default, a system-defined ISP domain exists. The domain name is system.
Valid characters in the ISP domain name depend on the command synatx. For more information, see AAA commands in User Access and Authentication Command Reference.
Specifying the default ISP domain
1. Enter system view.
system-view
2. Specify the default ISP domain.
domain default enable isp-name
By default, the default ISP domain is the system-defined ISP domain system.
Specifying an ISP domain for users that are assigned to nonexistent domains
1. Enter system view.
system-view
2. Specify the ISP domain to accommodate users that are assigned to nonexistent domains.
domain if-unknown isp-name
By default, no ISP domain is specified to accommodate users that are assigned to nonexistent domains.
Configuring ISP domain attributes
Setting ISP domain status
About this task
By setting the state of an ISP domain, you can allow or deny network service requests from users in the domain.
· Active—The device allows network service requests from users in the domain.
· Blocked—The device denies network service requests from users in the domain. To deny user network service requests during specific time, you can configure the device to place the domain in blocked state during the specified time ranges.
Procedure
1. Enter system view.
system-view
2. Enter ISP domain view.
domain name isp-name
3. Set the status of the ISP domain.
state { active | block [ time-range ] }
By default, an ISP domain is in active state, and users in the domain can request network services.
4. Specify time ranges during which the ISP domain is placed in blocked state.
state block time-range name time-range-name
By default, no time ranges are specified during which an ISP domain is placed in blocked state.
Configuring authorization attributes for an ISP domain
About this task
The device assigns the authorization attributes in the ISP domain to the authenticated users that do not receive these attributes from the server.
Procedure
system-view
2. Enter ISP domain view.
domain name isp-name
3. Configure authorization attributes for authenticated users in the ISP domain.
authorization-attribute user-group user-group-name
Including the idle timeout period in the user online duration to be sent to the server
About this task
If a user goes offline due to connection failure or malfunction, the user's online duration sent to the server includes the idle timeout period assigned by the authorization server. The online duration generated on the server is longer than the actual online duration of the user.
Procedure
1. Enter system view.
system-view
2. Enter ISP domain view.
domain name isp-name
3. Configure the device to include the idle timeout period in the user online duration to be sent to the server.
session-time include-idle-time
By default, the user online duration sent to the server does not include the idle timeout period.
Specifying the user address type in an ISP domain
1. Enter system view.
system-view
2. Enter ISP domain view.
domain name isp-name
3. Specify the user address type in the ISP domain.
user-address-type { ds-lite | ipv6 | nat64 | private-ds | private-ipv4 | public-ds | public-ipv4 }
By default, no user address type is specified.
Configuring AAA methods for an ISP domain
Configuring authentication methods for an ISP domain
Restrictions and guidelines
When you configure authentication, follow these restrictions and guidelines:
· For high availability, you can specify one primary authentication method and multiple backup authentication methods. When the primary method is invalid, the device attempts to use the backup methods in sequence.
For example, the hwtacacs-scheme hwtacacs-scheme-name local none parameters specify a primary HWTACACS authentication method and two backup methods (local authentication and no authentication). The device performs HWTACACS authentication by default and performs local authentication when the HWTACACS server is invalid. The device does not perform authentication when both of the previous methods are invalid.
The remote authentication method is invalid in the following situations:
¡ The specified authentication scheme does not exist.
¡ Authentication packet sending fails.
¡ The device does not receive any authentication response packets from an authentication server.
The local authentication method is invalid if the device fails to find the matching local user configuration.
· If an HWTACACS scheme is specified, the device uses the entered username for role authentication.
When the primary authentication method is local, the following rules apply to the authentication of a user:
· The device uses the backup authentication methods in sequence only if local authentication is invalid for one of the following reasons:
¡ An exception occurs in the local authentication process.
¡ The user account is not configured on the device or the user is not allowed to use the access service.
· The device does not turn to the backup authentication methods if local authentication is invalid because of any other reason. Authentication fails for the user.
Prerequisites
Before configuring authentication methods, complete the following tasks:
1. Determine the access type or service type to be configured. With AAA, you can configure an authentication method for each access type and service type.
2. Determine whether to configure the default authentication method for all access types or service types. The default authentication method applies to all access users. However, the method has a lower priority than the authentication method that is specified for an access type or service type.
Procedure
1. Enter system view.
system-view
2. Enter ISP domain view.
domain name isp-name
3. (Optional.) Specify default authentication methods for all types of users.
authentication default { hwtacacs-scheme hwtacacs-scheme-name [ local ] [ none ] | local [ hwtacacs-scheme hwtacacs-scheme-name ] [ none ] }
By default, the default authentication method is local.
4. Specify authentication methods for a user type or a service.
¡ Specify authentication methods for login users.
authentication login { hwtacacs-scheme hwtacacs-scheme-name [ local ] [ none ] | local [ hwtacacs-scheme hwtacacs-scheme-name ] [ none ] | none }
By default, the default authentication methods are used for login users.
¡ Specify authentication methods for obtaining a temporary user role.
authentication super hwtacacs-scheme hwtacacs-scheme-name
By default, the default authentication methods are used for obtaining a temporary user role.
Configuring authorization methods for an ISP domain
Restrictions and guidelines
For high availability, you can specify one primary authorization method and multiple backup authorization methods. When the primary method is invalid, the device attempts to use the backup methods in sequence. For example, the hwtacacs-scheme hwtacacs-scheme-name local none parameters specify a primary HWTACACS authorization method and two backup methods (local authorization and no authorization). The device performs HWTACACS authorization by default and performs local authorization when the HWTACACS server is invalid. The device does not perform authorization when both of the previous methods are invalid.
The remote authorization method is invalid in the following situations:
· The specified authorization scheme does not exist.
· Authorization packet sending fails.
· The device does not receive any authorization response packets from an authorization server.
The local authorization method is invalid if the device fails to find the matching local user configuration.
When the primary authorization method is local, the following rules apply to the authorization of a user:
· The device uses the backup authorization methods in sequence only if local authorization is invalid for one of the following reasons:
¡ An exception occurs in the local authorization process.
¡ The user account is not configured on the device or the user is not allowed to use the access service.
· The device does not turn to the backup authorization methods if local authorization is invalid because of any other reason. Authorization fails for the user.
Prerequisites
Before configuring authorization methods, complete the following tasks:
1. Determine the access type or service type to be configured. With AAA, you can configure an authorization scheme for each access type and service type.
2. Determine whether to configure the default authorization method for all access types or service types. The default authorization method applies to all access users. However, the method has a lower priority than the authorization method that is specified for an access type or service type.
Procedure
1. Enter system view.
system-view
2. Enter ISP domain view.
domain name isp-name
3. (Optional.) Specify default authorization methods for all types of users.
authorization default { hwtacacs-scheme hwtacacs-scheme-name [ local ] [ none ] | local [ hwtacacs-scheme hwtacacs-scheme-name ] [ none ] | none }
By default, the authorization method is local.
4. Specify authorization methods for a user type or a service.
¡ Specify command authorization methods.
authorization command { hwtacacs-scheme hwtacacs-scheme-name [ local ] [ none ] | local [ none ] | none }
By default, the default authorization methods are used for command authorization.
¡ Specify authorization methods for login users.
authorization login { hwtacacs-scheme hwtacacs-scheme-name [ local ] [ none ] | local [ hwtacacs-scheme hwtacacs-scheme-name ] [ none ] | none }
By default, the default authorization methods are used for login users.
Configuring accounting methods for an ISP domain
Restrictions and guidelines
For high availability, you can specify one primary accounting method and multiple backup accounting methods. When the primary method is invalid, the device attempts to use the backup methods in sequence. For example, the hwtacacs-scheme hwtacacs-scheme-name local none parameters specify a primary HWTACACS accounting method and two backup methods (local accounting and no accounting). The device performs HWTACACS accounting by default and performs local accounting when the HWTACACS server is invalid. The device does not perform accounting when both of the previous methods are invalid.
The remote accounting method is invalid in the following situations:
· The specified accounting scheme does not exist.
· Accounting packet sending fails.
· The device does not receive any accounting response packets from an accounting server.
The local accounting method is invalid if the device fails to find the matching local user configuration.
FTP, SFTP, and SCP users do not support accounting.
Local accounting does not provide statistics for charging. It only counts and controls the number of concurrent users that use the same local user account. The threshold is configured by using the access-limit command.
When the primary accounting method is local, the following rules apply to the accounting of a user:
· The device uses the backup accounting methods in sequence only if local accounting is invalid for one of the following reasons:
¡ An exception occurs in the local accounting process.
¡ The user account is not configured on the device or the user is not allowed to use the access service.
· The device does not turn to the backup accounting methods if local accounting is invalid because of any other reason. Accounting fails for the user.
Prerequisites
Before configuring accounting methods, complete the following tasks:
1. Determine the access type or service type to be configured. With AAA, you can configure an accounting method for each access type and service type.
2. Determine whether to configure the default accounting method for all access types or service types. The default accounting method applies to all access users. However, the method has a lower priority than the accounting method that is specified for an access type or service type.
Procedure
1. Enter system view.
system-view
2. Enter ISP domain view.
domain name isp-name
3. (Optional.) Specify default accounting methods for all types of users.
accounting default { hwtacacs-scheme hwtacacs-scheme-name [ local ] [ none ] | local [ hwtacacs-scheme hwtacacs-scheme-name ] [ none ] | none }
By default, the accounting method is local.
4. Specify accounting methods for a user type.
¡ Specify the command accounting method.
accounting command hwtacacs-scheme hwtacacs-scheme-name
By default, the default accounting methods are used for command accounting.
¡ Specify accounting methods for login users.
accounting login { hwtacacs-scheme hwtacacs-scheme-name [ local ] [ none ] | local [ hwtacacs-scheme hwtacacs-scheme-name ] [ none ] | none }
By default, the default accounting methods are used for login users.
Verifying and maintaining ISP domains
Perform display tasks in any view.
· Display configuration information about an ISP domain or all ISP domains.
display domain [ isp-name ]
Setting the maximum number of concurrent login users
About this task
Perform this task to set the maximum number of concurrent users that can log on to the device through a specific protocol, regardless of their authentication methods. The authentication methods include no authentication, local authentication, and remote authentication.
Procedure
1. Enter system view.
system-view
2. Set the maximum number of concurrent login users.
aaa session-limit { ftp | ssh | telnet } max-sessions
By default, the maximum number of concurrent login users is 32 for each user type.
Enabling password change prompt logging
About this task
Use this feature to enhance the protection of passwords for Telnet, SSH, NETCONF over SSH, and NETCONF over SOAP users and improve the system security.
This feature enables the device to generate logs to prompt users to change their weak passwords at an interval of 24 hours and at the users' login.
A password is a weak password if it does not meet the following requirements:
· Password composition restriction configured by using the password-control composition command.
· Minimum password length restriction set by using the password-control length command.
· Password complexity checking policy configured by using the password-control complexity command.
For a NETCONF over SSH or NETCONF over SOAP user, the device also generates a password change prompt log if any of the following conditions exists:
· The current password of the user is the default password or has expired.
· The user logs in to the device for the first time or uses a new password to log in after global password control is enabled.
The device stops generating password change prompt logs for a user when one of the following conditions exists:
· The password change prompt logging feature is disabled.
· The user has changed the password and the new password meets the password control requirements.
· The enabling status of a related password control feature has changed so the current password of the user meets the password control requirements.
· The password composition policy or the minimum password length has changed.
Restrictions and guidelines
You can use the display password-control command to display password control configuration. For more information about password control commands, see password control commands in User Access and Authentication Command Reference.
Procedure
1. Enter system view.
system-view
2. Enable password change prompt logging.
local-server log change-password-prompt
By default, password change prompt logging is enabled.
Configuring user online and offline recording
About user online and offline recording
This feature enables the device to record user information when the users fail to come online, or the users go offline normally or abnormally. These records help the administrator to quickly identify the causes of user online and offline faults. The feature occupies the system memory. To reduce the memory usage, you can disable this feature.
Restrictions and guidelines for user online and offline recording configuration
This feature is applicable only to login users.
Enabling user online failure recording
1. Enter system view.
system-view
2. Enable user online failure recording.
aaa online-fail-record enable
By default, user online failure recording is disabled.
Enabling user offline recording
1. Enter system view.
system-view
2. Enable user offline recording.
aaa offline-record enable
By default, user offline recording is disabled.
User normal offline recording and user abnormal offline recording take effect only when this feature is enabled.
3. Enable user normal offline recording.
aaa normal-offline-record enable
By default, user normal offline recording is disabled.
4. Enable user abnormal offline recording.
aaa abnormal-offline-record enable
By default, user abnormal offline recording is disabled.
Verifying and maintaining user online and offline records
Displaying user online failure records
To display user online failure records, execute the following command in any view:
display aaa online-fail-record { access-type login | domain domain-name | interface interface-type interface-number | { ip ipv4-address | ipv6 ipv6-address } | mac-address mac-address | s-vlan svlan-id [ c-vlan cvlan-id ] | slot slot-number | username user-name [ fuzzy-match ] } * [ brief | count count ]
display aaa online-fail-record time begin-time end-time [ date begin-date end-date ] [ brief ]
display aaa online-fail-record
Displaying user normal offline records
To display user normal offline records, execute the following command in any view:
display aaa normal-offline-record { access-type login | domain domain-name | interface interface-type interface-number | { ip ipv4-address | ipv6 ipv6-address } | mac-address mac-address | s-vlan svlan-id [ c-vlan cvlan-id ] | slot slot-number | username user-name [ fuzzy-match ] } * [ brief | count count ]
display aaa normal-offline-record time begin-time end-time [ date begin-date end-date ] [ brief ]
display aaa normal-offline-record
Displaying user abnormal offline records
To display user abnormal offline records, execute the following command in any view:
display aaa abnormal-offline-record { access-type login | domain domain-name | interface interface-type interface-number | { ip ipv4-address | ipv6 ipv6-address } | mac-address mac-address | svlan svlan-id [ cvlan cvlan-id ] | slot slot-number | username user-name [ fuzzy-match ] } * [ brief | count count ]
display aaa abnormal-offline-record offline-reason { idle-cut | quota-out | realtime-acct-fail | session-timeout | user-detect-fail } [ brief ]
display aaa abnormal-offline-record time begin-time end-time [ date begin-date end-date ] [ brief ]
display aaa abnormal-offline-record
Displaying user offline records
To display user offline records, execute the following command in any view:
display aaa offline-record { access-type login | domain domain-name | interface interface-type interface-number | { ip ipv4-address | ipv6 ipv6-address } | mac-address mac-address | s-vlan svlan-id [ c-vlan cvlan-id ] | slot slot-number | username user-name [ fuzzy-match ] } * [ brief | count count ]
display aaa offline-record time begin-time end-time [ date begin-date end-date ] [ brief ]
display aaa offline-record
Clearing user online and offline records
Perform clear tasks in user view.
· Clear user online failure records.
reset aaa online-fail-record
· Clear user normal offline records.
reset aaa normal-offline-record
· Clear user abnormal offline records.
reset aaa abnormal-offline-record
· Clear user offline records.
reset aaa offline-record
AAA configuration examples
Example: Configuring AAA for SSH users by an HWTACACS server
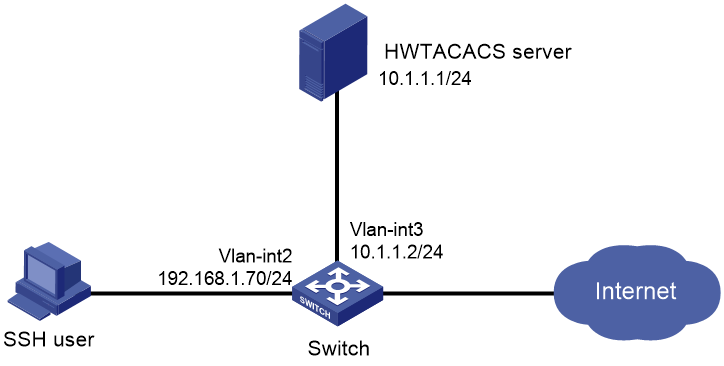
Network configuration
As shown in Figure 5, configure the switch to meet the following requirements:
· Use the HWTACACS server for SSH user authentication, authorization, and accounting.
· Assign the default user role network-operator to SSH users after they pass authentication.
· Exclude domain names from the usernames sent to the HWTACACS server.
· Use expert as the shared keys for secure HWTACACS communication.
Prerequisites
Configure IP addresses for interfaces, and make sure the devices are reachable.
Configuring the HWTACACS server
# Set the shared keys to expert for secure communication with the switch.
# Add an account for the SSH user, specify the password, but do not specify a user role for the user. (Details not shown.)
Configuring the switch
# Create local RSA key pairs with default names.
<Switch> system-view
[Switch] public-key local create rsa
# Create a local DSA key pair with the default name.
[Switch] public-key local create dsa
# Enable the Stelnet server.
[Switch] ssh server enable
# Create an HWTACACS scheme.
[Switch] hwtacacs scheme hwtac
# Specify the primary authentication server.
[Switch-hwtacacs-hwtac] primary authentication 10.1.1.1 49
# Specify the primary authorization server.
[Switch-hwtacacs-hwtac] primary authorization 10.1.1.1 49
# Specify the primary accounting server.
[Switch-hwtacacs-hwtac] primary accounting 10.1.1.1 49
# Set the shared keys to expert in plaintext form for secure HWTACACS communication.
[Switch-hwtacacs-hwtac] key authentication simple expert
[Switch-hwtacacs-hwtac] key authorization simple expert
[Switch-hwtacacs-hwtac] key accounting simple expert
# Exclude domain names from the usernames sent to the HWTACACS server.
[Switch-hwtacacs-hwtac] user-name-format without-domain
[Switch-hwtacacs-hwtac] quit
# Create an ISP domain named bbb and configure the domain to use the HWTACACS scheme for login user authentication, authorization, and accounting.
[Switch] domain name bbb
[Switch-isp-bbb] authentication login hwtacacs-scheme hwtac
[Switch-isp-bbb] authorization login hwtacacs-scheme hwtac
[Switch-isp-bbb] accounting login hwtacacs-scheme hwtac
[Switch-isp-bbb] quit
# Specify ISP domain bbb as the default ISP domain.
[Switch] domain default enable bbb
# Enable scheme authentication for user lines VTY 0 through VTY 63.
[Switch] line vty 0 63
[Switch-line-vty0-63] authentication-mode scheme
[Switch-line-vty0-63] quit
# Enable the default user role feature to assign authenticated SSH users the default user role network-operator.
[Switch] role default-role enable
Verifying the configuration
# Initiate an SSH connection to the switch, and enter the correct username and password. The user logs in to the switch. (Details not shown.)
# Verify that the user can use the commands permitted by the network-operator user role. (Details not shown.)
