- Table of Contents
-
- 11-Security Configuration Guide
- 00-Preface
- 01-Keychain configuration
- 02-Public key management
- 03-PKI configuration
- 04-Crypto engine configuration
- 05-SSH configuration
- 06-SSL configuration
- 07-Packet filter configuration
- 08-DHCP snooping configuration
- 09-DHCPv6 snooping configuration
- 10-ARP attack protection configuration
- 11-ND attack defense configuration
- 12-Attack detection and prevention configuration
- 13-IP-based attack prevention configuration
- 14-uRPF configuration
- Related Documents
-
| Title | Size | Download |
|---|---|---|
| 11-ND attack defense configuration | 90.20 KB |
Contents
ND attack defense tasks at a glance
Enabling source MAC consistency check for ND messages
Configuring ND attack detection
Restrictions and guidelines for ND attack detection configuration
Configuring ND attack detection for a VLAN
Enabling ND attack detection logging
Verifying and maintaining ND attack detection
Example: Configuring ND attack detection
Configuring ND attack defense
About ND attack defense
IPv6 Neighbor Discovery (ND) attack defense is able to identify forged ND messages to prevent ND attacks.
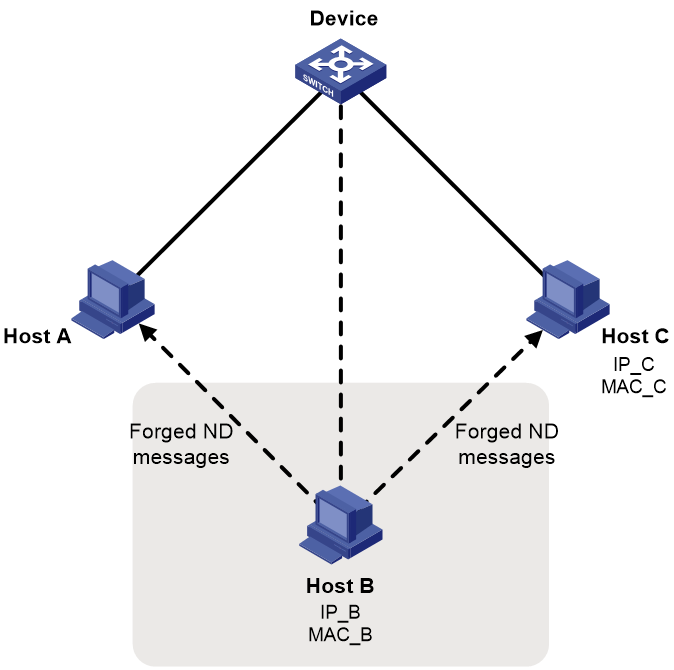
The IPv6 ND protocol does not provide any security mechanisms and is vulnerable to network attacks. As shown in Figure 1, an attacker can send the following forged ICMPv6 messages to perform ND attacks:
· Forged NS/NA/RS messages with an IPv6 address of a victim host. The gateway and other hosts update the ND entry for the victim with incorrect address information. As a result, all packets intended for the victim are sent to the attacking terminal.
· Forged RA messages with the IPv6 address of a victim gateway. As a result, all hosts attached to the victim gateway maintain incorrect IPv6 configuration parameters and ND entries.
ND attack defense tasks at a glance
The following ND attack defense tasks are optional.
· Enabling source MAC consistency check for ND messages
· Configuring ND attack detection
Enabling source MAC consistency check for ND messages
About this task
The source MAC consistency check feature is typically configured on gateways to prevent ND attacks.
This feature checks the source MAC address and the source link-layer address for consistency for each arriving ND message.
· If the source MAC address and the source link-layer address are not the same, the device drops the packet.
· If the addresses are the same, the device continues learning ND entries.
The ND logging feature logs source MAC inconsistency events, and it sends the log messages to the information center. The information center can then output log messages from different source modules to different destinations. For more information about the information center, see System Management Configuration Guide.
Procedure
1. Enter system view.
system-view
2. Enable source MAC consistency check for ND messages.
ipv6 nd mac-check enable
By default, source MAC consistency check is disabled for ND messages.
3. (Optional.) Enable the ND logging feature.
ipv6 nd check log enable
By default, the ND logging feature is disabled.
As a best practice, disable the ND logging feature to avoid excessive ND logs.
Configuring ND attack detection
About ND attack detection
ND attack detection checks incoming ND messages for user validity to prevent spoofing attacks. It is typically configured on access devices.
ND attack detection is applicable to VLAN networks.
ND attack detection defines the following types of interfaces on a VLAN network:
· ND trusted interface—Performs no user validity check on the received ND messages.
· ND untrusted interface—Discards incoming RA and redirect messages, and performs the user validity check on other types of incoming ND messages.
ND attack detection uses static IPv6 source guard binding entries, ND snooping entries, and DHCPv6 snooping entries for user validity check. User validity check compares the source IPv6 address and the source MAC address in an incoming ND message against those entries.
· If a match is found, the device verifies the user as legal, and it forwards the packet.
· If no match is found, the device verifies the user as illegal, and it discards the ND message.
The entries used for user validity check are generated as follows:
· ND snooping entries are automatically generated by the ND snooping feature. For information about ND snooping, see IPv6 neighbor discovery configuration in Layer 3–IP Services Configuration Guide.
· DHCPv6 snooping entries are automatically generated by the DHCPv6 snooping feature. For information about DHCPv6 snooping, see "Configuring DHCPv6 snooping."
Restrictions and guidelines for ND attack detection configuration
To prevent ND untrusted interfaces from dropping all received ND messages, make sure one or more of the these features are configured: IPv6 source guard static bindings, DHCPv6 snooping, and ND snooping.
To make the IPv6 source guard static bindings effective for ND attack detection, you must perform the following operations:
· Specify the vlan vlan-id option in the ipv6 source binding command.
· Enable ND attack detection for the same VLAN.
Configuring ND attack detection for a VLAN
1. Enter system view.
system-view
2. Enter VLAN view.
vlan vlan-id
3. Enable ND attack detection.
ipv6 nd detection enable
By default, ND attack detection is disabled.
4. (Optional.) Configure the interface as ND trusted interface:
a. Return to system view.
quit
b. Enter Layer 2 Ethernet or aggregate interface view.
interface interface-type interface-number
c. Configure the interface as ND trusted interface.
ipv6 nd detection trust
By default, all interfaces are ND untrusted interfaces.
Enabling ND attack detection logging
About this task
This feature allows a device to generate logs when it detects invalid ND packets. The log information helps administrators locate and solve problems. Each log records the following information:
· Victim port numbers in a VLAN.
· Source IP address of the invalid ND packets.
· Source MAC address of the invalid ND packets.
· VLAN ID of the invalid ND packets.
· Total number of dropped ND packets.
Procedure
1. Enter system view.
system-view
2. Enable ND attack detection logging.
ipv6 nd detection log enable
By default, ND attack detection logging is disabled.
Verifying and maintaining ND attack detection
To display statistics for ND messages dropped by ND attack detection, execute the following command in any view:
display ipv6 nd detection statistics [ interface interface-type interface-number ]
To clear ND attack detection statistics, execute the following command in user view:
reset ipv6 nd detection statistics [ interface interface-type interface-number ]
Example: Configuring ND attack detection
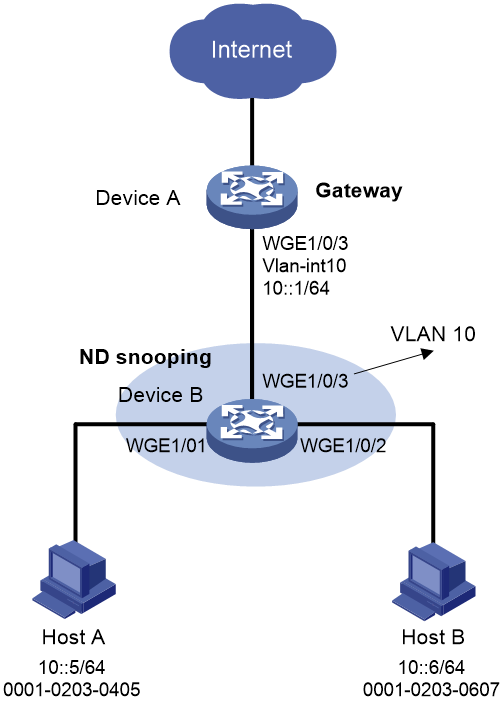
Network configuration
As shown in Figure 2, configure ND attack detection on Device B to check user validity for ND messages from Host A and Host B.
Procedure
1. Configure Device A:
# Create VLAN 10.
<DeviceA> system-view
[DeviceA] vlan 10
[DeviceA-vlan10] quit
# Configure Twenty-FiveGigE 1/0/3 to trunk VLAN 10.
[DeviceA] interface twenty-fivegige 1/0/3
[DeviceA-Twenty-FiveGigE1/0/3] port link-type trunk
[DeviceA-Twenty-FiveGigE1/0/3] port trunk permit vlan 10
[DeviceA-Twenty-FiveGigE1/0/3] quit
# Assign IPv6 address 10::1/64 to VLAN-interface 10.
[DeviceA] interface vlan-interface 10
[DeviceA-Vlan-interface10] ipv6 address 10::1/64
[DeviceA-Vlan-interface10] quit
2. Configure Device B:
# Create VLAN 10.
<DeviceB> system-view
[DeviceB] vlan 10
[DeviceB-vlan10] quit
# Configure Twenty-FiveGigE 1/0/1, Twenty-FiveGigE 1/0/2, and Twenty-FiveGigE 1/0/3 to trunk VLAN 10.
[DeviceB] interface twenty-fivegige 1/0/1
[DeviceB-Twenty-FiveGigE1/0/1] port link-type access
[DeviceB-Twenty-FiveGigE1/0/1] port access vlan 10
[DeviceB-Twenty-FiveGigE1/0/1] quit
[DeviceB] interface twenty-fivegige 1/0/2
[DeviceB-Twenty-FiveGigE1/0/2] port link-type access
[DeviceB-Twenty-FiveGigE1/0/2] port access vlan 10
[DeviceB-Twenty-FiveGigE1/0/2] quit
[DeviceB] interface twenty-fivegige 1/0/3
[DeviceB-Twenty-FiveGigE1/0/3] port link-type trunk
[DeviceB-Twenty-FiveGigE1/0/3] port trunk permit vlan 10
[DeviceB-Twenty-FiveGigE1/0/3] quit
# Enable ND attack detection for VLAN 10.
[DeviceB] vlan 10
[DeviceB-vlan10] ipv6 nd detection enable
# Enable ND snooping for IPv6 global unicast addresses and ND snooping for IPv6 link-local addresses in VLAN 10.
[DeviceB-vlan10] ipv6 nd snooping enable global
[DeviceB-vlan10] ipv6 nd snooping enable link-local
[DeviceB-vlan10] quit
# Configure Twenty-FiveGigE 1/0/3 as ND trusted interface.
[DeviceB] interface twenty-fivegige 1/0/3
[DeviceB-Twenty-FiveGigE1/0/3] ipv6 nd detection trust
Verifying the configuration
Verify that Device B inspects all ND messages received by Twenty-FiveGigE 1/0/1 and Twenty-FiveGigE 1/0/2 based on the ND snooping entries. (Details not shown.)
Enabling ND scanning
About this task
The device automatically creates ND entries by NS and NA messages when triggered by traffic. If no traffic is received or sent in a period of time, the ND entries cannot be created or updated in time.
To resolve this issue, you can enable the automatic ND scanning feature on the device. This feature enables the device to periodically send ND packets (NS requests) at a specified rate to the IPv6 addresses not in the specified ND entries.
Restrictions and guidelines
You can specify the source address for the sending NS requests when you enable automatic ND scanning on an interface:
· If you do not specify the source address, the interface uses its IPv6 address as the source address. The interface scans the IPv6 addresses that belong to both the automatic ND scanning range and the subnet of the interface IPv6 address.
If the interface is configured with multiple subnet IPv6 addresses and the addresses are also in the scanning range, the source address is the IPv6 address with the longest prefix. If the prefixes are in the same length, the source address is the primary IPv6 address for the interface.
· If you specify the source address, the interface uses the specified source address, and it scans all the IPv6 addresses in the automatic ND scanning range.
To avoid any impact on device performance, use automatic ND scanning only on networks where users come online and go offline frequently.
Procedure
1. Enter system view.
system-view
2. Set the ND packet sending rate for automatic ND scanning.
ipv6 nd scan auto send-rate { ppm ppm | pps }
By default, the device sends ND packets at the rate of 48 pps during automatic ND scanning.
3. Enter interface view.
interface interface-type interface-number
4. Enable automatic ND scanning.
ipv6 nd scan auto enable start-ipv6-address to end-ipv6-address [ source-addr source-ipv6-address ]
By default, automatic ND scanning is disabled.