- Table of Contents
-
- 05-Objects
- 01-Health monitoring
- 02-User management
- 03-Authentication
- 04-Portal
- 05-WAF
- 06-IPS
- 07-Anti-virus
- 08-Data filtering
- 09-URL filtering
- 10-File filtering
- 11-APT defense
- 12-APR
- 13-Terminal identification
- 14-Security action
- 15-Advanced settings
- 16-Intelligences from the threat management platform
- 17-Object group
- 18-ACL
- 19-SSL
- 20-Public key management
- 21-PKI
- 22-Trusted access controllers
- Related Documents
-
| Title | Size | Download |
|---|---|---|
| 02-User management | 101.24 KB |
User management
This help contains the following topics:
¡ Configure a user import policy
Introduction
Local users
Users
A local user is a set of user attributes stored in the local user database on the device for network access. A local user is uniquely identified by its username.
To implement local authentication, authorization, and accounting, create local users and configure user attributes on the device.
User groups
User groups simplify local user configuration and management. A user group contains a group of local users and has a set of local user attributes. You can configure local user attributes for a user group to implement centralized user attributes management for the local users in the group. Local user attributes that are manageable by using user groups are authorization attributes.
Each new created local user belongs to the system defined user group named system and has all attributes of the group.
Password control
To enhance password security for users, you can configure the password control feature.
Minimum password length
You can define the minimum length of user passwords. The system rejects any password that is shorter than the configured minimum length. By default, the minimum password length is 10 characters.
Password composition check
A password can be a combination of characters from the following types:
· Uppercase letters A to Z.
· Lowercase letters a to z.
· Digits 0 to 9.
· Special characters. See Table 1.
|
Character name |
Symbol |
Character name |
Symbol |
|
Ampersand sign |
& |
Apostrophe |
' |
|
Asterisk |
* |
At sign |
@ |
|
Back quote |
` |
Back slash |
\ |
|
Blank space |
N/A |
Caret |
^ |
|
Colon |
: |
Comma |
, |
|
Dollar sign |
$ |
Dot |
. |
|
Equal sign |
= |
Exclamation point |
! |
|
Left angle bracket |
< |
Left brace |
{ |
|
Left bracket |
[ |
Left parenthesis |
( |
|
Minus sign |
- |
Percent sign |
% |
|
Plus sign |
+ |
Pound sign |
# |
|
Quotation marks |
" |
Right angle bracket |
> |
|
Right brace |
} |
Right bracket |
] |
|
Right parenthesis |
) |
Semi-colon |
; |
|
Slash |
/ |
Tilde |
~ |
|
Underscore |
_ |
Vertical bar |
| |
Depending on the system's security requirements, you can set the minimum number of character types a password must contain and the minimum number of characters for each type, as shown in Table 2.
Table 2 Password composition check
|
Password combination level |
Minimum number of character types |
Minimum number of characters for each type |
|
Level 1 |
One |
One |
|
Level 2 |
Two |
One |
|
Level 3 |
Three |
One |
|
Level 4 |
Four |
One |
When a user sets or changes a password, the system examines whether the password meets the combination requirement. If the password does not meet the requirement, the operation fails.
By default, the minimum number of character types is one and the minimum number of characters for each type is one.
Password complexity check
The strength of a password increases as its complexity grows. A less complicated password is more likely to be cracked. For example, a password that contains the username or repeated characters is more likely to be cracked than those do not. To increase system security, configure a password complexity checking policy to make sure the user-configured passwords are complex enough against most password attacks.
You can apply the following password complexity requirements:
· A password cannot contain the username or the username spelled backwards. For example, if the username is abc, the password cannot be abc982 or 2cba.
· A password cannot contain more than two consecutive identical characters. For example, password a111 is not allowed.
Password history
This feature allows the system to store passwords that a user has used. When a user changes the password, the system compares the new password with the current password and those stored in the password history records. The new password must be different from the current one and those stored in the history records by a minimum of four characters. If the new password does not meet this requirement, the system displays an error message and rejects the password change operation.
You can set the maximum number of history password records for the system to maintain for each user. When the number of history password records exceeds the setting, the most recent record overwrites the earliest one.
Password updating
This feature allows you to set the minimum interval at which users can change their passwords. A user can only change the password once within the specified interval.
The minimum interval does not apply to the following situations:
· A user is prompted to change the password at the first login.
· The password expiration time expires.
Identity users
The user identification feature has the following benefits:
· Facilitates security policy deployment on a per-user basis.
· Implements network access behaviors auditing on users by providing user-based network attack/access traffic statistics.
· Enables the device to use fixed usernames instead of dynamic IP addresses to implement policy control.
Identity users
Identity users are used to record identification information of network access users from different sources. The identification information includes the username, user group name, and identity domain name of the users. The user identification module uniformly manages identity users from different sources.
The device supports the following methods to create identity users:
· Learning from the local user database—The user identification module learns local user information from the local user database and saves the user information as identity users.
· Importing from a .csv file—The network administrator imports user information from a .csv file to the device and the device automatically creates identity users based on the imported information.
· Importing from third-party servers—The device initiates user information requests to third-party servers, imports network access user information, and then creates identity users based on the imported information. This method enables the network administrator to manage identity users when user information is on the third-party servers. Supported third-party servers include LDAP servers and IMC RESTful servers.
Identity users will be deleted due to one of the following reasons:
· The network administrator deletes identity users manually.
· The user identification module automatically deletes identity users after the corresponding network access users are deleted from the local user database.
Identity groups
Identity users can be added to different groups for batch configuration and hierarchical user management. The groups are called identity groups. The user identification module uniformly manages identity groups from different sources.
The device supports the following methods to create identity groups:
· Learning from the local user database—When a local user group is created, the device instructs the user identification module to create an identity group with the same group name.
· Importing from a .csv file—The device imports identity user account information from a .csv file and then automatically creates identity groups based on the imported information.
· Importing from third-party servers—The device can import identity user account information from an IMC RESTful server or LDAP servers and then create identity groups based on the group information in the accounts. The device can also directly obtain user group information from LDAP servers and then creates identity groups.
An identity group is activated when it is used by an application module, and all services based on the identity group will take effect. When the application module stops using the identity group, the identity group is inactive.
Identity groups will be deleted due to one of the following reasons:
· The network administrator deletes identity groups.
· The user identification module automatically deletes an identity group if the corresponding local user group is deleted from the local user database.
Identity user management
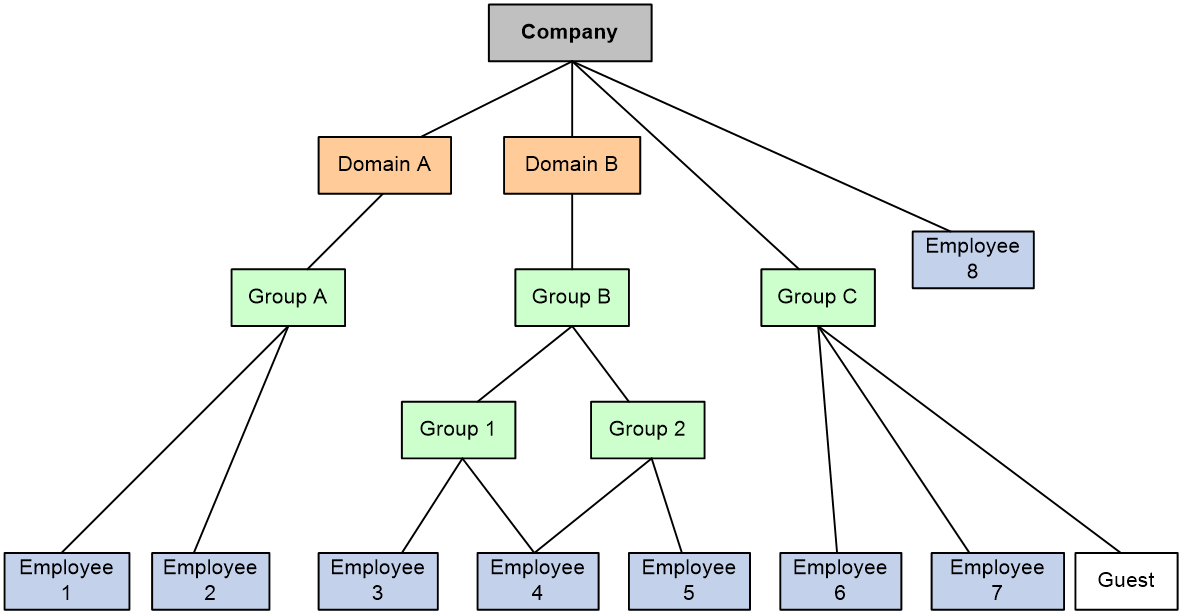
All identity users are organized in a tree structure. An identity user can belong to one or multiple identity groups. An identity group can belong to one or multiple higher-layer identity groups. The tree structure facilitates user location and query. As shown in Figure 1, the device uniquely identifies a managed object by the combination of identity domain and username or the combination of identity domain and identity group.
Figure 1 Identity user management architecture
Identity-based user access control
The following shows the process for identity-based user access control:
1. Identity authentication. A network access user passes identity authentication and comes online.
2. User identification. The device obtains the username and IP address of the online user, and associates the information with the local identity user account and the local identity group. Then, the username-IP mapping for the network access user is created. The administrator can also add static username-IP mappings to permit network access without identity authentication.
3. Identity-based access control. The device identifies the source IP address of the traffic destined for the network, and resolves the IP address to the username and user group based on the mapping. The device performs network access control for the user or user group based on other security feature settings such as blacklist and object policy.
Online users
Online users are online network access users (including portal, PPP, and IPoE users) that are managed by the user identification module. The device records the username, identity domain name, IP address, and MAC address of online users.
Online users include dynamic online users and static online users.
· Dynamic creation.
¡ Online network access users that access the network through the device—After a user passes local or remote authentication and comes online, the user identification module searches the user's username and domain name in local identity users. If a matching entry is found, the device creates an online user entry for the user.
¡ Online network access users obtained from third-party servers—After the device obtains information about an online user from a third-party server, the user identification module searches the user's username and domain name in local identity users. If a matching entry is found, the device creates an online user entry for the user. The device can obtain information about all online users of third-party servers (including online users on the other devices) for unified management and monitoring. Supported third-party servers include IMC RESTful server.
· Static configuration.
The network administrator manually creates online users. Each static identity user contains the mapping between the username and the IP addresses of the user. After a static identity user is created, the user identification module searches the user's username and domain name in local identity users. If a matching entry is found, the device creates a static online user entry for the static identity user. Static online users can access the network without identity authentication but their access to the network is controlled by security features. The network administrator can configure static identity users when only few people need to temporarily access the network.
Application modules can impose security policies on online users. When online user entries are deleted, the user identification module will instruct the application modules to stop processing services for the users.
Online users will be deleted due to one of the following reasons:
· The network administrator deletes online users manually.
· The access modules instruct the user identification module to delete online users after the associated network access users go offline.
· All dynamic online users are deleted after the device restarts up.
· All dynamic online users are deleted after the user identification feature is disabled.
· The third-party servers instruct the device to delete online users after associated users go offline.
User import policies
A user import policy is used to import identity users, online users, or identity groups from a RESTful server or LDAP servers.
The user import policy supports the following import methods:
· Automatic import—The device first imports all identity users and online users from the servers specified in the policy and then automatically imports identity users from the servers periodically.
· Manual import—The device initiates connection requests to the servers specified in the policy and then imports all identity users and online users from the servers.
Restrictions and guidelines
Restrictions and guidelines for users
A non-password-protected local user passes authentication if the user provides the correct username and passes attribute checks. To enhance security, configure a password for each local user.
For portal users, only the authorization ACL and idle timeout attributes take effect.
For SSL VPN users, only the SSL VPN policy group attribute takes effect.
Deletion of identity users does not delete the corresponding network access users from the local user database.
Restrictions and guidelines for user import policy configuration
When you import users from a .CSV template, make sure the file is a standard .CSV file and do not modify the annotation headers of the template. A violation might cause data loss.
To use the IMC RESTful server, make sure the server is installed with the SSM component and runs on IMC PLAT 7.0 (E0201) or its patch version.
After the device establishes a connection with the RESTful server, the RESTful server sends real-time user login and logout information for the device to update online users.
Restrictions and guidelines for email server configuration
Before you configure the email address of the receiver, you must configure the email server.
Restrictions and guidelines for password control
The password control settings configured on the User Password Control page take effect on all local users. To open the User Password Control page, access the User > User Management > Local Users > Users page and then click the Password control button on the menu.
You can configure the minimum password length, password complexity check, and password composition check on both the User Password Control page and the Create User or Edit User page. The settings configured on the Create User or Edit User page take precedence over the settings configured on the User Password Control page.
The Administrator Password Control page and the User Password Control page share the password control settings. If you change a password control setting on one page, the system automatically synchronizes the new setting to the other page.
After password control is enabled, the password set for a local user must have a minimum of four different characters.
For password control settings configured for a user to take effect, you must enable password control. To enable password control, click Password control on the Users page to enter the User Password Control page and select Enable password control.
Configure user management
Configure local users
You can create local users manually or import local users in bulk.
Create a local user
1. Click the Objects tab.
2. In the navigation pane, select User > User Management > Local Users.
3. Click the Users tab and then click Create. The Create User page opens.
4. Create a local user.
Table 3 Local user configuration items
|
Item |
Description |
|
Username |
Enter the name of a network access user. The user accesses the network resources through the device. To implement local authentication, you must configure local users on the device |
|
Set random password |
Select to generate a random password for the user. |
|
Receiver email |
Enter the email address of the receiver to receive the random password. Before you configure this field, please enter the Email Server page to configure the email server. |
|
Password |
Enter the password of the user. |
|
Confirm |
Enter the password of the user again, |
|
Validity period |
Set the validity period of the user. Expired user accounts cannot be used for authentication. · If both the start time and end time are specified, the end time must be later than the start time. · If only the start time is specified, the user is valid since the specified time. · If only the end time is specified, the user is valid until the specified time. |
|
Authorization user group |
Select an authorization user group. Each local user belongs to a user group and has all attributes of the group. The attributes include the password control attributes and authorization attributes. |
|
Identity group |
Select an identity group. The user identification module controls the network access of a local user based on the identity group to which the user belongs. |
|
Available services |
Select services that the user can use. Local authentication checks the service types of a local user. If none of the service types is available, the user cannot pass authentication. |
|
Max number of concurrent logins |
Enter the maximum number of users that can concurrently access the device by using the same username. When the number of logins using a username reaches the limit, no more local users can access the device by using the username. |
|
Description |
Enter the descriptive information of the user. |
5. (Optional.) Configure authorization attributes.
Table 4 Authorization attribute configuration items
|
Item |
Description |
|
Authorization ACL |
Select an authorization ACL. The device restricts authenticated users to access only the network resources permitted by the ACL. |
|
Idle timeout |
Enter the idle cut timeout period. The device logs out a user if the user's total traffic in the idle timeout period at the specified direction is less than the specified minimum traffic. |
|
Authorization VLAN |
Enter a VLAN ID. The device restricts authenticated users to access only the network resources in the VLAN. |
|
SSL VPN policy group |
Enter an SSL VPN policy group. The device restricts authenticated users to access only the network resources specified in the SSL VPN policy group. |
6. (Optional.) Configure binding attributes.
Table 5 Binding attribute configuration items
|
Item |
Description |
|
Access interface |
Select an access interface. If the actual access interface of the user is not the same as the binding interface, the user fails authentication. |
|
IPv4 address |
Enter an IPv4 address. If the IP address of the user is not the same as the binding IPv4 address, the user fails authentication. |
|
MAC address |
Enter a MAC address. If the MAC address of the user is not the same as the binding MAC address, the user fails authentication. |
|
VLAN |
Enter a VLAN ID. If the user belongs to a VLAN different from the binding VLAN, the user fails authentication. |
7. (Optional.) Configure password settings.
Table 6 Password setting configuration items
|
Item |
Description |
|
Min password length |
Enter the minimum password length. If the password that a user enters is shorter than this value, the system rejects the password setting. |
|
Min character types |
Enter the minimum number of character types in a password. If the number of character types in the password that a user enters is less than this value, the system rejects the password setting. |
|
Min number of characters for each type |
Enter the minimum number of characters for each type in a password. If the number of characters for each type in the password that a user enters is less than this value, the system rejects the password setting. |
|
No username or reversed username in password |
Select this item to reject a password that has the username or the reverse of the username. |
|
No more than two consecutive identical characters in password |
Select this item to reject a password that has more than two identical consecutive characters. |
8. Click OK. The user is displayed on the Users page.
Import local users in bulk
1. Click the Objects tab.
2. In the navigation pane, select User > User Management > Local Users.
3. Click the Users tab and then click Import. The Import Users page opens.
4. Import local users.
Table 7 Configuration items for importing local users
|
Item |
Description |
|
Import file |
Specify a .CSV file for the device to import local users. Make sure the .CSV file is a standard .csv file and do not modify the annotation headers of the template. A violation might cause data loss. |
|
Automatically create groups |
Select this item to enable the device to automatically create an identity group for a user if the identity group to which the user belongs does not exist on the device. If you do not select this item, the device does not create nonexistent user groups and it assigns the user to the system-defined user group system. |
|
Overriding existing user accounts |
Select this item to enable the device to override an existing identity user account that has the same name as an identity user account to be imported. If you do not select this item, the device retains the existing identity user account. |
|
Import from line |
Enter the number of the line at which the account import begins. If you do not specify the line number, the device imports identity user account information from the first line. |
5. Click OK. The imported local users are displayed on the Users page.
Configure password control
1. Click the Objects tab.
2. In the navigation pane, select User > User Management > Local Users.
3. Click the Users tab and then click Password Control. The User Password Control page opens.
4. Configure the password control settings.
Table 8 Password control configuration items
|
Item |
Description |
|
Enable password control |
Select this item to enable password control. |
|
Enable password length check |
Select this item to enable password length check. |
|
Min password length |
Enter the minimum password length. If the password that a user enters is shorter than this value, the system rejects the password setting. |
|
Enable password composition check |
Select this item to enable password composition check. |
|
Min number of character types |
Enter the minimum number of character types in a password. If the number of character types in the password that a user enters is less than this value, the system rejects the password setting. |
|
Min number of characters for each type |
Enter the minimum number of characters for each type in a password. If the number of characters for each type in the password that a user enters is less than this value, the system rejects the password setting. |
|
No more than two same consecutive characters in password |
Select this item to reject a password that has more than two identical consecutive characters. |
|
No username or reversed username in password |
Select this item to reject a password that has the username or the reverse of the username. |
|
Enable password history recording |
Select this item to enable password history recording. |
|
Max number of history password records |
Enter the maximum number of history password records. When the number of history password records exceeds this value, the most recent record overwrites the earliest one. |
|
Min password update interval |
Enter the minimum password update interval. A user can only change the password once within the specified interval. |
5. Click OK.
Manage online users
To manage online users, perform the following tasks:
1. Click the Objects tab.
2. In the navigation pane, select User > User Management > Online Users.
3. Manage online users.
Table 9 Configuration items for managing online users
|
Item |
Description |
|
Enable user identification |
Click this button to enable the user identification feature. |
|
Username match mode |
Select a username match mode. The following modes are available: · Keep-original—Uses the username entered by a user to perform username match. · With-domain—Uses the username that includes the authentication domain name of a user to perform username match. For example, if the authentication domain is abc and the entered username is test@123, the device searches username test@abc in local user accounts. · Without-domain—Uses the username that excludes the domain name of a user to perform username match. For example, if the authentication domain is abc and the entered username is test@123, the device searches username test in local user accounts that do not join any identity domains. |
Configure a user import policy
Create a user import policy
1. Click the Objects tab.
2. In the navigation pane, select User > User Management > User Import Policies.
3. Click Create. The Create User Import Policy page opens.
4. Create a user import policy.
Table 10 User import policy configuration items
|
Item |
Description |
|
Name |
Enter the name of a user import policy. The name uniquely identifies a user import policy. |
|
RESTful server |
Select a RESTful server. The device imports identity users and online users from the RESTful server. |
|
LDAP schemes |
Select LDAP schemes. The device imports identity users from the LDAP servers specified in the LDAP schemes. |
|
Import types |
Select the type of information to be imported. This parameter is applicable only to LDAP schemes. |
|
Enable auto import |
Select this item to enable automatic user import. After this feature is enabled, the device first imports identity users and online users from the servers specified in the user import policy and then periodically imports identity users from the servers. |
|
Import interval |
Enter the automatic import interval. The device automatically imports identity users from the servers specified in the user import policy at the specified interval. |
5. Click OK. The user import policy is displayed on the User Import Policy page.
Manually import users
After you configure the user import policy, you can manually import identity users and online users from the servers specified in the user import policy.
To manually import users, perform the following tasks:
· Manually import identity users—The device initiates user information requests to the servers, imports user account information from the servers, and then creates corresponding identity users. If the device fails to import an account, the device skips the account and continues to import the next account.
· Manually import online users—The device initiates a real-time online user information request to the server and then imports all online user information. The device can import online identity users only from an IMC RESTful server.
Configure the email server
The device sends a random password in an email notification to a user. Before you configure the email address of the receiver, you must configure the email server.
To configure the email server, perform the following tasks:
1. Click the Objects tab.
2. In the navigation pane, select User > User Management > Email Server.
3. Configure the email server.
Table 11 Email server configuration items
|
Item |
Description |
|
Email subject |
Enter the subject of the email notification. |
|
Email body |
Enter the body of the email notification. |
|
Sender address |
Set the address of the email sender. |
|
Server address |
Enter the URL of the email server, which starts with smtp://. |
|
Username |
Enter the username used to log in to the email server. |
|
Password |
Enter the password used to log in to the email server. |