- Table of Contents
-
- 01-Fundamentals Configuration Guide
- 00-Preface
- 01-CLI configuration
- 02-RBAC configuration
- 03-Login management configuration
- 04-FTP and TFTP configuration
- 05-File system management configuration
- 06-Configuration file management configuration
- 07-Software upgrade configuration
- 08-Emergency shell configuration
- 09-Automatic configuration
- 10-Device management configuration
- 11-Tcl configuration
- 12-Python configuration
- 13-License management
- 14-RAID management configuration
- Related Documents
-
| Title | Size | Download |
|---|---|---|
| 02-RBAC configuration | 321.68 KB |
Contents
Configuring resource access policies
About resource access policies
Restrictions and guidelines for resource access policy configuration
Configuring the user role interface policy
Configuring the user role VLAN policy
Configuring the user role VPN instance policy
Configuring the user role security zone policy
Restrictions and guidelines for user role assignment
Enabling the default user role feature
Assigning user roles to remote AAA authentication users
Assigning user roles to local AAA authentication users
Assigning user roles to non-AAA authentication users on user lines
Configuring temporary user role authorization
About temporary user role authorization
Restrictions and guidelines for temporary user role authorization
Setting the authentication mode for temporary user role authorization
Specifying the default target user role for temporary user role authorization
Setting an authentication password for temporary user role authorization
Automatically obtaining the login username for temporary user role authorization
Obtaining temporary user role authorization
Display and maintenance commands for RBAC
Example: Configuring RBAC for local AAA authentication users
Example: Configuring RBAC for RADIUS authentication users
Example: Configuring RBAC temporary user role authorization (HWTACACS authentication)
Example: Configuring RBAC temporary user role authorization (RADIUS authentication)
Configuring RBAC
About RBAC
Role-based access control (RBAC) controls access permissions of users based on user roles.
RBAC assigns access permissions to user roles that are created for different job functions. Users are given permission to access a set of items and resources based on the users' user roles. Separating permissions from users enables simple permission authorization management.
Permission assignment
Use the following methods to assign permissions to a user role:
· Define a set of rules to determine accessible or inaccessible items for the user role. (See "User role rules.")
· Configure resource access policies to specify which resources are accessible to the user role. (See "Resource access policies.")
To use a command related to a system resource, a user role must have access to both the command and the resource.
For example, a user role has access to the vlan command and access only to VLAN 10. When the user role is assigned, you can use the vlan command to create VLAN 10 and enter its view. However, you cannot create any other VLANs. If the user role has access to VLAN 10 but does not have access to the vlan command, you cannot use the command to enter the view of VLAN 10.
When a user logs in to the device with any user role and enters <?> in a view, help information is displayed for the system-defined command aliases in the view. However, the user might not have the permission to access the command aliases. Whether the user can access the command aliases depends on the user role's permission to the commands corresponding to the aliases. For information about command aliases, see "Using the CLI."
A user that logs in to the device with any user role has access to the system-view, quit, and exit commands.
User role rules
User role rules permit or deny access to the items, including commands, Web pages, XML elements, or MIB nodes. You can define the following types of rules for different access control granularities:
· Command rule—Controls access to a command or a set of commands that match a regular expression.
· Feature rule—Controls access to the commands of a feature by command type.
· Feature group rule—Controls access to the commands of features in a feature group by command type.
· Web menu rule—Controls access to Web pages used for configuring the device. These Web pages are called Web menus.
· XML element rule—Controls access to XML elements used for configuring the device.
· OID rule—Controls SNMP access to a MIB node and its child nodes. An OID is a dotted numeric string that uniquely identifies the path from the root node to a leaf node.
The items (commands, Web menus, XML elements, and MIB nodes) are controlled based on the following types:
· Read—Items that display configuration and maintenance information. For example, the display commands and the dir command.
· Write—Items that configure the features in the system. For example, the info-center enable command and the debugging command.
· Execute—Items that execute specific functions. For example, the ping command and the ftp command.
A user role can access the set of permitted items specified in the user role rules. The user role rules include predefined (identified by sys-n) and user-defined user role rules. For more information about the user role rule priority, see "Configuring user role rules."
Resource access policies
Resource access policies control access of a user role to system resources and include the following types:
· Interface policy—Controls access to interfaces.
· VLAN policy—Controls access to VLANs.
· VPN instance policy—Controls access to VPN instances.
· Security zone policy—Controls access to security zones.
Resource access policies do not control access to the interface, VPN instance, security zone, location identifier, or VLAN options in the display commands. You can specify these options in the display commands if the options are permitted by any user role rule.
Predefined user roles
The system provides predefined user roles. These user roles have access to all system resources. However, their access permissions differ, as shown in Table 1.
Among all of the predefined user roles, only network-admin, and level-15 can create, modify, and delete local users and local user groups. The other user roles can only modify their own passwords if they have permissions to configure local users and local user groups.
The access permissions of the level-0 to level-14 user roles can be modified through user role rules and resource access policies. However, you cannot make changes on the predefined access permissions of these user roles. For example, you cannot change the access permission of these user roles to the display history-command all command.
Table 1 Predefined roles and permissions matrix
|
User role name |
Permissions |
|
network-admin |
Accesses all features and resources in the system, except for the display security-logfile summary, info-center security-logfile directory, and security-logfile save commands. |
|
network-operator |
· Accesses the display commands for features and resources in the system. To display all accessible commands of the user role, use the display role command. · Enables local authentication login users to change their own passwords. · Accesses the command used for entering XML view. · Accesses all read-type Web menu items. · Accesses all read-type XML elements. · Accesses all read-type MIB nodes. |
|
level-n (n = 0 to 15) |
· level-0—Has access to commands including ping, tracert, ssh2, telnet, and super. Level-0 access rights are configurable. · level-1—Has access to the display commands of features and resources in the system. The level-1 user role also has all access rights of the level-0 user role. Level-1 access rights are configurable. · level-2 to level-8, and level-10 to level-14—Have no access rights by default. Access rights are configurable. · level-9—Has access to most of the features and resources in the system. If you are logged in with a local user account that has a level-9 user role, you can change the password in the local user account. The following are the major features and commands that the level-9 user role cannot access: ¡ RBAC non-debugging commands. ¡ Local users. ¡ File management. ¡ Device management. ¡ The display history-command all command. · level-15—Has the same rights as network-admin. |
|
security-audit |
Security log manager. The user role has the following access rights to security log files: · Accesses the commands for displaying and maintaining security log files (for example, the dir, display security-logfile summary, and more commands). · Accesses the commands for managing security log files and security log file system (for example, the info-center security-logfile directory, mkdir, and security-logfile save commands). For more information about security log management commands, see information center commands in Network Management and Monitoring Command Reference. For more information about file system management commands, see Fundamentals Command Reference.
Only the security-audit user role has access to security log files. You cannot assign the security-audit user role to non-AAA authentication users. |
|
guest-manager |
Accesses only guest-related web pages, and has no access to commands. |
User role assignment
You assign access rights to a user by assigning a minimum of one user role. The user can use the collection of items and resources accessible to all user roles assigned to the user. For example, you can access any interface to use the qos apply policy command if you are assigned the following user roles:
· User role A denies access to the qos apply policy command and permits access only to interface GigabitEthernet 1/0/1.
· User role B permits access to the qos apply policy command and all interfaces.
Depending on the authentication method, user role assignment has the following methods:
· AAA authorization—If scheme authentication is used, the AAA module handles user role assignment.
¡ If the user passes local authorization, the device assigns the user roles specified in the local user account.
¡ If the user passes remote authorization, the remote AAA server assigns the user roles specified on the server. The AAA server can be a RADIUS or HWTACACS server.
· Non-AAA authorization—When the user accesses the device without authentication or by passing password authentication on a user line, the device assigns user roles specified on the user line. This method also applies to SSH clients that use publickey or password-publickey authentication. User roles assigned to these SSH clients are specified in their respective device management user accounts.
For more information about AAA, see Security Configuration Guide. For more information about user lines, see "Login overview" and "Configuring CLI login."
FIPS compliance
The device supports the FIPS mode that complies with NIST FIPS 140-2 requirements. Support for features, commands, and parameters might differ in FIPS mode and non-FIPS mode. For more information about FIPS mode, see Security Configuration Guide.
RBAC tasks at a glance
To configure RBAC, perform the following tasks:
2. Configuring user role rules
3. (Optional.) Configuring a feature group
4. Configuring resource access policies
¡ Configuring the user role interface policy
¡ Configuring the user role VLAN policy
¡ Configuring the user role VPN instance policy
¡ Configuring the user role security zone policy
¡ Enabling the default user role feature
¡ Assigning user roles to remote AAA authentication users
¡ Assigning user roles to local AAA authentication users
¡ Assigning user roles to non-AAA authentication users on user lines
6. Configuring temporary user role authorization
a. Setting the authentication mode for temporary user role authorization
b. Specifying the default target user role for temporary user role authorization
c. Setting an authentication password for temporary user role authorization
d. (Optional.) Automatically obtaining the login username for temporary user role authorization
e. Obtaining temporary user role authorization
Creating a user role
About this task
In addition to the predefined user roles, you can create a maximum of 64 custom user roles for granular access control.
Procedure
1. Enter system view.
system-view
2. Create a user role and enter its view.
role name role-name
By default, the system has the following predefined user roles:
¡ network-admin.
¡ network-operator.
¡ level-n (where n equals an integer in the range of 0 to 15).
¡ security-audit.
¡ guest-manager.
Among these user roles, only the permissions and descriptions of the level-0 to level-14 user roles are configurable.
3. (Optional.) Configure a description for the user role.
description text
By default, a user role does not have a description.
Configuring user role rules
About this task
You can configure user role rules to permit or deny the access of a user role to specific commands, Web pages, XML elements, and MIB nodes.
The following guidelines apply to non-OID rules:
· If two user-defined rules of the same type conflict, the rule with the higher ID takes effect. For example, a user role can use the tracert command but not the ping command if the user role contains rules configured by using the following commands:
¡ rule 1 permit command ping
¡ rule 2 permit command tracert
¡ rule 3 deny command ping
· If a predefined user role rule and a user-defined user role rule conflict, the user-defined user role rule takes effect.
The following guidelines apply to OID rules:
· The system compares an OID with the OIDs specified in user role rules, and it uses the longest match principle to select a rule for the OID. For example, a user role cannot access the MIB node with OID 1.3.6.1.4.1.25506.141.3.0.1 if the user role contains rules configured by using the following commands:
¡ rule 1 permit read write oid 1.3.6
¡ rule 2 deny read write oid 1.3.6.1.4.1
¡ rule 3 permit read write oid 1.3.6.1.4
· If the same OID is specified in multiple rules, the rule with the higher ID takes effect. For example, a user role can access the MIB node with OID 1.3.6.1.4.1.25506.141.3.0.1 if the user role contains rules configured by using the following commands:
¡ rule 1 permit read write oid 1.3.6
¡ rule 2 deny read write oid 1.3.6.1.4.1
¡ rule 3 permit read write oid 1.3.6.1.4.1
Restrictions and guidelines
· Only the network-admin, and level-15 user roles have access to the following commands:
¡ The display history-command all command.
¡ All commands that start with the display role, display license, reboot, startup saved-configuration, and undo startup saved-configuration keywords.
¡ All commands that start with the role, undo role, super, undo super, license, password-recovery, and undo password-recovery keywords in system view.
¡ All commands that start with the snmp-agent community, undo snmp-agent community, snmp-agent usm-user, undo snmp-agent usm-user, snmp-agent group, and undo snmp-agent group keywords in system view.
¡ All commands that start with the user-role, undo user-role, authentication-mode, undo authentication-mode, set authentication password, and undo set authentication password keywords in user line view or user line class view.
¡ All commands that start with the user-role and undo user-role keywords in schedule view or in CLI-defined policy view.
¡ All commands of the event MIB feature.
· You can configure a maximum of 256 user-defined rules for a user role. The total number of user-defined user role rules cannot exceed 1024.
· Any rule modification, addition, or removal for a user role takes effect only on users who are logged in with the user role after the change.
Procedure
1. Enter system view.
system-view
2. Enter user role view.
role name role-name
3. Configure rules for the user role. Choose the options to configure as needed:
¡ Configure a command rule.
rule number { deny | permit } command command-string
¡ Configure a feature rule.
rule number { deny | permit } { execute | read | write } * feature [ feature-name ]
¡ Configure a feature group rule.
rule number { deny | permit } { execute | read | write } * feature-group feature-group-name
A feature group rule takes effect only after the feature group is created.
¡ Configure a Web menu rule.
rule number { deny | permit } { execute | read | write } * web-menu [ web-string ]
¡ Configure an XML element rule.
rule number { deny | permit } { execute | read | write } * xml-element [ xml-string ]
¡ Configure an OID rule.
rule number { deny | permit } { execute | read | write } * oid oid-string
Configuring a feature group
About this task
Use feature groups to bulk assign command access permissions to sets of features. In addition to the predefined feature groups, you can create a maximum of 64 custom feature groups and assign a feature to multiple feature groups.
Procedure
1. Enter system view.
system-view
2. Create a feature group and enter its view.
role feature-group name feature-group-name
By default, the system has the following predefined feature groups, which cannot be deleted or modified:
¡ L2—Includes all Layer 2 commands.
¡ L3—Includes all Layer 3 commands.
3. Add a feature to the feature group.
feature feature-name
By default, a feature group does not have any feature.
Configuring resource access policies
About resource access policies
Every user role has one interface policy, VPN instance policy, security zone policy, and VLAN policy. By default, these policies permit a user role to access any system resources. You can configure the policies of a user-defined user role or a predefined level-n user role to limit its access to any resources.
Restrictions and guidelines for resource access policy configuration
The policy configuration takes effect only on users who are logged in with the user role after the configuration.
Configuring the user role interface policy
1. Enter system view.
system-view
2. Enter user role view.
role name role-name
3. Enter user role interface policy view.
interface policy deny
By default, the interface policy of the user role permits access to all interfaces.
This command denies the access of the user role to any interfaces except the interfaces specified by using the permit interface command.
4. (Optional.) Specify a list of interfaces accessible to the user role.
permit interface interface-list
By default, no accessible interfaces are configured in user role interface policy view.
Repeat this step to add multiple accessible interfaces.
Configuring the user role VLAN policy
1. Enter system view.
system-view
2. Enter user role view.
role name role-name
3. Enter user role VLAN policy view.
vlan policy deny
By default, the VLAN policy of the user role permits access to all VLANs.
This command denies the access of the user role to any VLANs except the VLANs specified by using the permit vlan command.
4. (Optional.) Specify a list of VLANs accessible to the user role.
permit vlan vlan-id-list
By default, no accessible VLANs are configured in user role VLAN policy view.
Repeat this step to add multiple accessible VLANs.
Configuring the user role VPN instance policy
1. Enter system view.
system-view
2. Enter user role view.
role name role-name
3. Enter user role VPN instance policy view.
vpn-instance policy deny
By default, the VPN instance policy of the user role permits access to all VPN instances.
This command denies the access of the user role to any VPN instances except the VPN instances specified by using the permit vpn-instance command.
4. (Optional.) Specify a list of VPN instances accessible to the user role.
permit vpn-instance vpn-instance-name&<1-10>
By default, no accessible VPN instances are configured in user role VPN instance policy view.
Repeat this step to add multiple accessible VPN instances.
Configuring the user role security zone policy
1. Enter system view.
system-view
2. Enter user role view.
role name role-name
3. Enter user role security zone policy view.
security-zone policy deny
By default, the security zone policy of the user role permits access to all security zones.
This command denies the access of the user role to any security zones except the security zones specified by using the permit security-zone command.
4. (Optional.) Specify a list of security zones accessible to the user role.
permit security-zone security-zone-name&<1-10>
By default, no accessible security zones are configured in user role security zone policy view.
Repeat this step to add multiple accessible security zones.
Assigning user roles
Restrictions and guidelines for user role assignment
To control user access to the system, you must assign a minimum of one user role. Make sure a minimum of one user role among the user roles assigned by the server exists on the device.
Enabling the default user role feature
About this task
The default user role feature assigns the default user role to AAA-authenticated users if the authentication server (local or remote) does not assign any user roles to the users. These users are allowed to access the system with the default user role.
You can specify any user role existing in the system as the default user role.
Procedure
1. Enter system view.
system-view
2. Enable the default user role feature.
role default-role enable [ role-name ]
By default, the default user role feature is disabled.
If you do not use the authorization-attribute command to assign user roles to local users, you must enable the default user role feature. For information about the authorization-attribute command, see AAA commands in Security Command Reference.
Assigning user roles to remote AAA authentication users
For remote AAA authentication users, user roles are specified on the remote authentication server. For information about specifying user roles for RADIUS users on the RADIUS server, see the RADIUS server documentation. For HWTACACS users, the user roles must be specified in the roles="role-1 role-2 … role-n" format, where user roles are space separated. For example, specify roles="level-0 level-1 level-2" to assign the level-0, level-1, and level-2 user roles to an HWTACACS user.
For information about configuring the device to cooperate with the remote AAA server for user role assignment, see AAA configuration in Security Configuration Guide.
If the AAA server assigns the security-audit user role and other user roles to the same user, only the security-audit user role takes effect.
Assigning user roles to local AAA authentication users
About this task
Configure user roles for local AAA authentication users in their local user accounts. For information about AAA and local user configuration, see AAA configuration in Security Configuration Guide.
Restrictions and guidelines
· Every local user has a default user role. If this default user role is not suitable, remove it.
· If a local user is the only user with the security-audit user role, the user cannot be deleted.
· When you assign user roles to a user, the system prompts you to confirm the deletion of the user roles that are mutually exclusive with the new user roles.
· You can assign a maximum of 64 user roles to a local user.
Procedure
1. Enter system view.
system-view
2. Create a local user and enter its view.
local-user user-name class { manage | network }
3. Assign a user role to the local user.
authorization-attribute user-role role-name
By default, the network-operator user role is assigned to local users created by a network-admin or level-15 user.
Assigning user roles to non-AAA authentication users on user lines
About this task
Specify user roles for the following two types of login users on the user lines:
· Non-SSH users that use password authentication or no authentication.
· SSH clients that use publickey or password-publickey authentication. User roles assigned to these SSH clients are specified in their respective device management user accounts.
For more information about user lines, see "Login overview" and "Configuring CLI login." For more information about SSH, see Security Configuration Guide.
Restrictions and guidelines
· You can assign a maximum of 64 user roles to a non-AAA authentication user on a user line.
· The device cannot assign the security-audit user role to non-AAA authentication users.
Procedure
1. Enter system view.
system-view
2. Enter user line view or user line class view.
¡ Enter user line view.
line { first-num1 [ last-num1 ] | { aux | console | tty | vty } first-num2 [ last-num2 ] }
¡ Enter user line class view.
line class { aux | console | tty | vty }
For information about the priority order and application scope of the settings in user line view and user line class view, see "Configuring CLI login."
3. Specify a user role on the user line.
user-role role-name
By default, the network-admin user role is specified on the console/AUX user line, and the network-operator user role is specified on any other user line.
Configuring temporary user role authorization
About temporary user role authorization
Temporary user role authorization allows you to obtain another user role without reconnecting to the device. This feature is useful when you want to use a user role temporarily to configure a feature.
Temporary user role authorization is effective only on the current login. This feature does not change the user role settings in the user account that you have been logged in with. The next time you are logged in with the user account, the original user role settings take effect.
To enable a user to obtain another user role without reconnecting to the device, you must configure user role authentication. Table 2 describes the available authentication modes and configuration requirements.
Table 2 User role authentication modes
|
Keywords |
Authentication mode |
Description |
|
local |
Local password authentication only (local-only) |
The device uses the locally configured password for authentication. If no local password is configured for a user role in this mode, an AUX or console user can obtain the user role by either entering a string or not entering anything. |
|
scheme |
Remote AAA authentication through HWTACACS or RADIUS (remote-only) |
The device sends the username and password to the HWTACACS or RADIUS server for remote authentication. To use this mode, you must perform the following configuration tasks: · Configure the required HWTACACS or RADIUS scheme, and configure the ISP domain to use the scheme for the user. For more information, see AAA in Security Configuration Guide. · Add the user account and password on the HWTACACS or RADIUS server. |
|
local scheme |
Local password authentication first, and then remote AAA authentication (local-then-remote) |
Local password authentication is performed first. If no local password is configured for the user role in this mode, the device performs remote AAA authentication for console, TTY, and VTY users. An AUX user can obtain another user role by either entering a string or not entering anything. |
|
scheme local |
Remote AAA authentication first, and then local password authentication (remote-then-local) |
Remote AAA authentication is performed first. Local password authentication is performed in either of the following situations: · The HWTACACS or RADIUS server does not respond. · The remote AAA configuration on the device is invalid. |
Restrictions and guidelines for temporary user role authorization
If HWTACACS authentication is used, the following rules apply:
· If the device is not enabled to automatically obtain the login username as the authentication username, you must enter a username for role authentication.
· The device sends the username to the server in the username or username@domain-name format. Whether the domain name is included in the username depends on the user-name-format command in the HWTACACS scheme.
· To obtain a level-n user role, the user account on the server must have the target user role level or a level higher than the target user role. A user account that obtains the level-n user role can obtain any user role among level-0 through level-n.
· To obtain a non-level-n user role, make sure the user account on the server meets the following requirements:
¡ The account has a user privilege level.
¡ The HWTACACS custom attribute is configured for the account in the form of allowed-roles="role". The variable role represents the target user role.
If RADIUS authentication is used, the following rules apply:
· The device does not use the username you enter or the automatically obtained login username to request user role authentication. It uses a username in the $enabn$ format. The variable n represents a user role level, and a domain name is not included in the username. You can always pass user role authentication when the password is correct.
· To obtain a level-n user role, you must create a user account for the level-n user role in the $enabn$ format on the RADIUS server. The variable n represents the target user role level. For example, to obtain the authorization of the level-3 user role, you can enter any username. The device uses the username $enab3$ to request user role authentication from the server.
· To obtain a non-level-n user role, you must perform the following tasks:
¡ Create a user account named $enab0$ on the server.
¡ Configure the cisco-av-pair attribute for the account in the form of allowed-roles="role". The variable role represents the target user role.
The device selects an authentication domain for user role authentication in the following order:
1. The ISP domain included in the entered username.
2. The default ISP domain.
If you execute the quit command after obtaining user role authorization, you are logged out of the device.
Setting the authentication mode for temporary user role authorization
1. Enter system view.
system-view
2. Set the authentication mode.
super authentication-mode { local | scheme } *
By default, local-only authentication applies.
Specifying the default target user role for temporary user role authorization
1. Enter system view.
system-view
2. Specify the default target user role for temporary user role authorization.
super default role role-name
By default, the default target user role is network-admin.
Setting an authentication password for temporary user role authorization
About this task
Authentication passwords are required only for local password authentication.
Procedure
system-view
2. Set a local authentication password for a user role.
In non-FIPS mode:
super password [ role role-name ] [ { hash | simple } string ]
In FIPS mode:
super password [ role role-name ]
By default, no password is set.
If you do not specify the role role-name option, the command sets a password for the default target user role.
Automatically obtaining the login username for temporary user role authorization
About this task
This feature is applicable only to the login from a user line that uses scheme authentication, which requires a username for login. This feature enables the device to automatically obtain the login username when the login user requests a temporary user role authorization from a remote authentication server.
Restrictions and guidelines
If the user was logged in from a user line that uses password authentication or no authentication, the device cannot obtain the login username. The request for temporary user role authorization from a remote authentication server will fail.
This feature does not take effect on local password authentication for temporary user role authorization.
Procedure
1. Enter system view.
system-view
2. Enable the device to automatically obtain the login username when a login user requests temporary user role authorization from a remote authentication server.
super use-login-username
By default, the device prompts for a username when a login user requests temporary user role authorization from a remote authentication server.
Obtaining temporary user role authorization
Restrictions and guidelines
The operation of obtaining temporary user role authorization fails after three consecutive unsuccessful authentication attempts.
You might fail to switch to a non-level-n user role if both of the following conditions exist:
· User role switching authentication is performed in the same ISP domain as the current login user.
· User role switching authentication uses a different AAA method than the login authorization method configured for the ISP domain.
To resolve this issue, make sure the AAA methods configured by using the authentication super command are consistent with those configured by using the authorization login command for the ISP domain.
For more information about AAA, see Security Configuration Guide.
Prerequisites
Before you obtain temporary user role authorization, make sure the current user account has the permission to execute the super command to obtain temporary user role authorization.
Procedure
To obtain the temporary authorization to use a user role, execute the following command in user view:
super [ role-name ]
If you do not specify the role-name argument, you obtain the default target user role for temporary user role authorization.
Display and maintenance commands for RBAC
Execute display commands in any view.
|
Task |
Command |
|
Display user role information. |
display role [ name role-name ] |
|
Display user role feature information. |
display role feature [ name feature-name | verbose ] |
|
Display user role feature group information. |
display role feature-group [ name feature-group-name ] [ verbose ] |
RBAC configuration examples
Example: Configuring RBAC for local AAA authentication users
Network configuration
As shown in Figure 1, the router performs local AAA authentication for the Telnet user. The user account for the Telnet user is user1@bbb, which is assigned user role role1.
Configure role1 to have the following permissions:
· Execute the read commands of any feature.
· Access interfaces from GigabitEthernet 1/0/2 to GigabitEthernet 1/0/4. Access to any other interfaces is denied.

Procedure
# Assign an IP address to GigabitEthernet 1/0/1 (the interface connected to the Telnet user).
<Router> system-view
[Router] interface gigabitethernet 1/0/1
[Router-GigabitEthernet1/0/1] ip address 192.168.1.70 255.255.255.0
[Router-GigabitEthernet1/0/1] quit
# Enable the Telnet server.
[Router] telnet server enable
# Enable scheme authentication on the user lines for Telnet users.
[Router] line vty 0 63
[Router-line-vty0-63] authentication-mode scheme
[Router-line-vty0-63] quit
# Enable local authentication and authorization for ISP domain bbb.
[Router] domain bbb
[Router-isp-bbb] authentication login local
[Router-isp-bbb] authorization login local
[Router-isp-bbb] quit
# Create user role role1.
[Router] role name role1
# Add rule 1 to permit the user role to access the read commands of all features.
[Router-role-role1] rule 1 permit read feature
# Add rule 2 to permit the user role to enter interface view and use all commands available in interface view.
[Router-role-role1] rule 2 permit command system-view ; interface *
# Change the interface policy to permit the user role to access only GigabitEthernet 1/0/2 to GigabitEthernet 1/0/4.
[Router-role-role1] interface policy deny
[Router-role-role1-ifpolicy] permit interface gigabitethernet 1/0/2 to gigabitethernet 1/0/4
[Router-role-role1-ifpolicy] quit
[Router-role-role1] quit
# Create a device management user named user1 and enter local user view.
[Router] local-user user1 class manage
# Set a plaintext password of aabbcc for the user.
[Router-luser-manage-user1] password simple aabbcc
# Set the user service type to Telnet.
[Router-luser-manage-user1] service-type telnet
[Router-luser-manage-user1] authorization-attribute user-role role1
# Remove the default user role (network-operator) from the user. This operation ensures that the user has only the permissions of role1.
[Router-luser-manage-user1] undo authorization-attribute user-role network-operator
[Router-luser-manage-user1] quit
Verifying the configuration
# Telnet to the router, and enter the username and password to access the router. (Details not shown.)
# Verify that you cannot enter any interface view except the views of GigabitEthernet 1/0/2 to GigabitEthernet 1/0/4. This example uses GigabitEthernet 1/0/1.
<Router> system-view
[Router] interface gigabitethernet 1/0/1
Permission denied.
# Verify that you can access GigabitEthernet 1/0/2 to GigabitEthernet 1/0/4 to configure them. This example uses GigabitEthernet 1/0/2.
[Router] interface gigabitethernet 1/0/2
[Router-GigabitEthernet1/0/2] ip address 6.6.6.6 24
[Router-GigabitEthernet1/0/2] quit
# Verify that you can use all read commands of any feature. This example uses display clock.
[Router] display clock
09:31:56 UTC Sun 01/01/2017
[Router] quit
# Verify that you cannot use the write or execute commands of any feature.
<Router> debugging role all
Permission denied.
<Router> ping 192.168.1.58
Permission denied.
Example: Configuring RBAC for RADIUS authentication users
Network configuration
As shown in Figure 2, the router uses the FreeRADIUS server to provide AAA service for login users, including the Telnet user. The user account for the Telnet user is hello@bbb, which is assigned user role role2.
User role role2 has the following permissions:
· Use all commands in ISP domain view.
· Use the read and write commands of the arp and radius features.
· Access only VLANs 1 to 20 and interfaces GigabitEthernet 1/0/1 to GigabitEthernet 1/0/4.
The router and the FreeRADIUS server use a shared key of expert and authentication port 1812. The router delivers usernames with their domain names to the server.

Procedure
Make sure the settings on the router and the RADIUS server match.
1. Configure the router:
# Assign an IP address to GigabitEthernet 1/0/1 (the interface connected to the Telnet user).
<Router> system-view
[Router] interface gigabitethernet 1/0/1
[Router-GigabitEthernet1/0/1] ip address 192.168.1.70 255.255.255.0
[Router-GigabitEthernet1/0/1] quit
# Assign an IP address to GigabitEthernet 1/0/2 (the interface connected to the FreeRADIUS server).
[Router] interface gigabitethernet 1/0/2
[Router-GigabitEthernet1/0/2] ip address 10.1.1.2 255.255.255.0
[Router-GigabitEthernet1/0/2] quit
# Enable the Telnet server.
[Router] telnet server enable
# Enable scheme authentication on the user lines for Telnet users.
[Router] line vty 0 63
[Router-line-vty0-63] authentication-mode scheme
[Router-line-vty0-63] quit
# Create RADIUS scheme rad and enter RADIUS scheme view.
[Router] radius scheme rad
# Specify the primary authentication and authorization server address and the service port in the scheme.
[Router-radius-rad] primary authentication 10.1.1.1 1812
# Set the shared key to expert in the scheme for the router to authenticate to the server.
[Router-radius-rad] key authentication simple expert
[Router-radius-rad] quit
# Specify scheme rad as the authentication and authorization schemes for ISP domain bbb, and configure the ISP domain to not perform accounting for login users.
|
|
IMPORTANT: Because RADIUS user authorization information is piggybacked in authentication responses, the authentication and authorization methods must use the same RADIUS scheme. |
[Router] domain bbb
[Router-isp-bbb] authentication login radius-scheme rad
[Router-isp-bbb] authorization login radius-scheme rad
[Router-isp-bbb] accounting login none
[Router-isp-bbb] quit
# Create a feature group named fgroup1.
[Router] role feature-group name fgroup1
# Add the arp and radius features to the feature group.
[Router-featuregrp-fgroup1] feature arp
[Router-featuregrp-fgroup1] feature radius
[Router-featuregrp-fgroup1] quit
# Create a user role named role2.
[Router] role name role2
# Configure rule 1 to allow the user role to use all commands available in ISP domain view.
[Router-role-role2] rule 1 permit command system-view ; domain *
# Configure rule 2 to permit the user role to use the read and write commands of all features in fgroup1.
[Router-role-role2] rule 2 permit read write feature-group fgroup1
# Configure rule 3 to permit the user role to create VLANs and use all commands available in VLAN view.
[Router-role-role2] rule 3 permit command system-view ; vlan *
# Configure rule 4 to permit the user role to enter interface view and use all commands available in interface view.
[Router-role-role2] rule 4 permit command system-view ; interface *
# Configure the user role VLAN policy to disable configuration of any VLAN except VLANs 1 to 20.
[Router-role-role2] vlan policy deny
[Router-role-role2-vlanpolicy] permit vlan 1 to 20
[Router-role-role2-vlanpolicy] quit
# Configure the user role interface policy to disable access to any interface except GigabitEthernet 1/0/1 to GigabitEthernet 1/0/4.
[Router-role-role2] interface policy deny
[Router-role-role2-ifpolicy] permit interface gigabitethernet 1/0/1 to gigabitethernet 1/0/4
[Router-role-role2-ifpolicy] quit
[Router-role-role2] quit
2. Configure the RADIUS server:
# Add either of the user role attributes to the dictionary file of the FreeRADIUS server.
Cisco-AVPair = "shell:roles=\"role1 role2\""
Cisco-AVPair = "shell:roles*\"role1 role2\""
# Configure the settings required for the FreeRADIUS server to communicate with the router. (Details not shown.)
Verifying the configuration
# Telnet to the router, and enter the username and password to access the router. (Details not shown.)
# Verify that you can use all commands available in ISP domain view.
<Router> system-view
[Router] domain abc
[Router-isp-abc] authentication login radius-scheme abc
[Router-isp-abc] quit
# Verify that you can use all read and write commands of the radius and arp features. This example uses radius.
[Router] radius scheme rad
[Router-radius-rad] primary authentication 2.2.2.2
[Router-radius-rad] display radius scheme rad
...
# Verify that you cannot configure any VLAN except VLANs 1 to 20. This example uses VLAN 10 and VLAN 30.
[Router] vlan 10
[Router-vlan10] quit
[Router] vlan 30
Permission denied.
# Verify that you cannot configure any interface except GigabitEthernet 1/0/1 to GigabitEthernet 1/0/4. This example uses GigabitEthernet 1/0/2 and GigabitEthernet 1/0/5.
[Router] vlan 10
[Router-vlan10] port gigabitethernet 1/0/2
[Router-vlan10] port gigabitethernet 1/0/5
Permission denied.
Example: Configuring RBAC temporary user role authorization (HWTACACS authentication)
Network configuration
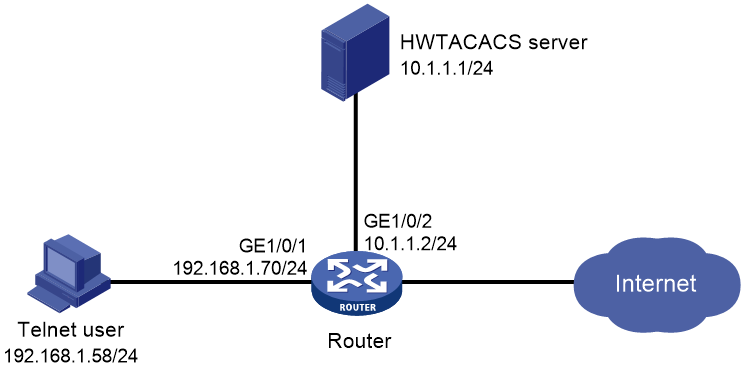
As shown in Figure 3, the router uses HWTACACS authentication for login users, including the Telnet user. The user account for the Telnet user is test@bbb, which is assigned user role level-0.
Configure the remote-then-local authentication mode for temporary user role authorization. The router uses the HWTACACS server to provide authentication for changing the user role among level-0 through level-3 or changing the user role to network-admin. If the AAA configuration is invalid or the HWTACACS server does not respond, the router performs local authentication.
Procedure
1. Configure the router:
# Assign an IP address to GigabitEthernet 1/0/1 (the interface connected to the Telnet user).
<Router> system-view
[Router] interface gigabitethernet 1/0/1
[Router-GigabitEthernet1/0/1] ip address 192.168.1.70 255.255.255.0
[Router-GigabitEthernet1/0/1] quit
# Assign an IP address to GigabitEthernet 1/0/2 (the interface connected to the HWTACACS server).
[Router] interface gigabitethernet 1/0/2
[Router-GigabitEthernet1/0/2] ip address 10.1.1.2 255.255.255.0
[Router-GigabitEthernet1/0/2] quit
# Enable the Telnet server.
[Router] telnet server enable
# Enable scheme authentication on the user lines for Telnet users.
[Router] line vty 0 15
[Router-line-vty0-15] authentication-mode scheme
[Router-line-vty0-15] quit
# Enable remote-then-local authentication for temporary user role authorization.
[Router] super authentication-mode scheme local
# Create an HWTACACS scheme named hwtac and enter HWTACACS scheme view.
[Router] hwtacacs scheme hwtac
# Specify the primary authentication server address and the service port in the scheme.
[Router-hwtacacs-hwtac] primary authentication 10.1.1.1 49
# Specify the primary authorization server address and the service port in the scheme.
[Router-hwtacacs-hwtac] primary authorization 10.1.1.1 49
# Set the shared key to expert in the scheme for the router to authenticate to the authentication server.
[Router-hwtacacs-hwtac] key authentication simple expert
# Set the shared key to expert in the scheme for the router to authenticate to the authorization server.
[Router-hwtacacs-hwtac] key authorization simple expert
# Exclude ISP domain names from the usernames sent to the HWTACACS server.
[Router-hwtacacs-hwtac] user-name-format without-domain
[Router-hwtacacs-hwtac] quit
# Create ISP domain bbb and enter ISP domain view.
[Router] domain bbb
# Configure ISP domain bbb to use HWTACACS scheme hwtac for login user authentication.
[Router-isp-bbb] authentication login hwtacacs-scheme hwtac
# Configure ISP domain bbb to use HWTACACS scheme hwtac for login user authorization.
[Router-isp-bbb] authorization login hwtacacs-scheme hwtac
# Configure ISP domain bbb to not perform accounting for login users.
[Router-isp-bbb] accounting login none
# Apply HWTACACS scheme hwtac to the ISP domain for user role authentication.
[Router-isp-bbb] authentication super hwtacacs-scheme hwtac
[Router-isp-bbb] quit
# Set the local authentication password to 654321 for user role level-3.
[Router] super password role level-3 simple 654321
# Set the local authentication password to 654321 for user role network-admin.
[Router] super password role network-admin simple 654321
[Router] quit
2. Configure the HWTACACS server:
This example uses ACSv4.0.
a. Access the User Setup page.
b. Add a user account named test. (Details not shown.)
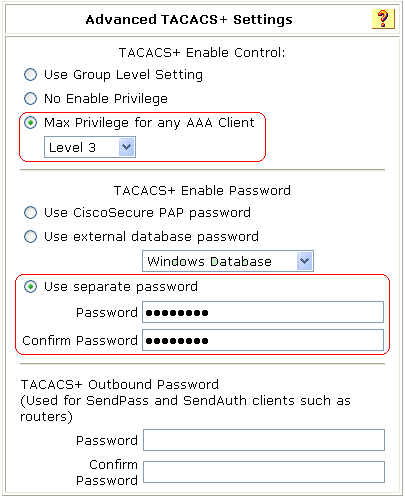
c. In the Advanced TACACS+ Settings area, configure the following parameters:
- Select Level 3 for the Max Privilege for any AAA Client option.
If the target user role is only network-admin for temporary user role authorization, you can select any level for the option.
- Select the Use separate password option, and specify enabpass as the password.
Figure 4 Configuring advanced TACACS+ settings
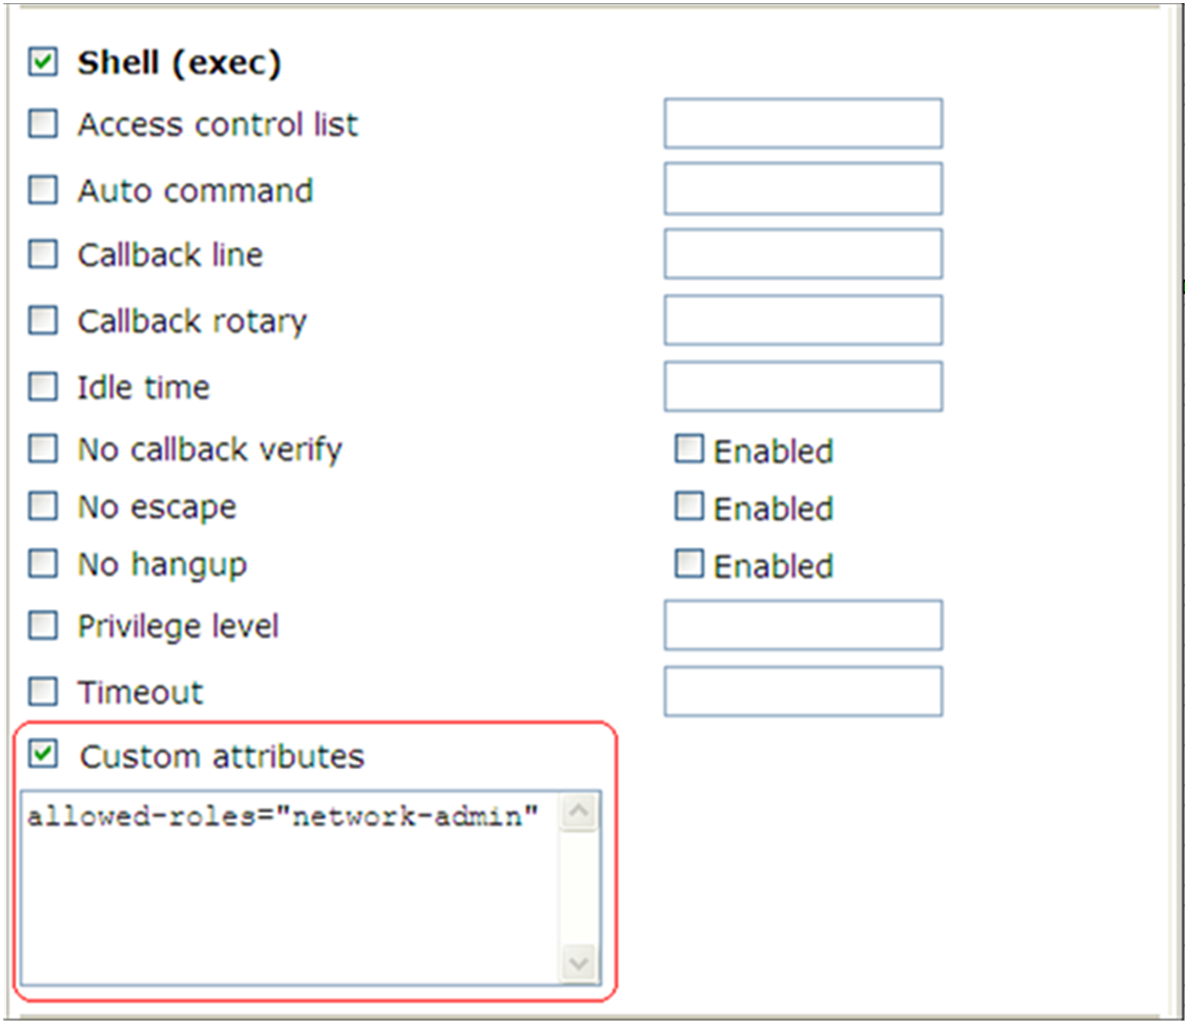
d. Select Shell (exec) and Custom attributes, and enter allowed-roles="network-admin" in the Custom attributes field.
Use a blank space to separate the allowed roles.
Figure 5 Configuring custom attributes for the Telnet user
Verifying the configuration
1. Telnet to the router, and enter username test@bbb and password aabbcc to access the router. Verify that you have access to diagnostic commands.
C:\> telnet 192.168.1.70
Trying 192.168.1.70 ...
Press CTRL+K to abort
Connected to 192.168.1.70 ...
******************************************************************************
* Copyright (c) 2004-2017 New H3C Technologies Co., Ltd. All rights reserved.*
* Without the owner's prior written consent, *
* no decompiling or reverse-engineering shall be allowed. *
******************************************************************************
login: test@bbb
Password:
<Router>?
User view commands:
ping Ping function
quit Exit from current command view
ssh2 Establish a secure shell client connection
super Switch to a user role
system-view Enter the System View
telnet Establish a telnet connection
tracert Tracert function
<Router>
2. Verify that you can obtain the level-3 user role:
# Use the super password to obtain the level-3 user role. When the system prompts for a username and password, enter username test@bbb and password enabpass.
<Router> super level-3
Username: test@bbb
Password:
The following output shows that you have obtained the level-3 user role.
User privilege role is level-3, and only those commands that authorized to the role can be used.
# If the ACS server does not respond, enter local authentication password 654321 at the prompt.
Invalid configuration or no response from the authentication server.
Change authentication mode to local.
Password:
User privilege role is level-3, and only those commands that authorized to the role can be used.
The output shows that you have obtained the level-3 user role.
3. Use the method in step 2 to verify that you can obtain the level-0, level-1, level-2, and network-admin user roles. (Details not shown.)
Example: Configuring RBAC temporary user role authorization (RADIUS authentication)
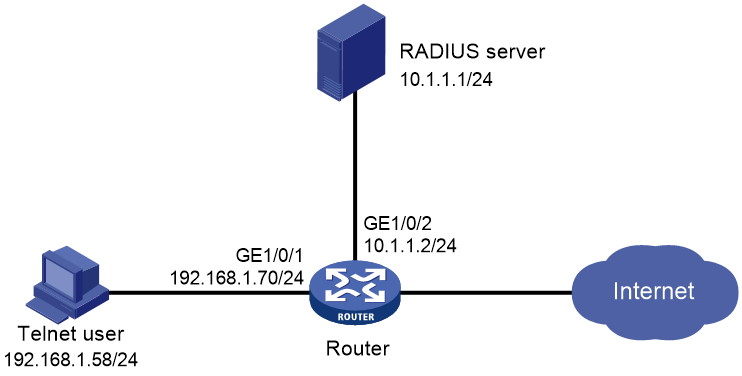
Network configuration
As shown in Figure 6, the router uses RADIUS authentication for login users, including the Telnet user. The user account for the Telnet user is test@bbb, which is assigned user role level-0.
Configure the remote-then-local authentication mode for temporary user role authorization. The router uses the RADIUS server to provide authentication for the network-admin user role. If the AAA configuration is invalid or the RADIUS server does not respond, the router performs local authentication.
Procedure
1. Configure the router:
# Assign an IP address to GigabitEthernet 1/0/1 (the interface connected to the Telnet user).
<Router> system-view
[Router] interface gigabitethernet 1/0/1
[Router-GigabitEthernet1/0/1] ip address 192.168.1.70 255.255.255.0
[Router-GigabitEthernet1/0/1] quit
# Assign an IP address to GigabitEthernet 1/0/2 (the interface connected to the RADIUS server).
[Router] interface gigabitethernet 1/0/2
[Router-GigabitEthernet1/0/2] ip address 10.1.1.2 255.255.255.0
[Router-GigabitEthernet1/0/2] quit
# Enable the Telnet server.
[Router] telnet server enable
# Enable scheme authentication on the user lines for Telnet users.
[Router] line vty 0 15
[Router-line-vty0-15] authentication-mode scheme
[Router-line-vty0-15] quit
# Enable remote-then-local authentication for temporary user role authorization.
[Router] super authentication-mode scheme local
# Create RADIUS scheme radius and enter RADIUS scheme view.
[Router] radius scheme radius
# Specify primary authentication server address 10.1.1.1, and set the shared key to expert in the scheme for secure communication between the router and the server.
[Router-radius-radius] primary authentication 10.1.1.1 key simple expert
# Exclude ISP domain names from the usernames sent to the RADIUS server.
[Router-radius-radius] user-name-format without-domain
[Router-radius-radius] quit
# Create ISP domain bbb and enter ISP domain view.
[Router] domain bbb
# Configure ISP domain bbb to use RADIUS scheme radius for login user authentication.
[Router-isp-bbb] authentication login radius-scheme radius
# Configure ISP domain bbb to use RADIUS scheme radius for login user authorization.
[Router-isp-bbb] authorization login radius-scheme radius
# Configure ISP domain bbb to not perform accounting for login users.
[Router-isp-bbb] accounting login none
# Apply RADIUS scheme radius to the ISP domain for user role authentication.
[Router-isp-bbb] authentication super radius-scheme radius
[Router-isp-bbb] quit
# Set the local authentication password to abcdef654321 for user role network-admin.
[Router] super password role network-admin simple abcdef654321
[Router] quit
2. Configure the RADIUS server:
This example uses ACSv4.2.
a. Add a user account named $enab0$ and set the password to 123456. (Details not shown.)
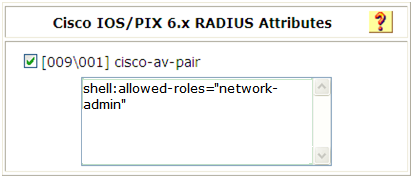
b. Access the Cisco IOS/PIX 6.x RADIUS Attributes page.
c. Configure the cisco-av-pair attribute, as shown in Figure 7.
Figure 7 Configuring the cisco-av-pair attribute
Verifying the configuration
1. Telnet to the router, and enter username test@bbb and password aabbcc to log in to the router. Verify that you have access to diagnostic commands.
C:\> telnet 192.168.1.70
Trying 192.168.1.70 ...
Press CTRL+K to abort
Connected to 192.168.1.70 ...
******************************************************************************
* Copyright (c) 2004-2017 New H3C Technologies Co., Ltd. All rights reserved.*
* Without the owner's prior written consent, *
* no decompiling or reverse-engineering shall be allowed. *
******************************************************************************
login: test@bbb
Password:
<Router>?
User view commands:
ping Ping function
quit Exit from current command view
ssh2 Establish a secure shell client connection
super Switch to a user role
system-view Enter the System View
telnet Establish a telnet connection
tracert Tracert function
<Router>
2. Verify that you can obtain the network-admin user role:
# Use the super password to obtain the network-admin user role. When the system prompts for a username and password, enter username test@bbb and password 123456.
<Router> super network-admin
Username: test@bbb
Password:
The following output shows that you have obtained the network-admin user role:
User privilege role is network-admin, and only those commands that authorized to the role can be used.
# If the ACS server does not respond, enter local authentication password abcdef654321 at the prompt.
Invalid configuration or no response from the authentication server.
Change authentication mode to local.
Password:
User privilege role is network-admin, and only those commands that authorized to the role can be used.
The output shows that you have obtained the network-admin user role.
Troubleshooting RBAC
This section describes several typical RBAC issues and their solutions.
Local users have more access permissions than intended
Symptom
A local user can use more commands than should be permitted by the assigned user roles.
Analysis
The local user might have been assigned to user roles without your knowledge. For example, the local user is automatically assigned the default user role when you create the user.
Solution
To resolve the issue:
1. Use the display local-user command to examine the local user accounts for undesirable user roles, and remove them.
2. If the issue persists, contact H3C Support.
Login attempts by RADIUS users always fail
Symptom
Attempts by a RADIUS user to log in to the network access device always fail, even though the following conditions exist:
· The network access device and the RADIUS server can communicate with one another.
· All AAA settings are correct.
Analysis
RBAC requires that a login user have a minimum of one user role. If the RADIUS server does not authorize the login user to use any user role, the user cannot log in to the device.
Solution
To resolve the issue:
1. Use one of the following methods:
¡ Configure the role default-role enable command. A RADIUS user can log in with the default user role when no user role is assigned by the RADIUS server.
¡ Add the user role authorization attributes on the RADIUS server.
2. If the issue persists, contact H3C Support.