- Table of Contents
- Related Documents
-
| Title | Size | Download |
|---|---|---|
| 01-Text | 1.83 MB |
Contents
About Oasis platform authentication
Configure Oasis authentication with an AC as the authenticator
Configure basic Oasis authentication settings
Configure settings on the device
Configure one-key authentication
Configure fixed account authentication
Configure WeChat official account authentication
Configure WeChat Wi-Fi authentication··
Configure guest authentication
Configure Facebook authentication
Configure member authentication
Configure combined authentication
Configure dumb terminal authentication
Customize an authentication page·
Configure advanced Oasis authentication settings
Enable the captive-bypass feature
Hide or customize the one-key authentication button
Enable self-service password change
Enable collaboration with an LDAP server for fixed account verification
Set the validity period of verification codes
Configure WeChat Wi-Fi authentication through QR code scanning
Redirect users to a WeChat mini program··
Change visual effect settings of the login page
Configure Internet access settings
Manage dumb terminal account groups
Configure portal automated authentication
Configure inter-site and inter-SSID re-authentication
Configure Internet access control
Configure the domain name whitelist and blacklist
View or export history of authentication template deployment
Configure Oasis authentication with a Xiaobei router as the authenticator
Configure one-key authentication
Configure WeChat Wi-Fi authentication··
Configure guest authentication
Configure combined authentication
Customize an authentication page·
Enable the captive-bypass feature
Hide or customize the one-key authentication button
Set the validity period of verification codes
Configure WeChat Wi-Fi authentication through QR code scanning
Redirect users to a WeChat mini program··
Change visual effect settings of the login page
Configure Internet access settings
Configure MAC-trigger authentication
Configure inter-site and inter-SSID re-authentication
Configure Internet access control
Configure the domain name whitelist and blacklist
View or export history of authentication template deployment
Configure Oasis authentication with a wireless router as the authenticator
Configure one-key authentication
Configure fixed account authentication
Configure WeChat official account authentication
Configure WeChat Wi-Fi authentication··
Configure guest authentication
Configure member authentication
Configure combined authentication
Configure dumb terminal authentication
Customize an authentication page·
Enable the captive-bypass feature
Hide or customize the one-key authentication button
Enable self-service password change
Enable collaboration with an LDAP server for fixed account verification
Set the validity period of verification codes
Configure WeChat Wi-Fi authentication through QR code scanning
Redirect users to a WeChat mini program··
Change visual effect settings of the login page
Configure Internet access settings
Manage dumb terminal account groups
Configure portal automated authentication
Configure inter-site and inter-SSID re-authentication
Configure Internet access control
Configure the domain name whitelist and blacklist
View or export history of authentication template deployment
Configure Oasis authentication with an MER gateway as the authenticator
Configure one-key authentication
Configure fixed account authentication
Configure WeChat official account authentication
Configure WeChat Wi-Fi authentication··
Configure guest authentication
Configure member authentication
Configure combined authentication
Customize an authentication page·
Enable the captive-bypass feature
Hide or customize the one-key authentication button
Enable self-service password change
Enable collaboration with an LDAP server for fixed account verification
Set the validity period of verification codes
Configure WeChat Wi-Fi authentication through QR code scanning
Redirect users to a WeChat mini program··
Change visual effect settings of the login page
Configure Internet access settings
Configure Internet access control
Configure the domain name whitelist and blacklist
View or export history of authentication template deployment
Configure the client blacklist
Configure authentication when an AP registers to an AC over a public network
About Oasis platform authentication
|
|
IMPORTANT: · Some features in this document are restricted only to China mainland. · WeChat Wi-Fi and the advanced features depending on it are unavailable because Tencent disabled its portal authentication interface. |
H3C Oasis platform provides abundant authentication methods for access users such as employees, guests, and IoT terminals. When a client wants to access the Internet or the specific network resources, the access device redirects the client to the Oasis platform for portal authentication.
H3C Oasis platform offers the following benefits:
· No upper limit for authentication clients.
· Abundant authentication policies.
· Custom ads pushing services.
H3C Oasis platform provides the authentication methods listed in Table 1.
Table 1 Authentication methods
|
Authentication method |
Applicable scenario |
Remarks |
Combined authentication |
|
One-key |
Low auditing and operational statistics collection requirements, such as restaurants and shops. |
MAC-based authentication. Users can complete authentication by simply clicking a button on the portal authentication page. |
Not supported |
|
Fixed account |
Network users are fixed, such as campus and office areas. |
Username and password based authentication. The following functions are supported: · LDAP · Import and export of accounts · Binding one account to multiple MAC addresses · Concurrent client limit |
Supported |
|
SMS login |
High auditing and operational statistics collection requirements. Applicable to all kinds of public areas. |
Phone number based authentication. SMS packages from Emay are required. Only packages starting with 3, 6, 8, 9SDK, EUCP, and 6INT are supported. The following functions are supported: · Verification code edit. · Multiple SMS gateways. · Remembering phone numbers within 365 days for code-free authentication, saving SMS package resources. · Binding of one phone number to one terminal. |
Supported |
|
WeChat official account login |
High operational statistics collection requirements. Applicable to all kinds of public areas. The operator must provide QR codes. |
Users only need to follow the official account for authentication, without the need to provide phone numbers or accounts. |
Supported but not recommended |
|
WeChat Wi-Fi |
High operational statistics collection requirements. Applicable to all kinds of public areas. |
WeChat authentication, including portal redirection and QR code scanning. If forced follow is not configured, users can choose whether to follow the official account after passing authentication. You can configure the system to log off users if they unfollow the official account. |
Supported |
|
Guest authentication |
Enterprises or shops where temporary guest access is required. |
An authentication method used together with WeChat mini program. A guest can access the network after an approver scans the QR code on the terminal of the guest and authorize the terminal. |
Not supported |
|
Dumb terminal authentication |
IoT devices, wireless printers, and POS terminals. |
Automated authentication on specific wireless terminals. |
Not supported |
|
App authentication |
Operators have the capabilities to develop apps to interoperate with Oasis interfaces. |
Authentication performed by a third-party authentication server and reported by an app to the Oasis platform. The operators must maintain their apps and ensure app compatibility with the Oasis platform. |
Not supported |
|
Facebook authentication |
Operators use Facebook to collect statistics about network users. |
Users must log in to Facebook to grant access to the Oasis platform. This method is available only at https://oasiscloud.h3c.com. |
Supported |
|
Member authentication |
Scenarios with a membership system, hotels and chain stores, for example. |
Operators must be able to develop their membership systems to collaborate with the interface provided by the Oasis platform. |
Supported |
|
Free authentication |
N/A |
Users that have passed authentication can access the network within the auth-free period without entering user information when the users come online again. |
N/A |
Table 2 Authentication method and networking compatibility
|
Authentication method |
Compatibility with networks with different authenticators |
|||
|
AC |
Xiaobei router |
Wireless router |
Wired router or MER gateway |
|
|
One-key authentication |
Yes |
Yes |
Yes |
Yes |
|
Fixed account authentication |
Yes |
No |
Yes |
Yes |
|
SMS authentication |
Yes |
Yes |
Yes |
Yes |
|
WeChat official account authentication |
Yes |
No |
Yes |
Yes |
|
WeChat Wi-Fi authentication |
Yes |
Yes |
Yes |
Yes |
|
Guest authentication |
Yes |
Yes |
Yes |
Yes |
|
App authentication |
Yes |
No |
Yes |
Yes |
|
Facebook authentication |
Yes |
No |
No |
No |
|
Member authentication |
Yes |
No |
Yes |
Yes |
|
Combined authentication |
Yes |
Yes |
Yes |
Yes |
|
Dumb terminal authentication |
Yes |
No |
Yes |
No |
|
Bulk authentication |
Yes |
Yes |
Yes |
No |
|
Custom authentication page |
Yes |
Yes |
Yes |
Yes |
|
|
NOTE: · A wireless router can act as an AC or fat AP to provide wireless authentication. A wired router connects to terminals directly or connects to terminals through a switch or fat AP for authentication. · MER gateways support only wired authentication. |
Configure Oasis authentication with an AC as the authenticator
Configure basic Oasis authentication settings
Prerequisites
Before configuring Oasis platform authentication, complete the following tasks:
· Connect the device to the Oasis platform.
For more information, see H3C Oasis Platform Deployment Guide.
· Complete the VLAN and DHCP settings.
· Configure wireless services and make sure the APs can come online.
Configure settings on the device
Restrictions and guidelines
Only software version 5405 or higher supports deploying authentication settings automatically. For other software versions, manually configure the following settings on the device.
For fast deployment of the following authentication methods, see "Appendix A Authentication commands for the device."
· One-key authentication.
· Fixed account authentication.
· SMS authentication.
· WeChat official account authentication.
· WeChat Wi-Fi authentication.
· App authentication.
· Facebook authentication.
· Dumb terminal authentication.
· Guest authentication.
· Member authentication.
Configure general settings
1. Configure a portal authentication domain.
# Add an ISP domain named cloud and enter its view.
<Sysname> system-view
[Sysname] domain cloud
# Specify the authentication, authorization and accounting methods as none.
[Sysname-isp-cloud] authentication portal none
[Sysname-isp-cloud] authorization portal none
[Sysname-isp-cloud] accounting portal none
[Sysname-isp-cloud] quit
2. Configure cloud portal authentication.
# Add a portal Web server named cloud and specify its URL and type. (If the administrator configures wireless service in the Oasis platform, the configuration will be deployed to the device automatically.)
[Sysname] portal web-server cloud
[Sysname-portal-websvr-cloud] url http://oasisauth.h3c.com/portal/protocol
[Sysname-portal-websvr-cloud] server-type oauth
# Configure a match rule to redirect HTTP requests that carry the user agent string CaptiveNetworkSupport to the URL http://oasisauth.h3c.com/generate_404.
[Sysname-portal-websvr-cloud] if-match user-agent CaptiveNetworkSupport redirect-url http://oasisauth.h3c.com/generate_404
# Configure a match rule to redirect HTTP requests that carry the user agent string Dalvik/2.1.0(Linux;U;Android7.0;HUAWEI to the URL http://oasisauth.h3c.com/generate_404.
[Sysname-portal-websvr-cloud] if-match user-agent Dalvik/2.1.0(Linux;U;Android7.0;HUAWEI redirect-url http://oasisauth.h3c.com/generate_404
# Configure a temporary pass rule to allow user packets that contain user agent information Mozilla to pass and then redirect the packets destined for the URL http://captive.apple.com to URL http://oasisauth.h3c.com/portal/protocol.
[Sysname-portal-websvr-cloud] if-match original-url http://captive.apple.com user-agent Mozilla temp-pass redirect-url http://oasisauth.h3c.com/portal/protocol
# Configure a temporary pass rule to allow user packets that contain user agent information Mozilla to pass and then redirect the packets destined for the URL http://www.apple.com to URL http://oasisauth.h3c.com/portal/protocol.
[Sysname-portal-websvr-cloud] if-match original-url http://www.apple.com user-agent Mozilla temp-pass redirect-url http://oasisauth.h3c.com/portal/protocol
[Sysname-portal-websvr-cloud] quit
# Configure a temporary pass rule to temporarily allow user packets that access URL http://10.168.168.168 to pass.
[Sysname] portal web-server cloud
[Sysname-portal-websvr-cloud] if-match original-url http://10.168.168.168 temp-pass
# Enable the optimized captive-bypass feature for iOS users.
[Sysname-portal-websvr-cloud] captive-bypass ios optimize enable
[Sysname-portal-websvr-cloud] quit
# Enable direct portal authentication on service template cloud.
[Sysname] wlan service-template cloud
[Sysname-wlan-st-cloud] portal enable method direct
# Configure the authentication domain as cloud and specify portal Web server cloud as the cloud portal Web server for portal authentication.
[Sysname-wlan-st-cloud] portal domain cloud
[Sysname-wlan-st-cloud] portal apply web-server cloud
[Sysname-wlan-st-cloud] quit
# Enable portal temporary pass and set the temporary pass period to 20 seconds.
[Sysname] wlan service-template cloud
[Sysname-wlan-st-cloud] portal temp-pass period 20 enable
[Sysname-wlan-st-cloud] quit
# Add an HTTP-based local portal Web service and enter its view.
[Sysname] portal local-web-server http
[Sysname-portal-local-websvr-http] quit
# Add an HTTPS-based local portal Web service and enter its view.
[Sysname] portal local-web-server https
[Sysname-portal-local-websvr-https] quit
# Enable the HTTP and HTTPS services.
[Sysname] ip http enable
[Sysname] ip https enable
# Enable validity check on wireless portal clients.
[Sysname] portal host-check enable
# Enable logging for portal user logins and logouts.
[Sysname] portal user log enable
# Configure destination-based portal-free rule1 to allow portal users to access the DNS service without authentication. (This example uses the 114.114.114.114 255.255.255.255.)
[Sysname] portal free-rule 1 destination ip 114.114.114.114 255.255.255.255
# Configure destination-based portal-free rules 2 and 4 to allow portal users to access the DNS service without authentication.
[Sysname] portal free-rule 2 destination ip any udp 53
[Sysname] portal free-rule 3 destination ip any tcp 53
[Sysname] portal free-rule 4 destination ip any tcp 5223
# Configure destination-based portal-free rule 5 to allow portal users to access the Oasis authentication server without authentication.
[Sysname] portal free-rule 5 destination oasisauth.h3c.com
# Configure destination-based portal-free rules 10 to 22 to allow portal users to access the Oasis authentication server without authentication.
[Sysname] portal free-rule 10 destination short.weixin.qq.com
[Sysname] portal free-rule 11 destination mp.weixin.qq.com
[Sysname] portal free-rule 12 destination long.weixin.qq.com
[Sysname] portal free-rule 13 destination dns.weixin.qq.com
[Sysname] portal free-rule 14 destination minorshort.weixin.qq.com
[Sysname] portal free-rule 15 destination extshort.weixin.qq.com
[Sysname] portal free-rule 16 destination szshort.weixin.qq.com
[Sysname] portal free-rule 17 destination szlong.weixin.qq.com
[Sysname] portal free-rule 18 destination szextshort.weixin.qq.com
[Sysname] portal free-rule 19 destination isdspeed.qq.com
[Sysname] portal free-rule 20 destination wx.qlogo.cn
[Sysname] portal free-rule 21 destination wifi.weixin.qq.com
[Sysname] portal free-rule 22 destination open.weixin.qq.com
# Enable portal safe-redirect.
[Sysname] portal safe-redirect enable
# Specify HTTP request methods permitted by portal safe-redirect.
[Sysname] portal safe-redirect method get post
# Specify browser types permitted by portal safe-redirect.
[Sysname] portal safe-redirect user-agent Android
[Sysname] portal safe-redirect user-agent CFNetwork
[Sysname] portal safe-redirect user-agent CaptiveNetworkSupport
[Sysname] portal safe-redirect user-agent MicroMessenger
[Sysname] portal safe-redirect user-agent Mozilla
[Sysname] portal safe-redirect user-agent WeChat
[Sysname] portal safe-redirect user-agent iPhone
[Sysname] portal safe-redirect user-agent micromessenger
Configure app authentication
|
|
IMPORTANT: Execute commands in this section after you finish the settings in "Configure general settings" or "Appendix A Authentication commands for the device." |
To configure app authentication:
1. Create Web server cloud and specify the authentication URL for the portal Web server. In this example, the URL is http://oasisauth.h3c.com/portal/appauth.html.
<Sysname> system-view
[Sysname] portal web-server cloud
[Sysname-portal-websvr-cloud] url http://oasisauth.h3c.com/portal/appauth.html
2. Configure a temporary pass rule to temporarily allow user packets that access URL http://10.168.168.1 to pass and then redirect the packets to URL http://oasisauth.h3c.com/portal/app. The URLs are for illustration only.
[Sysname-portal-websvr-cloud] if-match original-url http://10.168.168.1 temp-pass redirect-url http://oasisauth.h3c.com/portal/app
Configure Facebook authentication
|
|
IMPORTANT: · Execute commands in this section after you finish the settings in "Configure general settings" or "Appendix A Authentication commands for the device." · Free-rule 38 might disable the app from displaying pictures. Please configure this rule as needed or contact Technical Support. |
# Configure destination-based portal-free rules to allow portal users who send an HTTP/HTTPS request that carries Facebook-related host names to access network resources without authentication.
<Sysname> system-view
[Sysname] portal free-rule 31 destination facebook.com
[Sysname] portal free-rule 32 destination m.facebook.com
[Sysname] portal free-rule 33 destination www.facebook.com
[Sysname] portal free-rule 34 destination graph.facebook.com
[Sysname] portal free-rule 35 destination connect.facebook.net
[Sysname] portal free-rule 36 destination static.xx.fbcdn.net
[Sysname] portal free-rule 37 destination staticxx.fbcdn.com
[Sysname] portal free-rule 38 destination scontent-hkg-3-1.xx.fbcdn.net
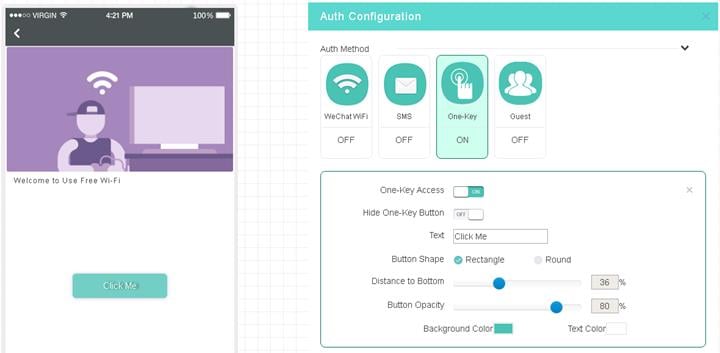
Configure one-key authentication
1.
Hover over the grid icon ![]() , and then
select Network Management.
, and then
select Network Management.
2. Select a site from the scenario menu, and then select Settings > ACs > Authentication from the navigation pane.
3. To add an authentication template, click Add on the Authentication Templates tab.
4.
To edit an authentication template, click
the Edit icon ![]() for that authentication template.
for that authentication template.
5.
To bind an authentication template to a
wireless service, click the Edit icon ![]() for that authentication template, select Yes from the Bind to Wireless Service field, and then click Apply. If the template has been bound to wireless service, skip this
step.
for that authentication template, select Yes from the Bind to Wireless Service field, and then click Apply. If the template has been bound to wireless service, skip this
step.
6.
Click the Draw icon ![]() for the target
authentication template.
for the target
authentication template.
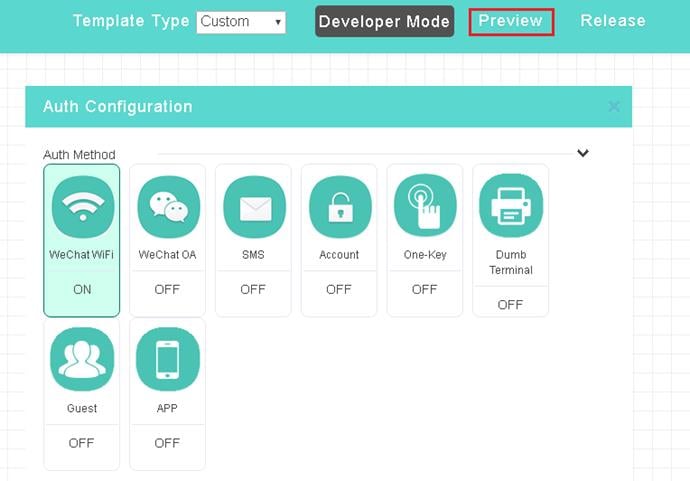
7. Click the One-Key tile in the Auth Configuration area, enable one-key authentication, and then configure other settings as needed.
8. Click OK or click Release in the upper right corner of the page.
Figure 1 Configuring one-key authentication

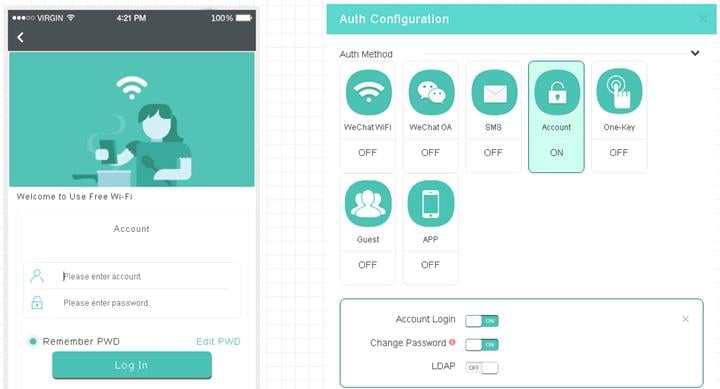
Configure fixed account authentication
Restrictions and guidelines
If you do not configure the validity period or configure it as 0, the account never expires.
If you select Bind MAC Address and do not enter any MAC addresses, clients that use the fixed account are not limited.
If you select Sent by Email, the system sends the account name and password to the specified email address. The number of email addresses cannot exceed 10 and must be separated by commas.
Procedure
1.
Hover over the grid icon ![]() , and then
select Network Management.
, and then
select Network Management.
2. Select a site from the scenario menu, and then select Settings > ACs > Users from the navigation pane.
3. Click the Fixed Accounts tab.
4. Click Add.
5. Configure fixed account information as required.
Figure 2 Adding a fixed account

6.
To add an authentication template, select Settings > ACs > Authentication from the navigation
pane, and then click Add on the Authentication Templates tab. To edit an authentication template, click the Edit icon ![]() for
that authentication template.
for
that authentication template.
7.
To bind an authentication template to a
wireless service, click the Edit icon ![]() for that authentication template, select Yes from the Bind to Wireless Service field, and then click Apply. If the template has been bound to wireless service, skip this
step.
for that authentication template, select Yes from the Bind to Wireless Service field, and then click Apply. If the template has been bound to wireless service, skip this
step.
8.
Click the Draw icon ![]() for the target
authentication template.
for the target
authentication template.
9. Click the Account tile in the Auth Configuration area, enable fixed account authentication, and then configure other settings as needed.
10. Disable other authentication methods.
11. Click OK or click Release in the upper right corner of the page.
Figure 3 Configuring fixed account authentication
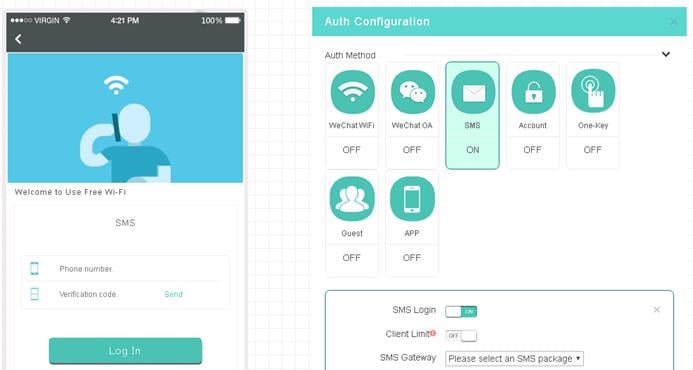
Configure SMS authentication
Restrictions and guidelines
To use SMS authentication, you must first purchase an SMS package from the Emay platform at www.emay.cn.
Procedure
1.
Hover over the grid icon ![]() , and then select Network Management.
, and then select Network Management.
2. Select a site from the scenario menu, and then select System > SMS Gateway from the navigation pane.
3.
To add an SMS gateway, click Add on the Emay SMS Platform tab. To edit an SMS gateway, click the Edit icon ![]() for that SMS
gateway.
for that SMS
gateway.
4. Configure the SMS gateway settings as needed.
An SMS signature is the beginning identifier part of the verification code.
Figure 4 Creating or editing an SMS gateway

5. Contact Emay customer service to perform the following tasks:
¡ Bind the IP address (139.217.27.153) of the Oasis domain (oasis.h3c.com) to the SMS package.
¡ Bind the IP address (139.217.11.74) of the Oasis domain (oasisauth.h3c.com) to the SMS package.
6.
To add an authentication template, select Settings > ACs > Authentication
from the navigation pane, and then click Add on the Authentication Templates tab. To edit an authentication template, click the Edit icon ![]() for that authentication template.
for that authentication template.
7.
To bind an authentication template to a
wireless service, click the Edit icon ![]() for that authentication template, select Yes from the Bind to Wireless Service field, and then click Apply. If the template has been bound to wireless service, skip this
step.
for that authentication template, select Yes from the Bind to Wireless Service field, and then click Apply. If the template has been bound to wireless service, skip this
step.
8.
Click the Draw icon ![]() for the
target authentication template.
for the
target authentication template.
9. Click the SMS tile in the Auth Configuration area, enable SMS authentication, and then configure other settings as needed.
10. Disable other authentication methods.
11. Click OK or click Release in the upper right corner of the page.
Figure 5 Configuring SMS authentication
Configure WeChat official account authentication
Restrictions and guidelines
Tenants must have a WeChat service account certified by Tencent.
Configure the WeChat official accounts platform
1. Use the applied WeChat service account to access the WeChat official accounts platform at https://mp.weixin.qq.com/.
Figure 6 Logging in to the service account
![]()
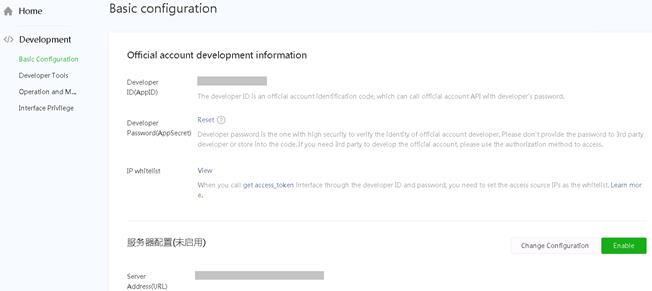
2. Select Development > Basic Configuration from the navigation pane.
a. On the page that opens, obtain the AppID and AppSecret.
After the AppSecret is enabled and generated, the WeChat official accounts platform will not store or display the AppSecret. Please save it properly.
Figure 7 Obtaining AppID and AppSecret
b. Add the IP addresses 139.217.7.53, 139.217.17.204, and 139.219.0.33 to the IP whitelists.
Figure 8 Adding an IP address to the whitelist

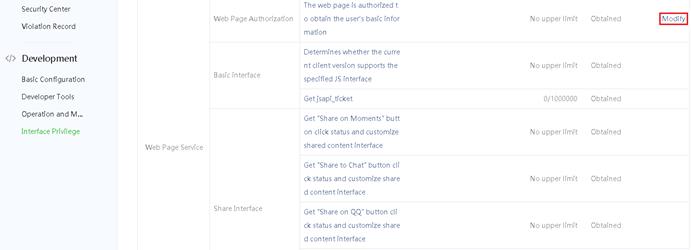
3. Select Development > Interface Privilege from the navigation pane, and then click Modify in the Web Page Authentication field.
Figure 9 Modifying Web page authentication
4. On the Function setting tab, click Set-up in the Webpage authentication domain name field.
Figure 10 Editing the Web page authenticate domain name

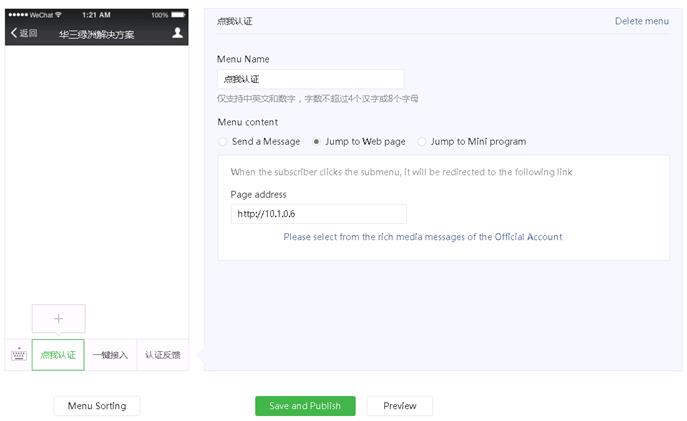
5. Select Function > Custom Menu from the navigation pane, click the add icon + , and then configure other settings as needed.
As a best practice, enter http://10.1.0.6 in in the Page address field.
Figure 11 Specifying a menu
Configure WeChat official account authentication
1. Select a site from the scenario menu, and then select Settings > ACs > Authentication from the navigation pane.
2.
To add an authentication template, click Add on the Authentication Templates tab. To edit an authentication template, click the Edit icon ![]() for that authentication template.
for that authentication template.
3.
To bind an authentication template to a
wireless service, click the Edit icon ![]() for that authentication template, select Yes from the Bind to Wireless Service field, and then click Apply. If the template has been bound to wireless service, skip this
step.
for that authentication template, select Yes from the Bind to Wireless Service field, and then click Apply. If the template has been bound to wireless service, skip this
step.
4.
Click the Draw icon ![]() for the
target authentication template.
for the
target authentication template.
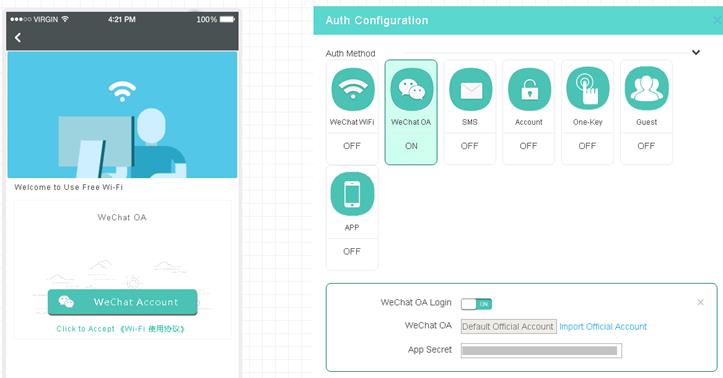
5. Click the WeChat OA tile in the Auth Configuration area, and then enable WeChat official account authentication.
6. Click Import Official Account and scan the QR code.
7. Enter the AppSecret.
8. Disable other authentication methods.
9. Click OK or click Release in the upper right corner of the page.
Figure 12 Configuring WeChat official account authentication
Configure WeChat Wi-Fi authentication
Restrictions and guidelines
· Tenants must have a WeChat official account, either an uncertified or certified service account or subscription account, and an online shop certified by Tencent and must make sure the WeChat Wi-Fi and shop mini program plug-ins have been enabled.
· Terminals to be authenticated must have logged in to WeChat and have been bound to their phone numbers.
· Some terminals such as Samsung and AGM terminals or some OS versions do not support this authentication method. If these terminals want to access the network, they will be authenticated by using one-key authentication.
· You can enable forced follow or redirection to WeChat mini program after authentication, but cannot configure both of them.
· This section configures portal-based WeChat Wi-Fi authentication. To configure WeChat Wi-Fi authentication through QR code scanning, see "Configure WeChat Wi-Fi authentication through QR code scanning."
Configure the WeChat official accounts platform
1. Use the official account to access WeChat Official Accounts Platform at https://mp.weixin.qq.com/.
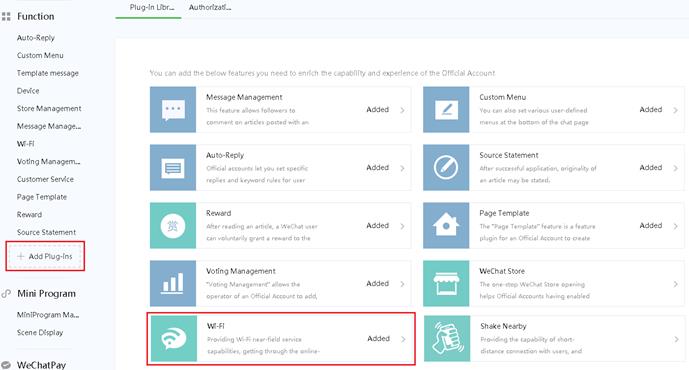
2. Click the Add Plug-ins button from the Function field to add a Wi-Fi plug-in.
Figure 13 Adding a Wi-Fi plug-in
3. From the navigation pane, select Function > Store Management, and then click the Create a new store button to add an online store.
Figure 14 Adding an online store

4. From the navigation pane, select Function > Wi-Fi, click the Add Device button on the Device Management tab, and then perform the following steps:
a. Select a store.
b. Select the Portal-authenticated device from the Device Type field.
Only the portal devices are supported.
c. Enter an SSID.
Figure 15 Adding a device

5. Select Development > Basic Configuration from the navigation pane.
a. On the page that opens, obtain the AppID and AppSecret.
After the AppSecret is enabled and generated, the WeChat official accounts platform will not store or display the AppSecret. Please save it properly.
Figure 16 Obtaining AppID and AppSecret

b. Add the IP addresses (139.217.7.53, 139.217.17.204 and 139.219.0.33) to the IP whitelists.
Figure 17 Adding an IP address to the whitelist

Configure WeChat Wi-Fi authentication
1. Select a site from the scenario menu, and then select Settings > ACs > Authentication from the navigation pane.
2.
To add an authentication template, click Add on the Authentication Templates tab. To edit an authentication template, click the Edit icon ![]() for that authentication template.
for that authentication template.
3.
To bind an authentication template to a
wireless service, click the Edit icon ![]() for that authentication template, select Yes from the Bind to Wireless Service field, and then click Apply. If the template has been bound to wireless service, skip this
step.
for that authentication template, select Yes from the Bind to Wireless Service field, and then click Apply. If the template has been bound to wireless service, skip this
step.
4.
Click the Draw icon ![]() for the
target authentication template.
for the
target authentication template.
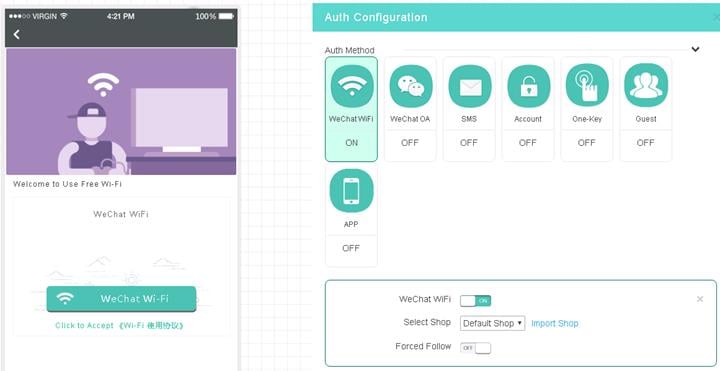
5. Click the WeChat Wi-Fi tile in the Auth Configuration area, and then enable WeChat Wi-Fi authentication.
6. Click Import Shop and scan the QR code.
Only the administrator of the official account can scan the QR code to authorize the official account.
7. Disable other authentication methods.
8. Click OK or click Release in the upper right corner of the page.
Figure 18 Configuring WeChat Wi-Fi authentication
Configure guest authentication
Restrictions and guidelines
After configuration, a guest can access the network only after the approver scans the QR code on the client and authorizes the client. The QR code is valid for five minutes. When the QR code expires, the guest must refresh the QR code.
Procedure
1.
Hover over the grid icon ![]() ,
and then select App Center.
,
and then select App Center.
2. Click the Accounts tab.
3. Click the Guest Accounts tab, click Add.
An approver is added after the approver scans the QR code, and then enters the verification code. If the approver is deleted, the Oasis platform automatically removes the permission from the approver.
Figure 19 Adding an approver
4. Select a site from the scenario menu, and then select Settings > ACs > Authentication from the navigation pane.
5.
To add an authentication template, click Add on the Authentication Templates tab. To edit an authentication template, click the Edit icon ![]() for that authentication template.
for that authentication template.
6.
To bind an authentication template to a
wireless service, click the Edit icon ![]() for that authentication template, select Yes from the Bind to Wireless Service field, and then click Apply. If the template has been bound to wireless service, skip this
step.
for that authentication template, select Yes from the Bind to Wireless Service field, and then click Apply. If the template has been bound to wireless service, skip this
step.
7.
Click the Draw icon ![]() for the
target authentication template.
for the
target authentication template.
8. Click the Guest tile in the Auth Configuration area, and then enable guest authentication.
9. Select approvers.
The Approvers field only displays the approvers authorized by this account and all its subaccounts. For tenants, the Approvers field displays the approvers authorized by all its subaccounts.
10. Disable other authentication methods.
11. Click OK or click Release in the upper right corner of the page.
Figure 20 Configuring guest authentication

Configure app authentication
With app authentication enabled, users will be redirected to a webpage to download an app for authentication.
Prerequisites
The operator must complete the following tasks:
· Develop a redirection page that provides a link for downloading the app and a link for opening the app.
· Add the key in the standard interface format for app authentication provided by the Oasis platform to the app.
Procedure
1.
Hover over the grid icon ![]() ,
and then select Network Management.
,
and then select Network Management.
2. Select a site from the scenario menu, and then select Settings > ACs > Authentication from the navigation pane.
3. To add an authentication template, click Add on the Authentication Templates tab.
4.
To edit an authentication template, click
the Edit icon ![]() for that authentication template.
for that authentication template.
5.
To bind an authentication template to a
wireless service, click the Edit icon ![]() for that authentication template, select Yes from the Bind to Wireless Service field, and then click Apply. If the template has been bound to a wireless service, skip this
step.
for that authentication template, select Yes from the Bind to Wireless Service field, and then click Apply. If the template has been bound to a wireless service, skip this
step.
6.
Click the Draw icon ![]() for the
target authentication template.
for the
target authentication template.
7. Click the APP tile in the Auth Configuration area, enable app authentication, specify the URL for redirection, and enter the key.
8. Click OK or click Release in the upper right corner of the page.
Figure 21 Configuring app authentication
Configure Facebook authentication
With Facebook authentication enabled, users will be redirected to the Facebook login page for authentication. They can access the network only after granting the Oasis platform to obtain his or her Facebook information (nickname, profile, and email information) from Facebook.
Prerequisites
Before configuring Facebook authentication, you must complete the following tasks on Facebook:
1. Create a Facebook app and obtain the app ID.
2. Enable client OAuth login and Web OAuth login, and enter https://oasiscloudportal.h3c.com as an OAuth redirect URI.
Procedure
1.
Hover over the grid icon ![]() ,
and then select Network Management.
,
and then select Network Management.
2. Select a site from the scenario menu, and then select Settings > ACs > Authentication from the navigation pane.
3. To add an authentication template, click Add on the Authentication Templates tab.
4.
To edit an authentication template, click
the Edit icon ![]() for that authentication template.
for that authentication template.
5.
To bind an authentication template to a
wireless service, click the Edit icon ![]() for that authentication template, select Yes from the Bind to Wireless Service field, and then click Apply. If the template has been bound to a wireless service, skip this
step.
for that authentication template, select Yes from the Bind to Wireless Service field, and then click Apply. If the template has been bound to a wireless service, skip this
step.
6.
Click the Draw icon ![]() for the
target authentication template.
for the
target authentication template.
7. Click the Facebook tile in the Auth Configuration area, enable authentication via Facebook, enter the App ID, and disable all the other authentication methods.
8. Click OK or click Release in the upper right corner of the page.
Figure 22 Configuring Facebook authentication
Configure member authentication
With member authentication enabled, members can access the network by entering his or her phone number on the authentication page. Non-members must register on the authentication page first and then access the network as members.
Procedure
1.
Hover over the grid icon ![]() ,
and then select Network Management.
,
and then select Network Management.
2. Select a site from the scenario menu, and then select Settings > ACs > Authentication from the navigation pane.
3. To add an authentication template, click Add on the Authentication Templates tab.
4.
To edit an authentication template, click
the Edit icon ![]() for that authentication template.
for that authentication template.
5.
To bind an authentication template to a
wireless service, click the Edit icon ![]() for that authentication template, select Yes from the Bind to Wireless Service field, and then click Apply. If the template has been bound to a wireless service, skip this
step.
for that authentication template, select Yes from the Bind to Wireless Service field, and then click Apply. If the template has been bound to a wireless service, skip this
step.
6.
Click the Draw icon ![]() for the
target authentication template.
for the
target authentication template.
7. Click the Member Authentication tile in the Auth Configuration area, enable member authentication, configure other parameters as needed, and disable all the other authentication methods.
8. Click OK or click Release in the upper right corner of the page.
Figure 23 Configuring member authentication

Configure combined authentication
Restrictions and guidelines
Only the following authentication methods can be used together:
· Fixed account authentication.
· SMS authentication.
· WeChat official account authentication.
· WeChat Wi-Fi authentication.
· Facebook authentication.
· Member authentication.
As a best practice, do not use the WeChat official account authentication with other authentication methods.
A user can access the network as long as the user passes one authentication.
Procedure
1. Configure settings on the device as described in "Configure settings on the device" if the device software version is below 5405.
2. Configure the WeChat official accounts platform as described in "Configure WeChat official account authentication" and "Configure WeChat Wi-Fi authentication" if the WeChat official account authentication or WeChat Wi-Fi authentication is used.
3. Configure a minimum of two authentication methods. (Details not shown.)
Configure dumb terminal authentication
Restrictions and guidelines
If an account group contains accounts that have been authenticated, changing the validity period of the account group will change the validity period of all the accounts in the group.
If you configure the validity period as 0, the account never expires.
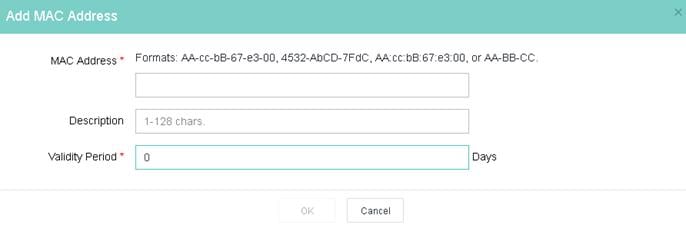
You can enter the first three bytes to add MAC addresses in bulk. The validity period configuration for a complete MAC address and that for a three-byte MAC address are not mutually exclusive. Assume that you add MAC addresses that start with AA-BB-CC and specify a 5-day validity period and then add MAC address AA-BB-CC-11-22-33 and specify a 10-day validity period. The validity periods of dumb terminals with a MAC address of AA-BB-CC-11-22-33 and a MAC address that starts with AA-BB-CC are 10 and 5 days, respectively.
Procedure
1.
Hover over the grid icon ![]() , and then
select App Center.
, and then
select App Center.
2. Click the Accounts tab.
3. On the Dumb Terminal Accounts tab, click Edit Account Group.
4. Click Add.
5. Enter the required information and then click OK.
Figure 24 Adding an account group
6. Select an account group and then click Add.
7. Enter a MAC address in the required format.
Figure 25 Adding a MAC address
8. Click the Authentication Templates tab.
9.
To add an authentication template, click Add. To edit an
authentication template, click the Edit icon ![]() for that
authentication template.
for that
authentication template.
10.
Click the Draw icon ![]() for the target
authentication template. You are placed on the Login tab.
for the target
authentication template. You are placed on the Login tab.
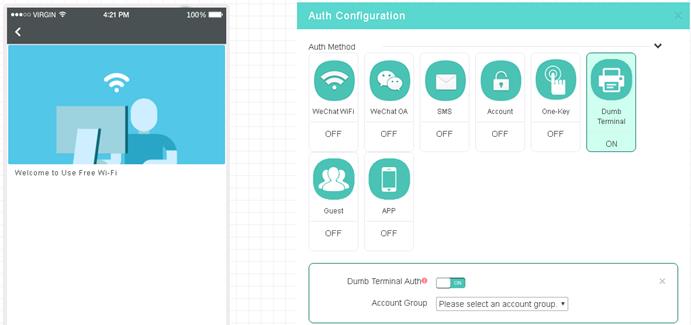
11. Click the Dumb Terminal tile in the Auth Configuration area, and then enable dumb terminal authentication.
12. Select an account group.
13. Click OK or click Release in the upper right corner of the page.
Figure 26 Configuring dumb terminal authentication
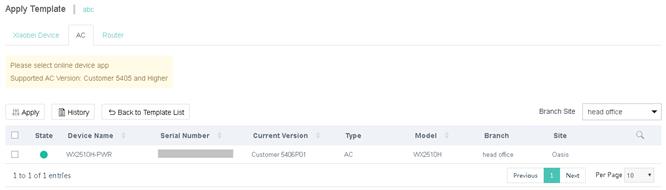
14. To deploy a template, perform the following steps:
a.
Click the Deploy Template
icon ![]() for that
authentication template.
for that
authentication template.
b. Click the ACs tab.
c. Select a branch or site.
d. Select an AC and then click Apply.
If no devices are displayed, please check the device version.
Figure 27 Deploying a template
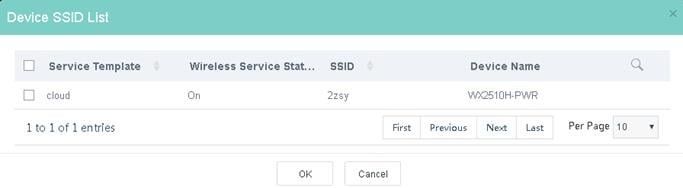
a. Select a service template or an SSID, and then click OK.
Figure 28 Selecting a service template
15. Enable MAC-triggered free authentication on the device. For more information, see "Configure MAC-trigger authentication."
Configure bulk authentication
Perform this task to deploy authentication settings in bulk.
Restrictions and guidelines
The configuration of a bulk authentication
template takes precedence over that of a non-bulk authentication template. For
the non-bulk authentication template to take effect, click the Edit icon ![]() for that authentication template, and then click
Apply.
for that authentication template, and then click
Apply.
Before deploying the configuration in bulk, make sure the following requirements are met:
· The devices where bulk authentication is deployed are online. If a device is offline, the deployment fails. The device will load the most recent deployed configurations at start up.
· The software version must be 5405 or higher.
· The wireless service name is the same as the portal Web server.
Procedure
1.
Hover over the grid icon ![]() , and then
select App Center.
, and then
select App Center.
2. On the Authentication Templates tab, click Add.
3.
Click the Draw icon ![]() for the target
authentication template. For the detailed configuration procedures of different
authentication methods, see "Configure basic Oasis authentication settings."
for the target
authentication template. For the detailed configuration procedures of different
authentication methods, see "Configure basic Oasis authentication settings."
Figure 29 Configuring bulk authentication
4. To deploy a template, perform the following steps:
a.
Click the Deploy Template
icon ![]() for that
authentication template.
for that
authentication template.
b. Click the ACs tab.
c. Select a branch or site.
d. Select an AC and then click Apply.
If no devices are displayed, please check the device version.
Figure 30 Deploying a template

Customize an authentication page
You can configure the landing page, login page, login success page, and home page and can push or disable the landing page or login success page as needed.
Restrictions and guidelines
The picture size cannot exceed 1 M. As a best practice, set the picture size to be in the range of 100 KB to 200 KB. Only JPG, JPEG, BMP, PNG, GIF, and SVG formats are allowed.
As a best practice to avoid affecting the loading speed of the page, do not add too many controls.
Procedure
1.
Hover over the grid icon ![]() , and then
select App Center.
, and then
select App Center.
2.
On the Authentication Templates tab, click
the Draw icon ![]() for the target authentication template.
for the target authentication template.
3. Configure the following settings as shown in Figure 31:
¡ Logo—The aspect ratio must be 1:1. The picture will be automatically cut into a circle. You can enter a shop name with a length of less than 12 characters.
¡ Background—The aspect ratio must be 3:5.
¡ Carousel—The aspect ratio must be 11:5. Two or three pictures of the same height are required.
¡ Picture—The aspect ratio must be 11:5. The description for the picture cannot exceed 48 characters.
¡ Video—The video size cannot exceed 1 M. Only MP4, WEBM, and OGG formats are allowed.
¡ Text—You can edit the font, font size, bold type, and font color.
Figure 31 Custom template description

4. To configure the homepage, click the Home tab, and then select Use Custom Link.
5. Enter a custom link and then click Upload.
6. To preview the link, click Preview in the upper right corner of the page.
Figure 32 Previewing the configuration change
7. Click Release in the upper right corner of the page.
The homepage pushed to users during portal authentication will be replaced by the page redirected by this custom link.
Figure 33 Configuring the custom template

Configure advanced Oasis authentication settings
The Oasis platform provides advanced authentication settings to simplify authentication management, reduce cost, and optimize market promotion. Table 3 describes available advanced features for each authentication method. You can configure these settings as needed.
Table 3 Advanced Oasis authentication features
|
Authentication method |
Advanced features |
|
One-key authentication |
Captive-bypass Hiding and customizing one-key authentication button Internet access settings Free authentication Inter-site and inter-SSID re-authentication Internet access control Developer mode Domain name whitelist and blacklist Viewing and exporting history of authentication configuration deployment |
|
Fixed-account authentication |
Captive-bypass Bulk management of fixed accounts Self-service password change Collaboration with LDAP server Changing visual effects of the login page Internet access settings Free authentication Inter-site and inter-SSID re-authentication Internet access control Developer mode Domain name whitelist and blacklist Viewing and exporting history of authentication configuration deployment |
|
SMS authentication |
Captive-bypass SMS gateway Client limit Remembering phone numbers Setting validity period of verification codes Changing visual effect settings of the login page Internet access settings Free authentication Inter-site and inter-SSID re-authentication Internet access control Developer mode Domain name whitelist and blacklist Viewing and exporting history of authentication configuration deployment |
|
WeChat official account authentication |
Captive-bypass Changing visual effect settings of the login page Internet access settings Free authentication Inter-site and inter-SSID re-authentication Internet access control Developer mode Domain name whitelist and blacklist Viewing and exporting history of authentication configuration deployment |
|
WeChat Wi-Fi |
Captive-bypass WeChat Wi-Fi authentication through QR code scanning Customizing Wi-Fi name Forced follow WeChat mini program redirection Log-off upon unfollow Changing visual effect settings of the login page Internet access settings Free authentication Inter-site and inter-SSID re-authentication Internet access control Developer mode Domain name whitelist and blacklist Viewing and exporting history of authentication configuration deployment |
|
Guest authentication |
Captive-bypass Internet access settings Free authentication Inter-site and inter-SSID re-authentication Internet access control Developer mode Domain name whitelist and blacklist Viewing and exporting history of authentication configuration deployment |
|
App authentication |
Captive-bypass Internet access settings Internet access control Developer mode Domain name whitelist and blacklist Viewing and exporting history of authentication configuration deployment |
|
Facebook authentication |
Captive-bypass Changing visual effect settings of the login page Internet access settings Inter-site and inter-SSID re-authentication Internet access control Developer mode Domain name whitelist and blacklist Viewing and exporting history of authentication configuration deployment |
|
Member authentication |
Captive-bypass Changing visual effect settings of the login page Internet access settings Inter-site and inter-SSID re-authentication Internet access control Developer mode Domain name whitelist and blacklist Viewing and exporting history of authentication configuration deployment |
|
Dumb terminal authentication |
Captive-bypass Management of dumb terminal account groups Internet access control Developer mode Domain name whitelist and blacklist Viewing and exporting history of authentication configuration deployment |
Enable the captive-bypass feature
Typically, the device pushes the authentication page to a client automatically when the client attempts to access a portal authentication network. The captive-bypass feature enables the device to push the portal authentication page to the client only when the user launches a browser.
To enable the captive-bypass feature, you must perform the following steps on the device:
1. Enter system view.
system-view
2. Enter portal Web server view of Web server cloud.
portal web-server cloud
3. Enable the captive-pass feature.
captive-bypass enable
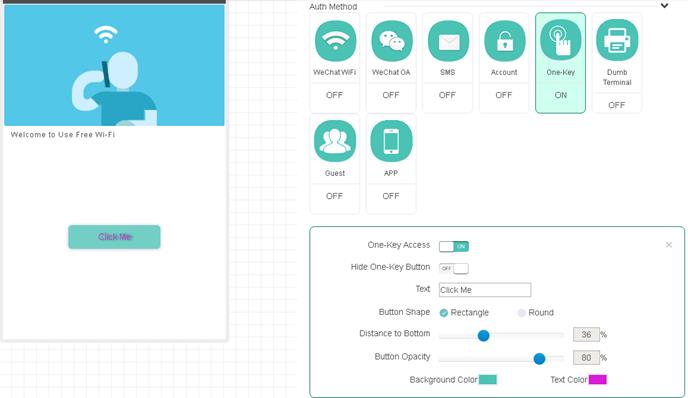
Hide or customize the one-key authentication button
Perform this task to hide the one-key authentication button or change the button style. If the button is hidden, users pass the authentication automatically after the countdown timer on the login page expires.
Restrictions and guidelines
You can change the button style only when the button is not hidden.
Procedure
1.
Hover over the grid icon ![]() , and then
select Network Management.
, and then
select Network Management.
2. Select a site from the scenario menu, and then select Settings > ACs > Authentication from the navigation pane.
3.
Click the Draw icon ![]() for the target
authentication template.
for the target
authentication template.
4. Click the One-Key tile in the Auth Configuration area, and then hide or customize the button as needed.
Manage fixed accounts
Perform this task to delete, import, or export fixed accounts in bulk.
To manage fixed accounts:
1.
Hover over the grid icon ![]() , and then select Network Management.
, and then select Network Management.
2. Select a site from the scenario menu, and then select Settings > ACs > Users from the navigation pane.
3. Click the Fixed Accounts tab.
4. To delete fixed accounts, select the target fixed accounts and then click Delete.
5. To import fixed accounts, click Import, download the template file and fill in the file as required, and then upload the template file.
6. To export fixed accounts, click Export.
Enable self-service password change
This feature enables users to change passwords at login. With this feature disabled, only the administrators can change the passwords of fixed accounts.
To enable self-service password change:
1.
Hover over the grid icon ![]() , and then select Network Management.
, and then select Network Management.
2. Select a site from the scenario menu, and then select Settings > ACs > Authentication from the navigation pane.
3.
Click the Draw icon ![]() for the target
authentication template.
for the target
authentication template.
4. Click the Account tile in the Auth Configuration area.
5. Enable Change Password.
Enable collaboration with an LDAP server for fixed account verification
Perform this task to enable the Oasis platform to report usernames and passwords to the LDAP server for verification when users attempt to access the WLAN by using fixed accounts. This frees network administrators from importing account information from the LDAP server to the Oasis platform.
Restrictions and guidelines
To use this feature, make sure the LDAP server has been configured.
Procedure
1.
Hover over the grid icon ![]() , and then
select Network Management.
, and then
select Network Management.
2. Select a site from the scenario menu, and then select Settings > ACs > Authentication from the navigation pane.
3.
Click the Draw icon ![]() for the target
authentication template.
for the target
authentication template.
4. Click the Account tile in the Auth Configuration area.
5. Enable LDAP and configure LDAP settings as needed.
6. Click LDAP Config Verification to verify the LDAP settings.
Configure SMS gateways
To use SMS authentication or enable SMS-only for first login, you must first purchase an SMS package and create an SMS gateway.
Restrictions and guidelines
If a default SMS gateway has been configured, SMS authentication uses the default SMS gateway.
You can use an SMS package to create multiple SMS gateways for different WLANs. These gateways use the same serial number, key, and password.
Procedure
1.
Hover over the grid icon ![]() , and then
select Network Management.
, and then
select Network Management.
2. Select a site from the scenario menu, and then select System > SMS Gateway from the navigation pane.
3. On the Emay SMS Platform tab, configure SMS gateways as needed.
Enable client limit
With this feature enabled, a phone number can be bound to only one client. If multiple clients using the same phone number come online, only the most recent one can stay online.
To enable client limit:
1.
Hover over the grid icon ![]() , and then
select Network Management.
, and then
select Network Management.
2. Select a site from the scenario menu, and then select Settings > ACs > Authentication from the navigation pane.
3.
Click the Draw icon ![]() for the target
authentication template.
for the target
authentication template.
4. Click the SMS tile in the Auth Configuration area.
5. Enable Client Limit.
Remember phone numbers
This feature enables users to use phone numbers that have passed SMS authentication to re-access the WLAN without being authenticated again within the specified period. This saves short message resources.
To remember phone numbers:
1.
Hover over the grid icon ![]() , and then
select Network Management.
, and then
select Network Management.
2. Select a site from the scenario menu, and then select Settings > ACs > Authentication from the navigation pane.
3.
Click the Draw icon ![]() for the target
authentication template.
for the target
authentication template.
4. Click the SMS tile in the Auth Configuration area.
5. Enable Remember Phone No. and specify the maximum period that a phone number can be remembered.
Set the validity period of verification codes
Verification codes sent to a phone number within the validity period are the same.
To set the validity period of verification codes:
1.
Hover over the grid icon ![]() , and then
select Network Management.
, and then
select Network Management.
2. Select a site from the scenario menu, and then select Settings > ACs > Authentication from the navigation pane.
3.
Click the Draw icon ![]() for the target
authentication template.
for the target
authentication template.
4. Click the SMS tile in the Auth Configuration area.
5. Set the verification code validity.
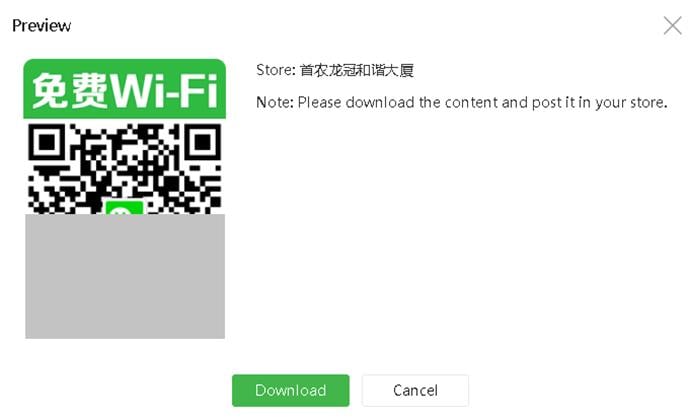
Configure WeChat Wi-Fi authentication through QR code scanning
With this feature configured, clients can pass WeChat Wi-Fi authentication simply by using WeChat to scan a specific QR code.
Restrictions and guidelines
For this feature to take effect, configure portal-based WeChat Wi-Fi authentication and disable the captive-bypass feature. For more information, see "Configure WeChat Wi-Fi authentication" and "Enable the captive-bypass feature."
As a best practice for easy configuration, obtain the QR code from a third-party website.
Configure the portal redirection feature on the device
# Configure a match rule to redirect HTTP requests destined for the URL http://o2o.gtimg.com/wifi/echo to the URL http://oasisauth.h3c.com/generate_404.
<Sysname> system-view
[Sysname] portal web-server cloud
[Sysname-portal-websvr-cloud] if-match original-url http://o2o.gtimg.com/wifi/echo redirect-url http://oasisauth.h3c.com/generate_404
Obtain the QR code from Tencent
1. Access WeChat Official Accounts Platform at https://mp.weixin.qq.com/.
2. From the navigation pane, select Function > Wi-Fi.
3. Click the User Connect tab, and then click Configure now in the QR code area.
Figure 34 User Connect tab

4. Click the Details button for the target shop.
5. Click the Preview button and then click Download.
Figure 35 Downloading the QR code
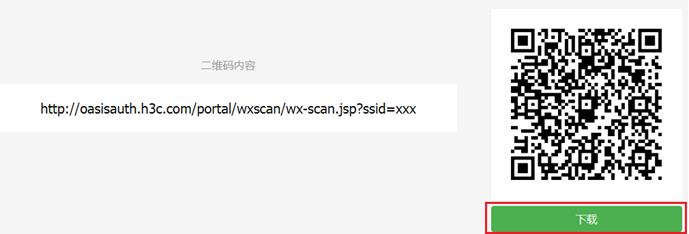
Obtain the QR code from a third-party website
This section uses website https://cli.im/ as an example.
To obtain the QR code from a third-party website:
1. Access the QR code generation website.
2. Enter http://oasisauth.h3c.com/portal/wxscan/wx-scan.jsp?ssid=ssid in the text area and click the button below to generate a QR code. The ssid represents the SSID of the shop.
Figure 36 Generating the QR code

3. Download the QR code.
Figure 37 Downloading the QR code
Set the WeChat Wi-Fi name
Restrictions and guidelines
This feature is available only for authentication templates configured in the App Center.
By default, the Wi-Fi name is h3c-lvzhou.
Procedure
1.
Hover over the grid icon ![]() ,
and then select App Center.
,
and then select App Center.
2.
On the Authentication Templates tab, click
the Draw icon ![]() for the target authentication template.
for the target authentication template.
3. Click the WeChat Wi-Fi tile in the Auth Configuration area.
4. Enable WeChat Wi-Fi and set the Wi-Fi name.
Enable forced follow
With this feature enabled, users must follow the WeChat official account to pass WeChat Wi-Fi authentication.
Restrictions and guidelines
This feature is unavailable when users use PCs to access the WLAN.
You cannot configure both this feature and mini program redirection.
Procedure
1.
Hover over the grid icon ![]() ,
and then select Network Management.
,
and then select Network Management.
2. Select a site from the scenario menu, and then select Settings > ACs > Authentication from the navigation pane.
3.
Click the Draw icon ![]() for the
target authentication template.
for the
target authentication template.
4. Click the WeChat Wi-Fi tile in the Auth Configuration area.
5. Enable Forced Follow.
Redirect users to a WeChat mini program
With this feature enabled, the system redirects users to a WeChat mini program after the users pass WeChat Wi-Fi authentication.
Users can click the banner at the top of the WeChat Chats page to re-access the mini program, as shown in Figure 38.

Restrictions and guidelines
Make sure the mini program is available before you enable this feature.
You cannot configure both this feature and forced follow.
Obtain the original ID of the mini program
1. Access WeChat Official Accounts Platform at https://mp.weixin.qq.com/.
2. From the navigation pane, select Mini Program > MiniProgram Manage.
3. Click Add and then bind the mini program to the official account.
Figure 39 Binding a mini program
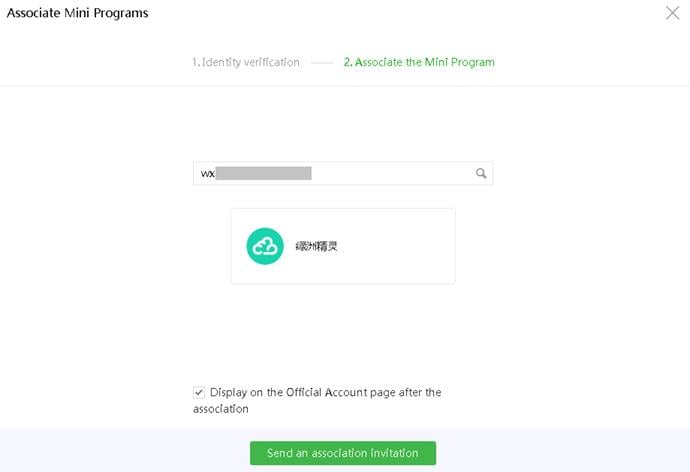
4. On the MiniProgram Manage page, hover over the icon of the bound mini program and click Details to view the original ID of the mini program.
Figure 40 Viewing the original ID of the mini program

Configure mini program redirection on the Oasis platform
Restrictions and guidelines
Change the mini program path when the homepage of the mini program changes.
Procedure
1.
Hover over the grid icon ![]() ,
and then select Network Management.
,
and then select Network Management.
2. Select a site from the scenario menu, and then select Settings > ACs > Authentication from the navigation pane.
3.
Click the Draw icon ![]() for the
target authentication template.
for the
target authentication template.
4. Click the WeChat Wi-Fi tile in the Auth Configuration area.
5. Enable Mini Program. This function is available only when Forced Follow is disabled.
6. Enter the mini program original ID and the mini program path.
Enable log-off upon unfollow
This feature enables the system to log off users that come online through WeChat Wi-Fi and unfollow the WeChat official account during association.
To enable log-off upon unfollow:
1.
Hover over the grid icon ![]() ,
and then select Network Management.
,
and then select Network Management.
2. Select a site from the scenario menu, and then select Settings > ACs > Authentication from the navigation pane.
3.
Click the Draw icon ![]() for the
target authentication template.
for the
target authentication template.
4. Click the WeChat Wi-Fi tile in the Auth Configuration area.
5. Enable Forced Follow and then enable Log-Off upon Unfollow.
Change visual effect settings of the login page
Perform this task to customize the background color, background opacity, and text color on the login page.
Restrictions and guidelines
|
|
CAUTION: Restoring default settings will remove all user-defined visual effect settings and the restore operation is irreversible. Please use this feature with caution. |
Visual effect settings of authentication methods take effect only when multiple authentication methods are enabled.
Procedure
1.
Hover over the grid icon ![]() ,
and then select Network Management.
,
and then select Network Management.
2. Select a site from the scenario menu, and then select Settings > ACs > Authentication from the navigation pane.
3.
Click the Draw icon ![]() for the
target authentication template.
for the
target authentication template.
4. Click to expand the Login Style menu in the Auth Configuration area.
5. Configure the background color, background opacity, and text color as needed.
The adjustment will be displayed in the preview area in real time. To restore the default visual effect settings, click Restore Default.
Configure Internet access settings
Procedure
1.
Hover over the grid icon ![]() ,
and then select Network Management.
,
and then select Network Management.
2. Select a site from the scenario menu, and then select Settings > ACs > Authentication from the navigation pane.
3.
Click the Draw icon ![]() for the
target authentication template.
for the
target authentication template.
4. Click to expand the Advanced Settings menu in the Auth Configuration area.
5. Configure Internet access settings as needed.
Parameters
· Session Timeout: Maximum continuous online duration of a client upon one authentication. A client will be logged off when its continuous online duration exceeds the timeout. The session timeout cannot be larger than the daily online duration.
· Daily Online Duration: Maximum online duration of a client for a day. A client will be logged off when its online duration for a day exceeds the limit. The daily online duration cannot be smaller than the session timeout.
· Minimum Traffic and Idle Timer: Logs off a client if its traffic within an idle timer fails to reach the minimum traffic threshold. Setting the idle timer to 0 disables the idle timer feature.
|
|
NOTE: As a best practice, set the idle timer to a value no larger than half of the clients' IP address lease, enabling entries of offline clients to be deleted in time. |
· Client Rate Limit: Limited rate of uplink and downlink client traffic. This feature is supported in versions higher than 5417P01.
· HTTPS for Landing and Login: Use HTTPS sessions for the Landing and Login page.
· Permit PC: Permit PCs to access the WLAN. Facebook authentication does not support this feature.
· SMS-Only for First Login: Require users to pass SMS authentication at the first login. If a user passes SMS authentication, the system generates a phone number and MAC address binding entry for the user. The administrators can view the entry in the client list in which phone numbers are used as usernames. App authentication and Facebook authentication do not support this feature.
Manage dumb terminal account groups
Perform this task to create, delete, or edit dumb terminal account groups and import or export dumb terminal accounts.
If you enable dumb terminal authentication and specify an account group, only dumb terminals in the group can access the WLAN.
To manage dumb terminal account groups:
1.
Hover over the grid icon ![]() ,
and then select App Center.
,
and then select App Center.
2. Click the Accounts tab.
3. On the Dumb Terminal Accounts tab, configure dumb terminal account groups.
Configure portal automated authentication
This feature allows users that have been authenticated to access the network without re-authentication within the auth-free period. The following modes are available:
· Portal redirection—In this mode, users must run a browser to trigger automatic portal authentication. This mode supports pushing ads to clients.
· MAC-trigger—In this mode, users can access the WLAN without running a browser. This mode does not support pushing ads to clients.
Configure portal redirection authentication
1.
Hover over the grid icon ![]() ,
and then select Network Management.
,
and then select Network Management.
2. Select a site from the scenario menu, and then select Settings > ACs > Authentication from the navigation pane.
3.
Click the Draw icon ![]() for the
target authentication template.
for the
target authentication template.
4. Click to expand the Advanced Settings menu in the Auth Configuration area.
5. Click the Auth-Free tab and configure the Free Auth feature.
Configure MAC-trigger authentication
1. Configure portal-free authentication. For more information, see "Configure portal redirection authentication."
2. Configure MAC-trigger authentication on the device:
a. Configure the MAC binding server.
|
|
NOTE: Perform this step only in versions earlier than 5405. Version 5405 and later support automatic authentication setting deployment to devices and do not need manual configuration of commands in this step. |
# Create a MAC binding server and enter its view.
<Sysname> system-view
[Sysname] portal mac-trigger-server cloud
# Enable cloud MAC-trigger authentication. Set the maximum number of MAC binding query attempts to 2 and the query interval to 3 seconds.
[Sysname-portal-mac-trigger-server-cloud] cloud-binding enable
[Sysname-portal-mac-trigger-server-cloud] binding-retry 2 interval 3
[Sysname-portal-mac-trigger-server-cloud] quit
b. Apply MAC binding server cloud to service template cloud.
[Sysname] wlan service-template cloud
[Sysname-wlan-st-cloud] portal apply mac-trigger-server cloud
Configure inter-site and inter-SSID re-authentication
This feature allows clients that have been authenticated to roam between wireless services associated with different sites or different SSIDs for the same site without re-authentication. These wireless services must use the same authentication template or have the same SSID.
Restrictions and guidelines
This feature is available only for authentication templates configured in the App Center.
Procedure
1.
Hover over the grid icon ![]() , and then
select App Center.
, and then
select App Center.
2.
Click the Draw icon ![]() for the target
authentication template.
for the target
authentication template.
3. Click to expand the Advanced Settings menu in the Auth Configuration area.
4. Click the Auth-Free tab and enable Free Auth.
5. Configure inter-site and inter-SSID re-authentication.
Configure Internet access control
Perform this task to specify the time ranges during which users are allowed to access the WLAN.
Restrictions and guidelines
Internet access control is on a per-hour basis. You can specify a maximum of five time ranges for a day. To specify a time range that ends at 24 o'clock, set the end time to 00. If you set a time range to 00 to 00 for a day, users can access the Internet at any time that day.
Procedure
1.
Hover over the grid icon ![]() , and then
select Network Management.
, and then
select Network Management.
2. Select a site from the scenario menu, and then select Settings > ACs > Authentication from the navigation pane.
3.
Click the Draw icon ![]() for the target
authentication template.
for the target
authentication template.
4. Click to expand the Advanced Settings menu in the Auth Configuration area.
5. Click the Internet Access Control tab and specify the time ranges.
Configure the developer mode
|
|
CAUTION: Editing the codes of existing functions might disable Oasis authentication. Please use this feature with caution. |
The developer mode allows users to modify the source codes of an authentication template for customization purposes.
Procedure
1.
Hover over the grid icon ![]() , and then
select Network Management.
, and then
select Network Management.
2. Select a site from the scenario menu, and then select Settings > ACs > Authentication from the navigation pane.
3.
Click the Draw icon ![]() for the target
authentication template.
for the target
authentication template.
4. Click Developer Mode in the upper right corner.
Configure the domain name whitelist and blacklist
Restrictions and guidelines
This feature takes effect only when wireless authentication is configured.
Procedure
1.
Hover over the grid icon ![]() , and then
select Network Management.
, and then
select Network Management.
2. Select a site from the scenario menu, and then select Settings > ACs > Authentication from the navigation pane.
3. Click the Domain Name Whitelist or Domain Name Blacklist tab to configure the whitelist or blacklist.
View or export history of authentication template deployment
Perform this task to view the history of all authentication template deployment or deployment in the current day, past 7 days, or past 30 days.
To view or export history of authentication template deployment:
1.
Hover over the grid icon ![]() , and then
select App Center.
, and then
select App Center.
2.
On the Authentication Templates tab, click the Apply icon ![]() for the target authentication template.
for the target authentication template.
3. Click the ACs tab to view the deployment history for an AC.
Configure Oasis authentication with a Xiaobei router as the authenticator
Configure basic settings
Prerequisites
Before configuring Oasis platform authentication, complete the following tasks:
· Connect the device to the Oasis platform.
For more information, see H3C Oasis Platform Deployment Guide.
· Complete the VLAN and DHCP settings.
Configure one-key authentication
1.
Hover over the grid icon ![]() , and then
select Network Management.
, and then
select Network Management.
2. Select a site from the scenario menu, and then select Settings > Xiaobei > WLAN Settings from the navigation pane.
3. Select the target Xiaobei router in the upper right corner of the page.
4.
On Authentication Templates tab, click
the Authentication button ![]() for that commercial
Wi-Fi. You are placed on the Login tab.
for that commercial
Wi-Fi. You are placed on the Login tab.
5. Click the One-Key tile in the Auth Configuration area, enable one-key authentication, and then configure other settings as needed.
6. Click OK or click Release in the upper right corner of the page.
Figure 41 Configuring one-key authentication
Configure SMS authentication
Restrictions and guidelines
To use SMS authentication, you must first purchase an SMS package from the Emay platform at www.emay.cn.
Procedure
1.
Hover over the grid icon ![]() , and then select Network Management.
, and then select Network Management.
2. Select a site from the scenario menu, and then select System > SMS Gateway from the navigation pane.
3.
To add an SMS gateway, click Add on the Emay SMS Platform
tab. To edit an SMS gateway, click the Edit icon ![]() for that SMS gateway.
for that SMS gateway.
4. Configure the SMS gateway settings as needed.
An SMS signature is the beginning identifier part of the verification code.
Figure 42 Creating or editing an SMS gateway

5. Contact Emay customer service to perform the following tasks:
¡ Bind the IP address (139.217.27.153) of the Oasis domain (oasis.h3c.com) to the SMS package.
¡ Bind the IP address (139.217.11.74) of the Oasis domain (oasisauth.h3c.com) to the SMS package.
6. Select Settings > Xiaobei > WLAN Settings from the navigation pane.
7. Select the target Xiaobei router in the upper right corner of the page.
8.
On Authentication
Templates tab, click the Authentication button ![]() for that commercial Wi-Fi. You are placed
on the Login tab.
for that commercial Wi-Fi. You are placed
on the Login tab.
9. Click the SMS tile in the Auth Configuration area, enable SMS authentication, and then configure other settings as needed.
10. Disable other authentication methods.
11. Click OK or click Release in the upper right corner of the page.
Figure 43 Configuring SMS authentication

Configure WeChat Wi-Fi authentication
Restrictions and guidelines
· Tenants must have a WeChat official account, either an uncertified or certified service account or subscription account, and an online shop certified by Tencent and must make sure the WeChat Wi-Fi and shop mini program plug-ins have been enabled.
· Terminals to be authenticated must have logged in to WeChat and have been bound to their phone numbers.
· Some terminals such as Samsung and AGM terminals or some OS versions do not support this authentication method. If these terminals want to access the network, they will be authenticated by using one-key authentication.
· You can enable forced follow or redirection to WeChat mini program after authentication, but cannot configure both of them.
· This section configures portal-based WeChat Wi-Fi authentication. To configure WeChat Wi-Fi authentication through QR code scanning, see "Configure WeChat Wi-Fi authentication through QR code scanning."
Configure the WeChat official accounts platform
1. Use the official account to access WeChat Official Accounts Platform at https://mp.weixin.qq.com/.
2. Click the Add Plug-ins button from the Function field to add a Wi-Fi plug-in
Figure 44 Adding a Wi-Fi plug-in

3. From the navigation pane, select Function > Store Management, and then click the Create a new store button to add an online store.
Figure 45 Adding an online store
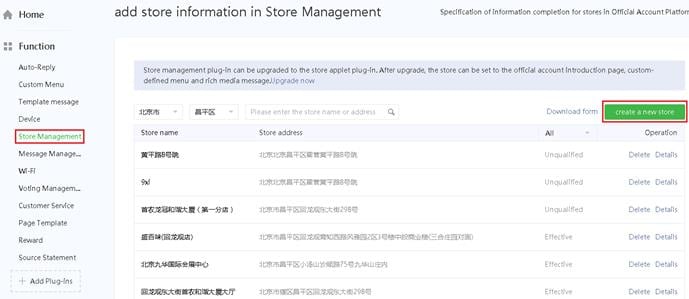
4. From the navigation pane, select Function > Wi-Fi, click the Add Device button on the Device Management tab, and then perform the following steps:
a. Select a store.
b. Select the Portal-authenticated device from the Device Type field.
Only the portal devices are supported.
c. Enter an SSID.
Figure 46 Adding a device

5. Select Development > Basic Configuration from the navigation pane.
a. On the page that opens, obtain the AppID and AppSecret.
After the AppSecret is enabled and generated, the WeChat official accounts platform will not store or display the AppSecret. Please save it properly.
Figure 47 Obtaining AppID and AppSecret
a. Add IP addresses 139.217.7.53, 139.217.17.204, and 139.219.0.33 to the IP whitelists.
Figure 48 Adding an IP address to the whitelist

Configure WeChat Wi-Fi authentication
1. Select a site from the scenario menu, and then select Settings > Xiaobei > WLAN Settings from the navigation pane.
2. Select the target Xiaobei router in the upper right corner of the page.
3.
On Authentication Templates tab, click
the Authentication button ![]() for that
commercial Wi-Fi. You are placed on the Login tab.
for that
commercial Wi-Fi. You are placed on the Login tab.
4. Click the WeChat Wi-Fi tile in the Auth Configuration area, and then enable WeChat Wi-Fi authentication.
5. Click Import Shop and scan the QR code.
Only the administrator of the official account can scan the QR code to authorize the official account.
6. Disable other authentication methods.
7. Click OK or click Release in the upper right corner of the page.
Figure 49 Configuring WeChat Wi-Fi authentication

Configure guest authentication
Restrictions and guidelines
After configuration, a guest can access the network only after the approver scans the QR code on the client and authorizes the client. The QR code is valid for five minutes. When the QR code expires, the guest must refresh the QR code.
Procedure
1.
Hover over the grid icon ![]() ,
and then select App Center.
,
and then select App Center.
2. Click the Accounts tab.
3. On the Guest Accounts tab, click Add.
An approver is added after the approver scans the QR code, and then enters the verification code. If the approver is deleted, the Oasis platform automatically removes the permission from the approver.
Figure 50 Adding an approver
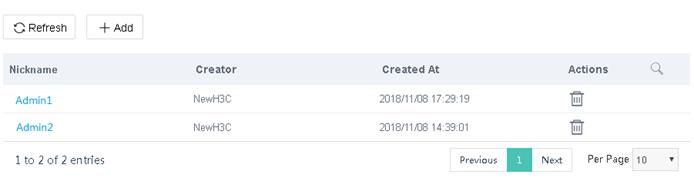
4. Select a site from the scenario menu, and then select Settings > Xiaobei > WLAN Settings from the navigation pane.
5. Select the target Xiaobei router in the upper right corner of the page.
6.
On Authentication Templates tab, click the
Authentication button ![]() for that
commercial Wi-Fi. You are placed on the Login tab.
for that
commercial Wi-Fi. You are placed on the Login tab.
7. Click the Guest tile in the Auth Configuration area, and then enable guest authentication.
8. Disable other authentication methods.
9. Click OK or click Release in the upper right corner of the page.
Figure 51 Configuring guest authentication
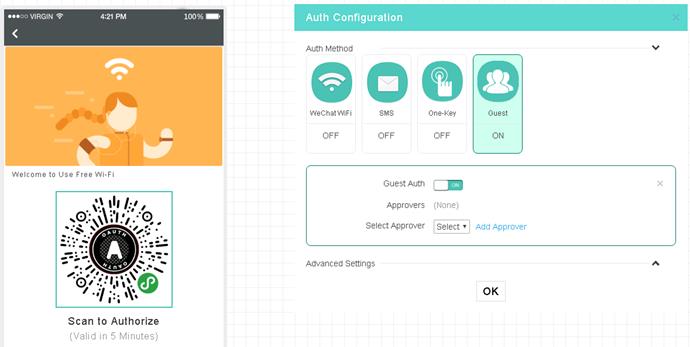
Configure combined authentication
Restrictions and guidelines
Only the following authentication methods can be used together:
· SMS authentication.
· WeChat Wi-Fi authentication.
A user can access the network as long as the user passes one authentication.
Procedure
1. Configure settings on the device as described in "Configure settings on the device" if the device software version is below 5405.
2. Configure the WeChat official accounts platform as described in "Configure WeChat official account authentication" and "Configure WeChat Wi-Fi authentication" if the WeChat official account authentication or WeChat Wi-Fi authentication is used.
3. Configure a minimum of two authentication methods. Details not shown.
Configure bulk authentication
Perform this task to deploy authentication settings in bulk.
Restrictions and guidelines
The configuration of a bulk authentication
template takes precedence over that of a non-bulk authentication template. For
the non-bulk authentication template to take effect, click the ![]() icon for
that authentication template to rebind the template.
icon for
that authentication template to rebind the template.
Before deploying the configuration in bulk, make sure the following requirements are met:
· The devices where bulk authentication is deployed are online. If a device is offline, the deployment fails. The device will load the most recent deployed configurations at start up.
· The software version must be Feature 1108 or higher.
Procedure
1.
Hover over the grid icon ![]() , and then
select App Center.
, and then
select App Center.
2. On the Authentication Templates tab, click Add.
3.
Click the Draw icon ![]() for that
authentication template. For the detailed procedures of different authentication
methods, see "Configure basic Oasis authentication settings."
for that
authentication template. For the detailed procedures of different authentication
methods, see "Configure basic Oasis authentication settings."
Figure 52 Configuring bulk authentication

4. To deploy a template, perform the following steps:
a.
Click the Deploy Template
icon ![]() for that
authentication template.
for that
authentication template.
b. Click the Xiaobei Devices tab.
c. Select a branch or site.
d. Select a Xiaobei device and then click Apply.
If no devices are displayed, please check the device version.
Figure 53 Deploying a template

Customize an authentication page
You can configure the landing page, login page, login success page, and home page and can push or disable the landing page or login success page as needed.
Restrictions and guidelines
The picture size cannot exceed 1 M. As a best practice, set the picture size to be in the range of 100 KB to 200 KB. Only JPG, JPEG, BMP, PNG, GIF, and SVG formats are allowed.
As a best practice to avoid affecting the loading speed of the page, do not add too many controls.
Procedure
1.
Hover over the grid icon ![]() , and then
select App Center.
, and then
select App Center.
2.
On the Authentication Templates tab, click
the Draw icon ![]() for the target authentication template.
for the target authentication template.
3. Configure the following settings as shown in Figure 31:
¡ Logo—The aspect ratio must be 1:1. The picture will be automatically cut into a circle. You can enter a shop name with a length of less than 12 characters.
¡ Background—The aspect ratio must be 3:5.
¡ Carousel—The aspect ratio must be 11:5. Two or three pictures of the same height are required.
¡ Picture—The aspect ratio must be 11:5. The description for the picture cannot exceed 48 characters.
¡ Video—The video size cannot exceed 1 M. Only MP4, WEBM, and OGG formats are allowed.
¡ Text—You can edit the font, font size, bold type, and font color.
Figure 54 Custom template description

4. To configure the homepage, click the Home tab, and then select Use Custom Link.
5. Enter a custom link and then click Upload.
6. To preview the link, click Preview in the upper right corner of the page.
Figure 55 Previewing the configuration change

7. Click Release in the upper right corner of the page.
The homepage pushed to users during portal authentication will be replaced by the page redirected by this custom link.
Figure 56 Configuring the custom template

Configure advanced settings
The Oasis platform provides advanced authentication settings to simplify authentication management, reduce cost, and optimize market promotion. Table 3 describes available advanced features for each authentication method. You can configure these settings as needed.
Table 4 Advanced Oasis authentication features
|
Authentication method |
Advanced features |
|
One-key authentication |
Captive-bypass Hiding and customizing one-key authentication button Internet access settings Free authentication Inter-site and inter-SSID re-authentication Internet access control Developer mode Domain name whitelist and blacklist Viewing and exporting history of authentication configuration deployment |
|
SMS authentication |
Captive-bypass SMS gateway Client limit Remembering phone numbers Setting validity period of verification codes Changing visual effect settings of the login page Internet access settings Free authentication Inter-site and inter-SSID re-authentication Internet access control Developer mode Domain name whitelist and blacklist Viewing and exporting history of authentication configuration deployment |
|
WeChat Wi-Fi |
Captive-bypass WeChat Wi-Fi authentication through QR code scanning Customizing Wi-Fi name Forced follow WeChat mini program redirection Log-off upon unfollow Changing visual effect settings of the login page Internet access settings Free authentication Inter-site and inter-SSID re-authentication Internet access control Developer mode Domain name whitelist and blacklist Viewing and exporting history of authentication configuration deployment |
|
Guest authentication |
Captive-bypass Internet access settings Free authentication Inter-site and inter-SSID re-authentication Internet access control Developer mode Domain name whitelist and blacklist Viewing and exporting history of authentication configuration deployment |
Enable the captive-bypass feature
Typically, the device pushes the authentication page to a client automatically when the client attempts to access a portal authentication network. The captive-bypass feature enables the device to push the portal authentication page to the client only when the user launches a browser.
To enable the captive-bypass feature, you must perform the following steps on the device:
1. Enter system view.
system-view
2. Enter portal Web server view of Web server cloud.
portal web-server cloud
3. Enable the captive-pass feature.
captive-bypass enable
Hide or customize the one-key authentication button
Perform this task to hide the one-key authentication button or change the button style. If the button is hidden, users pass the authentication automatically after the countdown timer on the login page expires.
Restrictions and guidelines
You can change the button style only when the button is not hidden.
Procedure
1.
Hover over the grid icon ![]() , and then
select Network Management.
, and then
select Network Management.
2. Select a site from the scenario menu, and then select Settings > Xiaobei > WLAN Settings from the navigation pane.
3. Select the target Xiaobei router in the upper right corner of the page.
4. Click the Authentication button for that commercial Wi-Fi.
5. Click Login tab.
6. On the Authentication tab menu, click One-Key in the Auth Method area, and then hide or customize the button as needed.
Configure SMS gateways
To use SMS authentication or enable SMS-only for first login, you must first purchase an SMS package and create an SMS gateway.
Restrictions and guidelines
If a default SMS gateway has been configured, SMS authentication uses the default SMS gateway.
You can use an SMS package to create multiple SMS gateways for different WLANs. These gateways use the same serial number, key, and password.
Procedure
1. Select a site from the scenario menu, and then select System > SMS Gateway from the navigation pane.
2. On the Emay SMS Platform tab, configure SMS gateways as needed.
Remember phone numbers
This feature enables users to use phone numbers that have passed SMS authentication to re-access the WLAN without being authenticated again within the specified period. This saves short message resources.
To remember phone numbers:
1. Select a site from the scenario menu, and then select Settings > Xiaobei > WLAN Settings from the navigation pane.
2. Select the target Xiaobei router in the upper right corner of the page.
3. Click the Authentication button for that commercial Wi-Fi.
4. Click the Login tab.
5. On the Authentication tab menu, click SMS in the Auth Method area.
6. Enable Remember Phone No. and specify the maximum period that a phone number can be remembered.
Set the validity period of verification codes
Verification codes sent to a phone number within the validity period are the same.
To set the validity period of verification codes:
1. Select a site from the scenario menu, and then select Settings > Xiaobei > WLAN Settings from the navigation pane.
2. Select the target Xiaobei router in the upper right corner of the page.
3. Click the Authentication button for that commercial Wi-Fi.
4. Click the Login tab.
5. On the Authentication tab menu, click SMS in the Auth Configuration area.
6. Set the verification code validity.
Configure WeChat Wi-Fi authentication through QR code scanning
With this feature configured, clients can pass WeChat Wi-Fi authentication simply by using WeChat to scan a specific QR code.
Restrictions and guidelines
For this feature to take effect, configure portal-based WeChat Wi-Fi authentication and disable the captive-bypass feature. For more information, see "Configure WeChat Wi-Fi authentication" and "Enable the captive-bypass feature."
As a best practice for easy configuration, obtain the QR code from a third-party website.
Configure the portal redirection feature on the device
# Configure a match rule to redirect HTTP requests destined for the URL http://o2o.gtimg.com/wifi/echo to the URL http://oasisauth.h3c.com/generate_404.
<Sysname> system-view
[Sysname] portal web-server cloud
[Sysname-portal-websvr-cloud] if-match original-url http://o2o.gtimg.com/wifi/echo redirect-url http://oasisauth.h3c.com/generate_404
Obtain the QR code from Tencent
1. Access WeChat Official Accounts Platform at https://mp.weixin.qq.com/.
2. From the navigation pane, select Function > Wi-Fi.
3. Click the User Connect tab, and then click Configure now in the QR code area.
Figure 57 User Connect tab
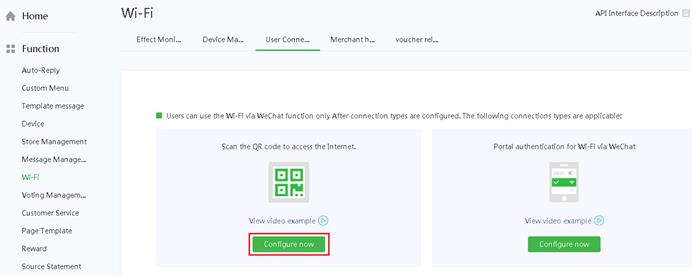
4. Click the Details button for that shop.
5. Click the Preview button and then click Download.
Figure 58 Downloading the QR code

Obtain the QR code from a third-party website
This section uses website https://cli.im/ as an example.
To obtain the QR code from a third-party website:
1. Access the QR code generation website.
2. Enter http://oasisauth.h3c.com/portal/wxscan/wx-scan.jsp?ssid=ssid in the text area and click the button below to generate a QR code. The ssid represents the SSID of the shop.
Figure 59 Generating the QR code
3. Download the QR code.
Figure 60 Downloading the QR code

Set the WeChat Wi-Fi name
Restrictions and guidelines
This feature is available only for authentication templates configured in the App Center.
By default, the Wi-Fi name is h3c-lvzhou.
Procedure
1.
Hover over the grid icon ![]() ,
and then select App Center. You are placed on the Authentication page.
,
and then select App Center. You are placed on the Authentication page.
2.
On the Authentication Templates tab, click
the Draw icon ![]() for that authentication template.
for that authentication template.
3. Click the Login tab.
4. On the Authentication tab menu, click WeChat Wi-Fi in the Auth Configuration area.
5. Enable WeChat Wi-Fi and set the Wi-Fi name.
Enable forced follow
With this feature enabled, users must follow the WeChat official account to pass WeChat Wi-Fi authentication.
Restrictions and guidelines
This feature is unavailable when users use PCs to access the WLAN.
You cannot configure both this feature and mini program redirection.
Procedure
1.
Hover over the grid icon ![]() ,
and then select Network Management.
,
and then select Network Management.
2. Select a site from the scenario menu, and then select Settings > Xiaobei > WLAN Settings from the navigation pane.
3. Select the target Xiaobei router in the upper right corner of the page.
4. Click the Authentication button for that commercial Wi-Fi.
5. Click the Login tab.
6. On the Authentication page, click WeChat Wi-Fi in the Auth Configuration area.
7. Enable Forced Follow.
Redirect users to a WeChat mini program
With this feature enabled, the system redirects users to a WeChat mini program after the users pass WeChat Wi-Fi authentication.
Users can click the banner at the top of the WeChat Chats page to re-access the mini program, as shown in Figure 38.
Figure 61 Mini program banner
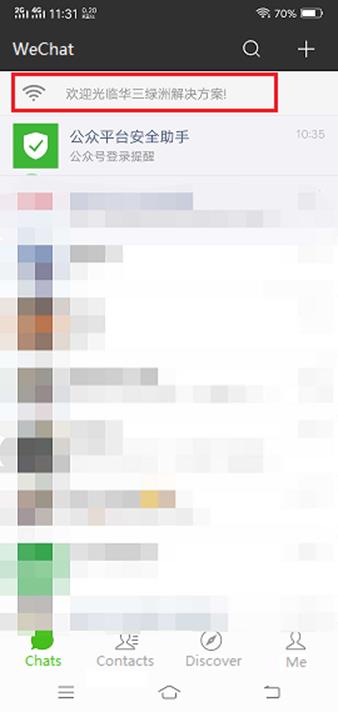
Restrictions and guidelines
Make sure the mini program is available before you enable this feature.
You cannot configure both this feature and forced follow.
Obtain the original ID of the mini program
1. Access WeChat Official Accounts Platform at https://mp.weixin.qq.com/.
2. From the navigation pane, select Mini Program > MiniProgram Manage.
3. Click Add and then bind the mini program to the official account.
Figure 62 Binding a mini program
4. On the MiniProgram Manage page, hover over the icon of the bound mini program and click Details to view the original ID of the mini program.
Figure 63 Viewing the original ID of the mini program
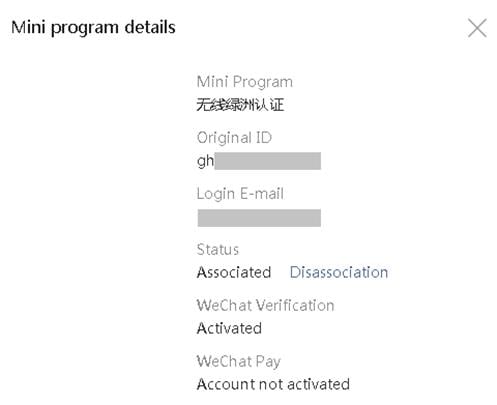
Configure mini program redirection on the Oasis platform
Restrictions and guidelines
Change the mini program path if the homepage of the mini program changes.
Procedure
1.
Hover over the grid icon ![]() ,
and then select Network Management.
,
and then select Network Management.
2. Select a site from the scenario menu, and then select Settings > Xiaobei > WLAN Settings from the navigation pane.
3. Select the target Xiaobei router in the upper right corner of the page.
4. Click the Authentication button for that commercial Wi-Fi.
5. Click the Login tab.
6. On the Authentication page, click WeChat Wi-Fi in the Auth Configuration area.
7. Enable Mini Program. This feature is available only when Forced Follow is disabled.
8. Enter the mini program original ID and the mini program path.
Change visual effect settings of the login page
Perform this task to customize the background color, background opacity, and text color on the login page.
Restrictions and guidelines
|
|
CAUTION: Restoring default settings will remove all user-defined visual effect settings and the restore operation is irreversible. Please use this feature with caution. |
Visual effect settings of authentication methods take effect only when multiple authentication methods are enabled.
Procedure
1.
Hover over the grid icon ![]() ,
and then select Network Management.
,
and then select Network Management.
2. Select a site from the scenario menu, and then select Settings > Xiaobei > WLAN Settings from the navigation pane.
3. Select the target Xiaobei router in the upper right corner of the page.
4. Click the Authentication button for that commercial Wi-Fi.
5. Click the Login tab.
6. On the Authentication page, expand the Login Style area.
7. Configure the background color, background opacity, and text color as needed.
The adjustment will be displayed in the preview area in real time. To restore the default visual effect settings, click Restore Default.
Configure Internet access settings
Procedure
1.
Hover over the grid icon ![]() ,
and then select Network Management.
,
and then select Network Management.
2. Select a site from the scenario menu, and then select Settings > Xiaobei > WLAN Settings from the navigation pane.
3. Select the target Xiaobei router in the upper right corner of the page.
4. Click the Authentication button for that commercial Wi-Fi.
5. Click the Login tab.
6. On the Authentication page, expand the Advanced Settings area.
7. Configure Internet access settings as needed.
Parameters
· HTTPS for Landing and Login: Uses HTTPS sessions for the Landing and Login page.
· Permit PC: Permits PCs to access the WLAN. Facebook authentication does not support this feature.
· SMS-Only for First Login: Requires users to pass SMS authentication at the first login. If a user passes the SMS authentication, the system generates a phone number and MAC address binding entry for the user. The administrators can view the entry in the client list in which phone numbers are used as usernames. App authentication and Facebook authentication do not support this feature.
Configure MAC-trigger authentication
This feature enables users to pass authentication without entering user information if the users went offline before and attempt to come online again within the free-auth period. Users can access the WLAN without running a browser. MAC-trigger authentication does not support ads pushing to clients.
To configure MAC-trigger authentication:
1.
Hover over the grid icon ![]() ,
and then select Network Management.
,
and then select Network Management.
2. Select a site from the scenario menu, and then select Settings > Xiaobei > Authentication from the navigation pane.
3. Select the target Xiaobei router in the upper right corner of the page.
4. Enable Once-for-All Authentication. The auth-free period is one day.
Configure inter-site and inter-SSID re-authentication
This feature allows clients that have been authenticated to roam between wireless services associated with different sites or different SSIDs for the same site without re-authentication. These wireless services must use the same authentication template or have the same SSID.
Restrictions and guidelines
This feature is available only for authentication templates configured in the App Center.
Procedure
1.
Hover over the grid icon ![]() ,
and then select App Center.
,
and then select App Center.
2. Select Authentication from the navigation pane.
3.
Click the Draw icon ![]() for that
authentication template.
for that
authentication template.
4. Click the Login tab.
5. On the Authentication page, expand the Advanced Settings area.
6. Click the Auth-Free tab and enable Free Auth.
7. Configure inter-site and inter-SSID re-authentication.
Configure Internet access control
Perform this task to specify the time ranges during which users are allowed to access the WLAN.
Restrictions and guidelines
Internet access control is on a per-hour basis. You can specify a maximum of five time ranges for a day. To specify a time range that ends at 24 o'clock, set the end time to 00. If you set a time range to 00 to 00 for a day, users can access the Internet at any time that day.
Procedure
1.
Hover over the grid icon ![]() ,
and then select Network Management.
,
and then select Network Management.
2. Select a site from the scenario menu, and then select Settings > Xiaobei > WLAN Settings from the navigation pane.
3. Select the target Xiaobei router in the upper right corner of the page.
4. Click the Authentication button for that commercial Wi-Fi.
5. Click the Login tab.
6. On the Authentication page, expand the Advanced Settings area.
7. Click the Internet Access Control tab and specify the time ranges.
Configure the developer mode
|
|
CAUTION: Editing the codes of existing functions might disable Oasis authentication. Please use this feature with caution. |
The developer mode allows users to modify the source codes of an authentication template for customization purposes.
To configure the developer mode:
1.
Hover over the grid icon ![]() ,
and then select Network Management.
,
and then select Network Management.
2. Select a site from the scenario menu, and then select Settings > Xiaobei > WLAN Settings from the navigation pane.
3. Select the target Xiaobei router in the upper right corner of the page.
4. Click the Authentication button for that commercial Wi-Fi.
5. On the page that opens, click Developer Mode in the upper right corner.
Configure the domain name whitelist and blacklist
Restrictions and guidelines
This feature takes effect only when wireless authentication is configured.
Procedure
1.
Hover over the grid icon ![]() ,
and then select Network Management.
,
and then select Network Management.
2. Select a site from the scenario menu, and then select Settings > Xiaobei > Authentication from the navigation pane.
3. Select the target Xiaobei router in the upper right corner of the page.
4. Configure the domain name whitelist or blacklist as needed.
View or export history of authentication template deployment
Perform this task to view the history of all authentication template deployment or deployment in the current day, past 7 days, or past 30 days.
To view or export history of authentication template deployment:
1.
Hover over the grid icon ![]() ,
and then select App Center.
,
and then select App Center.
2. Select Authentication from the navigation pane.
3.
Click the Apply
icon ![]() for that authentication template.
for that authentication template.
4. On the page that opens, click a tab to view the deployment history for a specific device type.
Configure Oasis authentication with a wireless router as the authenticator
Configure basic settings
Prerequisites
Before configuring Oasis platform authentication, complete the following tasks:
· Connect the device to the Oasis platform.
For more information, see H3C Oasis Platform Deployment Guide.
· Complete the VLAN and DHCP settings.
· Configure wireless services and make sure the APs can come online.
Configure one-key authentication
1.
Hover over the grid icon ![]() , and then select Network Management.
, and then select Network Management.
2. Select a site from the scenario menu, and then select Settings > Routers > Authentication from the navigation pane.
3. To add an authentication template, click Add on the Wireless Authentication Templates tab.
4.
To edit an authentication template, click
the Edit icon ![]() for that authentication template.
for that authentication template.
5.
To bind an authentication template to a
wireless service, click the Edit icon ![]() for that authentication template, select Yes from the Bind to Wireless Service field, and then click Apply. If the template has been bound to wireless service, skip this
step.
for that authentication template, select Yes from the Bind to Wireless Service field, and then click Apply. If the template has been bound to wireless service, skip this
step.
6.
Click the Draw icon ![]() for the
target authentication template.
for the
target authentication template.
7. Click the One-Key tile in the Auth Configuration area, enable one-key authentication, and then configure other settings as needed.
8. Click OK or click Release in the upper right corner of the page.
Figure 64 Configuring one-key authentication
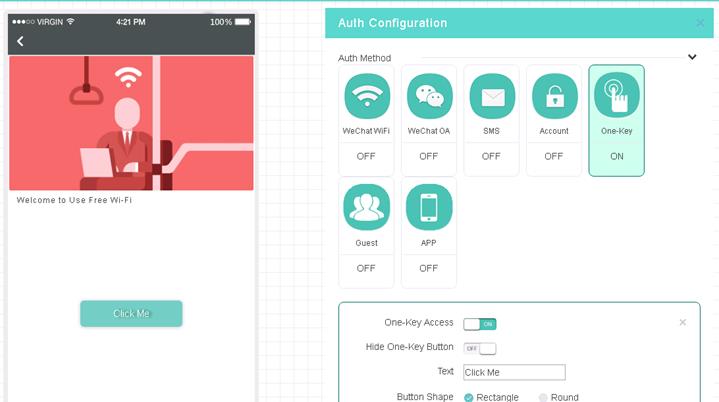
Configure fixed account authentication
Restrictions and guidelines
If you do not configure the validity period or configure it as 0, the account never expires.
If you select Bind MAC Address and do not enter any MAC addresses, clients that use the fixed account are not limited.
If you select Sent by Email, the system sends the account name and password to the specified email address. The number of email addresses cannot exceed 10 and must be separated by commas.
Procedure
1.
Hover over the grid icon ![]() ,
and then select Network Management.
,
and then select Network Management.
2. Select a site from the scenario menu, and then select Settings > Routers > Users from the navigation pane.
3. Click the Fixed Accounts tab.
4. Click Add.
5. Configure fixed account information as required.
Figure 65 Adding a fixed account
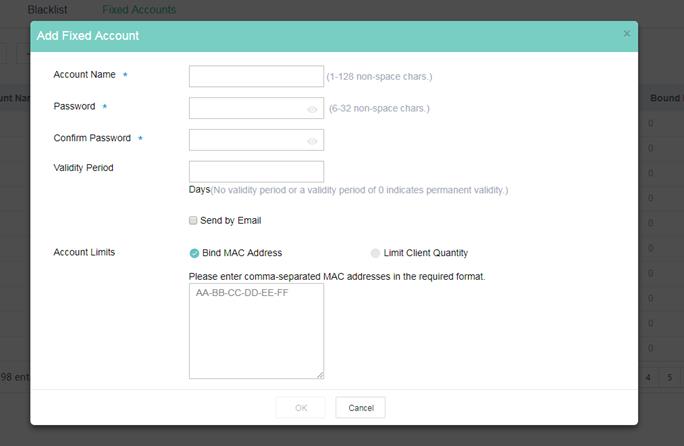
6.
To add an authentication template, select Settings > Routers > Authentication
from the navigation pane, and then click Add on the Wireless Authentication
Templates tab. To edit an authentication
template, click the Edit icon ![]() for that authentication template.
for that authentication template.
7.
To bind an authentication template to a
wireless service, click the Edit icon ![]() for that authentication template, select Yes from the Bind to Wireless Service field, and then click Apply. If the template has been bound to wireless service, skip this
step.
for that authentication template, select Yes from the Bind to Wireless Service field, and then click Apply. If the template has been bound to wireless service, skip this
step.
8.
Click the Draw icon ![]() for the
target authentication template.
for the
target authentication template.
9. Click the Account tile in the Auth Configuration area, enable fixed account authentication, and then configure other settings as needed.
10. Disable other authentication methods.
11. Click OK or click Release in the upper right corner of the page.
Figure 66 Configuring fixed account authentication

Configure SMS authentication
Restrictions and guidelines
To use SMS authentication, you must first purchase an SMS package from the Emay platform at www.emay.cn.
Procedure
1.
Hover over the grid icon ![]() , and then select Network Management.
, and then select Network Management.
2. Select a site from the scenario menu, and then select System > SMS Gateway from the navigation pane.
3.
To add an SMS gateway, click Add on the Emay SMS Platform tab. To edit an SMS gateway, click the Edit icon ![]() for that
SMS gateway.
for that
SMS gateway.
4. Configure the SMS gateway settings as needed.
An SMS signature is the beginning identifier part of the verification code.
Figure 67 Creating or editing an SMS gateway
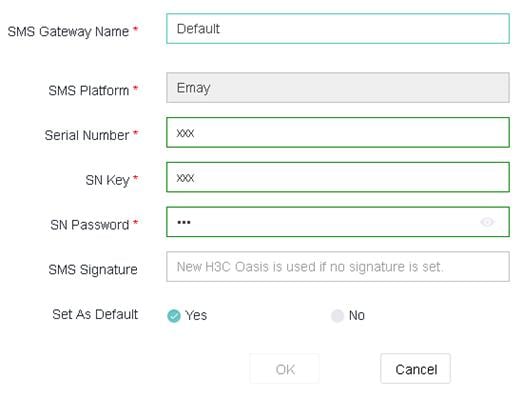
5. Contact Emay customer service to perform the following tasks:
¡ Bind the IP address (139.217.27.153) of the Oasis domain (oasis.h3c.com) to the SMS package.
¡ Bind the IP address (139.217.11.74) of the Oasis domain (oasisauth.h3c.com) to the SMS package.
6.
To add an authentication template, select Settings > Routers > Authentication
from the navigation pane, and then click Add on the Wireless Authentication
Templates tab. To edit an authentication
template, click the Edit icon ![]() for that authentication template.
for that authentication template.
7.
To bind an authentication template to a
wireless service, click the Edit icon ![]() for that authentication template, select Yes from the Bind to Wireless Service field, and then click Apply. If the template has been bound to wireless service, skip this
step.
for that authentication template, select Yes from the Bind to Wireless Service field, and then click Apply. If the template has been bound to wireless service, skip this
step.
8.
Click the Draw icon ![]() for the
target authentication template.
for the
target authentication template.
9. Click the SMS tile in the Auth Configuration area, enable SMS authentication, and then configure other settings as needed.
10. Disable other authentication methods.
11. Click OK or click Release in the upper right corner of the page.
Figure 68 Configuring SMS authentication

Configure WeChat official account authentication
Restrictions and guidelines
Tenants must have a WeChat service account certified by Tencent.
Configure the WeChat official accounts platform
1. Use the applied WeChat service account to access the WeChat official accounts platform at https://mp.weixin.qq.com/.
Figure 69 Logging in to the service account
![]()
2. Select Development > Basic Configuration from the navigation pane.
a. On the page that opens, obtain the AppID and AppSecret.
After the AppSecret is enabled and generated, the WeChat official accounts platform will not store or display the AppSecret. Please save it properly.
Figure 70 Obtaining AppID and AppSecret
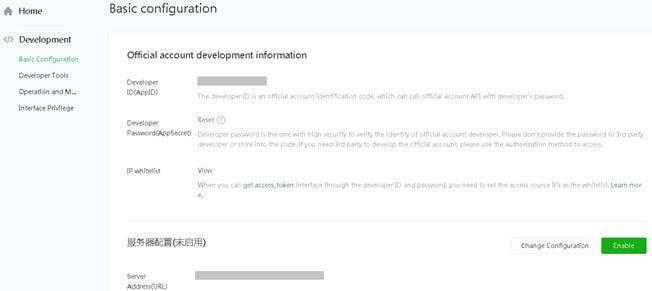
b. Add the IP addresses 139.217.7.53, 139.217.17.204, and 139.219.0.33 to the IP whitelists.
Figure 71 Adding an IP address to the whitelist
3. Select Development > Interface Privilege from the navigation pane, and then click Modify in the Web Page Authentication field.
Figure 72 Modifying Web page authentication

4. On the Function setting tab, click Set-up in the Webpage authentication domain name field.
Figure 73 Editing the Web page authenticate domain name
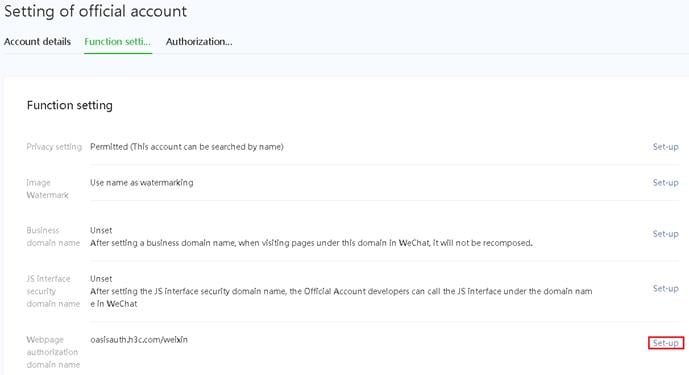
5. Select Function > Custom Menu from the navigation pane, click the add icon + , and then configure other settings as needed.
As a best practice, enter http://10.1.0.6 in in the Page address field.
Figure 74 Specifying a menu

Configure WeChat official account authentication
1. Select a site from the scenario menu, and then select Settings > Routers > Authentication from the navigation pane.
2.
To add an authentication template, click Add on the Wireless Authentication
Templates tab. To edit an authentication
template, click the Edit icon ![]() for that authentication template.
for that authentication template.
3.
To bind an authentication template to a
wireless service, click the Edit icon ![]() for that authentication template, select Yes from the Bind to Wireless Service field, and then click Apply. If the template has been bound to wireless service, skip this
step.
for that authentication template, select Yes from the Bind to Wireless Service field, and then click Apply. If the template has been bound to wireless service, skip this
step.
4.
Click the Draw icon ![]() for the
target authentication template.
for the
target authentication template.
5. Click the WeChat OA tile in the Auth Configuration area, and then enable WeChat official account authentication.
6. Click Import Official Account and scan the QR code.
7. Enter the AppSecret.
8. Disable other authentication methods.
9. Click OK or click Release in the upper right corner of the page.
Figure 75 Configuring WeChat official account authentication
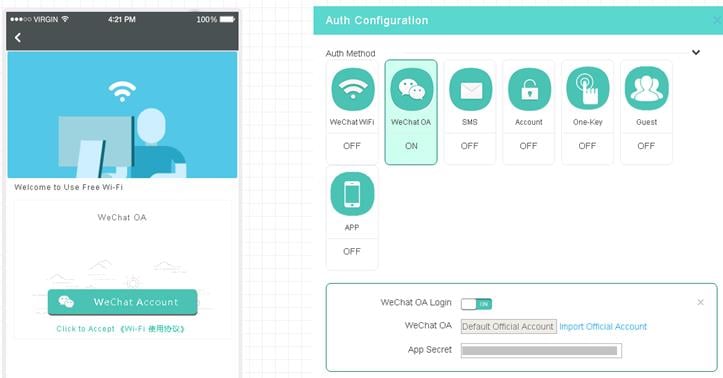
Configure WeChat Wi-Fi authentication
Restrictions and guidelines
· Tenants must have a WeChat official account, either an uncertified or certified service account or subscription account, and an online shop certified by Tencent and must make sure the WeChat Wi-Fi and shop mini program plug-ins have been enabled.
· Terminals to be authenticated must have logged in to WeChat and have been bound to their phone numbers.
· Some terminals such as Samsung and AGM terminals or some OS versions do not support this authentication method. If these terminals want to access the network, they will be authenticated by using one-key authentication.
· You can enable forced follow or redirection to WeChat mini program after authentication, but cannot configure both of them.
· This section configures portal-based WeChat Wi-Fi authentication. To configure WeChat Wi-Fi authentication through QR code scanning, see "Configure WeChat Wi-Fi authentication through QR code scanning."
Configure the WeChat official accounts platform
1. Use the official account to access WeChat Official Accounts Platform at https://mp.weixin.qq.com/.
2. Click the Add Plug-ins button from the Function field to add a Wi-Fi plug-in.
Figure 76 Adding a Wi-Fi plug-in

3. From the navigation pane, select Function > Store Management, and then click the Create a new store button to add an online store.
Figure 77 Adding an online store
4. From the navigation pane, select Function > Wi-Fi, click the Add Device button on the Device Management tab, and then perform the following steps:
a. Select a store.
b. Select the Portal-authenticated device from the Device Type field.
Only the portal devices are supported.
c. Enter an SSID.
Figure 78 Adding a device
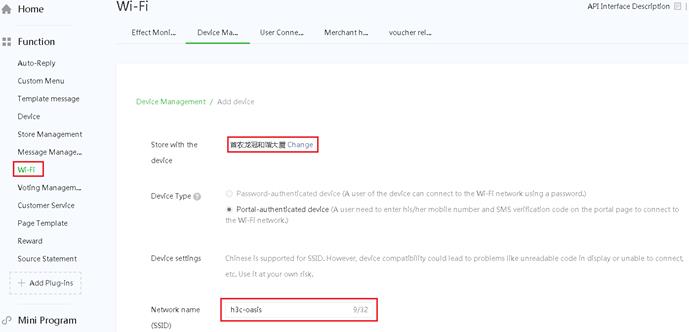
5. Select Development > Basic Configuration from the navigation pane.
a. On the page that opens, obtain the AppID and AppSecret.
After the AppSecret is enabled and generated, the WeChat official accounts platform will not store or display the AppSecret. Please save it properly.
Figure 79 Obtaining AppID and AppSecret
a. Add the IP addresses (139.217.7.53, 139.217.17.204 and 139.219.0.33) to the IP whitelists.
Figure 80 Adding an IP address to the whitelist
Configure WeChat Wi-Fi authentication
1. Select a site from the scenario menu, and then select Settings > Routers > Authentication from the navigation pane.
2.
To add an authentication template, click Add on the Wireless Authentication
Templates tab. To edit an authentication
template, click the Edit icon ![]() for that authentication template.
for that authentication template.
3.
To bind an authentication template to a
wireless service, click the Edit icon ![]() for that authentication template, select Yes from the Bind to Wireless Service field, and then click Apply. If the template has been bound to wireless service, skip this
step.
for that authentication template, select Yes from the Bind to Wireless Service field, and then click Apply. If the template has been bound to wireless service, skip this
step.
4.
Click the Draw icon ![]() for the
target authentication template.
for the
target authentication template.
5. Click the WeChat Wi-Fi tile in the Auth Configuration area, and then enable WeChat Wi-Fi authentication.
6. Click Import Shop and scan the QR code.
Only the administrator of the official account can scan the QR code to authorize the official account.
7. Disable other authentication methods.
8. Click OK or click Release in the upper right corner of the page.
Figure 81 Configuring WeChat Wi-Fi authentication

Configure guest authentication
Restrictions and guidelines
After configuration, a guest can access the network only after the approver scans the QR code on the client and authorizes the client. The QR code is valid for five minutes. When the QR code expires, the guest must refresh the QR code.
Procedure
1.
Hover over the grid icon ![]() ,
and then select App Center.
,
and then select App Center.
2. Click the Accounts tab.
3. Click the Guest Accounts tab, click Add.
An approver is added after the approver scans the QR code, and then enters the verification code. If the approver is deleted, the Oasis platform automatically removes the permission from the approver.
Figure 82 Adding an approver
4. Select a site from the scenario menu, and then select Settings > Routers > Authentication from the navigation pane.
5.
To add an authentication template, click Add on the Wireless Authentication
Templates tab. To edit an authentication
template, click the Edit icon ![]() for that authentication template.
for that authentication template.
6.
To bind an authentication template to a
wireless service, click the Edit icon ![]() for that authentication template, select Yes from the Bind to Wireless Service field, and then click Apply. If the template has been bound to wireless service, skip this
step.
for that authentication template, select Yes from the Bind to Wireless Service field, and then click Apply. If the template has been bound to wireless service, skip this
step.
7.
Click the Draw icon ![]() for the
target authentication template.
for the
target authentication template.
8. Click the Guest tile in the Auth Configuration area, and then enable guest authentication.
9. Select approvers.
The Approvers field only displays the approvers authorized by this account and all its subaccounts. For tenants, the Approvers field displays the approvers authorized by all its subaccounts.
10. Disable other authentication methods.
11. Click OK or click Release in the upper right corner of the page.
Figure 83 Configuring guest authentication
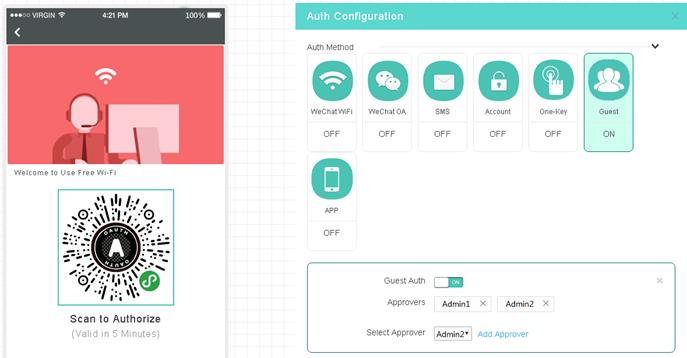
Configure app authentication
With app authentication enabled, users will be redirected to a webpage to download an app for authentication.
Prerequisites
The operator must complete the following tasks:
· Develop a redirection page that provides a link for downloading the app and a link for opening the app.
· Add the key in the standard interface format for app authentication provided by the Oasis platform to the app.
Procedure
1.
Hover over the grid icon ![]() ,
and then select Network Management.
,
and then select Network Management.
2. Select a site from the scenario menu, and then select Settings > Routers > Authentication from the navigation pane.
3. To add an authentication template, click Add on the Wireless Authentication Templates tab.
4.
To edit an authentication template, click
the Edit icon ![]() for that authentication template.
for that authentication template.
5.
To bind an authentication template to a
wireless service, click the Edit icon ![]() for that authentication template, select Yes from the Bind to Wireless Service field, and then click Apply. If the template has been bound to a wireless service, skip this
step.
for that authentication template, select Yes from the Bind to Wireless Service field, and then click Apply. If the template has been bound to a wireless service, skip this
step.
6.
Click the Draw icon ![]() for the
target authentication template.
for the
target authentication template.
7. Click the APP tile in the Auth Configuration area, enable app authentication, specify the URL for redirection, and enter the key.
8. Click OK or click Release in the upper right corner of the page.
Figure 84 Configuring app authentication

Configure member authentication
With member authentication enabled, members can access the network by entering his or her phone number on the authentication page. Non-members must register on the authentication page first and then access the network as members.
Procedure
1.
Hover over the grid icon ![]() ,
and then select Network Management.
,
and then select Network Management.
2. Select a site from the scenario menu, and then select Settings > Routers > Authentication from the navigation pane.
3. To add an authentication template, click Add on the Wireless Authentication Templates tab.
4.
To edit an authentication template, click
the Edit icon ![]() for that authentication template.
for that authentication template.
5.
To bind an authentication template to a
wireless service, click the Edit icon ![]() for that authentication template, select Yes from the Bind to Wireless Service field, and then click Apply. If the template has been bound to a wireless service, skip this
step.
for that authentication template, select Yes from the Bind to Wireless Service field, and then click Apply. If the template has been bound to a wireless service, skip this
step.
6.
Click the Draw icon ![]() for the
target authentication template.
for the
target authentication template.
7. Click the Member Authentication tile in the Auth Configuration area, enable member authentication, configure other parameters as needed, and disable all the other authentication methods.
8. Click OK or click Release in the upper right corner of the page.
Figure 85 Configuring member authentication
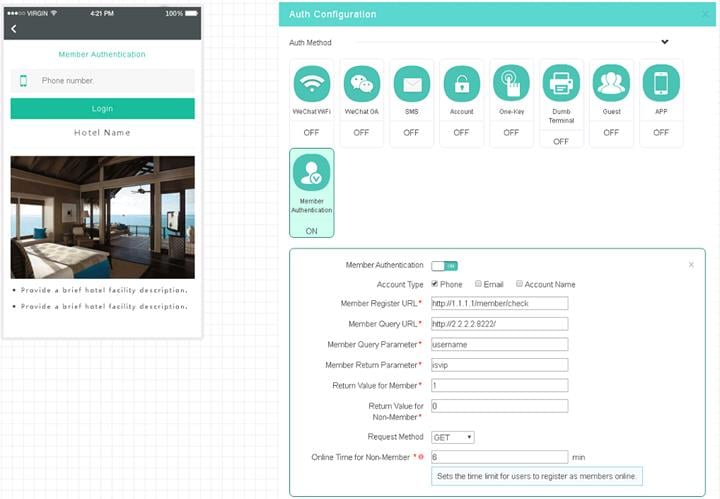
Configure combined authentication
Restrictions and guidelines
Only the following authentication methods can be used together:
· Fixed account authentication.
· SMS authentication.
· WeChat official account authentication.
· WeChat Wi-Fi authentication.
· Facebook authentication.
· Member authentication.
As a best practice, do not use the WeChat official account authentication with other authentication methods.
A user can access the network as long as the user passes one authentication.
Procedure
1. Configure settings on the device as described in "Configure settings on the device" if the device software version is below 5405.
2. Configure the WeChat official accounts platform as described in "Configure WeChat official account authentication" and "Configure WeChat Wi-Fi authentication" if the WeChat official account authentication or WeChat Wi-Fi authentication is used.
3. Configure a minimum of two authentication methods. Details not shown.
Configure dumb terminal authentication
Restrictions and guidelines
If an account group contains accounts that have been authenticated, changing the validity period of the account group will change the validity period of all the accounts in the group.
If you configure the validity period as 0, the account never expires.
You can enter the first three bytes to add MAC addresses in bulk. The validity period configuration for a complete MAC address and that for a three-byte MAC address are not mutually exclusive. Assume that you add MAC addresses that start with AA-BB-CC and specify a 5-day validity period and then add MAC address AA-BB-CC-11-22-33 and specify a 10-day validity period. The validity periods of dumb terminals with a MAC address of AA-BB-CC-11-22-33 and a MAC address that starts with AA-BB-CC are 10 and 5 days, respectively.
Procedure
1.
Hover over the grid icon ![]() , and then
select App Center.
, and then
select App Center.
2. Click the Accounts tab.
3. On the Dumb Terminal Accounts tab, click Edit Account Group.
4. Click Add.
5. Enter the required information and then click OK.
Figure 86 Adding an account group
6. Select an account group and then click Add.
7. Enter a MAC address in the required format.
Figure 87 Adding a MAC address
8. Click the Authentication Templates tab.
9.
To add an authentication template, click Add. To edit an
authentication template, click the Edit icon ![]() for that
authentication template.
for that
authentication template.
10.
Click the Draw icon ![]() for the target
authentication template. You are placed on the Login tab.
for the target
authentication template. You are placed on the Login tab.
11. Click the Dumb Terminal tile in the Auth Configuration area, and then enable dumb terminal authentication.
12. Select an account group.
13. Click OK or click Release in the upper right corner of the page.
Figure 88 Configuring dumb terminal authentication
14. To deploy a template, perform the following steps:
a.
Click the Deploy Template
icon ![]() for that
authentication template.
for that
authentication template.
b. Click the Router tab.
c. Select a branch or site.
d. Select a device and then click Apply.
If no devices are displayed, please check the device version.
Figure 89 Deploying a template

e. Select a service template or an SSID, and then click OK.
Figure 90 Selecting a service template
15. Enable MAC-triggered free authentication on the device. For more information, see "Configure MAC-trigger authentication."
Configure bulk authentication
Perform this task to deploy authentication settings in bulk.
Restrictions and guidelines
The configuration of a bulk authentication
template takes precedence over that of a non-bulk authentication template. For
the non-bulk authentication template to take effect, click the Edit icon ![]() for that authentication template, and then
click Apply.
for that authentication template, and then
click Apply.
Before deploying the configuration in bulk, make sure the following requirements are met:
· The devices where the bulk authentication is deployed are online. If a device is offline, the deployment fails for the device. The device will load the most recent deployed configurations at start up.
· The wireless service name is the same as the portal Web server.
Procedure
1.
Hover over the grid icon ![]() , and then
select App Center.
, and then
select App Center.
2. On the Authentication Templates tab, click Add.
3.
Click the Draw icon ![]() for the target
authentication template. For the detailed configuration procedures of different
authentication methods, see "Configure basic Oasis authentication settings."
for the target
authentication template. For the detailed configuration procedures of different
authentication methods, see "Configure basic Oasis authentication settings."
Figure 91 Configuring bulk authentication
4. To deploy a template, perform the following steps:
a.
Click the Deploy Template
icon ![]() for that
authentication template.
for that
authentication template.
b. Click the Router tab.
c. Select a branch or site.
d. Select a device and then click Apply.
If no devices are displayed, please check the device version.
Figure 92 Deploying a template

Customize an authentication page
You can configure the landing page, login page, login success page, and home page and can push or disable the landing page or login success page as needed.
Restrictions and guidelines
The picture size cannot exceed 1 M. As a best practice, set the picture size to be in the range of 100 KB to 200 KB. Only JPG, JPEG, BMP, PNG, GIF, and SVG formats are allowed.
As a best practice to avoid affecting the loading speed of the page, do not add too many controls.
Procedure
1.
Hover over the grid icon ![]() , and then
select App Center.
, and then
select App Center.
2.
On the Authentication Templates tab, click
the Draw icon ![]() for the target authentication template.
for the target authentication template.
3. Configure the following settings as shown in Figure 31:
¡ Logo—The aspect ratio must be 1:1. The picture will be automatically cut into a circle. You can enter a shop name with a length of less than 12 characters.
¡ Background—The aspect ratio must be 3:5.
¡ Carousel—The aspect ratio must be 11:5. Two or three pictures of the same height are required.
¡ Picture—The aspect ratio must be 11:5. The description for the picture cannot exceed 48 characters.
¡ Video—The video size cannot exceed 1 M. Only MP4, WEBM, and OGG formats are allowed.
¡ Text—You can edit the font, font size, bold type, and font color.
Figure 93 Custom template description
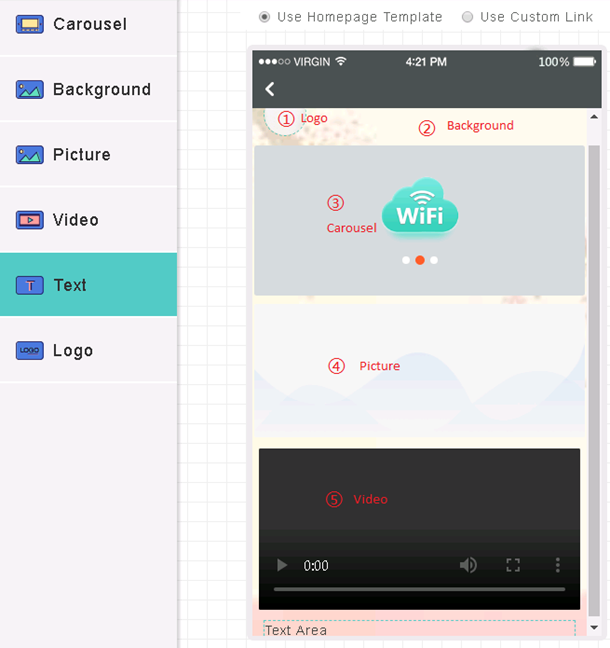
4. To configure the homepage, click the Home tab, and then select Use Custom Link.
5. Enter a custom link and then click Upload.
6. To preview the link, click Preview in the upper right corner of the page.
Figure 94 Previewing the configuration change

7. Click Release in the upper right corner of the page.
The homepage pushed to users during portal authentication will be replaced by the page redirected by this custom link.
Figure 95 Configuring the custom template
Configure advanced settings
The Oasis platform provides advanced authentication settings to simplify authentication management, reduce cost, and optimize market promotion. Table 3 describes available advanced features for each authentication method. You can configure these settings as needed.
Table 5 Advanced Oasis authentication features
|
Authentication method |
Advanced features |
|
One-key authentication |
Captive-bypass Hiding and customizing one-key authentication button Internet access settings Free authentication Inter-site and inter-SSID re-authentication Internet access control Developer mode Domain name whitelist and blacklist Viewing and exporting history of authentication configuration deployment |
|
Fixed-account authentication |
Captive-bypass Bulk management of fixed accounts Self-service password change Collaboration with LDAP server Changing visual effects of the login page Internet access settings Free authentication Inter-site and inter-SSID re-authentication Internet access control Developer mode Domain name whitelist and blacklist Viewing and exporting history of authentication configuration deployment |
|
SMS authentication |
Captive-bypass SMS gateway Client limit Remembering phone numbers Setting validity period of verification codes Changing visual effect settings of the login page Internet access settings Free authentication Inter-site and inter-SSID re-authentication Internet access control Developer mode Domain name whitelist and blacklist Viewing and exporting history of authentication configuration deployment |
|
WeChat official account authentication |
Captive-bypass Changing visual effect settings of the login page Internet access settings Free authentication Inter-site and inter-SSID re-authentication Internet access control Developer mode Domain name whitelist and blacklist Viewing and exporting history of authentication configuration deployment |
|
WeChat Wi-Fi |
Captive-bypass WeChat Wi-Fi authentication through QR code scanning Customizing Wi-Fi name Forced follow WeChat mini program redirection Log-off upon unfollow Changing visual effect settings of the login page Internet access settings Free authentication Inter-site and inter-SSID re-authentication Internet access control Developer mode Domain name whitelist and blacklist Viewing and exporting history of authentication configuration deployment |
|
Guest authentication |
Captive-bypass Internet access settings Free authentication Inter-site and inter-SSID re-authentication Internet access control Developer mode Domain name whitelist and blacklist Viewing and exporting history of authentication configuration deployment |
|
App authentication |
Captive-bypass Internet access settings Internet access control Developer mode Domain name whitelist and blacklist Viewing and exporting history of authentication configuration deployment |
|
Member authentication |
Captive-bypass Changing visual effect settings of the login page Internet access settings Inter-site and inter-SSID re-authentication Internet access control Developer mode Domain name whitelist and blacklist Viewing and exporting history of authentication configuration deployment |
|
Dumb terminal authentication |
Captive-bypass Management of dumb terminal account groups Internet access control Developer mode Domain name whitelist and blacklist Viewing and exporting history of authentication configuration deployment |
Enable the captive-bypass feature
Typically, the device pushes the authentication page to a client automatically when the client attempts to access a portal authentication network. The captive-bypass feature enables the device to push the portal authentication page to the client only when the user launches a browser.
To enable the captive-bypass feature, you must perform the following steps on the device:
1. Enter system view.
system-view
2. Enter portal Web server view of Web server cloud.
portal web-server cloud
3. Enable the captive-pass feature.
captive-bypass enable
Hide or customize the one-key authentication button
Perform this task to hide the one-key authentication button or change the button style. If the button is hidden, users pass the authentication automatically after the countdown timer on the login page expires.
Restrictions and guidelines
You can change the button style only when the button is not hidden.
Procedure
1.
Hover over the grid icon ![]() , and then
select Network Management.
, and then
select Network Management.
2. Select a site from the scenario menu, and then select Settings > Routers > Authentication from the navigation pane.
3. Click the Wireless Authentication Templates tab.
4.
Click the Draw icon ![]() for the target
authentication template.
for the target
authentication template.
5. Click the One-Key tile in the Auth Configuration area, and then hide or customize the button as needed.
Manage fixed accounts
Perform this task to delete, import, or export fixed accounts in bulk.
To manage fixed accounts:
1.
Hover over the grid icon ![]() , and then select Network Management.
, and then select Network Management.
2. Select a site from the scenario menu, and then select Settings > Routers > Users from the navigation pane.
3. Click the Fixed Accounts tab.
4. To delete fixed accounts, select the target fixed accounts and then click Delete.
5. To import fixed accounts, click Import, download the template file and fill in the file as required, and then upload the template file.
6. To export fixed accounts, click Export.
Enable self-service password change
This feature enables users to change passwords at login. With this feature disabled, only the administrators can change the passwords of fixed accounts.
To enable self-service password change:
1.
Hover over the grid icon ![]() , and then select Network Management.
, and then select Network Management.
2. Select a site from the scenario menu, and then select Settings > Routers > Authentication from the navigation pane.
3. Click the Wireless Authentication Templates tab.
4.
Click the Draw icon ![]() for the target
authentication template.
for the target
authentication template.
5. Click the Account tile in the Auth Configuration area.
6. Enable Change Password.
Enable collaboration with an LDAP server for fixed account verification
Perform this task to enable the Oasis platform to report usernames and passwords to the LDAP server for verification when users attempt to access the WLAN by using fixed accounts. This frees network administrators from importing account information from the LDAP server to the Oasis platform.
Restrictions and guidelines
To use this feature, make sure the LDAP server has been configured.
Procedure
1.
Hover over the grid icon ![]() , and then
select Network Management.
, and then
select Network Management.
2. Select a site from the scenario menu, and then select Settings > Routers > Authentication from the navigation pane.
3. Click the Wireless Authentication Templates tab.
4.
Click the Draw icon ![]() for the target
authentication template.
for the target
authentication template.
5. Click the Account tile in the Auth Configuration area.
6. Enable LDAP and configure LDAP settings as needed.
7. Click LDAP Config Verification to verify the LDAP settings.
Configure SMS gateways
To use SMS authentication or enable SMS-only for first login, you must first purchase an SMS package and create an SMS gateway.
Restrictions and guidelines
If a default SMS gateway has been configured, SMS authentication uses the default SMS gateway.
You can use an SMS package to create multiple SMS gateways for different WLANs. These gateways use the same serial number, key, and password.
Procedure
1.
Hover over the grid icon ![]() , and then
select Network Management.
, and then
select Network Management.
2. Select a site from the scenario menu, and then select System > SMS Gateway from the navigation pane.
3. On the Emay SMS Platform tab, configure SMS gateways as needed.
Enable client limit
With this feature enabled, a phone number can be bound to only one client. If multiple clients using the same phone number come online, only the most recent one can stay online.
To enable client limit:
1.
Hover over the grid icon ![]() , and then
select Network Management.
, and then
select Network Management.
2. Select a site from the scenario menu, and then select Settings > Routers > Authentication from the navigation pane.
3. Click the Wireless Authentication Templates tab.
4.
Click the Draw icon ![]() for the target
authentication template.
for the target
authentication template.
5. Click the SMS tile in the Auth Configuration area.
6. Enable Client Limit.
Remember phone numbers
This feature enables users to use phone numbers that have passed SMS authentication to re-access the WLAN without being authenticated again within the specified period. This saves short message resources.
To remember phone numbers:
1.
Hover over the grid icon ![]() , and then
select Network Management.
, and then
select Network Management.
2. Select a site from the scenario menu, and then select Settings > Routers > Authentication from the navigation pane.
3. Click the Wireless Authentication Templates tab.
4.
Click the Draw icon ![]() for the target
authentication template.
for the target
authentication template.
5. Click the SMS tile in the Auth Configuration area.
6. Enable Remember Phone No. and specify the maximum period that a phone number can be remembered.
Set the validity period of verification codes
Verification codes sent to a phone number within the validity period are the same.
To set the validity period of verification codes:
1.
Hover over the grid icon ![]() , and then
select Network Management.
, and then
select Network Management.
2. Select a site from the scenario menu, and then select Settings > Routers > Authentication from the navigation pane.
3. Click the Wireless Authentication Templates tab.
4.
Click the Draw icon ![]() for the target
authentication template.
for the target
authentication template.
5. Click the SMS tile in the Auth Configuration area.
6. Set the verification code validity.
Configure WeChat Wi-Fi authentication through QR code scanning
With this feature configured, clients can pass WeChat Wi-Fi authentication simply by using WeChat to scan a specific QR code.
Restrictions and guidelines
For this feature to take effect, configure portal-based WeChat Wi-Fi authentication and disable the captive-bypass feature. For more information, see "Configure WeChat Wi-Fi authentication" and "Enable the captive-bypass feature."
As a best practice for easy configuration, obtain the QR code from a third-party website.
Configure the portal redirection feature on the device
# Configure a match rule to redirect HTTP requests destined for the URL http://o2o.gtimg.com/wifi/echo to the URL http://oasisauth.h3c.com/generate_404.
<Sysname> system-view
[Sysname] portal web-server cloud
[Sysname-portal-websvr-cloud] if-match original-url http://o2o.gtimg.com/wifi/echo redirect-url http://oasisauth.h3c.com/generate_404
Obtain the QR code from Tencent
1. Access WeChat Official Accounts Platform at https://mp.weixin.qq.com/.
2. From the navigation pane, select Function > Wi-Fi.
3. Click the User Connect tab, and then click Configure now in the QR code area.
Figure 96 User Connect tab
4. Click the Details button for the target shop.
5. Click the Preview button and then click Download.
Figure 97 Downloading the QR code
Obtain the QR code from a third-party website
This section uses website https://cli.im/ as an example.
To obtain the QR code from a third-party website:
1. Access the QR code generation website.
2. Enter http://oasisauth.h3c.com/portal/wxscan/wx-scan.jsp?ssid=ssid in the text area and click the button below to generate a QR code. The ssid represents the SSID of the shop.
Figure 98 Generating the QR code
3. Download the QR code.
Figure 99 Downloading the QR code
Set the WeChat Wi-Fi name
Restrictions and guidelines
This feature is available only for authentication templates configured in the App Center.
By default, the Wi-Fi name is h3c-lvzhou.
Procedure
1.
Hover over the grid icon ![]() ,
and then select App Center.
,
and then select App Center.
2.
On the Authentication Templates tab, click
the Draw icon ![]() for the target authentication template.
for the target authentication template.
3. Click the WeChat Wi-Fi tile in the Auth Configuration area.
4. Enable WeChat Wi-Fi and set the Wi-Fi name.
Enable forced follow
With this feature enabled, users must follow the WeChat official account to pass WeChat Wi-Fi authentication.
Restrictions and guidelines
This feature is unavailable when users use PCs to access the WLAN.
You cannot configure both this feature and mini program redirection.
Procedure
1.
Hover over the grid icon ![]() ,
and then select Network Management.
,
and then select Network Management.
2. Select a site from the scenario menu, and then select Settings > Routers > Authentication from the navigation pane.
3. Click the Wireless Authentication Templates tab.
4.
Click the Draw icon ![]() for the
target authentication template.
for the
target authentication template.
5. Click the WeChat Wi-Fi tile in the Auth Configuration area.
6. Enable Forced Follow.
Redirect users to a WeChat mini program
With this feature enabled, the system redirects users to a WeChat mini program after the users pass WeChat Wi-Fi authentication.
Users can click the banner at the top of the WeChat Chats page to re-access the mini program, as shown in Figure 38.
Figure 100 Mini program banner
Restrictions and guidelines
Make sure the mini program is available before you enable this feature.
You cannot configure both this feature and forced follow.
Obtain the original ID of the mini program
1. Access WeChat Official Accounts Platform at https://mp.weixin.qq.com/.
2. From the navigation pane, select Mini Program > MiniProgram Manage.
3. Click Add and then bind the mini program to the official account.
Figure 101 Binding a mini program
4. On the MiniProgram Manage page, hover over the icon of the bound mini program and click Details to view the original ID of the mini program.
Figure 102 Viewing the original ID of the mini program
Configure mini program redirection on the Oasis platform
Restrictions and guidelines
Change the mini program path when the homepage of the mini program changes.
Procedure
1.
Hover over the grid icon ![]() ,
and then select Network Management.
,
and then select Network Management.
2. Select a site from the scenario menu, and then select Settings > Routers > Authentication from the navigation pane.
3. Click the Wireless Authentication Templates tab.
4.
Click the Draw icon ![]() for the
target authentication template.
for the
target authentication template.
5. Click the WeChat Wi-Fi tile in the Auth Configuration area.
6. Enable Mini Program. This function is available only when Forced Follow is disabled.
7. Enter the mini program original ID and the mini program path.
Enable log-off upon unfollow
This feature enables the system to log off users that come online through WeChat Wi-Fi and unfollow the WeChat official account during association.
To enable log-off upon unfollow:
1.
Hover over the grid icon ![]() ,
and then select Network Management.
,
and then select Network Management.
2. Select a site from the scenario menu, and then select Settings > Routers > Authentication from the navigation pane.
3. Click the Wireless Authentication Templates tab.
4.
Click the Draw icon ![]() for the
target authentication template.
for the
target authentication template.
5. Click the WeChat Wi-Fi tile in the Auth Configuration area.
6. Enable Forced Follow and then enable Log-Off upon Unfollow.
Change visual effect settings of the login page
Perform this task to customize the background color, background opacity, and text color on the login page.
Restrictions and guidelines
|
|
CAUTION: Restoring default settings will remove all user-defined visual effect settings and the restore operation is irreversible. Please use this feature with caution. |
Visual effect settings of authentication methods take effect only when multiple authentication methods are enabled.
Procedure
1.
Hover over the grid icon ![]() ,
and then select Network Management.
,
and then select Network Management.
2. Select a site from the scenario menu, and then select Settings > Routers > Authentication from the navigation pane.
3. Click the Wireless Authentication Templates tab.
4.
Click the Draw icon ![]() for the
target authentication template.
for the
target authentication template.
5. Click to expand the Login Style menu in the Auth Configuration area.
6. Configure the background color, background opacity, and text color as needed.
The adjustment will be displayed in the preview area in real time. To restore the default visual effect settings, click Restore Default.
Configure Internet access settings
Procedure
1.
Hover over the grid icon ![]() ,
and then select Network Management.
,
and then select Network Management.
2. Select a site from the scenario menu, and then select Settings > Routers > Authentication from the navigation pane.
3. Click the Wireless Authentication Templates tab.
4.
Click the Draw icon ![]() for the
target authentication template.
for the
target authentication template.
5. Click to expand the Advanced Settings menu in the Auth Configuration area.
6. Configure Internet access settings as needed.
Parameters
· Session Timeout: Maximum continuous online duration of a client upon one authentication. A client will be logged off when its continuous online duration exceeds the timeout. The session timeout cannot be larger than the daily online duration.
· Daily Online Duration: Maximum online duration of a client for a day. A client will be logged off when its online duration for a day exceeds the limit. The daily online duration cannot be smaller than the session timeout.
· Minimum Traffic and Idle Timer: Logs off a client if its traffic within an idle timer fails to reach the minimum traffic threshold. Setting the idle timer to 0 disables the idle timer feature.
|
|
NOTE: As a best practice, set the idle timer to a value no larger than half of the clients' IP address lease, enabling entries of offline clients to be deleted in time. |
· Client Rate Limit: Limited rate of uplink and downlink client traffic. This feature is supported in versions higher than 5417P01.
· HTTPS for Landing and Login: Use HTTPS sessions for the Landing and Login page.
· Permit PC: Permit PCs to access the WLAN. Facebook authentication does not support this feature.
· SMS-Only for First Login: Require users to pass SMS authentication at the first login. If a user passes SMS authentication, the system generates a phone number and MAC address binding entry for the user. The administrators can view the entry in the client list in which phone numbers are used as usernames. App authentication and Facebook authentication do not support this feature.
Manage dumb terminal account groups
Perform this task to create, delete, or edit dumb terminal account groups and import or export dumb terminal accounts.
If you enable dumb terminal authentication and specify an account group, only dumb terminals in the group can access the WLAN.
To manage dumb terminal account groups:
1.
Hover over the grid icon ![]() ,
and then select App Center.
,
and then select App Center.
2. Click the Accounts tab.
3. On the Dumb Terminal Accounts tab, configure dumb terminal account groups.
Configure portal automated authentication
This feature allows users that have been authenticated to access the network without re-authentication within the auth-free period. The following modes are available:
· Portal redirection—In this mode, users must run a browser to trigger automatic portal authentication. This mode supports pushing ads to clients.
· MAC-trigger—In this mode, users can access the WLAN without running a browser. This mode does not support pushing ads to clients.
Configure portal redirection authentication
1.
Hover over the grid icon ![]() ,
and then select Network Management.
,
and then select Network Management.
2. Select a site from the scenario menu, and then select Settings > Routers > Authentication from the navigation pane.
3. Click the Wireless Authentication Templates tab.
4.
Click the Draw icon ![]() for the
target authentication template.
for the
target authentication template.
5. Click to expand the Advanced Settings menu in the Auth Configuration area.
6. Click the Auth-Free tab and configure the Free Auth feature.
Configure MAC-trigger authentication
1. Configure portal-free authentication. For more information, see "Configure portal redirection authentication."
2. Apply MAC binding server cloud to service template cloud.
[Sysname] wlan service-template cloud
[Sysname-wlan-st-cloud] portal apply mac-trigger-server cloud
Configure inter-site and inter-SSID re-authentication
This feature allows clients that have been authenticated to roam between wireless services associated with different sites or different SSIDs for the same site without re-authentication. These wireless services must use the same authentication template or have the same SSID.
Restrictions and guidelines
This feature is available only for authentication templates configured in the App Center.
Procedure
1.
Hover over the grid icon ![]() , and then
select App Center.
, and then
select App Center.
2.
Click the Draw icon ![]() for the target
authentication template.
for the target
authentication template.
3. Click to expand the Advanced Settings menu in the Auth Configuration area.
4. Click the Auth-Free tab and enable Free Auth.
5. Configure inter-site and inter-SSID re-authentication.
Configure Internet access control
Perform this task to specify the time ranges during which users are allowed to access the WLAN.
Restrictions and guidelines
Internet access control is on a per-hour basis. You can specify a maximum of five time ranges for a day. To specify a time range that ends at 24 o'clock, set the end time to 00. If you set a time range to 00 to 00 for a day, users can access the Internet at any time that day.
Procedure
1.
Hover over the grid icon ![]() , and then
select Network Management.
, and then
select Network Management.
2. Select a site from the scenario menu, and then select Settings > Routers > Authentication from the navigation pane.
3. Click the Wireless Authentication Templates tab.
4.
Click the Draw icon ![]() for the target
authentication template.
for the target
authentication template.
5. Click to expand the Advanced Settings menu in the Auth Configuration area.
6. Click the Internet Access Control tab and specify the time ranges.
Configure the developer mode
|
|
CAUTION: Editing the codes of existing functions might disable Oasis authentication. Please use this feature with caution. |
The developer mode allows users to modify the source codes of an authentication template for customization purposes.
Procedure
1.
Hover over the grid icon ![]() , and then
select Network Management.
, and then
select Network Management.
2. Select a site from the scenario menu, and then select Settings > Routers > Authentication from the navigation pane.
3. Click the Wireless Authentication Templates tab.
4.
Click the Draw icon ![]() for the target
authentication template.
for the target
authentication template.
5. Click Developer Mode in the upper right corner.
Configure the domain name whitelist and blacklist
Restrictions and guidelines
This feature takes effect only when wireless authentication is configured.
Procedure
1.
Hover over the grid icon ![]() , and then
select Network Management.
, and then
select Network Management.
2. Select a site from the scenario menu, and then select Settings > Routers > Authentication from the navigation pane.
3. Click the Domain Name Whitelist or Domain Name Blacklist tab to configure the whitelist or blacklist.
View or export history of authentication template deployment
Perform this task to view the history of all authentication template deployment or deployment in the current day, past 7 days, or past 30 days.
To view or export history of authentication template deployment:
1.
Hover over the grid icon ![]() , and then
select App Center.
, and then
select App Center.
2.
On the Authentication Templates tab, click the Apply icon ![]() for the target authentication template.
for the target authentication template.
3. Click the ACs tab to view the deployment history for an AC.
Configure Oasis authentication with an MER gateway as the authenticator
Configure basic settings
Prerequisites
Before configuring Oasis platform authentication, complete the following tasks:
· Connect the device to the Oasis platform.
For more information, see H3C Oasis Platform Deployment Guide.
· Complete the VLAN and DHCP settings.
Configure one-key authentication
1.
Hover over the grid icon ![]() , and then
select Network Management.
, and then
select Network Management.
2. Select a site from the scenario menu, and then select Settings > Device Category > Authentication from the navigation pane.
3. To add an authentication template, click Add on the Wired Authentication Templates tab.
4.
To edit an authentication template, click
the Edit icon ![]() for that authentication template.
for that authentication template.
5.
To bind an authentication template to an
interface, click the Edit icon ![]() for that authentication template, select the
target VLAN interface or Layer 3 Ethernet interface, and then click Apply. If the
template has been bound to an interface, skip this step.
for that authentication template, select the
target VLAN interface or Layer 3 Ethernet interface, and then click Apply. If the
template has been bound to an interface, skip this step.
6.
Click the Draw icon ![]() for the target
authentication template.
for the target
authentication template.
7. Click the One-Key tile in the Auth Configuration area, enable one-key authentication, and then configure other settings as needed.
8. Click OK or click Release in the upper right corner of the page.
Figure 103 Configuring one-key authentication
Configure fixed account authentication
Restrictions and guidelines
If you do not configure the validity period or configure it as 0, the account never expires.
If you select Bind MAC Address and do not enter any MAC addresses, clients that use the fixed account are not limited.
If you select Sent by Email, the system sends the account name and password to the specified email address. The number of email addresses cannot exceed 10 and must be separated by commas.
Procedure
1.
Hover over the grid icon ![]() , and then
select Network Management.
, and then
select Network Management.
2. Select a site from the scenario menu, and then select Settings > Device Category > Users from the navigation pane.
3. Click the Fixed Accounts tab.
4. Click Add.
5. Configure fixed account information as required.
Figure 104 Adding a fixed account

6.
To add an authentication template, select Settings > Device Category > Authentication
from the navigation pane, and then click Add on the Wired Authentication
Templates tab. To edit an authentication
template, click the Edit icon ![]() for that authentication template.
for that authentication template.
7.
To bind an authentication template to an
interface, click the Edit icon ![]() for that authentication template, select the
target VLAN interface or Layer 3 Ethernet interface, and then click Apply. If the
template has been bound to an interface, skip this step.
for that authentication template, select the
target VLAN interface or Layer 3 Ethernet interface, and then click Apply. If the
template has been bound to an interface, skip this step.
8.
Click the Draw icon ![]() for the target
authentication template.
for the target
authentication template.
9. Click the Account tile in the Auth Configuration area, enable fixed account authentication, and then configure other settings as needed.
10. Disable other authentication methods.
11. Click OK or click Release in the upper right corner of the page.
Figure 105 Configuring fixed account authentication
Configure SMS authentication
Restrictions and guidelines
To use SMS authentication, you must first purchase an SMS package from the Emay platform at www.emay.cn.
Procedure
1.
Hover over the grid icon ![]() , and then select Network Management.
, and then select Network Management.
2. Select a site from the scenario menu, and then select System > SMS Gateway from the navigation pane.
3.
To add an SMS gateway, click Add on the Emay SMS Platform tab. To edit an SMS gateway, click the Edit icon ![]() for that
SMS gateway.
for that
SMS gateway.
4. Configure the SMS gateway settings as needed.
An SMS signature is the beginning identifier part of the verification code.
Figure 106 Creating or editing an SMS gateway
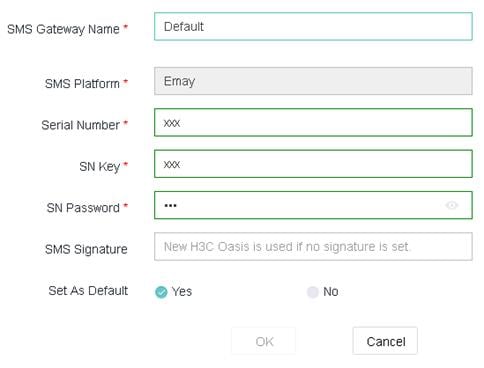
5. Contact Emay customer service to perform the following tasks:
¡ Bind the IP address (139.217.27.153) of the Oasis domain (oasis.h3c.com) to the SMS package.
¡ Bind the IP address (139.217.11.74) of the Oasis domain (oasisauth.h3c.com) to the SMS package.
6.
To add an authentication template, select Settings > Device Category > Authentication from the navigation
pane, and then click Add on the Wired
Authentication Templates tab. To edit an authentication template, click the Edit icon ![]() for that authentication template.
for that authentication template.
7.
To bind an authentication template to an
interface, click the Edit icon ![]() for that authentication template, select the
target VLAN interface or Layer 3 Ethernet interface, and then click Apply. If the
template has been bound to an interface, skip this step.
for that authentication template, select the
target VLAN interface or Layer 3 Ethernet interface, and then click Apply. If the
template has been bound to an interface, skip this step.
8.
Click the Draw icon ![]() for the
target authentication template.
for the
target authentication template.
9. Click the SMS tile in the Auth Configuration area, enable SMS authentication, and then configure other settings as needed.
10. Disable other authentication methods.
11. Click OK or click Release in the upper right corner of the page.
Figure 107 Configuring SMS authentication
Configure WeChat official account authentication
Restrictions and guidelines
Tenants must have a WeChat service account certified by Tencent.
Configure the WeChat official accounts platform
1. Use the applied WeChat service account to access the WeChat official accounts platform at https://mp.weixin.qq.com/.
Figure 108 Logging in to the service account
![]()
2. Select Development > Basic Configuration from the navigation pane.
a. On the page that opens, obtain the AppID and AppSecret.
After the AppSecret is enabled and generated, the WeChat official accounts platform will not store or display the AppSecret. Please save it properly.
Figure 109 Obtaining AppID and AppSecret
b. Add the IP addresses 139.217.7.53, 139.217.17.204, and 139.219.0.33 to the IP whitelists.
Figure 110 Adding an IP address to the whitelist
3. Select Development > Interface Privilege from the navigation pane, and then click Modify in the Web Page Authentication field.
Figure 111 Modifying Web page authentication
4. On the Function setting tab, click Set-up in the Webpage authentication domain name field.
Figure 112 Editing the Web page authenticate domain name
5. Select Function > Custom Menu from the navigation pane, click the add icon + , and then configure other settings as needed.
As a best practice, enter http://10.1.0.6 in in the Page address field.
Figure 113 Specifying a menu
Configure WeChat official account authentication
1. Select a site from the scenario menu, and then select Settings > Device Category > Authentication from the navigation pane.
2.
To add an authentication template, click Add on the Wired Authentication
Templates tab. To edit an authentication
template, click the Edit icon ![]() for that authentication template.
for that authentication template.
3.
To bind an authentication template to an
interface, click the Edit icon ![]() for that authentication template, select the
target VLAN interface or Layer 3 Ethernet interface, and then click Apply. If the
template has been bound to an interface, skip this step.
for that authentication template, select the
target VLAN interface or Layer 3 Ethernet interface, and then click Apply. If the
template has been bound to an interface, skip this step.
4.
Click the Draw icon ![]() for the
target authentication template.
for the
target authentication template.
5. Click the WeChat OA tile in the Auth Configuration area, and then enable WeChat official account authentication.
6. Click Import Official Account and scan the QR code.
7. Enter the AppSecret.
8. Disable other authentication methods.
9. Click OK or click Release in the upper right corner of the page.
Figure 114 Configuring WeChat official account authentication
Configure WeChat Wi-Fi authentication
Restrictions and guidelines
· Tenants must have a WeChat official account, either an uncertified or certified service account or subscription account, and an online shop certified by Tencent and must make sure the WeChat Wi-Fi and shop mini program plug-ins have been enabled.
· Terminals to be authenticated must have logged in to WeChat and have been bound to their phone numbers.
· Some terminals such as Samsung and AGM terminals or some OS versions do not support this authentication method. If these terminals want to access the network, they will be authenticated by using one-key authentication.
· You can enable forced follow or redirection to WeChat mini program after authentication, but cannot configure both of them.
· This section configures portal-based WeChat Wi-Fi authentication. To configure WeChat Wi-Fi authentication through QR code scanning, see "Configure WeChat Wi-Fi authentication through QR code scanning."
Configure the WeChat official accounts platform
1. Use the official account to access WeChat Official Accounts Platform at https://mp.weixin.qq.com/.
2. Click the Add Plug-ins button from the Function field to add a Wi-Fi plug-in.
Figure 115 Adding a Wi-Fi plug-in
3. From the navigation pane, select Function > Store Management, and then click the Create a new store button to add an online store.
Figure 116 Adding an online store
4. From the navigation pane, select Function > Wi-Fi, click the Add Device button on the Device Management tab, and then perform the following steps:
a. Select a store.
b. Select the Portal-authenticated device from the Device Type field.
Only the portal devices are supported.
c. Enter an SSID.
Figure 117 Adding a device
5. Select Development > Basic Configuration from the navigation pane.
a. On the page that opens, obtain the AppID and AppSecret.
After the AppSecret is enabled and generated, the WeChat official accounts platform will not store or display the AppSecret. Please save it properly.
Figure 118 Obtaining AppID and AppSecret
a. Add the IP addresses (139.217.7.53, 139.217.17.204 and 139.219.0.33) to the IP whitelists.
Figure 119 Adding an IP address to the whitelist
Configure WeChat Wi-Fi authentication
1. Select a site from the scenario menu, and then select Settings > Device Category > Authentication from the navigation pane.
2.
To add an authentication template, click Add on the Wired Authentication
Templates tab. To edit an authentication
template, click the Edit icon ![]() for that authentication template.
for that authentication template.
3.
To bind an authentication template to an
interface, click the Edit icon ![]() for that authentication template, select the
target VLAN interface or Layer 3 Ethernet interface, and then click Apply. If the
template has been bound to an interface, skip this step.
for that authentication template, select the
target VLAN interface or Layer 3 Ethernet interface, and then click Apply. If the
template has been bound to an interface, skip this step.
4.
Click the Draw icon ![]() for the
target authentication template.
for the
target authentication template.
5. Click the WeChat Wi-Fi tile in the Auth Configuration area, and then enable WeChat Wi-Fi authentication.
6. Click Import Shop and scan the QR code.
Only the administrator of the official account can scan the QR code to authorize the official account.
7. Disable other authentication methods.
8. Click OK or click Release in the upper right corner of the page.
Figure 120 Configuring WeChat Wi-Fi authentication
Configure guest authentication
Restrictions and guidelines
After configuration, a guest can access the network only after the approver scans the QR code on the client and authorizes the client. The QR code is valid for five minutes. When the QR code expires, the guest must refresh the QR code.
Procedure
1.
Hover over the grid icon ![]() ,
and then select App Center.
,
and then select App Center.
2. Click the Accounts tab.
3. Click the Guest Accounts tab, click Add.
An approver is added after the approver scans the QR code, and then enters the verification code. If the approver is deleted, the Oasis platform automatically removes the permission from the approver.
Figure 121 Adding an approver
4. Select a site from the scenario menu, and then select Settings > Device Category > Authentication from the navigation pane.
5.
To add an authentication template, click Add on the Wired Authentication
Templates tab. To edit an authentication
template, click the Edit icon ![]() for that authentication template.
for that authentication template.
6.
To bind an authentication template to an
interface, click the Edit icon ![]() for that authentication template, select the
target VLAN interface or Layer 3 Ethernet interface, and then click Apply. If the
template has been bound to an interface, skip this step.
for that authentication template, select the
target VLAN interface or Layer 3 Ethernet interface, and then click Apply. If the
template has been bound to an interface, skip this step.
7.
Click the Draw icon ![]() for the
target authentication template.
for the
target authentication template.
8. Click the Guest tile in the Auth Configuration area, and then enable guest authentication.
9. Select approvers.
The Approvers field only displays the approvers authorized by this account and all its subaccounts. For tenants, the Approvers field displays the approvers authorized by all its subaccounts.
10. Disable other authentication methods.
11. Click OK or click Release in the upper right corner of the page.
Figure 122 Configuring guest authentication
Configure app authentication
With app authentication enabled, users will be redirected to a webpage to download an app for authentication.
Prerequisites
The operator must complete the following tasks:
· Develop a redirection page that provides a link for downloading the app and a link for opening the app.
· Add the key in the standard interface format for app authentication provided by the Oasis platform to the app.
Procedure
1.
Hover over the grid icon ![]() ,
and then select Network Management.
,
and then select Network Management.
2. Select a site from the scenario menu, and then select Settings > Device Category > Authentication from the navigation pane.
3. To add an authentication template, click Add on the Wired Authentication Templates tab.
4.
To edit an authentication template, click
the Edit icon ![]() for that authentication template.
for that authentication template.
5.
To bind an authentication template to an
interface, click the Edit icon ![]() for that authentication template, select the
target VLAN interface or Layer 3 Ethernet interface, and then click Apply. If the
template has been bound to an interface, skip this step.
for that authentication template, select the
target VLAN interface or Layer 3 Ethernet interface, and then click Apply. If the
template has been bound to an interface, skip this step.
6.
Click the Draw icon ![]() for the
target authentication template.
for the
target authentication template.
7. Click the APP tile in the Auth Configuration area, enable app authentication, specify the URL for redirection, and enter the key.
8. Click OK or click Release in the upper right corner of the page.
Figure 123 Configuring app authentication
Configure member authentication
With member authentication enabled, members can access the network by entering his or her phone number on the authentication page. Non-members must register on the authentication page first and then access the network as members.
Procedure
1.
Hover over the grid icon ![]() ,
and then select Network Management.
,
and then select Network Management.
2. Select a site from the scenario menu, and then select Settings > Device Category > Authentication from the navigation pane.
3. To add an authentication template, click Add on the Wired Authentication Templates tab.
4.
To edit an authentication template, click
the Edit icon ![]() for that authentication template.
for that authentication template.
5.
To bind an authentication template to an
interface, click the Edit icon ![]() for that authentication template, select the
target VLAN interface or Layer 3 Ethernet interface, and then click Apply. If the
template has been bound to an interface, skip this step.
for that authentication template, select the
target VLAN interface or Layer 3 Ethernet interface, and then click Apply. If the
template has been bound to an interface, skip this step.
6.
Click the Draw icon ![]() for the
target authentication template.
for the
target authentication template.
7. Click the Member Authentication tile in the Auth Configuration area, enable member authentication, configure other parameters as needed, and disable all the other authentication methods.
8. Click OK or click Release in the upper right corner of the page.
Figure 124 Configuring member authentication

Configure combined authentication
Restrictions and guidelines
Only the following authentication methods can be used together:
· Fixed account authentication.
· SMS authentication.
· WeChat official account authentication.
· WeChat Wi-Fi authentication.
· Facebook authentication.
· Member authentication.
As a best practice, do not use the WeChat official account authentication with other authentication methods.
A user can access the network as long as the user passes one authentication.
Procedure
1. Configure settings on the device as described in "Configure settings on the device" if the device software version is below 5405.
2. Configure the WeChat official accounts platform as described in "Configure WeChat official account authentication" and "Configure WeChat Wi-Fi authentication" if the WeChat official account authentication or WeChat Wi-Fi authentication is used.
3. Configure a minimum of two authentication methods. Details not shown.
Customize an authentication page
You can configure the landing page, login page, login success page, and home page and can push or disable the landing page or login success page as needed.
Restrictions and guidelines
The picture size cannot exceed 1 M. As a best practice, set the picture size to be in the range of 100 KB to 200 KB. Only JPG, JPEG, BMP, PNG, GIF, and SVG formats are allowed.
As a best practice to avoid affecting the loading speed of the page, do not add too many controls.
Procedure
1.
Hover over the grid icon ![]() , and then
select App Center.
, and then
select App Center.
2.
On the Authentication Templates tab, click
the Draw icon ![]() for the target authentication template.
for the target authentication template.
3. Configure the following settings as shown in Figure 31:
¡ Logo—The aspect ratio must be 1:1. The picture will be automatically cut into a circle. You can enter a shop name with a length of less than 12 characters.
¡ Background—The aspect ratio must be 3:5.
¡ Carousel—The aspect ratio must be 11:5. Two or three pictures of the same height are required.
¡ Picture—The aspect ratio must be 11:5. The description for the picture cannot exceed 48 characters.
¡ Video—The video size cannot exceed 1 M. Only MP4, WEBM, and OGG formats are allowed.
¡ Text—You can edit the font, font size, bold type, and font color.
Figure 125 Custom template description

4. To configure the homepage, click the Home tab, and then select Use Custom Link.
5. Enter a custom link and then click Upload.
6. To preview the link, click Preview in the upper right corner of the page.
Figure 126 Previewing the configuration change
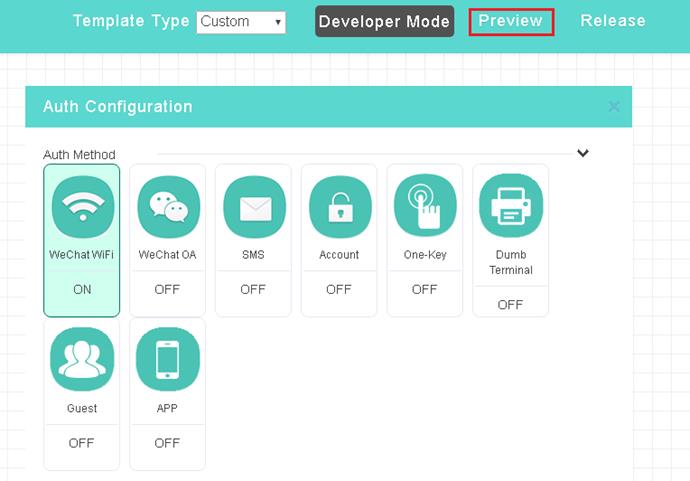
7. Click Release in the upper right corner of the page.
The homepage pushed to users during portal authentication will be replaced by the page redirected by this custom link.
Figure 127 Configuring the custom template
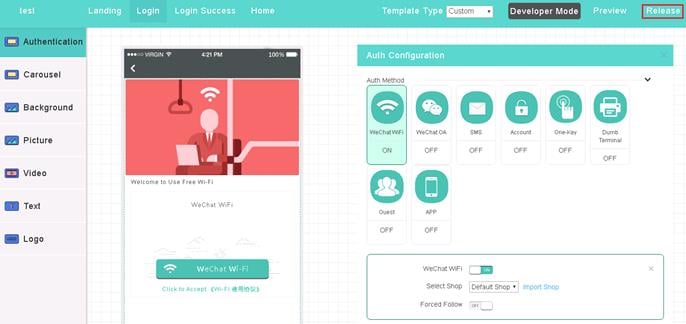
Configure advanced settings
The Oasis platform provides advanced authentication settings to simplify authentication management, reduce cost, and optimize market promotion. Table 3 describes available advanced features for each authentication method. You can configure these settings as needed.
Table 6 Advanced Oasis authentication features
|
Authentication method |
Advanced features |
|
One-key authentication |
Captive-bypass Hiding and customizing one-key authentication button Internet access settings Free authentication Inter-site and inter-SSID re-authentication Internet access control Developer mode Domain name whitelist and blacklist Viewing and exporting history of authentication configuration deployment |
|
Fixed-account authentication |
Captive-bypass Bulk management of fixed accounts Self-service password change Collaboration with LDAP server Changing visual effects of the login page Internet access settings Free authentication Inter-site and inter-SSID re-authentication Internet access control Developer mode Domain name whitelist and blacklist Viewing and exporting history of authentication configuration deployment |
|
SMS authentication |
Captive-bypass SMS gateway Client limit Remembering phone numbers Setting validity period of verification codes Changing visual effect settings of the login page Internet access settings Free authentication Inter-site and inter-SSID re-authentication Internet access control Developer mode Domain name whitelist and blacklist Viewing and exporting history of authentication configuration deployment |
|
WeChat official account authentication |
Captive-bypass Changing visual effect settings of the login page Internet access settings Free authentication Inter-site and inter-SSID re-authentication Internet access control Developer mode Domain name whitelist and blacklist Viewing and exporting history of authentication configuration deployment |
|
WeChat Wi-Fi |
Captive-bypass WeChat Wi-Fi authentication through QR code scanning Customizing Wi-Fi name Forced follow WeChat mini program redirection Log-off upon unfollow Changing visual effect settings of the login page Internet access settings Free authentication Inter-site and inter-SSID re-authentication Internet access control Developer mode Domain name whitelist and blacklist Viewing and exporting history of authentication configuration deployment |
|
Guest authentication |
Captive-bypass Internet access settings Free authentication Inter-site and inter-SSID re-authentication Internet access control Developer mode Domain name whitelist and blacklist Viewing and exporting history of authentication configuration deployment |
|
App authentication |
Captive-bypass Internet access settings Internet access control Developer mode Domain name whitelist and blacklist Viewing and exporting history of authentication configuration deployment |
|
Member authentication |
Captive-bypass Changing visual effect settings of the login page Internet access settings Inter-site and inter-SSID re-authentication Internet access control Developer mode Domain name whitelist and blacklist Viewing and exporting history of authentication configuration deployment |
|
Dumb terminal authentication |
Captive-bypass Management of dumb terminal account groups Internet access control Developer mode Domain name whitelist and blacklist Viewing and exporting history of authentication configuration deployment |
Enable the captive-bypass feature
Typically, the device pushes the authentication page to a client automatically when the client attempts to access a portal authentication network. The captive-bypass feature enables the device to push the portal authentication page to the client only when the user launches a browser.
To enable the captive-bypass feature, you must perform the following steps on the device:
1. Enter system view.
system-view
2. Enter portal Web server view of Web server cloud.
portal web-server cloud
3. Enable the captive-pass feature.
captive-bypass enable
Hide or customize the one-key authentication button
Perform this task to hide the one-key authentication button or change the button style. If the button is hidden, users pass the authentication automatically after the countdown timer on the login page expires.
Restrictions and guidelines
You can change the button style only when the button is not hidden.
Procedure
1.
Hover over the grid icon ![]() , and then
select Network Management.
, and then
select Network Management.
2. Select a site from the scenario menu, and then select Settings > Device Category > Authentication from the navigation pane.
3. Click the Wired Authentication Templates tab.
4.
Click the Draw icon ![]() for the target
authentication template.
for the target
authentication template.
5. Click the One-Key tile in the Auth Configuration area, and then hide or customize the button as needed.
Manage fixed accounts
Perform this task to delete, import, or export fixed accounts in bulk.
To manage fixed accounts:
1.
Hover over the grid icon ![]() , and then select Network Management.
, and then select Network Management.
2. Select a site from the scenario menu, and then select Settings > Device Category > Users from the navigation pane.
3. Click the Fixed Accounts tab.
4. To delete fixed accounts, select the target fixed accounts and then click Delete.
5. To import fixed accounts, click Import, download the template file and fill in the file as required, and then upload the template file.
6. To export fixed accounts, click Export.
Enable self-service password change
This feature enables users to change passwords at login. With this feature disabled, only the administrators can change the passwords of fixed accounts.
To enable self-service password change:
1.
Hover over the grid icon ![]() , and then select Network Management.
, and then select Network Management.
2. Select a site from the scenario menu, and then select Settings > Device Category > Authentication from the navigation pane.
3. Click the Wired Authentication Templates tab.
4.
Click the Draw icon ![]() for the target
authentication template.
for the target
authentication template.
5. Click the Account tile in the Auth Configuration area.
6. Enable Change Password.
Enable collaboration with an LDAP server for fixed account verification
Perform this task to enable the Oasis platform to report usernames and passwords to the LDAP server for verification when users attempt to access the WLAN by using fixed accounts. This frees network administrators from importing account information from the LDAP server to the Oasis platform.
Restrictions and guidelines
To use this feature, make sure the LDAP server has been configured.
Procedure
1.
Hover over the grid icon ![]() , and then
select Network Management.
, and then
select Network Management.
2. Select a site from the scenario menu, and then select Settings > Device Category > Authentication from the navigation pane.
3. Click the Wired Authentication Templates tab.
4.
Click the Draw icon ![]() for the target
authentication template.
for the target
authentication template.
5. Click the Account tile in the Auth Configuration area.
6. Enable LDAP and configure LDAP settings as needed.
7. Click LDAP Config Verification to verify the LDAP settings.
Configure SMS gateways
To use SMS authentication or enable SMS-only for first login, you must first purchase an SMS package and create an SMS gateway.
Restrictions and guidelines
If a default SMS gateway has been configured, SMS authentication uses the default SMS gateway.
You can use an SMS package to create multiple SMS gateways for different WLANs. These gateways use the same serial number, key, and password.
Procedure
1.
Hover over the grid icon ![]() , and then
select Network Management.
, and then
select Network Management.
2. Select a site from the scenario menu, and then select System > SMS Gateway from the navigation pane.
3. On the Emay SMS Platform tab, configure SMS gateways as needed.
Enable client limit
With this feature enabled, a phone number can be bound to only one client. If multiple clients using the same phone number come online, only the most recent one can stay online.
To enable client limit:
1.
Hover over the grid icon ![]() , and then
select Network Management.
, and then
select Network Management.
2. Select a site from the scenario menu, and then select Settings > Device Category > Authentication from the navigation pane.
3. Click the Wired Authentication Templates tab.
4.
Click the Draw icon ![]() for the target
authentication template.
for the target
authentication template.
5. Click the SMS tile in the Auth Configuration area.
6. Enable Client Limit.
Remember phone numbers
This feature enables users to use phone numbers that have passed SMS authentication to re-access the WLAN without being authenticated again within the specified period. This saves short message resources.
To remember phone numbers:
1.
Hover over the grid icon ![]() , and then
select Network Management.
, and then
select Network Management.
2. Select a site from the scenario menu, and then select Settings > Device Category > Authentication from the navigation pane.
3. Click the Wired Authentication Templates tab.
4.
Click the Draw icon ![]() for the target
authentication template.
for the target
authentication template.
5. Click the SMS tile in the Auth Configuration area.
6. Enable Remember Phone No. and specify the maximum period that a phone number can be remembered.
Set the validity period of verification codes
Verification codes sent to a phone number within the validity period are the same.
To set the validity period of verification codes:
1.
Hover over the grid icon ![]() , and then
select Network Management.
, and then
select Network Management.
2. Select a site from the scenario menu, and then select Settings > Device Category > Authentication from the navigation pane.
3. Click the Wired Authentication Templates tab.
4.
Click the Draw icon ![]() for the target
authentication template.
for the target
authentication template.
5. Click the SMS tile in the Auth Configuration area.
6. Set the verification code validity.
Configure WeChat Wi-Fi authentication through QR code scanning
With this feature configured, clients can pass WeChat Wi-Fi authentication simply by using WeChat to scan a specific QR code.
Restrictions and guidelines
For this feature to take effect, configure portal-based WeChat Wi-Fi authentication and disable the captive-bypass feature. For more information, see "Configure WeChat Wi-Fi authentication" and "Enable the captive-bypass feature."
As a best practice for easy configuration, obtain the QR code from a third-party website.
Configure the portal redirection feature on the device
# Configure a match rule to redirect HTTP requests destined for the URL http://o2o.gtimg.com/wifi/echo to the URL http://oasisauth.h3c.com/generate_404.
<Sysname> system-view
[Sysname] portal web-server cloud
[Sysname-portal-websvr-cloud] if-match original-url http://o2o.gtimg.com/wifi/echo redirect-url http://oasisauth.h3c.com/generate_404
Obtain the QR code from Tencent
1. Access WeChat Official Accounts Platform at https://mp.weixin.qq.com/.
2. From the navigation pane, select Function > Wi-Fi.
3. Click the User Connect tab, and then click Configure now in the QR code area.
Figure 128 User Connect tab

4. Click the Details button for the target shop.
5. Click the Preview button and then click Download.
Figure 129 Downloading the QR code

Obtain the QR code from a third-party website
This section uses website https://cli.im/ as an example.
To obtain the QR code from a third-party website:
1. Access the QR code generation website.
2. Enter http://oasisauth.h3c.com/portal/wxscan/wx-scan.jsp?ssid=ssid in the text area and click the button below to generate a QR code. The ssid represents the SSID of the shop.
Figure 130 Generating the QR code
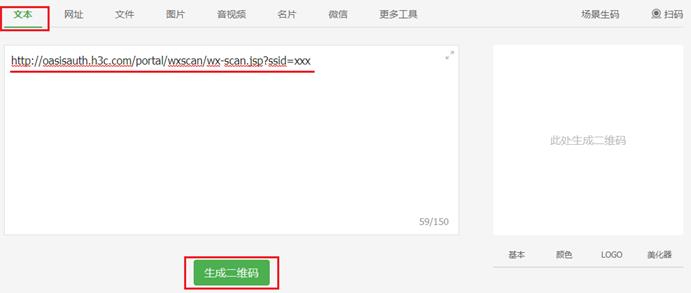
3. Download the QR code.
Figure 131 Downloading the QR code

Set the WeChat Wi-Fi name
Restrictions and guidelines
This feature is available only for authentication templates configured in the App Center.
By default, the Wi-Fi name is h3c-lvzhou.
Procedure
1.
Hover over the grid icon ![]() ,
and then select App Center.
,
and then select App Center.
2.
On the Authentication Templates tab, click
the Draw icon ![]() for the target authentication template.
for the target authentication template.
3. Click the WeChat Wi-Fi tile in the Auth Configuration area.
4. Enable WeChat Wi-Fi and set the Wi-Fi name.
Enable forced follow
With this feature enabled, users must follow the WeChat official account to pass WeChat Wi-Fi authentication.
Restrictions and guidelines
This feature is unavailable when users use PCs to access the WLAN.
You cannot configure both this feature and mini program redirection.
Procedure
1.
Hover over the grid icon ![]() ,
and then select Network Management.
,
and then select Network Management.
2. Select a site from the scenario menu, and then select Settings > Device Category > Authentication from the navigation pane.
3. Click the Wired Authentication Templates tab.
4.
Click the Draw icon ![]() for the
target authentication template.
for the
target authentication template.
5. Click the WeChat Wi-Fi tile in the Auth Configuration area.
6. Enable Forced Follow.
Redirect users to a WeChat mini program
With this feature enabled, the system redirects users to a WeChat mini program after the users pass WeChat Wi-Fi authentication.
Users can click the banner at the top of the WeChat Chats page to re-access the mini program, as shown in Figure 38.
Figure 132 Mini program banner

Restrictions and guidelines
Make sure the mini program is available before you enable this feature.
You cannot configure both this feature and forced follow.
Obtain the original ID of the mini program
1. Access WeChat Official Accounts Platform at https://mp.weixin.qq.com/.
2. From the navigation pane, select Mini Program > MiniProgram Manage.
3. Click Add and then bind the mini program to the official account.
Figure 133 Binding a mini program

4. On the MiniProgram Manage page, hover over the icon of the bound mini program and click Details to view the original ID of the mini program.
Figure 134 Viewing the original ID of the mini program
Configure mini program redirection on the Oasis platform
Restrictions and guidelines
Change the mini program path when the homepage of the mini program changes.
Procedure
1.
Hover over the grid icon ![]() ,
and then select Network Management.
,
and then select Network Management.
2. Select a site from the scenario menu, and then select Settings > Device Category > Authentication from the navigation pane.
3. Click the Wired Authentication Templates tab.
4.
Click the Draw icon ![]() for the
target authentication template.
for the
target authentication template.
5. Click the WeChat Wi-Fi tile in the Auth Configuration area.
6. Enable Mini Program. This function is available only when Forced Follow is disabled.
7. Enter the mini program original ID and the mini program path.
Enable log-off upon unfollow
This feature enables the system to log off users that come online through WeChat Wi-Fi and unfollow the WeChat official account during association.
To enable log-off upon unfollow:
1.
Hover over the grid icon ![]() ,
and then select Network Management.
,
and then select Network Management.
2. Select a site from the scenario menu, and then select Settings > Device Category > Authentication from the navigation pane.
3. Click the Wired Authentication Templates tab.
4.
Click the Draw icon ![]() for the
target authentication template.
for the
target authentication template.
5. Click the WeChat Wi-Fi tile in the Auth Configuration area.
6. Enable Forced Follow and then enable Log-Off upon Unfollow.
Change visual effect settings of the login page
Perform this task to customize the background color, background opacity, and text color on the login page.
Restrictions and guidelines
|
|
CAUTION: Restoring default settings will remove all user-defined visual effect settings and the restore operation is irreversible. Please use this feature with caution. |
Visual effect settings of authentication methods take effect only when multiple authentication methods are enabled.
Procedure
1.
Hover over the grid icon ![]() ,
and then select Network Management.
,
and then select Network Management.
2. Select a site from the scenario menu, and then select Settings > Device Category > Authentication from the navigation pane.
3. Click the Wired Authentication Templates tab.
4.
Click the Draw icon ![]() for the
target authentication template.
for the
target authentication template.
5. Click to expand the Login Style menu in the Auth Configuration area.
6. Configure the background color, background opacity, and text color as needed.
The adjustment will be displayed in the preview area in real time. To restore the default visual effect settings, click Restore Default.
Configure Internet access settings
Procedure
1.
Hover over the grid icon ![]() ,
and then select Network Management.
,
and then select Network Management.
2. Select a site from the scenario menu, and then select Settings > Device Category > Authentication from the navigation pane.
3. Click the Wired Authentication Templates tab.
4.
Click the Draw icon ![]() for the
target authentication template.
for the
target authentication template.
5. Click to expand the Advanced Settings menu in the Auth Configuration area.
6. Configure Internet access settings as needed.
Parameters
· Session Timeout: Maximum continuous online duration of a client upon one authentication. A client will be logged off when its continuous online duration exceeds the timeout. The session timeout cannot be larger than the daily online duration.
· Daily Online Duration: Maximum online duration of a client for a day. A client will be logged off when its online duration for a day exceeds the limit. The daily online duration cannot be smaller than the session timeout.
· Minimum Traffic and Idle Timer: Logs off a client if its traffic within an idle timer fails to reach the minimum traffic threshold. Setting the idle timer to 0 disables the idle timer feature.
|
|
NOTE: As a best practice, set the idle timer to a value no larger than half of the clients' IP address lease, enabling entries of offline clients to be deleted in time. |
· Client Rate Limit: Limited rate of uplink and downlink client traffic. This feature is supported in versions higher than 5417P01.
· HTTPS for Landing and Login: Use HTTPS sessions for the Landing and Login page.
· Permit PC: Permit PCs to access the WLAN. Facebook authentication does not support this feature.
· SMS-Only for First Login: Require users to pass SMS authentication at the first login. If a user passes SMS authentication, the system generates a phone number and MAC address binding entry for the user. The administrators can view the entry in the client list in which phone numbers are used as usernames. App authentication and Facebook authentication do not support this feature.
Configure free authentication
This feature enables users to pass authentication without entering user information if the users went offline before and attempt to come online again within the free-auth period. Free authentication supports the following modes:
· Portal-free authentication—In this mode, users must run a browser to trigger automatic portal authentication. This mode supports ads pushing to clients.
· MAC-trigger authentication—In this mode, users can access the WLAN without running a browser. This mode does not support ads pushing to clients.
Configure portal-free authentication
1.
Hover over the grid icon ![]() ,
and then select Network Management.
,
and then select Network Management.
2. Select a site from the scenario menu, and then select Settings > Device Category > Authentication from the navigation pane.
3. Click the Wired Authentication Templates tab.
4.
Click the Draw icon ![]() for the
target authentication template.
for the
target authentication template.
5. Click to expand the Advanced Settings menu in the Auth Configuration area.
6. Click the Auth-Free tab and configure the Free Auth feature.
Configure MAC-trigger authentication
1. Configure portal-free authentication. For more information, see "Configure portal redirection authentication."
2. Apply MAC binding server cloud to service template cloud.
[Sysname] wlan service-template cloud
[Sysname-wlan-st-cloud] portal apply mac-trigger-server cloud
Configure Internet access control
Perform this task to specify the time ranges during which users are allowed to access the WLAN.
Restrictions and guidelines
Internet access control is on a per-hour basis. You can specify a maximum of five time ranges for a day. To specify a time range that ends at 24 o'clock, set the end time to 00. If you set a time range to 00 to 00 for a day, users can access the Internet at any time that day.
Procedure
1.
Hover over the grid icon ![]() , and then
select Network Management.
, and then
select Network Management.
2. Select a site from the scenario menu, and then select Settings > Device Category > Authentication from the navigation pane.
3. Click the Wired Authentication Templates tab.
4.
Click the Draw icon ![]() for the target
authentication template.
for the target
authentication template.
5. Click to expand the Advanced Settings menu in the Auth Configuration area.
6. Click the Internet Access Control tab and specify the time ranges.
Configure the developer mode
|
|
CAUTION: Editing the codes of existing functions might disable Oasis authentication. Please use this feature with caution. |
The developer mode allows users to modify the source codes of an authentication template for customization purposes.
Procedure
1.
Hover over the grid icon ![]() , and then
select Network Management.
, and then
select Network Management.
2. Select a site from the scenario menu, and then select Settings > Device Category > Authentication from the navigation pane.
3. Click the Wired Authentication Templates tab.
4.
Click the Draw icon ![]() for the target
authentication template.
for the target
authentication template.
5. Click Developer Mode in the upper right corner.
Configure the domain name whitelist and blacklist
Restrictions and guidelines
This feature takes effect only when wireless authentication is configured.
Procedure
1.
Hover over the grid icon ![]() , and then
select Network Management.
, and then
select Network Management.
2. Select a site from the scenario menu, and then select Settings > Device Category > Authentication from the navigation pane.
3. Click the Domain Name Whitelist or Domain Name Blacklist tab to configure the whitelist or blacklist.
View or export history of authentication template deployment
Perform this task to view the history of all authentication template deployment or deployment in the current day, past 7 days, or past 30 days.
To view or export history of authentication template deployment:
1.
Hover over the grid icon ![]() , and then
select App Center.
, and then
select App Center.
2.
On the Authentication Templates tab, click the Apply icon ![]() for the target authentication template.
for the target authentication template.
3. Click the ACs tab to view the deployment history for an AC.
Manage Oasis platform users
Configure the client blacklist
Perform this task to forbid specific clients to access the WLAN.
Restrictions and guidelines
This feature takes effect only on offline clients. If you add an online client to the blacklist, the client will be rejected at the next access attempt.
Procedure
1.
Hover over the grid icon ![]() , and then
select Network Management.
, and then
select Network Management.
2. Select a site from the scenario menu, and then select Settings > Device Category > Users from the navigation pane.
3. Perform either of the following tasks to add users to the blacklist:
¡ On
the Guests tab, click the Add to
Blacklist icon ![]() for the target
user.
for the target
user.
¡ On the Blacklist tab, click Add.
Log off online users
Perform this task to log off specific online users or all online users.
Restrictions and guidelines
This feature does not take effect on auth-free users.
This feature is available only in scenarios with an AC or wired router as the authenticator.
Procedure
1.
Hover over the grid icon ![]() , and then
select Network Management.
, and then
select Network Management.
2. Select a site from the scenario menu, and then select Dashboard > Clients > Guest Details from the navigation pane.
3. On the Online Clients tab, click Authenticated Clients.
4. To log off specific clients, select the clients and then click Log Off Selected Users. To log off all clients, click Log Off All Users.
Configure portal fail-permit
This feature is available only in scenarios with an AC or wireless router as the authenticator.
Portal fail-permit allows users to have network access without portal authentication when the access device detects that the portal authentication server or portal Web server is unreachable.
After portal authentication resumes, unauthenticated users must pass portal authentication to access the network. Users who have passed portal authentication before the fail-permit event can continue accessing the network.
Restrictions and guidelines
For this feature to take effect, make sure you have configured basic settings on the device. For more information, see "Configure settings on the device."
Procedure
1. Enable portal fail-permit.
<Sysname> system-view
[Sysname] wlan service-template cloud
[Sysname-wlan-st-cloud] portal fail-permit web-server
[Sysname-wlan-st-cloud] quit
2. Configure portal Web server detection.
|
|
CAUTION: To avoid portal server flapping, follow the provided order to configure portal Web server detection. |
# Specify the URL and the type for portal Web server detection.
[Sysname] portal web-server cloud
[Sysname-portal-websvr-cloud] server-detect url http://oasisauth.h3c.com/portal/ping detect-type http
# Configure server detection:
¡ Set the detection interval to 600 seconds.
¡ Set the maximum number of consecutive detection failures to 2.
¡ Configure the device to send a log message and a trap massage after server reachability status changes.
[Sysname-portal-websvr-cloud] server-detect interval 10 retry 2 log trap
[Sysname-portal-websvr-cloud] quit
Configure authentication when an AP registers to an AC over a public network
This feature is available only in scenarios with an AC or wireless router as the authenticator.
By default, the device provides HTTP port 80 for clients to exchange authentication packets. With local forwarding enabled, if APs register on the AC through the public network and port 80 is unavailable, perform this task to configure CMCC or change HTTP service port for clients to perform Oasis authentication.
Configure CMCC
You must configure CMCC on both the AC and the Oasis platform.
To configure CMCC:
1. Configure the CMCC protocol
¡ Configure the Oasis platform:
- Configure the Oasis platform in an AC+fit AP network
- Configure the Oasis platform in a wired network
2. (Optional.) Configure CMCC portal-free authentication
¡ Configure the Oasis platform
Restrictions and guidelines
With CMCC configured, the session timeout, daily online duration, minimum traffic, and idle timer settings become unavailable.
Configure the CMCC protocol
Configure the Oasis platform in an AC+fit AP network
1.
Hover over the grid icon ![]() , and then
select Network Management.
, and then
select Network Management.
2. Select a site from the scenario menu, and then select Settings > ACs > Authentication from the navigation pane.
3.
Click the Draw icon ![]() for the target
authentication template.
for the target
authentication template.
4. Click to expand the Advanced Settings menu in the Auth Configuration area.
5. Click the CMCC tab.
6. Enable CMCC Protocol and select a protocol as needed.
Configure the Oasis platform in a wired network with a router as the authenticator
1.
Hover over the grid icon ![]() , and then
select Network Management.
, and then
select Network Management.
2. Select a site from the scenario menu, and then select Settings > Routers > Authentication from the navigation pane.
3.
Click the Draw icon ![]() for the target
authentication template.
for the target
authentication template.
4. Click to expand the Advanced Settings menu in the Auth Configuration area.
5. Click the CMCC tab.
6. Enable CMCC Protocol and select a protocol as needed.
Configure the device
# Create the portal authentication server cloud and enter its view.
<Sysname> system-view
[Sysname] portal server cloud
# Specify 139.217.11.74 as the IPv4 address of the portal authentication server.
[Sysname-portal-server-cloud] ip 139.217.11.74
# Specify the type of the portal authentication server as cmcc.
[Sysname-portal-server-cloud] server-type cmcc
# Configure the device to send register packets to the portal authentication server at intervals of 60 seconds.
[Sysname-portal-server-cloud] server-register interval 60
[Sysname-portal-server-cloud] quit
Configure CMCC portal-free authentication
Configure the Oasis platform
# Enable portal-free authentication. For more information, see "Configure portal redirection authentication" for AC+fit AP networks and "Configure portal redirection authentication" for wireless networks with a wireless router as the authenticator.
Configure the device
Make sure you have configured basic settings on the device. For more information, see "Configure settings on the device."
To configure the device:
1. Configure the MAC binding server.
|
|
CAUTION: To avoid affecting wireless services, you must specify a dedicated MAC binding server for CMCC even if a MAC binding server has been created. |
# Create MAC binding server mts and enter its view.
<Sysname> system-view
[Sysname] portal mac-trigger-server mts
# Specify the IP address of the MAC binding server as 139.217.11.74.
[Sysname-portal-mac-trigger-server-mts] ip 139.217.11.74
# Specify the type of the MAC binding server as cmcc.
[Sysname-portal-mac-trigger-server-mts] server-type cmcc
# (Optional.) Set the free-traffic threshold for portal users, in bytes.
[Sysname-portal-mac-trigger-server-mts] free-traffic threshold 1
[Sysname-portal-mac-trigger-server-mts] quit
# Bind MAC binding server mts to service template cloud.
[Sysname] wlan service-template cloud
[Sysname-wlan-st-cloud] portal apply mac-trigger-server mts
2. Configure authorization attributes for users in the ISP domain.
# Create ISP domain cloud.
[Sysname] domain cloud
# Set the idle timer, in minutes.
[Sysname-isp-cloud] authorization-attribute idle-cut 30
# Set the session timeout, in minutes.
[Sysname-isp-cloud] authorization-attribute session-timeout 360
[Sysname-isp-cloud] quit
Change the HTTP service port
Before performing this task, make sure you have configured basic settings on the device. For more information, see "Configure settings on the device."
To change the HTTP service port:
1. Set the HTTP service port number. In this example, the port number is 8088.
<Sysname> system-view
[Sysname] ip http port 8088
2. Create an HTTP-based local portal Web service and set the listening port number to 8088.
[Sysname] portal local-web-server http
[Sysname-portal-local-websvr-http] tcp-port 8088
[Sysname-portal-local-websvr-http] quit
3. Configure the portal server.
# Configure the URL for the portal Web server. x.x.x.x represents the egress IP of the network in which the AC resides.
[Sysname] portal web-server cloud
[Sysname-portal-websvr-cloud] url http://oasisauth.h3c.com/portal/protocol?redirect_uri=http://x.x.x.x:8088/portal/cloudlogin.html
# Configure the Oasis server to redirect users to x.x.x.x:8088.
[Sysname-portal-websvr-cloud] if-match original-url http://captive.apple.com user-agent Mozilla temp-pass redirect-url http://oasisauth.h3c.com/portal/protocol?redirect_uri=http://x.x.x.x:8088/portal/cloudlogin.html
[Sysname-portal-websvr-cloud] if-match original-url http://www.apple.com user-agent Mozilla temp-pass redirect-url http://oasisauth.h3c.com/portal/protocol?redirect_uri=http://x.x.x.x:8088/portal/cloudlogin.html
[Sysname-portal-websvr-cloud] quit
Configure wireless services
1.
Hover over the grid icon ![]() , and then
select Network Management.
, and then
select Network Management.
2. Select a site from the scenario menu, and then select Settings > Device Category > Wireless Services from the navigation pane.
3. On the Wireless Services tab, click Add.
4. To configure an encryption service, select On or Off for the Encryption Service field as needed.
Figure 135 Configuring an encryption service
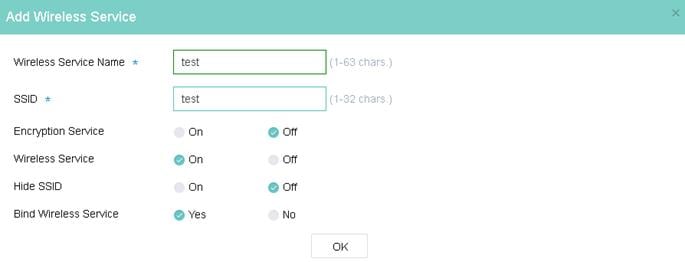
5. To synchronize SSID information, click Sync SSID Info.
Make sure you have created a wireless service and configured SSID information on the device.
|
|
NOTE: This feature is available only for ACs of a version earlier than 5418 and routers of a version earlier than 0809. |
Figure 136 Synchronizing SSID information

6. To synchronize wireless service settings on devices to the Oasis platform, click Sync to Cloud. This operation synchronizes settings such as wireless service name, SSID, and guaranteed bandwidth ratio to the Oasis platform.
|
|
NOTE: This feature is available only for ACs of version 5418 or later and routers of version 0809 or later. |
FAQ
I modified and deployed authentication template settings successfully. Why do the previous settings take effect on clients that come online after the deployment?
Verify that the settings are modified and deployed successfully. If the issue persists, clear browser access records and caching on the client.
The Authentication Templates page in the App Center does not display devices available for template deployment. What should I do?
Verify that the device version is as required. If not, upgrade the device to the most recent version.
How can I change the SSID of a wireless service?
1. Change the Wi-Fi name from the Oasis platform. For AC+fit AP networks, you can also change the Wi-Fi name on the AC.
2. Change the SSID from the WeChat Official Accounts Platform. Access the platform at https://mp.weixin.qq.com/, select Function > Wi-Fi from the navigation pane, click the Device Manage tab, and then change the SSID.
3. Unbind and then rebind the service template from the authentication service.
How can I update my Oasis platform to use newly released features?
Feature on the Oasis platform are automatically updated and do not require manual operations. For new authentication template features, you might need to reconfigure and then release the template for the new features to take effect.
Why can a client go offline and then come online without being authenticated even if free authentication is not configured?
The system does not remove the client entry from the authenticated client list immediately upon a client disassociation event. The entry will not be removed until the idle timer expires or the administrator logs the client off. An offline client can come online without being authenticated if its entry still exists.
You can view client entries from the Oasis platform or by executing the display portal user all command.
Why does the number of authenticated clients exceed the total number of online clients?
This symptom occurs if a client just went offline. The system does not remove the client entry from the authenticated client list immediately upon a client disassociation event. The entry will not be removed until the idle timer expires or the administrator logs the client off manually.
Can I use one WeChat official account to configure WeChat Wi-Fi authentication for multiple sites?
Yes. A WeChat official account can be bound to multiple authentication templates and used by different Oasis accounts.
I have configured authentication settings on the device and the Oasis platform as required. Client access attempt can trigger portal authentication but cannot open the redirection page. What should I do?
This issue might occur if the network segment of the client's IP address is unknown to the uplink devices and packets cannot be transmitted back. To resolve this issue, configure the nat outbound command on the device's interface that connects the device to the external network, or use IGP to advertise the network segment in the network.
iOS clients cannot trigger authentication even if optimized captive-bypass is enabled. What should I do?
Execute the portal captive-bypass optimize delay seconds command to set the captive-bypass detection timeout. The value range is 6 to 60 seconds and the default value is 6 seconds.
To avoid affecting device performance, do not set the timeout to a large value.
Appendix A Authentication commands for the device
This section describes commands that need to be executed on the device for one-key, fixed-account, WeChat official account, WeChat Wi-Fi, app, Facebook, dumb terminal, guest, and member authentication.
For app and Facebook authentications, you must configure settings in "Configure app authentication" and "Configure Facebook authentication," respectively, after you complete settings in this section.
To fast execute these commands on the device, edit the dimmed sections as needed and paste all the commands in user view of the device.
|
|
NOTE: · Execute these commands only in versions earlier than 5405. Version 5405 and later support automatic authentication setting deployment to devices and do not need manual configuration of these commands. · Make sure the commands do not conflict with configuration existing on the device. · Make sure you have completed tasks in the configuration prerequisites. For more information, see "Prerequisites." |
system-view
domain cloud
authentication portal none
authorization portal none
accounting portal none
quit
portal web-server cloud
url http://oasisauth.h3c.com/portal/protocol
server-type oauth
if-match user-agent CaptiveNetworkSupport redirect-url http://oasisauth.h3c.com/generate_404
if-match user-agent Dalvik/2.1.0(Linux;U;Android7.0;HUAWEI redirect-url http://oasisauth.h3c.com/generate_404
if-match original-url http://captive.apple.com user-agent Mozilla temp-pass redirect-url http://oasisauth.h3c.com/portal/protocol
if-match original-url http://www.apple.com user-agent Mozilla temp-pass redirect-url http://oasisauth.h3c.com/portal/protocol
if-match original-url http://10.168.168.168 temp-pass
captive-bypass ios optimize enable
quit
wlan service-template cloud
portal enable method direct
portal domain cloud
portal apply web-server cloud
portal temp-pass period 20 enable
quit
portal local-web-server http
quit
portal local-web-server https
quit
ip http enable
ip https enable
portal host-check enable
portal user log enable
portal free-rule 1 destination ip 114.114.114.114 255.255.255.255
portal free-rule 2 destination ip any udp 53
portal free-rule 3 destination ip any tcp 53
portal free-rule 4 destination ip any tcp 5223
portal free-rule 5 destination oasisauth.h3c.com
portal free-rule 10 destination short.weixin.qq.com
portal free-rule 11 destination mp.weixin.qq.com
portal free-rule 12 destination long.weixin.qq.com
portal free-rule 13 destination dns.weixin.qq.com
portal free-rule 14 destination minorshort.weixin.qq.com
portal free-rule 15 destination extshort.weixin.qq.com
portal free-rule 16 destination szshort.weixin.qq.com
portal free-rule 17 destination szlong.weixin.qq.com
portal free-rule 18 destination szextshort.weixin.qq.com
portal free-rule 19 destination isdspeed.qq.com
portal free-rule 20 destination wx.qlogo.cn
portal free-rule 21 destination wifi.weixin.qq.com
portal free-rule 22 destination open.weixin.qq.com
portal safe-redirect enable
portal safe-redirect method get post
portal safe-redirect user-agent Android
portal safe-redirect user-agent CFNetwork
portal safe-redirect user-agent CaptiveNetworkSupport
portal safe-redirect user-agent MicroMessenger
portal safe-redirect user-agent Mozilla
portal safe-redirect user-agent WeChat
portal safe-redirect user-agent iPhone
portal safe-redirect user-agent micromessenger