- Table of Contents
- Related Documents
-
| Title | Size | Download |
|---|---|---|
| 01-Text | 5.46 MB |
Support for multiple feature entrances
Configuring an authentication policy
Assigning users to a user group
Configuring the SMS message platform
Configuring WeChat authentication
Configuring third-party authentication parameters
Configuring the SMS message operation
Managing the SMS message content
Configuring an SMS message delivery task
Configuring the WeChat operation
Adding a WeChat official account
Configuring a WeChat official account
Configuring a WeChat delivery task
Overview
Intelligent Portal Management (IPM) is a management platform that provides Wi-Fi marketing for enterprises and organizations. IPM supports site-based authentication policy customization, monitors and analyzes customer flow data, and flexibly pushes advertisements to customers. IPM meets the management and marketing requirements of portal sites, upgrades service quality, and improves customers' online experiences.
Functions
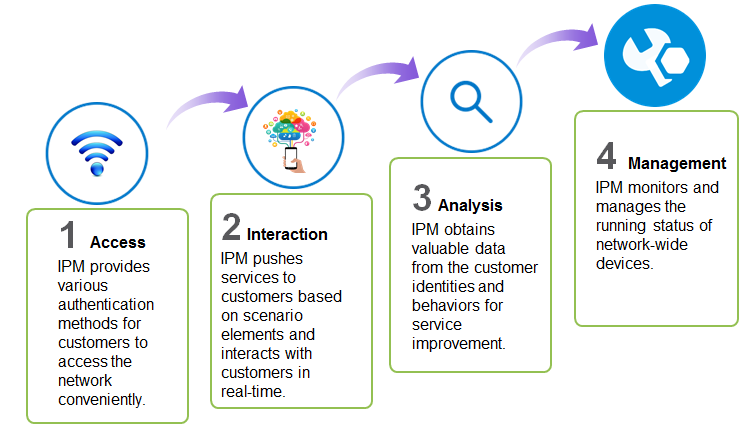
As shown in Figure 1, IPM provides the following functions:
· Access—Provides SMS message authentication, WeChat authentication, and other authentication methods for customers to access the network conveniently.
· Interaction—Uses IPM portals or apps to push services to customers based on scenario elements (for example, customer identity, time, and location), and interacts with customers to build real-time value-added relationship.
· Analysis—Obtains valuable data from the customer identities and behaviors for service improvement.
· Management—Monitors and manages the running status of network-wide devices.
Concepts
Policy management
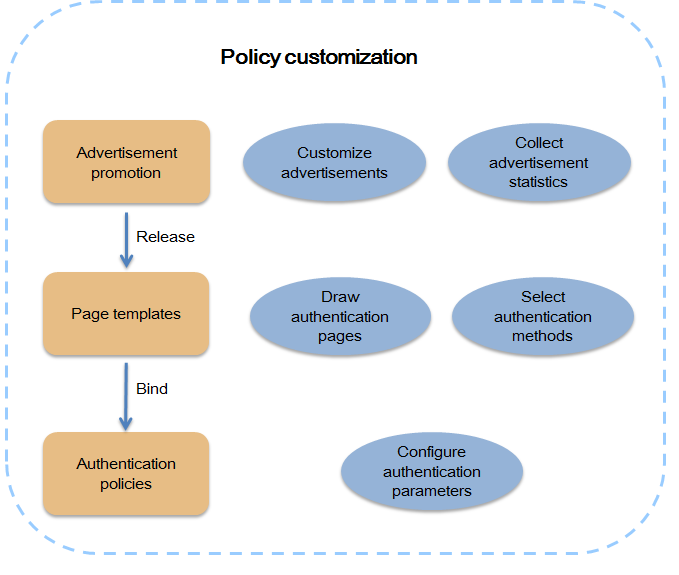
As shown in Figure 2, you can customize authentication policies by following these steps:
1. Make advertisements in Advertisement Management, and add them to theme templates. The advertisement statistics report provides data of advertisement views and hits and can be used as a reference for the administrator to make and adjust marketing strategies.
2. Customize authentication methods and authentication pages by drawing theme templates in Page Template. You can add advertisements to the templates by integrating texts, pictures, videos, and links to the advertisements.
3. Bind released page templates to authentication policies and configure authentication parameters. For example, if WeChat authentication is added to a page template, you must configure a WeChat official account in the authentication policy bound to this page template.
Portal management
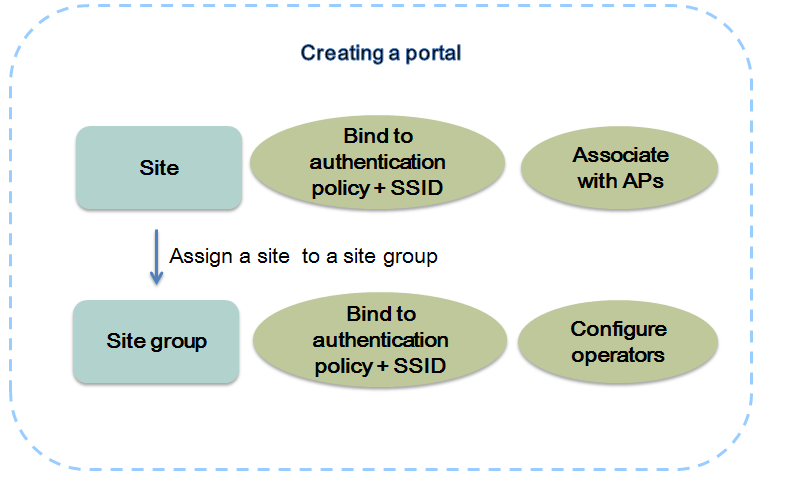
IPM allows you to create sites on a per branch portal basis and assign them to site groups with different operators. Each site must be associated with physically deployed APs and configured with an SSID for wireless authentication.
Both sites and site groups can be bound to authentication policies. If a site and its site groups are bound to different authentication policies, an authentication policy bound to the activity group, site, and area group is selected in descending order of priority. For more information about site groups, see "Hierarchical management."
Figure 3 Creating a portal
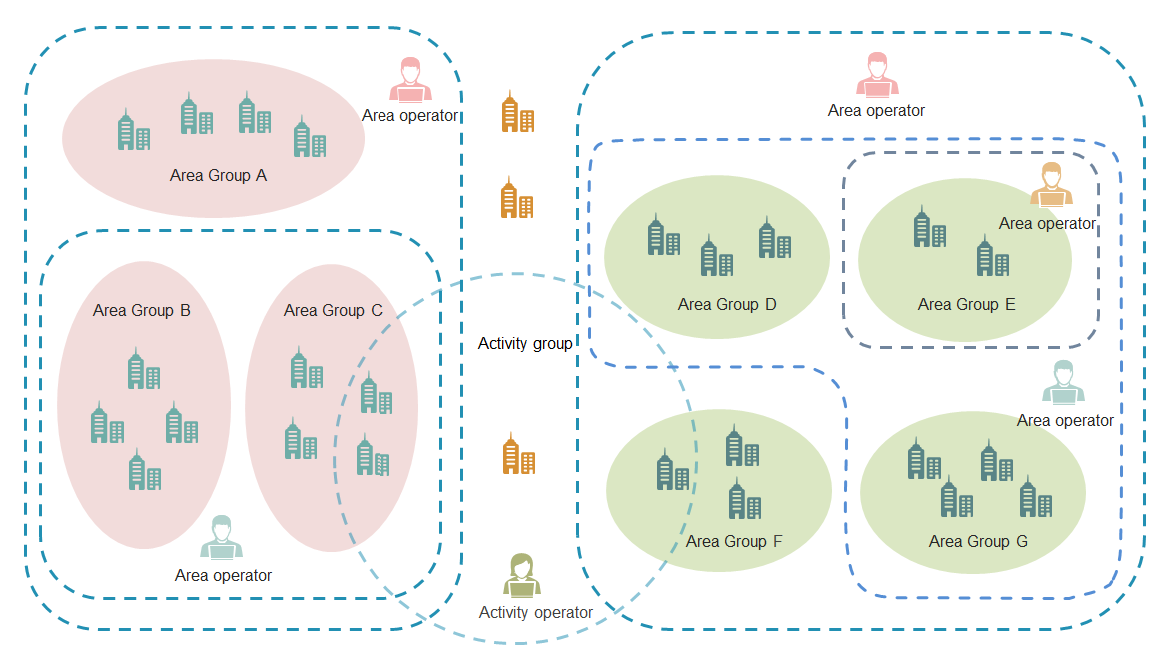
Hierarchical management
IPM supports the following operator types:
· Super administrator—Has the privilege to create the super administrator, area operators, and activity operators and manages all area groups and activity groups.
· Area operator—Has the privilege to create area operators and configure subgroups. IPM supports a maximum of three levels of area operators.
· Activity operator—Only has the privilege to view site data of the activity group to which the operator is assigned.
IPM supports the following site group types:
· Area group—Created based on branch levels and locations. An area group supports a maximum of five levels of subgroups. A subgroup is managed by the same operator as its parent area group. If an area operator is added by a parent area operator, groups managed by the area operator can only be selected from the groups managed by the parent area operator.
· Activity group—Used for the activity promotion. Sites in different areas can be assigned to an activity group. An activity group cannot include subgroups.
Figure 4 Hierarchical management of operators and site groups
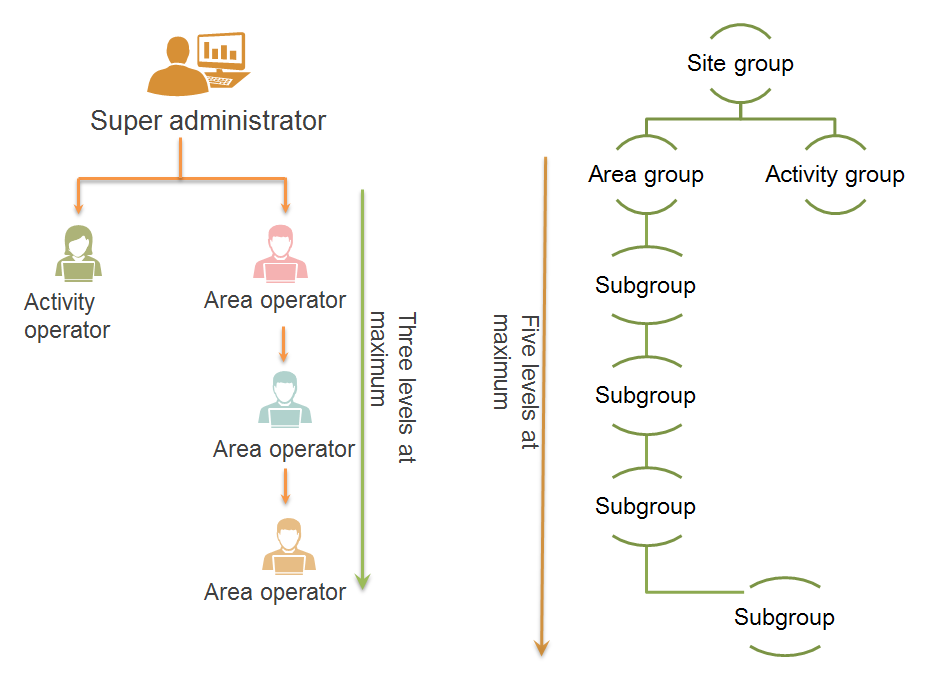
Figure 5 Relationship between site groups and operators
Benefits
IPM delivers the following benefits:
· Integrates device management, portal customization, and business marketing.
· Supports various authentication methods and accurate point-to-point advertisement promotion.
· Promotes product marketing and brand influence based on the customer flow data analysis.
· Supports unified management of physically dispersed portals, area-based or activity-based management policies, and inter-area user interaction.
Prerequisites
Before you use IPM, perform the following tasks:
1. Build a wireless network and add wireless devices to the iMC platform.
2. Configure wireless authentication parameters on wireless devices. For more information about configuration procedures, see related configuration guides.
Support for multiple feature entrances
IPM provides multiple feature entrances for easy access.
As shown in Figure 6, four entrances are available for Page Template. Entrances in Configuration Wizard help the administrator to configure service processes fast. Entrances in Quick Start link to each configuration page and simplify IPM maintenance.
Figure 6 Multiple entrances of Page Template

This administration guide uses entrances on the left navigation tree for illustration.
Configuration wizard
As shown in Figure 7, the configuration wizard enables the administrator to configure WeChat, SMS message, and account authentication methods fast.
Figure 7 Configuration process
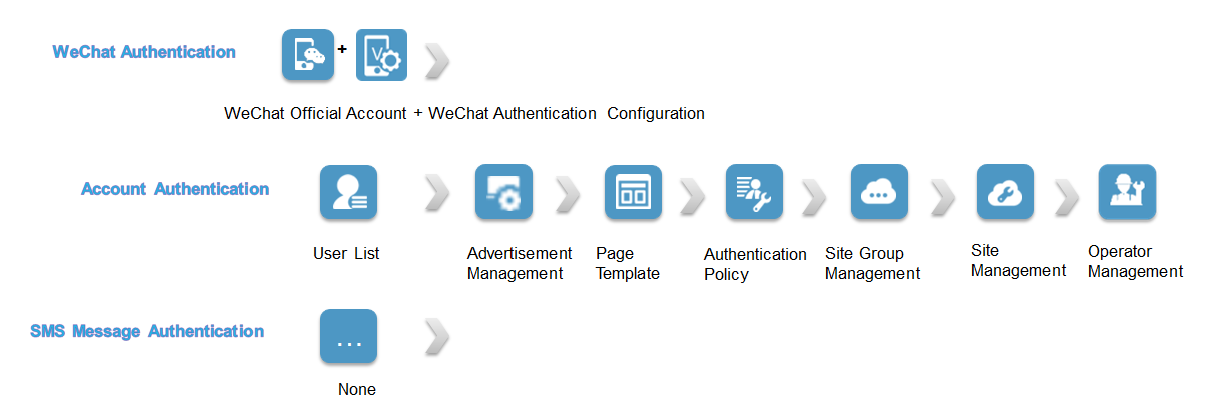
A brief authentication configuration process is as follows:
1. Access the Quick Start page, click the Configuration Wizard icon, and then select one authentication method to enter the configuration wizard page for this method.
2. Perform one of the following tasks according to the authentication method:
· For WeChat authentication, you must apply for a WeChat official account in advance, and access WeChat Official Account to add the official account to IPM. For more information, see "Configuring the WeChat operation." Then, access WeChat Authentication Configuration to bind the WeChat official account to the shop information. For more information, see "Configuring WeChat authentication."
· For account authentication, you must configure user account information in IPM in advance in User List. For more information, see "User list."
· For SMS message authentication, you must configure SMS message delivery at the gateway. You can use the iMC platform or a third-party SMS gateway to send SMS messages.
3. Access Advertisement Management and make advertisements. For more information, see "Managing advertisements."
4. Access Page Template and customize endpoint authentication pages. For more information, see "Theme management."
5. Access Authentication Policy and configure authentication policy parameters. For more information, see "Configuring an authentication policy."
6. Access Site Group Management and add a site group, and then assign sites to the site group. For more information, see "Adding a site group."
7. Access Site Management and configure site information. For more information, see "Adding a site."
8. Access Operator Management and add operators. For more information, see "Managing operators."
To access a configuration page, click the configuration wizard option of the page, or click Previous and Next to locate the page.
Features
Data statistics
IPM monitors both network device running status and customer flow data. Various statistics collected by IPM provide data support for marketing strategies.
Dashboard monitoring
The dashboard monitors network device running status and customer flow data in real-time.
To access the device monitoring page or customer flow monitoring page:
1. From the left navigation tree, select Quick Start, and then click the Monitor icon on the page that opens.
2. Perform one of the following tasks:
¡ Select Device to open the device monitoring page.
¡ Select Customer Flow to open the customer flow page.
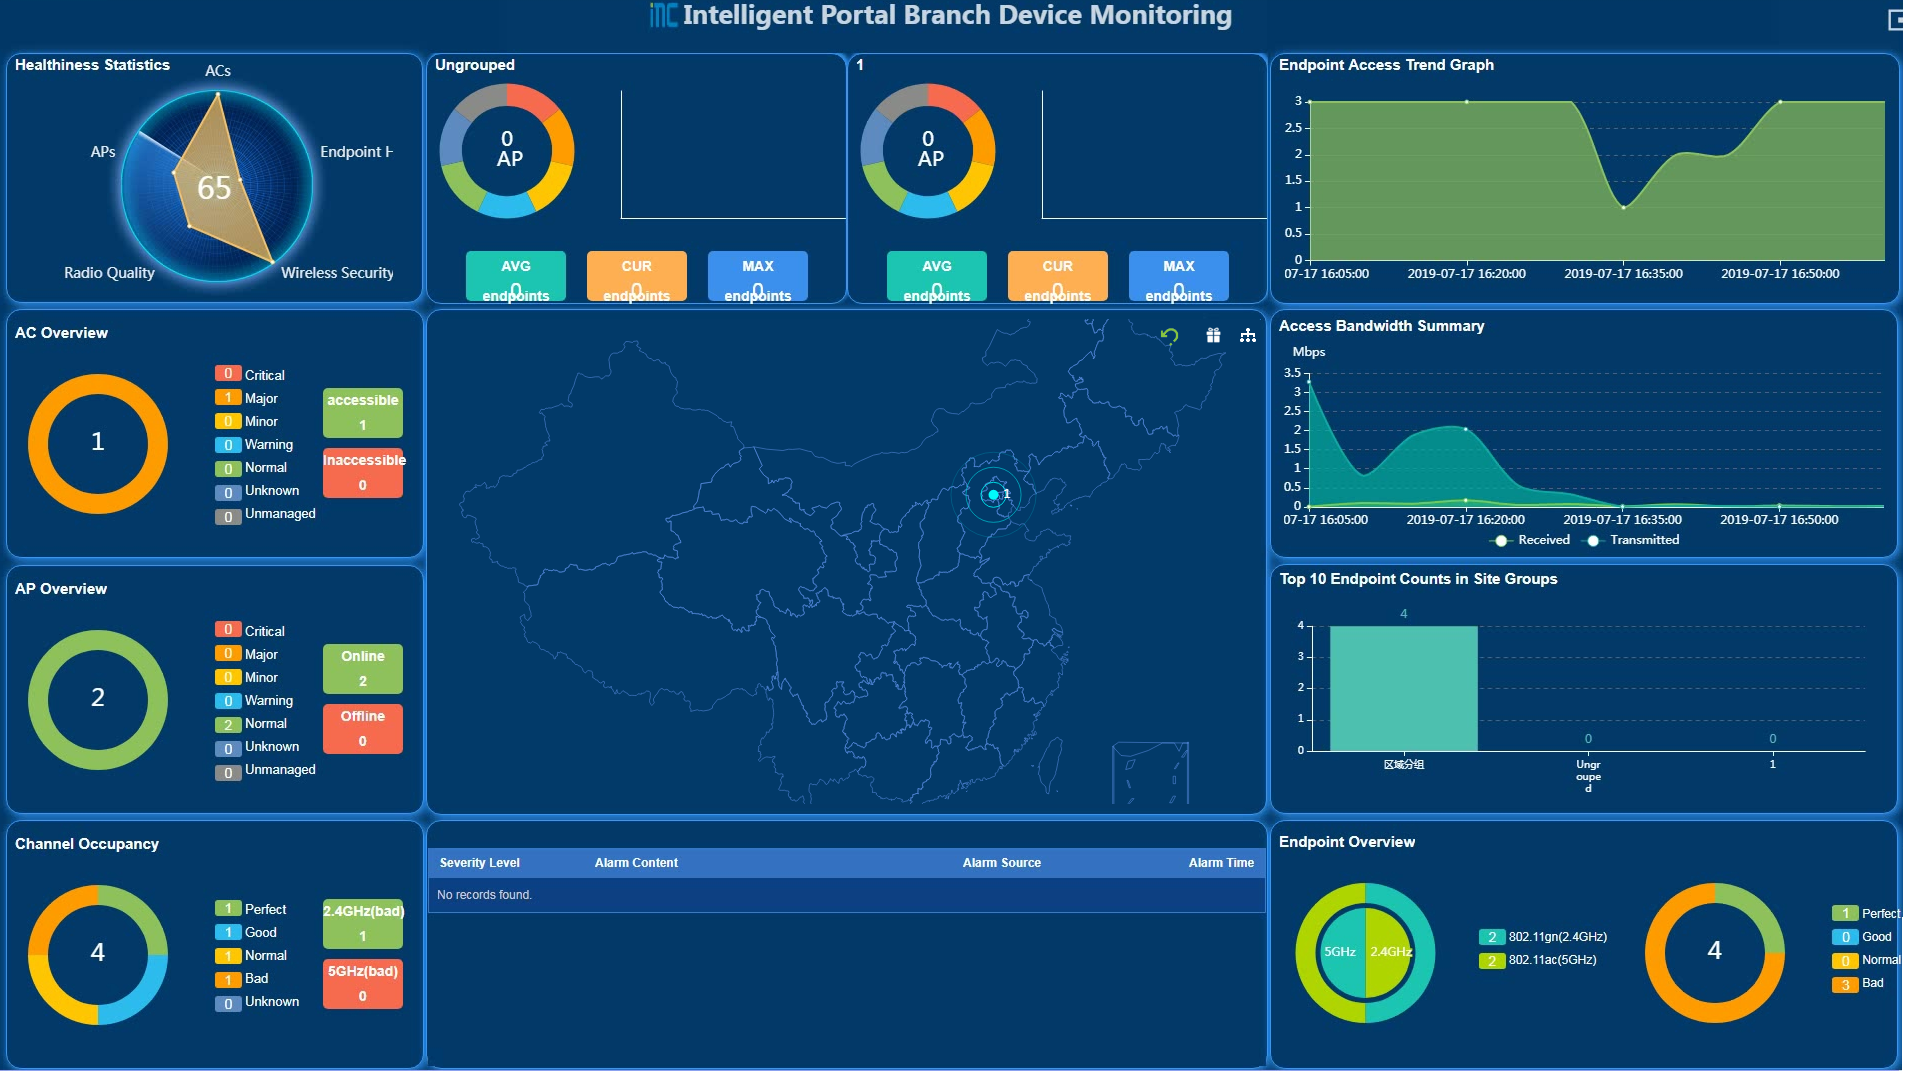
As shown in Figure 8, the device monitoring page displays the following information:
· The dashboard provides real-time performance status of network-wide ACs, APs, and endpoints.
· The carousel displays network resource information of all site groups or sites.
· The map in the middle displays distribution information of all sites, and it supports the switchover between activity groups and area groups.
¡ If you click an area group, the dashboard displays statistics for this group. The carousel displays the site information of the area group and its subgroups accordingly.
¡ If you click the Activity group icon ![]() in the upper
right corner of the page and
then click an activity group on the map, the
dashboard displays statistics for this group. The carousel displays the site information of this group accordingly.
in the upper
right corner of the page and
then click an activity group on the map, the
dashboard displays statistics for this group. The carousel displays the site information of this group accordingly.
As shown in Figure 9, the customer flow monitoring dashboard displays customer flow data, which can be used for the strategy adjustment. For example, a bank manager can open more service windows at the customer peak time based on the customer flow trend graph.
Figure 9 Customer flow monitoring

Advertisement statistics
To access the Advertisement Statistics page, select Advertisement Promotion > Advertisement Statistics from the left navigation tree. As shown in Figure 10, the Advertisement Statistics page displays advertisement data based on customer visits and can be used for advertisement promotion analysis to improve the advertisement effect.
Figure 10 Advertisement statistics

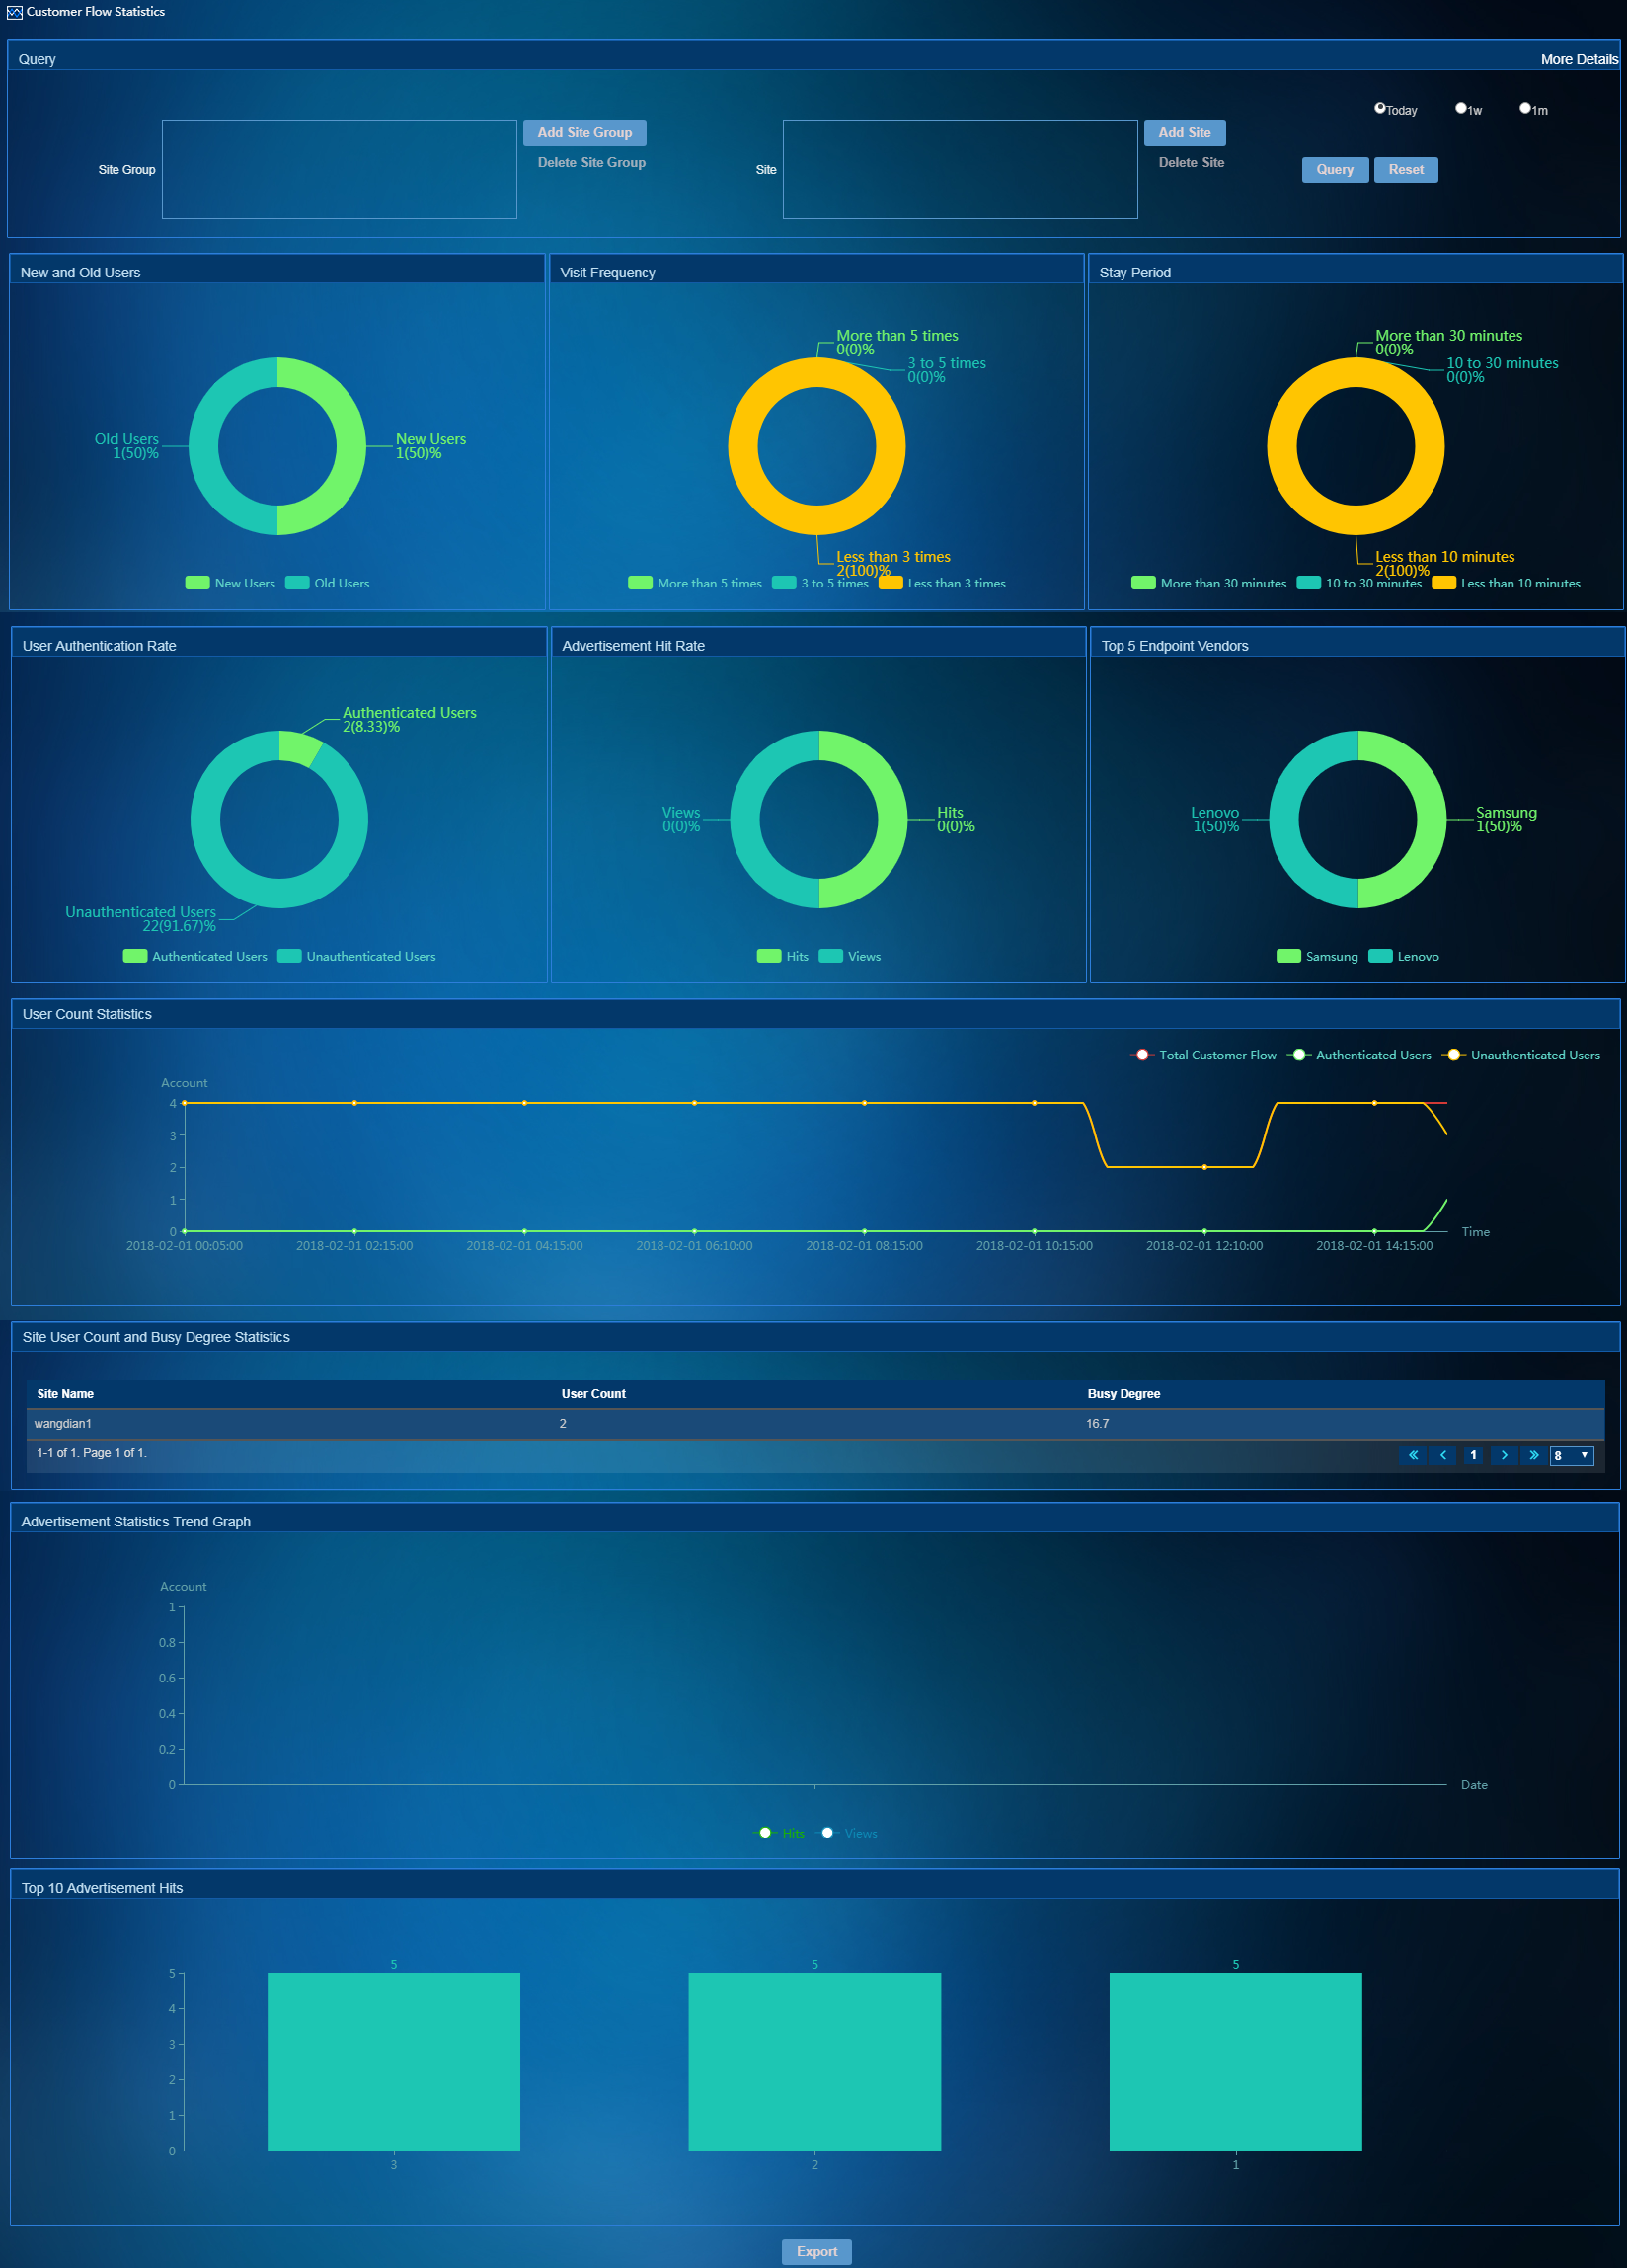
Customer flow statistics
To access the Customer Flow Statistics page, select User Management > Customer Flow Statistics from the left navigation tree. As shown in Figure 11, the Customer Flow Statistics page displays customer behaviors in pie charts and trend graphs, which plays an important role in deciding marketing strategies. To view customer flow statistics for today, the recent one week, and the recent one month, select Today, 1w, and 1m in the upper corner of the page, respectively.
Figure 11 Customer flow statistics
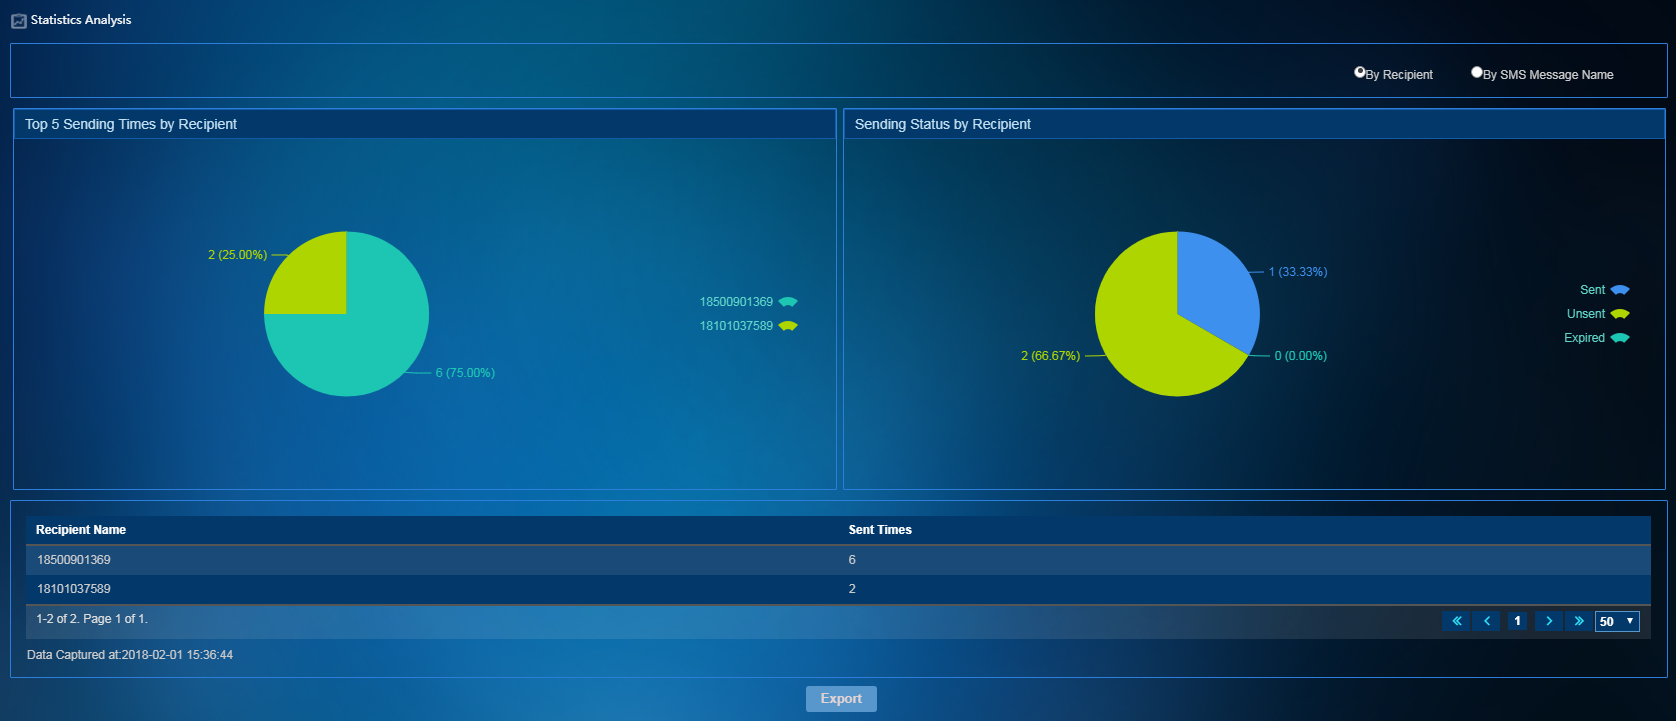
SMS message statistics
To access the SMS message statistics page, select SMS Message Operation > Statistics Analysis from the left navigation tree. As shown in Figure 12, the pie charts and list on the Statistics Analysis page displays SMS message sending statistics.
Figure 12 SMS message statistics
Network resources
Network resources include AP resources and endpoint resources. IPM analyzes network resources statistics to help the administrator locate wireless network issues.
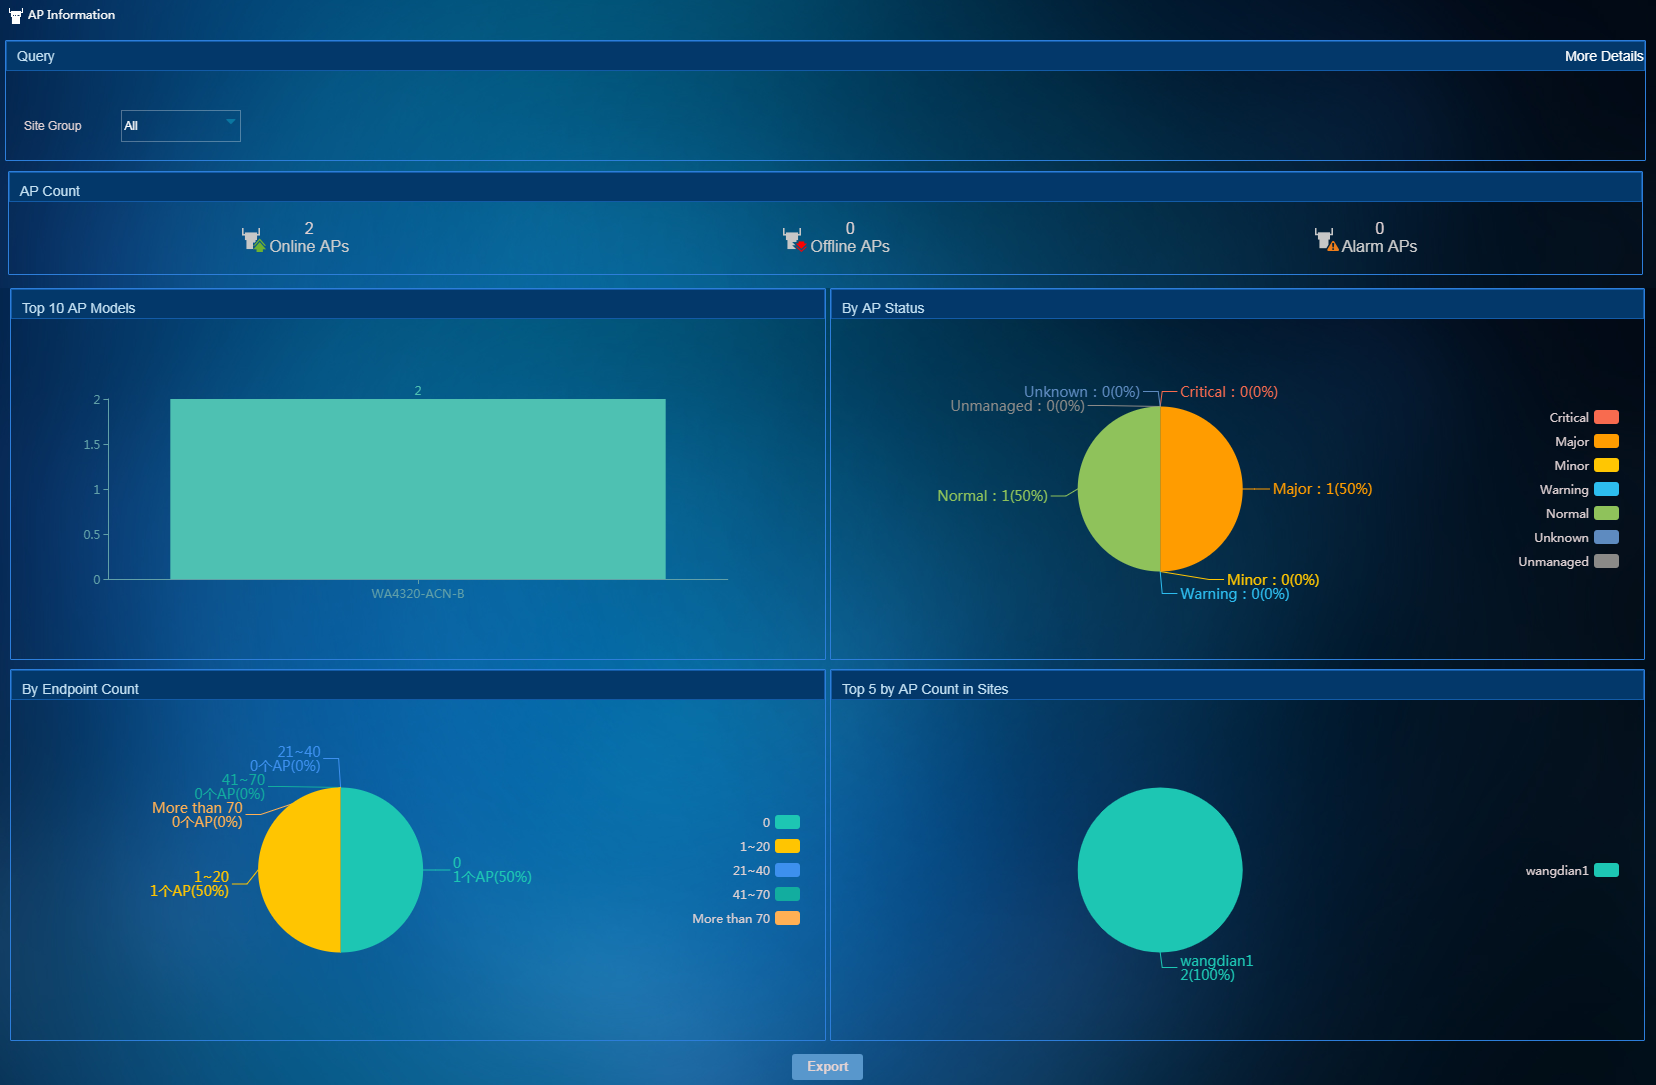
Viewing AP information
To access the AP Information page, select Network Resources > AP Information from the left navigation tree. As shown in Figure 13, the AP Information page collects AP statistics by various criteria. You can view the AP information network-wide or on a per site group basis.
Figure 13 Viewing AP information
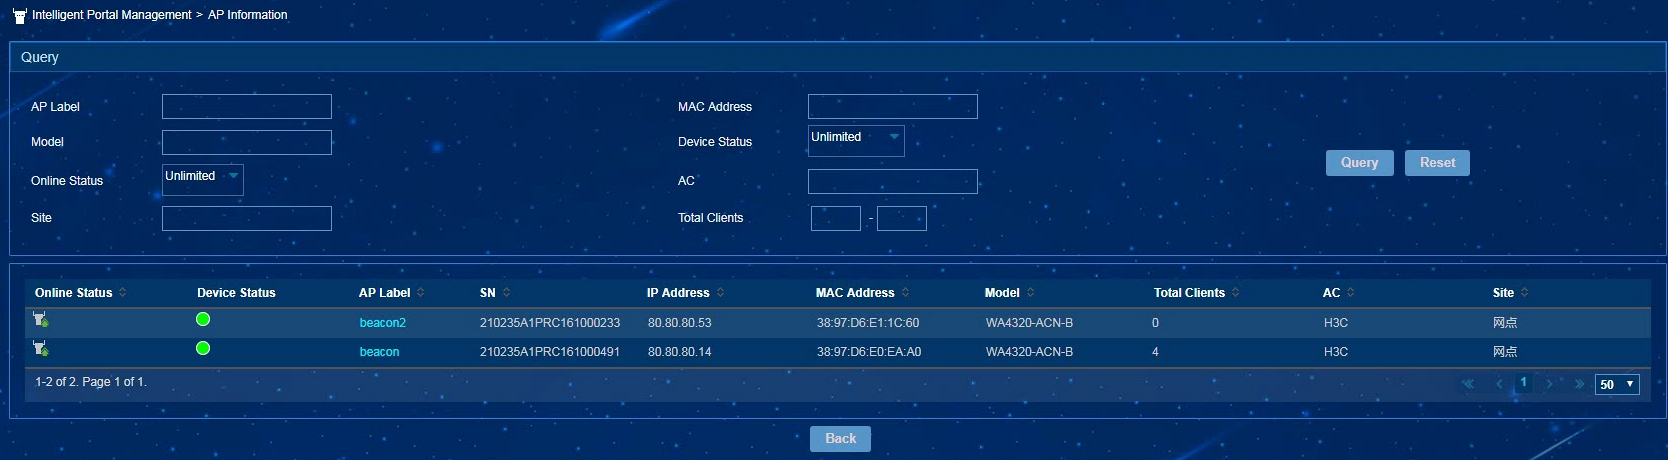
To view the AP details list, click the More Details link in the upper right corner of the AP Information page. You can query AP details by MAC address and site.
Figure 14 AP details list
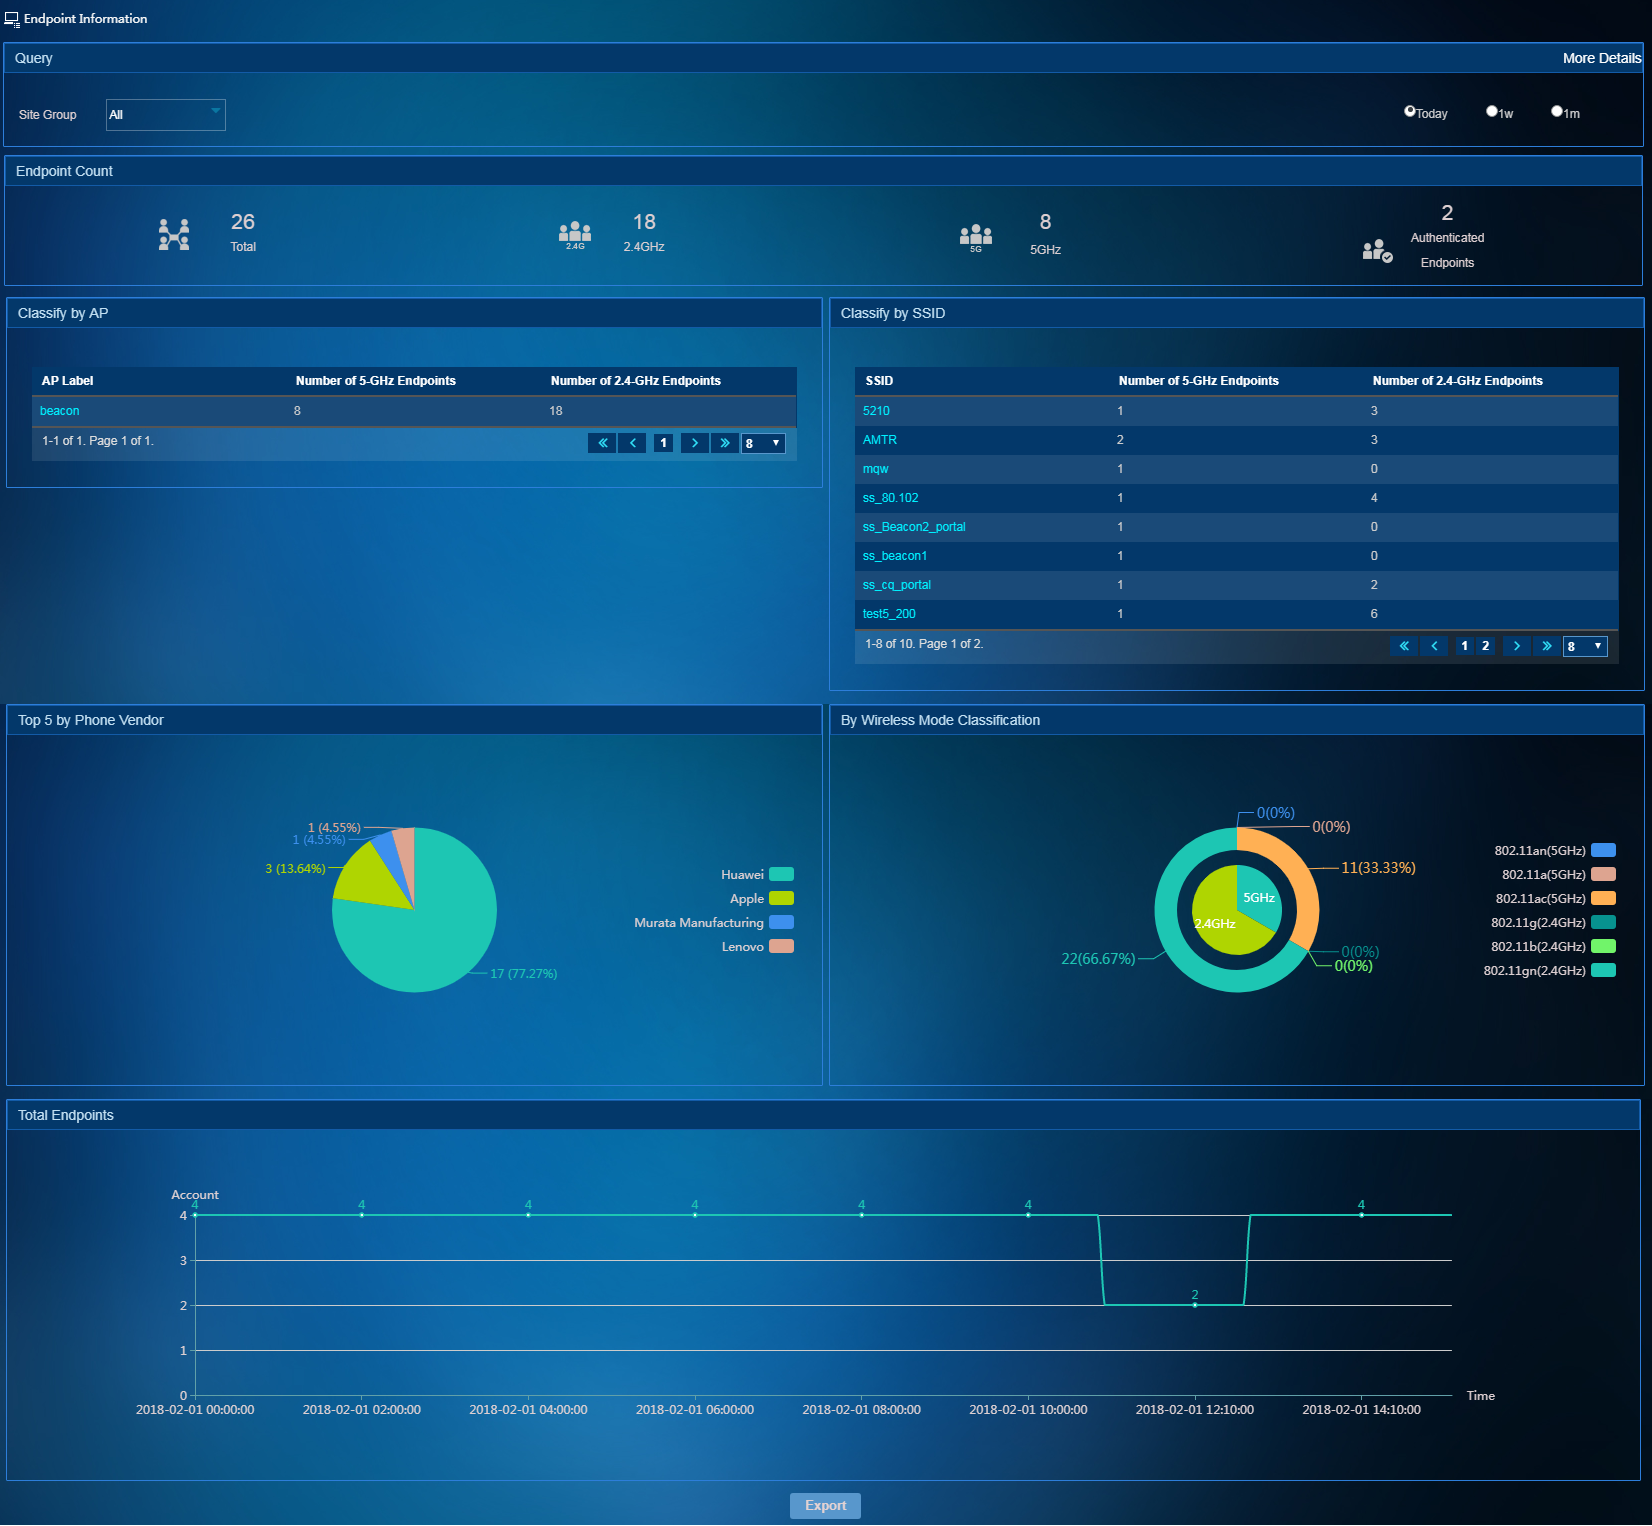
Viewing endpoint information
To access the Endpoint Information page, select Network Resources > Endpoint Information from the left navigation tree. As shown in Figure 15, the Endpoint Information page collects endpoint statistics by various criteria. You can view the endpoint information network-wide or on a per site group basis.
Figure 15 Viewing endpoint information
Report management
Various types of IPM reports collect user and advertisement statistics based on groups and sites and allow you to view and analyze report data in different perspectives.
To access the report management page, select Report Management from the left navigation tree.
Theme management
Viewing page templates
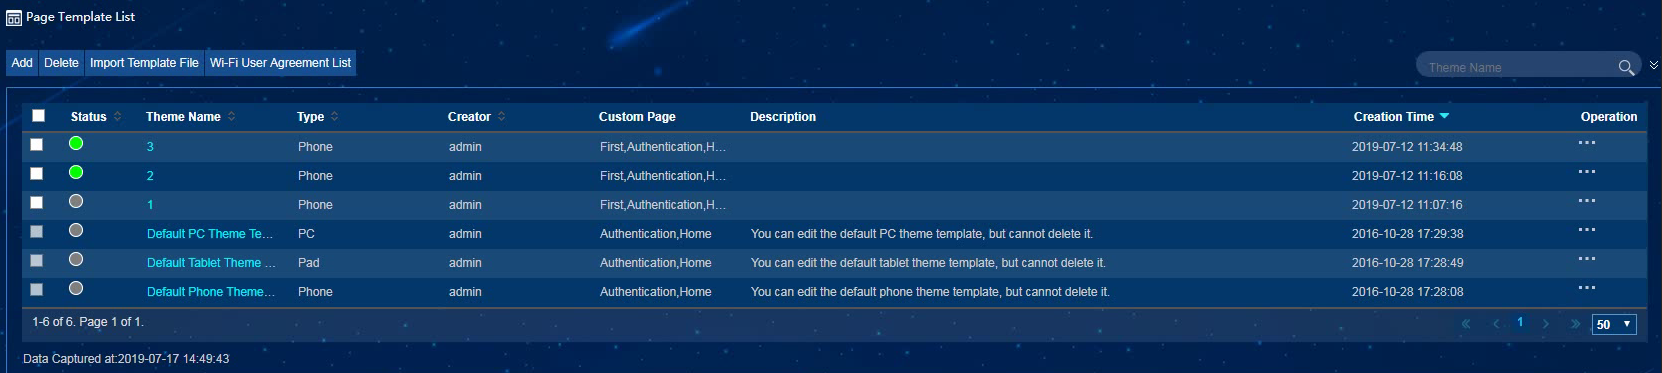
To view page templates, select Page Template from the left navigation tree.
As shown in Figure 16, a page template can be in one of the following status:
· Unreleased—Indicated in a gray circle in the Status column. Page templates in this status can be edited.
· Released—Indicated in a green circle in the Status column. Page templates in this status cannot be edited. You can bind only released page templates to authentication policies.
· Bound—Indicated in a red circle in the Status column. Page templates in this status are bound to authentication polices.
Adding a page template
The administrator can customize the first page, authentication page, and authentication completion page for PCs, pads, and phones. Figure 17 displays an example of the customized first page, authentication page, and authentication completion page on a phone.
Figure 17 Customized pages on a phone

To add a page template:
1. From the left navigation tree, select Page Template.
2. On the Page Template page, click Add.
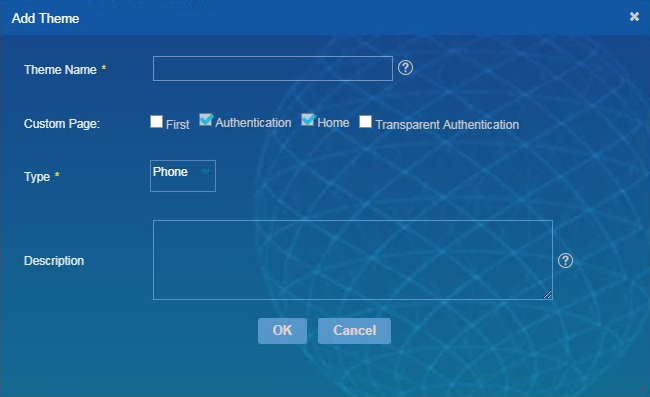
3. Configure theme parameters, as shown in Figure 18, and then click OK.
4. On the template customization page, select a page type, and drag basic controls from the Basic Controls area. Then edit the controls in the right area of the page, as shown in Figure 19.
Figure 19 Customizing a template

5. Save the page. You can immediately release the page after saving it.
The customization of the first page is optional. The customization of the authentication page and authentication completion page is required.
Only released page templates can be bound to authentication polices. To edit a released page template, you must cancel the page template release first.
Importing a page template
1. From the left navigation tree, select Page Template.
2. On the Page Template page, click Import Template File.
The Import Template File page opens, as shown in Figure 20.
Figure 20 Importing a template file
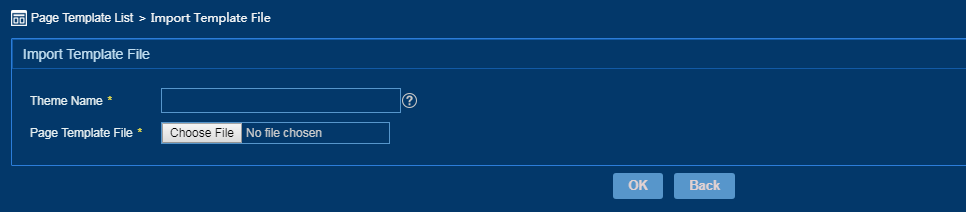
3. Enter a unique theme name.
4. Click Choose File, and then select a local page template.
5. Click OK.
Configuring an authentication policy
An authentication policy bound to a portal defines wireless services available for portal users.
To configure an authentication policy:
1. From the left navigation tree, select Authentication Policy.
2. On the Authentication Policy List page, click Add.
3. Configure the following parameters on the Add Authentication Policy page, as shown in Figure 21:
¡ Name—Enter an authentication policy name.
¡ Description—Enter a description of the authentication policy.
¡ Page Template—Select a page template to bind it to the authentication policy.
¡ Authentication Free—Select this option if no user authentication is required and only authentication completion page is pushed to users.
¡ Only Mobile Endpoints—Select this option if IPM authenticates only mobile endpoints.
¡ Transparent Authentication Period—Specify a transparent period during which a user can reconnect to the network by clicking One-Click Login without entering a verification code. The default is Today.
¡ Idle Time Before Network Cut (Minutes)—Specify an idle time after which the user is disconnected from the network if the user traffic is less than the value specified in the Idle Traffic Before Network Cut field.
¡ Idle Traffic Before Network Cut (Bytes)—Use this parameter with Idle Time Before Network Cut.
¡ Max. Online Duration Per Access (Seconds)—Specify the maximum online duration for each network access. If you set the parameter value to 0, the online duration per access is unlimited.
¡ Maximum Online Duration Per Day (Seconds)—Specify the maximum total duration for which a user can use the network from 00:00 to 24:00. If you set the parameter value to 0, the online duration per day is unlimited.
¡ Maximum Traffic Per Day (MB)—Specify the maximum total traffic that can be used by a user from 00:00 to 24:00. If you set the parameter value to 0, the traffic per day is unlimited.
¡ WeChat Configuration—Select a WeChat configuration name if WeChat authentication is selected on the page template. For more information about WeChat authentication, see "Configuring WeChat authentication."
¡ SMS Message Authentication—Configure a description for the authentication message if SMS authentication is selected on the page template.
¡ Authentication Email Subject—Configure the subject for the authentication email if email authentication is selected on the page template.
¡ Authentication Email Body—Enter the body of the authentication email if email authentication is selected on the page template.
Figure 21 Adding an authentication policy

4. Click OK.
Managing advertisements
IPM supports customizing the following types of advertisements to provide flexible advertisement push services:
· Static advertisements—Support adding picture advertisements.
· Dynamic advertisements—Support adding scrolling pictures, pictures, two pictures in parallel, three pictures in parallel, four pictures in parallel, rich text, and titles to advertisements. You can also add tag advertisements.
Static advertisements
To add a static advertisement:
1. From the navigation tree, select Advertisement Promotion > Static Advertisement Management.
2. Click Add on the page that opens.
3. Configure the following parameters to add a static advertisement, as shown in Figure 22.
¡ Advertisement Name—Enter a unique advertisement name.
¡ Advertisement Vendor—Enter the name of the advertisement vendor.
¡ Advertisement URL—Enter the URL of the advertisement. When you add an advertisement to a theme template, the advertisement URL is embedded into the advertisement picture.
¡ Advertisement Description—Enter a description for the advertisement.
¡ Advertisement Picture—Upload the advertisement picture. Static advertisements support only pictures.
Figure 22 Adding a static advertisement

4. Click OK.
The advertisement is added to the static advertisement list, as shown in Figure 23.
Figure 23 Static advertisement list
To select the customized advertisement when you customize the page template, select Picture in the Basic Controls area, then select Static Advertisement to select the advertisement.
Dynamic advertisements
Adding a dynamic advertisement
1. From the navigation tree, select Advertisement Promotion > Dynamic Advertisement Management.
2. Click Add on the page that opens.
3. Configure the following parameters to add a dynamic advertisement, as shown in Figure 24.
¡ Advertisement Name—Enter a unique advertisement name.
¡ Type—Select a dynamic advertisement type. Options include Scrolling Pictures, Picture, Two Pictures in Parallel, Three Pictures in Parallel, Four Pictures in Parallel, Rich Text, and Title.
¡ Default Advertisement—Select a static advertisement as the default advertisement when the advertisement type is set to Scrolling Picture, Picture, Two Pictures in Parallel, Three Pictures in Parallel, Four Pictures in Parallel, or Rich Text.
¡ Advertisement Description—Enter a description for the advertisement.
Figure 24 Adding a dynamic advertisement

4. Click OK.
The advertisement is added to the dynamic advertisement list, as shown in Figure 25.
Figure 25 Dynamic advertisement list
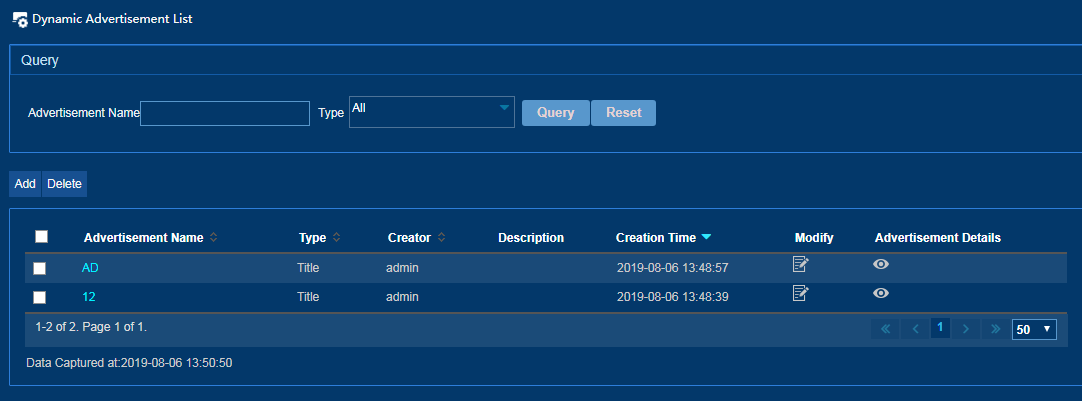
Adding a tag advertisement
Tag advertisements support the collaboration between advertisements and user tags. IPM can push different advertisements to users based on user tags.
To add a tag advertisement:
1. Access the dynamic advertisement list.
2. Click the name of an advertisement.
3. On the Tag Advertisement List page that opens, click Add.
4. Select an advertisement tag and add advertisements to this tag.
Figure 26 Adding a tag advertisement

5. Click Add.
After you select a dynamic advertisement with an advertisement tag for a page template, the collaboration between page elements and user tags can push specific advertisements to targeted users.
Managing sites
Adding a site
1. From the left navigation tree, select Site Management.
2. On the Site Management page, click Add.
3. Configure the following site parameters, as shown in Figure 27:
¡ Site Name—Enter the name of the site.
¡ Site Address—Enter a keyword string and then select the matching site address, or click the site on the map to obtain the address. The longitude and latitude field is automatically populated when you click the site on the map. If you enter the site address, the longitude and latitude are not automatically obtained. You can manually enter the site location.
¡ Associate with Location View—Select a location view for the site. The heat map of a site is available only when the site is associated with a location view. For more information, see "Viewing the heat map."
¡ Associated AP List—Select APs that have been deployed in the site. Batch import is supported. For more information, see "Importing site APs."
¡ Associate with IP Address Group List—Select bound IP address groups that have been configured for portal authentication. For more information, see "Binding IP groups to the portal device."
¡ Associate with ACG List—Select associated ACG devices. You can configure sites in ACG configuration. For more information, see "Adding an ACG."
¡ Bind to Authentication Policies—If the site group to which the site belongs has been bound to an authentication policy, you do not need to bind an authentication policy to the site. If a site and its site group are bound to different authentication policies, the site selects an authentication policy bound to the activity group, site, and area group in descending order of priority.

4. Click OK.
Adding a site group
1. From the left navigation tree, select Site Group.
2. On the Site Group Management page, click Add.
3. Configure the following site group parameters, as shown in Figure 28.
¡ Site Group Address—Enter a keyword string and then select the matching address, or click the site on the map to obtain the address.
¡ Longitude and Latitude—This field is automatically populated when you click the site group on the map. If you enter the site group address, the longitude and latitude are not automatically obtained. You can enter the site location.
¡ Operator—Select operators that can manage the site group. If you do not select any operators, only the administrator has the privilege to manage this site group.
¡ Bind to Authentication Policies—Bind the site group to authentication policies. If a site and its area group and activity group are bound to different policies, IPM selects a policy from the following policies in descending order of priority:
- Policies bound to the activity group of the site.
- Policies bound to the site.
- Policies bound to the area group of the site.

4. Click OK.
Moving sites to a site group
1. Access the Site Group Management page.
2. On the site group list, click a site group name.
The site group details page opens, as shown in Figure 29.
Figure 29 Moving sites to a site group
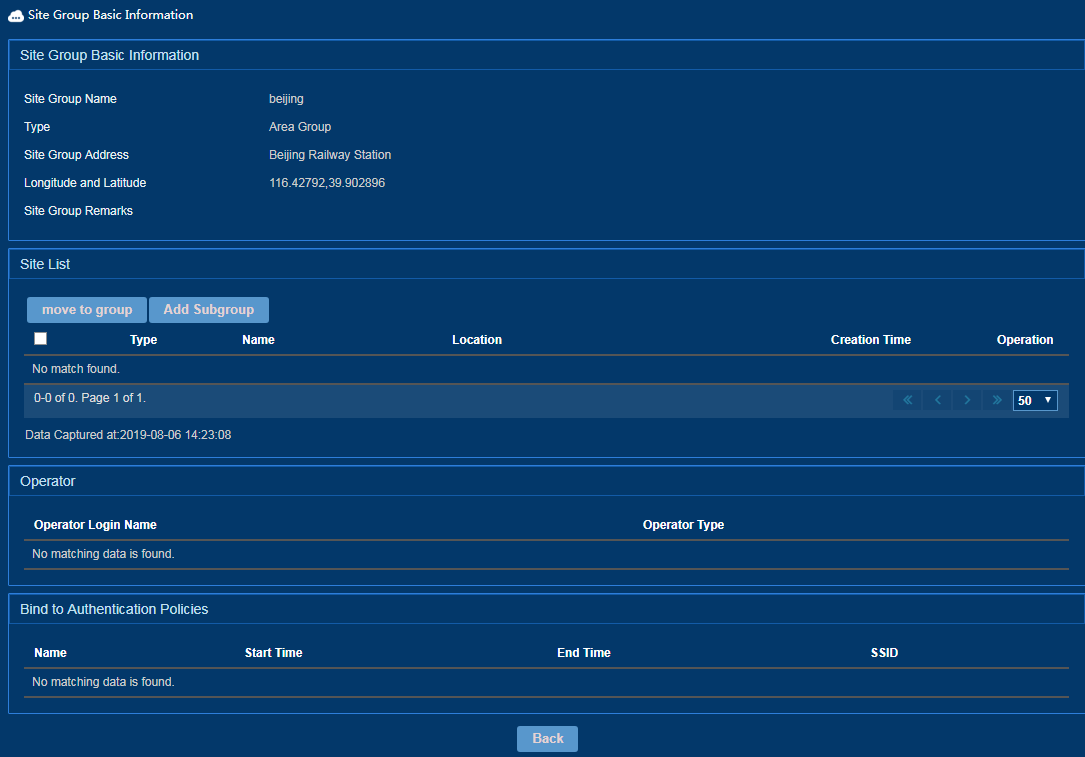
3. On the site list, select sites, and click move to group.
4. Select the site group on the dialog box that opens.
5. Click OK.
Adding a subgroup
1. Access the Site Group Management page.
2. On the site group list, click a site group name.
The site group details page opens, as shown in Figure 29.
3. On the site list, click Add Subgroup, and then configure the subgroup in the same way a site group is configured.
Importing site APs
IPM supports batch importing APs of a site.
To import site APs:
1. Access the Site Management page.
2. Click Import Site APs above the site list.
3. On the page that opens, select a .csv file, as shown in Figure 30.
4. Click Next to view the import result.

|
|
NOTE: You can associate a site with offline APs only by importing these APs. |
Viewing the heat map
The heat map of a site displays real-time and history distributions of endpoints that have passed authentication.
To view the heat map of a site:
1. Access the Site Management page.
2. On the site list, click the location view name in the Heat Map column of a site.
The heat map of the site is displayed, as shown in Figure 31.
Figure 31 Viewing the heat map

Managing users
User list
Adding users
For account-based wireless access solutions, the administrator must preconfigure information of all users by batch import or manually adding users one by one.
To batch import users:
1. From the left navigation tree, select User Management > User List.
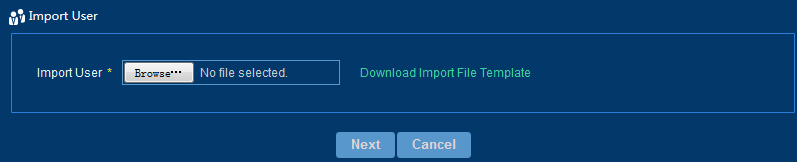
2. Click Batch Import above the user list.
3. On the Import User page that opens, select a .csv file, as shown in Figure 32.
4. Click Next to view the import result.
Figure 32 Batch importing users
To add a user:
1. From the left navigation tree, select User Management > User List.
2. Click Add User above the user list.
3. On the Add User page, configure user information, as shown in Figure 33.
The Set Online User Count parameter setting limits the maximum of concurrent online users of an account. You can select By User Group to use the count value that is set when the user group is added, or select Set Count, and then enter a value in the field that appears.

4. Click OK.
Viewing user endpoint information
1. From the left navigation tree, select User Management > User List.
2. Click User Endpoint Information above the user list.
Figure 34 Viewing user endpoint information
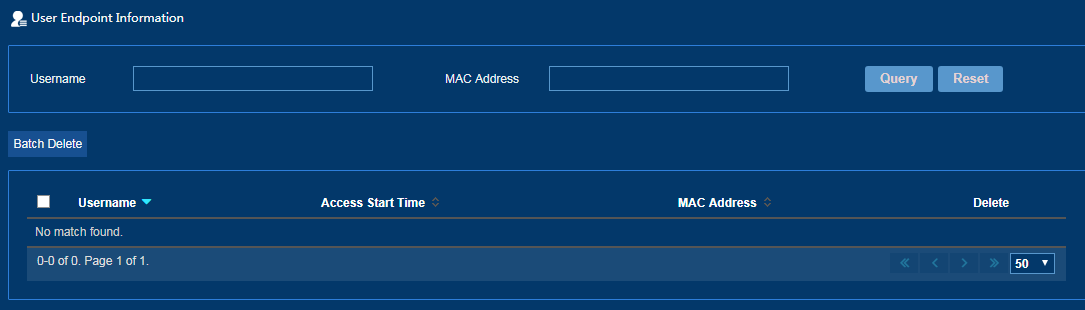
On the user endpoint list, you can remove MAC addresses of users who come online through transparent authentication. These users must be authenticated again when they access the network next time.
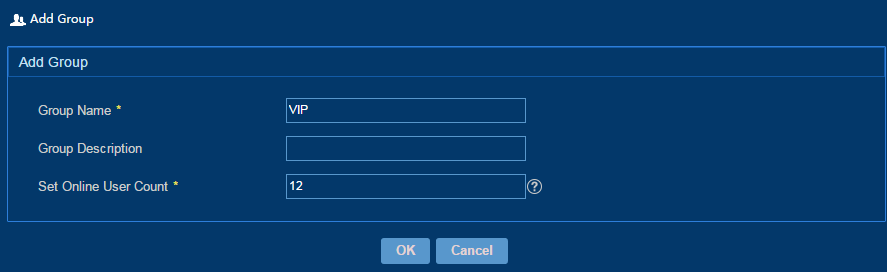
Adding a user group
1. From the left navigation tree, select User Management > User Group.
2. On the User Group page, click Add.
3. Configure user group information, as shown in Figure 35.
The Set Online User Count parameter setting limits the maximum of concurrent online users of an account in this user group.
|
|
NOTE: The user group feature cooperates with the third-party ACG gateway. The added user group name must be consistent with the configuration on the ACG. The ACG policy assigns different bandwidth and online privileges to user groups. For more information about the ACG configuration, see related document. The ACG device must be associated with the site. For more information, see "Adding an ACG." |
4. Click OK.
Assigning users to a user group
1. Access the user group list.
2. Click a user group name.
The user group details page opens.
3. Click Add User, and then select users on the dialog box that opens.
4. Click OK.
Online users
The online user list displays information about online users of all sites in real-time. Account names, WeChat accounts, or phone numbers of online users are displayed based on the user authentication type. The online user list allows you to query user information by criteria, such as the account name, site name, user IP, and user MAC.
To access the online user list, select User Management > Online User from the left navigation tree.
Figure 36 Online users

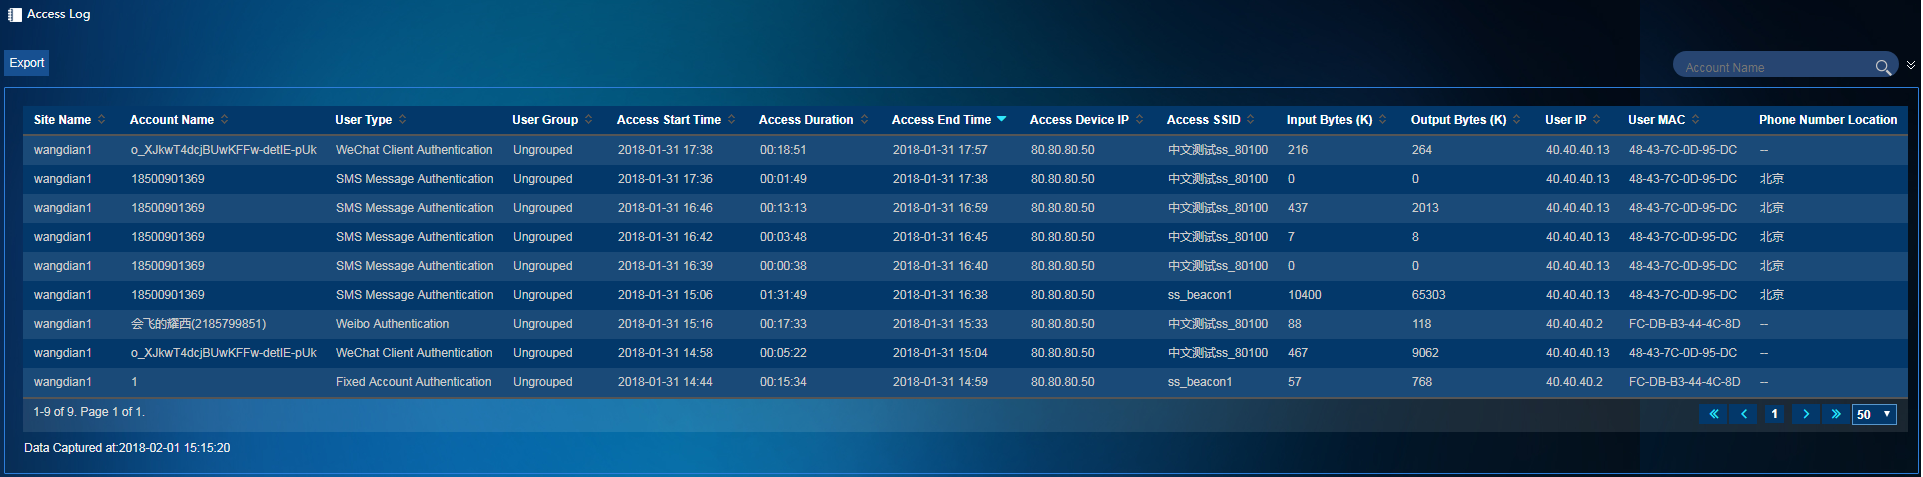
Access log
The access log list contains information about all users that have connected to the portal network, and it can be used as a supplement for customer flow statistics. To access the access log list, select User Management > Access Logs from the left navigation tree.
Access failure logs
The access failure log list records information about users who fail to access the network.
To access the access failure log list, select User Management > Access Failure Logs from the left navigation tree.
Manually logging off users
Manually log off online users to ensure the network security.
To manually log off one or multiple online users:
1. Access the online user list.
2. Select one or multiple online users.
3. Click Manually Log Off.
Managing the blacklist
Adding users to the blacklist
Users that are added to the blacklist will be forcibly logged off. They cannot access the network until they are removed from the blacklist.
To add users to the blacklist:
1. Access the User List page.
2. Select one or multiple users.
3. Click Add to Blacklist.
Removing users from the blacklist
1. From the left navigation tree, select User Management > Blacklist.
2. Select one or multiple users from the blacklist.
3. Click Remove from Blacklist.
System configuration
Managing operators
An IPM operator can be a super administrator, area operator, or activity operator. For relationship among these types of operators, see "Hierarchical management."
A super administrator manages all activity groups and area groups. An area operator manages area groups. An activity operator manages an activity group.
If an area operator is added by a parent area operator, groups managed by the area operator can only be selected from the groups managed by the parent area operator.
To add an operator:
1. From the left navigation tree, select System Configuration > Operator Management.
2. Click Add.
3. Add an operator, as shown in Figure 38.
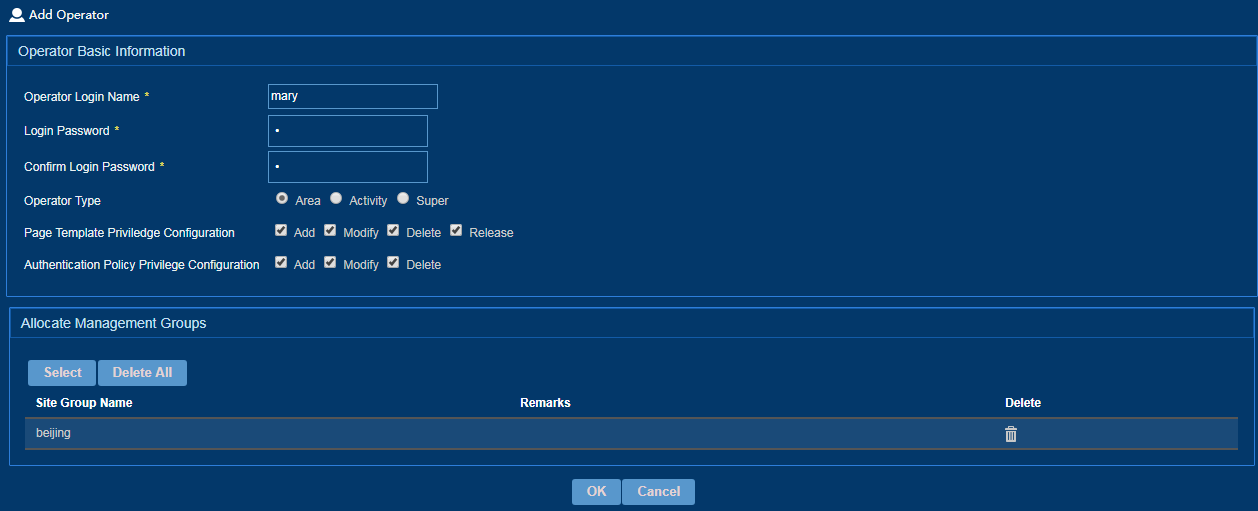
4. Click OK.
Endpoint identification
IPM is preconfigured with various HTTP user agents for endpoint identification. The administrator can add user-defined HTTP user agents.
To add an HTTP user agent:
1. From the left navigation tree, select System Configuration > Endpoint Identification.
2. Click the HTTP User Agent link.
3. On the HTTP User Agent page, click Add.
4. Configure the following parameters as shown in Figure 39:
¡ HTTP User Agent—Enter an HTTP user agent string, which is typically in the OS&&endpoint model format. The user agent string is the key information extracted from the User-Agent field of an HTTP request packet. For example, if the User-Agent field of the HTTP request is Mozilla/5.0(iPad; U; CPU iPhone OS 3_2 like Mac OS X; en-us) AppleWebKit/531.21.10 (KHTML, like Gecko) Version/4.0.4 Mobile/7B314 Safari/531.21.10 when you access the network through the Safari browser on an iPad, the key information is iPad and like Mac OS X. You can configure the user agent string as iPad&&like Mac OS X to represent the endpoint type and OS information, where the double ampersand (&&) indicates AND.
¡ Vendor—Select the endpoint vendor that matches the HTTP user agent string. Available options include existing vendors in IPM.
¡ Endpoint Type—Select the endpoint type that matches the HTTP user agent string. Available options include existing endpoint types in IPM.
¡ OS—Select the endpoint OS that matches the HTTP user agent string. Available options include existing operating systems in IPM.
¡ Description—Enter a description for the HTTP user agent configuration. A detailed description helps operators differentiate HTTP user agent configurations.
Figure 39 Adding an HTTP user agent

5. Click OK.
Adding an ACG
IPM collaborates with an ACG gateway to control the network access privilege of users. The ACG associated with each site controls user network access based on the user group. To ensure correct collaboration between IPM and an ACG gateway, configure the gateway IP address, port number, and shared key for the ACG gateway. You can configure an associated ACG for a site when you add the site.
To add an ACG:
1. From the left navigation tree, select System Configuration > ACG Configuration.
2. Click Add.
3. Add an ACG, as shown in Figure 40.
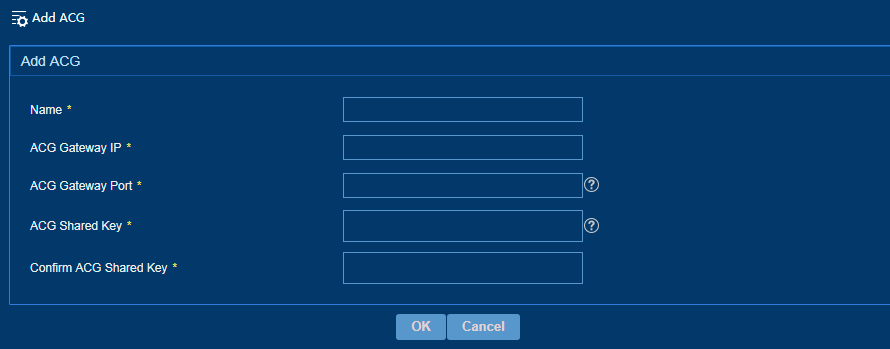
4. Click OK.
Configuring system parameters
1. From the left navigation tree, select System Configuration > System Parameters.
2. Configure the following parameters, as shown in Figure 41.
¡ Device Monitoring Page Title—Enter the title of the device monitoring page.
¡ Customer Flow Monitoring Page Title—Enter the title of the customer flow monitoring page.
¡ iMC Server Address—Specify the public address of the iMC sever used to cooperate with the WeChat server.
¡ IPM WeChat Cloud Server Address—Enter the public address of the WeChat authentication server.
¡ Phone Number Format Requirement—Enter a Java regular expression. IPM uses this regular expression to determine whether the number string provided by the user during authentication is a phone number.
¡ SMS Message Verification Code Length—Set a length for SMS message verification codes for SMS message authentication.
¡ IP After NAT—Enter an IP address if NAT is used in the network.
¡ Limit Online User Count—Select whether to enable limiting concurrent online users of the same account. The concurrent online user count of the same account takes effect only after you enable this feature.
¡ Enable Authentication Logging—Select whether to enable authentication logging. Authentication information is logged if you enable this feature.
¡ Enable Heartbeat—Select whether to enable heartbeat check. If you enable this feature, IPM performs the heartbeat check on lightweight portal devices.
¡ Heartbeat Interval (Seconds)—Set an interval for IPM to perform the heartbeat check. As a best practice, set this value to be identical to the user synchronization interval for lightweight portal authentication on the device.
¡ Max. Heartbeat Check Times—Set the maximum number of heartbeat recheck times. This number does not include the first check failure. IPM logs out portal authenticated users when this number is exceeded and no heartbeat is detected.
¡ Phone Number Location—Select a location. IPM uses this location to determine whether phone numbers are local.
¡ Authentication Data and Parameter Configuration—Click Take Effect Immediately to enable the authentication policy to take effect immediately. If you do not click Take Effect Immediately, the authentication policy takes effect when a periodic task is executed at intervals of 10 minutes.
¡ Page Template—Click Immediately Release to enable the authentication server to obtain the page templates that have been configured. This task is typically performed for data recovery authentication server capacity expansion. Do not perform this task frequently or at a time users come online or go offline. Before you perform this task, make sure all authentication servers have been started.

Platform device view
The platform device view enables the administrator to view wireless devices on the network and configure them conveniently.
To access the platform device view, select System Configuration > Platform Device View, as shown in Figure 42.
Figure 42 Platform device view

Configuring the SMS message platform
The SMS message platform originates from the iMC platform, and IPM provides a quick entrance for it. For more information about configuring the SMS message platform, see H3C IMC Enterprise and Standard Platform Administrator Guide.
The SMS message platform can be used for SMS message authentication and marketing. For more information, see "Configuring the SMS message operation."
To access the SMS message platform configuration page, select System Configuration > SMS Platform Configuration from the left navigation tree, as shown in Figure 43.
Figure 43 Configuring the SMS message platform

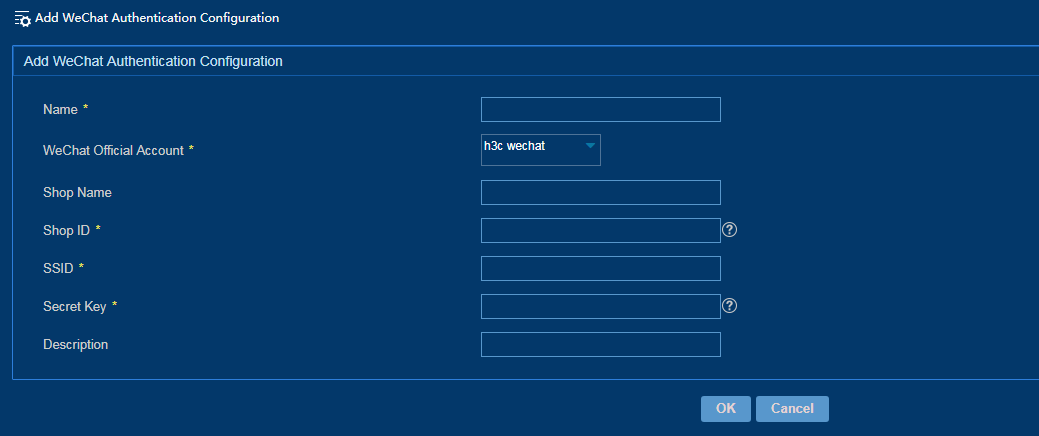
Configuring WeChat authentication
Associate the WeChat official account with shop information for WeChat authentication. For more information about adding a WeChat official account, see "Adding a WeChat official account."
To configure WeChat authentication:
1. From the left navigation tree, select System Configuration > WeChat Authentication Configuration.
2. Click Add.
3. Configure WeChat authentication for a branch portal, as shown in Figure 44.
The WeChat configuration parameters must be same in IPM and WeChat official platform.
Figure 44 Configuring WeChat authentication for a branch portal
4. Click OK.
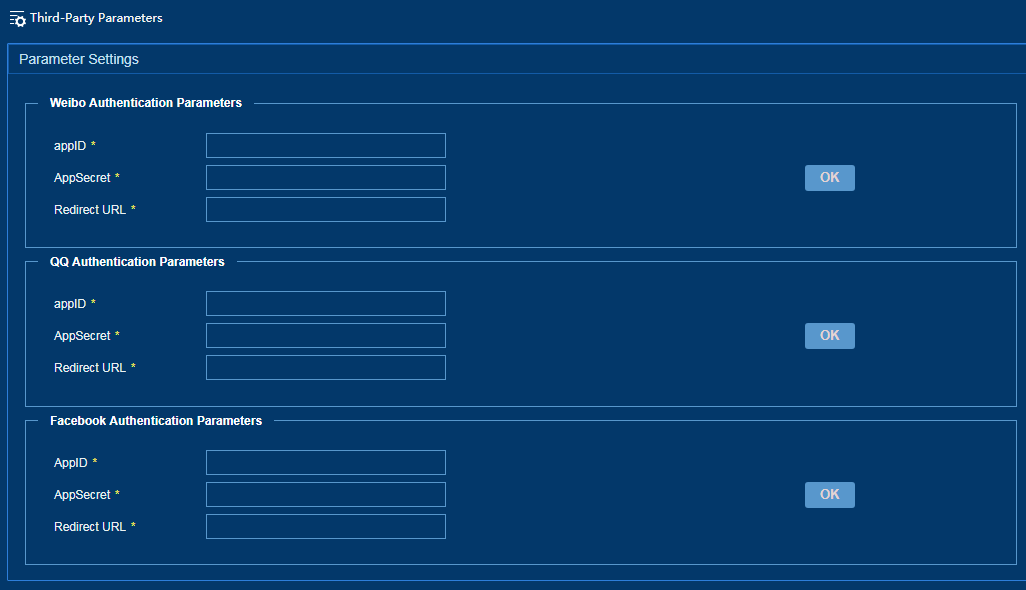
Configuring third-party authentication parameters
If IPM uses Weibo, QQ, or Alipay authentication methods, you must configure third-party authentication parameters.
To configure third-party authentication parameters:
1. From the left navigation tree, select System Configuration > Third-Party Authentication Configuration Parameters.
2. Configure the following third-party authentication parameters, as shown in Figure 45.
¡ AppID—Enter a unique app ID.
¡ AppSecret—Enter an app private key for app verification.
¡ Redirect URL—Enter a redirect URL. A user is redirected to this URL when logging in by using a third-party private key.
Figure 45 Configuring third-party authentication parameters
Configuring the SMS message operation
The SMS message operation enables the administrator to edit SMS message for accurate marketing and send messages by user or user group. It also supports message exchange with customers.
Managing the SMS message content
1. From the left navigation tree, select SMS Message Operation > Content Management.
Figure 46 Content management
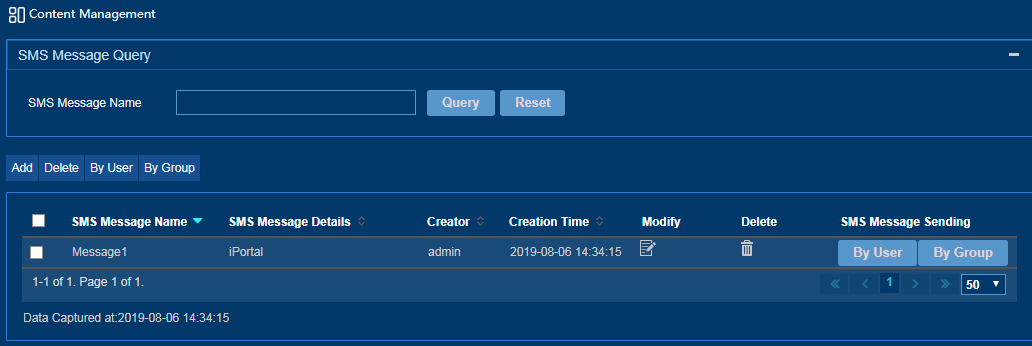
2. Click Add.
3. Add an SMS message content, as shown in Figure 47.
Figure 47 Adding an SMS message content
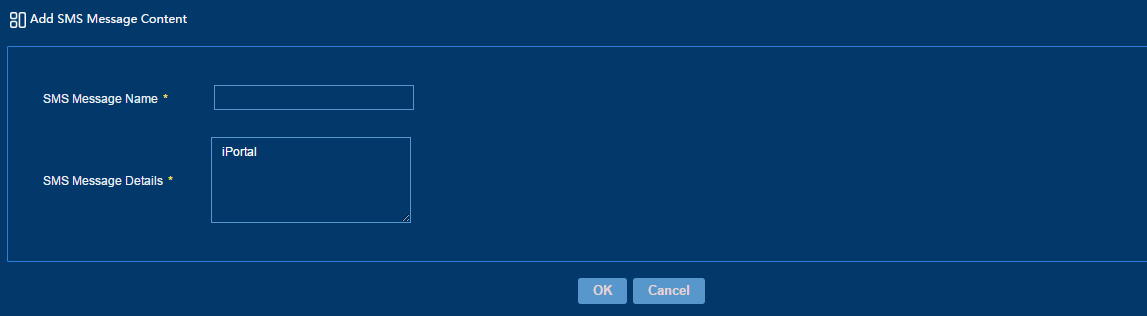
4. Click OK.
Sending SMS messages
On the Content Management page, you can select to send SMS messages by user or by user group:
· To send SMS messages by user, select SMS messages from the SMS message list, and then click By User.
· To send SMS messages by user group, select SMS messages from the SMS message list, and then click By Group.
To access the Content Management page, select SMS Message Operation > Content Management from the left navigation tree.
You can also configure sending SMS messages immediately or at a specific time.
Figure 48 Sending SMS messages by user

Figure 49 Sending SMS messages by user group

To view the sending information about SMS messages, access the SMS message sending management page as shown in Figure 50. To access this page, select SMS Message Operation > Sending Management from the left navigation tree.
Figure 50 SMS message delivery

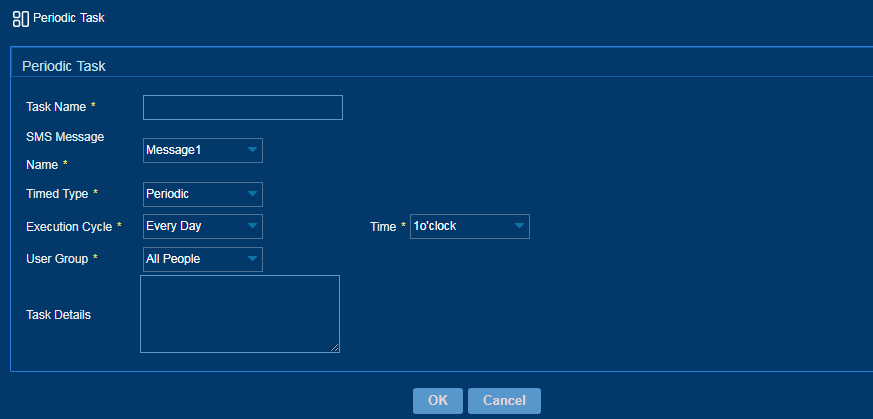
Configuring an SMS message delivery task
Perform this task to send a message to targeted users periodically or at a specific time.
To configure an SMS message delivery task:
1. From the navigation tree, select SMS Message Operation > Timed Sending.
2. On the page that opens, click Add.
3. Configure an SMS message delivery task as shown in Figure 51.
Figure 51 Configuring an SMS message delivery task
4. Click OK.
Configuring the WeChat operation
The WeChat operation uses WeChat official accounts to push messages and services to users by using various methods with accurate location and broad coverage.
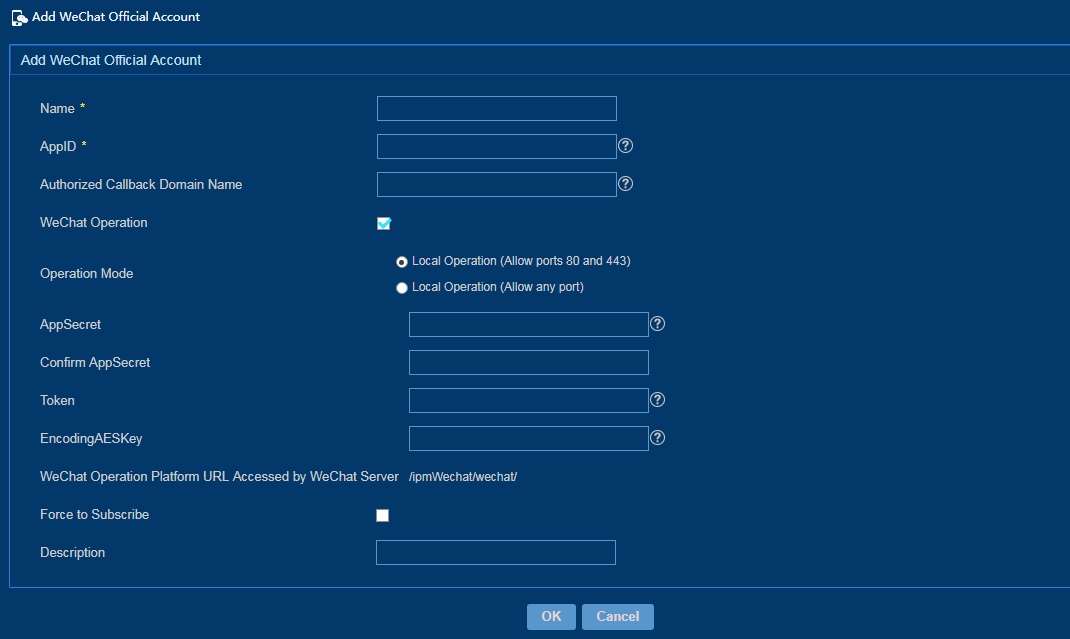
Adding a WeChat official account
The administrator must apply for a WeChat official account in advance, and then configure the official account information in IPM.
To add a WeChat official account:
1. From the left navigation tree, select WeChat Operation > WeChat Official Account.
2. Click Add.
3. Add the WeChat official account that has been successfully applied, as shown in Figure 52.
The WeChat configuration parameters must be same in IPM and WeChat official platform.
Figure 52 Adding a WeChat official account
4. Click OK.
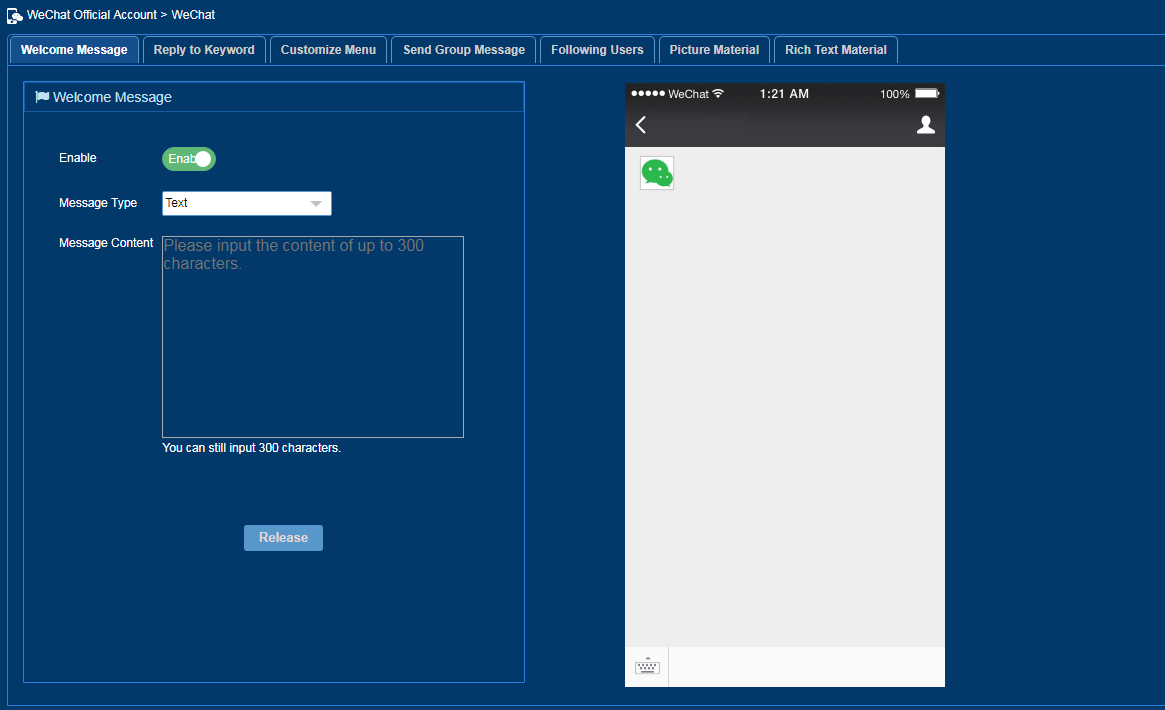
Configuring a WeChat official account
The administrator can customize WeChat official account information, including the welcome message, menu, message interaction, and user information. Rich text materials are also supported.
On the WeChat official account list, click the
Advanced Configuration icon ![]() of
a WeChat official account, and configure advanced functions as needed on the
page that opens, as shown in Figure 53.
of
a WeChat official account, and configure advanced functions as needed on the
page that opens, as shown in Figure 53.
Figure 53 Configuring a WeChat official account
Managing the WeChat content
You can customize the WeChat content and send it at a specific time.
To manage the WeChat content:
1. From the left navigation tree, select WeChat Operation > Content Management.
2. Click Add.
3. Configure the WeChat content, as shown in Figure 54.
Figure 54 Adding the WeChat content

4. Click OK.
Configuring a WeChat delivery task
Perform this task to send the WeChat content to targeted users periodically or at a specific time.
To configure a WeChat delivery task:
1. From the left navigation tree, select WeChat Operation > Timed Sending.
2. Click Add.
3. Configure a WeChat delivery task, as shown in Figure 55.
Figure 55 Configuring a WeChat delivery task

Configuring portal authentication
Portal authentication provides authentication and authorization for users based on Web pages.
Adding access devices
Only access devices you have added can communicate with IPM.
In portal authentication, IPM acts as both the authentication server and the accounting server. Scenarios with IPM as the authentication server and another accounting server are not supported.
To add an access device:
1. From the left navigation tree, select Portal Configuration > Access Device.
2. Click Add.
The page for adding an access device opens, as shown in Figure 56.
3. Click Add IPv4 Dev or Add IPv6 Dev to select an access device.
4. Configuring the following parameters for the access device:
¡ Authentication Port—Enter the port to which IPM listens for RADIUS authentication packets. The port must be the same as what is configured on the access device at the CLI. The default port number is 1812.
¡ Accounting Port—Enter the port to which IPM listens for RADIUS accounting packets. The value must be the same as what is configured on the access device at the CLI. The default port number is 1813.
¡ Forcible Logout Type—Select a method that forces users to log out. Options are Disconnect user and Shut down and bring up port.
¡ Access Device Type—Select an access device type from the list.
¡ Shared Key—Enter a shared key. The shared key is used for the access device and IPM to authenticate each other. The value must be the same as what is configured on the access device at the CLI.
¡ Confirm Shared Key—Enter the same shared key as the value in the Shared Key field.
Figure 56 Adding an access device

5. Click OK.
Configuring IP groups
An IP address group determines the accessible network range for endpoint users.
The following workflow applies:
1. The administrator assigns IP addresses of the network-wide endpoint users to multiple IP address groups according to the network diagram, user distribution, and portal device configuration (NAT or IP address reallocation for example).
2. When an endpoint user accesses the network from the portal device, only users whose IP addresses are in the bound IP group can pass authentication.
To add an IP group:
1. From the left navigation tree, select Portal Configuration > Portal IP Group.
2. Click Add.
3. Configure the following parameters for an IP address group, as shown in Figure 57:
¡ IP Group Name—Enter the name of an IP address group, which must be unique in IPM.
¡ IPv6—Select Yes to configure the IP address group as an IPv6 address group or select No to configure the IP address group as an IPv4 address group. If you select Yes, you only need to configure Start IP and End IP.
¡ Start IP—Enter the start IPv4 or IPv6 address in an IP address group. When entering an IPv4 address, you must enter a complete IPv4 address. When entering an IPv6 address, you can enter a complete IPv6 address or an IPv6 address in compressed format.
¡ End IP—Enter the end IPv4 or IPv6 address in an IP address group. When entering an IPv4 address, you must enter a complete IPv4 address. When entering an IPv6 address, you can enter a complete IPv6 address or an IPv6 address in compressed format. The start IP address cannot be higher than the end IP address.
¡ Action—Select the type of an IP address group, which can be Normal or NAT. This parameter appears only when you select No for the IPv6 parameter.
- The NAT option is applicable to the network that has a NAT gateway between private portal devices and a public portal server.
- The Normal option is applicable to that network that no NAT gateway is deployed between portal devices and the portal server and portal devices are not configured with IP address reallocation.

4. Click OK.
Configuring the portal server
Configure IPM as the portal server to enable it to receive and process portal authentication packets.
To configure the portal server,
1. From the left navigation tree, select Portal Configuration > Portal Server.
2. Configure the following parameters for the portal server, as shown in Figure 58:
¡ Log Level—Specify levels of information to be recorded in logs.
¡ Request Timeout (Seconds)—Enter the timeout time of the request sent by the portal server to a portal device.
¡ Server Heartbeat Interval (Seconds)—Enter the interval at which the portal server sends a server heartbeat packet to the portal device.
- The portal server sends a server heartbeat packet to the portal device at certain intervals. If receiving no server heartbeat packet within an interval, the portal device considers the portal server failed and changes the authentication mode to the fail-open mode. In the fail-open mode, the portal device allows all users to access the Internet without authentication.
- If the portal device receives a server heartbeat packet in the fail-open mode, the device considers that the portal server recovers and restores to the authentication mode.
To enable server heartbeat on the portal device, select Yes for Support Server Heartbeat for the portal device. For the CLI configuration on the device, see relation configuration guide.
Figure 58 Configuring the portal server

3. Click OK.
Configuring portal devices
Portal devices cooperate with the portal server to perform portal authentication for users.
Adding a portal device
1. From the left navigation tree, select Portal Configuration > Portal Device.
2. Click Add.
3. Add a portal device, as shown in Figure 59:
¡ Device Name—Enter the name of the portal device. The name must be unique in IPM.
¡ IP Address—Enter the IPv4 or IPv6 address of the portal device.
¡ Key—Enter a key. The key is used for the portal device and IPM to authenticate each other. The value must be the same as what is configured on the portal device at the CLI.
¡ Confirm Key—Enter the same key as the value in the Key field.
¡ Authentication Retries—Enter the number of authentication requests that the portal server re-sends to the portal device when a request times out. The portal server considers a request times out if it cannot receive a reply from the portal device within a specified period of time after the request is sent.
¡ Logout Retries—Enter the number of logout requests that the portal server re-sends to the portal device when a request times out. The portal server considers a request times out if it cannot receive a reply from the portal device within a specified period of time after the request is sent.
¡ Support Server Heartbeat—Select Yes or No to enable or disable server heartbeat for the portal device.
¡ Version—Select a portal version for the portal device.
¡ Device Description—Enter detailed information about a portal device for easy maintenance.
Figure 59 Adding a portal device
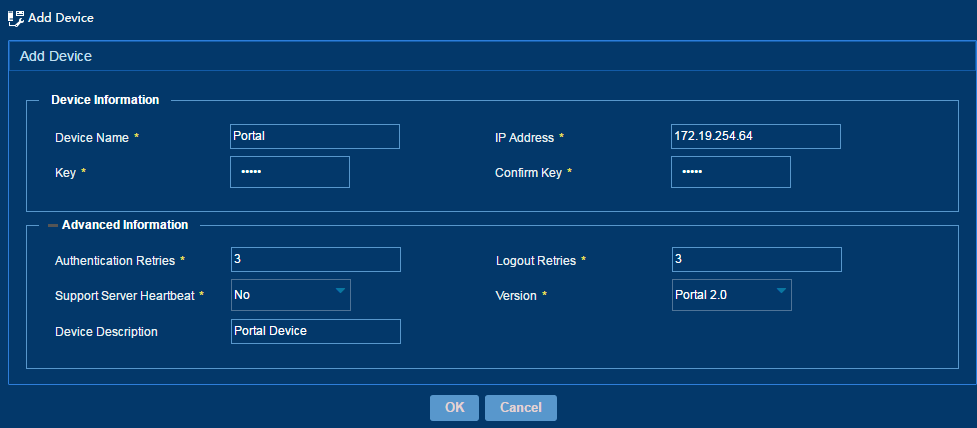
4. Click OK.
Binding IP groups to the portal device
1. Access the portal device configuration page.
2. Click the Bind IP Address Groups ![]() icon in the Operation
column.
icon in the Operation
column.
3. On the page that opens, click Add.
4. Perform the following tasks, as shown in Figure 60.
a. Select an authentication method used by endpoint users for Select Authentication Method. Options are PAP and CHAP.
b. Select IP groups that can access the network from the IP group list.
Figure 60 Binding IP groups to the portal device
