- Table of Contents
- Related Documents
-
| Title | Size | Download |
|---|---|---|
| 01-text | 127.62 KB |
Contents
Managing the WLAN feature image on switches
Installing the WLAN feature image
Uninstalling the feature image
Deleting the uninstalled feature image file
WLAN feature image installation and uninstallation examples
Example: Installing and uninstalling the WLAN feature image (centralized IRF devices)
Example: Installing and uninstalling the WLAN feature image (distributed devices in standalone mode)
Example: Installing and uninstalling the WLAN feature image (distributed devices in IRF mode)
Managing the WLAN feature image on switches
Overview
For a switch to manage access points (APs) by using the access controller (AC) functionality, you can install the WLAN feature image on the switch. This document describes how to install, uninstall, update, and delete the WLAN feature image on a switch.
Installing the WLAN feature image
This task activates the WLAN feature image. Switches with an activated WLAN feature image can provide AC functionality.
Restrictions and guidelines
· Log in to the switch from the console port to install the feature image. If you use Telnet or SSH, you might be disconnected from the switch before the installation is completed.
· To avoid installation failures or system errors, do not install the feature image when the switch is faulty.
· Do not install the feature image if hardware resources on the switch are exhausted.
· In a multiuser environment, make sure no other administrators access the switch while you are performing the installation.
· Unless otherwise required, do not execute any commands on the switch during the installation process.
· Make sure the following installation order is used when you install a feature image:
? (Centralized IRF devices) To install a feature image on an IRF fabric, first install the feature image on the master device and then on the subordinate devices.
? (Distributed devices in standalone mode) To install a feature image on a distributed device, first install the feature image on the active MPU and then on the standby MPU.
? (Distributed devices in IRF mode) To uninstall a feature image, first uninstall the image from the subordinate members. On each member device, first uninstall the image from the standby MPU.
· For the feature image to take effect, log out from the switch and then log in again after the installation is complete.
· The activate operation updates only the current software image list. For the image changes to take effect after a reboot, you must perform a commit operation to update the main startup image list.
Preparing for installation
1. Use the display device command and the display system stable state command to verify that the device is operating correctly and the device system is stable.
2. Use the save command to save the running configuration.
3. Use FTP or TFTP to transfer the feature image file to the root directory of a file system on the switch.
4. Use the dir command to verify that sufficient storage space is available for the feature image.
Procedure
Perform the following tasks in user view.
To install the WLAN feature image:
1. Verify that the feature image is the correct version.
display install package
2. Activate the feature image.
?
Centralized IRF devices:
install activate feature filename&<1-30> slot slot-number
? Distributed
devices in standalone mode:
install activate feature filename&<1-30> slot slot-number
? Distributed
devices in IRF mode:
install activate feature filename&<1-30> chassis chassis-number slot slot-number
3. Commit the software changes.
install commit
Uninstalling the feature image
This task deactivates the installed feature image and disables the switch from providing AC functionality. Uninstalled images are still stored on the storage medium. To permanently delete the images, see "Deleting the uninstalled feature image file."
Restrictions and guidelines
· After the uninstallation, commands provided by the uninstalled feature image still exist in the configuration file, but these commands do not take effect. As a best practice, delete the commands and save the running configuration.
· The deactivate operation removes images only from the current software image list. For the software changes to take effect after a reboot, you must perform a commit operation to remove the images from the main startup image list.
· Make sure the following uninstallation order is used when you uninstall a feature image:
? (Centralized IRF devices) To uninstall a feature image from an IRF fabric, first uninstall the image from the subordinate devices and then from the master device.
? (Distributed devices in standalone mode) To uninstall a feature image from a distributed device, first uninstall the image from the standby MPU and then from the active MPU.
? (Distributed devices in IRF mode) To uninstall a feature image, first uninstall the image from the subordinate members. On each member device, first uninstall the image from the standby MPU.
Preparing for uninstallation
Use the display system stable state command to verify that the system is stable.
Procedure
Perform the following tasks in user view.
To uninstall the feature image:
1. Deactivate the feature image.
?
Centralized IRF devices:
install deactivate feature filename&<1-30> slot slot-number
? Distributed
devices in standalone mode:
install deactivate feature filename&<1-30> slot slot-number
? Distributed
devices in IRF mode:
install
deactivate feature filename&<1-30> chassis chassis-number
slot slot-number
2. Commit the software changes.
install commit
Updating the feature image
1. Uninstall the current WLAN feature image (see "Uninstalling the feature image").
2. Delete the .mdb configuration file by using the delete /unreserved command.
3. Install the new WLAN feature image (see "Installing the WLAN feature image").
4. Save the running configuration by using the save command.
Deleting the uninstalled feature image file
After the feature image is uninstalled successfully, you can delete the feature image file to release the storage space.
To delete the uninstalled feature image file, execute one of the following commands in user view:
·
Centralized IRF devices:
install remove [ slot slot-number ] { filename | inactive }
·
Distributed devices in standalone mode:
install remove [ slot slot-number ] { filename | inactive }
·
Distributed devices in IRF mode:
install
remove [ chassis chassis-number slot slot-number ] { filename | inactive }
WLAN feature image installation and uninstallation examples
Example: Installing and uninstalling the WLAN feature image (centralized IRF devices)
Network configuration
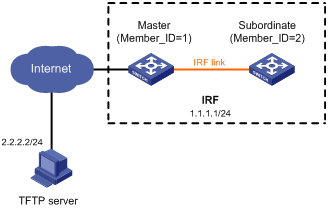
As shown in Figure 1, the IRF fabric has two member devices. The WLAN feature image is provided in the s7500exsv2-uww.bin file.
Install the WLAN feature image on the IRF fabric for the fabric to support AC functionality. When the AC functionality is not needed, uninstall and delete the feature image.
Procedure
1. Install the WLAN feature image:
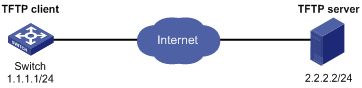
# Download the WLAN feature image file from the TFTP server.
<Sysname> tftp 2.2.2.2 get s7500exsv2-uww.bin
% Total % Received % Xferd Average Speed Time Time Time Current
Dload Upload Total Spent Left Speed
100 34.6M 100 34.6M 0 0 764k 0 --:--:-- --:--:-- --:--:-- 810k
Writing file...Done.
# Display feature image file information.
<Sysname> display install package flash:/s7500exsv2-uww.bin verbose
flash:/S7500EXSV2-UWW.bin
[Package]
Vendor: H3C
Product: S7500EXSV2
Service name: wlan
Platform version: 7.1.064
Product version: Release 5120
Supported board: mpu
Version type: debug
[Component]
Component: wlan
Description: wlan package
# Display active software images.
<Sysname> display install active
Active packages on slot 1:
flash:/S7500EXS-CMW710-BOOT-A752301.bin
flash:/S7500EXS-CMW710-SYSTEM-A752301.bin
flash:/S7500EXS-CMW710-DEVKIT-A752301.bin
flash:/S7500EXS-CMW710-MANUFACTURE-A752301.bin
Active packages on slot 2:
flash:/S7500EXS-CMW710-BOOT-A752301.bin
flash:/S7500EXS-CMW710-SYSTEM-A752301.bin
flash:/S7500EXS-CMW710-DEVKIT-A752301.bin
flash:/S7500EXS-CMW710-MANUFACTURE-A752301.bin
# Identify the version compatibility, recommended ISSU methods, and possible impact of the upgrade.
<Sysname> install activate feature flash:/s7500exsv2-uww.bin slot 1 test
Verifying the file flash:/s7500exsv2-uww.bin on slot 1..............Done.
Identifying the upgrade methods.....Done.
Upgrade summary according to following table:
flash:/s7500exsv2-uww.bin
Running Version New Version
None Release 5121P11
Slot Upgrade Way
1 Service Upgrade
Influenced service according to following table on slot 1:
flash:/s7500exsv2-uww.bin
comsh cfad
<Sysname> install activate feature flash:/s7500exsv2-uww.bin slot 2 test
Copying file flash:/s7500exsv2-uww.bin to slot2#flash:/s7500exsv2-uww.bin............Done.
Verifying the file flash:/s7500exsv2-uww.bin on slot 2..............Done.
Identifying the upgrade methods.....Done.
Upgrade summary according to following table:
flash:/s7500exsv2-uww.bin
Running Version New Version
None Release 5121P11
Slot Upgrade Way
2 Service Upgrade
Influenced service according to following table on slot 2:
flash:/s7500exsv2-uww.bin
comsh cfad
The output shows that both members need a service upgrade.
# Activate the WLAN feature image.
<Sysname> install activate feature flash:/s7500exsv2-uww.bin slot 1
Verifying the file flash:/s7500exsv2-uww.bin on slot 1..............Done.
Identifying the upgrade methods.....Done.
Upgrade summary according to following table:
flash:/s7500exsv2-uww.bin
Running Version New Version
None Release 5121P11
Slot Upgrade Way
1 Service Upgrade
Upgrading software images to compatible versions. Continue? [Y/N]:y
This operation might take several minutes, please wait..............Done.
<Sysname> install activate feature flash:/s7500exsv2-uww.bin slot 2
File flash:/s7500exsv2-uww.bin already exists on slot 2.
Overwrite the existing files? [Y/N]:y
Copying file flash:/s7500exsv2-uww.bin to slot2#flash:/s7500exsv2-uww.bin............Done.
Verifying the file flash:/s7500exsv2-uww.bin on slot 2..............Done.
Identifying the upgrade methods.....Done.
Upgrade summary according to following table:
flash:/s7500exsv2-uww.bin
Running Version New Version
None Release 5121P11
Slot Upgrade Way
2 Service Upgrade
Upgrading software images to compatible versions. Continue? [Y/N]:y
This operation might take several minutes, please wait..............Done.
# Display active software images.
<Sysname> display install active
Active packages on slot 1:
flash:/S7500EXS-CMW710-BOOT-A752301.bin
flash:/S7500EXS-CMW710-SYSTEM-A752301.bin
flash:/S7500EXS-CMW710-DEVKIT-A752301.bin
flash:/S7500EXS-CMW710-MANUFACTURE-A752301.bin
flash:/s7500exsv2-uww.bin
Active packages on slot 2:
flash:/S7500EXS-CMW710-BOOT-A752301.bin
flash:/S7500EXS-CMW710-SYSTEM-A752301.bin
flash:/S7500EXS-CMW710-DEVKIT-A752301.bin
flash:/S7500EXS-CMW710-MANUFACTURE-A752301.bin
flash:/s7500exsv2-uww.bin
# Commit the software changes.
<Sysname> install commit
This operation will take several minutes, please wait..............Done.
2. Verify the installation:
# Log out from the IRF fabric and then log in again.
# Try to execute AC-related commands. If AC-related commands can be used, the installation is successful.
3. Uninstall and delete the WLAN feature image:
# Uninstall the WLAN feature image.
<Sysname> install deactivate feature flash:/s7500exsv2-uww.bin slot 2
This operation might take several minutes, please wait..............Done.
<Sysname> install deactivate feature flash:/s7500exsv2-uww.bin slot 1
This operation might take several minutes, please wait..............Done.
# Commit the software changes.
<Sysname> install commit
This operation will take several minutes, please wait..............Done.
# Verify that the WLAN feature image has been uninstalled.
<Sysname> display install inactive
Inactive packages on slot 1:
flash:/s7500exsv2-uww.bin
Inactive packages on slot 2:
flash:/s7500exsv2-uww.bin
# Delete the WLAN feature image file.
<Sysname> install remove flash:/s7500exsv2-uww.bin
# Verify that no inactive software images exist in the root directory of the file system.
<Sysname> display install inactive
# Verify that the WLAN feature image file has been deleted.
<Sysname> dir
Example: Installing and uninstalling the WLAN feature image (distributed devices in standalone mode)
Network configuration
As shown in Figure 2, the switch has two MPUs. The active MPU is in slot 6. The standby MPU is in slot 7. The interface card for forwarding packets is in slot 1. The WLAN feature image is provided in the s10500b-uww.bin file.
Install the WLAN feature image for the switch to support AC functionality. When the AC functionality is not needed, uninstall and delete the feature image.
Procedure
1. Install the WLAN feature image:
# Download the WLAN feature image file from the TFTP server.
<Sysname> tftp 2.2.2.2 get s10500b-uww.bin
% Total % Received % Xferd Average Speed Time Time Time Current
Dload Upload Total Spent Left Speed
100 54.8M 100 54.8M 0 0 130k 0 0:07:09 0:07:09 --:--:-- 120k
Writing file...Done.
# Display feature image file information.
<Sysname> display install package flash:/s10500b-uww.bin verbose
flash:/S10500B-UWW.bin
[Package]
Vendor: H3C
Product: S10500
Service name: wlan
Platform version: 7.1.064
Product version: Alpha 5121P12
Supported board: mpu_xlp lpu_rmi lpu_sibyte lpu_xlp lpu_arm
Version type: debug
[Component]
Component: wlan
Description: wlan package
# Display active software images.
<Sysname> display install active
Active packages on slot 1:
flash:/S10500-CMW710-BOOT-A752301.bin
flash:/S10500-CMW710-SYSTEM-A752301.bin
flash:/S10500-CMW710-DEVKIT-A752301.bin
flash:/S10500-CMW710-MANUFACTURE-A752301.bin
Active packages on slot 6:
flash:/S10500-CMW710-BOOT-A752301.bin
flash:/S10500-CMW710-SYSTEM-A752301.bin
flash:/S10500-CMW710-DEVKIT-A752301.bin
flash:/S10500-CMW710-MANUFACTURE-A752301.bin
Active packages on slot 7:
flash:/S10500-CMW710-BOOT-A752301.bin
flash:/S10500-CMW710-SYSTEM-A752301.bin
flash:/S10500-CMW710-DEVKIT-A752301.bin
flash:/S10500-CMW710-MANUFACTURE-A752301.bin
# Identify the version compatibility, recommended ISSU methods, and possible impact of the upgrade.
<Sysname> install activate feature flash:/s10500b-uww.bin slot 6 test
Verifying the file flash:/S10500B-UWW.bin on slot 6...................................Done.
Identifying the upgrade methods.......Done.
Upgrade summary according to following table:
flash:/S10500B-UWW.bin
Running Version New Version
None Alpha 5120
Slot Upgrade Way
1 Service Upgrade
6 Service Upgrade
Influenced service according to following table on slot 6:
flash:/S10500B-UWW.bin
comsh cfad
<Sysname> install activate feature flash:/s10500b-uww.bin slot 7 test
Copying file flash:/S10500B-UWW.bin to slot7#flash:/S10500B-UWW.bin..................Done.
Verifying the file flash:/S10500B-UWW.bin on slot 7...................................Done.
Identifying the upgrade methods.......Done.
Upgrade summary according to following table:
flash:/S10500B-UWW.bin
Running Version New Version
None Alpha 5120
Slot Upgrade Way
7 Service Upgrade
Influenced service according to following table on slot 7:
flash:/S10500B-UWW.bin
comsh cfad
The output shows that both MPUs need a service upgrade.
# Activate the WLAN feature image.
<Sysname> install activate feature flash:/s10500b-uww.bin slot 6
Verifying the file flash:/S10500B-UWW.bin on slot 6................................Done.
Identifying the upgrade methods.......Done.
Upgrade summary according to following table:
flash:/S10500B-UWW.bin
Running Version New Version
None Alpha 5120
Slot Upgrade Way
1 Service Upgrade
6 Service Upgrade
Upgrading software images to compatible versions. Continue? [Y/N]:y
This operation might take several minutes, please wait..........................Done.
<Sysname> install activate feature flash:/s10500b-uww.bin slot 7
File flash:/s10500b-uww.bin already exists on slot 7.
Overwrite the existing files? [Y/N]:y
Copying file flash:/S10500B-UWW.bin to slot7#flash:/S10500B-UWW.bin..................Done.
Verifying the file flash:/S10500B-UWW.bin on slot 7..............Done.
Identifying the upgrade methods.......Done.
Upgrade summary according to following table:
flash:/S10500B-UWW.bin
Running Version New Version
None Alpha 5120
Slot Upgrade Way
7 Service Upgrade
Upgrading software images to compatible versions. Continue? [Y/N]:y
This operation might take several minutes, please wait..........................Done.
# Display active software images.
<Sysname> display install active
Active packages on slot 1:
flash:/S10500-CMW710-BOOT-A752301.bin
flash:/S10500-CMW710-SYSTEM-A752301.bin
flash:/S10500-CMW710-DEVKIT-A752301.bin
flash:/S10500-CMW710-MANUFACTURE-A752301.bin
flash:/S10500B-UWW.bin
Active packages on slot 6:
flash:/S10500-CMW710-BOOT-A752301.bin
flash:/S10500-CMW710-SYSTEM-A752301.bin
flash:/S10500-CMW710-DEVKIT-A752301.bin
flash:/S10500-CMW710-MANUFACTURE-A752301.bin
flash:/S10500B-UWW.bin
Active packages on slot 7:
flash:/S10500-CMW710-BOOT-A752301.bin
flash:/S10500-CMW710-SYSTEM-A752301.bin
flash:/S10500-CMW710-DEVKIT-A752301.bin
flash:/S10500-CMW710-MANUFACTURE-A752301.bin
flash:/S10500B-UWW.bin
# Commit the software changes.
<Sysname> install commit
This operation will take several minutes, please wait...........................Done.
2. Verify the installation:
# Log out from the switch and then log in again.
# Try to execute AC-related commands. If AC-related commands can be used, the installation is successful.
3. Uninstall and delete the WLAN feature image:
# Uninstall the WLAN feature image.
<Sysname> install deactivate feature flash:/s10500b-uww.bin slot 7
This operation might take several minutes, please wait..............Done.
<Sysname> install deactivate feature flash:/s10500b-uww.bin slot 6
This operation might take several minutes, please wait..............Done.
# Commit the software changes.
<Sysname> install commit
This operation will take several minutes, please wait..............Done.
# Verify that the WLAN feature image has been uninstalled.
<Sysname> display install inactive
Inactive packages on slot 6:
flash:/S10500B-UWW.bin
Inactive packages on slot 7:
flash:/S10500B-UWW.bin
# Delete the WLAN feature image file.
<Sysname> install remove flash:/s10500b-uww.bin
# Verify that no inactive software images exist in the root directory of the file system.
<Sysname> display install inactive
# Verify that the WLAN feature image file has been deleted.
<Sysname> dir
Example: Installing and uninstalling the WLAN feature image (distributed devices in IRF mode)
Network configuration
As shown in Figure 3, the IRF fabric has two members. Each member has one MPU in slot 6 (active MPU), one MPU in slot 7 (standby MPU), and one interface card in slot 1. The WLAN feature image is provided in the s10500b-uww.bin file.
Install the WLAN feature image on the IRF fabric to support AC functionality. When the AC functionality is not needed, uninstall and delete the feature image.

Procedure
1. Install the WLAN feature image:
# Download the WLAN feature image file from the TFTP server.
<Sysname> tftp 2.2.2.2 get s10500b-uww.bin
% Total % Received % Xferd Average Speed Time Time Time Current
Dload Upload Total Spent Left Speed
100 54.8M 100 54.8M 0 0 130k 0 0:07:09 0:07:09 --:--:-- 120k
Writing file...Done.
# Display feature image file information.
<Sysname> display install package flash:/s10500b-uww.bin verbose
flash:/S10500B-UWW.bin
[Package]
Vendor: H3C
Product: S10500
Service name: wlan
Platform version: 7.1.064
Product version: Alpha 5121P12
Supported board: mpu_xlp lpu_rmi lpu_sibyte lpu_xlp lpu_arm
Version type: debug
[Component]
Component: wlan
Description: wlan package
# Display active software images.
<Sysname> display install active
Active packages on chassis 1 slot 1:
flash:/S10500-CMW710-BOOT-A752301.bin
flash:/S10500-CMW710-SYSTEM-A752301.bin
flash:/S10500-CMW710-DEVKIT-A752301.bin
flash:/S10500-CMW710-MANUFACTURE-A752301.bin
Active packages on chassis 1 slot 6:
flash:/S10500-CMW710-BOOT-A752301.bin
flash:/S10500-CMW710-SYSTEM-A752301.bin
flash:/S10500-CMW710-DEVKIT-A752301.bin
flash:/S10500-CMW710-MANUFACTURE-A752301.bin
Active packages on chassis 1 slot 7:
flash:/S10500-CMW710-BOOT-A752301.bin
flash:/S10500-CMW710-SYSTEM-A752301.bin
flash:/S10500-CMW710-DEVKIT-A752301.bin
flash:/S10500-CMW710-MANUFACTURE-A752301.bin
Active packages on chassis 2 slot 1:
flash:/S10500-CMW710-BOOT-A752301.bin
flash:/S10500-CMW710-SYSTEM-A752301.bin
flash:/S10500-CMW710-DEVKIT-A752301.bin
flash:/S10500-CMW710-MANUFACTURE-A752301.bin
Active packages on chassis 2 slot 6:
flash:/S10500-CMW710-BOOT-A752301.bin
flash:/S10500-CMW710-SYSTEM-A752301.bin
flash:/S10500-CMW710-DEVKIT-A752301.bin
flash:/S10500-CMW710-MANUFACTURE-A752301.bin
Active packages on chassis 2 slot 7:
flash:/S10500-CMW710-BOOT-A752301.bin
flash:/S10500-CMW710-SYSTEM-A752301.bin
flash:/S10500-CMW710-DEVKIT-A752301.bin
flash:/S10500-CMW710-MANUFACTURE-A752301.bin
# Identify the version compatibility, recommended ISSU methods, and possible impact of the upgrade.
<Sysname> install activate feature flash:/s10500b-uww.bin chassis 1 slot 6 test
Verifying the file flash:/S10500B-UWW.bin on chassis 1 slot 6.......................Done.
Identifying the upgrade methods.............Done.
Upgrade summary according to following table:
flash:/S10500B-UWW.bin
Running Version New Version
None Alpha 5120
Chassis Slot Upgrade Way
1 1 Service Upgrade
1 6 Service Upgrade
Influenced service according to following table on chassis 1 slot 6:
flash:/S10500B-UWW.bin
comsh cfad
<Sysname> install activate feature flash:/s10500b-uww.bin chassis 1 slot 7 test
Verifying the file flash:/S10500B-UWW.bin on chassis 1 slot 7.......................Done.
Identifying the upgrade methods.............Done.
Upgrade summary according to following table:
flash:/S10500B-UWW.bin
Running Version New Version
None Alpha 5120
Chassis Slot Upgrade Way
1 7 Service Upgrade
Influenced service according to following table on chassis 1 slot 7:
flash:/S10500B-UWW.bin
comsh cfad
<Sysname> install activate feature flash:/s10500b-uww.bin chassis 2 slot 6 test
Copying file flash:/S10500B-UWW.bin to chassis2#slot6#flash:/S10500B-UWW.bin.........Done.
Verifying the file flash:/S10500B-UWW.bin on chassis 2 slot 6.......................Done.
Identifying the upgrade methods....Done.
Upgrade summary according to following table:
flash:/S10500B-UWW.bin
Running Version New Version
None Alpha 5120
Chassis Slot Upgrade Way
2 1 Service Upgrade
2 6 Service Upgrade
Influenced service according to following table on chassis 2 slot 6:
flash:/S10500B-UWW.bin
comsh cfad
<Sysname> install activate feature flash:/s10500b-uww.bin chassis 2 slot 7 test
Copying file flash:/S10500B-UWW.bin to chassis2#slot7#flash:/S10500B-UWW.bin.........Done.
Verifying the file flash:/S10500B-UWW.bin on chassis 2 slot 7.......................Done.
Identifying the upgrade methods....Done.
Upgrade summary according to following table:
flash:/S10500B-UWW.bin
Running Version New Version
None Alpha 5120
Chassis Slot Upgrade Way
2 7 Service Upgrade
Influenced service according to following table on chassis 2 slot 7:
flash:/S10500B-UWW.bin
comsh cfad
The output shows that all MPUs need a service upgrade.
# Activate the WLAN feature image.
<Sysname> install activate feature flash:/s10500b-uww.bin chassis 1 slot 6
Verifying the file flash:/S10500B-UWW.bin on chassis 1 slot 6..................Done.
Identifying the upgrade methods............Done.
Upgrade summary according to following table:
flash:/S10500B-UWW.bin
Running Version New Version
None Alpha 5120
Chassis Slot Upgrade Way
1 1 Service Upgrade
1 6 Service Upgrade
Upgrading software images to compatible versions. Continue? [Y/N]:y
This operation might take several minutes, please wait................................Done.
<Sysname> install activate feature flash:/s10500b-uww.bin chassis 1 slot 7
Verifying the file flash:/S10500B-UWW.bin on chassis 1 slot 7......................Done.
Identifying the upgrade methods............Done.
Upgrade summary according to following table:
flash:/S10500B-UWW.bin
Running Version New Version
None Alpha 5120
Chassis Slot Upgrade Way
1 7 Service Upgrade
Upgrading software images to compatible versions. Continue? [Y/N]:y
This operation might take several minutes, please wait................................Done.
<Sysname> install activate feature flash:/s10500b-uww.bin chassis 2 slot 6
File flash:/S10500B-UWW.bin already exists on chassis 2 slot 6.
Overwrite the existing files? [Y/N]:y
Copying file flash:/S10500B-UWW.bin to chassis2#slot6#flash:/S10500B-UWW.bin.........Done.
Verifying the file flash:/S10500B-UWW.bin on chassis 2 slot 6......................Done.
Identifying the upgrade methods.....Done.
Upgrade summary according to following table:
flash:/S10500B-UWW.bin
Running Version New Version
None Alpha 5120
Chassis Slot Upgrade Way
2 1 Service Upgrade
2 6 Service Upgrade
Upgrading software images to compatible versions. Continue? [Y/N]:y
This operation might take several minutes, please wait..........................Done.
<Sysname> install activate feature flash:/s10500b-uww.bin chassis 2 slot 7
File flash:/S10500B-UWW.bin already exists on chassis 2 slot 7.
Overwrite the existing files? [Y/N]:y
Copying file flash:/S10500B-UWW.bin to chassis2#slot7#flash:/S10500B-UWW.bin.........Done.
Verifying the file flash:/S10500B-UWW.bin on chassis 2 slot 7......................Done.
Identifying the upgrade methods.....Done.
Upgrade summary according to following table:
flash:/S10500B-UWW.bin
Running Version New Version
None Alpha 5120
Chassis Slot Upgrade Way
2 7 Service Upgrade
Upgrading software images to compatible versions. Continue? [Y/N]:y
This operation might take several minutes, please wait..........................Done.
# Display active software images.
<Sysname> display install active
Active packages on chassis 1 slot 1:
flash:/S10500-CMW710-BOOT-A752301.bin
flash:/S10500-CMW710-SYSTEM-A752301.bin
flash:/S10500-CMW710-DEVKIT-A752301.bin
flash:/S10500-CMW710-MANUFACTURE-A752301.bin
flash:/S10500B-UWW.bin
Active packages on chassis 1 slot 6:
flash:/S10500-CMW710-BOOT-A752301.bin
flash:/S10500-CMW710-SYSTEM-A752301.bin
flash:/S10500-CMW710-DEVKIT-A752301.bin
flash:/S10500-CMW710-MANUFACTURE-A752301.bin
flash:/S10500B-UWW.bin
Active packages on chassis 1 slot 7:
flash:/S10500-CMW710-BOOT-A752301.bin
flash:/S10500-CMW710-SYSTEM-A752301.bin
flash:/S10500-CMW710-DEVKIT-A752301.bin
flash:/S10500-CMW710-MANUFACTURE-A752301.bin
flash:/S10500B-UWW.bin
Active packages on chassis 2 slot 1:
flash:/S10500-CMW710-BOOT-A752301.bin
flash:/S10500-CMW710-SYSTEM-A752301.bin
flash:/S10500-CMW710-DEVKIT-A752301.bin
flash:/S10500-CMW710-MANUFACTURE-A752301.bin
flash:/S10500B-UWW.bin
Active packages on chassis 2 slot 6:
flash:/S10500-CMW710-BOOT-A752301.bin
flash:/S10500-CMW710-SYSTEM-A752301.bin
flash:/S10500-CMW710-DEVKIT-A752301.bin
flash:/S10500-CMW710-MANUFACTURE-A752301.bin
flash:/S10500B-UWW.bin
Active packages on chassis 2 slot 7:
flash:/S10500-CMW710-BOOT-A752301.bin
flash:/S10500-CMW710-SYSTEM-A752301.bin
flash:/S10500-CMW710-DEVKIT-A752301.bin
flash:/S10500-CMW710-MANUFACTURE-A752301.bin
flash:/S10500B-UWW.bin
# Commit the software changes.
<Sysname> install commit
This operation will take several minutes, please wait...........................Done.
2. Verify the installation:
# Log out from the IRF fabric and then log in again.
# Try to execute AC-related commands. If AC-related commands can be used, the installation is successful.
3. Uninstall and delete the WLAN feature image:
# Uninstall the WLAN feature image.
<Sysname> install deactivate feature flash:/s10500b-uww.bin chassis 2 slot 7
This operation might take several minutes, please wait..............Done.
<Sysname> install deactivate feature flash:/s10500b-uww.bin chassis 2 slot 6
This operation might take several minutes, please wait..............Done.
<Sysname> install deactivate feature flash:/s10500b-uww.bin chassis 1 slot 7
This operation might take several minutes, please wait..............Done.
<Sysname> install deactivate feature flash:/s10500b-uww.bin chassis 1 slot 6
This operation might take several minutes, please wait..............Done.
# Commit the software changes.
<Sysname> install commit
This operation will take several minutes, please wait..............Done.
# Verify that the WLAN feature image has been uninstalled.
<Sysname> display install inactive
Inactive packages on chassis 1 slot 6:
flash:/S10500B-UWW.bin
Inactive packages on chassis 1 slot 7:
flash:/S10500B-UWW.bin
Inactive packages on chassis 2 slot 6:
flash:/S10500B-UWW.bin
Inactive packages on chassis 2 slot 7:
flash:/S10500B-UWW.bin
# Delete the WLAN feature image file.
<Sysname> install remove flash:/s10500b-uww.bin
# Verify that no inactive software images exist in the root directory of the file system.
<Sysname> display install inactive
# Verify that the WLAN feature image file has been deleted.
<Sysname> dir
Example: Installing and uninstalling the WLAN feature image (centralized IRF devices),3
Example: Installing and uninstalling the WLAN feature image (distributed devices in IRF mode),11
Example: Installing and uninstalling the WLAN feature image (distributed devices in standalone mode),7
Preparing for installation,1
Preparing for uninstallation,2
Procedure,2
Procedure,3
Restrictions and guidelines,1
Restrictions and guidelines,2
