- Table of Contents
- Related Documents
-
| Title | Size | Download |
|---|---|---|
| 01-Web Overview | 281.37 KB |
Logging in to the Web interface
Logging out of the Web interface
Introduction to the Web interface
Introduction to the Web-based NM functions
Failure to access the device through the Web interface
The interface types and output information vary by device model and radio type.
The device provides Web-based configuration interfaces for visual device management and maintenance.
Figure 1 Web-based network management operating environment

Logging in to the Web interface
Follow these guidelines when you log in to the Web interface:
· The default Web login information depends on the device model.
· The PC where you configure the device is not necessarily the Web-based network management terminal. A Web-based network management terminal is a PC (or another terminal) used to log in to the Web interface and is required to be reachable to the device.
· If you click the verification code displayed on the Web login page, you can get a new verification code.
· If you have configured a fix verification code by using the web captcha command, you can also use the fixed verification code to log in to the device. For more information, see Fundamentals Configuration Guide.
· Up to 5 users can concurrently log in to the device through the Web interface.
· You can also log in to the Web interface through HTTPS, but you must enable HTTPS on the device, and the address you input in the address bar must start with https://. For more information, see "Configuring service management."
· If you have configured the auto authentication mode for an HTTPS login user by using the web https-authorization mode command, the user is automatically authenticated by the PKI certificate, without inputting any username and password. For more information, see Fundamentals Configuration Guide.
You can use the following default settings to log in to the Web interface through HTTP:
· Username—admin
· Password—h3capadmin
· IP address of VLAN-interface 1 on the device—192.168.0.50.
To log in to the Web interface of the device from a PC:
1. Connect the Ethernet port of the device to the PC by using a crossover Ethernet cable.
By default, all ports belong to VLAN 1.
2. Configure an IP address for the PC and make sure the PC and the device can reach each other.
For example, assign the PC an IP address (for example, 192.168.0.2) on the same subnet as 192.168.0.50.
3. Open the browser and input the login information:
a. Type the IP address http://192.168.0.50 in the address bar and press Enter.
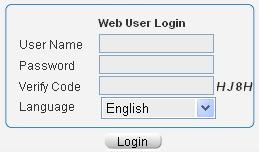
The login page of the Web interface (see Figure 2) appears.
b. Enter the username admin and the password h3capadmin, and the verification code, select the language (English and Chinese are supported at present), and click Login.
Figure 2 Login page of the Web interface
Logging out of the Web interface
|
|
CAUTION: A logged-in user cannot automatically log out by directly closing the browser. |
As shown in Figure 3, click Logout in the upper-right corner of the Web interface to quit Web-based network management.
The system does not save the current configuration before you log out of the Web interface. H3C recommends you to save the current configuration before logout.
Introduction to the Web interface
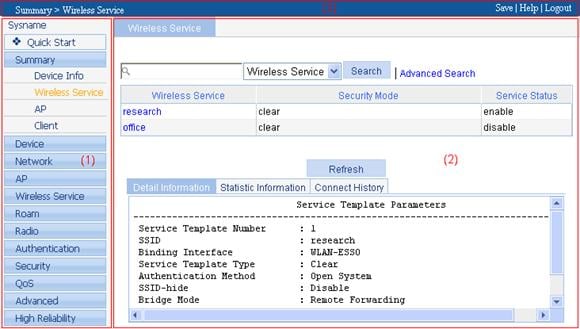
The Web interface is composed of three parts: navigation tree, title area, and body area, as shown in Figure 3.
Figure 3 Web-based configuration interface
|
(1) Navigation area |
(2) Body area |
· Navigation area—Organizes the Web-based NM function menus in the form of a navigation tree, where you can select function menus as needed. The result is displayed in the body area.
· Body area—The area where you can configure and display a function.
· Title area—On the left, displays the path of the current configuration interface in the navigation area; on the right, provides the Save button to quickly save the current configuration, the Help button to display the Web related help information, and the Logout button to log out of the Web interface.
Web user level
Web user levels, ranging from low to high, are visitor, monitor, configure, and management. A user with a higher level has all the operating rights of a user with a lower level.
· Visitor—Users of this level can perform the ping and traceroute operations, but they can neither access the device data nor configure the device.
· Monitor—Users of this level can only access the device data but cannot configure the device.
· Configure—Users of this level can access data from the device and configure the device, but they cannot upgrade the host software, add/delete/modify users, or backup/restore the application file.
· Management—Users of this level can perform any operations for the device.
Introduction to the Web-based NM functions
User level in Table 1 indicates that users of this level or users of a higher level can perform the corresponding operations.
Table 1 Description for Web-based NM functions
|
Function menu |
Description |
User level |
||||||
|
Quick Start |
Perform quick configuration of the device. |
Configure |
||||||
|
Summary |
Device |
Display and refresh system resource state, device information, device interface information, and recent system operation logs. |
Monitor |
|||||
|
Wlan Service |
Display the information of the queried WLAN service, including the detailed information, statistics, and connection history. |
Monitor |
||||||
|
Radio |
Display related information of a radio, including the wireless service related to the radio and the radio interface statistics. |
Monitor |
||||||
|
WDS |
Display related information of WDS, including state and neighbor information. |
Monitor |
||||||
|
Client |
Display the detailed information and statistics of the client. |
Monitor |
||||||
|
Clear statistics of the client, disconnect the connection, and add the client into the blacklist. |
Configure |
|||||||
|
Device |
Basic |
Set sysname |
Display and configure the system name. |
Configure |
||||
|
Set idle timeout |
Display and configure the idle timeout period for a logged-in user. |
Configure |
||||||
|
Device Maintenance |
Software Upgrade |
Upload the file to be upgraded from the local host to upgrade the system software. |
Management |
|||||
|
Reboot |
Reboot the device. |
Management |
||||||
|
Diagnostic Information |
Generate a diagnostic information file, view the file, or save the file to the local host. |
Management |
||||||
|
System Time |
System Time |
Display the system date and time. |
Monitor |
|||||
|
Set the system time. |
Configure |
|||||||
|
Time Zone |
Display the system time zone and daylight saving time settings. |
Monitor |
||||||
|
Configure the system time zone and daylight saving time. |
Configure |
|||||||
|
System Time |
System Time |
Display and set the system time. |
Configure |
|||||
|
Time Zone |
Display and set the time zone of the system. |
Configure |
||||||
|
Syslog |
Loglist |
Display and refresh system logs. |
Monitor |
|||||
|
Clear system logs. |
Configure |
|||||||
|
Loghost |
Display and configure the loghost. |
Configure |
||||||
|
Logset |
Display and configure the buffer capacity, and refresh interval for displaying system logs. |
Configure |
||||||
|
Configuration management |
Backup |
Back up the configuration file for the next startup to the host of the current user. |
Management |
|||||
|
Restore |
Upgrade the configuration file on the host of the current user to the device for the next startup. |
Management |
||||||
|
Save |
Save the current configuration to the configuration file for the next startup. |
Configure |
||||||
|
Initialize |
Restore the system to factory defaults. |
Management |
||||||
|
File management |
Manage files on the device, including displaying file list, downloading a file, uploading a file, removing a file, and setting the main boot file. |
Management |
||||||
|
Interface Management |
Display interface information and statistics. |
Monitor |
||||||
|
Create, modify, and delete an interface, and clear interface statistics. |
Configure |
|||||||
|
TR-069 |
Display TR-069 configuration. |
Monitor |
||||||
|
Congfigure TR-069. |
Configure |
|||||||
|
User Management |
Summary |
Display brief information about FTP and Telnet users. |
Monitor |
|||||
|
Super Password |
Configure the password for a lower-level user to switch from the current access level to the management level. |
Management |
||||||
|
Create |
Create an FTP or Telnet user. |
Management |
||||||
|
Modify |
Modify FTP or Telnet user information. |
Management |
||||||
|
Remove |
Remove an FTP or a Telnet user. |
Management |
||||||
|
Switch To Management |
Switch the current user level to the management level. |
Monitor |
||||||
|
SNMP |
Display SNMP configuration information. |
Monitor |
||||||
|
Configure SNMP. |
Management |
|||||||
|
Loopback Test |
Perform the loopback test on Ethernet interfaces. |
Configure |
||||||
|
Network |
MAC |
MAC |
Display MAC address information. |
Monitor |
||||
|
Create or remove MAC addresses. |
Configure |
|||||||
|
Config |
Display and configure MAC address aging time. |
Configure |
||||||
|
VLAN |
VLAN |
Display all VLANs on the device and information about their member ports. |
Monitor |
|||||
|
Create, modify, and delete VLANs. |
Configure |
|||||||
|
Port |
Display VLANs to which a port on the device belongs. |
Monitor |
||||||
|
Modify the VLANs to which a port belongs. |
Configure |
|||||||
|
ARP Management |
ARP Table |
Display ARP table information. |
Monitor |
|||||
|
Add, modify, or delete an ARP entry. |
Configure |
|||||||
|
Gratuitous ARP |
Display configuration information of gratuitous ARP. |
Monitor |
||||||
|
Configure gratuitous ARP. |
Configure |
|||||||
|
IGMP Snooping |
Basic |
Display global IGMP Snooping configuration information and the IGMP Snooping configuration information in a VLAN, and the IGMP Snooping multicast entry information. |
Monitor |
|||||
|
Configure IGMP Snooping globally and in a VLAN. |
Configure |
|||||||
|
Advance |
Display the IGMP Snooping configuration information on a port. |
Monitor |
||||||
|
Configure IGMP Snooping on a port. |
Configure |
|||||||
|
IPv4 Routing |
Summary |
Display the IPv4 active route table. |
Monitor |
|||||
|
Create |
Create an IPv4 static route. |
Configure |
||||||
|
Remove |
Delete the selected IPv4 static routes. |
Configure |
||||||
|
IPv6 Routing |
Summary |
Display the IPv6 active route table. |
Monitor |
|||||
|
Create |
Create an IPv6 static route. |
Configure |
||||||
|
Remove |
Delete the selected IPv6 static routes. |
Configure |
||||||
|
DHCP |
DHCP Server |
Display the DHCP service status, the DHCP address pool information, the DHCP server status on an interface, and information about an address assigned from a DHCP address pool. |
Monitor |
|||||
|
Set the DHCP service status, add, modify, or delete a DHCP address pool, and modify the DHCP server status on an interface. |
Configure |
|||||||
|
DNS |
Static Domain Name Resolution |
Display, create, modify, or delete a static host name-to-IP address mapping. |
Configure |
|||||
|
Dynamic Domain Name Resolution |
Display and configure related parameters for dynamic domain name resolution. Display, create, or delete an IP address and the domain name suffix. |
Configure |
||||||
|
PPPoE |
Client |
Display PPPoE client information. |
Monitor |
|||||
|
Create, modify, or delete a PPPoE client. |
Configure |
|||||||
|
Session |
Display the summary and statistics of a PPPoE session. |
Monitor |
||||||
|
Service Management |
Display the states of the services: enabled or disabled. |
Configure |
||||||
|
Specify whether to enable various services, and sets related parameters. |
Management |
|||||||
|
Diagnostic Tools |
IPv4 Ping |
Ping an IPv4 address or host and display the result. |
Visitor |
|||||
|
IPv6 Ping |
Ping an IPv6 address or host and display the result. |
Visitor |
||||||
|
Trace Route |
Perform trace route operations and display the result. |
Visitor |
||||||
|
WLAN Service |
Access Service |
Display an access service. |
Monitor |
|||||
|
Create and configure an access service, and add a MAC authentication list. |
Configure |
|||||||
|
WDS |
WDS Setup |
Display a WDS service. |
Monitor |
|||||
|
Configure a WDS service. |
Configure |
|||||||
|
WDS Global Setup |
Display WDS global configuration. |
Monitor |
||||||
|
Configure WDS global parameters. |
Configure |
|||||||
|
Radio |
Radio |
Display radio status, including radio mode and radio status. |
Monitor |
|||||
|
Configure radio parameters, including 802.11n settings. |
Configure |
|||||||
|
Rate |
Display rate settings. |
Monitor |
||||||
|
Configure 802.11n rates, including MCS index. |
Configure |
|||||||
|
Scan |
Display channel scanning, including scanning mode, scanning type and scanning interval; view the AP operating mode (normal, monitor, and hybrid). |
Monitor |
||||||
|
Configure channel scanning, including scanning mode and scanning type; allows you to set the AP operating mode (normal, monitor, and hybrid). |
Configure |
|||||||
|
Calibration |
Channel Information |
Display or refresh AP status, including the channel where an AP is operating, and power. |
Monitor |
|||||
|
Parameter Setting |
Display radio parameters. |
Monitor |
||||||
|
Configure radio parameters. |
Configure |
|||||||
|
Channel Detection |
Display detection records and history records. |
Monitor |
||||||
|
Display and refresh detection records and history records. |
Configure |
|||||||
|
Antenna |
Configure the antenna of an AP. |
Configure |
||||||
|
Authentication |
AAA |
Domain Setup |
Display ISP domain configuration information. |
Monitor |
||||
|
Add and remove ISP domains. |
Management |
|||||||
|
Authentication |
Display the authentication method configuration information of an ISP domain. |
Monitor |
||||||
|
Specify authentication methods for an ISP domain. |
Management |
|||||||
|
Authorization |
Display the authorization method configuration information of an ISP domain. |
Monitor |
||||||
|
Specify authorization methods for an ISP domain. |
Management |
|||||||
|
Accounting |
Display the accounting method configuration information of an ISP domain. |
Monitor |
||||||
|
Specify accounting methods for an ISP domain. |
Management |
|||||||
|
RADIUS |
Display and add, modify, and delete a RADIUS scheme. |
Management |
||||||
|
HWTACACS |
Server Configuration |
Display and modify HWTACACS server configuration. |
Management |
|||||
|
Parameter Configuration |
Display and modify HWTACACS parameter configuration. |
Management |
||||||
|
Users |
Local User |
Display local users’ configuration information. |
Monitor |
|||||
|
Add, modify, and remove local users. |
Management |
|||||||
|
User Group |
Display user groups’ configuration information. |
Monitor |
||||||
|
Add, modify, and remove user groups. |
Management |
|||||||
|
Guest |
Display guest users’ configuration information. |
Monitor |
||||||
|
Add, modify, and remove guest users. |
Management |
|||||||
|
PKI |
Entity |
.Display information about PKI entities. |
Monitor |
|||||
|
Add, modify, and delete a PKI entity. |
Configure |
|||||||
|
Domain |
Display information about PKI domains. |
Monitor |
||||||
|
Add, modify, and delete a PKI domain. |
Configure |
|||||||
|
Certificate |
Display the certificate information of PKI domains and the contents of a certificate. |
Monitor |
||||||
|
Generate a key pair, destroy a key pair, retrieve a certificate, request a certificate, and delete a certificate. |
Configure |
|||||||
|
CRL |
Display the contents of the CRL. |
Monitor |
||||||
|
Receive the CRL of a domain. |
Configure |
|||||||
|
WIDS |
WIDS Setup |
Display IDS configuration. |
Monitor |
|||||
|
Configure IDS detection, including flood attack detection, spoofing attack detection, and weak IV detection. |
Configure |
|||||||
|
History Record |
Display IDS attack detection history. |
Monitor |
||||||
|
Clear history record of IDS attack detection and add the detected devices that initiate attacks to blacklist. |
Configure |
|||||||
|
Statistics |
Display statistics of IDS attack detection. |
Monitor |
||||||
|
Clear the statistics. |
Configure |
|||||||
|
Blacklist and White list |
Blacklist |
Display dynamic and static blacklists. |
Monitor |
|||||
|
Clear dynamic blacklist and static blacklist; enable dynamic blacklist; add entries to the static blacklist. |
Configure |
|||||||
|
White List |
Display white list. |
Monitor |
||||||
|
Clear white list, and add entries to the white list. |
Configure |
|||||||
|
User Isolation |
Enable or disable user isolation. |
Configure |
||||||
|
QoS |
Time Range |
Display |
Display time range configuration information. |
Monitor |
||||
|
Add |
Create a time range. |
Configure |
||||||
|
Delete |
Delete a time range. |
Configure |
||||||
|
ACL IPv4 |
Display |
Display IPv4 ACL configuration information. |
Monitor |
|||||
|
Add |
Create an IPv4 ACL. |
Configure |
||||||
|
Basic Setup |
Configure a rule for a basic IPv4 ACL. |
Configure |
||||||
|
Advanced Setup |
Configure a rule for an advanced IPv4 ACL. |
Configure |
||||||
|
Link Setup |
Create a rule for an Ethernet frame header ACL. |
Configure |
||||||
|
Wlan Setup |
Create a rule for a WLAN-AP ACL. |
Configure |
||||||
|
Delete |
Delete an IPv4 ACL or its rules. |
Configure |
||||||
|
ACL IPv6 |
Display |
Display IPv6 ACL configuration information. |
Monitor |
|||||
|
Add |
Create an IPv6 ACL. |
Configure |
||||||
|
Basic Setup |
Configure a rule for a basic IPv6 ACL. |
Configure |
||||||
|
Advanced Setup |
Configure a rule for an advanced IPv6 ACL. |
Configure |
||||||
|
Delete |
Delete an IPv6 ACL or its rules. |
Configure |
||||||
|
Wireless QoS |
Wireless QoS |
Display wireless QoS, including SVP mapping, CAC admission policy, radio EDCA and client EDCA. |
Monitor |
|||||
|
Configure wireless QoS, including SVP mapping, CAC admission policy, radio EDCA and client EDCA. |
Configure |
|||||||
|
Radio Statistics |
Display radio statistics, including WMM status and detailed radio information. |
Monitor |
||||||
|
Display radio statistics, including WMM status and detailed radio information, and clear the radio statistics. |
Configure |
|||||||
|
Client Statistics |
Display client statistics, including WMM status and detailed client information. |
Monitor |
||||||
|
Display client statistics, including WMM status and detailed client information, and clear the client statistics. |
Configure |
|||||||
|
Client Rate Limit |
Display the configured client rate limit information. |
Monitor |
||||||
|
Configure and modify client rate limiting mode, direction and rate. |
Configure |
|||||||
|
Bandwidth Guarantee |
Display bandwidth guarantee configuration and bandwidth information. |
Monitor |
||||||
|
Configure bandwidth guarantee. |
Configure |
|||||||
|
Trust Mode |
Display priority trust mode configuration information. |
Management |
||||||
|
Configure the priority trust mode. |
Management |
|||||||
|
Classifier |
Display |
Display classifier configuration information. |
Monitor |
|||||
|
Add |
Create a class. |
Configure |
||||||
|
Setup |
Configure the classification rules for a class. |
Configure |
||||||
|
Delete |
Delete a class or its classification rules. |
Configure |
||||||
|
Behavior |
Display |
Display traffic behavior configuration information. |
Monitor |
|||||
|
Add |
Create a traffic behavior. |
Configure |
||||||
|
Setup |
Configure actions for a traffic behavior. |
Configure |
||||||
|
Delete |
Delete a traffic behavior. |
Configure |
||||||
|
QoS Policy |
Display |
Display QoS policy configuration information. |
Monitor |
|||||
|
Add |
Create a QoS policy. |
Configure |
||||||
|
Setup |
Configure the classifier-behavior associations for a QoS policy. |
Configure |
||||||
|
Delete |
Delete a QoS policy or its classifier-behavior associations. |
Configure |
||||||
|
Port Policy |
Display |
Display the QoS policy applied to a port. |
Monitor |
|||||
|
Setup |
Apply a QoS policy to a port. |
Configure |
||||||
|
Delete |
Remove the QoS policy from the port. |
Configure |
||||||
|
Service Policy |
Display the QoS policy applied to a WLAN-ESS port. |
Monitor |
||||||
|
Configure the QoS policy applied to a WLAN-ESS port. |
Configure |
|||||||
|
Advanced Settings |
District code |
Display the district code. |
Monitor |
|||||
|
Modify the district code. |
Configure |
|||||||
|
Switch to AP |
Display the AP working mode switching information. |
Monitor |
||||||
|
Switch the working mode of an AP. |
Configure |
|||||||
|
Continuous Transmit |
Display the continuous transmitting mode of an AP. |
Monitor |
||||||
|
Switch the continuous transmitting mode of an AP. |
Configure |
|||||||
|
Uplink Monitor |
Display uplink interfaces. |
Monitor |
||||||
|
Configure an uplink interface. |
Configure |
|||||||
|
Channel usage rate |
Display channel usage rate. |
Monitor |
||||||
|
Evaluate the channel usage rate |
Configure |
|||||||
|
Band Navigation |
Display band navigation settings. |
Monitor |
||||||
|
Set band navigation parameters. |
Configure |
|||||||
|
Multicast optimization |
Set Multicast optimization parameters. |
Configure |
||||||
Common Web interface elements
Common buttons and icons
Table 2 Common buttons and icons
|
Button and icon |
Description |
|
|
Bring the configuration on the current page into effect. |
|
|
Cancel the configuration on the current page, and go to the corresponding display page or device information page. |
|
|
Refresh the information on the current page. |
|
|
Clear all statistics or items in a list. |
|
|
Enter the page for adding an entry. |
|
|
Delete entries on a list. |
|
|
Select all the entries on a list or all ports on a device panel. |
|
|
Clear all the entries on a list or all ports on a device panel. |
|
|
Restore the values of all the entries on the current page to the default. |
|
|
Typically located on a configuration procedure page of the configuration wizard, it allows you to save the configuration of the current configuration procedure (not bring it into effect) and go to the page of the next configuration procedure. |
|
|
Typically located on a configuration procedure page of the configuration wizard, it allows you to save the configuration of the current configuration procedure (not bring it into effect) and return to the page of the previous configuration procedure. |
|
|
Typically located on a configuration procedure page of the configuration wizard, it allows you to bring all configurations into effect. |
|
|
Typically located on the Operation column of a display page, it allows you to enter the modify page of a corresponding entry so as to display or modify the configurations of the entry. |
|
|
Typically located on the Operation column of a display page, it allows you to remove an entry. |
Content display by pages
The Web interface can display contents by pages, as shown in Figure 4. You can set the number of entries displayed per page, and view the contents on the first, previous, next, and last pages, or go to any page that you want to check.
Figure 4 Content display by pages
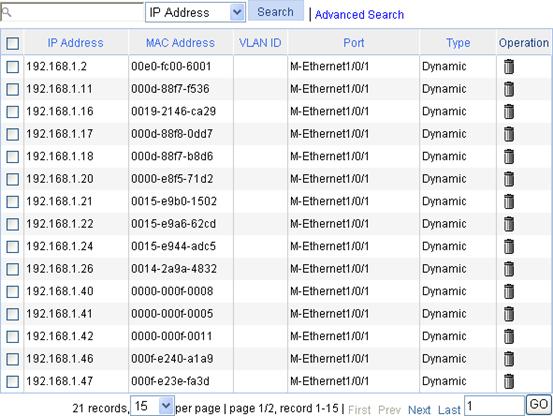
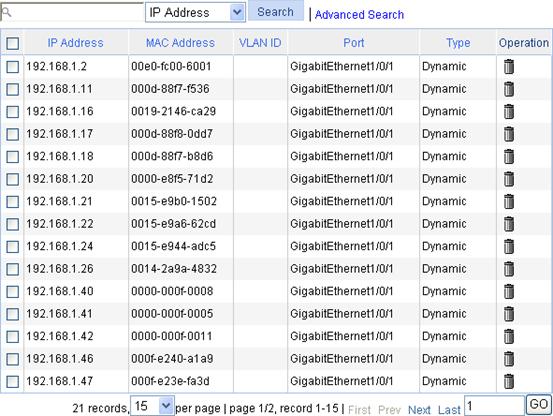
Searching function
Basic search
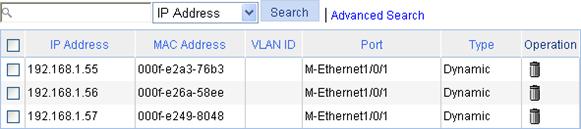
As shown in Figure 4, input the keyword in the text box above the list, select a search item from the drop-down list and click the Search button to display the entries that match the criteria. Figure 5 shows an example of searching for entries with 00e0 included in the MAC address.
Figure 5 Basic search function example


Advanced search
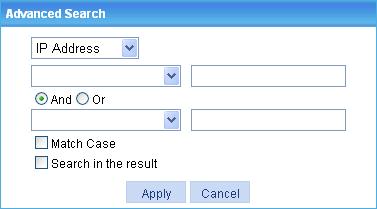
Advanced search function: As shown in Figure 4, you can click the Advanced Search link to open the advanced search page, as shown in Figure 6. Specify the search criteria, and click Apply to display the entries that match the criteria.
Take the ARP table shown in Figure 4 as an example. If you want to search for the ARP entries with 000f at the beginning of the MAC address, and IP address range being 192.168.1.50 to 192.168.1.59, follow these steps:
1. Click the Advanced Search link.
2. Specify the search criteria on the advanced search page as shown in Figure 7.
Figure 7 Advanced search function example (I)
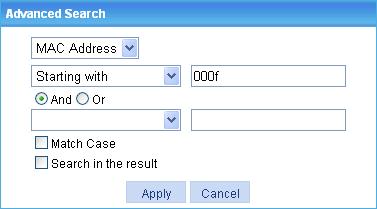
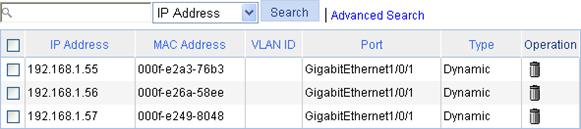
3. Click Apply. The ARP entries with 000f at the beginning of the MAC address are displayed
4. Click the Advanced Search link.
5. Specify the search criteria on the advanced search page as shown in Figure 8.
Figure 8 Advanced search function example (II)
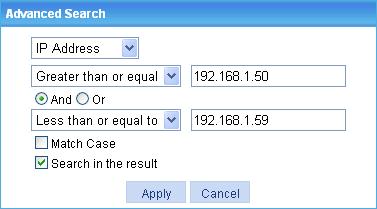
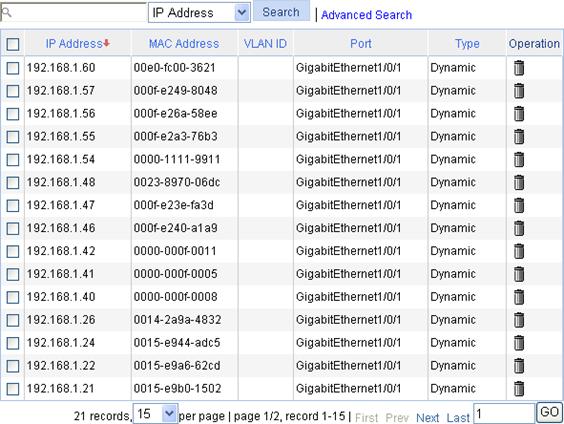
6. Click Apply. The ARP entries with 000f at the beginning of the MAC address and IP address range 192.168.1.50 to 192.168.1.59 are displayed as shown in Figure 9.
Figure 9 Advanced search function example (III)
Basic sorting function
The Web interface provides you with the basic sorting function to display entries in certain orders.
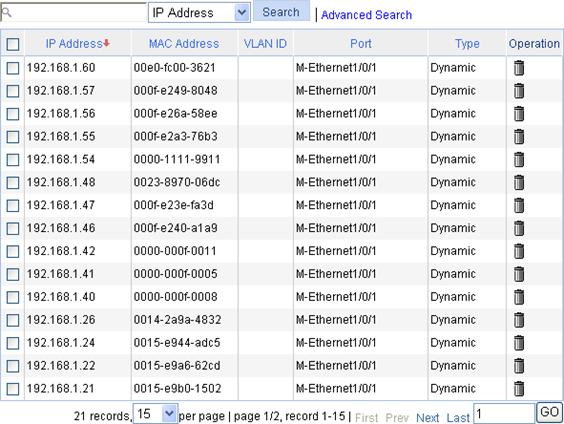
On a list page, you can click the blue heading item of each column to sort the entries based on the heading item you selected. After your clicking, the heading item is displayed with an arrow beside it as shown in Figure 10. The upward arrow indicates the ascending order, and the downward arrow indicates the descending order.
Figure 10 Basic sorting function example (based on IP address in the descending order)
Configuration guidelines
· The Web-based configuration interface supports the operating systems of Windows XP, Windows 2000, Windows Server 2003 Enterprise Edition, Windows Server 2003 Standard Edition, Windows Vista, Windows 7, Windows 8, Linux, and MAC OS.
· The Web-based configuration interface supports the browsers of Microsoft Internet Explorer 6.0 SP2 and higher, Mozilla Firefox 3.0 and higher, Google Chrome 2.0.174.0 and higher.
· The Web-based configuration interface does not support the Back, Next, Refresh buttons provided by the browser. Using these buttons may result in abnormal display of Web pages.
· The Windows firewall limits the number of TCP connections, so when you use IE to log in to the Web interface, sometimes you may be unable to open the Web interface. To avoid this problem, turn off the Windows firewall before login.
· If the software version of the device changes, clear the cache data on the browser before logging in to the device through the Web interface; otherwise, the Web page content may not be displayed correctly.
· You can display at most 20,000 entries that support content display by pages.
Troubleshooting Web browser
Failure to access the device through the Web interface
Symptom
You can ping the device successfully, and log in to the device through Telnet. HTTP is enabled and the operating system and browser version meet the Web interface requirements. However, you cannot access the Web interface of the device.
Analysis
· If you use the Microsoft Internet Explorer, you can access the Web interface only when these functions are enabled: Run ActiveX controls and plug-ins, script ActiveX controls marked safe for scripting and active scripting.
· If you use the Mozilla Firefox, you can access the Web interface only when JavaScript is enabled.
Configuring the Internet Explorer settings
1. Open the Internet Explorer, and then select Tools > Internet Options.
2. Click the Security tab, and then select a Web content zone to specify its security settings.
Figure 11 Internet Explorer setting (I)
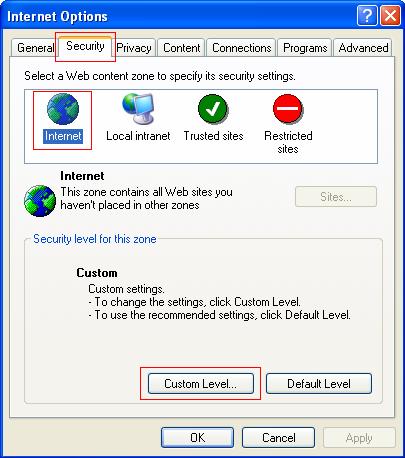
3. Click Custom Level.
The dialog box Security Settings appears.
4. Set the enable these functions: Run ActiveX controls and plug-ins, script ActiveX controls marked safe for scripting and active scripting.
Figure 12 Internet Explorer Setting (II)
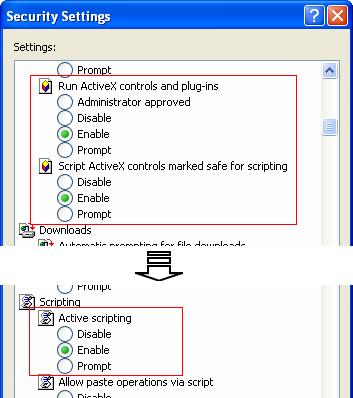
5. Click OK in the Security Settings dialog box.
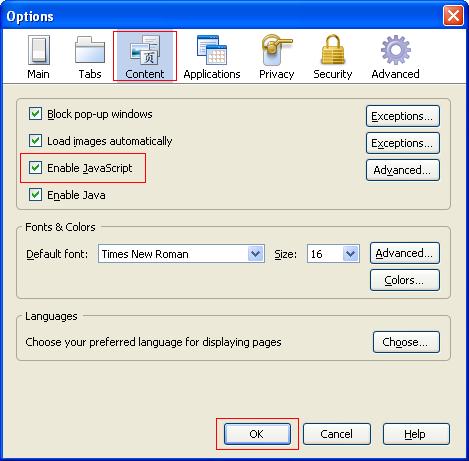
Configuring Firefox Web browser settings
1. Open the Firefox Web browser, and then select Tools > Options.
2. Click the Content tab, select the Enable JavaScript box, and click OK.
Figure 13 Firefox Web browser setting