- Table of Contents
- Related Documents
-
| Title | Size | Download |
|---|---|---|
| 01-CLI Configuration | 227.46 KB |
Contents
Redisplaying input but not submitted commands
Configuring the history buffer size
Configuring user privilege and command levels
Configuring a user privilege level
Switching user privilege level
Modifying the level of a command
Saving the current configuration
Displaying and maintaining the CLI
This chapter includes these sections:
· Checking command-line errors
· Configuring user privilege and command levels
· Saving the current configuration
· Displaying and maintaining the CLI
|
|
NOTE: · The term "switch" or "device" in this chapter refers to the switching engine on a WX3000E wireless switch. · The WX3000E series comprises WX3024E and WX3010E wireless switches. · The port numbers in this chapter are for illustration only. |
What is CLI?
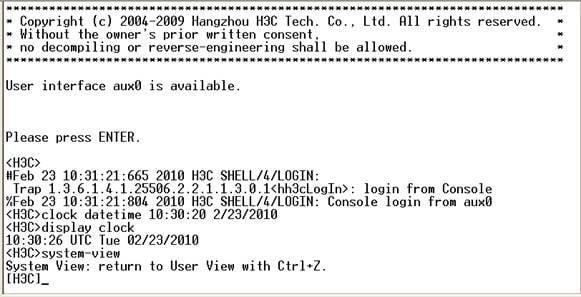
The command line interface (CLI) enables you to interact with your device by typing text commands. At the CLI, you can instruct your device to perform a given task by typing a text command and then pressing Enter. Compared with the graphical user interface (GUI) where you use a mouse to perform configurations, the CLI allows you to input more information in one command line.
Figure 1 CLI example
Entering the CLI
The device provides multiple methods for entering the CLI, such as through OAP, telnet, and SSH. For more information, see the chapter “Logging in to the switching engine configuration.”
Command conventions
Command conventions help you understand command meanings. Commands in product manuals comply with the conventions listed in Table 1.
|
Convention |
Description |
|
Boldface |
Bold text represents commands and keywords that you enter literally as shown. |
|
Italic |
Italic text represents arguments that you replace with actual values. |
|
[ ] |
Square brackets enclose syntax choices (keywords or arguments) that are optional. |
|
{ x | y | ... } |
Braces enclose a set of required syntax choices separated by vertical bars, from which you select one. |
|
[ x | y | ... ] |
Square brackets enclose a set of optional syntax choices separated by vertical bars, from which you select one or none. |
|
{ x | y | ... } * |
Asterisk marked braces enclose a set of required syntax choices separated by vertical bars, from which you select at least one. |
|
[ x | y | ... ] * |
Asterisk marked square brackets enclose optional syntax choices separated by vertical bars, from which you select one choice, multiple choices, or none. |
|
&<1-n> |
The argument or keyword and argument combination before the ampersand (&) sign can be entered 1 to n times. |
|
# |
A line that starts with a pound (#) sign is comments. |
|
|
NOTE: The keywords of command lines are case insensitive. |
Take the clock datetime time date command as an example to understand the meaning of the command line parameters according to Table 1.
Figure 2 Read command line parameters
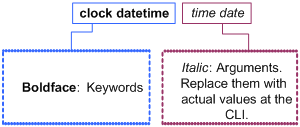
For example, you can type the following command line at the CLI of your device and press Enter to set the device system time to 10 o’clock 30 minutes 20 seconds, February 23, 2010.
<Sysname> clock datetime 10:30:20 2/23/2010
You can read any command that is more complicated according to Table 1.
Undo form of a command
The undo form of a command restores the default, disables a function, or removes a configuration.
Almost all configuration commands have an undo form. For example, the info-center enable command enables the information center, and the undo info-center enable command disables the information center.
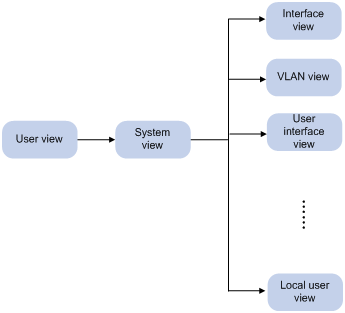
CLI views
CLI view description
Commands are grouped into different classes by function. To use a command, you must enter the class view of the command.
CLI views adopt a hierarchical structure, as shown in Figure 3.
· After logging in to the switch, you are in user view. The prompt of user view is <device name>. In user view, you can perform display, debugging, and file management operations, set the system time, restart your device, and perform FTP and telnet operations.
· You can enter system view from user view. In system view, you can configure parameters such as daylight saving time, banners, and short-cut keys.
· From system view, you can enter different function views. For example, enter interface view to configure interface parameters, create a VLAN and enter its view, enter user interface view to configure login user attributes, create a local user and enter local user view to configure the password and level of the local user.
|
|
NOTE: Enter ? in any view to display all the commands that can be executed in this view. |
Entering system view
When you log in to the device, you automatically enter user view, where <Device name> is displayed. You can perform limited operations in user view, for example, display operations, file operations, and Telnet operations. To perform further configuration for the device, enter system view.
Follow the step below to enter system view:
|
To do… |
Use the command… |
Remarks |
|
Enter system view from user view |
system-view |
Required Available in user view |
Exiting the current view
The CLI is divided into different command views. Each view has a set of specific commands and defines the effective scope of the commands. The commands available to you at any given time depend on the view you are in.
Follow the step below to exit the current view:
|
To do… |
Use the command… |
Remarks |
|
Return to the parent view from the current view |
quit |
Required Available in any view. |
|
|
NOTE: · The quit command in user view terminates the current connection between the terminal and the device. · In public key code view, use the public-key-code end command to return to the parent view (public key view). In public key view, use the peer-public-key end command to return to system view. |
Returning to user view
This feature allows you to return to user view from any other view, without using the quit command repeatedly. You can also press Ctrl+Z to return to user view from the current view.
Follow the step below to exit to user view:
|
To do… |
Use the command… |
Remarks |
|
Return to user view |
return |
Required Available in any view except user view |
Using the CLI online help
Type a question mark (?) to access online help. See the following examples.
1. Type ? in any view to display all commands available in this view and brief descriptions of these commands. For example:
<Sysname> ?
User view commands:
archive Specify archive settings
backup Backup next startup-configuration file to TFTP server
boot-loader Set boot loader
bootrom Update/read/backup/restore bootrom
cd Change current directory
clock Specify the system clock
…Omitted…
2. When you type part of a command and a ? separated by a space.
If ? is at the position of a keyword, the CLI displays all possible keywords with a brief description for each keyword. For example:
<Sysname> terminal ?
debugging Send debug information to terminal
logging Send log information to terminal
monitor Send information output to current terminal
trapping Send trap information to terminal
If ? is at the position of an argument, the CLI displays a description about this argument. For example:
<Sysname> system-view
[Sysname] interface vlan-interface ?
<1-4094> VLAN interface number
[Sysname] interface vlan-interface 1 ?
<cr>
[Sysname] interface vlan-interface 1
The string <cr> indicates that the command is a complete command, and you can execute the command by pressing Enter.
3. If you type an incomplete character string followed by a ?, the CLI displays all commands starting with the typed character(s).
<Sysname> c?
cd
clock
cluster
copy
<Sysname> display cl?
clipboard
clock
cluster
Typing commands
Editing command lines
Table 2 lists some shortcut keys you can use to edit command lines.
|
Key |
Function |
|
Common keys |
If the edit buffer is not full, pressing a common key inserts the character at the position of the cursor and moves the cursor to the right. |
|
Backspace |
Deletes the character to the left of the cursor and moves the cursor back one character. |
|
Left arrow key or Ctrl+B |
The cursor moves one character space to the left. |
|
Right arrow key or Ctrl+F |
The cursor moves one character space to the right. |
|
Tab |
If you press Tab after entering part of a keyword, the system automatically completes the keyword: · If finding a unique match, the system substitutes the complete keyword for the incomplete one and displays it in the next line. · If there is more than one match, you can press Tab repeatedly to display in cycles all the keywords starting with the character string that you typed. · If there is no match, the system does not modify the incomplete keyword and displays it again in the next line. |
Typing incomplete keywords
You can input a command comprising incomplete keywords that can uniquely identify the complete command.
In user view, for example, commands starting with an s include startup saved-configuration and system-view.
· To enter system view, type sy.
· To set the configuration file to be used at the next startup, type st s.
You can also press Tab to have an incomplete keyword automatically completed.
Configuring command aliases
The command alias function allows you to replace the first keyword of a command with your preferred keyword. For example, if you configure show as the replacement for the display keyword, then to execute the display xx command, you can input the command alias show xx.
Note the following guidelines when configuring command aliases:
· When you input a command alias, the system displays and saves the command in its original format instead of its alias. In other words, you can define and use a command alias but the command is not restored in its alias format.
· When you define a command alias, the cmdkey and alias arguments must be in their complete form.
· When you input an incomplete keyword that partially matches both a defined alias and the keyword of a command and the command alias function is enabled, the alias wins. To execute the command whose keyword partially matches your input, input the complete keyword. When you input a character string that partially matches multiple aliases, the system gives you prompts.
· If you press Tab after you input the keyword of an alias, the original format of the keyword is displayed.
· You can replace only the first keyword of a non-undo command instead of the complete command; and you can replace only the second keyword of undo commands.
Follow these steps to configure command aliases:
|
To do… |
Use the command… |
Remarks |
|
Enter system view |
system-view |
— |
|
Enable the command alias function |
command-alias enable |
Required Disabled by default, which means you cannot configure command aliases. |
|
Configure a command alias |
command-alias mapping cmdkey alias |
Required Not configured by default. |
Configuring CLI hotkeys
Follow these steps to configure CLI hotkeys:
|
To do… |
Use the command… |
Remarks |
|
Enter system view |
system-view |
— |
|
Configure CLI hotkeys |
hotkey { CTRL_G | CTRL_L | CTRL_O | CTRL_T | CTRL_U } command |
Optional The Ctrl+G, Ctrl+L and Ctrl+O hotkeys are specified at the CLI by default. |
|
Display hotkeys |
display hotkey |
Available in any view. See Table 3 for hotkeys reserved by the system. |
|
|
NOTE: By default, the Ctrl+G, Ctrl+L and Ctrl+O hotkeys are associated with pre-defined commands and the Ctrl+T and Ctrl+U hotkeys are not. · Ctrl+G corresponds to the display current-configuration command. · Ctrl+L corresponds to the display ip routing-table command. · Ctrl+O corresponds to the undo debugging all command. |
Table 3 Hotkeys reserved by the system
|
Hotkey |
Function |
|
Ctrl+A |
Moves the cursor to the beginning of the current line. |
|
Ctrl+B |
Moves the cursor one character to the left. |
|
Ctrl+C |
Stops performing a command. |
|
Ctrl+D |
Deletes the character at the current cursor position. |
|
Ctrl+E |
Moves the cursor to the end of the current line. |
|
Ctrl+F |
Moves the cursor one character to the right. |
|
Ctrl+H |
Deletes the character to the left of the cursor. |
|
Ctrl+K |
Terminates an outgoing connection. |
|
Ctrl+N |
Displays the next command in the history command buffer. |
|
Ctrl+P |
Displays the previous command in the history command buffer. |
|
Ctrl+R |
Redisplays the current line information. |
|
Ctrl+V |
Pastes the content in the clipboard. |
|
Ctrl+W |
Deletes all the characters in a continuous string to the left of the cursor. |
|
Ctrl+X |
Deletes all the characters to the left of the cursor. |
|
Ctrl+Y |
Deletes all the characters to the right of the cursor. |
|
Ctrl+Z |
Exits to user view. |
|
Ctrl+] |
Terminates an incoming connection or a redirect connection. |
|
Esc+B |
Moves the cursor to the leading character of the continuous string to the left. |
|
Esc+D |
Deletes all the characters of the continuous string at the current cursor position and to the right of the cursor. |
|
Esc+F |
Moves the cursor to the front of the next continuous string to the right. |
|
Esc+N |
Moves the cursor down by one line (available before you press Enter) |
|
Esc+P |
Moves the cursor up by one line (available before you press Enter) |
|
Esc+< |
Specifies the cursor as the beginning of the clipboard. |
|
Esc+> |
Specifies the cursor as the ending of the clipboard. |
|
|
NOTE: The hotkeys in the table above are defined by the switch. If the same hotkeys are defined by the terminal software that you use to interact with the switch, the hotkeys defined by the terminal software take effect. |
Redisplaying input but not submitted commands
If your command input is interrupted by output system information, use this feature to redisplay the previously input but not submitted commands.
Follow these steps to enable redisplaying of input but not submitted commands:
|
To do… |
Use the command… |
Remarks |
|
Enter system view |
system-view |
— |
|
Enable redisplaying of input but not submitted commands |
info-center synchronous |
Required Disabled by default |
|
|
NOTE: With this feature enabled, the following rules apply: · If you have no input at the command line prompt and the system outputs system information such as logs, the system will not display the command line prompt after the output. · If the system outputs system information when you are typing interactive information (not YES/NO for confirmation), the system will not redisplay the prompt information but a line break after the output and then display what you have typed. · For more information about the info-center synchronous command, see the Network Management and Monitoring Command Reference. |
Checking command-line errors
If a command contains syntax errors, the CLI reports error information. Table 4 lists some common command line errors.
Table 4 Common command line errors
|
Error information |
Cause |
|
% Unrecognized command found at '^' position. |
The command was not found. |
|
% Incomplete command found at '^' position. |
Incomplete command |
|
% Ambiguous command found at '^' position. |
Ambiguous command |
|
% Too many parameters found at '^' position. |
Too many parameters |
|
% Wrong parameter found at '^' position. |
Wrong parameters |
Using command history
The CLI automatically saves the commands recently used in the history command buffer. You can access and execute them again.
Accessing history commands
Follow a step below to access history commands:
|
To do… |
Use the key/command… |
Result |
|
Display history commands |
display history-command |
Displays valid history commands you used |
|
Display the previous history command |
Up arrow key or Ctrl+P |
Displays the previous history command, if any |
|
Display the next history command |
Down arrow key or Ctrl+N |
Displays the next history command, if any |
|
|
NOTE: You can use arrow keys to access history commands in Windows 200X and XP Terminal or Telnet. However, in Windows 9X HyperTerminal, you need to use Ctrl+P or Ctrl+N, because they are defined differently and the up and down arrow keys are invalid. |
· The commands saved in the history command buffer are in the same format in which you typed the commands. If you type an incomplete command, the command saved in the history command buffer is also incomplete.
· If you execute the same command repeatedly, the switch saves the earliest record. However, if you execute the same command in different formats, the system saves them as different commands. For example, if you execute the display cu command repeatedly, the system saves only one command in the history command buffer. If you execute the command in the format of display cu and display current-configuration respectively, the system saves them as two commands.
· By default, the CLI can save up to 10 commands for each user. To set the capacity of the history command buffer for the current user interface, use the history-command max-size command. (For more information about the history-command max-size command, see the Fundamentals Command Reference.
Configuring the history buffer size
Follow these steps to configure the history buffer size:
|
To do… |
Use the command… |
Remarks |
|
Enter system view |
system-view |
— |
|
Enter user interface view |
user-interface { first-num1 [ last-num1 ] | { aux | vty } first-num2 [ last-num2 ] } |
— |
|
Set the maximum number of commands that can be saved in the history buffer |
history-command max-size size-value |
Optional By default, the history buffer can save up to 10 commands. |
|
|
NOTE: For more information about the user-interface and history-command max-size commands, see the Fundamentals Command Reference. |
Controlling the CLI display
Multi-screen display
Controlling multi-screen display
If the output information spans multiple screens, each screen pauses after it is displayed. Perform one of the following operations to proceed.
|
Action |
Function |
|
Press Space |
Displays the next screen. |
|
Press Enter |
Displays the next line. |
|
Press Ctrl+C |
Stops the display and the command execution. |
|
Press <PageUp> |
Displays the previous page. |
|
Press <PageDown> |
Displays the next page. |
By default, each screen displays up to 24 lines. To change the maximum number of lines displayed on the next screen, use the screen-length command. For more information about the screen-length command, see the Fundamentals Command Reference.
Disabling multi-screen display
Use the following command to disable the multi-screen display function. All the output information is displayed at one time and the screen is refreshed continuously until the last screen is displayed.
|
To do… |
Use the command… |
Remarks |
|
Disable the multi-screen display function |
screen-length disable |
Required By default, a login user uses the settings of the screen-length command. The default settings of the screen-length command are: multiple-screen display is enabled and up to 24 lines are displayed on the next screen. This command is executed in user view, and takes effect for the current user only. When the user re-logs into the switch, the default configuration is restored. |
Filtering output information
|
|
NOTE: Only the display commands that have the | { begin | exclude | include } regular-expression ] option support filtering output information. For more information, see the Fundamentals Command Reference. |
Introduction
You can use regular expressions in display commands to filter output information.
The following methods are available for filtering output information:
· Input the begin, exclude, or include keyword plus a regular expression in the display command to filter the output information.
· When the system displays the output information in multiple screens, use /, - or + plus a regular expression to filter subsequent output information. / equals the keyword begin, - equals the keyword exclude, and + equals the keyword include.
The following definitions apply to the begin, exclude, and include keywords:
· begin: Displays the first line that matches the specified regular expression and all lines that follow.
· exclude: Displays all lines that do not match the specified regular expression.
· include: Displays all lines that match the specified regular expression.
A regular expression is a case sensitive string of 1 to 256 characters. It supports the following special characters.
|
Character |
Meaning |
Remarks |
|
^string |
Starting sign. string appears only at the beginning of a line. |
For example, regular expression “^user” only matches a string beginning with “user”, not “Auser”. |
|
string$ |
Ending sign. string appears only at the end of a line. |
For example, regular expression "user$” only matches a string ending with “user”, not “userA”. |
|
. |
Matches any single character, such as a single character, a special character, and a blank. |
For example, “.l” matches both “loopback” and “vlan”. |
|
* |
Matches the preceding character or character group zero or multiple times. |
For example, “zo*” matches “z” and “zoo”; “(zo)*” matches “zo” and “zozo”. |
|
+ |
Matches the preceding character or character group one or multiple times |
For example, “zo+” matches “zo” and “zoo”, but not “z”. |
|
| |
Matches the preceding or succeeding character string |
For example, “def|int” only matches a character string containing “def” or “int”. |
|
_ |
If it is at the beginning or the end of a regular expression, it equals ^ or $. In other cases, it equals comma, space, round bracket, or curly bracket. |
For example, “a_b” matches “a b” or “a(b”; “_ab” only matches a line starting with “ab”; “ab_” only matches a line ending with “ab”. |
|
- |
It connects two values (the smaller one before it and the bigger one after it) to indicate a range together with [ ]. |
For example, “1-9” means 1 to 9 (inclusive); “a-h” means a to h (inclusive). |
|
[ ] |
Matches a single character contained within the brackets. |
For example, [16A] matches a string containing any character among 1, 6, and A; [1-36A] matches a string containing any character among 1, 2, 3, 6, and A (- is a hyphen). “]” can be matched as a common character only when it is put at the beginning of characters within the brackets, for example [ ]string]. There is no such limit on “[”. |
|
( ) |
A character group. It is usually used with “+” or “*”. |
For example, (123A) means a character group “123A”; “408(12)+” matches 40812 or 408121212. But it does not match 408. |
|
\index |
Repeats the character string specified by the index. A character string refers to the string within () before \. index refers to the sequence number (starting from 1 from left to right) of the character group before \. If only one character group appears before \, index can only be 1; if n character groups appear before index, index can be any integer from 1 to n. |
For example, (string)\1 repeats string, and a matching string must contain stringstring. (string1)(string2)\2 repeats string2, and a matching string must contain string1string2string2. (string1)(string2)\1\2 repeats string1 and string2 respectively, and a matching string must contain string1string2string1string2. |
|
[^] |
Matches a single character not contained within the brackets. |
For example, [^16A] means to match a string containing any character except 1, 6 or A, and the matching string can also contain 1, 6 or A, but cannot contain these three characters only. For example, [^16A] matches “abc” and “m16”, but not 1, 16, or 16A. |
|
\<string |
Matches a character string starting with string. |
For example, “\<do” matches word “domain” and string “doa”. |
|
string\> |
Matches a character string ending with string. |
For example, “do\>” matches word “undo” and string “abcdo”. |
|
\bcharacter2 |
Matches character1character2. character1 can be any character except number, letter or underline, and \b equals [^A-Za-z0-9_]. |
For example, “\ba” matches “-a” with “-“ being character1, and “a” being character2, but it does not match “2a” or “ba”. |
|
\Bcharacter |
Matches a string containing character, and no space is allowed before character. |
For example, “\Bt” matches “t” in “install”, but not “t” in “big top”. |
|
character1\w |
Matches character1character2. character2 must be a number, letter, or underline, and \w equals [^A-Za-z0-9_]. |
For example, “v\w” matches “vlan”, with “v” being character1, and “l” being character2. v\w also matches “service”, with “i” being character2. |
|
\W |
Equals \b. |
For example, “\Wa” matches “-a”, with “-” being character1, and “a” being character2, but does not match “2a” or “ba”. |
|
\ |
Escape character. If a special character listed in this table follows \, the specific meaning of the character is removed. |
For example, “\\” matches a string containing “\”, “\^” matches a string containing “^”, and “\\b” matches a string containing “\b”. |
Example of filtering output information
1. Example of using the begin keyword
# Display the configuration from the line containing “user-interface” to the last line in the current configuration.
<Sysname> display current-configuration | begin user-interface
user-interface aux 0
user-interface vty 0 4
authentication-mode scheme
idle-timeout 30000 0
user-interface vty 5 15
idle-timeout 30000 0
#
return
2. Example of using the exclude keyword
# Display the non-direct routes in the routing table (the output depends on the device model and the current configuration).
<Sysname> display ip routing-table | exclude Direct
Routing Tables: Public
Destination/Mask Proto Pre Cost NextHop Interface
10.1.1.0/24 Static 60 0 10.1.1.2 Vlan1
3. Example of using the include keyword
# Display the route entries that contain Vlan in the routing table.
<Sysname> display ip routing-table | include Vlan
Routing Tables: Public
Destination/Mask Proto Pre Cost NextHop Interface
192.168.1.0/24 Direct 0 0 192.168.1.42 Vlan999
Configuring user privilege and command levels
Introduction
To avoid unauthorized access, the switch defines user privilege levels and command levels. User privilege levels correspond to command levels. When a user at a specific privilege level logs in, the user can only use commands at that level, or lower levels.
All the commands are categorized into four levels: visit, monitor, system, and manage, and are identified from low to high, respectively by 0 through 3. Table 5 describes the command levels.
Table 5 Default command levels
|
Level |
Privilege |
Description |
|
0 |
Visit |
Involves commands for network diagnosis and commands for accessing an external device. Configuration of commands at this level cannot survive a device restart. Upon device restart, the commands at this level will be restored to the default settings. Commands at this level include ping, tracert, telnet and ssh2. |
|
1 |
Monitor |
Involves commands for system maintenance and service fault diagnosis. Commands at this level are not allowed to be saved after being configured. After the switch is restarted, the commands at this level will be restored to the default settings. Commands at this level include debugging, terminal, refresh, reset, and send. |
|
2 |
System |
Provides service configuration commands, including routing configuration commands and commands for configuring services at different network levels. By default, commands at this level include all configuration commands except for those at manage level. |
|
3 |
Manage |
Involves commands that influence the basic operation of the system and commands for configuring system support modules. By default, commands at this level involve the configuration commands of file system, FTP, TFTP, Xmodem download, user management, level setting, and parameter settings within a system (which are not defined by any protocols or RFCs). |
Configuring a user privilege level
A user privilege level can be configured by using AAA authentication parameters or under a user interface.
Configure user privilege level by using AAA authentication parameters
If the authentication mode of a user interface is scheme, the user privilege level of users logging into the user interface is specified in AAA authentication configuration.
Follow these steps to configure the user privilege level by using AAA authentication parameters:
|
To do… |
Use the command… |
Remarks |
|
|
Enter system view |
system-view |
— |
|
|
Enter user interface view |
user-interface { first-num1 [ last-num1 ] | { aux | vty } first-num2 [ last-num2 ] } |
— |
|
|
Specify the scheme authentication mode |
authentication-mode scheme |
Required By default, the authentication mode for VTY users is password, and no authentication is needed for AUX login users. |
|
|
Return to system view |
quit |
— |
|
|
Configure the authentication mode for SSH users as password |
For more information, see the Security Configuration Guide. |
Required if users use SSH to log in, and username and password are needed at authentication |
|
|
Configure the user privilege level by using AAA authentication parameters |
Using local authentication |
· Use the local-user command to create a local user and enter local user view. · Use the level keyword in the authorization-attribute command to configure the user privilege level. |
User either approach · For local authentication, if you do not configure the user privilege level, the user privilege level is 0. · For remote authentication, if you do not configure the user privilege level, the user privilege level depends on the default configuration of the authentication server. |
|
Using remote authentication (RADIUS, HWTACACS, and LDAP authentications) |
Configure the user privilege level on the authentication server |
||
Example of configuring a user privilege level by using AAA authentication parameters
# You are required to authenticate the users that telnet to the switch through VTY 1, verify their username and password, and specify the user privilege level as 3.
<Sysname> system-view
[Sysname] user-interface vty 1
[Sysname-ui-vty1] authentication-mode scheme
[Sysname-ui-vty1] quit
[Sysname] local-user test
[Sysname-luser-test] password cipher 12345678
[Sysname-luser-test] service-type telnet
When users telnet to the switch through VTY 1, they need to input username test and password 12345678. After passing the authentication, the users can only use the commands of level 0. If the users want to use commands of levels 0, 1, 2 and 3, the following configuration is required:
[Sysname-luser-test] authorization-attribute level 3
Configure the user privilege level under a user interface
· If the authentication mode of a user interface is scheme, and SSH publickey authentication type (only username is needed for this authentication type) is adopted, the user privilege level of users logging into the user interface is the user interface level.
· If the authentication mode of a user interface is none or password, the user privilege level of users logging into the user interface is the user interface level.
Follow these steps to configure the user privilege level under a user interface (SSH publickey authentication type):
|
To do… |
Use the command… |
Remarks |
|
Configure the authentication type for SSH users as publickey |
For more information, see the Security Configuration Guide. |
Required if the SSH login mode is adopted, and only username is needed during authentication. After the configuration, the authentication mode of the corresponding user interface must be set to scheme. |
|
Enter system view |
system-view |
— |
|
Enter user interface view |
user-interface { first-num1 [ last-num1 ] | vty first-num2 [ last-num2 ] } |
— |
|
Configure the authentication mode for any user that uses the current user interface to log in to the switch |
authentication-mode scheme |
Required By default, the authentication mode for VTY users is password, and no authentication is needed for AUX users. |
|
Configure the privilege level for users that log in through the current user interface |
user privilege level level |
Optional By default, the user privilege level for users logged in through OAP is 3, and that for users logged in through the other user interfaces is 0. |
Follow these steps to configure the user privilege level under a user interface (none or password authentication mode):
|
To do… |
Use the command… |
Remarks |
|
Enter system view |
system-view |
— |
|
Enter user interface view |
user-interface { first-num1 [ last-num1 ] | { aux | vty } first-num2 [ last-num2 ] } |
— |
|
Configure the authentication mode for any user that uses the current user interface to log in to the switch |
authentication-mode { none | password } |
Optional By default, the authentication mode for VTY user interfaces is password, and no authentication is needed for AUX login users. |
|
Configure the privilege level of users logged in through the current user interface |
user privilege level level |
Optional By default, the user privilege level for users logged in through OAP is 3, and that for users logged in through the other user interfaces is 0. |
Example of configuring a user privilege level under a user interface
# Perform no authentication on users logged in to the switch through telnet, and specify their privilege level as 1. (Use no authentication mode in a secure network environment.)
<Sysname> system-view
[Sysname] user-interface vty 0 4
[Sysname-ui-vty0-4] authentication-mode none
[Sysname-ui-vty0-4] user privilege level 1
# Authenticate users logged in to the switch through Telnet, verify their password, and specify their user privilege level as 2.
<Sysname> system-view
[Sysname] user-interface vty 0 4
[Sysname-ui-vty1] authentication-mode password
[Sysname-ui-vty0-4] set authentication password cipher 12345678
[Sysname-ui-vty0-4] user privilege level 2
By default, users logged in through telnet use the commands of level 0 after passing the authentication. After the configuration, when users log in to the switch through Telnet, they need to input password 12345678, and then they can use commands of levels 0, 1, and 2.
|
|
NOTE: · For more information about user interfaces, see the chapter “Login to the device configuration.” For more information about the user-interface, authentication-mode, and user privilege level commands, see the Fundamentals Command Reference. · For more information about AAA authentication, see the Security Configuration Guide. For more information about the local-user and authorization-attribute commands, see the Security Command Reference. · For more information about SSH, see the Security Configuration Guide. |
Switching user privilege level
Introduction
Users can switch to a different user privilege level temporarily without logging out and terminating the current connection. After the privilege level switch, users can continue to configure the switch without relogging in, but the commands that they can execute have changed. For example, if the current user privilege level is 3, the user can configure system parameters. After switching to user privilege level 0, the user can only execute simple commands, like ping and tracert, and only a few display commands. The switching operation is effective for the current login. After the user relogs in, the user privilege restores to the original level.
· To avoid problems, H3C recommends that administrators log in to the switch by using a lower privilege level and view switch operating parameters, and when they have to maintain the switch, they can switch to a higher level temporarily
· If the administrators need to leave for a while or ask someone else to manage the switch temporarily, they can switch to a lower privilege level before they leave to restrict the operation by others.
Setting the authentication mode for user privilege level switch
· A user can switch to a privilege level equal to or lower than the current one unconditionally and is not required to input a password (if any).
· For security, a user is required to input the password (if any) to switch to a higher privilege level. The authentication falls into one of the following categories:
|
Authentication mode |
Meaning |
Description |
|
local |
Local password authentication |
The switch authenticates a user by using the privilege level switch password input by the user. When this mode is applied, you need to set the password for privilege level switch with the super password command. |
|
scheme |
Remote AAA authentication through HWTACACS or RADIUS |
The switch sends the username and password for privilege level switch to the HWTACACS or RADIUS server for remote authentication. When this mode is applied, you need to perform the following configurations: · Configure HWTACACS or RADIUS scheme and reference the created scheme in the ISP domain. For more information, see the Security Configuration Guide. · Create the corresponding user and configure password on the HWTACACS or RADIUS server. |
|
local scheme |
Performs the local password authentication first and then the remote AAA authentication |
The switch authenticates a user by using the local password first, and if no password for privilege level switch is set, for the user logged in from the AUX port, the privilege level is switched directly; for the user logged in from VTY user interfaces, the AAA authentication is performed. |
|
scheme local |
Performs remote AAA authentication first and then the local password authentication |
AAA authentication is performed first, and if the remote HWTACACS or RADIUS server does not respond or AAA configuration on the switch is invalid, the local password authentication is performed. |
Follow these steps to set the authentication mode for user privilege level switch:
|
To do… |
Use the command… |
Remarks |
|
Enter system view |
system-view |
— |
|
Set the authentication mode for user privilege level switch |
super authentication-mode { local | scheme } * |
Optional local by default. |
|
Configure the password for user privilege level switch |
super password [ level user-level ] { simple | cipher } password |
Required if the authentication mode is set to local (specify the local keyword when setting the authentication mode) By default, no privilege level switch password is configured. |
|
|
CAUTION: · If no user privilege level is specified when you configure the password for switching the user privilege level with the super password command, the user privilege level defaults to 3. · If you specify the simple keyword, the password is saved in the configuration file in plain text, which is easy to be stolen. If you specify the cipher keyword, the password is saved in the configuration file in cipher text, which is safer. · The timeout for AAA authentication is 120 seconds. After the timeout, the device considers AAA authentication no response. · If the user logs in from the AUX port, the privilege level can be switched to a higher level, although the authentication mode is local, and no user privilege level password is configured. |
Switching the user privilege level
Follow these steps to switch the user privilege level:
|
To do… |
Use the command… |
Remarks |
|
Switch the user privilege level |
super [ level ] |
Required When logging in to the switch, a user has a user privilege level, which depends on user interface or authentication user level. Available in user view. |
When you switch the user privilege level, the information you need to provide varies with combinations of the user interface authentication mode and the super authentication mode.
Table 6 Information input for user privilege level switch
|
User interface authentication mode |
User privilege level switch authentication mode |
Information input for the first authentication mode |
Information input after the authentication mode changes |
|
none/password |
local |
Local user privilege level switch password (configured on the switch) |
— |
|
local scheme |
Local user privilege level switch password |
Username and password for privilege level switch (configured on the AAA server) |
|
|
scheme |
Username and password for privilege level switch |
— |
|
|
scheme local |
Username and password for privilege level switch |
Local user privilege level switch password |
|
|
scheme |
local |
Local user privilege level switch password |
— |
|
local scheme |
Local user privilege level switch password |
Password for privilege level switch (configured on the AAA server). The system uses the username used for logging in as the privilege level switch username. |
|
|
scheme |
Password for privilege level switch (configured on the AAA server). The system uses the username used for logging in as the privilege level switch username. |
— |
|
|
scheme local |
Password for privilege level switch (configured on the AAA server). The system uses the username used for logging in as the privilege level switch username. |
Local user privilege level switch password |
|
|
CAUTION: · When the authentication mode is set to local, configure the local password before switching to a higher user privilege level. · When the authentication mode is set to scheme, configure AAA related parameters before switching to a higher user privilege level. · The privilege level switch fails after three consecutive unsuccessful password attempts. · For more information about user interface authentication, see the chapter “CLI login.” |
Modifying the level of a command
All the commands in a view default to different levels. The administrator can change the default level of a command to a lower level or a higher level as needed.
Follow these steps to modify the command level:
|
To do… |
Use the command… |
Remarks |
|
Enter system view |
system-view |
— |
|
Configure the command level in a specified view |
command-privilege level level view view command |
Required See Table 5 for the default settings. |
|
|
CAUTION: H3C recommends you to use the default command level or modify the command level under the guidance of professional staff. An improper change of the command level may bring inconvenience to your maintenance and operation, or even potential security problems. |
Saving the current configuration
You can input the save command in any view to save all the submitted and executed commands into the configuration file. Commands saved in the configuration file can survive a reboot. The save command does not take effect on one-time commands, such as display commands, which display specified information, and the reset commands, which clear specified information. The one-time commands executed are never saved.
Displaying and maintaining the CLI
|
To do… |
Use the command… |
Remarks |
|
Display defined command aliases and the corresponding commands |
display command-alias [ | { begin | exclude | include } regular-expression ] |
Available in any view |
|
Display the clipboard information |
display clipboard [ | { begin | exclude | include } regular-expression ] |
Available in any view |