- Table of Contents
-
- 01-Fundamentals Configuration Guide
- 00-Preface
- 01-CLI configuration
- 02-RBAC configuration
- 03-Login management configuration
- 04-FTP and TFTP configuration
- 05-File system management configuration
- 06-Configuration file management configuration
- 07-Software upgrade configuration
- 08-ISSU configuration
- 09-Emergency Shell configuration
- 10-Automatic configuration
- 11-Device management configuration
- 12-Tcl configuration
- 13-Management with BootWare
- 14-Python configuration
- 15-License management
- Related Documents
-
| Title | Size | Download |
|---|---|---|
| 05-File system management configuration | 92.17 KB |
Specifying a directory name or file name
File system management restrictions and guidelines
Managing storage media and file systems
Mounting or unmounting a file system
Displaying directory information
Displaying the working directory
Changing the working directory
Archiving or extracting directories
Setting the operation mode for directories
Displaying the contents of a text file
Compressing or decompressing a file
Archiving or extracting files·
Deleting files from the recycle bin
Setting the operation mode for files
Managing file systems
Overview
File systems
The device supports the flash memory and USB disk.
· The flash memory has one file system.
· The USB disk can be partitioned. An unpartitioned storage medium has one file system. A partitioned storage medium has one file system on each partition.
File system naming conventions
The name of the file system on a flash memory has the following parts:
· File system location. For more information, see "File system location".
· Storage medium type flash.
· Colon (:).
The name of a file system on a USB disk has the following parts:
· File system location. For more information, see "File system location".
· Storage medium type usb.
· Sequence number, a lower-case English letter such as a, b, or c.
· Partition number, a digit that starts at 0 and increments by 1. If the USB disk is not partitioned, the system determines that the USB disk has one partition.
· Colon (:).
For example, the file system on the first partition of the first USB disk is named usba0:.
|
|
IMPORTANT: File system names are case sensitive and must be entered in lower case. |
File system location
(In standalone mode.) To identify a file system on the active MPU, you do not need to specify the file system location. To identify a file system on the standby MPU, you must specify the file system location in the slotn# format. The n argument represents the slot number of a card. For example, the location is slot16# for a file system that resides on the card in slot 16.
(In IRF mode.) To identify a file system on the global active MPU, you do not need to specify the file system location. To identify a file system on a global standby MPU, you must specify the file system location in the chassism#slotn# format. The m argument represents the member ID of the IRF member device. The n argument represents the slot number of the MPU. For example, the location is chassis2#slot16# for a file system that resides on the MPU in slot 16 of member device 2.
Default file system
You are working with the default file system by default after you log in. To specify a file or directory on the default file system, you do not need to specify the file system name. For example, you do not need to specify any location information if you want to save the running configuration to the root directory of the default file system.
To change the default file system, use the BootWare menu. For more information, see the software release notes.
Directories
Directories in a file system are structured in a tree form.
Root directory
The root directory is represented by a forwarding slash (/). For example, flash:/ represents the root directory of the flash memory.
Working directory
The working directory is also called the current directory.
In standalone mode, the default working directory is the root directory of the flash memory on the active MPU.
In IRF mode, the default working directory is the root directory of the flash memory on the global active MPU.
Directory naming conventions
When you specify a name for a directory, follow these conventions:
· A directory name can contain letters, digits, and special characters.
· A directory whose name starts with a dot character (.) is a hidden directory. To prevent the system from hiding a directory, make sure the directory name does not start with a dot character.
Commonly used directories
The device has some factory-default directories. The system automatically creates directories during operation. These directories include:
· diagfile—Stores diagnostic information files.
· license—Stores license files.
· logfile—Stores log files.
· seclog—Stores security log files.
· versionInfo—Stores software version information files.
Files
File naming conventions
When you specify a name for a file, follow these conventions:
· A file name can contain letters, digits, and special characters.
· A file whose name starts with a dot character (.) is a hidden file. To prevent the system from hiding a file, make sure the file name does not start with a dot character.
Common file types
The device is shipped with some files. The system automatically creates files during operation. The types of these files include:
· .ipe file—Compressed software image package file.
· .bin file—Software image file.
· .cfg file—Configuration file.
· .mdb file—Binary configuration file.
· .log file—Log file.
Hidden files and directories
Some system files and directories are hidden. For correct system operation and full functionality, do not modify or delete hidden files or directories.
Specifying a directory name or file name
Specifying a directory name
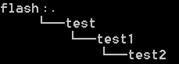
To specify a directory, you can use the absolute path or a relative path. For example, the working directory is flash:/. To specify the test2 directory in Figure 1, you can use the following methods:
· flash:/test/test1/test2 (absolute path)
· flash:/test/test1/test2/ (absolute path)
· test/test1/test2 (relative path)
· test/test1/test2/ (relative path)
Figure 1 Sample directory hierarchy
Specifying a file name
To specify a file, use the following methods:
· Enter the absolute path of the file and the file name in the format of filesystem/directory1/directory2/…/directoryn/filename, where directoryn is the directory in which the file resides.
· Enter the relative path of the file and the file name.
For example, the working directory is flash:/. The samplefile.cfg file is in the test2 directory shown in Figure 1. To specify the file, you can use the following methods:
· flash:/test/test1/test2/samplefile.cfg
· test/test1/test2/samplefile.cfg
FIPS compliance
The device supports the FIPS mode that complies with NIST FIPS 140-2 requirements. Support for features, commands, and parameters might differ in FIPS mode and non-FIPS mode. For more information about FIPS mode, see Security Configuration Guide.
File system management restrictions and guidelines
To avoid file system corruption, do not perform the following tasks during file system management:
· Installing or removing storage media.
· Installing or removing cards.
· Performing an active/standby switchover in standalone mode.
· Performing a switchover between the global active MPU and a global standby MPU in IRF mode.
· Creating, deleting, starting, or stopping an MDC.
If you remove a storage medium while a directory or file on the medium is being accessed, the device might not recognize the medium when you reinstall it. To reinstall this kind of storage medium, perform one of the following tasks:
· If you were accessing a directory on the storage medium, change the working directory.
· If you were accessing a file on the storage medium, close the file.
· If another administrator was accessing the storage medium, unmount all partitions on the storage medium.
Make sure a USB disk is not write protected before an operation that requires the write right on the disk.
You cannot access a storage medium that is being partitioned, or a file system that is being formatted or repaired. To access a storage medium after it is partitioned or a file system after it is formatted or repaired, use one of the following methods:
· Use the absolute path to specify a file or directory. For example, use the dir flash:/ command to display the files and directories in the file system on the flash memory.
· Use the cd command to change the working directory to the root directory of the file system before accessing a file or directory in the file system. For example, to display the files and directories in the root directory of the file system on the flash memory, perform the following tasks:
a. Use the cd flash:/ command to change the working directory to the root directory of the file system.
b. Execute the dir command.
Before managing file systems, directories, and files, make sure you know the possible impact.
Managing storage media and file systems
Partitioning a USB disk
A USB disk can be divided into logical devices called partitions. Operations on one partition do not affect the other partitions.
Restrictions and guidelines
A partition must have a minimum of 32 MB of storage space.
The actual partition size and the specified partition size might have a difference of less than 5% of the storage medium's total size.
Before partitioning a USB disk, perform the following tasks:
· Back up the files in the storage medium. The partition operation clears all data on the medium.
· To partition a USB disk, make sure the disk is not write protected. If the disk is write protected, the partition operation will fail, and you must remount or reinstall the disk to restore access to the USB disk.
· Make sure no other users are accessing the medium.
After partitioning a USB disk, perform the following tasks:
· Reconfigure paths of image files to include the correct partition information.
· To make sure the first partition has sufficient storage space for software image and configuration files, set the log file directory to a different partition. By default, the system automatically saves log files to the second partition. If the directory does not exist, use the info-center logfile directory command to change the directory to avoid log loss. For more information about this command, see Network Management and Monitoring Command Reference.
Configuration procedure
Perform this task in user view.
|
Task |
Command |
Remarks |
|
Partition a storage medium. |
fdisk medium [ partition-number ] |
By default, a USB disk has only one partition (usba0:). To partition a storage medium evenly, specify the partition-number argument. To customize the sizes of partitions, do not specify the partition-number argument. The command will require you to specify a size for each partition. |
Mounting or unmounting a file system
Generally, file systems on a hot-swappable storage medium are automatically mounted when the storage medium is connected to the device. If the system cannot recognize a file system, you must mount the file system before you can access it.
To remove a hot-swappable storage medium from the device, you must first unmount all file systems on the storage medium to disconnect the medium from the device. Removing a connected hot-swappable storage medium might damage files on the storage medium or even the storage medium itself.
To use an unmounted file system, you must mount the file system again.
Restrictions and guidelines
You can mount or unmount a file system only when no other users are accessing the file system.
To prevent a USB disk and the USB interface from being damaged, make sure the following requirements are met before unmounting file systems on the USB disk:
· The system has recognized the USB disk.
· The USB disk LED is not blinking.
Configuration procedure
Perform one of the following tasks in user view as appropriate:
|
Task |
Command |
|
Mount a file system. |
mount filesystem |
|
Unmount a file system. |
umount filesystem |
Formatting a file system
|
|
CAUTION: Formatting a file system permanently deletes all files and directories in the file system. You cannot restore the deleted files or directories. |
You can format a file system only when no other users are accessing the file system.
Perform this task in user view.
|
Task |
Command |
|
Format a file system. |
format filesystem |
Repairing a file system
If part of a file system is inaccessible, use this task to examine and repair the file system.
You can repair a file system only when no other users are accessing the file system.
Perform this task in user view.
|
Task |
Command |
|
Repair a file system. |
fixdisk filesystem |
Managing directories
Displaying directory information
Perform this task in user view.
|
Task |
Command |
Remarks |
|
Display directory or file information. |
dir [ /all ] [ file | directory | /all-filesystems ] |
If multiple users perform file operations (for example, creating or deleting files or directories) at the same time, the output for this command might be incorrect. |
Displaying the working directory
Perform this task in user view.
|
Task |
Command |
|
Display the working directory. |
pwd |
Changing the working directory
Perform this task in user view.
|
Task |
Command |
|
Change the working directory. |
cd { directory | .. } |
Creating a directory
Perform this task in user view.
|
Task |
Command |
|
Create a directory. |
mkdir directory |
Renaming a directory
Perform this task in user view.
|
Task |
Command |
|
Rename a directory. |
rename source-directory dest-directory |
Archiving or extracting directories
When you archive or extract directories or display archived directories, files in the directories are also archived, extracted, or displayed.
Perform the following tasks in user view:
|
Task |
Command |
|
Archive directories. |
tar create [ gz ] archive-file dest-file [ verbose ] source source-directory &<1-5> |
|
Extract directories. |
tar extract archive-file file [ verbose ] [ screen | to directory ] |
|
Display archived directories. |
tar list archive-file file |
Deleting a directory
To delete a directory, you must delete all files and subdirectories in the directory. To delete a file, use the delete command. To delete a subdirectory, use the rmdir command.
Deleting a directory permanently deletes all its files in the recycle bin, if any.
Perform this task in user view.
|
Task |
Command |
|
Delete a directory. |
rmdir directory |
Setting the operation mode for directories
The device supports the following directory operation modes:
· alert—The system prompts for confirmation when your operation might cause problems such as data loss. This mode provides an opportunity to cancel a disruptive operation.
· quiet—The system does not prompt for confirmation.
To set the operation mode for directories:
|
Step |
Command |
Remarks |
|
1. Enter system view. |
system-view |
N/A |
|
2. Set the operation mode for directories. |
file prompt { alert | quiet } |
The default mode is alert. This command also sets the operation mode for files. |
Managing files
You can create a file by copying a file, downloading a file, or using the save command. For more information about downloading a file, see "Configuring FTP" and "Configuring TFTP." For more information about the save command, see Fundamentals Command Reference.
Displaying file information
Perform this task in user view.
|
Task |
Command |
Remarks |
|
Display directory or file information. |
dir [ /all ] [ file | directory | /all-filesystems ] |
If multiple users perform file operations (for example, creating or deleting files or directories) at the same time, the output for this command might be incorrect. |
Displaying the contents of a text file
Perform this task in user view.
|
Task |
Command |
|
Display the contents of a text file. |
more file |
Renaming a file
Perform this task in user view.
|
Task |
Command |
|
Rename a file. |
rename source-file dest-file |
Copying a file
Perform this task in user view.
|
Task |
Command |
|
Copy a file. |
·
In non-FIPS mode: ·
In FIPS mode: |
Moving a file
Perform this task in user view.
|
Task |
Command |
|
Move a file. |
move source-file { dest-file | dest-directory } |
Compressing or decompressing a file
Perform the following tasks in user view:
|
Task |
Command |
|
Compress a file. |
gzip file |
|
Decompress a file. |
gunzip file |
Archiving or extracting files
Perform the following tasks in user view:
|
Task |
Command |
|
Archive files. |
tar create [ gz ] archive-file dest-file [ verbose ] source source-file &<1-5> |
|
Extract files. |
tar extract archive-file file [ verbose ] [ screen | to directory ] |
|
Display the names of archived files. |
tar list archive-file file |
Deleting or restoring a file
You can delete a file permanently or move it to the recycle bin. A file moved to the recycle bin can be restored, but a permanently deleted file cannot.
Files in the recycle bin occupy storage space. To save storage space, periodically empty the recycle bin by using the reset recycle-bin command.
Perform the following tasks in user view:
|
Task |
Command |
|
Delete a file by moving it to the recycle bin. |
delete file |
|
Restore a file from the recycle bin. |
undelete file |
|
Delete a file permanently. |
delete /unreserved file |
|
|
IMPORTANT: Do not use the delete command to delete files from the recycle bin. To delete files from the recycle bin, use the reset recycle-bin command. |
Deleting files from the recycle bin
Each file system has a recycle bin of its own. A recycle bin is a folder named .trash in the root directory of a file system.
To view which files or directories are in a recycle bin, use either of the following methods:
· Access the file system and execute the dir/all .trash command.
· Execute the cd .trash command to enter the recycle bin folder, and then execute the dir command.
To delete files from a recycle bin, perform the following task in user view:
|
Task |
Command |
|
Delete files from the recycle bin. |
reset recycle-bin [ /force ] |
Calculating the file digest
File digests are used to verify file integrity.
Use the following commands in user view:
|
Task |
Command |
|
Calculate the digest of a file by using the SHA-256 algorithm. |
sha256sum file |
|
Calculate the digest of a file by using the MD5 algorithm. |
md5sum file |
Setting the operation mode for files
The device supports the following file operation modes:
· alert—The system prompts for confirmation when your operation might cause problems such as file corruption or data loss. This mode provides an opportunity to cancel a disruptive operation.
· quiet—The system does not prompt for confirmation.
To set the operation mode for files:
|
Step |
Command |
Remarks |
|
1. Enter system view. |
system-view |
N/A |
|
2. Set the operation mode for files. |
file prompt { alert | quiet } |
The default mode is alert. This command also sets the operation mode for directories. |
Executing a batch file
A batch file contains a set of commands. Executing a batch file executes the commands in the file one by one.
The system executes the commands in a batch file at the background and does not output the execution results. To verify the execution results, use the display current-configuration command.
Restrictions and guidelines
To execute a batch file on the device, create a batch file on a PC and load the batch file to the device.
As a best practice, try every command on the device to make sure the command line can be executed correctly before adding the command to a batch file. If a command is invalid or a condition for executing the command is not met, the command fails and the system continues to execute the next command.
Configuration procedure
|
Step |
Command |
|
1. Enter system view. |
system-view |
|
2. Execute a batch file. |
execute filename |