- Table of Contents
-
- 01-Fundamentals Configuration Guide
- 00-Preface
- 01-CLI configuration
- 02-RBAC configuration
- 03-Login management configuration
- 04-FTP and TFTP configuration
- 05-File system management configuration
- 06-Configuration file management configuration
- 07-Software upgrade configuration
- 08-ISSU configuration
- 09-Automatic configuration
- 10-Device management configuration
- 11-Tcl configuration
- 12-Management with Boot ROM
- 13-Python configuration
- 14-License management
- Related Documents
-
| Title | Size | Download |
|---|---|---|
| 12-Management with Boot ROM | 215.34 KB |
Managing the system with BootWare
Updating the extended BootWare segment
Updating the basic BootWare segment
Running the extended BootWare segment
Downloading Comware software to the flash memory
Displaying all files in the flash memory·
Deleting a file from the flash memory
Restoring the factory-default configuration
Accessing the BootWare upgrade menu
Skipping the configuration file at the next startup
Setting the switch startup mode
Setting the default storage medium
Using the EXTENDED ASSISTANT menu
Disabling password recovery capability·
Comware software upgrade examples
Using XMODEM to upgrade software through the console port
Using TFTP to upgrade Comware software through the management Ethernet port
Using FTP to upgrade Comware software through the management Ethernet port
Managing the system with BootWare
BootWare provides a menu method for performing basic file operations, software upgrade, and system management. You can use this method when you cannot access the Comware CLI, for example, because of software image corruption.
|
|
NOTE: Output in this document is for illustration only. |
Overview
The BootWare program is stored in the built-in flash memory of each member device. It comprises one basic segment and one extended segment. The basic segment enables the system to complete basic initialization, and the extended segment bootstraps the Comware software images.
Table 1 lists the menus that each segment provides and the major tasks you can perform from these menus. You can access these menus only during system startup.
|
BootWare segment |
Menu |
Tasks |
Reference |
|
Basic |
BASIC BOOT |
· Update the BootWare. · Start the BootWare extended segment. |
|
|
Extended |
EXTENDED BOOT |
· Download Comware software. · Select files for startup. · Restore factory-default configuration |
|
|
Extended |
EXTENDED ASSISTANT |
· Examine system memory. · Search system memory. |
Restrictions and guidelines
Use BootWare menus for software upgrade only when you cannot access the CLI. From BootWare menus, you can upgrade IRF member devices only one by one.
To upgrade software on an IRF member device from its BootWare menus, make sure you have one connection to its console port and one connection to its management port. You can only access the BootWare menus through the console port. The management port can be used for file transfer.
Availability of some menu options depends on the password recovery capability setting.
Using the BASIC BOOT menu
To access the BASIC BOOT menu:
1. Connect a configuration terminal to the console port of the device.
2. Power on the device.
Starting......
Press Ctrl+D to access BASIC BOOT MENU...
Press Ctrl+T to start heavy memory test
3. Press Ctrl+D within three seconds after the " Press Ctrl+D to access BASIC BOOT MENU..." prompt message appears. If you fail to do this within the time limit, the system starts to run the extended BootWare segment.
********************************************************************************
* *
* BASIC BOOTROM, Version 214 *
* *
********************************************************************************
BASIC BOOT MENU
1. Update full BootRom
2. Update extended BootRom
3. Update basic BootRom
4. Boot extended BootRom
0. Reboot
Ctrl+U: Access BASIC ASSISTANT MENU
Enter your choice(0-4):
Table 2 BASIC BOOT menu options
|
Option |
Task |
|
<1> Update full BootRom |
Update the entire BootWare, including the basic segment and the extended segment. |
|
<2> Update extended BootRom |
Update the extended BootWare segment. |
|
<3> Update basic BootRom |
Update the basic BootWare segment. |
|
<4> Boot extended BootRom |
Run the extended BootWare segment. |
|
<0> Reboot |
Reboot the device. |
Updating the entire BootWare
To update the entire BootWare, enter 1 in the BASIC BOOT menu.
Enter your choice(0-4): 1
Please select your download baudrate:
1.* 9600
2. 19200
3. 38400
4. 57600
5. 115200
0. Return to boot menu
Enter your choice(0-5):
Download baudrate is 9600 bps
Please change the terminal's baudrate to 9600 bps and select XMODEM protocol
Press enter key when ready
Now please start transfer file with XMODEM protocol
If you want to exit, Press <Ctrl+X>
Loading ...CCCCCCCCCCC...Done.
Will you Update Basic BootRom? (Y/N):Y
Updating Basic BootRom...........Done.
Updating extended BootRom? (Y/N):Y
Updating extended BootRom.........Done.
Updating the extended BootWare segment
If the extended BootWare segment is corrupt, enter 2 in the BASIC BOOT menu to update it.
Enter your choice(0-4): 2
Please select your download baudrate:
1.* 9600
2. 19200
3. 38400
4. 57600
5. 115200
0. Return to boot menu
Enter your choice(0-5):
Download baudrate is 9600 bps
Please change the terminal's baudrate to 9600 bps and select XMODEM protocol
Press enter key when ready
Now please start transfer file with XMODEM protocol
If you want to exit, Press <Ctrl+X>
Loading ...CCCCCCCCCCCCCC ...Done.
Updating extended BootRom? (Y/N):Y
Updating extended BootRom.........Done.
Updating the basic BootWare segment
To update the basic BootWare segment, enter 3 in the BASIC BOOT menu.
Enter your choice(0-4): 3
Please select your download baudrate:
1.* 9600
2. 19200
3. 38400
4. 57600
5. 115200
0. Return to boot menu
Enter your choice(0-5):
Download baudrate is 9600 bps
Please change the terminal's baudrate to 9600 bps and select XMODEM protocol
Press enter key when ready
Now please start transfer file with XMODEM protocol
If you want to exit, Press <Ctrl+X>
Loading ...CCCCCCCCCCC...Done.
Will you Update Basic BootRom? (Y/N):Y
Updating Basic BootRom...........Done.
Updating extended BootRom? (Y/N):Y
Updating extended BootRom.........Done.
Running the extended BootWare segment
To run the extended BootWare segment, enter 4 in the BASIC BOOT menu.
Enter your choice(0-5): 4
Booting extended BootRom
The extended BootRom is self-decompressing......Done.
********************************************************************************
* *
* H3C 7502E-XS BOOTROM, Version 214 *
* *
********************************************************************************
Copyright (c) 2004-2014 Hangzhou H3C Technologies Co., Ltd.
Creation Date : Nov 19 2014,11:25:44
CPU Clock Speed : 1000MHz
Memory Size : 4096MB
Flash Size : 1024MB
CPLD Version : 003/001
PCB Version : Ver.A
Mac Address : 741F4A9B818E
Press Ctrl+B to access EXTENDED BOOT MENU...0
Using the EXTENDED BOOT menu
To access the EXTENDED BOOT menu, press Ctrl+B within three seconds after the "Press Ctrl+B to access EXTENDED BOOT MENU...0" prompt message appears. If you fail to do this, the system starts decompressing the Comware software.
Starting......
Press Ctrl+D to access BASIC BOOT MENU...
Press Ctrl+T to start heavy memory test
********************************************************************************
* *
* H3C 7502E-XS BOOTROM, Version 214 *
* *
********************************************************************************
Copyright (c) 2004-2014 Hangzhou H3C Technologies Co., Ltd.
Creation Date : Nov 19 2014,11:25:44
CPU Clock Speed : 1000MHz
Memory Size : 4096MB
Flash Size : 1024MB
CPLD Version : 003/001
PCB Version : Ver.A
Mac Address : 741F4A9B818E
Press Ctrl+B to access EXTENDED BOOT MENU...0
The following is the EXTENDED BOOT menu:
Password recovery capability is enabled.
EXTENDED BOOT MENU
1. Download image to flash
2. Select image to boot
3. Display all files in flash
4. Delete file from flash
5. Restore to factory default configuration
6. Enter BootRom upgrade menu
7. Skip current system configuration
8. Set switch startup mode
9. Set default boot storage medium
0. Reboot
Ctrl+Z: Access EXTENDED ASSISTANT MENU
Ctrl+F: Format file system
Ctrl+P: Change authentication for console login
Ctrl+R: Download image to SDRAM and run
Enter your choice(0-9):
Table 3 EXTENDED BOOT menu options
|
Option |
Task |
Reference |
|
<1> Download image to flash |
Download Comware software to the flash memory. |
|
|
<2> Select image to boot |
Select startup image files and configuration files. |
|
|
<3> Display all files in flash |
Display all files in the flash memory. |
|
|
<4> Delete file from flash |
Delete files from the flash memory. |
|
|
<5> Restore to factory default configuration |
Restore the factory-default configuration. This option is not available if password recovery capability is enabled. |
|
|
<6> Enter BootRom upgrade menu |
Access the BootWare upgrade menu |
|
|
<7> Skip current system configuration |
Skip the configuration file at the next startup. The skip is a one-time operation and takes effect only for the first system boot or reboot after you choose this option. This option is not available if password recovery capability is disabled. |
|
|
<8> Set switch startup mode |
Set the switch startup mode to full startup mode or fast startup mode. |
|
|
<9> Set default boot storage medium |
Set the default storage medium. At startup, the switch searches the default storage medium for the startup images. |
|
|
<0> Reboot |
Reboot the device. |
N/A |
|
|
NOTE: · Basic Comware 7 software images include a .bin boot image and a .bin system image. A system must have the two images to operate appropriately. They are released both in separate .bin files and in an .ipe package file so you can update the images separately or as a whole. You can set one Comware software image as a main (M) or backup (B) image. · At startup, the device always attempts to boot first with the main Comware software images. If the attempt fails, for example, because the image file is corrupt, the device tries to boot with the backup Comware software images. If the attempt still fails, the device displays a failure message. |
Downloading Comware software to the flash memory
To download Comware software to the flash memory, enter 1 in the EXTENDED BOOT menu.
Enter your choice(0-9): 1
1. Set TFTP protocol parameters
2. Set FTP protocol parameters
3. Set XMODEM protocol parameters
0. Return to boot menu
You can use one of the following protocol and port combinations for the download operation:
· TFTP and the management Ethernet port.
· FTP and the management Ethernet port.
· XMODEM and the console port.
Selecting files for startup
To select files to be used at startup, enter 2 in the EXTENDED BOOT menu.
Enter your choice(0-3): 2
1. Set image file
2. Set bin file
3. Set configuration file
0. Return to boot menu
Table 4 File menu options
|
Option |
Task |
Reference |
|
<1> Set image file |
Specify an .ipe file for startup. |
|
|
<2> Set bin file |
Specify.bin files for startup. |
|
|
<3> Set configuration file |
Specify next-startup configuration files. |
Selecting the main and backup configuration files for startup |
|
<0> Return to boot menu |
Return to the EXTENDED BOOT menu. |
N/A |
Selecting an .ipe file for startup
To select an .ipe file, enter 1.
Enter your choice(0-3): 1
File Number File Size(bytes) File Name
================================================================================
1(b) 186368 flash:/S7500EXS-test.ipe
2(*b) 145408 flash:/S7500EXS.ipe
Free space: 842231808 bytes
(*)-with main attribute
(b)-with backup attribute
(*b)-with both main and backup attribute
Note:Select .bin files. One but only one boot image and system image must be
included.
Enter file No.(Allows multiple selection):2
You have selected:
flash:/S7500EXS.ipe
Please input the file attribute (Main/Backup) main
In this example, the device will use the S7500EXS.ipe file as the main startup image file at the next startup.
Selecting.bin files for startup
To select .bin files, enter 2.
Enter your choice(0-3): 2
File Number File Size(bytes) File Name
================================================================================
1(b) 186368 flash:/boot-test.bin
2(b) 145408 flash:/system-test.bin
1.bin
3(*b) 134459392 flash:/boot.bin
4(*b) 15006720 flash:/system.bin
Free space: 842231808 bytes
(*)-with main attribute
(b)-with backup attribute
(*b)-with both main and backup attribute
Note:Select .bin files. One but only one boot image and system image must be
included.
Enter file No.(Allows multiple selection):3
Enter another file No.(0-Finish choice):4
You have selected:
flash:/boot.bin
flash:/system.bin
Please input the file attribute (Main/Backup) main
In this example, the device will use the boot.bin and system.bin files as the main startup image files at the next startup.
Selecting the main and backup configuration files for startup
To select the main and backup configuration files for startup, enter 3.
Enter your choice(0-3): 3
File Number File Size(bytes) File Name
================================================================================
1 3882 flash:/labtop-13.cfg
2(*) 5097 flash:/test.cfg
3 5098 flash:/startup.cfg
Free space: 842231808 bytes
(*)-with main attribute
(b)-with backup attribute
(*b)-with both main and backup attribute
Please input the file number to change: 1
Please input the file attribute (Main/Backup/None) main
In this example, the device will use the labtop-13.cfg file as the main configuration file at the next startup.
Displaying all files in the flash memory
To display all files in the flash memory, enter 3 in the EXTENDED BOOT menu.
Enter your choice(0-9): 3
Display all file(s) in flash:
File Number File Size(bytes) File Name
================================================================================
1 137865 flash:/diag_20110101-084757.tar.gz
2 0 flash:/lauth.dat
3 305 flash:/.trash/test.py.txt_0001
4 88 flash:/.trash/.trashinfo
5 305 flash:/.trash/c.txt_0001
6 149999 flash:/labtop-13.mdb
7(*b) 134459392 flash:/SYSTEM.bin
8(*b) 15006720 flash:/BOOT.bin
9(*) 3882 flash:/labtop-13.cfg
10 169208 flash:/test.mdb
11 5097 flash:/test.cfg
12 1 flash:/.moduleimagemain.data
13 169208 flash:/startup.mdb
14 5098 flash:/startup.cfg
15 536 flash:/versionInfo/version0.dat
16 8 flash:/versionInfo/versionCtl.dat
17 1056 flash:/versionInfo/version1.dat
18 591 flash:/serverkey
19 553723 flash:/logfile/logfile.log
20 735 flash:/hostkey
Free space: 842231808 bytes
The current image is BOOT.bin
(*)-with main attribute
(b)-with backup attribute
(*b)-with both main and backup attribute
Deleting a file from the flash memory
To delete a file from the flash memory, enter 4 in the EXTENDED BOOT menu, and enter the number of the file to be deleted.
Enter your choice(0-9): 4
Deleting the file in flash:
File Number File Size(bytes) File Name
================================================================================
1 137865 flash:/diag_20110101-084757.tar.gz
2 0 flash:/lauth.dat
3 305 flash:/.trash/test.py.txt_0001
4 88 flash:/.trash/.trashinfo
5 305 flash:/.trash/c.txt_0001
6 149999 flash:/labtop-13.mdb
7(*b) 134459392 flash:/SYSTEM.bin
8(*b) 15006720 flash:/BOOT.bin
9(*) 3882 flash:/labtop-13.cfg
10 169208 flash:/test.mdb
11 5097 flash:/test.cfg
12 1 flash:/.moduleimagemain.data
13 169208 flash:/startup.mdb
14 5098 flash:/startup.cfg
15 536 flash:/versionInfo/version0.dat
16 8 flash:/versionInfo/versionCtl.dat
17 1056 flash:/versionInfo/version1.dat
18 591 flash:/serverkey
19 553723 flash:/logfile/logfile.log
20 735 flash:/hostkey
Free space: 842231808 bytes
The current image is BOOT.bin
(*)-with main attribute
(b)-with backup attribute
(*b)-with both main and backup attribute
Please input the file number to change: 1
The file you selected is diag_20110101-084757.tar.gz,Delete it? (Y/N):Y
Deleting.....Done.
Restoring the factory-default configuration
|
|
CAUTION: Performing this task can cause all next-startup configuration files in the current storage medium to be permanently deleted. |
To restore the factory-default configuration from the EXTENDED BOOT menu, make sure password recovery capability is disabled. If the capability is enabled, you cannot perform the task.
To enable the system to start up with the factory-default configuration instead of a next-startup configuration file:
1. Enter 5 in the EXTENDED BOOT menu.
EXTENDED BOOT MENU
1. Download image to flash
2. Select image to boot
3. Display all files in flash
4. Delete file from flash
5. Restore to factory default configuration
6. Enter BootRom upgrade menu
7. Skip current system configuration
8. Set switch startup mode
9. Set default boot storage medium
0. Reboot
Ctrl+Z: Access EXTENDED ASSISTANT MENU
Ctrl+F: Format file system
Ctrl+P: Change authentication for console login
Ctrl+R: Download image to SDRAM and run
Enter your choice(0-9):
2. Follow the system instruction to complete the task.
¡ If password recovery capability is enabled, first disable the capability from the CLI, and then reboot the device to access the EXTENDED BOOT menu.
Password recovery capability is enabled. To perform this operation, first
disable the password recovery capability using the undo password-recovery
enable command in CLI.
¡ If password recovery capability is disabled, enter Y at the prompt to complete the task.
Because the password recovery capability is disabled, this operation can
cause the configuration files to be deleted, and the system will start up
with factory defaults. Are you sure to continue?[Y/N]Y
Setting...Done.
Accessing the BootWare upgrade menu
To access the BootWare upgrade menu, enter 6 in the EXTENDED BOOT menu.
Enter your choice(0-9): 6
1. Update full BootRom
2. Update extended BootRom
3. Update basic BootRom
0. Return to boot menu
For information about this menu, see Table 2.
Skipping the configuration file at the next startup
To skip the configuration file at the next startup, enter 7 in the EXTENDED BOOT menu.
Enter your choice(0-9): 7
The current setting will run with current configuration file when reboot.
Are you sure you want to skip current configuration file when reboot? Yes or No
(Y/N):Y
Setting...Done.
This setting takes effect only at the next startup. It does not take effect for subsequent reboots.
Setting the switch startup mode
The switch supports the following switch startup modes: full startup mode and fast startup mode.
To set the switch startup mode, enter 8 in the EXTENDED BOOT menu.
Enter your choice(0-9): 8
The current mode is full startup mode!
Are you sure you want to change it to fast startup mode? Yes or No (Y/N):Y
Setting...Done.
Setting the default storage medium
At startup, the switch searches the default storage medium for the startup images.
To set the default storage medium, enter 9 in the EXTENDED BOOT menu.
Enter your choice(0-9): 9
Please set the default storage medium:
Note:the default storage medium is flash
NO. Medium Name File System Total Size Available Space
1 flash YAFFS2 1048576KB 822630KB
0 Exit
Enter your choice(0-1): 1
Set the default storage medium successfully!
Using the EXTENDED ASSISTANT menu
1. In the EXTENDED BOOT menu, press Ctrl+Z to enter the EXTENDED ASSISTANT menu.
EXTENDED ASSISTANT MENU
1. Display memory
2. Search memory
0. Return to boot menu
Enter your choice(0-2):
2. To view memory information, enter 1, and then provide the memory address and length.
Enter your choice(0-2): 1
Info: Press Ctrl+C to abort or return to EXTENDED ASSISTANT MENU.
Info: Enter the address and length in hexadecimal notation.
Info: Only 4 bytes mode supported.
Enter memory address:40
Enter memory length:4
00000040: 55555555 55555555 55555555 55555555 UUUUUUUUUUUUUUUU
3. To search memory for certain data, enter 2, and then provide the start and end addresses and the value of interest.
Enter your choice(0-2): 2
Info: Press Ctrl+C to abort or return to EXTENDED ASSISTANT MENU.
Info: Enter the address and value in hexadecimal notation.
Info: Only 4 bytes mode supported.
Enter start address:80
Enter end address:90
Enter the value to search for:0000
00000080: 3c1b8f10 277b0a24 03600008 00000000 <...'{.$.`......
|
|
NOTE: The device displays and searches for memory information in 4-byte mode. If the memory address you enter is not a multiple of 4 bytes, the device automatically adjusts it. |
Table 5 describes the error messages that might appear when you use the EXTENDED ASSISTANT menu.
|
Error message |
Description |
|
Invalid address. |
The start or end address is beyond the memory space or the end address is lower than the start address. |
|
Invalid length |
The entered memory length is so great that the calculated end address is beyond the memory space. |
|
Invalid value. |
No value is provided at the prompt Enter the value to search for: before Enter is pressed. |
|
The value not fount. |
The specified value is not found in the specified memory space, or the length of the specified value is not valid because it is not a multiple of 4 bytes. |
BootWare shortcut keys
BootWare provides the shortcut keys in Table 6.
Table 6 BootWare shortcut keys
|
Shortcut keys |
Prompt message |
Function |
|
Ctrl+B |
Press Ctrl+B to access EXTENDED BOOT MENU… |
Accesses the EXTENDED BOOT menu while the device is starting up. |
|
Ctrl+C |
Please Start To Transfer File, Press <Ctrl+C> To Exit. |
Stops the ongoing file transfer and exits the current operation interface. |
|
Info: Press Ctrl+C to abort or return to EXTENDED ASSISTANT MENU. |
Returns to the EXTENDED ASSISTANT menu. If the system is outputting the result of an operation, this shortcut key combination aborts the display first. |
|
|
Ctrl+D |
Press Ctrl+D to access BASIC-BOOTROM MENU… |
Accesses the BASIC BOOT menu. |
|
Ctrl+D = Quit |
Exits the parameter settings menu. |
|
|
Ctrl+F |
Ctrl+F: Format file system |
Formats the storage medium. |
|
Ctrl+P |
Ctrl+P: Change authentication for console login |
Skips console login authentication at the next startup. The skip is a one-time operation. It takes effect only for the first system boot or reboot after you choose this option. This function is available only when password recovery capability is enabled. |
|
Ctrl+R |
Ctrl+R: Download image to SDRAM and run |
Downloads Comware software images to the SDRAM and runs the images to start up the device. |
|
Ctrl+T |
Press Ctrl+T to start heavy memory test |
Starts a RAM test.
This RAM test is intended for memory troubleshooting. As a best practice, do not perform this test. |
|
Ctrl+U |
Ctrl+U: Access BASIC ASSISTANT MENU |
Accesses the BASIC ASSISTANT MENU from the BASIC BOOT menu. |
|
Ctrl+Z |
Ctrl+Z: Access EXTENDED ASSISTANT MENU |
Accesses the EXTENDED ASSISTANT menu from the EXTENDED BOOT menu. From the EXTENDED ASSISTANT menu, you can display memory information. |
Disabling password recovery capability
Password recovery capability controls console user access to the device configuration and SDRAM from BootWare menus. This feature also decides the method for handling console login password loss (see Figure 1).
If password recovery capability is enabled, a console user can access the device configuration without authentication to configure new passwords.
If password recovery capability is disabled, console users must restore the factory-default configuration before they can configure new passwords. Restoring the factory-default configuration deletes the next-startup configuration files.
To enhance system security, disable password recovery capability.
Figure 1 Handling console login password loss
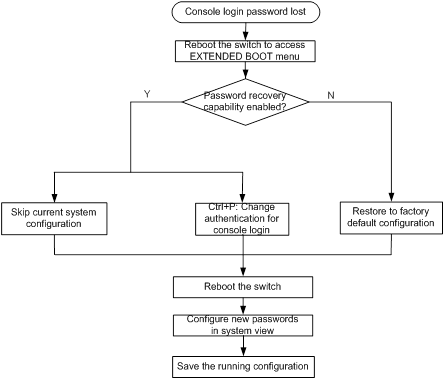
Table 7 summarizes options whose availability depends on the password recovery capability setting.
Table 7 BootWare options and password recovery capability compatibility matrix
|
BootWare menu option |
Password recovery enabled |
Password recovery disabled |
Tasks that can be performed |
|
Ctrl+R: Download image to SDRAM and run |
Yes |
No |
Load and run Comware software images in SDRAM. |
|
Set configuration file |
Yes |
No |
Specify the main and backup configuration files for the next startup. |
|
Ctrl+P: Change authentication for console login |
Yes |
No |
Skip console login authentication at the next startup. The skip is a one-time operation. It takes effect only for the first system boot or reboot after you choose this option. |
|
Skip current system configuration |
Yes |
No |
Skip the configuration file at the next startup. The skip is a one-time operation. It takes effective only for the first system boot or reboot after you choose this option. This option does not delete the configuration file. |
|
Restore to factory default configuration |
No |
Yes |
Delete the next-startup configuration file and load the factory-default configuration. |
To disable password recovery capability:
|
Step |
Command |
Remarks |
|
1. Enter system view. |
system-view |
N/A |
|
2. Disable password recovery capability. |
undo password-recovery enable |
By default, password recovery capability is enabled. |
When password recovery capability is disabled, you cannot downgrade the software configuration of the device to a version that does not support the capability through the BootWare menus. You can do so at the CLI, but the configured BootWare menu password becomes effective again.
Comware software upgrade examples
Using XMODEM to upgrade software through the console port
1. In the EXTENDED BOOT menu, enter 1.
The protocol submenu appears.
Enter your choice(0-9):1
1. Set TFTP protocol parameters
2. Set FTP protocol parameters
3. Set XMODEM protocol parameters
0. Return to boot menu
Enter your choice(0-3):
2. In the protocol submenu, enter 3.
The baud rate submenu appears.
Enter your choice(0-3):3
Please select your download baudrate:
1.* 9600
2. 19200
3. 38400
4. 57600
5. 115200
0. Return to boot menu
Enter your choice(0-5):5
3. Select the correct download baud rate.
In this example, enter 5 to select 115200 bps.
Download baudrate is 115200 bps
Please change the terminal's baudrate to 115200 bps and select XMODEM protocol
4. Change the baud rate of your console terminal to match the setting on the baud rate submenu. Then, close your connection to the device and reestablish the connection to make the terminal's baud rate change take effect. Finally, press Enter.
The download confirmation message appears.
Are you sure to download file to flash? Yes or No (Y/N):Y
5. Enter Y to continue.
Now please start transfer file with XMODEM protocol
If you want to exit, Press <Ctrl+X>
Loading ...CCCCCCCCCCCCCCCCCCCCCCCCC
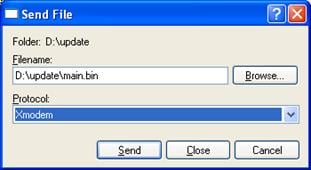
6. Select Transfer > Send File in the HyperTerminal window. In the dialog box that appears, click Browse to select the source file, and select Xmodem from the Protocol list. In this example, the file D:\update\main.bin is selected.
Figure 2 File transmission dialog box
7. Click Send.
The following dialog box appears:
Figure 3 File transfer progress
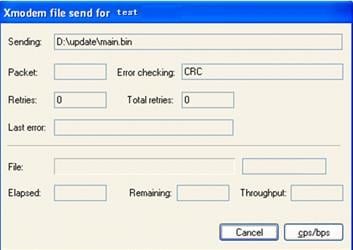
After the file transfer is complete, the system displays the file attribute setting prompt.
8. Enter M to set the file as the main startup image file.
Please input the file attribute (Main/Backup/None) main
The boot.bin image is self-decompressing...
Load File name : default_file boot-update.bin //Specify the downloaded boot image.
Free space: 470519808 bytes
Writing flash...................................................................
.............
Done.
The system-update.bin image is self-decompressing...
Load File name : default_file system-update.bin //Specify the downloaded system image.
Free space: 461522944 bytes
Writing flash...................................................................
.............
Done.
Your baudrate should be set to 9600 bps again!
Press enter key when ready
Using TFTP to upgrade Comware software through the management Ethernet port
In this example, the device acts as the TFTP client.
To upgrade Comware software through the management Ethernet port:
1. Connect the device to the intended TFTP server through the device's management Ethernet port and obtain the IP address of the intended TFTP server. Connect your terminal to the device's console port.
You can use the same PC for the two purposes.
2. On the intended TFTP server, run TFTP server and specify the working path for software upgrade.
3. Run the terminal emulation program on the terminal, reboot the device, and enter the EXTENDED BOOT menu.
4. In the EXTENDED BOOT menu, enter 1.
The protocol submenu appears.
Enter your choice(0-9): 1
1. Set TFTP protocol parameters
2. Set FTP protocol parameters
3. Set XMODEM protocol parameters
0. Return to boot menu
5. In the protocol submenu, enter 1, set the relevant parameters, and press Enter.
Set the required fields and leave the others to use the default settings. If the device and the TFTP server reside on different subnets, you must specify the gateway IP address. If the device and the TFTP server reside on the same subnet, you can specify any unused IP address as the local IP address.
Enter your choice(0-3):1
Load File Name : S7500EXS.ipe
:
Server IP Address :192.168.0.30
Local IP Address :192.168.0.20
Subnet Mask :0.0.0.0
Gateway IP Address :0.0.0.0
Loading... Done
6. When the following message appears, enter Y.
Are you sure to download file to flash? Yes or No (Y/N):Y
Loading.........................................................................
................................................................................
................................................................................
................................................................Done.
After the file transfer is complete, the system displays the file attribute setting prompt.
7. Enter M to configure the file as the main startup image file.
Please input the file attribute (Main/Backup/None) M
Image file boot.bin is self-decompressing...
Free space: 534980608 bytes
Writing flash...................................................................
................................................................................
...................................................................Done.
Image file system.bin is self-decompressing...
Free space: 525981696 bytes
Writing flash...................................................................
................................................................................
................................................................................
................................................................................
................................................................................
................................................................................
.......................................................................Done.
EXTENDED BOOT MENU
1. Download image to flash
2. Select image to boot
3. Display all files in flash
4. Delete file from flash
5. Restore to factory default configuration
6. Enter BootRom upgrade menu
7. Skip current system configuration
8. Set switch startup mode
9. Set default boot storage medium
0. Reboot
Ctrl+Z: Access EXTENDED ASSISTANT MENU
Ctrl+F: Format file system
Ctrl+P: Change authentication for console login
Ctrl+R: Download image to SDRAM and run
Enter your choice(0-9): 0
If another image file has the main attribute, this operation removes the main attribute from the file.
8. After the EXTENDED BOOT menu appears again, enter 0 to reboot the device.
After the device restarts up, the new software takes effect.
Using FTP to upgrade Comware software through the management Ethernet port
In this example, the device acts as the FTP client.
To upgrade Comware software through the management Ethernet port:
1. Connect the device to the intended FTP server through the device's management Ethernet port and obtain the IP address of the intended TFTP server. Connect your terminal to the device's console port.
You can use the same PC for the two purposes.
2. On the intended FTP server, run FTP server, specify the working path for software upgrade, and configure an FTP user account.
3. Run the terminal emulation program on the terminal, reboot the device, and enter the EXTENDED BOOT menu.
4. Use the relevant steps described in "Using TFTP to upgrade Comware software through the management Ethernet port" to complete the upgrade.