- Table of Contents
- Related Documents
-
| Title | Size | Download |
|---|---|---|
| 03-H3C_S7500E-XS_Software_Upgrade_Configuration_Examples | 188.41 KB |
H3C S7500E-XS Software Upgrade Configuration Examples
|
Copyright © 2016 Hangzhou H3C Technologies Co., Ltd. All rights reserved. No part of this manual may be reproduced or transmitted in any form or by any means without prior written consent of Hangzhou H3C Technologies Co., Ltd. The information in this document is subject to change without notice. |
|
Contents
Software upgrade configuration examples
Upgrading software from the CLI
Example: Upgrading software by using a file on a TFTP server
Example: Upgrading software by using a file on an FTP server
Example: Upgrading software by using a file on an FTP server
Upgrading software from the BootWare menu
Example: Upgrading software by using a file on a TFTP server
Software upgrade configuration examples
This document provides software upgrade examples. In this document, examples of upgrading software from the CLI use the non-ISSU method.
Upgrading software from the CLI
Example: Upgrading software by using a file on a TFTP server
Network requirements
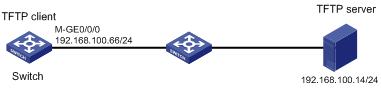
As shown in Figure 1, the switch is connected to a host (TFTP server) through another switch. The software upgrade file is stored on the host.
Download the software upgrade file to the switch and upgrade the switch.
Software version used
This configuration example was created and verified on S7500EXS-CMW710-R7178.
Configuration restrictions and guidelines
When you upgrade software, follow these restrictions and guidelines:
· Make sure the switch has sufficient storage space for the upgrade file. If the switch does not have sufficient storage space, delete unused files by using the delete /unreserved file-url command.
· Save the running configuration before the upgrade for the configuration to survive a reboot.
Configuration procedures
1. Configure the TFTP server:
# Assign IP address 192.168.100.14/24 to the TFTP server. (Details not shown.)
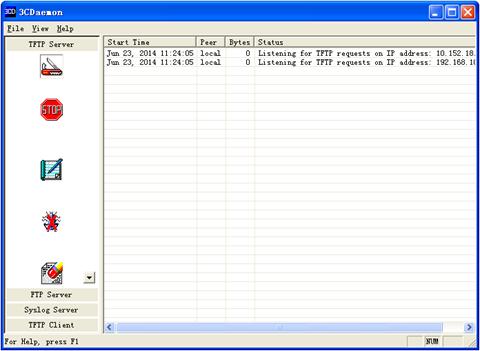
# Start the TFTP server and specify a working directory. This example uses the 3CDaemon TFTP server. (Details not shown.)
Figure 2 Configuring the TFTP server
2. Upgrade the switch:
# Assign an IP address to M-GigabitEthernet 0/0/0. Make sure the switch can reach the TFTP server.
<Switch> system-view
[Switch] interface M-GigabitEthernet0/0/0
[Switch-M-GigabitEthernet0/0/0] ip address 192.168.100.66 255.255.255.0
[Switch-M-GigabitEthernet0/0/0] quit
[Switch] quit
# Verify that the switch can ping the TFTP server.
<Switch> ping 192.168.100.14
PING 192.168.100.14: 56 data bytes, press CTRL_C to break
Reply from 192.168.100.14: bytes=56 Sequence=0 ttl=128 time=2 ms
Reply from 192.168.100.14: bytes=56 Sequence=1 ttl=128 time=1 ms
Reply from 192.168.100.14: bytes=56 Sequence=2 ttl=128 time=1 ms
Reply from 192.168.100.14: bytes=56 Sequence=3 ttl=128 time=1 ms
Reply from 192.168.100.14: bytes=56 Sequence=4 ttl=128 time=1 ms
--- 192.168.100.14 ping statistics ---
5 packet(s) transmitted
5 packet(s) received
0.00% packet loss
round-trip min/avg/max = 1/1/2 ms
# Save running the configuration.
<Switch> save
The current configuration will be written to the device. Are you sure? [Y/N]:y
Please input the file name(*.cfg)[flash:/startup.cfg]
(To leave the existing filename unchanged, press the enter key):
flash:/startup.cfg exists, overwrite? [Y/N]:y
Validating file. Please wait...
Saved the current configuration to mainboard device successfully.
# Display device information.
<Switch> display device
Slot Type State Subslot Soft Ver Patch Ver
2 S7502E-XS Master 1 S7500EXS-r7178 None
The output shows that the switch is the master in the IRF fabric.
# Download the upgrade file from the TFTP server to the root directory of the storage medium on the switch.
<Switch> tftp 192.168.100.14 get s7500EXS.ipe
% Total % Received % Xferd Average Speed Time Time Time Current
Dload Upload Total Spent Left Speed
100 70.7M 100 70.7M 0 0 1193k 0 0:00:50 0:00:50 --:--:-- 1127k
# Specify the upgrade file as the main startup image file for the switch.
<Switch> boot-loader file flash:/s7500EXS.ipe slot 2 main
Verifying the file flash:/s7500EXS.ipe on slot 2..............................
...............................Done.
H3C S7502E-XS images in IPE:
s7500EXS-CMW710-BOOT-test.bin
s7500EXS-CMW710-SYSTEM-test.bin
This command will set the main startup software images. Continue? [Y/N]:y
Add images to slot 2.
Decompressing file s7500EXS-CMW710-BOOT-test.bin to flash:/s7500EXS-CMW710-BOOT-test.bin........................................Done.
Decompressing file s7500EXS-CMW710-SYSTEM-test.bin to flash:/s7500EXS-CMW710-SYSTEM
-test.bin......................................................................
................................................................................
................................................................................
...................................................................Done.
Decompression completed.
You are recommended to delete the .ipe file after you set startup software image
s for all slots.
Do you want to delete flash:/s7500EXS.ipe now? [Y/N]:y
The images that have passed all examinations will be used as the main startup software images at the next reboot on slot 2.
# Specify the current startup image files as the backup startup image files. This step ensures that the switch can start up even if the upgrade file is corrupt or not correct.
<Switch> boot-loader file boot flash:/s7500EXS-CMW710-BOOT-old.bin system flash:/s7500EXS-CMW710-SYSTEM-old.bin slot 2 backup
This command will set the backup startup software images. Continue? [Y/N]:y
Verifying the file flash:/s7500EXS-cmw710-boot-test.bin on slot 2............Done.
Verifying the file flash:/s7500EXS-cmw710-system-test.bin on slot 2..............
.......................................................................Done.
The images that have passed all examinations will be used as the backup startup software images at the next reboot on slot 2.
# Reboot the switch.
<Switch> reboot
Verifying the configuration
# Verify that the software has been upgraded.
<Switch> display version
H3C Comware Software, Version 7.1.045, Release 7178
Copyright (c) 2004-2015 Hangzhou H3C Tech. Co., Ltd. All rights reserved.
H3C S7502E-XS uptime is 0 weeks, 0 days, 3 hours, 44 minutes
Last reboot reason : Cold reboot
Boot image: flash:/s7500EXS-CMW710-BOOT-test.bin
Boot image version: 7.1.045, Release 7178
Compiled Dec 20 2015 12:00:00
System image: flash:/s7500EXS-CMW710-SYSTEM-test.bin
System image version: 7.1.045, Release 7178
Compiled Dec 20 2015 12:00:00
---- More ----
# Display the current software images and startup software images.
<Switch> display boot-loader slot 2
Software images on slot 2:
Current software images:
flash:/s7500EXS-cmw710-boot-test.bin
flash:/s7500EXS-cmw710-system-test.bin
Main startup software images:
flash:/s7500EXS-cmw710-boot-test.bin
flash:/s7500EXS-cmw710-system-test.bin
Backup startup software images:
flash:/s7500EXS-cmw710-boot-old.bin
flash:/s7500EXS-cmw710-system-old.bin
Configuration files
#
interface M-GigabitEthernet0/0/0
port link-mode route
ip address 192.168.100.66 255.255.255.0
#
Example: Upgrading software by using a file on an FTP server
Network requirements
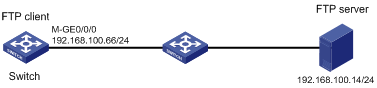
As shown in Figure 3, the switch is connected to a host (FTP server) through another switch. The software upgrade file is stored on the host.
Download the software upgrade file to the switch and upgrade the switch.
Software version used
This configuration example was created and verified on S7500EXS-CMW710-R7178.
Configuration restrictions and guidelines
When you upgrade software, follow these restrictions and guidelines:
· Make sure the switch has sufficient storage space for the upgrade file. If the switch does not have sufficient storage space, delete unused files by using the delete /unreserved file-url command.
· Save the running configuration before the upgrade for the configuration to survive a reboot.
Configuration procedures
1. Configure the FTP server:
# Assign the IP address 192.168.100.14/24 to the FTP server. (Details not shown.)
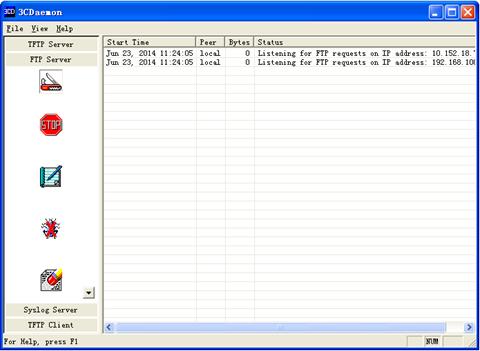
# Start the FTP server and specify a working directory. This example uses the 3CDaemon FTP server. (Details not shown.)
# Add a local user account. (Details not shown.)
# Set the username to 123456 and the password to 123456 for the user account.
Figure 4 Configuring the FTP server
2. Upgrade the switch:
# Assign an IP address to M-GigabitEthernet 0/0/0. Make sure the switch can reach the FTP server.
<Switch> system-view
[Switch] interface M-GigabitEthernet0/0/0
[Switch-M-GigabitEthernet0/0/0] ip address 192.168.100.66 255.255.255.0
[Switch-M-GigabitEthernet0/0/0] quit
[Switch] quit
# Verify that the switch can ping the FTP server.
<Switch> ping 192.168.100.14
PING 192.168.100.14: 56 data bytes, press CTRL_C to break
Reply from 192.168.100.14: bytes=56 Sequence=0 ttl=128 time=2 ms
Reply from 192.168.100.14: bytes=56 Sequence=1 ttl=128 time=1 ms
Reply from 192.168.100.14: bytes=56 Sequence=2 ttl=128 time=1 ms
Reply from 192.168.100.14: bytes=56 Sequence=3 ttl=128 time=1 ms
Reply from 192.168.100.14: bytes=56 Sequence=4 ttl=128 time=1 ms
--- 192.168.100.14 ping statistics ---
5 packet(s) transmitted
5 packet(s) received
0.00% packet loss
round-trip min/avg/max = 1/1/2 ms
# Save the running configuration.
<Switch> save
The current configuration will be written to the device. Are you sure? [Y/N]:y
Please input the file name(*.cfg)[flash:/startup.cfg]
(To leave the existing filename unchanged, press the enter key):
flash:/startup.cfg exists, overwrite? [Y/N]:y
Validating file. Please wait...
Saved the current configuration to mainboard device successfully.
# Display device information.
<Switch> display device
Slot Type State Subslot Soft Ver Patch Ver
2 S7502E-XS Master 1 S7500EXS-r7178 None
The output shows that the switch is the master in the IRF fabric.
# Use the username 123456 and the password 123456 to log in to the FTP server.
<Switch> ftp 192.168.100.14
Connected to 192.168.100.14 (192.168.100.14).
220 3Com 3CDaemon FTP Server Version 2.0
User (192.168.100.14:(none)): 123456
331 User name ok, need password
Password:
230 Logged in successfully
Remote system type is MSDOS.
# Set the file transfer mode to binary.
ftp> binary
200 Type is Image (Binary)
# Download the upgrade file from the FTP server to the root directory of the storage medium on the switch.
ftp> get s7500EXS.ipe
227 Entering passive mode (192,168,100,14,8,86)
125 Using existing data connection
226 Closing data connection; File transfer successful.
70445056 bytes received in 53.6 seconds (1.25 Mbyte/s)
ftp> quit
# Specify the upgrade file as the main startup image file for the switch.
<Switch> boot-loader file flash:/s7500EXS.ipe slot 2 main
Verifying the file flash:/s7500EXS.ipe on slot 2..............................
...............................Done.
H3C S7502E-XS images in IPE:
s7500EXS-CMW710-BOOT-test.bin
s7500EXS-CMW710-SYSTEM-test.bin
This command will set the main startup software images. Continue? [Y/N]:y
Add images to slot 2.
Decompressing file s7500EXS-CMW710-BOOT-test.bin to flash:/s7500EXS-CMW710-BOOT-test.bin........................................Done.
Decompressing file s7500EXS-CMW710-SYSTEM-test.bin to flash:/s7500EXS-CMW710-SYSTEM-test.bin......................................................................
................................................................................
................................................................................
...................................................................Done.
Decompression completed.
You are recommended to delete the .ipe file after you set startup software images for all slots.
Do you want to delete flash:/s7500EXS.ipe now? [Y/N]:y
The images that have passed all examinations will be used as the main startup software images at the next reboot on slot 2.
# Specify the current startup image files as the backup startup image files for the switch. This step ensures that the switch can start up even if the upgrade file is corrupt or not correct.
<Switch> boot-loader file boot flash:/s7500EXS-CMW710-BOOT-old.bin system flash:/s7500EXS-CMW710-SYSTEM-old.bin slot 2 backup
This command will set the backup startup software images. Continue? [Y/N]:y
Verifying the file flash:/s7500EXS-cmw710-boot-old.bin on slot 2............Done
.
Verifying the file flash:/s7500EXS-cmw710-system-old.bin on slot 2..............
.......................................................................Done.
The images that have passed all examinations will be used as the backup startup so
ftware images at the next reboot on slot 2.
# Reboot the switch.
<Switch> reboot
Verifying the configuration
# Verify that the software has been upgraded.
<Switch> display version
H3C Comware Software, Version 7.1.045, Release 7178
Copyright (c) 2004-2015 Hangzhou H3C Tech. Co., Ltd. All rights reserved.
H3C S7502E-XS uptime is 0 weeks, 0 days, 5 hours, 45 minutes
Last reboot reason : Cold reboot
Boot image: flash:/s7500EXS-CMW710-BOOT-test.bin
Boot image version: 7.1.045, Release 7178
Compiled Dec 20 2015 12:00:00
System image: flash:/s7500EXS-CMW710-SYSTEM-test.bin
System image version: 7.1.045, Release 7178
Compiled Dec 20 2015 12:00:00
---- More ----
# Display the current software images and startup software images.
<Switch> display boot-loader slot 2
Software images on slot 2:
Current software images:
flash:/s7500EXS-cmw710-boot-test.bin
flash:/s7500EXS-cmw710-system-test.bin
Main startup software images:
flash:/s7500EXS-cmw710-boot-test.bin
flash:/s7500EXS-cmw710-system-test.bin
Backup startup software images:
flash:/s7500EXS-cmw710-boot-old.bin
flash:/s7500EXS-cmw710-system-old.bin
Configuration files
#
interface M-GigabitEthernet0/0/0
port link-mode route
ip address 192.168.100.66 255.255.255.0
#
Example: Upgrading software by using a file on an FTP server
Network requirements
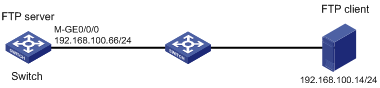
As shown in Figure 5, the switch is connected to a host (FTP client) through another switch. The software upgrade file is stored on the host.
Configure the switch as an FTP server. Upload the upgrade file from the FTP client and upgrade the switch.
Software version used
This configuration example was created and verified on S7500EXS-CMW710-R7178.
Requirements analysis
To use the switch as an FTP server, you must enable FTP service and create a local user account on the switch.
Configuration restrictions and guidelines
When you upgrade software, follow these restrictions and guidelines:
· Make sure the switch has sufficient storage space for the upgrade file. If the switch does not have sufficient storage space, delete unused files by using the delete /unreserved file-url command.
· Save the running configuration before the upgrade for the configuration to survive a reboot.
· You must set the file transfer mode to binary.
Configuration procedures
1. Configure the FTP server:
# Assign an IP address to M-GigabitEthernet 0/0/0.
<Switch> system-view
[Switch] interface M-GigabitEthernet0/0/0
[Switch-M-GigabitEthernet0/0/0] ip address 192.168.100.66 255.255.255.0
[Switch-M-GigabitEthernet0/0/0] quit
# Add a local user account. Set the username to abc and the password to 123456.
[Switch] local-user abc
[Switch-luser-abc] password simple 123456
# Assign the network-admin user role to the user account.
[Switch-luser-abc] authorization-attribute user-role network-admin
# Remove the default network-operator user role.
[Switch-luser-abc] undo authorization-attribute user-role network-operator
# Assign FTP service to the user account.
[Switch-luser-abc] service-type ftp
[Switch-luser-abc] quit
# Enable the FTP server.
[Switch] ftp server enable
[Switch] quit
# Save the running configuration.
<Switch> save
The current configuration will be written to the device. Are you sure? [Y/N]:y
Please input the file name(*.cfg)[flash:/startup.cfg]
(To leave the existing filename unchanged, press the enter key):
flash:/startup.cfg exists, overwrite? [Y/N]:y
Validating file. Please wait...
Saved the current configuration to mainboard device successfully.
2. Configure the FTP client:
# Assign IP address 192.168.100.14/24 to the FTP client. Make sure the FTP client can reach the switch. (Details not shown.)
# Use username abc and password 123456 to log in to the FTP server.
C:\Documents and Settings\Administrator> ftp 192.168.100.66
Connected to 192.168.100.66.
220 FTP service ready.
User (192.168.100.66:(none)): abc
331 Password required for abc.
Password:
230 User logged in.
# Access the directory that contains the upgrade file.
ftp> lcd E:\
Local directory now E:\
# Set the file transfer mode to binary.
ftp> binary
200 TYPE is now 8-bit binary
# Transfer the upgrade file to the root directory of the storage medium on the FTP server.
ftp> put s7500EXS.ipe
200 PORT command successful
150 Connecting to port 2903
226 File successfully transferred
ftp: 70445056 bytes sent in 1.05 seconds 67282.77Kbytes/sec.
# Verify that the image file is saved on the FTP server.
ftp> ls s7500EXS.ipe
200 PORT command successful
150 Connecting to port 3391
s7500EXS.ipe
226 1 matches total
ftp: 24 bytes received in 0.00 seconds 24000.00Kbytes/sec.
# Close the FTP connection.
ftp> bye
3. Upgrade the switch:
# Display device information.
<Switch> display device
Slot Type State Subslot Soft Ver Patch Ver
2 S7502E-XS Master 1 S7500EXS-r7178 None
The output shows that the switch is the master in the IRF fabric.
# Specify the upgrade file as the main startup image file for the switch.
<Switch> boot-loader file flash:/s7500EXS.ipe slot 2 main
Verifying the file flash:/s7500EXS.ipe on slot 2..............................
...............................Done.
H3C S7502E-XS images in IPE:
s7500EXS-CMW710-BOOT-test.bin
s7500EXS-CMW710-SYSTEM-test.bin
This command will set the main startup software images. Continue? [Y/N]:y
Add images to slot 2.
Decompressing file s7500EXS-CMW710-BOOT-test.bin to flash:/s7500EXS-CMW710-BOOT-test.bin..........................................Done.
Decompressing file s7500EXS-CMW710-SYSTEM-test.bin to flash:/s7500EXS-CMW710-SYSTEM
-test.bin......................................................................
................................................................................
................................................................................
...................................................................Done.
Decompression completed.
You are recommended to delete the .ipe file after you set startup software image
s for all slots.
Do you want to delete flash:/s7500EXS.ipe now? [Y/N]:y
The images that have passed all examinations will be used as the main startup so
ftware images at the next reboot on slot 2.
# Specify the current startup image files as the backup startup image files for the switch. This step ensures that the switch can start up even if the upgrade file is corrupt or not correct.
<Switch> boot-loader file boot flash:/s7500EXS-CMW710-BOOT-old.bin system flash:/s7500E-XS-CMW710-SYSTEM-old.bin slot 2 backup
This command will set the backup startup software images. Continue? [Y/N]:y
Verifying the file flash:/s7500EXS-cmw710-boot-old.bin on slot 2............Done
.
Verifying the file flash:/s7500EXS-cmw710-system-old.bin on slot 2..............
.......................................................................Done.
The images that have passed all examinations will be used as the backup startup so
ftware images at the next reboot on slot 2.
# Reboot the switch.
<Switch> reboot
Verifying the configuration
# Verify that the software has been upgraded.
<Switch> display version
H3C Comware Software, Version 7.1.045, Release 7178
Copyright (c) 2004-2015 Hangzhou H3C Tech. Co., Ltd. All rights reserved.
H3C S7502E-XS uptime is 0 weeks, 0 days, 5 hours, 45 minutes
Last reboot reason : Cold reboot
Boot image: flash:/s7500EXS-CMW710-BOOT-test.bin
Boot image version: 7.1.045, Release 7178
Compiled Dec 20 2015 12:00:00
System image: flash:/s7500EXS-CMW710-SYSTEM-test.bin
System image version: 7.1.045, Release 7178
Compiled Dec 20 2015 12:00:00
---- More ----
# Display the current software images and startup software images.
<Switch> display boot-loader slot 2
Software images on slot 2:
Current software images:
flash:/s7500EXS-cmw710-boot-test.bin
flash: s7500EXS-cmw710-system-test.bin
Main startup software images:
flash:/s7500EXS-cmw710-boot-test.bin
flash: s7500EXS-cmw710-system-test.bin
Backup startup software images:
flash:/s7500EXS-cmw710-boot-old.bin
flash: s7500EXS-cmw710-system-old.bin
Configuration files
#
interface M-GigabitEthernet0/0/0
port link-mode bridge
ip address 192.168.100.66 255.255.255.0
#
local-user abc class manage
password hash $h$6$YMVbbwFL/vviWcQu$+CuTbYCehNZtZo5RCXiadpYbXYWa2omt5TUtEh3UPCg3fZjxYCp5WzbuE2GoowVi2YA/BK+mnSZJZqi5jRDuCg==
service-type ftp
authorization-attribute user-role network-admin
#
ftp server enable
#
Upgrading software from the BootWare menu
Example: Upgrading software by using a file on a TFTP server
Network requirements
As shown in Figure 6, the switch cannot start up. The software upgrade file is stored on the file server (TFTP server).
Upgrade the switch software from the BootWare menu.

Software version used
This configuration example was created and verified on S7500EXS-CMW710-R7178.
Configuration restrictions and guidelines
Make sure the switch has sufficient storage space for the upgrade file. If the switch does not have sufficient storage space, delete unused files by using the delete /unreserved file-url command.
Configuration procedures
1. Configure the host:
# Use a serial cable to connect a host to the console port of the switch.
# To access the switch through the console port, run a terminal emulator program (for example, HyperTerminal or PuTTY) on the host. For information about using a terminal emulator program, see the program's user guide.
The following are the required terminal settings:
¡ Baud rate—9600.
¡ Data bits—8.
¡ Stop bits—1.
¡ Parity—none.
¡ Flow control—none.
2. Configure the file server:
# Assign IP address 192.168.100.14/24 to the TFTP server. (Details not shown.)
# Enable the TFTP server and specify the directory where the software upgrade file resides as the working directory. This example uses the 3CDaemon TFTP server. (Details not shown.)
Figure 7 Configuring the TFTP server

3. Upgrade the switch:
# Use a straight-through cable to connect the TFTP server to M-GigabitEthernet 0/0/0 of the switch.
# Save the running configuration on the switch.
[Switch] system-view
[Switch] save
The current configuration will be written to the device. Are you sure? [Y/N]:y
Please input the file name(*.cfg)[flash:/startup.cfg]
(To leave the existing filename unchanged, press the enter key):
flash:/startup.cfg exists, overwrite? [Y/N]:y
Validating file. Please wait...
Saved the current configuration to mainboard device successfully.
[Switch] quit
# Reboot the switch.
<Switch> reboot
During startup, the following information appears:
Starting......
Press Ctrl+D to access BASIC BOOT MENU...
Press Ctrl+T to start heavy memory test
Booting extended BootRom
The extended BootRom is self-decompressing......Done.
*******************************************************************
* *
* H3C 7502E-XS BOOTROM, Version 214 *
* *
*******************************************************************
Copyright (c) 2004-2014 Hangzhou H3C Technologies Co., Ltd.
Creation Date : Nov 19 2014,11:25:44
CPU Clock Speed : 1000MHz
Memory Size : 4096MB
Flash Size : 1024MB
CPLD Version : 003/001
PCB Version : Ver.A
Mac Address : 741F4A9B818E
Press Ctrl+B to access EXTENDED BOOT MENU...0
# Press Ctrl + B at the prompt. The extended BootWare menu appears.
Password recovery capability is enabled.
EXTENDED BOOT MENU
1. Download image to flash
2. Select image to boot
3. Display all files in flash
4. Delete file from flash
5. Restore to factory default configuration
6. Enter BootRom upgrade menu
7. Skip current system configuration
8. Set switch startup mode
9. Set default boot storage medium
0. Reboot
Ctrl+Z: Access EXTENDED ASSISTANT MENU
Ctrl+F: Format file system
Ctrl+P: Change authentication for console login
Ctrl+R: Download image to SDRAM and run
Enter your choice(0-9):
# Enter 1. The file transfer protocol selection menu appears.
1. Set TFTP protocol parameters
2. Set FTP protocol parameters
3. Set XMODEM protocol parameters
0. Return to boot menu
Enter your choice(0-3):
# Enter 1 to set TFTP parameters as shown in Table 1.
Load File Name : S7500EXS.ipe
:
Server IP Address :192.168.0.30
Local IP Address :192.168.0.20
Subnet Mask :0.0.0.0
Gateway IP Address :0.0.0.0
Loading... Done.
|
Parameter |
Description |
|
Load File Name |
Specify the name of the file to be downloaded. |
|
Server IP Address |
Specify the IP address of the TFTP server. |
|
Local IP Address |
Specify the IP address of the switch. |
|
Subnet Mask |
Specify the subnet mask. |
|
Gateway IP Address |
Specify the gateway IP address. If the TFTP server and the switch are not on the same network segment, you must set this parameter. |
# Press Enter. The following message appears:
Are you sure to download file to flash? Yes or No (Y/N):Y
# Enter Y to download the file. If you enter N, the system returns to the extended BootWare menu.
Loading.........................................................................
................................................................................
................................................................................
................................................................Done.
After the file is downloaded, the following message appears:
Please input the file attribute (Main/Backup/None)
# Enter M to save the file to the flash memory and specify the file as the main startup file.
Image file boot.bin is self-decompressing...
Free space: 534980608 bytes
Writing flash...................................................................
................................................................................
...................................................................Done.
Image file system.bin is self-decompressing...
Free space: 525981696 bytes
Writing flash...................................................................
................................................................................
................................................................................
................................................................................
................................................................................
................................................................................
.......................................................................Done.
EXTENDED BOOT MENU
1. Download image to flash
2. Select image to boot
3. Display all files in flash
4. Delete file from flash
5. Restore to factory default configuration
6. Enter BootRom upgrade menu
7. Skip current system configuration
8. Set switch startup mode
9. Set default boot storage medium
0. Reboot
Ctrl+Z: Access EXTENDED ASSISTANT MENU
Ctrl+F: Format file system
Ctrl+P: Change authentication for console login
Ctrl+R: Download image to SDRAM and run
Enter your choice(0-9):
# Enter 0 to reboot the switch.
Loading the main image files...
Loading file flash:/s7500EXS-cmw710-system-test.bin........................
............................................................................
............................................................................
.........................Done.
Loading file flash:/s7500EXS-cmw710-boot-test.bin..........................
....Done.
Image file flash:/s7500EXS-cmw710-boot-test.bin is self-decompressing......
....................................................Done.
System image is starting...
Line aux1 is available.
Press ENTER to get started.
Verifying the configuration
# Verify that the software has been upgraded.
<Switch> display version
H3C Comware Software, Version 7.1.045, Release 7178
Copyright (c) 2004-2015 Hangzhou H3C Tech. Co., Ltd. All rights reserved.
H3C S7502E-XS uptime is 0 weeks, 0 days, 5 hours, 45 minutes
Last reboot reason : Cold reboot
Boot image: flash:/s7500EXS-cmw710-boot-test.bin
Boot image version: 7.1.045, Release 7178
Compiled Dec 20 2015 12:00:00
System image: flash:/s7500EXS-cmw710-system-test.bin
System image version: 7.1.045, Release 7178
Compiled Dec 20 2015 12:00:00
---- More ----
# Display the current software images and startup software images.
<Switch> display boot-loader slot 2
Software images on slot 2:
Current software images:
flash:/s7500EXS-cmw710-boot-test.bin
flash:/s7500EXS-cmw710-system-test.bin
Main startup software images:
flash:/s7500EXS-cmw710-boot-test.bin
flash:/s7500EXS-cmw710-system-test.bin
Backup startup software images:
flash:/s7500EXS -cmw710-boot-old.bin
flash:/s7500EXS-cmw710-system- old.bin
Configuration files
None.
Related documentation
· H3C S7500E-XS Switch Series Fundamentals Configuration Guide-Release 7178
· H3C S7500E-XS Switch Series Fundamentals Command Reference-Release 7178