| Title | Size | Downloads |
|---|---|---|
| H3C S3600 Series Ethernet Switches Operation Manual-Release 1702(V1.01)-Web Authentication Operation.pdf | 102.09 KB |
- Table of Contents
- Related Documents
-
| Title | Size | Download |
|---|---|---|
| 20-Web Authentication Operation | 102.09 KB |
Table of Contents
1 Web Authentication Configuration
Introduction to Web Authentication
Web Authentication Configuration
Configuring Web Authentication
Configuring HTTPS Access for Web Authentication
Customizing Web Authentication Pages
Customizing Authentication Pages
Editing an Authentication Page File
Displaying and Maintaining Web Authentication
Web Authentication Configuration Example
![]()
l Support of setting the maximum online time for Web authentication users is added. See Configuring Web Authentication.
l Support of HTTPS access for Web Authentication is added. See Configuring HTTPS Access for Web Authentication.
l Support of customizing Web Authentication pages is added. See Customizing Web Authentication Pages.
When configuring Web authentication, go to these sections for information you are interested in:
l Introduction to Web Authentication
l Web Authentication Configuration
l Displaying and Maintaining Web Authentication
l Web Authentication Configuration Example
Introduction to Web Authentication
Web authentication is a port-based authentication method that is used to control the network access rights of users. With Web authentication, users are freed from installing any special authentication client software.
With Web authentication enabled, before a user passes the Web authentication, it cannot access any network, except that it can access the authentication page or some free IP addresses. After the user passes the Web authentication, it can access any reachable networks.
Web Authentication Configuration
Configuration Prerequisites
Configure an ISP domain and an AAA RADIUS scheme for the domain before performing the following configurations.
![]()
l Web authentication can use only a RADIUS authentication scheme; it does not support local authentication.
l The user number limit configured under an AAA scheme does not take effect for Web authentication. Web authentication does not support accounting. Configure accounting for the AAA scheme as optional.
Configuring Web Authentication
Follow these steps to configure Web authentication:
|
To do… |
Use the command… |
Remarks |
|
Enter system view |
system-view |
— |
|
Set the IP address and port number of the Web authentication server |
web-authentication web-server ip ip-address [ port port-number ] |
Required If no port number is specified, port 80 will be used. No Web authentication server is set by default. |
|
Enable Web authentication globally |
web-authentication enable |
Required Disabled globally by default |
|
Enable Web authentication on a port |
interface interface-type interface-number |
Required Disabled on port by default |
|
web-authentication select method { shared | designated } |
||
|
quit |
||
|
Set a free IP address range that can be accessed by users before Web authentication |
web-authentication free-ip ip-address { mask-length | mask } |
Optional No such address range by default |
|
Set an authentication-free user |
web-authentication free-user ip ip-address mac mac-address |
Optional No such user by default |
|
Forcibly log out the specified or all users. |
web-authentication cut connection { all | mac mac-address | user-name user-name | interface interface-type interface-number } |
Optional |
|
Set the idle user checking interval for Web authentication |
web-authentication timer idle-cut timer |
Optional 900 seconds by default |
|
Set the maximum online time for Web authentication users |
web-authentication timer max-online timer |
Optional 1800 seconds by default |
|
Set the maximum number of online Web authentication users |
web-authentication max-connection number |
Optional 128 users by default on a port, and 512 users by default on a device |
|
interface interface-type interface-number |
||
|
web-authentication max-connection number |
![]()
l Before enabling global Web authentication, you should first set the IP address of a Web authentication server.
l Web authentication cannot be enabled when one of the following features is enabled, and vice versa: 802.1x, MAC authentication, port security, port aggregation and IRF.
l You can make Web authentication settings on individual ports before Web authentication is enabled globally, but they will not take effect. The Web authentication settings on ports take effect immediately once you enable Web authentication globally.
l A Web authentication client and the switch with Web authentication enabled must be able to communicate at the network layer so that the Web authentication page can be displayed on the Web authentication client.
l Web authentication is mutually exclusive with functions that depend on ACLs such as IP filtering, ARP intrusion detection, QoS, and port binding.
l After a user gets online in shared access method, if you configure an authentication-free user whose IP address and MAC address are the same as those of the online user, the online user will be forced to get offline.
Configuring HTTPS Access for Web Authentication
HTTP and HTTPS can be used for interaction between an authentication client and an access device:
l If HTTP is used, there are potential security problems because HTTP packets are transferred in plain text;
l If HTTPS is used, data security is ensured because HTTPS packets are transferred in ciphertext based on SSL.
After you configure HTTPS access for Web authentication on the switch, the switch will allow clients to use HTTPS to open the authentication pages for secure transmission of authentication information.
Configuration Prerequisites
To configure the access protocol as HTTPS, be sure to configure the PKI domain and SSL server policy, and request a certificate for the PKI domain at first. For information about SSL and PKI configuration, refer to PKI Operation and SSL Operation in this manual.
Configuration Procedure
Follow these steps to specify the access protocol for Web authentication:
|
To do… |
Use the command… |
Remarks |
|
Enter system view |
system-view |
— |
|
Specify the access protocol |
web-authentication protocol { http | https server-policy policy-name } |
Required HTTP is used by default. |
![]()
l You must configure this command before enabling Web authentication. That is, after enabling Web authentication, you cannot change the access protocol for Web authentication.
l The SSL server policy must exist and, after the HTTPS access configuration, must not be removed.
Customizing Web Authentication Pages
The Web authentication device supports customizing authentication pages in the following ways:
l Use the default page framework and customize page elements as described in Customizing Page Elements.
l Edit HTML files to push pictures, advertisements and the like to users. Refer to Customizing Authentication Pages and Editing an Authentication Page File.
Customizing Page Elements
The default Web authentication page is a frame, which consists of four parts. The device allows you to customize the four parts in form of text strings.
Follow these steps to customize Web authentication page elements:
|
To do… |
Use the command… |
Remarks |
|
Enter system view |
system-view |
— |
|
Customize the Web authentication page elements |
web-authentication customize { corp-name corporation-text | email email-string | phone-num phonenum-string | platform-name platform-text } |
Optional By default, there is no customized information on Web authentication pages. |
![]()
The web-authentication customize command is used to customize part of the information provided on the default authentication page. You cannot change the overall style of the authentication page. This is applicable to simple authentication pages.
Customizing Authentication Pages
The device also supports Web authentication pages totally developed by third parties as long as the authentication pages comply with rules of customizing the authentication page file. You can load such customized authentication pages to the device, providing authentication pages with richer contents and flexible styles.
Follow these steps to customize Web authentication pages:
|
To do… |
Use the command… |
Remarks |
|
Enter system view |
system-view |
— |
|
Configure or modify the Web authentication page file |
web-authentication customize file fileName |
Optional By default, there is no customized authentication page file. |
![]()
l After you configure and load a Web authentication page file, the device will display the loaded Web authentication pages. The customized information (configured in section Customizing Page Elements) for the default authentication page will not be displayed.
l The file name specified by fileName must contain the system root directory and the relative path, such as unit1>flash:/test.zip.
Editing an Authentication Page File
With Web authentication, the device allows you to customize the Web authentication pages to be pushed to users. You can compress and then upload the customized authentication page files in HTML format to the local storage medium of the device. Each authentication page file includes seven main index pages, which are login page, login success page, login failure page, online page, system busy page, authentication-free page, and Logout success page.
A Web authentication page must comply with the authentication page file customization rules to ensure normal Web authentication and system operation.
Rules on file names
The main pages of the authentication pages have predefined file names, which cannot be changed. The following table lists the names.
Table 1-1 Main authentication page file names
|
Main authentication page |
File name |
|
Login page |
login.htm |
|
Login success page |
loginSuccess.htm |
|
Login failure page |
loginFail.htm |
|
Online page Pushed for online state notification |
online.htm |
|
System busy page Pushed when the system is busy or the user is in the login process |
busy.htm |
|
Authentication-free page |
freeUser.htm |
|
logout success page |
logoutSuccess.htm |
![]()
You can define the names of the files other than the main authentication page files. The file names and directory names are case-insensitive.
Rules on page requests
The web authentication module supports only Post and Get requests.
l Get requests are used to get the static files in the authentication pages and allow no recursion. For example, if file Login.htm includes contents that perform Get action on file ca.htm, file ca.htm cannot include any reference to file Login.htm.
l Post requests are used when users submit username and password pairs, log on the system, and log off the system.
Rules on Post request attributes
1) Observe the following requirements when editing a form of an authentication page:
l An authentication page can have multiple forms, but there must be one and only one form whose action is null. Otherwise, user information cannot be sent to the local portal server.
l The username attribute is fixed as WaUser, and the password attribute is fixed as WaPwd.
l Attribute WaButton is required to indicate the action that the user requests, which can be Login or Logout.
l A login Post request must contain WaUser, WaPwd, and WaButton attributes.
l A Logout Post request must contain the WaButton attribute.
2) Authentication pages login.htm and loginFail.htm must contain the login Post request.
The following example shows part of the script in page login.htm.
<form method = post >
<p>User name:<input type="text" name = "WaUser" style="width:160px;height:22px" maxlength=64>
<p>Password :<input type="password" name = "WaPwd" style="width:160px;height:22px" maxlength=32>
<p><input type=SUBMIT value="Login" name = "WaButton" style="width:60px;">
</form>
3) Authentication pages loginSuccess.htm and online.htm must contain the Logout Post request.
The following example shows part of the script in page online.htm.
<form action=login.cgi method = post >
<p><input type=SUBMIT value="Logout" name="WaButton" style="width:60px;">
</form>
Rules on page file compression and saving
l A set of authentication page files must be compressed into a standard zip file. A zip file name is in the form of *****.zip, and can contain only letters, numerals, and underscores.
l Zip files can be transferred to the device through FTP or TFTP.
Rules on file size and contents
For the system to push customized authentication pages smoothly, you need comply with the following size and content requirements on authentication pages.
l The size of the zip file of each set of authentication pages, including the main authentication pages and the page elements, must be no more than 500 KB.
l The size of a single page, including the main authentication page and the page elements, must be no more than 50 KB before being compressed.
l Page elements can contain only static contents such as HTML, JS, CSS, and pictures.
Displaying and Maintaining Web Authentication
|
To do… |
Use the command… |
Remarks |
|
Display global and port Web authentication configuration information |
display web-authentication configuration |
Available in any view |
|
Display information about specified or all online Web-authentication users. |
display web-authentication connection { all | interface interface-type interface-number | user-name user-name } |
Web Authentication Configuration Example
Network requirements
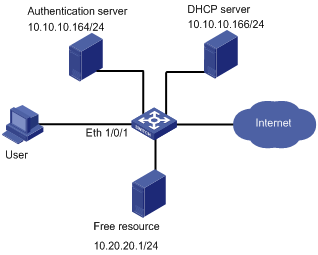
As shown in Figure 1-1, a user connects to the Ethernet switch through port Ethernet 1/0/1.
l Configure the DHCP server so that users can obtain IP addresses from it.
l Configure Web authentication on Ethernet 1/0/1 to control the access of the user to the Internet.
l Configure a free IP address range, which can be accessed by the user before it passes the Web authentication.
Network diagram
Figure 1-1 Web authentication for user
Configuration procedure
# Perform DHCP-related configuration on the DHCP server. (It is assumed that the user will automatically obtain an IP address through the DHCP server.)
# Set the IP address and port number of the Web authentication server.
<Switch> system-view
[Switch] web-authentication web-server ip 10.10.10.10 port 8080
# Configure a free IP address range, so that the user can access free resources before it passes the Web authentication.
[Switch] web-authentication free-ip 10.20.20.1 24
# Enable Web authentication on Ethernet 1/0/1 and set the user access method to designated.
[Switch] interface Ethernet 1/0/1
[Switch-Ethernet1/0/1] web-authentication select method designated
# Create RADIUS scheme radius1 and enter its view.
[Switch] radius scheme radius1
# Set the IP address of the primary RADIUS authentication server.
[Switch-radius-radius1] primary authentication 10.10.10.164
# Enable accounting optional.
[Switch-radius-radius1] accounting optional
# Set the password that will be used to encrypt the messages exchanged between the switch and the RADIUS authentication server.
[Switch -radius-radius1] key authentication expert
# Configure the system to strip domain name off a user name before transmitting the user name to the RADIUS server.
[Switch-radius-radius1] user-name-format without-domain
[Switch-radius-radius1] quit
# Create ISP domain aabbcc.net for Web authentication users and enter the domain view.
[Switch] domain aabbcc.net
# Configure domain aabbcc.net as the default user domain.
[Switch] domain default enable aabbcc.net
# Reference scheme radius1 in domain aabbcc.net.
[Switch-isp-aabbcc.net] scheme radius-scheme radius1
# Enable Web authentication globally. (It is recommended to take this step as the last step, so as to avoid the case that a valid user cannot access the network due to that some other related configurations are not finished.)
[Switch] web-authentication enable
Now, Web authentication takes effect. Before the user passes the Web authentication, it cannot access external networks and can only access the free resource.
The user can perform the following steps to access the Internet:
Step 1: Enter http://10.10.10.10:8080 in the address column of IE. A page with the following prompt will be displayed: ”Please input your name and the password!”.
Step 2: Enter the correct user name and password and then click [login]. The following page will be displayed: ”Authentication passed!”.
Now the user can access external networks.
