- Table of Contents
- Related Documents
-
| Title | Size | Download |
|---|---|---|
| 04-L3+NAT Configuration | 211.52 KB |
1.2 NAT Configuration Task List
1.3 Configuring Address Translation
1.3.1 Introduction to Address Translation
1.3.2 Configuring Address Translation
1.4 Configuring Internal Server
1.4.1 Introduction to Internal Server
1.4.2 Configuring an Internal Server
1.6.2 Enabling NAT Log Function
1.7 Configuring User Resource Limit
1.7.1 Introduction to User Resource Limit
1.7.2 Configuring User Resource Limit
1.8 Configuring Connection-limit
1.8.1 Introduction to Connection-limit
1.9 Displaying and Maintaining NAT
1.10 NAT Configuration Example
1.10.1 NAT Configuration Example
1.10.2 Exporting NAT Logs to the Information Center
1.10.3 Exporting NAT logs to Log Server
1.11.1 Symptom 1: Abnormal Translation of IP Addresses
1.11.2 Symptom 2: Internal Server Functions Abnormally
Chapter 1 NAT Configuration
When configuring NAT, go to these sections for information you are interested in:
l Configuring Address Translation
l Configuring User Resource Limit
l Configuring Connection-limit
l Displaying and Maintaining NAT
& Note:
The line processing unit (LPU) mentioned in this chapter is LSB1NATB0.
1.1 NAT Overview
1.1.1 Introduction to NAT
Network Address Translation (NAT for short) provides a way of translating the IP address in an IP packet header to another IP address. In practice, NAT is primarily designed for private network users to access public networks. This way of using a smaller number of public IP addresses to represent a larger number of private IP addresses can effectively alleviate the depletion of IP addresses.
& Note:
Private or internal IP addresses refer to IP addresses used in an internal network whereas public or external IP addresses refer to the globally unique IP addresses used on the Internet.
According to RFC 1918, three blocks of IP addresses are reserved for private networks:
l In Class A: 10.0.0.0 to 10.255.255.255;
l In Class B: 172.16.0.0 to 172.31.255.255;
l In Class C: 192.168.0.0 to 192.168.255.255;
The above three ranges of IP addresses are not assigned over the Internet. You can use these IP addresses in enterprises freely without the need for applying them from the ISPs or the registration center.
Figure 1-1 depicts a basic NAT operation:
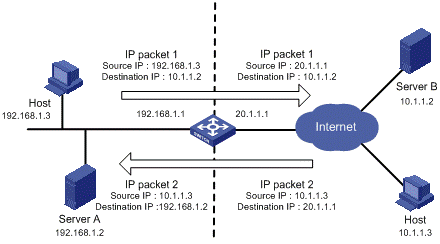
Figure 1-1 A basic NAT operation
l NAT gateway lies between the private network and the public network.
l The internal PC (with source IP address 192.168.1.3) sends an IP packet (IP packet 1) to the external server (with source IP address 10.1.1.2) through the NAT gateway.
l Upon receipt of the packet, the NAT gateway checks the packet header and translates the original private address 192.168.1.3 to a globally unique IP address 20.1.1.1 for routing over the Internet. After that, the gateway forwards the packet and records the mapping between the two addresses in its network address translation table.
l The external server responds the internal PC with an IP packet (IP packet 2 with original destination IP address 20.1.1.1) through the NAT gateway. Upon receipt of the packet, the NAT gateway checks the packet header and looks in its network address translation table for the mapping and replaces the original destination address with the private address 192.168.1.3.
The above NAT operation is transparent to the terminals like the Host and the Server in the above figure. The external server believes that the IP address of the internal PC is 20.1.1.1, and is unaware of the private address 192.168.1.3. As such, NAT hides the private network from the external networks.
Despite the advantage of allowing internal hosts to access external resources and providing privacy, NAT also has the following disadvantages:
l As NAT involves translation of IP addresses, the packet headers that carry these addresses cannot be encrypted. This is also true to the application protocol packets when the contained IP address or port number needs to be translated. For example, you cannot encrypt an FTP connection, or its port command cannot work correctly.
l Network debugging becomes more difficult. For example, when a host in a private network tries to attack other networks, it is harder to pinpoint the attacking host as the host IP address has been hidden.
l The influence of NAT on network performance is not obvious when the bandwidth is lower than 1.5 Gbps. The bottleneck in this scenario lies in the transmission rate. However, when the bandwidth is higher than 1.5 Gbps, NAT could affect the switch performance to a certain extent.
1.1.2 NAT Functionalities
I. Many-to-many NAT and NAT control
As depicted in Figure 1-1, when an internal network user accesses an external network, NAT uses an external or public IP address to replace the original internal IP address. In Figure 1-1, this address is the outbound interface address (a public IP address) of the NAT gateway. This means that all internal hosts use the same external IP address when accessing external networks. In this scenario, only one host is allowed to access external networks at a given time. Hence, it is referred to as “one-to-one NAT”.
Another form of NAT solves this problem by allowing the NAT gateway to have multiple public IP addresses. When the first internal host accesses external networks, NAT chooses a public IP address for it, records the mapping between the two addresses and transfers data packets. When the second internal host accesses external networks, a similar process happens, but this time another public IP address is used, and so are the remaining internal hosts. In this way, multiple internal hosts can access the external networks simultaneously. This type of NAT is called “many-to-many NAT”.
& Note:
The number of public IP addresses an NAT gateway has is far less than the number of internal hosts, because not all internal hosts will access the external networks at the same time. The number of necessary public IP addresses should be determined based on the statistics on the number of the hosts that might access external networks during peak time.
In practice, an enterprise may need to allow some internal hosts to access external networks while prohibiting others. This can be achieved through the NAT control mechanism. If a source IP address is among those addresses that have been denied access to external networks, the NAT gateway will not translate this address.
The “many-to-many NAT” can be realized through definition of an address pool whereas NAT control can be achieved through ACLs.
l Address pool: a set of consecutive public IP addresses intended for address translation. The address pool should be configured according to the number of legal IP addresses, the number of internal hosts, and the actual network requirements. The NAT gateway will select an address from the address pool and use it as the source public IP address during address translation.
l NAT control through ACLs: NAT is only applied to the packets that match the ACL rules. This makes the use of NAT more flexible.
II. NAPT
Another form of NAT is network address port translation (NAPT for short). NAPT allows multiple internal addresses to be mapped to the same external public IP address, namely “multiple-to-one NAT”, or “address multiplexing”.
The destination addresses of the packets from different internal hosts are mapped to the same external IP address but with different port numbers. In other words, NAPT maps the combination of a private IP address and a port number to the combination of a public IP address and a port number.
Figure 1-2 depicts an NAPT process.
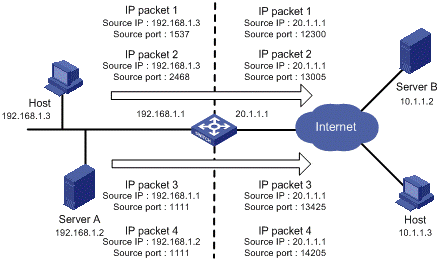
As illustrated in the above figure, four data packets arrive at the NAT gateway. Packets 1 and 2 have the same internal address but different source port numbers. Packets 3 and 4 have different internal addresses but the same source port number. NAPT maps the four data packets to the same external address but with different source port numbers. Therefore, the packets can still be discriminated. When response packets arrive, the NAT gateway can forward them to the corresponding hosts based on the destination address and port numbers.
III. Internal server
NAT hides the internal network structure, including the identities of internal hosts. However, in practice, external contacts to internal hosts are sometimes also necessary. In this case, you need an internal server, such as a WWW server or an FTP server to provide such services. With NAT, you can deploy an internal server easily and flexibly. For instance, you can use 20.1.1.10 as the WWW server’s external address, 20.1.1.11 as the FTP server’s external address; or you can even use such address 20.1.1.12:8080 as the WWW server’s external address.
Currently, this feature is available on the device. When an external user accesses an internal server, NAT translates the destination address in the request packet to the private IP address of the internal server. When the internal server returns a packet, NAT translates the source address (a private IP address) of the packet into a public IP address.
IV. Easy IP
Easy IP allows the NAT gateway to use the public IP address of an interface as the translated source address for NAT. Besides, the NAT gateway can use ACLs to define the internal IP addresses for NAT.
Easy IP applies to scenarios where there is only one public network interface address or there are only a few internal host addresses.
V. Support for special protocols
Apart from the basic address translation function, NAT also provides a perfect application layer gateway (ALG) mechanism that supports translation for some special application protocols without requiring the NAT platform to be modified, featuring high scalability. The IP addresses and/or port numbers contained in such protocol messages need address translation. The special protocols supported by the S9500 series include: Internet control message protocol (ICMP), domain name system (DNS), Internet locator service (ILS), and NetBIOS over TCP/IP (NBT).
VI. NAT multiple-instance
This feature allows users from different MPLS VPNs to access external networks through the same outbound interface. It also allows them to have the same internal network address. The process works as follows:
When an MPLS VPN user communicates with an external network, NAT replaces its internal IP address and port number with the NAT gateway’s external IP address and port number. It also records the relevant MPLS VPN information, such as the protocol type and router distinguisher (RD for short). When the response packet arrives, the NAT gateway then restores the external IP address and port number to the internal IP address and port number. Additionally, the NAT gateway can identify the users who access the external network. Besides NAT, NAPT also supports multiple-instance.
The multiple-instance feature can also apply to internal servers so that external users can access an internal host of an MPLS VPN. For example, in MPLS VPN1, the host that provides WWW service has an internal address 10.110.1.1. The host can use 202.110.10.20 as an external IP address so that the Internet users can access the WWW service in MPLS VPN1 through this external address.
1.2 NAT Configuration Task List
Follow the following steps to configure NAT:
|
To do… |
Use the command… |
Remarks |
|
Enter system view |
system-view |
— |
|
Define an address pool |
nat address-group group-number start-address end-address |
Optional Not necessary when the switch has been configured with Easy IP. |
|
Configure address translation |
Refer to Configuring Address Translation. |
Required |
|
Configure an internal server |
Refer to Configuring Internal Server. |
Optional |
|
Enable NAT application layer gateway |
nat alg { all | dns | ftp | ils | nbt } |
Optional Enabled by default Currently, the NAT ALG supports only standard ports for DNS, FTP, ILS, and NBT. |
|
Configure the binding |
Refer to Configuring the Binding |
Required |
|
Configure NAT log |
Refer to Configuring NAT Log |
Optional |
|
Configure user resource limit |
Refer to Configuring User Resource Limit |
Optional Only the NAPT with application gateway function disabled has user resource limit. |
|
Configure connection-limit |
Refer to Configuring Connection-limit |
Optional |
& Note:
The addresses in the address pool referenced by NAT must be different from the interface address. Otherwise, the service can be implemented. To use the interface address as the translation address, Easy IP must be used.
1.3 Configuring Address Translation
1.3.1 Introduction to Address Translation
Address translation is implemented by associating an ACL with an address pool (or an interface address in case of Easy IP). This association specifies what packets (defined by ACLs) can use which address (one in the address pool, or the interface address itself) to access the external network. When an internal host needs to send data packets to an external network, the NAT gateway checks the first packet against the ACL to see if it is permitted. If so, NAT chooses an address from the address pool (or the interface address, depending on the association) to perform address translation. This address mapping is recorded in an address translation table so that subsequent packets can be translated directly according to this mapping entry.
For details about ACL, refer to ACL Configuration in QoS ACL Volume.
The configuration for different forms of address translation varies somewhat:
l Easy IP
This feature is implemented using the nat outbound acl-number command, without the address-group keyword specified. When address translation, the NAT gateway directly uses an interface’s public IP address as the translated IP address, and uses ACLs to restrict the traffic.
l NAT (address pool with the VPN attribute)
If you specify the address-group keyword in the nat outbound acl-number command, you can configure the VPN attribute of an address pool, that is, the VPN that the address pool belongs to. Generally, such a VPN has no hosts and is only used for injecting NAT routes. You can configure the VPN attributes to advertise the NAT routes to other accessible VPNs, thus implementing interworking between VPNs in a NAT-enabled VPN networking application.
l Many-to-many NAT
You only need to associate an ACL with an address pool, without considering port numbers.
l NAPT
You need to associate an ACL with an address pool, and deal with both IP addresses and port numbers.
l NAT multiple-instance
You need to configure vpn instance vpn-instance-name in the rule of an ACL to specify the MPLS VPN users that need address translation and add a static route to the public network into the routing table of the private network. NAT multiple-instance is supported on Easy IP, Many-to-many NAT, and NAPT.
![]() Caution:
Caution:
For a multi-channel service (for example, FTP service, which uses a control channel and a data channel), it is not recommended to modify NAT configurations during service establishment. Otherwise, the service may fail because some sub-channels that have not been established may use different rules for NAT.
1.3.2 Configuring Address Translation
I. Configuring Easy IP
Follow these steps to configure Easy IP:
|
To do… |
Use the command… |
Remarks |
|
Enter system view |
system-view |
— |
|
Enter VLAN interface view |
interface vlan-interface interface-number |
— |
|
Enable Easy IP by associating the ACL with the interface IP address |
nat outbound acl-number |
Required |
II. Configuring many-to-many NAT
Follow these steps to configure many-to-many NAT:
|
To do… |
Use the command… |
Remarks |
|
Enter system view |
system-view |
— |
|
Enter VLAN interface view |
interface vlan-interface interface-number |
— |
|
Enable many-to-many NAT, and associate an ACL with an IP address pool to translate IP address alone |
nat outbound acl-number address-group group-number no-pat |
Required |
III. Configuring NAPT
Follow these steps to configure NAPT:
|
To do… |
Use the command… |
Remarks |
|
Enter system view |
system-view |
— |
|
Enter VLAN interface view |
interface vlan-interface interface-number |
— |
|
Enable NAPT and associate an ACL with an IP address pool to translate both IP address and port number. |
nat outbound acl-number address-group group-number |
Required |
& Note:
l For the ACL referenced by NAT, only the source IP address, destination IP address, and VPN instance take effect.
l For NO-PAT translation, if multiple NAT rules are configured on a VLAN interface, the device will determine the rule priority based on the ACL numbers bound with the NAT rules and always match the NAT rule with a greater ACL number. The priorities of the rules of an ACL are based on rule number. The smaller the rule number, the higher the priority.
l In PAT translation, ACLs are matched according to the "depth-first" order.
l After removing a NAT-enabled VLAN virtual interface or the association between an ACL and an address pool, you need to execute the reset nat session command to purge all NAT entries if you want the NATed public network address to be reassigned.
l When configuring the nat outbound acl-number command on an interface bound with a VPN, note that the specified VPN in the referenced ACL rule cannot be the same as the bound VPN. For example, if VLAN-interface 10 is bound with VPN 1 and ACL 2001 has a rule using VPN 1 (rule permit vpn-instance vpn1), you cannot configure the nat outbound 2001 command on VLAN-interface 10.
1.4 Configuring Internal Server
1.4.1 Introduction to Internal Server
To configure an internal server, you need to map an external IP address and port to the internal server. This is done through the nat server command.
Internal server configurations include: external IP address, external port, internal server IP address, internal server port, and internal server protocol type.
If an internal server belongs to an MPLS VPN instance, you should specify the vpn-instance-name argument. With this argument not provided, the internal server is considered belonging to a private network.
1.4.2 Configuring an Internal Server
Follow the following steps to configure an internal server:
|
To do… |
Use the command… |
Remarks |
|
Enter system view |
system-view |
— |
|
Enter VLAN interface view |
interface Vlan-interface interface-number |
— |
|
Configure an internal server |
nat server [ vpn-instance vpn-instance-name ] protocol pro-type global global-address [ global-port ] inside host-address [ host-port ] |
Use either command |
|
nat server [ vpn-instance vpn-instance-name ] protocol pro-type global global-address global-port1 global-port2 inside host-address1 host-address2 host-port |
1.5 Configuring the Binding
1.5.1 Introduction to Binding
Through the use of the L3+NAT board on a switch, the NAT services can be handled centrally and more efficiently thanks to the quick handling capability of the hardware.
When a VLAN interface is configured with NAT, you can bind the VLAN interface with the NAT virtual interface so that all the packets that pass through the VLAN interface are redirected to the L3+NAT board for handling.
Before configuring the binding, you must configure the VLAN interface first.
1.5.2 Configuration Procedure
Follow these steps to configure the binding:
|
To do... |
Use the command… |
Remarks |
|
Enter system view |
system-view |
— |
|
Enter NAT service interface view |
interface nat interface-number |
— |
|
Configure the binding |
nat binding interface interface-type interface-number |
Required Only VLAN interfaces can be bound. A NAT service interface can be bound with multiple NAT-enabled interfaces. |
![]() Caution:
Caution:
l After removing a NAT-enabled VLAN virtual interface or the binding of an NAT-enabled VLAN interface with a NAT service interface, you need to execute the reset nat session command to purge all NAT entries if you want the NATed public network address to be reassigned.
1.6 Configuring NAT Log
1.6.1 Introduction to NAT Log
NAT log is a type of system information generated by the NAT gateway during the IP address translation. NAT log contains such information as the packet’s source IP address, source port address, destination IP address, destination port address, translated source IP address, translated source port address and other user operations. The log only traces operations of private network users in accessing an external network, not those in the opposite direction.
As multiple private users share one public IP address when accessing an external network through a NAT gateway, it is hard to identify each of the users. The log function, however, can enhance network security (for supervising purpose) by keeping records of the private network users that access the external network.
1.6.2 Enabling NAT Log Function
Follow these steps to enable NAT log function:
|
To do... |
Use the command… |
Remarks |
|
Enter system view |
system-view |
— |
|
Enable log function |
nat log enable [ acl acl-number ] |
Required Disabled by default |
|
Generate NAT log when establishing a NAT session |
nat log flow-begin |
Required By default, no log is generated when establishing NAT session. |
|
Enable and set the interval for logging active flows |
nat log flow-active minutes |
Required Disabled by default |
1.6.3 Exporting NAT Logs
NAT logs can be exported in two directions, either to the information center or to the NAT log server.
In the former case, NAT logs are first converted into system logs and exported to the local device’s information center. Depending on the configuration of the information system, NAT logs are again exported to their final destination. At most 10 NAT logs can be exported to the information center at one time.
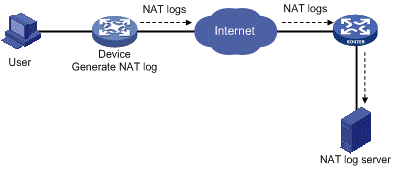
In the latter case, NAT logs are encapsulated into UDP packets and sent to the log server, as shown in Figure 1-3. The UDP packets may come in several versions, each with different packet formats. Only version 1 is used presently. A UDP packet is composed of a header and several NAT logs.
I. Exporting NAT logs to the information center
Follow these steps to export NAT logs to the information center:
|
To do... |
Use the command… |
Remarks |
|
Enter system view |
system-view |
— |
|
Export NAT logs to the information center |
userlog nat syslog |
Required NAT logs are exported to the NAT log server by default. |
& Note:
l Exporting NAT logs to the information center occupies storage space. This approach is recommended when the volume of NAT logs is small.
l NAT logs exporting to the information center are prioritized as informational, meaning that they are ordinary information.
l For detailed information about data priority, refer to Information Center Configuration in System Volume.
II. Exporting NAT logs to log server
When exporting NAT logs to the log server in UDP packets, you can configure the following three parameters:
l IP address and UDP port number of the NAT log server. NAT logs cannot be exported successfully without configuring the information center export direction and specifying the log server address.
l Source IP address of NAT logs. This address allows the log server to identify the log source. You are recommended to use the loopback interface address as the source IP address of NAT logs.
l Version number of NAT logs. NAT logs may come in several versions, each with different packet formats. However, the device supports only version 1 currently.
Follow these steps to configure a NAT log server:
|
To do... |
Use the command… |
Remarks |
|
Enter system view |
system-view |
— |
|
Specify the IP address and UDP port number of the NAT log server |
userlog nat export [ slot slot-number ] host ip-address udp-port |
Required |
|
Specify the source IP address of the UDP packet that carries NAT logs |
userlog nat export source-ip ip-address |
Optional By default, the source IP address is the interface IP address through which the packet is sent. |
|
Specify the version number of NAT logs |
userlog nat export version version-number |
Optional Version 1 is used by default |
& Note:
l The IP address of the NAT log server must be a valid unicast address.
l As for the UDP port number of the log server, you are recommended to use a port number greater than 1024 to avoid conflicts with the system-defined port numbers.
1.7 Configuring User Resource Limit
1.7.1 Introduction to User Resource Limit
User resource limit is a function that defines the maximum number of ordinary users (non-VPN users in an internal network) or VPN users as well as their connections in accessing external network(s). This can help distributing resources more reasonably.
This function only applies to NAPT with its application layer gateway function not enabled.
1.7.2 Configuring User Resource Limit
Follow these steps to configure user resource limit:
|
To do… |
Use the command… |
Remarks |
|
Enter system view |
system-view |
— |
|
Set limits for ordinary users or VPN users. |
nat limit { public | vpn-instance vpn-instance-name } user-amount user-limit connection-amount connection-limit |
Optional By default, the ordinary users occupy all the system resources. |
& Note:
l On a newly started system without any configuration, the system resources are completely occupied by ordinary users.
l Before a user resource limit is configured for public network users, resources are allocated from those for public network users to a VPN user until the public network user resources are used up.
l After the administrator configures a limit on the resources for public network users, resources can be allocated only from the remaining resources to a VPN user until the remaining system resources are used up.
l The user resource configuration is performed on a single L3+NAT board, but takes effect to all L3+NAT boards if there are multiple L3+NAT boards.
1.8 Configuring Connection-limit
1.8.1 Introduction to Connection-limit
l Limiting connection number means that when the number of connections initiated by a user reaches a certain upper limit, the user cannot establish new connections. The user must wait (for at least 5 minutes) till the connection number is lower than the upper limit in order to create new connections.
l Limiting connection rate means that a user connection rate cannot exceed a predefined maximum value.
For the connection-limit function to take effect, you need to set a connection-limit policy, bind the policy with the NAT module, and meanwhile activate the connection-limit switch.
![]() Caution:
Caution:
l For parameters not configured in a connection-limit policy, the global configurations take effect.
l For user connections not covered in a connection-limit policy, the global configurations take effect.
1.8.2 Configuration Procedure
I. Configuring global connection-limit parameters
Follow these steps to configure global connection-limit parameters
|
To do... |
Use the command… |
Remarks |
|
Enter system view |
system-view |
— |
|
Enable connection-limit function |
connection-limit enable |
Required Disabled by default |
|
Configure connection-limit action globally |
connection-limit default action [ permit | deny ] |
Optional User connections are not counted and limited by default. |
|
Configure connection number limits globally |
connection-limit default amount upper-limit max-amount |
Optional 200 by default |
|
Set the maximum connection rate globally |
connection-limit default rate max-rate max-rate |
Optional 100 by default |
II. Configuring connection-limit policy
Follow these steps to configure a connection-limit policy:
|
To do... |
Use the command… |
Remarks |
|
Enter system view |
system-view |
— |
|
Create or edit a connection-limit policy and enter the connection-limit policy view |
connection-limit policy policy-number |
Required |
|
Configure the rules of connection-limit |
limit limit-id source user-ip [ vpn-instance vpn-instance-name ] { amount max-amount | rate } * |
Required |
|
Set connection-limit mode |
limit mode { all | amount | rate } |
Optional By default, both the number and rate of user connections are limited. |
|
Set the maximum connection rate in a policy |
limit rate max-rate |
Optional By default, the global setting is used. |
III. Binding a connection-limit policy to a NAT module
Follow these steps to bind a connection-limit policy to a NAT module
|
To do... |
Use the command… |
Remarks |
|
Enter system view |
system-view |
— |
|
Bind a connection-limit policy to the NAT module |
nat connection-limit-policy policy-number |
Required |
![]() Caution:
Caution:
l A NAT module limits user connections based on the policy bound to it. Each NAT module can be bound with one policy only.
l The global connection-limit configuration does not take effect until you bind the connection-limit policy with the NAT module.
l If multiple NAT modules exist in the system, the connection limit policy applies to all these NAT modules.
l A connection limit policy does not take effect in NO-PAT translation.
1.9 Displaying and Maintaining NAT
|
To do… |
Use the command… |
Remarks |
|
Display information about the NAT address pool |
display nat address-group |
Available in any view |
|
Display configurations about all forms of NAT |
display nat all |
Available in any view |
|
Display the connection-limit information |
display nat connection-limit { all | ip user-ip [ vpn-instance vpn-instance-name ] } |
Available in any view |
|
Display the address translation configuration |
display nat outbound |
Available in any view |
|
Display the internal server information |
display nat server |
Available in any view |
|
Display the information about active connections |
display nat session slot slot-number protocol { tcp | udp } [ vpn-instance vpn-instance-name ] source { global global-address global-port | inside inside-address inside-port } destination dst-address destination-port |
Available in any view |
|
Display NAT statistics |
display nat statistics slot slot-number |
Available in any view |
|
Display information about the connection-limit policy |
display connection-limit policy { policy-number | all } |
Available in any view |
|
Display NAT log information |
display nat log |
Available in any view |
|
Display information about the resource allocation and utilization |
display nat limit { all | public | vpn-instance vpn-instance--name } |
Available in any view |
|
Display NAT log configuration and statistics |
display userlog export slot slot-number |
Available in any view |
|
Clears the records in the NAT log buffer |
reset userlog nat logbuffer slot slot-number |
Available in user view |
|
Clears NAT log statistics |
reset userlog export slot slot-number |
Available in user view |
|
Clears the address translation mapping table in the memory and release the memory dynamically allocated for storing the mapping table |
reset nat session slot slot-number |
Available in user view |
& Note:
Clearing the NAT log buffer implies loss of all NAT logs. In general, you are not recommended to use this command.
1.10 NAT Configuration Example
1.10.1 NAT Configuration Example
I. Network requirements
As illustrated in Figure 1-4, a company accesses the Internet through VLAN 10 of the NAT-enabled device. The company provides two WWW servers, one FTP server, and one SMTP server for external users to access. The internal network address segment is 10.110.0.0/16. The internal address for the FTP server is 10.110.10.1, for the WWW server 1 is 10.110.10.2, for the WWW server 2 is 10.110.10.3, and for the SMTP server 10.110.10.4. The company wants to provide a unified IP address to external users. Specifically, the company has the following requirements:
l The internal users in subnet 10.110.10.0/24 can access the Internet, while users in other network segments cannot.
l External PCs can access an internal server.
l The company has 6 legal IP addresses ranging from 202.38.160.100/24 to 202.38.160.105/24. Address 202.38.160.100 is used as the one for external access and port 8080 is used for WWW server 2.
l Configure a connection-limit policy and bind it to the NAT module. Configure the upper limit of connections as 1000 (based on the source address) respectively, which means the number of connections initiated from internal user cannot exceed 1000.
II. Network diagram
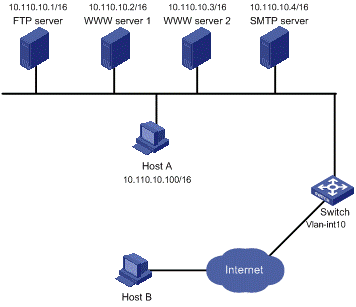
Figure 1-4 NAT network diagram
III. Configuration procedure
# Configure an address pool and an ACL.
<Switch> system-view
System View: return to User View with Ctrl+Z.
[Switch] nat address-group 1 202.38.160.101 202.38.160.103
[Switch] acl number 2001
[Switch-acl-basic-2001] rule permit source 10.110.10.0 0.0.0.255
[Switch-acl-basic-2001] quit
# Apply NAT to 10.110.10.0/24 only
[Switch] vlan 10
[Switch-vlan10] port Ethernet 1/1/1
[Switch-vlan10] quit
[Switch] interface Vlan-interface 10
[Switch-Vlan-interface10] nat outbound 2001 address-group 1
[Switch-Vlan-interface10] quit
[Switch] interface nat 2/0/1
[Switch-NAT2/0/1] nat binding interface Vlan-interface 10
# Configure the internal FTP server.
[Switch-Vlan-interface10] nat server protocol tcp global 202.38.160.100 ftp inside 10.110.10.1 ftp
# Configure the internal WWW server 1.
[Switch-Vlan-interface10] nat server protocol tcp global 202.38.160.100 www inside 10.110.10.2 www
# Configure the internal WWW server 2.
[Switch-Vlan-interface10] nat server protocol tcp global 202.38.160.100 8080 inside 10.110.10.3 www
# Configure the internal SMTP server.
[Switch-Vlan-interface10] nat server protocol tcp global 202.38.160.100 smtp inside 10.110.10.4 smtp
[Switch-Vlan-interface10] quit
# Enable the connection-limit function.
[[Switch] connection-limit enable
# Configure a connection-limit policy and rules.
[Switch] connection-limit policy 1
[Switch-connection-limit-policy-1] limit mode amount
[Switch-connection-limit-policy-1] limit 1 source 10.110.10.1 amount 1000
[Switch-connection-limit-policy-1] quit
# Bind the connection-limit policy with the NAT module.
[Switch] nat connection-limit-policy 1
1.10.2 Exporting NAT Logs to the Information Center
I. Network requirements
l A host in the private network accesses Device B in the public network through Device A, which is enabled with NAT;
l Device A sends NAT logs to the information center in the form of system logs;
l You can view the records on the information center to supervise the private network users.
II. Network diagram
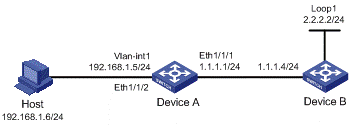
Figure 1-5 Export NAT logs to information center
III. Configuration procedure
& Note:
The following only lists configurations pertinent to NAT logs. Configurations regarding the IP addresses of the devices and NAT function are omitted here.
# Specify to export the NAT logs of Device A to the information center.
<Sysname> system-view
System View: return to User View with Ctrl+Z.
[Sysname] userlog nat syslog
# Enable the NAT log function on Device A.
[Sysname] nat log enable
# View the log buffer to monitor access records.
[Sysname] quit
<Sysname> dir
Directory of cf0:/
0 -rw- 16850028 Aug 07 2009 04:02:42 mainpack.bin
1 drw- - Aug 07 2005 05:13:48 logfile
2 -rw- 1747 Aug 07 2009 04:05:38 config.cfg
3 -rw- 524288 Aug 13 2009 01:27:40 basicbtm.bin
4 -rw- 524288 Aug 13 2009 01:27:40 extendbtm.bin
249852 KB total (232072 KB free)
File system type of cf0: FAT32
<Sysname> cd logfile
<Sysname> more logfile.log
……omitted……
%@250005%Jul 7 04:20:04:72 2005 Sysname USERLOG/7/NAT:
ICMP; 192.168.1.6:768--->1.1.1.1:12288; 2.2.2.2:768;
[2005/07/07 04:20:03-0000/00/00 00:00:00];
Operator 8: Data flow created
%@250006%Jul 7 04:20:10:72 2005 Sysname USERLOG/7/NAT:
ICMP; 192.168.1.6:768--->1.1.1.1:12288; 2.2.2.2:768;
[2005/07/07 04:20:03-2005/07/07 04:20:09];
Operator 1: Normal over
%@250007%Jul 7 04:20:30:72 2005 Sysname USERLOG/7/NAT:
ICMP; 192.168.1.6:768--->1.1.1.1:12288; 2.2.2.2:768;
[2005/07/07 04:20:29-0000/00/00 00:00:00];
Operator 8: Data flow created
……omitted……
Apart from NAT logs, the log file includes other system logs. The following table shows the description of NAT logs:
|
Field |
Description |
|
ICMP |
ICMP |
|
192.168.1.6:768 |
Source IP address and port number before translation |
|
1.1.1.1:12288 |
Source IP address and port number after translation |
|
2.2.2.2:768 |
Destination IP address and port number |
|
2005/07/07 04:20:03 2005/07/07 04:20:29 |
Start time of the NAT session (In this example, the time displayed is the device’s system time. When the logs are exported in UDP packet, the UDP packet records the interval in seconds between the current system time and Greenwich time 0 AM, Jan 1st, 1970. The log server, based on its own system time, converts this interval and exports it. |
|
2005/07/07 04:20:09 0000/00/00 00:00:00 |
End time of the NAT session 0000/00/00 00:00:00 means that this time is uncertain. |
|
Operator |
Reasons for generating NAT logs come from: l ”Aged for reset or config-change” refers to logs generated due to configuration change or manual session deletion; l “Aged for no-pat of NAT” refers to logs generated when the no-pat session ages; l “Active data flow timeout” refers to logs generated when the duration of NAT session exceeds the active data flow time; l “Data flow created” refers to logs generated when a NAT session is established; l “Normal over” refers to logs generated when the session is aged out. |
1.10.3 Exporting NAT logs to Log Server
I. Network requirements
l A PC in the private network accesses Device B on the public network through Device A, which is enabled with NAT.
l Device A sends NAT logs to the information center in UDP packets;
II. Network diagram

Figure 1-6 Export NAT log to log server
III. Configuration procedure
& Note:
The following only lists configurations pertinent to NAT logs. Configurations regarding the IP addresses of the devices and NAT function are omitted here.
# Specify to export the NAT logs of Device A to the NAT log server.
<Sysname> system-view
System View: return to User View with Ctrl+Z.
[Sysname] userlog nat export host 3.3.3.7 9021
# Set the source IP address of NAT log packets for Device A to 9.9.9.9
[Sysname] userlog nat export source-ip 9.9.9.9
# Enable the NAT log function on Device A.
[Sysname] nat log enable
You must run XLog on the NAT log server or the system log server to view NAT log information.
1.11 Troubleshooting NAT
1.11.1 Symptom 1: Abnormal Translation of IP Addresses
Solution: Enable debugging for NAT. Try to locate the problem based on the debugging display. Use other commands, if necessary, to further identify the problem. Pay special attention to the translated source address and ensure that this address is the address that you intend to change to. If not, there may be an address pool bug. Also ensure a route is available between the destination network and the address pool segment. Be aware of the possible effects that the firewall or the ACLs have to NAT, and also note the route configurations.
1.11.2 Symptom 2: Internal Server Functions Abnormally
Solution: Check whether the internal server host is properly configured; whether the router is correctly configured with respect to the internal server parameters, such as the internal server IP address. It is also possible that the firewall that has denied external access to the internal network. You can use the display acl command to verify this.