- Table of Contents
-
- H3C S7502 Ethernet Switch Installation Manual-(V1.02)
- 00-1Cover
- 01-Chapter 1 Product Overview
- 02-Chapter 2 Line Processing Units
- 03-Chapter 3 Installation Preparations
- 04-Chapter 4 Hardware Installation
- 05-Chapter 5 System Commissioning
- 06-Chapter 6 Hardware Maintenance
- 07-Chapter 7 Software Maintenance
- 08-Chapter 8 Troubleshooting
- 09-Appendix A Lightning Protection
- 10-Appendix B AC Power Cables Used in Different Countries or Regions
- Related Documents
-
| Title | Size | Download |
|---|---|---|
| 07-Chapter 7 Software Maintenance | 253.45 KB |
Table of Contents
Chapter 7 Software Maintenance
7.1 Introduction to Loading Approaches
7.1.1 Loading Software Remotely and Locally through Command Lines
7.1.2 Loading Software Locally through Boot Menu
7.2 Loading Software Locally through Boot Menu
7.2.2 Loading Software from Console Port Using Xmodem
7.2.3 Loading Software from Ethernet Port Using TFTP
7.2.4 Loading Software from the Management and Upgrade Ethernet Port Using FTP
7.3 Loading Software Remotely or Locally through Command Lines
7.4 Booting the Switch with Dual Images
7.5 Loading a Host Software Containing the Boot ROM File
7.5.1 Example of Upgrading Using Combined Host Software File
Chapter 7 Software Maintenance
You can use either the command lines or BOOT menu to load software onto the S7502.
7.1 Introduction to Loading Approaches
7.1.1 Loading Software Remotely and Locally through Command Lines
You can load the software:
l By FTP
l By TFTP
7.1.2 Loading Software Locally through Boot Menu
You can load the software:
l From the console port using XModem
l From an Ethernet port using TFTP
l From an Ethernet port using FTP
& Note:
l Ensure that the Boot ROM version matches the host software version when you load the Boot ROM and host software. You are recommended to load the Boot ROM program only when the host software to be loaded does not match the existing Boot ROM version. Frequent loading is discouraged.
l The Boot Menu can only be used to load the Boot ROM program and host software of SRPUs. To load the Boot ROM program of LPUs, use command lines.
7.2 Loading Software Locally through Boot Menu
If your terminal is directly connected to the switch, you can load Boot ROM and host software locally.
Before loading the software, make sure that your terminal is correctly connected to the switch.
& Note:
The steps that you should take to load Boot ROM program are the same as those you take to load host software, except that in a Boot ROM program loading process you need to press <Ctrl+U> and <Enter> after accessing the Boot ROM menu and will view a different prompt message. Boot ROM loading steps are described below as an example.
7.2.1 BOOT Menu
A power-on switch will run the Boot ROM program first and the terminal will display the following information:
Starting......
RAM Line....OK
System is booting................
******************************************
* *
* H3C S7502 Boot ROM, Version 530 *
* *
******************************************
Copyright(c) 2004-2007 Hangzhou H3C Tech. Co., Ltd.
Creation date : Apr 20 2007, 14:48:52
CPU type : MPC8245
CPU Clock Speed : 300Mhz
BUS Clock Speed : 33Mhz
BOOT_FLASH type : M29W040B
Flash Size : 32MB
Memory Size : 256MB
S7502 main board self testing................................
SDRAM Data lines Selftest.................................OK!
SDRAM Address lines Selftest..............................OK!
SDRAM fast selftest.......................................OK!
Please check LEDs.....................LEDs selftest finished!
CPLD selftest.............................................OK!
The switch Mac address is .....................0000.0309.0004
Press Ctrl+B to enter Boot Menu... 3
Press <Ctrl+B> and the system displays the following message:
Password :
To access Boot Menu, press <Ctrl+B> within five seconds after the screen prompts “Press Ctrl+B to enter Boot Menu...” Otherwise, the system will start executing the program decompression and at this time if you want to access Boot Menu, you will have to reboot the switch.
If the system enters the program decompression process, you will have to wait a long time for the system to get ready, for the program file is rather big in size and many commands needs to be registered.
Enter the correct Boot ROM password and the system displays the Boot Menu.
By default, no password is set for the switch.
If you want to modify the password, keep in mind the modified one.
Boot Menu
1: Download application file to flash
2: Select application file to boot
3: Display all files in flash
4: Delete file from flash
0: Reboot
Enter your choice(0-5):
7.2.2 Loading Software from Console Port Using Xmodem
I. Introduction to XModem
The XModem protocol is a file transfer protocol widely used due to its simplicity and good performances. XModem transfers files through the console port, supporting data packets of 128 bytes and 1KB. With respect to reliability, it supports checksum, CRC, and error packet retransmission mechanism. Normally, the maximum number of retransmission attempts is 10.
XModem transmission is completed by the receiving program and sending program. The receiving program initiates packet checking method negotiation by sending the negotiation character. If the negotiation passes, the sending program starts packet transmission. Upon the receipt of a complete packet, the receiving program checks it using the agreed-upon checking method. If the check succeeds, the receiving program sends an acknowledgement character; if the check fails, it sends a reject character. Upon the receipt of the acknowledgement, the sending program continues to send the next packet; upon the receipt of the reject, it retransmits the packet.
II. Loading Boot ROM
Follow these steps to download the Boot ROM program:
Step 1: Press <Ctrl+U> and <Enter> in the Boot Menu to display the Boot ROM update menu:
SRPU bootrom update menu:
1. Set TFTP protocol parameter
2. Set FTP protocol parameter
3. Set XMODEM protocol parameter
0. Return to boot menu
Enter your choice(0-3):3
Step 2: Type <3> to download the Boot ROM program using XModem. Press <Enter> and the system displays the following download speed setting menu:
Please select your download baudrate:
1. 9600
2. 19200
3. 38400
4. 57600
5. 115200
0. Exit
Enter your choice (0-5):5
Step 3: Choose an appropriate download baud rate. Type <5> to choose the baud rate 115200 bps. Press <Enter> and the system displays the following information:
Are you sure to update SRPU bootrom? Yes or No(Y/N)
Step 4: Type <Y> to start the downloading or <N> to return to the program downloading menu. If you type <Y>, the system displays the following information:
Download baudrate is 115200 bps. Please change the terminal's baudrate to 115200 bps, and select XMODEM protocol.
Press enter key when ready.
& Note:
You do not need to modify the HyperTerminal’s baud rate if you have chosen 9600 bps, and thus you can skip Steps 5 and 6 and go to Step 7 directly. At this time, the system will not display the above information.
![]() Step 5: Select [File/Properties] in the HyperTerminal
window, click <Configure> in the popup dialog box, and select the baud
rate of 115200bps in the console port configuration dialog box.
Step 5: Select [File/Properties] in the HyperTerminal
window, click <Configure> in the popup dialog box, and select the baud
rate of 115200bps in the console port configuration dialog box.
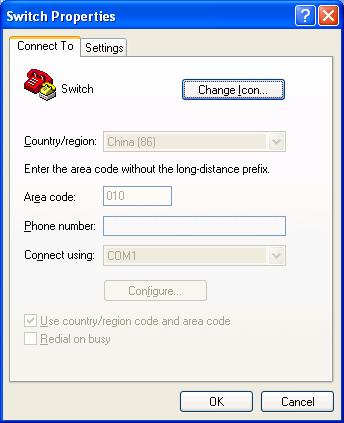
Figure 7-1 Properties dialog box
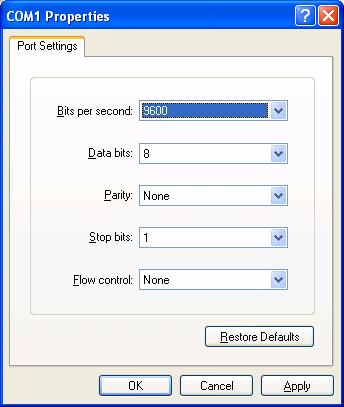
Figure 7-2 Console port configuration dialog box
Step 6: Click the Disconnect icon to disconnect the HyperTerminal from the switch and then click the Connect icon to re-establish the connection using the new baud rate setting.
& Note:
After changing the baud rate setting, you must disconnect and reconnect the terminal emulator to validate the new configuration.
Step 7: Press <Enter> to start program downloading. The system displays the following information:
Now please start transfer file with XMODEM protocol.
If you want to exit, Press <Ctrl+X>
Downloading ... CCCCC
Step 8: Select [Transfer/Send File] in the HyperTerminal window. In the popup dialog box similar to the following figure, click <Browse>, select the software you need to download, and set the protocol to XModem.
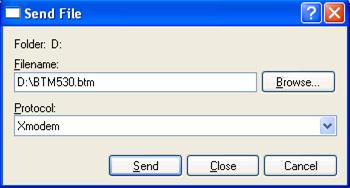
Figure 7-3 File Sending dialog box
Step 9: Click <Send>. The system displays the following interface.
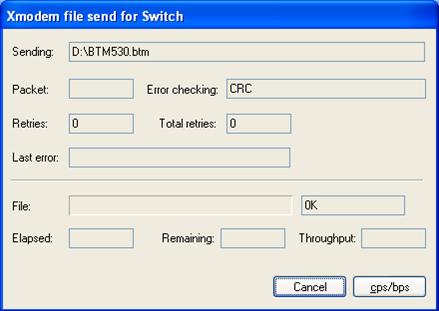
Figure 7-4 Sending file interface
After completing the downloading, the system displays the following information:
Downloading ...CCCCCCCCCCCCCCCCCCCCCCCCCCCCCCCCCCCCCCCCCCCCCCCCCCC.done!
Are you sure to update SRPU bootrom? Yes or No(Y/N)y
Step 10: Type <Y> to start file downloading or <N> to return to the program downloading menu. If you type <Y>, the system starts Boot ROM program downloading automatically. The system displays the following information upon the completion of the entire process:
SRPU bootrom is updating now......
Get flash Type......FLASH_M29W040B
Erasing flash......done!
Programming flash......done!
Checking flash......done!
SRPU bootrom update menu:
1. Set TFTP protocol parameter
2. Set FTP protocol parameter
3. Set XMODEM protocol parameter
0. Return to boot menu
Enter your choice(0-3):3
Step 11: Type <3> to return to the Boot Menu. Then type <0> to reboot the system and the system displays the following information:
Rebooting...
Please change the terminal's baudrate to 9600 bps!
Step 12: Change the baud rate of HyperTerminal back to 9600 bps as described in Steps 5 and 6. Then press any key as prompted.
& Note:
You do not need to reset the HyperTerminal’s baud rate and can skip the last step if you have chosen 9600 bps. In this case, the system does not display the message “Please change the terminal's baudrate to 9600 bps!” as shown in Step 11.
III. Loading host software
Follow these steps to download the host software of the switch:
Step 1: Select <1> from Boot Menu. The system displays the following information:
1. Set TFTP protocol parameter
2. Set FTP protocol parameter
3. Set XMODEM protocol parameter
0. Return to boot menu
Enter your choice(0-3):3
The subsequent steps are the same as those for loading Boot ROM, except for the messages displayed.
7.2.3 Loading Software from Ethernet Port Using TFTP
I. Introduction to TFTP
Trivial File Transfer Protocol (TFTP) is a TCP/IP protocol used for file transmission between clients and servers. It uses UDP to provide unreliable data stream transfer service.
The following describes how to load the software when the S7502 switch functions as a TFTP client.
II. Loading Boot ROM
Step 1: Connect the switch to the PC,, which saves the file to be downloaded, through the Ethernet port for management and upgrade. The IP address of the PC is required. Connect the switch to another PC through the Console port. The two PCs can be the same one.
Step 2: Run the TFTP Server program on the PC connected to the Ethernet port, and specify the path for program loading.
![]() Caution:
Caution:
l TFTP Server program is not shipped with the S7502 switch.
l When loading Boot ROM and host software, you must use a crossover cable to connect to the Ethernet port for upgrading.
Step 3: Run terminal emulation program on the PC that is connected to the console port. Start the switch, enter the Boot Menu, and then enter the download protocol menu.
To download the Boot ROM program, press <Ctrl+U> and <Enter> to access the menu for Boot ROM downloading when the system displays “Enter your choice(0-5):”
SRPG bootrom update menu:
1. Set TFTP protocol parameter
2. Set FTP protocol parameter
3. Set XMODEM protocol parameter
0. Return to boot menu
Enter your choice(0-3):1
Step 4: In the download protocol menu, type <1> to select TFTP protocol to download Boot ROM or host software. Press <Enter> and the system displays the following information:
Load File name:
Switch IP address: //IP address of the switch. This IP address must be in the same network segment as that of the PC that saves the file to be downloaded.
Switch IP address: //IP address of the PC that saves the file to be downloaded.
Step 5: Enter the TFTP parameter values and press <Enter>. The system displays the following information:
Are you sure to update your bootrom? Yes or No(Y/N)
Step 6: Type <Y> to start file downloading or <N> to return to the program downloading menu. Suppose you type <Y>. The system starts Boot ROM program downloading and upon its completion automatically starts Boot ROM loading. The system displays the following information upon the completion of the entire process:
Prepare for loading...OK!
Loading....................................................done!
SRPU bootrom is updating now......
Get flash Type......FLASH_M29W040B
Erasing flash......done!
Programming flash......done!
Checking flash......done!
III. Loading host software
Follow these steps to download the host software of the switch:
Step 1: Select <1> from Boot Menu. The system displays the following information:
1. Set TFTP protocol parameter
2. Set FTP protocol parameter
3. Set XMODEM protocol parameter
0. Return to boot menu
Enter your choice(0-3):3
The subsequent steps are the same as those for loading Boot ROM, except for the messages displayed.
7.2.4 Loading Software from the Management and Upgrade Ethernet Port Using FTP
I. Introduction to FTP
A switch can be used through Ethernet port as an FTP server or a client to provide another approach to software loading and file configuration.
In the following example, the switch functions as an FTP client.
II. Loading SRPU Boot ROM
Step 1: Connect the switch to the PC, which saves the file to be downloaded, through the management and upgrade Ethernet port. The IP address of the PC is required. The IP address of the PC is required. Connect the switch to another PC through the Console port. The two PCs can be the same one.
Step 2: Run the FTP Server program on the PC connected to the Ethernet port, and specify the path for program loading.
![]() Caution:
Caution:
l FTP Server program is not shipped with the S7502 switch.
l When loading Boot ROM and host software, you must use a crossover cable to connect to the Ethernet port for upgrade.
Step 3: Run the terminal emulation program on the PC connected to the console port. Start the switch, enter the Boot Menu, and then enter the download protocol menu.
To download the Boot ROM program, press <Ctrl+U> and <Enter> to access the menu for Boot ROM downloading when the system displays ”Enter your choice (0-5):”
1. Set TFTP protocol parameter
2. Set FTP protocol parameter
3. Set XMODEM protocol parameter
0. Return to boot menu
Enter your choice(0-3):2
Step 4: In the download protocol menu, type <2> to select FTP protocol for downloading the Boot ROM and host software. Press <Enter> and the system displays the following information:
Load File name:
Switch IP address: //IP address of the switch. This IP address must be in the same network segment as that of the PC that saves the file to be downloaded.
Switch IP address: //IP address of the PC that saves the file to be downloaded.
FTP User Name:
FTP User Password:
Step 5: Enter the FTP parameter values and then press <Enter>. The system displays the following information:
Are you sure to update SRPU bootrom? Yes or No(Y/N)
Step 6: Type <Y> to start file downloading or <N> to return to the program downloading menu. If you type <Y> and press <Eenter>, the system starts program downloading and upon its completion, writes the program to the Flash. The system displays the following information after completing the writing operation:
……
SRPU bootrom is updating now......
Get flash Type......FLASH_M29W040B
Erasing flash......done!
Programming flash......done!
Checking flash......done!
III. Loading host software
Follow these steps to download the host software:
Step 1: Select <1> from Boot Menu. The system displays the following information:
1. Set TFTP protocol parameter
2. Set FTP protocol parameter
3. Set XMODEM protocol parameter
0. Return to boot menu
Enter your choice(0-3):3
The subsequent steps are the same as those for loading Boot ROM, except for the messages displayed.
7.3 Loading Software Remotely or Locally through Command Lines
If your terminal is connected to the switch through a network, you can load Boot ROM and host software remotely through command lines.
7.3.1 Loading by FTP
Run the FTP Server on the local PC. Ensure that you have configured the username and password and set the correct file directory. Assume that the IP address of the PC is 10.10.110.1.
Log in to the switch through Telnet or the console port, to send the host program to the switch by using FTP.
& Note:
l The S7502 supports dual image booting, that is, usually the switch boots with the main image (i.e. the primary file), but uses the backup image (i.e. the backup file) instead when the primary one has any error. Refer to section 7.4 “Booting the Switch with Dual Images” on page 7-14 for details.
l The S7502 also supports the upgrade by using a combined Boot ROM file, that is, upgrading the Boot ROM of all cards using a combined Boot ROM file. Refer to section 7.5 “Loading a Host Software Containing the Boot ROM File” on page 7-16 for details.
Assume that:
l The main boot file is SWITCH002.app.
l The active host software is SWITCH001.app.
l The Boot ROM program is SWITCHbtm.btm.
Follow these steps after logging in to the switch.
Step 1: Download the software to the switch through FTP.
<H3C> ftp 10.10.110.1
Trying ...
Press CTRL+K to abort
Connected.
220 WFTPD 2.0 service (by Texas Imperial Software) ready for new user
User(none):lyt
331 Give me your password, please
Password:
230 Logged in successfully
[ftp] get Switchbtm.app Switchbtm.btm
[ftp] bye
& Note:
You can also download two copies of host software and specify one as the primary and the other as the backup.
Step 2: Load the Boot ROM.
<H3C> boot bootrom Switchbtm. btm slot 0
Board 0 upgrading BOOTROM, please wait...
Upgrade board 0 BOOTROM succeeded!
Step 3: Load the host software.
l Load the primary file.
<H3C> boot boot-loader primary SWITCH002.app
l Load the backup file.
<H3C> boot boot-loader backup SWITCH001.app
<H3C> display boot-loader
The primary app to boot of board 0 at the next time is: flash:/SWITCH002.app
The backup app to boot of board 0 is: flash:/SWITCH001.app
The app to boot of board 0 at this time is: flash:/SWITCH001.app
<H3C> reboot (Check whether other configuration is saved before restarting the system, in case the configuration is lost after the restart.)
Now you have completed the downloading of Boot ROM and host software.
Note that you must reboot the switch to validate host software downloading. If the Flash does not have enough space, you can delete some program files in the Flash after completing the Boot ROM loading. (You are recommended to delete the host program that is no longer in use.) Then you can upload the host program to the switch through FTP.
Note that the switch cannot be powered off during loading process.
7.3.2 Loading by TFTP
Remote loading by TFTP is similar to loading by FTP, except that the protocol used for downloading is TFTP. In this case, the switch can only be used as a TFTP client to download the software to its Flash from the TFTP server. After the downloading is completed, the remaining procedure is the same as that in the case of remote loading by FTP.
7.4 Booting the Switch with Dual Images
The S7502 supports dual image booting: usually the switch boots with the main image (i.e. the primary file), but uses the backup image (i.e. the backup file) instead when the main image has any error.
Refer to section 7.3 “Loading Software Remotely or Locally through Command Lines” on page 7-12 for loading dual images to the switch using commands. The following introduces the setting of dual images in Boot menu.
Step 1: Enter Boot menu.
BOOT MENU
1. Download application file to flash
2. Select application file to boot
3. Display all files in flash
4. Delete file from flash
5. Modify bootrom password
0. Reboot
Enter your choice(0-5): 2
Step 2: Type <2> to enter the menu for choosing the active booting file.
File Number File Size(bytes) File Name
========================================================
1. 4 snmpboots
2. 1972 SWITCH100.cfg
3. 1012 taskswitch.log
4. 631736 Btm530.btm
5. 199696 8241btm.app
6. 2427 cfg.txt
7. 6048565 SWITCH200.app
8(*). 5639172 SWITCH000.app
9(-). 203460 SWITCH100.app
The current application file is :SWITCH000.app
The backup application file is : SWITCH100.app
Free Space : 471040 bytes
The system shows all the files in the Flash, wherein the one with an asterisk (*) is the primary file and the one with a hyphen (-) is the backup file.
Step 3: Re-configure the primary and backup files.
l Set the primary file.
Enter the serial number of the desired primary file when the terminal shows the following information:
Please input the primary application file number to boot :9
Press <Enter>. The terminal displays the primary file name you have chosen. Type <Y> to acknowledge or <N> to reset.
The primary file you selected is SWITCH100.app, are you sure? Yes or No(Y/N):Y
If you type <Y>, the terminal displays the following information:
On reboot, SWITCH100.app will become the default primary application file to boot!
This means the primary file has been set successfully.
l Set the backup file.
You can set the backup file in a similar way you set the primary file. The terminal displays the following information:
Please input the backup application file number :7
The file you selected is SWITCH200.app, are you sure? Yes or No(Y/N)y
On reboot,SWITCH200.app will become the backup application file to boot!
Step 3: Decide whether to run the primary file immediately. If you type <Y> and press <Enter>, the system begins to reboot.
Do you want to run SWITCH100.app now?Yes or No(Y/N)?Y
press Ctrl+B to enter Boot Menu... 5
Auto-booting....................
One of the following cases may occur when the system is restarted:
l The primary file is correct and the system boots with the primary file.
l An error occurs when the system boots with the primary file, so it boots with the backup file.
l An error occurs to both the primary and backup files, so the system chooses randomly an application file for booting.
l The system stops choosing the boot file if it fails when booting with a random application file. Then it supposes that the file system is unavailable or no correct booting file is available.
& Note:
l If you specify only the primary file, and set no backup file, the system boots with the primary file. If the primary file has any error, the system randomly chooses an application file for booting.
l If you specify only the backup file, and set no primary file, the system boots with the backup file.
l If you specify neither the primary file nor the backup file, the system randomly chooses an application file for booting.
7.5 Loading a Host Software Containing the Boot ROM File
The S7502 supports multiple types of cards and these cards use different versions of Boot ROM. Thus, you are required to use the correct Boot ROM file when upgrading the Boot ROM of a card. The upgrading fails if the Boot ROM file does not match the card.
To avoid the inconvenience caused by different Boot ROM files in upgrading, Boot ROM files are combined into a host software file. That is, you can use this combined file for on-line upgrade of all cards.
A Boot ROM file is named as “*.btm”, while a host software file containing the Boot ROM file is named as “*.app”.
7.5.1 Example of Upgrading Using Combined Host Software File
I. Preset conditions
l The SRPU in slot 0 of the S7502 is LS81P12TE.
l The LPU in slot 1 is LS81FT48A.
l The host software containing the Boot ROM file is S7502.app.
l Both online upgrading through command line and upgrading through Boot Menu use FTP mode.
Step 1: Download the host software that supports the combined Boot ROM file to the switch through FTP.
<H3C> ftp 10.10.110.1
[ftp] get S7502.app
[ftp] bye
Step 2: Specify S7502.app as the application software used by the switch for the next boot.
<H3C> boot boot-loader primary S7502.app
Step 3: Reboot the switch to make the S7502.app effective.
<H3C> reboot
Step 4: Upgrade the Boot ROM of the SRPU and LPU using the combined host software file.
<H3C> boot bootrom S7502btm.btm slot 0 1
Upgrade board 0 BOOTROM succeeded!
Board 1 upgrading BOOTROM, please wait...
Load finished!
Start Upgrading...
Frame 0 IO Board 1 upgrade BOOTROM succeeded!
By now, you have completed the Boot ROM upgrade.
7.6 Handling Loading Failure
If loading fails, the system runs the original version.
To handle a loading failure, proceed as follows:
1) Check whether the physical ports are correctly and well connected.
l If no, reconnect them correctly and restart the loading process.
l If yes, go to step 2.
2) Check the loading information for the following input errors on the HyperTerminal:
l If the XModem is used for loading, the baud rate of the HyperTerminal is not changed back to 9600bps after you load the software by using a baud rate other than 9600 bps.
l If the TFTP or FTP is used for loading, the IP address of server or switch, the name of the file to be downloaded, or the working path of TFTP server is wrong.
3) If loading fails when the physical connection is normal and no input errors are found, contact the local agents of Hangzhou H3C Technologies Co., Ltd. for help.
7.7 Handling Password Loss
If you lose the Boot ROM password of the switch, contact the local agents of Hangzhou H3C Technologies Co., Ltd.