- Table of Contents
- Related Documents
-
| Title | Size | Download |
|---|---|---|
| 04-SSH Configuration Examples | 875 KB |
Table of Contents
1.3.1 Configuring an SSH Server
1.3.2 Configuring an SSH Client
Chapter 2 SSH Configuration Commands
2.1 SSH Configuration Commands
2.2 Configuring an H3C Switch as an SSH Server
2.3 Configuring an H3C Switch as an SSH Client
Chapter 3 SSH Configuration Examples
3.1 SSH Configuration Examples
3.1.1 When the Switch Acts as the SSH Server and the Authentication Type is Password
3.1.2 When the Switch Acts as an SSH Server and the Authentication Type is RSA
3.1.3 When the Switch Acts as an SSH Client and the Authentication Type is Password
3.1.4 When the Switch Acts as an SSH Client and the Authentication Type is RSA
3.1.5 When the Switch Acts as an SSH Client and First-time authentication is not Supported
Keywords: SSH, RSA
Abstract: This article introduces the application of SSH on the H3C S7500 series Ethernet switches in real network environments, and then presents detailed configurations of the involved SSH client and Ethernet switches respectively.
Acronyms: SSH (Secure Shell), RSA (Rivest Shamir Adleman)
Chapter 1 SSH Overview
1.1 Introduction to SSH
Secure Shell (SSH) is designed to provide secure remote login and other security services in insecure network environments. When users remotely access the switch across an insecure network, SSH will automatically encrypt data before transmission and decrypt data after they reach the destination to guarantee information security and protect switches from such attacks as plain-text password interception. In addition, SSH provides powerful authentication to defend against the man-in-the-middle attacks. SSH uses the client/server mode, by which the SSH server accepts the connection requests from SSH clients and provides authentication. SSH clients can establish SSH connections and log into the SSH server through the SSH connections.
SSH also provides other functions, such as compressing the data to be transmitted to speed up the transmission speed, functioning as Telnet, and providing secure channels for FTP, PoP and even PPP.
& Note:
For details about SSH functions supported on Ethernet switches, refer to related user manuals.
1.2 Support for SSH Functions
Currently, an S7500 switch can function as an SSH client or an SSH server.
1.3 SSH Configuration
1.3.1 Configuring an SSH Server
I. For a H3C switch to be the SSH server
l Configure the protocols supported on user interfaces
l Create or destroy an RSA key pair
l Create an SSH user and specify an authentication type
l Specify a service type for the SSH user
l Configure the SSH management function on the SSH server
l Configure a client public key on the SSH server
l Specify a public key for the SSH user
II. For a non H3C device to be the SSH server
For such configuration, refer to the related user manual.
1.3.2 Configuring an SSH Client
I. Using SSH client software
There are many kinds of SSH client software, such as PuTTY and OpenSSH. You can select one as required and refer to the attached manual for configuration.
II. Using an SSH2-capable switch
l Configure whether first-time authentication is supported
l Establish a connection between the SSH client and the SSH server
1.3.3 Precautions
l If you have configured a user interface to support the SSH protocol, you must configure AAA authentication for the user interface by using the authentication-mode scheme command to ensure successful login.
l Creating an RSA key pair on the SSH server is necessary for successful SSH login.
Chapter 2 SSH Configuration Commands
2.1 SSH Configuration Commands
To implement SSH, you need to configure the SSH client and the SSH server correctly.
The subsequent sections describe SSH configuration commands on the switch. For more information, refer to the SSH Operation Manual.
2.2 Configuring an H3C Switch as an SSH Server
2.2.1 Configuration Procedure
Table 2-1 Configure the switch as an SSH server
|
Role |
Common configuration |
Authentication type |
Public key configuration |
Remarks |
|
|
SSH server |
For detailed command, refer to Common configuration. |
Password authentication |
— |
For detailed command, refer to Password authentication configuration. |
|
|
RSA authentication |
Configure a public key manually: copy the public key from the client public key file to the SSH server. |
Associate the client public key saved on the SSH server to the SSH client |
For detailed commands, refer to Configuring the client RSA public key manually . |
||
I. Precautions for authentication type configuration
The above table introduces the password authentication and RSA authentication separately. In practice, you can combine the two authentication types.
l Executing the ssh authentication-type default password-publickey command or the ssh user authentication-type password-publickey command means that users must not only pass the password authentication but also pass the RSA authentication to login the SSH server.
l Executing the ssh authentication-type default all command or the ssh user authentication-type all command means that users can login the SSH server as long as they pass either the password or RSA authentication.
II. Public key configuration procedure and precautions
As shown in Table 2-1, you need to copy or import the public key from the client to the server.
l When a host acts as the SSH client, use the SSH client program to generate an RSA key pair and display the RSA public key.
l When a switch acts as the SSH client, use the display rsa local-key-pair public command to display the RSA public key after creating RSA key pair through the corresponding commands.
l Manually copy the RSA public key to the SSH server. Thus, the SSH server has the same public key as the SSH client, and can authenticate the SSH client when the SSH client establishes a connection with it.
2.2.2 Configuration Commands
I. Common configuration
Table 2-2 Common configuration
|
Operation |
Command |
Remarks |
|
Enter system view |
system-view |
— |
|
Enter the view of one or multiple user interfaces |
user-interface [ type-keyword ] number [ ending-number ] |
— |
|
Configure the authentication mode as scheme |
authentication-mode scheme [ command-authorization ] |
Required By default, the user interface authentication mode is password. |
|
Specify the supported protocol(s) |
protocol inbound { all |ssh | telnet } |
Optional By default, both Telnet and SSH are supported. |
|
Return to the system view |
quit |
— |
|
Create an RSA key pair |
rsa local-key-pair create |
Required By default, no RSA key pair is created. |
|
Destroy the RSA key pair |
rsa local-key-pair destroy |
Optional |
|
Specify a service type for the SSH user |
ssh user username service-type { stelnet | sftp | all } |
Optional stelnet by default |
|
Set SSH authentication timeout time |
ssh server timeout seconds |
Optional By default, the timeout time is 60 seconds. |
|
Set SSH authentication retry times |
ssh server authentication-retries times |
Optional By default, the number of retry times is 3. |
|
Set RSA server key update interval |
ssh server rekey-interval hours |
Optional By default, the system does not update RSA server keys. |
|
Configure SSH server to be compatible with SSH1.x clients |
ssh server compatible-ssh1x enable |
Optional By default, SSH server is compatible with SSH1.x clients. |
II. Password authentication configuration
Table 2-3 Configure password authentication
|
Operation |
Command |
Description |
|
|
Create an SSH User and specify an authentication type |
Specify the default authentication type for all SSH users |
ssh authentication-type default password |
Optional By default, the authentication type is password. Note that: If both commands are used and different authentication types are specified, the authentication type specified with the ssh user authentication-type command takes precedence. |
|
ssh user username |
|||
|
Create an SSH user, and specify an authentication type for the user |
ssh user username authentication-type password |
||
& Note:
For common configuration commands, refer to Table 2-2.
III. Configuring the client RSA public key manually
Table 2-4 Configure the client RSA public key manually
|
Operation |
Command |
Description |
|
|
Create an SSH user and specify an authentication type |
Specify the default authentication type for all SSH users |
ssh authentication-type default rsa |
Use either command. By default, the authentication type is password. Note that: If both commands are used and different authentication types are specified, the authentication type specified with the ssh user authentication-type command takes precedence. |
|
ssh user username |
|||
|
Create an SSH user, and specify an authentication type for it |
ssh user username authentication-typ rsa |
||
|
Enter public key view |
rsa peer-public-key keyname |
Required |
|
|
Enter public key edit view |
public-key-code begin |
— |
|
|
Configure the client RSA public key |
Enter the content of the RSA public key |
The content must be a hexadecimal string that is generated randomly by the SSH-supported client software and coded compliant to PKCS. Spaces and carriage returns are allowed between characters. |
|
|
Return from public key code view to public key view |
public-key-code end |
When you exit public key code view, the system automatically saves the public key. |
|
|
Return from public key view to system view |
peer-public-key end |
— |
|
|
Assign a public key to an SSH user |
ssh user username assign rsa-key keyname |
Required If you issue this command multiple times, the last command overrides the previous ones |
|
& Note:
For common configuration commands, refer to Table 2-2.
2.3 Configuring an H3C Switch as an SSH Client
When the device connects to the SSH server as an SSH client, you can configure whether the device supports first-time authentication.
l First-time authentication means that when the SSH client accesses the server for the first time and is not configured with the server host public key, the user can continue accessing the server, and will save the host public key on the client for use in subsequent authentications.
l When first-time authentication is not supported, a client, if not configured with the server host public key, will be denied of access to the server. To access the server, a user must configure in advance the server host public key locally and specify the public key name for authentication.
2.3.1 Configuration Procedure
Table 2-5 Configure the switch as an SSH client
|
Role |
Common configuration |
First-time authentication support |
Public key configuration |
Access the SSH server |
Remarks |
|
|
SSH Client |
Refer to Common configuration |
Yes |
— |
Establish a connection between the SSH client and the SSH server |
Refer to Enabling first-time authentication. |
|
|
No |
Configure a public key manually: copy the server public key from the public key file to the SSH client |
Specify the host public key of the SSH server to be connected |
Refer to Disabling first-time authentication. |
|||
As shown in Table 2-5, you need to configure the server public key to the client in the case that the SSH client does not support first-time authentication.
l On the SSH server, use the display rsa local-key-pair public command to display the RSA public key.
l Configure the public key to the SSH client. Thus, the SSH client can authenticate the SSH server using the public key when establishing a connection with the SSH server.
2.3.2 Configuration Commands
I. Enabling first-time authentication
Table 2-6 Enable first-time authentication
|
Operation |
Command |
Description |
|
Enter system view |
system-view |
— |
|
Enable first-time authentication |
ssh client first-time enable |
Optional Enabled by default |
|
Establish a connection with the SSH server |
ssh2 { host-ip | host-name } [ port-num ] [ prefer_kex { dh_group1 | dh_exchange_group } | prefer_ctos_cipher { des | aes128 } | prefer_stoc_cipher { des | aes128 } | prefer_ctos_hmac { sha1 | sha1_96 | md5 | md5_96 } | prefer_stoc_hmac { sha1 | sha1_96 | md5 | md5_96 } ] * |
Required In this command, you can also specify the preferred key exchange algorithm, encryption algorithms and HMAC algorithms between the server and client. |
II. Disabling first-time authentication
Table 2-7 Disable first-time authentication
|
Operation |
Command |
Description |
|
Enter system view |
system-view |
— |
|
Disable first-time authentication |
undo ssh client first-time |
Required Enabled by default |
|
Enter public key view |
rsa peer-public-key keyname |
Required |
|
Enter public key edit view |
public-key-code begin |
— |
|
Configure server public key |
Enter the content of the public key |
When you input the key data, spaces are allowed between the characters you input (because the system can remove the spaces automatically); you can also press <Enter> to continue your input at the next line. But the key you input should be a hexadecimal digit string coded in the public key format. |
|
Return to public key view from public key edit view |
public-key-code end |
When you exit public key code view, the system automatically saves the public key |
|
Exit public key view and return to system view |
peer-public-key end |
— |
|
Specify the host key name of the server |
ssh client { server-ip | server-name } assign rsa-key keyname |
Optional Required when the SSH client does not support first-time authentication You need to copy the server public key to the SSH client before performing this configuration. |
|
Start the client to establish a connection with an SSH server |
ssh2 { host-ip | host-name } [ port-num ] [ prefer_kex { dh_group1 | dh_exchange_group } | prefer_ctos_cipher { des | aes128 } | prefer_stoc_cipher { des | aes128 } | prefer_ctos_hmac { sha1 | sha1_96 | md5 | md5_96 } | prefer_stoc_hmac { sha1 | sha1_96 | md5 | md5_96 } ] * |
Required In this command, you can also specify the preferred key exchange algorithm, encryption algorithms and HMAC algorithms between the server and client. |
Chapter 3 SSH Configuration Examples
& Note:
The S7500 software version in this configuration example is Release 3135.
3.1 SSH Configuration Examples
3.1.1 When the Switch Acts as the SSH Server and the Authentication Type is Password
I. Network requirements
As shown in Figure 3-1, establish an SSH connection between the host (SSH Client) and the switch (SSH Server) for secure data exchange. The host runs SSH2.0 client software. Password authentication is required.
II. Network diagram

Figure 3-1 Network diagram of SSH server configuration using password authentication
III. Configuration procedure
1) Configure the SSH server
# Create a VLAN interface on the switch and assign an IP address, which the SSH client will use to connect with the SSH server.
<H3C> system-view
[H3C] interface vlan-interface 1
[H3C-Vlan-interface1] ip address 192.168.0.1 255.255.255.0
[H3C-Vlan-interface1] quit
# Generate an RSA key pair.
[H3C] rsa local-key-pair create
The key name will be: H3C_Host
The range of public key size is (512 ~ 2048).
NOTES: If the key modulus is greater than 512,
It will take a few minutes.
Input the bits in the modulus[default = 1024]:
Generating keys...
..............++++++
............................++++++
...........................................++++++++
.................++++++++
.........
# Set the authentication mode for the user interface to AAA.
[H3C] user-interface vty 0 4
[H3C-ui-vty0-4] authentication-mode scheme
# Enable the user interface to support SSH.
[H3C-ui-vty0-4] protocol inbound ssh
[H3C-ui-vty0-4] quit
# Create local client “client001”, and set the authentication password to “abc”, protocol type to SSH, and command privilege level to 3 for the client.
[H3C] local-user client001
[H3C-luser-client001] password simple abc
[H3C-luser-client001] service-type ssh level 3
[H3C-luser-client001] quit
![]() Caution:
Caution:
This example configures the server to use local authentication, therefore the AAA scheme referenced by the ISP domain must be a local authentication scheme. Otherwise, the client cannot log into the server.
# Specify the authentication type for user “client001” as password.
[H3C] ssh user client001 authentication-type password
2) Configure the SSH client
# Configure an IP address (192.168.0.2 in this case) for the SSH client. This IP address and that of the VLAN interface on the switch must be in the same network segment.
# Configure the SSH client software to establish a connection to the SSH server.
Take SSH client software “Putty” (version 0.58) as an example:
l Run PuTTY.exe to enter the following configuration interface.
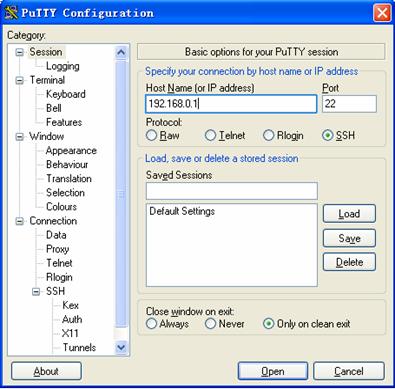
Figure 3-2 SSH client configuration interface
In the Host Name (or IP address) text box, enter the IP address of the SSH server.
l From the category on the left pane of the window, select SSH under Connection. The window as shown in Figure 3-3 appears.

Figure 3-3 SSH client configuration interface 2
Under Protocol options, select 2 from Preferred SSH protocol version.
l As shown in Figure 3-4, click Open to enter the following interface. If the connection is normal, you will be prompted to enter the user name “client001” and password “abc”. Once authentication succeeds, you will log onto the server.

Figure 3-4 SSH client interface
3.1.2 When the Switch Acts as an SSH Server and the Authentication Type is RSA
I. Network requirements
As shown in Figure 3-5, establish an SSH connection between the host (SSH client) and the switch (SSH Server) for secure data exchange. The host runs SSH2.0 client software. RSA authentication is required.
II. Network diagram
Figure 3-5 Network diagram of SSH server configuration
III. Configuration procedure
1) Configure the SSH server
# Create a VLAN interface on the switch and assign an IP address, which the SSH client will use as the destination for SSH connection.
<H3C> system-view
[H3C] interface vlan-interface 1
[H3C-Vlan-interface1] ip address 192.168.0.1 255.255.255.0
[H3C-Vlan-interface1] quit
# Generate an RSA key pair.
[H3C] rsa local-key-pair create
# Set the authentication mode for the user interface to AAA.
[H3C] user-interface vty 0 4
[H3C-ui-vty0-4] authentication-mode scheme
# Enable the user interface to support SSH.
[H3C-ui-vty0-4] protocol inbound ssh
# Set the client’s command privilege level to 3
[H3C-ui-vty0-4] user privilege level 3
[H3C-ui-vty0-4] quit
# Configure the authentication type of the SSH client named “client 001” as RSA.
[H3C] ssh user client001 authentication-type rsa
& Note:
Before performing the following steps, you must generate an RSA key pair (using the client software) on the client, and configure the public key on the server. For details, refer to Configuring the SSH Client.
# Configure the client’s public key named “Switch001” on the server.
[H3C] rsa peer-public-key Switch001
RSA public key view: return to System View with "peer-public-key end".
[H3C-rsa-public-key] public-key-code begin
RSA key code view: return to last view with "public-key-code end".
[H3C-rsa-key-code]30818702 818100CF 442CE3EC 1119A454 E020AD94 E7D65B09
[H3C-rsa-key-code]B04455B3 9D7BFA99 15670D98 F5D4ACFE B32C4CDF 01DF3C40
[H3C-rsa-key-code]CB55B76C D1A0F5FF 0470414A 0910CAA8 DF4BCBFD 5BA9B4AA
[H3C-rsa-key-code]BF23531A 2A09DBB3 32956441 2E16BFA2 D01607AC 56B82B9A
[H3C-rsa-key-code]D8435E7B 0CBD897F 930A105E 06D91AFB A9F548FC 566A3463
[H3C-rsa-key-code]419AC3E0 A3C26A33 8D9B0C32 ED2D1902 0125
[H3C-rsa-key-code] public-key-code end
[H3C-rsa-public-key] peer-public-key end
# Assign the public key “Switch001” to client “client001”.
[H3C] ssh user client001 assign rsa-key Switch001
2) Configure the SSH client
# Generate an RSA key pair, taking PuTTYGen as example.
l Run PuTTYGen.exe, choose SSH-2 RSA and click Generate.
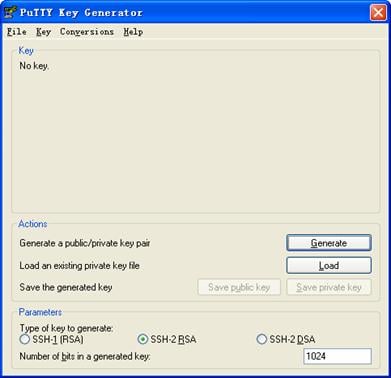
Figure 3-6 Generate a client key pair (1)
& Note:
While generating the key pair, you must move the mouse continuously and keep the mouse off the green process bar shown in Figure 3-7. Otherwise, the process bar stops moving and the key pair generating process is stopped.

Figure 3-7 Generate a client key pair (2)
After the key pair is generated, click Save public key and enter the name of the file for saving the public key (“public” in this case).
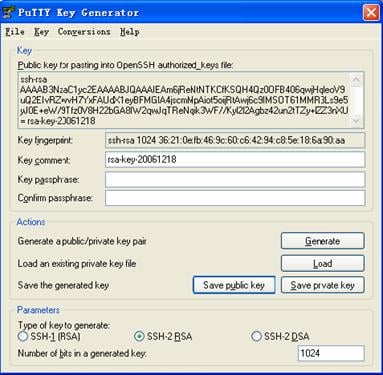
Figure 3-8 Generate a client key pair (3)
Likewise, to save the private key, click Save private key. A warning window pops up to prompt you whether to save the private key without any protection. Click Yes and enter the name of the file for saving the private key (“private.ppk” in this case).

Figure 3-9 Generate a client key pair (4)
l Run SSHKEY.exe and click Browse to select the public file “public”. Then, click Convert to convert the RSA public key to the PKCS format.

Figure 3-10 Generate a client key pair (5)
& Note:
After the public key is converted to the PKCS format, you need to manually configure the RSA public key in the PKCS format on the server, and complete the server end configuration before continuing to configure the client.
# Establish a connection with the SSH server.
The following takes the SSH client software Putty (version 0.58) as an example.
l Launch PuTTY.exe to enter the following interface.

Figure 3-11 SSH client configuration interface 1
In the Host Name (or IP address) text box, enter the IP address of the server.
l From the category on the left pane of the window, select SSH under Connection. The window as shown in Figure 3-12appears.
Figure 3-12 SSH client configuration interface 2
Under Protocol options, select 2 from Preferred SSH protocol version.
l Select Connection > SSH > Auth. The following window appears.
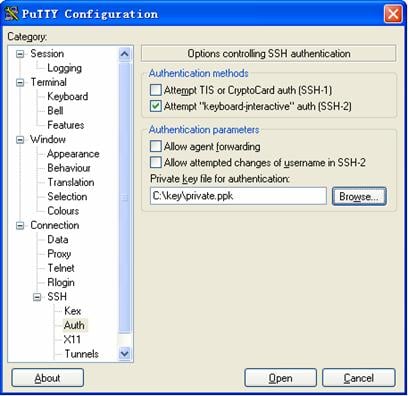
Figure 3-13 SSH client configuration interface (2)
Click Browse… to bring up the file selection window, navigate to the private key file and click OK.
l From the window shown in Figure 3-13, click Open. The following SSH client interface appears. If the connection is normal, you will be prompted to enter the username and password, as shown in Figure 3-14.

Figure 3-14 SSH client interface
3.1.3 When the Switch Acts as an SSH Client and the Authentication Type is Password
I. Network requirements
As shown in Figure 3-15, establish an SSH connection between Switch A (SSH Client) and Switch B (SSH Server) for secure data exchange. The user name for login is client001 and the SSH server’s IP address is 10.165.87.136. Password authentication is required.
II. Network diagram

Figure 3-15 Network diagram of SSH client configuration when using password authentication
III. Configuration procedure
1) Configure Switch B
# Create a VLAN interface on the switch and assign an IP address, which the SSH client will use to connect with the SSH server.
<H3C> system-view
[H3C] interface vlan-interface 1
[H3C-Vlan-interface1] ip address 10.165.87.136 255.255.255.0
[H3C-Vlan-interface1] quit
# Generate an RSA key pair.
[H3C] rsa local-key-pair create
# Set the authentication mode for the user interface to AAA.
[H3C] user-interface vty 0 4
[H3C-ui-vty0-4] authentication-mode scheme
# Enable the user interface to support SSH.
[H3C-ui-vty0-4] protocol inbound ssh
[H3C-ui-vty0-4] quit
# Create local user “client001”, and set the authentication password to “abc”, the login protocol to SSH, and user command privilege level to 3.
[H3C] local-user client001
[H3C-luser-client001] password simple abc
[H3C-luser-client001] service-type ssh level 3
[H3C-luser-client001] quit
![]() Caution:
Caution:
This example configures the server to use local authentication, therefore the AAA scheme referenced by the ISP domain must be a local authentication scheme. Otherwise, the client cannot log into the server.
# Configure the authentication type of user “client001” as password.
[H3C] ssh user client001 authentication-type password
2) Configure Switch A
# Create a VLAN interface on the switch and assign an IP address, which serves as the SSH client’s address in an SSH connection.
<H3C> system-view
[H3C] interface vlan-interface 1
[H3C-Vlan-interface1] ip address 10.165.87.137 255.255.255.0
[H3C-Vlan-interface1] quit
# Establish a connection to the server 10.165.87.136.
[H3C] ssh2 10.165.87.136
Username: client001
Trying 10.165.87.136 ...
Press CTRL+K to abort
Connected to 10.165.87.136 ...
The Server is not authenticated. Do you continue to access it?(Y/N):y
Do you want to save the server's public key?(Y/N):n
Enter password:
*******************************************************************
* Copyright (c) 2004-2007 Hangzhou H3C Technologies Co., Ltd. *
* Without the owner's prior written consent, *
* no decompiling or reverse-engineering shall be allowed. *
*******************************************************************
<H3C>
3.1.4 When the Switch Acts as an SSH Client and the Authentication Type is RSA
I. Network requirements
As shown in Figure 3-16, establish an SSH connection between Switch A (SSH Client) and Switch B (SSH Server) for secure data exchange. The user name is client001 and the SSH server’s IP address is 10.165.87.136. RSA authentication is required.
II. Network diagram
Figure 3-16 Network diagram of SSH client configuration when using publickey authentication
III. Configuration procedure
1) Configure Switch B
# Create a VLAN interface on the switch and assign an IP address, which the SSH client will use to connect with the SSH server.
<H3C> system-view
[H3C] interface vlan-interface 1
[H3C-Vlan-interface1] ip address 10.165.87.136 255.255.255.0
[H3C-Vlan-interface1] quit
# Generate an RSA key pair.
[H3C] rsa local-key-pair create
# Set the authentication mode for the user interfaces to AAA.
[H3C] user-interface vty 0 4
[H3C-ui-vty0-4] authentication-mode scheme
# Enable the user interfaces to support SSH.
[H3C-ui-vty0-4] protocol inbound ssh
# Set the user command privilege level to 3.
[H3C-ui-vty0-4] user privilege level 3
[H3C-ui-vty0-4] quit
# Specify the authentication type of user “client001” as RSA.
[H3C] ssh user client001 authentication-type rsa
& Note:
Before proceeding with the following steps, you need to generate an RSA key pair on the client, and manually configure the RSA public key on the SSH server. For detailed information, refer to SSH client configuration.
# Configure the public key of the SSH client on the SSH server, and specify the public key name as Switch001.
[H3C] rsa peer-public-key Switch001
RSA public key view: return to System View with "peer-public-key end".
[H3C-rsa-public-key] public-key-code begin
RSA key code view: return to last view with "public-key-code end".
[H3C-rsa-key-code] 3047
[H3C-rsa-key-code] 0240
[H3C-rsa-key-code] C8969B5A 132440F4 0BDB4E5E 40308747 804F608B
[H3C-rsa-key-code] 349EBD6A B0C75CDF 8B84DBE7 D5E2C4F8 AED72834
[H3C-rsa-key-code] 74D3404A 0B14363D D709CC63 68C8CE00 57C0EE6B
[H3C-rsa-key-code] 074C0CA9
[H3C-rsa-key-code] 0203
[H3C-rsa-key-code] 010001
[H3C-rsa-key-code] public-key-code end
[H3C-rsa-public-key] peer-public-key end
[H3C]
# Assign the public key Switch001 to user client001.
[H3C] ssh user client001 assign rsa-key Switch001
2) Configure Switch A
# Create a VLAN interface on the switch and assign an IP address, which serves as the SSH client’s address in an SSH connection.
<H3C> system-view
[H3C] interface vlan-interface 1
[H3C-Vlan-interface1] ip address 10.165.87.137 255.255.255.0
[H3C-Vlan-interface1] quit
# Generate an RSA key pair
[H3C] rsa local-key-pair create
# Display the RSA public key on the client.
<H3C> display rsa local-key-pair public
=====================================================
Time of Key pair created: 05:15:04 2006/12/08
Key name: H3C_Host
Key type: RSA encryption Key
=====================================================
Key code:
3047
0240
C8969B5A 132440F4 0BDB4E5E 40308747 804F608B
349EBD6A B0C75CDF 8B84DBE7 D5E2C4F8 AED72834
74D3404A 0B14363D D709CC63 68C8CE00 57C0EE6B
074C0CA9
0203
010001
<Omitted>
& Note:
After generating an RSA key pair on the client, you need to configure the RSA public key on the SSH server and complete the SSH server configuration before continuing to configure the SSH client.
# Establish an SSH connection to the server 10.165.87.136.
[H3C] ssh2 10.165.87.136
Username: client001
Trying 10.165.87.136 ...
Press CTRL+K to abort
Connected to 10.165.87.136 ...
The Server is not authenticated. Do you continue to access it?(Y/N):y
Do you want to save the server's public key?(Y/N):n
*******************************************************************
* Copyright (c) 2004-2007 Hangzhou H3C Technologies Co., Ltd. *
* Without the owner's prior written consent, *
* no decompiling or reverse-engineering shall be allowed. *
*******************************************************************
<H3C>
3.1.5 When the Switch Acts as an SSH Client and First-time authentication is not Supported
I. Network requirements
As shown in Figure 3-17, establish an SSH connection between Switch A (SSH Client) and Switch B (SSH Server) for secure data exchange. The user name is client001 and the SSH server’s IP address is 10.165.87.136. The RSA authentication mode is used to enhance security.
II. Network diagram
Figure 3-17 Network diagram of SSH client configuration
III. Configuration procedure
1) Configure Switch B
# Create a VLAN interface on the switch and assign an IP address, which the SSH client will use to connect with the SSH server.
<H3C> system-view
[H3C] interface vlan-interface 1
[H3C-Vlan-interface1] ip address 10.165.87.136 255.255.255.0
[H3C-Vlan-interface1] quit
# Generate an RSA key pair.
[H3C] rsa local-key-pair create
# Set the authentication mode for the user interfaces to AAA.
[H3C] user-interface vty 0 4
[H3C-ui-vty0-4] authentication-mode scheme
# Enable the user interfaces to support SSH.
[H3C-ui-vty0-4] protocol inbound ssh
# Set the user command privilege level to 3.
[H3C-ui-vty0-4] user privilege level 3
[H3C-ui-vty0-4] quit
# Specify the authentication type for user “client001” as RSA.
[H3C] ssh user client001 authentication-type rsa
& Note:
Before proceeding with the following steps, you need to generate an RSA key pair on the client, and manually configure the RSA public key on the SSH server. For detailed information, refer to SSH client configuration.
# Configure the public key of the SSH client on the SSH server, and specify the public key name as Switch001
[H3C] rsa peer-public-key Switch001
RSA public key view: return to System View with "peer-public-key end".
[H3C-rsa-public-key] public-key-code begin
RSA key code view: return to last view with "public-key-code end".
[H3C-rsa-key-code] 3047
[H3C-rsa-key-code] 0240
[H3C-rsa-key-code] C8969B5A 132440F4 0BDB4E5E 40308747 804F608B
[H3C-rsa-key-code] 349EBD6A B0C75CDF 8B84DBE7 D5E2C4F8 AED72834
[H3C-rsa-key-code] 74D3404A 0B14363D D709CC63 68C8CE00 57C0EE6B
[H3C-rsa-key-code] 074C0CA9
[H3C-rsa-key-code] 0203
[H3C-rsa-key-code] 010001
[H3C-rsa-key-code] public-key-code end
[H3C-rsa-public-key] peer-public-key end
[H3C]
# Assign public key Switch001 to user “client001”
[H3C] ssh user client001 assign rsa-key Switch001
& Note:
If first-time authentication is disabled on the device, it is necessary to configure on the SSH client the RSA public key of the SSH server.
# Display the RSA public key on the server.
[H3C] display rsa local-key-pair public
=====================================================
Time of Key pair created: 09:04:41 2000/04/04
Key name: H3C_Host
Key type: RSA encryption Key
=====================================================
Key code:
308188
028180
C9330FFD 2E2A606F 3BFD5554 8DACDFB8 4D754E86
FC2D15E8 1996422A 0F6A2A6A A94A207E 1E25F3F9
E0EA01A2 4E0F2FF7 B1D31505 39F02333 E443EE74
5C3615C3 E5B3DC91 D41900F0 2AE8B301 E55B1420
024ECF2C 28A6A454 C27449E0 46EB1EAF 8A918D33
BAF53AF3 63B1FB17 F01E4933 00BE2EEA A272CD78
C289B7DD 2BE0F7AD
0203
010001
<Omitted>
2) Configure Switch A
# Create a VLAN interface on the switch and assign an IP address, which serves as the SSH client’s address in an SSH connection.
<H3C> system-view
[H3C] interface vlan-interface 1
[H3C-Vlan-interface1] ip address 10.165.87.137 255.255.255.0
[H3C-Vlan-interface1] quit
# Generate an RSA key pair
[H3C] rsa local-key-pair create
# Display the client’s RSA host public key.
<H3C> display rsa local-key-pair public
=====================================================
Time of Key pair created: 05:15:04 2006/12/08
Key name: H3C_Host
Key type: RSA encryption Key
=====================================================
Key code:
3047
0240
C8969B5A 132440F4 0BDB4E5E 40308747 804F608B
349EBD6A B0C75CDF 8B84DBE7 D5E2C4F8 AED72834
74D3404A 0B14363D D709CC63 68C8CE00 57C0EE6B
074C0CA9
0203
010001
<Omitted>
& Note:
After the SSH client generates an RSA key pair, it is necessary to configure the RSA public key on the SSH server and complete the SSH server configuration before continuing to configure the SSH client.
# Disable first-time authentication on the device.
[H3C] undo ssh client first-time
& Note:
If first-time authentication is disabled on the device, it is necessary to configure on the SSH client the RSA public key of the SSH server.
# Configure the public key of the SSH server on the SSH client, and specify the public key name as Switch002.
[H3C] rsa peer-public-key Switch002
RSA public key view: return to System View with "peer-public-key end".
[H3C-rsa-public-key] public-key-code begin
RSA key code view: return to last view with "public-key-code end".
[H3C-rsa-key-code] 308188
[H3C-rsa-key-code] 028180
[H3C-rsa-key-code] C9330FFD 2E2A606F 3BFD5554 8DACDFB8 4D754E86
[H3C-rsa-key-code] FC2D15E8 1996422A 0F6A2A6A A94A207E 1E25F3F9
[H3C-rsa-key-code] E0EA01A2 4E0F2FF7 B1D31505 39F02333 E443EE74
[H3C-rsa-key-code] 5C3615C3 E5B3DC91 D41900F0 2AE8B301 E55B1420
[H3C-rsa-key-code] 024ECF2C 28A6A454 C27449E0 46EB1EAF 8A918D33
[H3C-rsa-key-code] BAF53AF3 63B1FB17 F01E4933 00BE2EEA A272CD78
[H3C-rsa-key-code] C289B7DD 2BE0F7AD
[H3C-rsa-key-code] 0203
[H3C-rsa-key-code] 010001
[H3C-rsa-key-code] public-key-code end
[H3C-rsa-public-key] peer-public-key end
[H3C]
# Specify the host public key name of the server.
[H3C] ssh client 10.165.87.136 assign rsa-key Switch002
# Establish the SSH connection to server 10.165.87.136.
[H3C] ssh2 10.165.87.136
Username: client001
Trying 10.165.87.136 ...
Press CTRL+K to abort
Connected to 10.165.87.136 ...
*******************************************************************
* Copyright (c) 2004-2007 Hangzhou H3C Technologies Co., Ltd. *
* Without the owner's prior written consent, *
* no decompiling or reverse-engineering shall be allowed. *
*******************************************************************
<H3C>