- Table of Contents
- Related Documents
-
| Title | Size | Download |
|---|---|---|
| 01-Configuration Wizard | 127.35 KB |
Entering the configuration wizard homepage
Configuring management IP address
Finishing configuration wizard
The configuration wizard guides you through configuring the basic service parameters, including the system name, system location, contact information, and management IP address.
Basic service setup
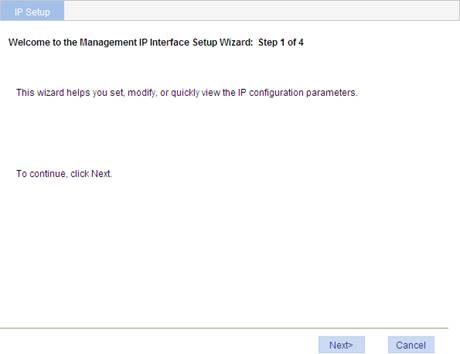
Entering the configuration wizard homepage
Select Wizard from the navigation tree.
Figure 1 Configuration wizard homepage
Configuring system parameters
1. On the wizard homepage, click Next.
Figure 2 System parameter configuration page
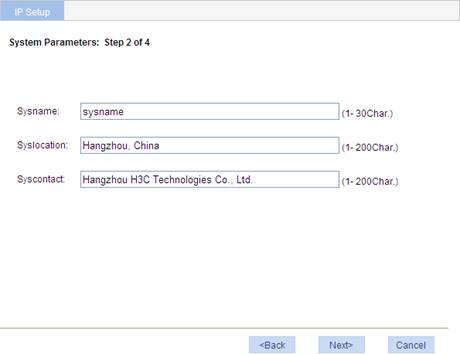
2. Configure the parameters as described in Table 1.
|
Item |
Description |
|
Sysname |
Specify the system name. The system name appears at the top of the navigation tree. You can also set the system name in the System Name page you enter by selecting Device > Basic. For more information, see "Configuring basic device settings." |
|
Syslocation |
Specify the physical location of the system. You can also set the physical location in the setup page you enter by selecting Device > SNMP. For more information, see "Configuring SNMP." |
|
Syscontact |
Set the contact information for users to get in touch with the device vendor for help. You can also set the contact information in the setup page you enter by selecting Device > SNMP. For more information, see "Configuring SNMP." |
Configuring management IP address
|
|
CAUTION: Modifying the management IP address used for the current login terminates the connection to the device. Use the new management IP address to re-log in to the system. |
1. On the system parameter configuration page, click Next.
Figure 3 Management IP address configuration page
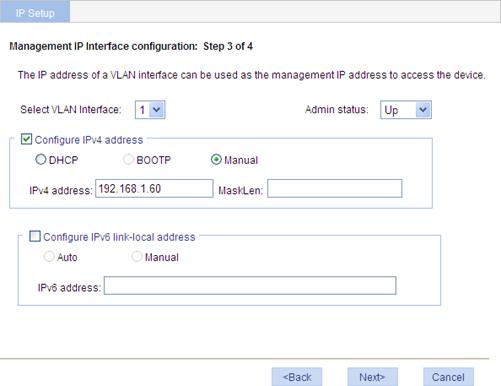
2. Configure the parameters as described in Table 2.
|
Item |
Description |
|
|
Select VLAN Interface |
Select a VLAN interface. Available VLAN interfaces are those configured in the page that you enter by selecting Network > VLAN Interface and selecting the Create tab. The IP address of a VLAN interface can be used as the management IP address to access the device. Configure a VLAN interface and its IP address in the page that you enter by selecting Network > VLAN Interface. For more information, see "Configuring VLAN interfaces." |
|
|
Admin status |
Enable or disable the VLAN interface. When errors occurred in the VLAN interface, disable the interface and then enable the port to bring the port to operate properly. By default, the VLAN interface is down if no Ethernet ports in the VLAN is up. The VLAN is in the up state if one or more ports in the VLAN are up.
Disabling or enabling the VLAN interface does not affect the status of the Ethernet ports in the VLAN. That is, the port status does not change with the VLAN interface status. |
|
|
Configure IPv4 address |
DHCP |
Configure how the VLAN interface obtains an IPv4 address: · DHCP—Obtain an IP address through DHCP. This option is not supported. · BOOTP—Obtain an IP address through BOOTP. This option is not supported. Manual—Manually specify an IPv4 address and the mask length. |
|
BOOTP |
||
|
Manual |
||
|
IPv4 address |
Specify an IPv4 address and the mask length for the VLAN interface. Dotted decimal notation is also allowed for the mask length field. These two fields are configurable if Manual is selected. |
|
|
MaskLen |
||
|
Configure IPv6 link-local address (The device does support IPv6.) |
Auto |
Configure how the VLAN interface obtains an IPv6 link-local address. · Auto—Automatically generate a link-local address based on the link-local address prefix (FE80::/64) and the link layer address of the interface. · Manual—Manually assign an IPv6 link-local address to the interface. |
|
Manual |
||
|
IPv6 address |
Specify an IPv6 link-local address for the VLAN interface. This field is configurable if you select Manual. The address prefix must be FE80::/64. |
|
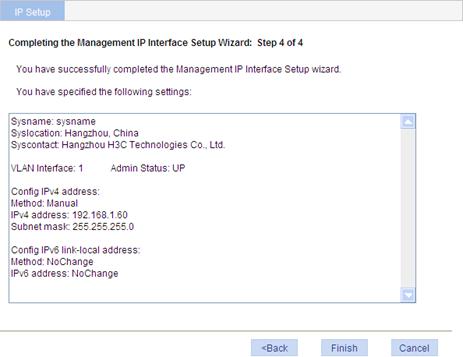
Finishing configuration wizard
After finishing the management IP address configuration, click Next.
The page displays your configurations. Review the configurations and if you want to modify the settings click Back to go back to the page. Click Finish to confirm your settings and the system performs the configurations.
Figure 4 Configuration complete