- Table of Contents
- Related Documents
-
| Title | Size | Download |
|---|---|---|
| 04-HQoS Configuration | 338.99 KB |
Contents
Configuring an forwarding class
Configuring an forwarding profile
Configuring an forwarding group
Configuring an scheduler policy
Instantiating an forwarding group
Applying an scheduler policy to an interface
Copying an forwarding group or scheduler policy
Displaying and maintaining HQoS
HQoS overview
Introduction to HQoS
Quality of Service (QoS) is widely used in networks to ensure transmission quality and provide differentiated service levels for various data flows.
In response to increased network users and service types, Ethernet devices are required not only to further subdivide service traffic but also to uniformly manage and hierarchically schedule traffic by user in addition to service. This is beyond the capability of traditional QoS.
Hierarchical Quality of Service (QoS) uniformly manages traffic and hierarchically schedules traffic by user, network service, and application. It provides more granular traffic control and quality assurance services than traditional QoS.
HQoS-capable devices can hierarchically classify and schedule traffic, for example, by both user and application, and control internal resources based on policies at different levels. HQoS guarantees QoS for advanced users and saves the overall networking costs.
How HQoS works
To achieve hierarchical scheduling, Hierarchical Quality of Service (HQoS) was developed. It organizes a scheduler policy into a hierarchical tree that consists of a root node, branches nodes, and leaf nodes, where:
· The root node is the convergence point for all traffic and corresponds to a scheduler.
· A branch node is located in the middle of the hierarchy and corresponds to a scheduler.
· A leaf node is at the bottom layer and corresponds to a scheduling queue.
A scheduler can schedule multiple scheduling queues or schedulers. Each node is configured with match criteria and control parameters. The match criteria determine the traffic direction and the control parameters define control actions for traffic traversing this node.
Parent nodes and nested child nodes also exist in the hierarchical tree. A parent node is the convergence point for the traffic of its child nodes. Traffic that has been classified and regulated at a child node will be re-classified and regulated together with other traffic streams at the parent node. By configuring match criteria and actions oriented to different levels (user-level, service level, and traffic type level, for example) on the child and parent nodes, you can achieve hierarchical traffic management.
Figure 1 shows how HQoS works. The QoS-local-ID range next to a node is the match criteria of the node. Strict priority, weighted round robin (WRR), or generic traffic shaping (GTS) in the arrow pointing to an upstream node is the control parameter of the current node. With the topmost scheduler policy applied to an interface, you can classify and manage the inbound traffic of the interface multiple times.
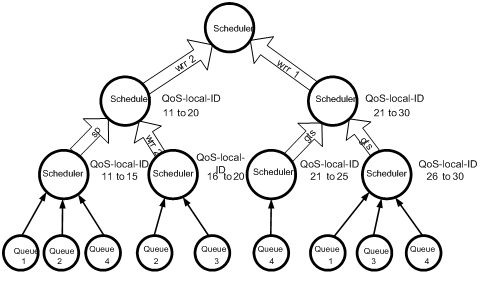
Different from traditional single-layer QoS, HQoS manages traffic in scheduling queues at multiple levels including physical level, logical level, and application level or service level. For example, at the physical level, you can manage the total bandwidth of physical interfaces; at the logical level, you can manage the per-user bandwidth of the interface; at the service level, you can manage per-application bandwidth for a user. Through multi-level traffic management, HQoS helps service providers implement multi-service, multi-user service management.
Terminology
· Forwarding class
A forwarding class is a scheduling entity (a leaf node) in the scheduler policy tree. A forwarding class corresponds to a scheduling queue. Packets are assigned to different scheduling queues according to the specified mapping rules. The parameters associated with a forwarding class determine the behavior of the scheduling queue.
As shown in Table 1, the system pre-defines four forwarding classes: BE, AF, EF, and NC, in the descending order of priority.
Table 1 Predefined forwarding classes
|
Forwarding class name |
Forwarding class name expansion |
Service type |
Forwarding class type |
|
NC |
Network Control |
Highest-priority forwarding services, such as network control packet transmission |
High-priority services |
|
EF |
Expedited Forwarding |
Delay/jitter-sensitive services, such as voice and video traffic transmission |
|
|
AF |
Assured Forwarding |
Services guaranteeing transmission quality, such as VPN and data packet transmission |
Services guaranteeing transmission quality |
|
BE |
Best Effort |
Best-effort services, such as common network browsing services |
Best-effort services |
· Forwarding group
A forwarding group is a scheduling entity (a branch node) in the scheduler policy tree. Multiple forwarding groups or forwarding classes can be nested in a forwarding group. A forwarding group corresponds to a scheduler. The parameters associated with a forwarding group determine the scheduling priority and bandwidth resources assigned to the forwarding group.
· Forwarding profile
Forwarding profiles are scheduling rules configured for the scheduling entities in a scheduler policy. A forwarding profile contains the scheduling priority, scheduling weight, shaping parameters, and drop parameters. It determines the actions to take on the traffic passing the forwarding class or forwarding group associated with the forwarding profile.
· Drop profile
Drop profiles are drop rules defined for queues. As dropping packets is a traffic management behavior, you must nest a drop profile within a forwarding profile for the drop profile to take effect.
· Scheduler policy
Scheduler policies are sets of scheduling entities. From an scheduler policy, a hierarchical tree of schedule entities stretches out with forwarding groups at the second layer and forwarding classes or other forwarding groups under the second-layer forwarding groups.
· Scheduling layer
A scheduling layer indicates the nesting layer of a scheduling entity in the scheduler policy. A forwarding group must match certain criteria at the corresponding layer.
· Instantiation
Instantiation is a special match operation. A scheduling entity matches criteria in the instantiation process. An instantiation entity is the result of instantiating a forwarding group. A forwarding group can have multiple instances, with each using a distinct scheduler. The difference between the instances of a forwarding group lies in only the instantiation rules.
Instantiation can be performed in one of the following modes:
? Match mode—You must explicitly specify instantiation criteria for a forwarding group to be instantiated.
? Group mode—You do not need to specify instantiation criteria explicitly for a forwarding group to be instantiated, but you must do that for the child forwarding groups in the forwarding group to be instantiated.
HQoS configuration task list
Configuring HQoS is to create a scheduler policy tree. You must create nodes (scheduling entities) first, associate these insular nodes and specify traffic actions for each node then, and at last, configure match criteria for each branch nodes of the tree to determine the path of the traffic in the tree.
Figure 2 HQoS configuration structure
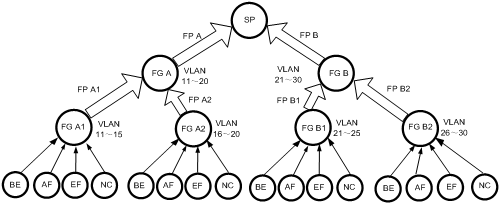
As shown in Figure 2, the HQoS configuration procedure goes through the following phases:
1. Create scheduling entities and configure forwarding profiles for them. More specifically, create nodes forwarding group A, forwarding group A1, forwarding group A2, forwarding group B, forwarding group B1, and forwarding group B2 and configure traffic actions forwarding profile A, forwarding profile A1, forwarding profile A2, forwarding profile B, forwarding profile B1, forwarding profile B2.
2. Associate the scheduling entities with the forwarding profiles. More specifically, nest these nodes (such as nesting forwarding group A1 and forwarding group A2 in forwarding group A, nest BE, AF, EF, and NC in forwarding group A1) and then associate each node with its forwarding profile (such as associating forwarding group A with forwarding profile A). In this phase, the nodes are organized into a tree.
3. Instantiate forwarding groups. More specifically, configure match criteria for each node (for example, assign packets of QoS-local-ID 11 through QoS-local-ID 20 to forwarding group A).
4. Apply the organized scheduler policy to an interface.
Complete the following tasks to configure HQoS:
|
Task |
Remarks |
|
|
Optional |
||
|
Optional |
||
|
Required |
||
|
Required |
||
|
Required |
||
|
Required |
||
|
Required |
||
|
Optional |
||
|
Optional |
||
HQoS basic configuration
Configuring an forwarding class
In HQoS, a packet that arrives at a port is classified and mapped to a forwarding class before it can be assigned to a scheduling queue.
Map traffic to forwarding classes in one the following methods:
· Using a QoS policy to classify traffic into classes, configure the action of marking forwarding classes in a traffic behavior, associate each traffic class with the traffic behavior in a QoS policy, and then apply the QoS policy to an interface. Traffic classes are mapped to forwarding classes. With this method, you can classify packets based on attributes such as packet priority, IP address, MAC address, VLAN, and protocol type.
· Using a user precedence-to-forwarding class (UP-to-forwarding class) mapping table to map packets with certain user precedence to the forwarding class.
|
|
NOTE: For how to configure QoS policies and UP-to-forwarding class mapping tables, see the chapters “Configuring a QoS policy” and “Configuring priority mapping”. |
To mark forwarding classes for packets:
|
Step |
Command |
|
1. Enter system view. |
system-view |
|
2. Create a traffic behavior and enter traffic behavior view. |
traffic behavior behavior–name |
|
3. Configure the action of marking forwarding classes. |
remark forwarding-class { id fc-id | name fc-name } |
Configuring a drop profile
Packet dropping can be used for congestion avoidance. A router can assign drop levels for received packets and color the received packets. Packets of different colors can be assigned to different queues. You can configure drop parameters (queue length threshold for example) for packets of different colors. When the queue length reaches a certain threshold, the drop action is performed. An HQoS drop profile supports two drop algorithms:
· Tail drop—Packet drop is determined by the specified drop threshold. When the queue length reaches the upper threshold, all newly arriving packets are dropped.
· WRED—Drop levels are taken into account for packet dropping in each queue. When the queue length of packets in a color (red, yellow, or green) exceeds the lower threshold, the system begins to drop packets at a certain drop probability before the queue length reaches the upper threshold. When the queue length exceeds the upper threshold, all newly arriving packets are dropped.
The system creates a pre-defined drop profile automatically. The pre-defined drop profile is named default and numbered 0. The contents of the pre-defined drop profile cannot be modified.
Configuring a drop profile includes:
· Creating a user-defined drop profile
· Modifying the parameters of the user-defined drop profile
Creating a user-defined drop profile
To create a user-defined drop profile:
|
Step |
Command |
Remarks |
|
1. Enter system view. |
system-view |
N/A |
|
2. Create a user-defined drop profile. |
qos drop-profile dp-name [ id dp-id ] |
This command can either create a user-defined drop profile or enter the view of an existing drop profile (user-defined or pre-defined). |
|
|
NOTE: The default contents of a newly created drop profile are the same as those of the pre-defined drop profile. |
Modifying the parameters of the user-defined drop profile
To modify the contents of the user-defined drop profile:
|
Step |
Command |
Remarks |
|
1. Enter system view. |
system-view |
N/A |
|
2. Enter user-defined drop profile view. |
qos drop-profile dp-name [ id dp-id ] |
N/A |
|
3. Configure drop parameters for red packets. |
red low-limit low-limit high-limit high-limit discard-probability discard-prob |
Optional. |
|
4. Configure drop parameters for yellow packets. |
yellow low-limit low-limit high-limit high-limit discard-probability discard-prob |
Optional. |
|
5. Configure drop parameters for green packets. |
green low-limit low-limit high-limit high-limit discard-probability discard-prob |
Optional. |
|
6. Set the exponent for average queue length calculation. |
weighting-constant exponent |
Optional. |
Configuring an forwarding profile
In a scheduler policy tree, each node (forwarding group or forwarding class) must be configured with a forwarding profile. A forwarding profile contains a set of actions to be taken on traffic passing the node for traffic policing and traffic control.
Creating forwarding profiles is required in scheduler policy configuration. The system creates a pre-defined forwarding profile automatically. The pre-defined forwarding profile is named default and numbered 0. The contents of the pre-defined forwarding profile cannot be modified.
Configuring a forwarding profile includes:
· Creating a user-defined forwarding profile
· Modifying the contents of the user-defined forwarding profile
Creating a user-defined forwarding profile
To create a user-defined forwarding profile:
|
Step |
Command |
Remarks |
|
1. Enter system view. |
system-view |
N/A |
|
2. Create a user-defined forwarding profile. |
qos forwarding-profile fp-name [ id fp-id ] |
This command can either create a user-defined forwarding profile or enter the view of an existing forwarding profile (user-defined or pre-defined). |
Modifying the user-defined forwarding profile
A forwarding profile includes a set of WFQ weight parameters, a set of traffic shaping parameters, minimum guaranteed bandwidth, and an existing drop profile to be referenced. For more information about drop profile configuration, see “Configuring a drop profile.”
To modify the user-defined forwarding profile:
|
Step |
Command |
Remarks |
|
1. Enter system view. |
system-view |
N/A |
|
2. Enter user-defined forwarding profile view. |
qos forwarding-profile fp-name [ id fp-id ] |
N/A |
|
3. Configure the WFQ weight parameters. |
wfq [ weight weight-value ] |
Optional. The WFQ weight defaults to 1. |
|
4. Configure the GTS parameters. |
gts cir cir-value [ cbs cbs-value ] |
Optional. By default, no GTS parameter is configured for a forwarding profile, and traffic rate is not limited. |
|
5. Configure the minimum guaranteed bandwidth. |
bandwidth bandwidth-value |
Optional. By default, no minimum guaranteed bandwidth is configured in a forwarding profile. On the SR8800, this command only applies to EF queues. |
|
6. Reference a drop profile. |
drop-profile dp-name |
Optional. By default, a forwarding profile does not reference any drop profile, and tail-drop is adopted. |
|
|
NOTE: · A forwarding profile with GTS parameters configured takes effect at only the forwarding group-1 layer and the forwarding group-2 layer for an Ethernet interface or POS interface, and only the forwarding group-1 layer for other interfaces. · A forwarding profile with the minimum guaranteed bandwidth takes effect at only the forwarding group-2 layer for an Ethernet interface or POS interface, and only the forwarding group-1 layer for other interfaces. · A forwarding profile with WFQ weight parameters takes effect at only the forwarding group-1 layer and the forwarding class layer for an Ethernet interface or POS interface, and only the forwarding class layer for other interfaces. · A forwarding profile with a drop profile configured takes effect at only the forwarding class layer. · Modifying a forwarding profile that has been applied to an interface may fail due to insufficient hardware resources. |
Configuring an forwarding group
As forwarding groups are basic scheduling entities and instantiation objects in a scheduler policy tree, creating forwarding groups is required in scheduler policy configuration.
The system creates a pre-defined forwarding group automatically. The pre-defined forwarding group is named default and numbered 0. The contents of the pre-defined forwarding group cannot be modified.
Configuring a forwarding group includes:
· Creating a user-defined forwarding group
· Nesting forwarding classes in the forwarding group
· Nesting forwarding groups in the forwarding group
Creating a user-defined forwarding group
To create a user-defined forwarding group:
|
Step |
Command |
Remarks |
|
1. Enter system view. |
system-view |
N/A |
|
2. Create a user-defined forwarding group. |
qos forwarding-group fg-name [ id fg-id ] |
This command can either create a user-defined forwarding group or enter the view of an existing forwarding group (user-defined or pre-defined). |
Nesting an forwarding class in the forwarding group and associate the forwarding class with an forwarding profile
When nesting a forwarding class in a forwarding group, you must associate the forwarding class with a forwarding profile.
This forwarding profile defines the action that should be taken on the traffic assigned to the scheduling queue of the forwarding class.
You can nest multiple forwarding classes in a forwarding group. A forwarding class can be nested in multiple forwarding groups and associated with a distinct forwarding profile in each forwarding group.
To nest a forwarding class in the user-defined forwarding group:
|
Step |
Command |
|
1. Enter system view. |
system-view |
|
2. Enter user-defined forwarding group view. |
qos forwarding-group fg-name [ id fg-id ] |
|
3. Associate an forwarding class with an forwarding profile. |
forwarding-class fc-name profile fp-name |
|
|
NOTE: · Each time you try to associate a forwarding class with a forwarding profile, the system checks the contents of the forwarding profile. If the forwarding profile conflicts with the forwarding class, your association attempt will fail. · In addition to nesting a new forwarding class in a forwarding group and associating a forwarding profile with the newly nested forwarding class, the forwarding-class fc-name profile fp-name command allows you to associate an existing forwarding class in a forwarding group with a new forwarding profile. · You cannot nest a forwarding class in a forwarding group with nested forwarding groups. |
Nesting a child forwarding group in the forwarding group and associate the child forwarding group with an forwarding profile
When nesting a child forwarding group in another forwarding group, you must associate the child forwarding group with a forwarding profile.
This forwarding profile defines the scheduling action that should be taken on the traffic of the child forwarding group.
You can nest multiple forwarding groups in a forwarding group. A forwarding group can be nested in multiple forwarding groups and associated with a distinct forwarding profile in each parent forwarding group.
To nest a child forwarding group in the forwarding group:
|
Step |
Command |
|
1. Enter system view. |
system-view |
|
2. Enter user-defined forwarding group view. |
qos forwarding-group fg-name [ id fg-id ] |
|
3. Associate a child forwarding group with an forwarding profile. |
forwarding-group sub-fg-name profile fp-name |
|
|
NOTE: · Each time you try to associate a forwarding group with a forwarding profile, the system checks the contents of the forwarding profile. If the forwarding profile conflicts with the forwarding group, your association attempt will fail. · In addition to nesting a new forwarding group in a forwarding group and associating a forwarding profile with the newly nested forwarding group, the forwarding-group sub-fg-name profile fp-name command allows you to associate an existing child forwarding group in a forwarding group with a new forwarding profile. · You cannot nest a child forwarding group in a forwarding group with nested forwarding classes. · A forwarding group with child forwarding groups nested cannot be nested in another forwarding group. · A forwarding group cannot nest itself. |
Configuring an scheduler policy
|
|
NOTE: The scheduler policy configuration conflicts with the port QoS configuration (including queue-based GTS, port WRED, and hardware queue scheduling). For more information about port QoS, see the chapters “Configuring traffic shaping and line rate”, “Configuring congestion avoidance”, and “Configuring hardware congestion management”. |
A scheduler policy is a set of hierarchical scheduling entities. By applying a scheduler policy in the outbound or inbound direction of an interface, you can perform hierarchical QoS for the outgoing or incoming traffic of the interface.
You must create a scheduler policy before organizing forwarding groups and forwarding classes into a scheduler policy tree.
Configuring a scheduler policy includes:
· Creating an scheduler policy
· Nesting forwarding groups in the scheduler policy
Creating an scheduler policy
To create a scheduler policy:
|
Step |
Command |
Remarks |
|
1. Enter system view. |
system-view |
N/A |
|
2. Create an scheduler policy. |
qos scheduler-policy sp-name [ id sp-id ] |
This command can either create a scheduler policy or enter the view of an existing scheduler policy. |
Nesting an forwarding group in the scheduler policy
Similar to nesting child forwarding groups in a parent forwarding group, you can nest a forwarding group in a scheduler policy by associating the forwarding group with a forwarding profile in scheduler policy view.
You can nest multiple forwarding groups in a scheduler policy. A forwarding group can be nested in multiple scheduler policies and associated with a different forwarding profile in each scheduler policy.
To nest a forwarding group in the user-defined scheduler policy:
|
Step |
Command |
|
1. Enter system view. |
system-view |
|
2. Enter scheduler policy view. |
qos scheduler-policy sp-name [ id sp-id ] |
|
3. Associate an forwarding group with an forwarding profile. |
forwarding-group fg-name profile fp-name |
|
|
NOTE: · Each time you try to associate a forwarding group with a forwarding profile, the system checks the contents of the forwarding profile. If the forwarding profile conflicts with the forwarding group, your association attempt will fail. · In addition to nesting a new forwarding group in a scheduler policy and associating a forwarding profile with the newly nested forwarding group, the forwarding-group sub-fg-name profile fp-name command allows you to associate an existing forwarding group in a scheduler policy with a new forwarding profile. Associating an instantiated forwarding group with a new forwarding profile can cause all the instances of the forwarding group to replace the current forwarding profile with the new forwarding profile. · The number of forwarding groups (including instances of forwarding groups) that can be nested at a layer in the scheduler policy tree is limited. Once the limit is reached, your nesting attempt will fail. · Because forwarding group nodes on a scheduler policy tree must be unique, you cannot nest the same forwarding group in the scheduler policy more than once. Forwarding group instances are not considered here. |
Instantiating an forwarding group
Why instantiation
The most significant feature of HQoS is that it can perform multi-level, multi-service control and scheduling for traffic. For this purpose, the system must classify traffic of forwarding group nodes by user and service.
Instantiation can:
· Specify the layer of an forwarding group node in the scheduler policy tree
· Differentiate traffic by user or service
A forwarding group can be instantiated into multiple forwarding group instances. These forwarding group instances can be considered as special forwarding group entities. They derive all the features from the source forwarding group, including the associated forwarding profile, the nested forwarding classes or forwarding groups, and the forwarding profiles associated with these nested forwarding classes or forwarding groups. The difference between an instance and its source forwarding group is that the instance is configured with an instantiation rule (or a match criterion) for traffic classification by service or user type.
Figure 3 Instantiated forwarding groups in an scheduler policy
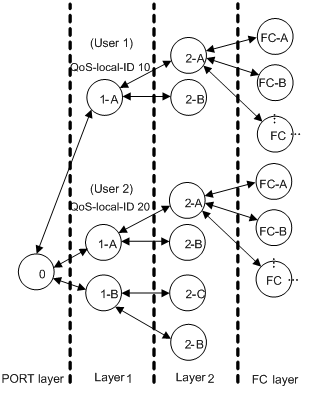
Figure 3 shows the results of a sample instantiation: forwarding group A at Layer 1 is instantiated by QoS-local-ID into two instances with the same internal structure.
Instantiation mode
Instantiation can be performed in one of the following modes:
· Match mode—Instances created from the same forwarding group in this mode are differentiated by their match criteria. Traffic satisfying the match criteria configured for a forwarding group enters the scheduler of the forwarding group. Match criteria can be QoS-local IDs. You can mark a packet with a QoS-local ID as needed, for example, based on its source IP address. Packets from different IP address segments can be marked with different QoS-local IDs.
· Group mode—An instance created in this mode is only a set of child forwarding groups nested in the source forwarding group. No match criteria are configured for the source forwarding group. However, the child forwarding groups nested in the source forwarding group must be configured with match criteria.
Because forwarding classes cannot be instantiated, you cannot instantiate a forwarding group with nested forwarding classes in the group mode.
Instantiating an forwarding group
When instantiating a forwarding group, you must specify the scheduler policy layer of the forwarding group. The forwarding groups nested in a scheduler policy are at Layer 1, and the forwarding groups nested in a forwarding group at Layer 1 are at Layer 2. Instantiation of a forwarding group must be performed in the corresponding layer view in the specified scheduler policy.
To instantiate a forwarding group:
|
Step |
Command |
Remarks |
|
1. Enter system view. |
system-view |
N/A |
|
2. Enter scheduler policy view. |
qos scheduler-policy sp-name [ id sp-id ] |
N/A |
|
3. Enter scheduler policy layer view. |
layer { 1 | 2 } |
N/A |
|
4. Instantiate a user-defined forwarding group. |
·
In match mode: ·
In group mode: |
Use either command. |
|
|
NOTE: · When performing forwarding group instantiation, instantiate a parent forwarding group before instantiating its child forwarding groups. Before removing instances of a parent forwarding group, you must remove all instances of the child forwarding groups first. · To instantiate a parent forwarding group and its child forwarding groups in the match mode, the instantiation rule of the parent node must be the sum of the instantiation rules of the child forwarding groups, and the instantiation rules of child forwarding groups cannot overlap. · You can instantiate a forwarding group multiple times, but the instantiation rules must not overlap. · The pre-defined forwarding group nested in a scheduler policy has been instantiated in the group mode. You cannot modify or remove the instantiation rule of the pre-defined forwarding group. |
You can change the QoS-local ID of a packet by marking the QoS-local ID.
To set the QoS-local ID marking action for a traffic behavior:
|
Step |
Command |
|
1. Enter system view. |
system-view |
|
2. Create a behavior and enter behavior view. |
traffic behavior behavior-name |
|
3. Configure the QoS-local ID marking action for the traffic behavior. |
remark qos-local-id local-id-value |
|
4. Exit behavior view. |
quit |
Applying an scheduler policy to an interface
A scheduler policy can be applied only in the outbound direction of an interface. After being applied, the scheduler policy can control and manage traffic.
Configuration prerequisites
Before applying a scheduler policy to an interface, complete the following tasks:
· Configure child nodes for all forwarding group nodes nested in the scheduler policy
· Nest forwarding classes in a forwarding group with nested forwarding classes. Forwarding class nesting of a forwarding group node is considered complete only when all the pre-defined forwarding classes are nested.
· Instantiate all forwarding group nodes in the scheduler policy tree. A forwarding group node that has not been instantiated cannot appear in a scheduler policy tree.
Applying an scheduler policy to an interface
To apply a scheduler policy to an interface:
|
Step |
Command |
Remarks |
|
1. Enter system view. |
system-view |
N/A |
|
2. Enter interface view or port group view. |
·
Enter Ethernet interface view, ATM interface
view, MP-group interface view, or POS interface view: ·
Enter port group view: |
Use either command. Configured in interface view, the setting takes effect on the current interface only. Configured in port group view, the setting takes effect on all ports in the port group. |
|
3. Apply an scheduler policy to the interface or port group. |
qos apply scheduler-policy sp-name outbound |
N/A |
|
|
NOTE: · Only one scheduler policy can be applied to an interface at a time. · You cannot change the structure of a scheduler policy tree that has been applied to an interface. However, you can associate a forwarding group or forwarding class with a new forwarding profile or modify the contents of associated forwarding profiles in the scheduler policy tree. To change the structure of the scheduler policy tree, for example, to add/remove forwarding class or forwarding group nodes or perform instantiation, you must remove the scheduler policy from the interface first. · An HQoS scheduler policy is mutually exclusive with class-based queuing (CBQ) on an interface. |
Copying an forwarding group or scheduler policy
You can copy forwarding groups and scheduler policies to simplify the configuration procedure.
Copying an forwarding group
You can copy a forwarding group to generate multiple destination forwarding groups at a time. They are numbered by the system automatically.
Except their names and numbers, these destination forwarding groups are the same.
The number of forwarding groups allowed to be created is limited. When the limit is reached, the copying process stops and no more destination forwarding groups can be created.
To copy a forwarding group:
|
Step |
Command |
|
1. Enter system view. |
system-view |
|
2. Copy an forwarding group to multiple destination forwarding groups. |
qos copy forwarding-group fg-source to fg-dest&<1-8> |
Copying an scheduler policy
By copying a scheduler policy, only one destination scheduler policy can be generated. The number of the destination scheduler policy is automatically assigned by the system.
Except the name and number, the destination scheduler policy is the same as the source scheduler policy, including in instantiation rules.
To copy a scheduler policy:
|
Step |
Command |
|
1. Enter system view. |
system-view |
|
2. Copy an scheduler policy. |
qos copy scheduler-policy sp-source to sp-dest |
Displaying and maintaining HQoS
|
Task |
Command |
Remarks |
|
Display forwarding class information. |
display qos forwarding-class [ fc-name ] [ | { begin | exclude | include } regular-expression ] |
Available in any view |
|
Display forwarding group information. |
display qos forwarding-group [ fg-name ] [ | { begin | exclude | include } regular-expression ] |
Available in any view |
|
Display drop profile information. |
display qos drop-profile [ dp-name ] [ | { begin | exclude | include } regular-expression ] |
Available in any view |
|
Display forwarding profile information. |
display qos forwarding-profile [ fp-name ] [ | { begin | exclude | include } regular-expression ] |
Available in any view |
|
Display scheduler policy information. |
display qos scheduler-policy name [ sp-name ] [ | { begin | exclude | include } regular-expression ] |
Available in any view |
|
Display the scheduler policy information and traffic statistics for a specified port or all ports. |
display qos scheduler-policy interface [ interface-type interface-number [ outbound ] ] [ | { begin | exclude | include } regular-expression ] |
Available in any view |
|
Display the diagnosis information of a specified port or all ports. |
display qos scheduler-policy diagnosis interface [ interface-type interface-number [ outbound ] ] [ | { begin | exclude | include } regular-expression ] |
Available in any view |
HQoS configuration examples
|
|
NOTE: · HQoS configuration example I and HQoS configuration example II are both applicable to Ethernet interfaces and POS interfaces. · Only HQoS configuration example II is applicable to ATM interfaces, serial interfaces, and MP-group interfaces. |
HQoS configuration example I
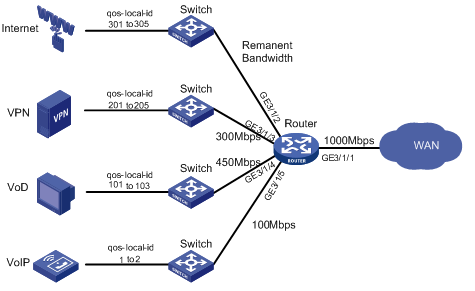
QoS-local-ID mode identifies services by QoS-local ID. Traffic accessing a backbone router fall into four types: VoIP, VoD, VPN, and Internet. You can assign different IP segment to carry different services, and then perform rate limiting and bandwidth management for each type of service. For a service type, you can further differentiate its users.
Network requirements
Assume that the rate limit for the outgoing interface is 1000 Mbps.
Table 2 and Table 3 present the overall requirements for each service and the requirements for the user groups of each service respectively.
Table 2 Requirements for the services
|
Requirements (right) |
IP precedence |
Queue scheduling priority |
Rate limit |
|
Service type (below) |
|||
|
VoIP |
6, 7 |
Strict priority |
100 Mbps |
|
VoD |
4, 5 |
High (bandwidth assured) |
450 Mbps |
|
VPN |
2, 3 |
Medium (bandwidth assured) |
300 Mbps |
|
Internet |
0, 1 |
Low |
Using the surplus bandwidth |
Table 3 Requirements for the user groups of each service
|
Requirements (right) |
Number of groups |
Bandwidth assignment |
IP assignment |
|
Service type (below) |
|||
|
VoIP service |
2 |
Bandwidth sharing |
10.1.1.X, 10.1.2.X |
|
VoD service |
3 |
Bandwidth assignment at the ratio of 2:2:1 |
20.1.1.X, 20.1.2.X, 20.1.3.X |
|
VPN |
Created as needed |
· Given less than three user groups, 100 Mbps for each user group · Given three or more user groups, bandwidth sharing |
30.1.1.X, 30.1.2.X, 30.1.3.X, 30.1.4.X, 30.1.5.X |
|
Internet |
5 |
· Bandwidth sharing · Total bandwidth not restricted, but 36 Mbps of the maximum bandwidth for each user group (As all the other services are rate limited, the guaranteed bandwidth for Internet traffic is 150 Mbps, providing a minimum of 30 Mbps bandwidth for each user group.) |
40.1.1.X, 40.1.2.X, 40.1.3.X, 40.1.4.X, 40.1.5.X |
Figure 4 Network diagram
Configuration considerations
· Map VoIP traffic with IP precedence 6 or 7 to the pre-defined forwarding class NC, VoD traffic with IP precedence 4 or 5 to the pre-defined forwarding class EF, VPN traffic with IP precedence 2 or 3 to the pre-defined forwarding class AF, and Internet traffic with IP precedence 0 or 1 to the pre-defined forwarding class BE.
· Mark VoIP traffic, VoD traffic, VPN traffic, and Internet traffic with a QoS-local ID by source IP address, and then map VoIP traffic, VoD traffic, VPN traffic, and Internet traffic each to a forwarding group by QoS-local ID.
· The user groups of the VoIP, VoD, VPN, and Internet services are each assigned to a distinct forwarding group by instantiation.
Configuration procedure
1. Map different classes of traffic to forwarding classes.
As all traffic is differentiated by IP precedence, you can use the default UP-to-forwarding class mapping table for mapping different classes of traffic to the pre-defined forwarding classes. To this end, you must use the qos trust auto command on the incoming ports to specify the trusted priority type.
<Router> system-view
[Router] interface GigabitEthernet 3/1/2
[Router-GigabitEthernet3/1/2] qos trust auto
[Router-GigabitEthernet3/1/2] quit
[Router] interface GigabitEthernet 3/1/3
[Router-GigabitEthernet3/1/3] qos trust auto
[Router-GigabitEthernet3/1/3] quit
[Router] interface GigabitEthernet 3/1/4
[Router-GigabitEthernet3/1/4] qos trust auto
[Router-GigabitEthernet3/1/4] quit
[Router] interface GigabitEthernet 3/1/5
[Router-GigabitEthernet3/1/5] qos trust auto
[Router-GigabitEthernet3/1/5] quit
2. Create forwarding profiles for the Layer-1 forwarding groups.
[Router] qos forwarding-profile voip
[Router-fp-voip] gts cir 100000
[Router-fp-voip] quit
[Router] qos forwarding-profile vod
[Router-fp-vod] gts cir 450000
[Router-fp-vod] quit
[Router] qos forwarding-profile vpn
[Router-fp-vpn] gts cir 300000
[Router-fp-vpn] quit
3. Create forwarding profiles for the Layer-2 forwarding groups.
[Router] qos forwarding-profile vpn-fg2
[Router-fp-vpn-fg2] gts cir 100000
[Router-fp-vpn-fg2] quit
[Router] qos forwarding-profile internet-fg2
[Router-fp-internet-fg2] gts cir 36000
[Router-fp-internet-fg2] quit
[Router] qos forwarding-profile empty
[Router-fp-empty] quit
4. Create forwarding profiles for the forwarding classes.
[Router] qos forwarding-profile vod-fc-1
[Router-fp-vod-fc-1] wfq weight 2
[Router-fp-vod-fc-1] quit
[Router] qos forwarding-profile vod-fc-2
[Router-fp-vod-fc-2] wfq weight 2
[Router-fp-vod-fc-2] quit
[Router] qos forwarding-profile vod-fc-3
[Router-fp-vod-fc-3] wfq weight 1
[Router-fp-vod-fc-3] quit
5. Nests the forwarding classes in the Layer-2 forwarding groups.
[Router] qos copy forwarding-group default to internet-fg2 voip-fg2 vod-fg2-1 vod-fg2-2 vod-fg2-3 vpn-fg2
[Router] qos forwarding-group vod-fg2-1
[Router-fg-vod-fg2-1] forwarding-class EF profile vod-fc-1
[Router-fg-vod-fg2-1] quit
[Router] qos forwarding-group vod-fg2-2
[Router-fg-vod-fg2-2] forwarding-class EF profile vod-fc-2
[Router-fg-vod-fg2-2] quit
[Router] qos forwarding-group vod-fg2-3
[Router-fg-vod-fg2-3] forwarding-class EF profile vod-fc-3
[Router-fg-vod-fg2-3] quit
6. Nest the Layer-2 forwarding groups in the Layer-1 forwarding groups.
[Router] qos forwarding-group voip
[Router-fg-voip] forwarding-group voip-fg2 profile empty
[Router-fg-voip] quit
[Router] qos forwarding-group vod
[Router-fg-vod] forwarding-group vod-fg2-1 profile empty
[Router-fg-vod] forwarding-group vod-fg2-2 profile empty
[Router-fg-vod] forwarding-group vod-fg2-3 profile empty
[Router-fg-vod] quit
[Router] qos forwarding-group vpn
[Router-fg-vpn] forwarding-group vpn-fg2 profile vpn-fg2
[Router-fg-vpn] quit
[Router] qos forwarding-group internet
[Router-fg-internet] forwarding-group internet-fg2 profile internet-fg2
[Router-fg-internet] quit
7. Mark traffic with a QoS-local ID based on the source IP address.
[Router] acl number 2001
[Router-acl-basic-2001] rule permit source 10.1.1.0 0.0.0.255
[Router-acl-basic-2001] acl number 2002
[Router-acl-basic-2002] rule permit source 10.1.2.0 0.0.0.255
[Router-acl-basic-2002] acl number 2101
[Router-acl-basic-2101] rule permit source 20.1.1.0 0.0.0.255
[Router-acl-basic-2101] acl number 2102
[Router-acl-basic-2102] rule permit source 20.1.2.0 0.0.0.255
[Router-acl-basic-2102] acl number 2103
[Router-acl-basic-2103] rule permit source 20.1.3.0 0.0.0.255
[Router-acl-basic-2103] acl number 2201
[Router-acl-basic-2201] rule permit source 30.1.1.0 0.0.0.255
[Router-acl-basic-2201] acl number 2202
[Router-acl-basic-2202] rule permit source 30.1.2.0 0.0.0.255
[Router-acl-basic-2202] acl number 2203
[Router-acl-basic-2203] rule permit source 30.1.3.0 0.0.0.255
[Router-acl-basic-2203] acl number 2204
[Router-acl-basic-2204] rule permit source 30.1.4.0 0.0.0.255
[Router-acl-basic-2204] acl number 2205
[Router-acl-basic-2205] rule permit source 30.1.5.0 0.0.0.255
[Router-acl-basic-2205] acl number 2301
[Router-acl-basic-2301] rule permit source 40.1.1.0 0.0.0.255
[Router-acl-basic-2301] acl number 2302
[Router-acl-basic-2302] rule permit source 40.1.2.0 0.0.0.255
[Router-acl-basic-2302] acl number 2303
[Router-acl-basic-2303] rule permit source 40.1.3.0 0.0.0.255
[Router-acl-basic-2303] acl number 2304
[Router-acl-basic-2304] rule permit source 40.1.4.0 0.0.0.255
[Router-acl-basic-2304] acl number 2305
[Router-acl-basic-2305] rule permit source 40.1.5.0 0.0.0.255
[Router-acl-basic-2305] quit
[Router] traffic classifier 1
[Router-classifier-1] if-match acl 2001
[Router-classifier-1] traffic classifier 2
[Router-classifier-2] if-match acl 2002
[Router-classifier-2] traffic classifier 101
[Router-classifier-101] if-match acl 2101
[Router-classifier-101] traffic classifier 102
[Router-classifier-102] if-match acl 2102
[Router-classifier-102] traffic classifier 103
[Router-classifier-103] if-match acl 2103
[Router-classifier-103] traffic classifier 201
[Router-classifier-201] if-match acl 2201
[Router-classifier-201] traffic classifier 202
[Router-classifier-202] if-match acl 2202
[Router-classifier-202] traffic classifier 203
[Router-classifier-203] if-match acl 2203
[Router-classifier-203] traffic classifier 204
[Router-classifier-204] if-match acl 2204
[Router-classifier-204] traffic classifier 205
[Router-classifier-205] if-match acl 2205
[Router-classifier-205] traffic classifier 301
[Router-classifier-301] if-match acl 2301
[Router-classifier-301] traffic classifier 302
[Router-classifier-302] if-match acl 2302
[Router-classifier-302] traffic classifier 303
[Router-classifier-303] if-match acl 2303
[Router-classifier-303] traffic classifier 304
[Router-classifier-304] if-match acl 2304
[Router-classifier-304] traffic classifier 305
[Router-classifier-305] if-match acl 2305
[Router-classifier-305] quit
[Router] traffic behavior 1
[Router-behavior-1] remark qos-local-id 1
[Router-behavior-1] traffic behavior 2
[Router-behavior-2] remark qos-local-id 2
[Router-behavior-2] traffic behavior 101
[Router-behavior-101] remark qos-local-id 101
[Router-behavior-101] traffic behavior 102
[Router-behavior-102] remark qos-local-id 102
[Router-behavior-102] traffic behavior 103
[Router-behavior-103] remark qos-local-id 103
[Router-behavior-103] traffic behavior 201
[Router-behavior-201] remark qos-local-id 201
[Router-behavior-201] traffic behavior 202
[Router-behavior-202] remark qos-local-id 202
[Router-behavior-202] traffic behavior 203
[Router-behavior-203] remark qos-local-id 203
[Router-behavior-203] traffic behavior 204
[Router-behavior-204] remark qos-local-id 204
[Router-behavior-204] traffic behavior 205
[Router-behavior-205] remark qos-local-id 205
[Router-behavior-205] traffic behavior 301
[Router-behavior-301] remark qos-local-id 301
[Router-behavior-301] traffic behavior 302
[Router-behavior-302] remark qos-local-id 302
[Router-behavior-302] traffic behavior 303
[Router-behavior-303] remark qos-local-id 303
[Router-behavior-303] traffic behavior 304
[Router-behavior-304] remark qos-local-id 304
[Router-behavior-304] traffic behavior 305
[Router-behavior-305] remark qos-local-id 305
[Router-behavior-305] quit
[Router] qos policy localid
[Router-qospolicy-localid] classifier 1 behavior 1
[Router-qospolicy-localid] classifier 2 behavior 2
[Router-qospolicy-localid] classifier 101 behavior 101
[Router-qospolicy-localid] classifier 102 behavior 102
[Router-qospolicy-localid] classifier 103 behavior 103
[Router-qospolicy-localid] classifier 201 behavior 201
[Router-qospolicy-localid] classifier 202 behavior 202
[Router-qospolicy-localid] classifier 203 behavior 203
[Router-qospolicy-localid] classifier 204 behavior 204
[Router-qospolicy-localid] classifier 205 behavior 205
[Router-qospolicy-localid] classifier 301 behavior 301
[Router-qospolicy-localid] classifier 302 behavior 302
[Router-qospolicy-localid] classifier 303 behavior 303
[Router-qospolicy-localid] classifier 304 behavior 304
[Router-qospolicy-localid] classifier 305 behavior 305
[Router-qospolicy-localid] quit
8. Create a scheduler policy and instantiate the forwarding groups.
[Router] qos scheduler-policy SP
[Router-sp-SP] forwarding-group voip profile voip
[Router-sp-SP] forwarding-group vod profile vod
[Router-sp-SP] forwarding-group vpn profile vpn
[Router-sp-SP] forwarding-group internet profile empty
[Router-sp-SP] layer 1
[Router-sp-SP-layer1] forwarding-group voip group
[Router-sp-SP-layer1] forwarding-group vod group
[Router-sp-SP-layer1] forwarding-group vpn group
[Router-sp-SP-layer1] forwarding-group internet group
[Router-sp-SP-layer1] layer 2
[Router-sp-SP-layer2] forwarding-group voip-fg2 match extended qos-local-id 1 2
[Router-sp-SP-layer2] forwarding-group vod-fg2-1 match qos-local-id 101
[Router-sp-SP-layer2] forwarding-group vod-fg2-2 match qos-local-id 102
[Router-sp-SP-layer2] forwarding-group vod-fg2-3 match qos-local-id 103
[Router-sp-SP-layer2] forwarding-group vpn-fg2 match extended qos-local-id 201 to 205
[Router-sp-SP-layer2] forwarding-group internet-fg2 match extended qos-local-id 301 to 305
[Router-sp-SP-layer2] quit
[Router-sp-SP] quit
9. Configure GTS on GigabitEthernet 3/1/1.
[Router] interface GigabitEthernet 3/1/1
[Router-GigabitEthernet3/1/1] qos gts any cir 1000000
10. Apply the scheduler policy SP and the QoS policy localid in the outbound direction of GigabitEthernet 3/1/1.
[Router-GigabitEthernet3/1/1] qos apply scheduler-policy SP outbound
[Router-GigabitEthernet3/1/1] qos apply policy localid outbound
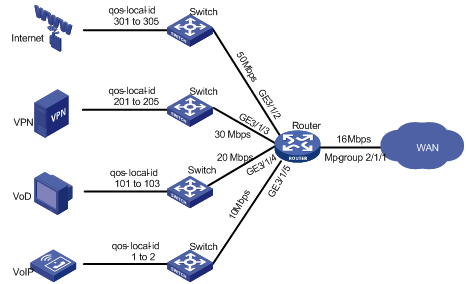
HQoS configuration example II
QoS-local-ID mode identifies services by QoS-local ID. Traffic accessing a backbone router fall into four types: VoIP, VoD, VPN, and Internet. You can assign different IP segment to carry different services, and then perform rate limiting and bandwidth management for each type of service. For a service type, you can further differentiate its users.
Network requirements
Assume that the rate limit for the outgoing interface is 16 Mbps.
Table 4 and Table 5 present the overall requirements for each service and the requirements for the user groups of each service respectively.
Table 4 Requirements for the services
|
Requirements (right) |
IP precedence |
Queue scheduling priority |
Rate limit |
|
Service type (below) |
|||
|
VoIP |
6, 7 |
Strict priority |
2 Mbps |
|
VoD |
4, 5 |
High (bandwidth assured) |
3 Mbps |
|
VPN |
2, 3 |
Medium (bandwidth assured) |
4 Mbps |
|
Internet |
0, 1 |
Low |
Using the surplus bandwidth |
Table 5 Requirements for the user groups of each service
|
Requirements (right) |
Number of groups |
IP assignment |
|
Service type (below) |
||
|
VoIP service |
2 |
10.1.1.X, 10.1.2.X |
|
VoD service |
3 |
20.1.1.X, 20.1.2.X, 20.1.3.X |
|
VPN |
5 |
30.1.1.X, 30.1.2.X, 30.1.3.X, 30.1.4.X, 30.1.5.X |
|
Internet |
5 |
40.1.1.X, 40.1.2.X, 40.1.3.X, 40.1.4.X, 40.1.5.X |
Figure 5 Network diagram
Configuration considerations
· Map VoIP traffic with IP precedence 6 or 7 to the pre-defined forwarding class NC, VoD traffic with IP precedence 4 or 5 to the pre-defined forwarding class EF, VPN traffic with IP precedence 2 or 3 to the pre-defined forwarding class AF, and Internet traffic with IP precedence 0 or 1 to the pre-defined forwarding class BE.
· Mark VoIP traffic, VoD traffic, VPN traffic, and Internet traffic with a QoS-local ID by source IP address, and then map VoIP traffic, VoD traffic, VPN traffic, and Internet traffic each to a forwarding group by QoS-local ID.
· The user groups of the VoIP, VoD, VPN, and Internet services are each assigned to a distinct forwarding group by instantiation.
Configuration procedure
1. Map different classes of traffic to forwarding classes.
As all traffic is differentiated by IP precedence, you can use the default UP-to-forwarding class mapping table for mapping different classes of traffic to the pre-defined forwarding classes. To this end, you must use the qos trust auto command on the incoming ports to specify the trusted priority type.
<Router> system-view
[Router] interface GigabitEthernet 3/1/2
[Router-GigabitEthernet3/1/2] qos trust auto
[Router-GigabitEthernet3/1/2] quit
[Router] interface GigabitEthernet 3/1/3
[Router-GigabitEthernet3/1/3] qos trust auto
[Router-GigabitEthernet3/1/3] quit
[Router] interface GigabitEthernet 3/1/4
[Router-GigabitEthernet3/1/4] qos trust auto
[Router-GigabitEthernet3/1/4] quit
[Router] interface GigabitEthernet 3/1/5
[Router-GigabitEthernet3/1/5] qos trust auto
[Router-GigabitEthernet3/1/5] quit
2. Create the forwarding profiles for Layer-1 forwarding groups.
[Router] qos forwarding-profile voip
[Router-fp-voip] gts cir 2000
[Router-fp-voip] quit
[Router] qos forwarding-profile vod
[Router-fp-vod] gts cir 3000
[Router-fp-vod] quit
[Router] qos forwarding-profile vpn
[Router-fp-vpn] gts cir 4000
[Router-fp-vpn] quit
3. Create a forwarding profile for the forwarding class.
[Router] qos forwarding-profile empty
4. Nest forwarding classes in Layer-1 forwarding groups.
[Router] qos forwarding-group voip
[Router-hqos-fg-voip] forwarding-class BE profile empty
[Router-hqos-fg-voip] forwarding-class AF profile empty
[Router-hqos-fg-voip] forwarding-class EF profile empty
[Router-hqos-fg-voip] forwarding-class NC profile empty
[Router-fg-voip] quit
[Router] qos forwarding-group vod
[Router-fg-vod] forwarding-class BE profile empty
[Router-fg-vod] forwarding-class AF profile empty
[Router-fg-vod] forwarding-class EF profile empty
[Router-fg-vod] forwarding-class NC profile empty
[Router-fg-vod] quit
[Router] qos forwarding-group vpn
[Router-fg-vpn] forwarding-class BE profile empty
[Router-fg-vpn] forwarding-class AF profile empty
[Router-fg-vpn] forwarding-class EF profile empty
[Router-fg-vpn] forwarding-class NC profile empty
[Router-fg-vpn] quit
[Router] qos forwarding-group internet
[Router-fg-internet] forwarding-class BE profile empty
[Router-fg-internet] forwarding-class AF profile empty
[Router-fg-internet] forwarding-class EF profile empty
[Router-fg-internet] forwarding-class NC profile empty
[Router-fg-internet] quit
5. Mark traffic with a QoS-local ID based on the source IP address.
[Router] acl number 2001
[Router-acl-basic-2001] rule permit source 10.1.1.0 0.0.0.255
[Router-acl-basic-2001] acl number 2002
[Router-acl-basic-2002] rule permit source 10.1.2.0 0.0.0.255
[Router-acl-basic-2002] acl number 2101
[Router-acl-basic-2101] rule permit source 20.1.1.0 0.0.0.255
[Router-acl-basic-2101] acl number 2102
[Router-acl-basic-2102] rule permit source 20.1.2.0 0.0.0.255
[Router-acl-basic-2102] acl number 2103
[Router-acl-basic-2103] rule permit source 20.1.3.0 0.0.0.255
[Router-acl-basic-2103] acl number 2201
[Router-acl-basic-2201] rule permit source 30.1.1.0 0.0.0.255
[Router-acl-basic-2201] acl number 2202
[Router-acl-basic-2202] rule permit source 30.1.2.0 0.0.0.255
[Router-acl-basic-2202] acl number 2203
[Router-acl-basic-2203] rule permit source 30.1.3.0 0.0.0.255
[Router-acl-basic-2203] acl number 2204
[Router-acl-basic-2204] rule permit source 30.1.4.0 0.0.0.255
[Router-acl-basic-2204] acl number 2205
[Router-acl-basic-2205] rule permit source 30.1.5.0 0.0.0.255
[Router-acl-basic-2205] acl number 2301
[Router-acl-basic-2301] rule permit source 40.1.1.0 0.0.0.255
[Router-acl-basic-2301] acl number 2302
[Router-acl-basic-2302] rule permit source 40.1.2.0 0.0.0.255
[Router-acl-basic-2302] acl number 2303
[Router-acl-basic-2303] rule permit source 40.1.3.0 0.0.0.255
[Router-acl-basic-2303] acl number 2304
[Router-acl-basic-2304] rule permit source 40.1.4.0 0.0.0.255
[Router-acl-basic-2304] acl number 2305
[Router-acl-basic-2305] rule permit source 40.1.5.0 0.0.0.255
[Router-acl-basic-2305] quit
[Router] traffic classifier 1
[Router-classifier-1] if-match acl 2001
[Router-classifier-1] traffic classifier 2
[Router-classifier-2] if-match acl 2002
[Router-classifier-2] traffic classifier 101
[Router-classifier-101] if-match acl 2101
[Router-classifier-101] traffic classifier 102
[Router-classifier-102] if-match acl 2102
[Router-classifier-102] traffic classifier 103
[Router-classifier-103] if-match acl 2103
[Router-classifier-103] traffic classifier 201
[Router-classifier-201] if-match acl 2201
[Router-classifier-201] traffic classifier 202
[Router-classifier-202] if-match acl 2202
[Router-classifier-202] traffic classifier 203
[Router-classifier-203] if-match acl 2203
[Router-classifier-203] traffic classifier 204
[Router-classifier-204] if-match acl 2204
[Router-classifier-204] traffic classifier 205
[Router-classifier-205] if-match acl 2205
[Router-classifier-205] traffic classifier 301
[Router-classifier-301] if-match acl 2301
[Router-classifier-301] traffic classifier 302
[Router-classifier-302] if-match acl 2302
[Router-classifier-302] traffic classifier 303
[Router-classifier-303] if-match acl 2303
[Router-classifier-303] traffic classifier 304
[Router-classifier-304] if-match acl 2304
[Router-classifier-304] traffic classifier 305
[Router-classifier-305] if-match acl 2305
[Router-classifier-305] quit
[Router] traffic behavior 1
[Router-behavior-1] remark qos-local-id 1
[Router-behavior-1] traffic behavior 2
[Router-behavior-2] remark qos-local-id 2
[Router-behavior-2] traffic behavior 101
[Router-behavior-101] remark qos-local-id 101
[Router-behavior-101] traffic behavior 102
[Router-behavior-102] remark qos-local-id 102
[Router-behavior-102] traffic behavior 103
[Router-behavior-103] remark qos-local-id 103
[Router-behavior-103] traffic behavior 201
[Router-behavior-201] remark qos-local-id 201
[Router-behavior-201] traffic behavior 202
[Router-behavior-202] remark qos-local-id 202
[Router-behavior-202] traffic behavior 203
[Router-behavior-203] remark qos-local-id 203
[Router-behavior-203] traffic behavior 204
[Router-behavior-204] remark qos-local-id 204
[Router-behavior-204] traffic behavior 205
[Router-behavior-205] remark qos-local-id 205
[Router-behavior-205] traffic behavior 301
[Router-behavior-301] remark qos-local-id 301
[Router-behavior-301] traffic behavior 302
[Router-behavior-302] remark qos-local-id 302
[Router-behavior-302] traffic behavior 303
[Router-behavior-303] remark qos-local-id 303
[Router-behavior-303] traffic behavior 304
[Router-behavior-304] remark qos-local-id 304
[Router-behavior-304] traffic behavior 305
[Router-behavior-305] remark qos-local-id 305
[Router-behavior-305] quit
[Router] qos policy localid
[Router-qospolicy-localid] classifier 1 behavior 1
[Router-qospolicy-localid] classifier 2 behavior 2
[Router-qospolicy-localid] classifier 101 behavior 101
[Router-qospolicy-localid] classifier 102 behavior 102
[Router-qospolicy-localid] classifier 103 behavior 103
[Router-qospolicy-localid] classifier 201 behavior 201
[Router-qospolicy-localid] classifier 202 behavior 202
[Router-qospolicy-localid] classifier 203 behavior 203
[Router-qospolicy-localid] classifier 204 behavior 204
[Router-qospolicy-localid] classifier 205 behavior 205
[Router-qospolicy-localid] classifier 301 behavior 301
[Router-qospolicy-localid] classifier 302 behavior 302
[Router-qospolicy-localid] classifier 303 behavior 303
[Router-qospolicy-localid] classifier 304 behavior 304
[Router-qospolicy-localid] classifier 305 behavior 305
[Router-qospolicy-localid] quit
6. Create a scheduler policy and instantiate the forwarding groups.
[Router] qos scheduler-policy SP
[Router-sp-SP] forwarding-group voip profile voip
[Router-sp-SP] forwarding-group vod profile vod
[Router-sp-SP] forwarding-group vpn profile vpn
[Router-sp-SP] forwarding-group internet profile empty
[Router-sp-SP] layer 1
[Router-sp-SP-layer1] forwarding-group voip match qos-local-id 1 2
[Router-sp-SP-layer1] forwarding-group vod match qos-local-id 101 to 103
[Router-sp-SP-layer1] forwarding-group vpn match qos-local-id 201 to 205
[Router-sp-SP-layer1] forwarding-group internet match qos-local-id 301 to 305
[Router-sp-SP] quit
7. Configure GTS on interface Mp-group 2/1/1.
[Router] interface Mp-group 2/1/1
[Router-Mp-group2/1/1] qos gts any cir 16000
8. Apply the scheduler policy SP and the QoS policy localid in the outbound direction of interface Mp-group2/1/1.
[Router-Mp-group2/1/1] qos apply scheduler-policy SP outbound
[Router-Mp-group2/1/1] qos apply policy localid outbound
