- Table of Contents
- Related Documents
-
| Title | Size | Download |
|---|---|---|
| 01-Text | 998.15 KB |
Prepare for FIST SMS installation
Obtain the FIST SMS installation package
Install and start FIST SMS in Linux
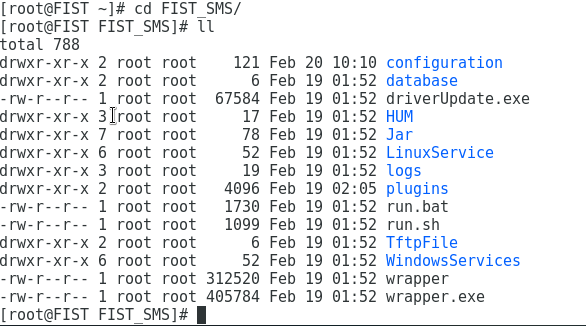
Internal programs of FIST SMS software package
Internal programs of FIST SMS software package in Linux
Edit the monitor.properties configuration file
Edit the sellog.properties configuration file
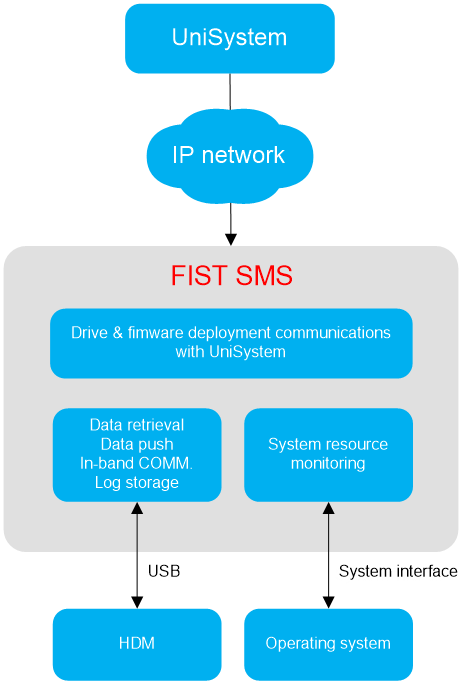
About FIST SMS
H3C FIST SMS is the software installed in the operating system of a server to enhance HDM and UniSystem management capabilities.
FIST SMS provides the following functions:
· Enhances the in-band management capabilities of HDM on the server.
· Enhances the out-of-band management capabilities of UniSystem on the server.
Figure 1 FIST SMS management model
Applicable products
This document is applicable to the following products:
· H3C UniServer B16000
· H3C UniServer R3900 G7
· H3C UniServer R4900 G7
· H3C UniServer R3350 G7
· H3C UniServer R3950 G7
· H3C UniServer R4950 G7
· H3C UniServer R6930 G7
· H3C UniServer R5330 G7
· H3C UniServer R5500 G7
· H3C UniServer R4330 G7
· H3C UniServer R4930 G7
· H3C UniServer R4970 G7
· H3C UniServer R4700 G6
· H3C UniServer R4900 G6
· H3C UniServer R4900 G6 Ultra
· H3C UniServer R4950 G6
· H3C UniServer R5350 G6
· H3C UniServer R5300 G6
· H3C UniServer B5700 G5
· H3C UniServer R4300 G5
· H3C UniServer R4330 G5
· H3C UniServer R4330 G5 H3
· H3C UniServer R4700 G5
· H3C UniServer R4900 G5
· H3C UniServer R4930 G5
· H3C UniServer R4930 G5 H3
· H3C UniServer R4930LC G5 H3
· H3C UniServer R4950 G5
· H3C UniServer R5300 G5
· H3C UniServer R5500 G5
· H3C UniServer R5500LC G5
· H3C UniServer R6900 G5
· H3C UniServer B5700 G3
· H3C UniServer B5800 G3
· H3C UniServer B7800 G3
· H3C UniServer E3200 G3
· H3C UniServer R2700 G3
· H3C UniServer R2900 G3
· H3C UniServer R4300 G3
· H3C UniServer R4500 G3
· H3C UniServer R4700 G3
· H3C UniServer R4900 G3
· H3C UniServer R4950 G3
· H3C UniServer R5300 G3
· H3C UniServer R6700 G3
· H3C UniServer R6900 G3
· H3C UniServer R8900 G3
Prepare for FIST SMS installation
|
|
IMPORTANT: · To allow UniSystem to manage a server through FIST SMS, disable the firewall on the server or add port 12580 and port 6900 to the allowlist of the firewall after FIST SMS is installed. · FIST SMS can be installed only on physical servers. |
Table 1 shows the requirements for installing FIST SMS on a server.
Table 1 FIST SMS installation requirements
|
Item |
Requirements |
|
Operating system |
Linux: · Red Hat Enterprise Linux 7.9 (64 bit) (includes KVM) · Red Hat Enterprise Linux 8.6 (64 bit) (includes KVM) · Red Hat Enterprise Linux 9.0 (64 bit) (includes KVM) · Red Hat Enterprise Linux 9.4 (64 bit) (includes KVM) · BC-Linux 21.10U4(64 bit) · Rocky Linux 9.0 · Rocky Linux 9.4 |
|
Software |
OpenJDK version 1.8 (64-bit) |
|
Privileges required for FIST SMS installation |
Administrative privileges |
|
|
NOTE:. When you install FIST SMS on G6 and later servers: · Red Hat Enterprise Linux 7.9 (64 bit) supports kernel version redhat7.9+3.10.0-1160.el7.x86_64. · BC-Linux 21.10U4(64 bit) supports kernel version 5.10.0-200.0.0.113.25.oe2203sp3.bclinux.x86_64. |
Guidelines
The webpage screenshots used in this document are for illustration only and might differ from your products.
Install and start FIST SMS
Obtain the FIST SMS installation package
Download the FIST SMS installation package from Support > Software Download > Servers > Software package page of a server model on the H3C website.
Install and start FIST SMS
|
|
IMPORTANT: As a best practice, do not run FIST SMS and UniSystem server simultaneously in the operating system. |
If a server is managed by UniSystem as an HDM server node, you can install FIST SMS on the server remotely through UniSystem. For information about the procedure, see H3C Servers UniSystem User Guide.
The following information describes the procedure for installing and starting FIST SMS on a server locally.
Install and start FIST SMS in Linux
Install FIST SMS in Linux
1. Log in to the Linux server as the root user, as shown in Figure 2.
Figure 2 Logging in as the root user
![]()
2. Download the FIST SMS installation package and save the package to the root directory of the server. This example uses FIST SMS of version 1.03.08.
3. Execute the tar -xf FIST_SMS-1.03.08.tar.gz command to decompress the installation package, as shown in Figure 3.
Figure 3 Decompressing the FIST SMS installation package

Start FIST SMS in Linux
You can start FIST SMS by using one of the following methods:
· Method 1—Start FIST SMS directly. FIST SMS will stop running after a system reboot.
· Method 2—Register and then FIST SMS. FIST SMS will keep running after a system reboot. As a best practice, use this method.
Before you start FIST SMS on a server, make sure TCP port 12580 is available on the server.
Start FIST SMS directly
1. Open the terminal window.
2. Execute the cd /FIST SMS/ command to access the directory where FIST SMS resides.
Figure 4 Accessing the FIST SMS directory
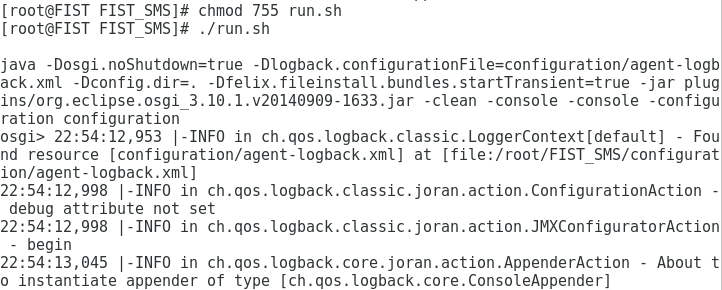
3. Execute the chmod 755 run.sh command to make the run.sh file executable.
4. Enter the ./run.sh command to execute the run.sh script file.
Now, FIST SMS is started, as shown in Figure 5.
Register and start FIST SMS
5. Open the terminal window.
6. Execute the cd /FIST_SMS/LinuxService/bin command to access the /LinuxService/bin directory.
Figure 6 Accessing the /LinuxService/bin directory

7. Execute the chmod 755 InstallApp-NT.sh command to make the InstallApp-NT.sh file executable. Then, execute the ./InstallApp-NT.sh command to register and start FIST SMS.
Figure 7 Registering and starting FIST SMS

Check FIST SMS status
1. Execute the service FIST_SMS status command to check the status of the FIST SMS service, as shown in Figure 8.
Figure 8 Checking the status of the FIST SMS service
![]()
2. To stop the FIST SMS service, execute the service FIST_SMS stop command, as shown Figure 9.
Figure 9 Stopping the FIST SMS service
![]()
3. To start the FIST SMS service, execute the service FIST_SMS start command, as shown in Figure 10.
Figure 10 Starting the FIST SMS service

FIST SMS functions
Data collection
FIST SMS can obtain and monitor the CPU, memory, drive, NIC, and version information of the server it runs on.
Table 2 describes the information collected by FIST SMS.
Table 2 Information collected by FIST SMS
|
Item |
Collected info |
|
OS |
Basic OS information, including the OS name, version, system time, and time zone. |
|
CPU |
Basic CPU information, including the CPU model, frequency, count, and system CPU usage. |
|
Memory |
Basic memory information, including the memory capacity and usage. |
|
NIC |
Basic NIC information, including the NIC model, IPv4 address, subnet mask, MAC address, and network throughput. |
|
Drive |
Total available capacity of the system drive and disk usage. |
|
Version info |
· HDM, BIOS, FIST SMS version information. · BIOS boot option and boot mode. · Product name. · Warranty serial number. |
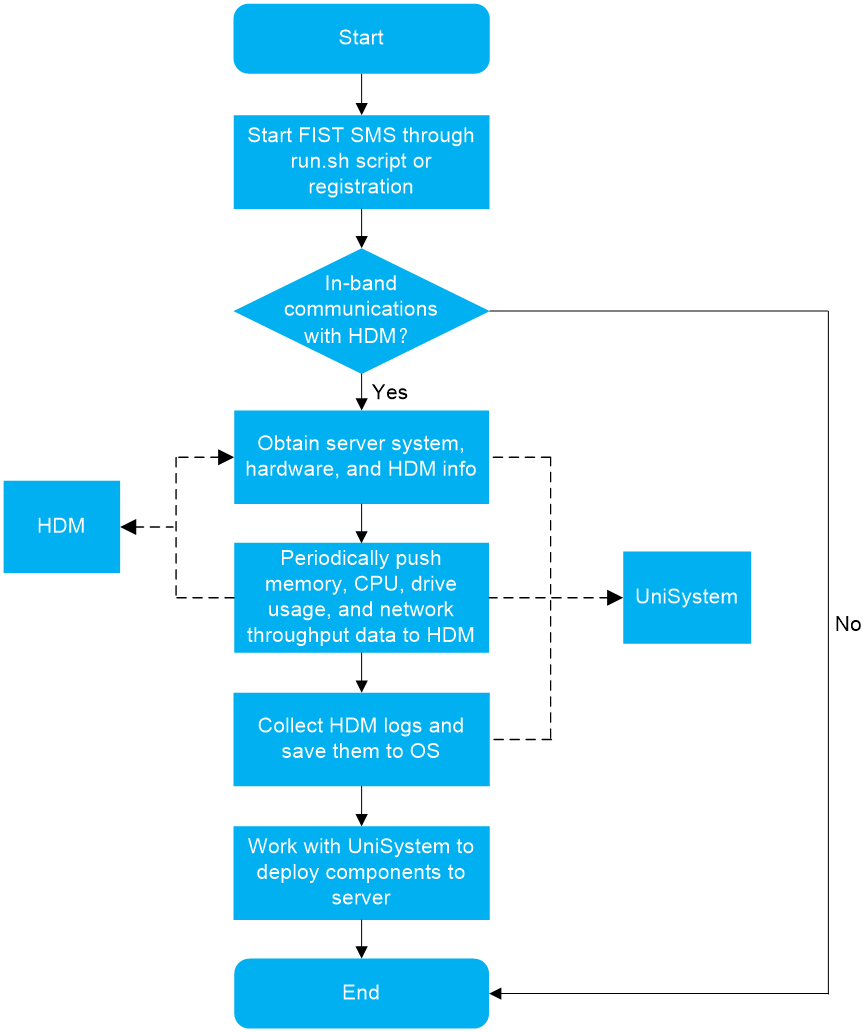
HDM-related functions
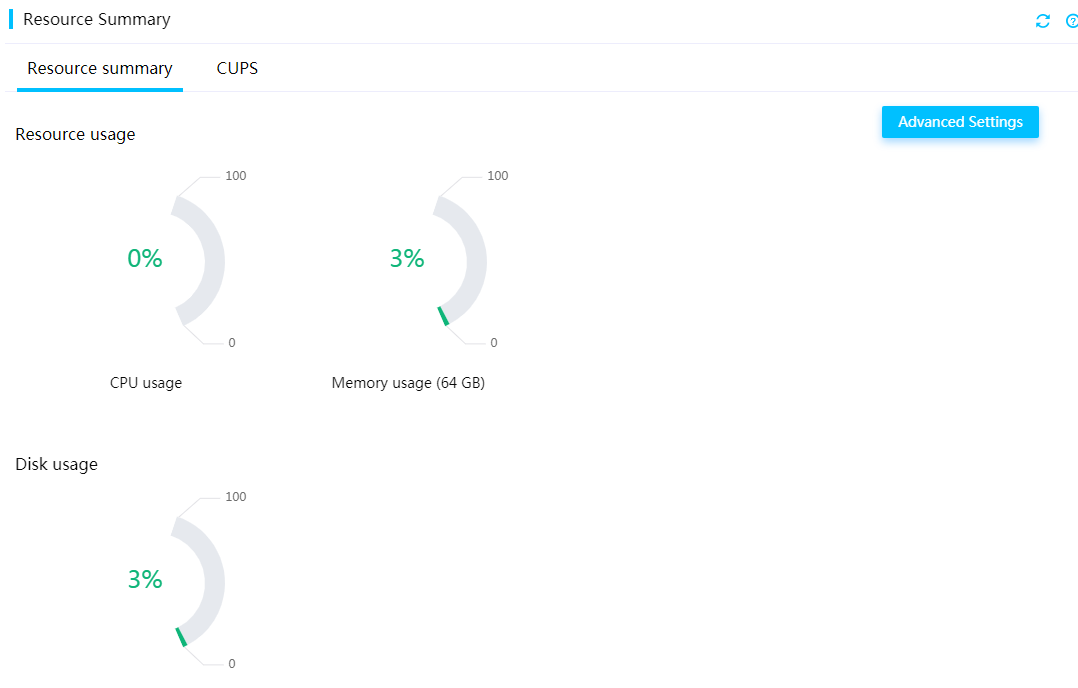
System resource monitoring
FIST SMS can push memory, CPU, disk usage, and network throughput data of the server to HDM in real time. You can view the information in HDM on the Dashboard > Monitoring page.
HDM can obtain the system resource information of a server only after FIST SMS is installed on the server.
Figure 12 System resource monitoring in HDM
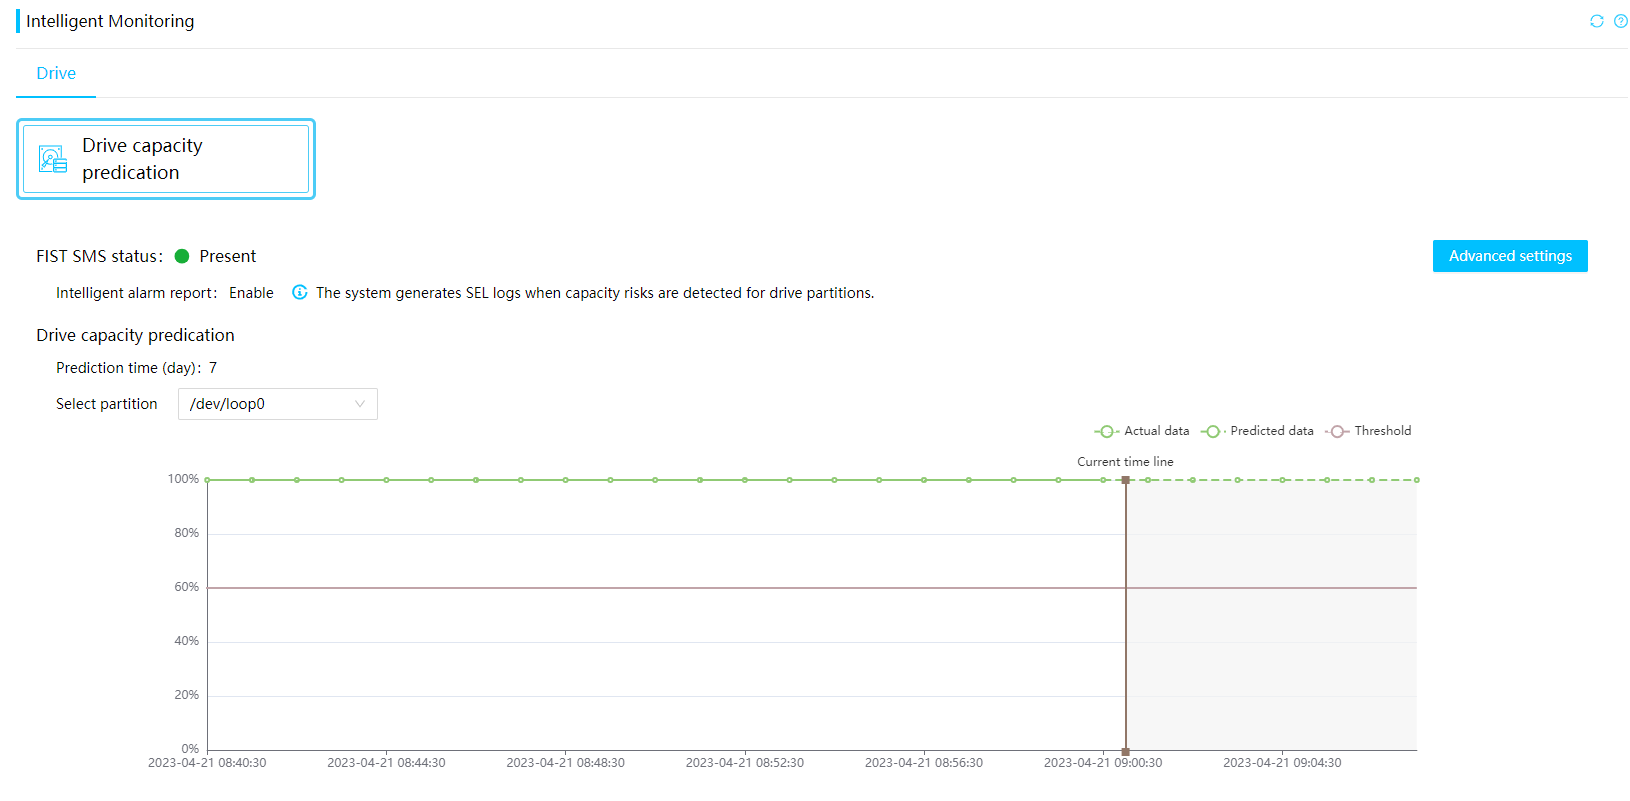
Drive Usage Prediction
After drive usage prediction is enabled and the prediction duration is configured in HDM, FIST SMS predicts the OS drive usage and sends the prediction result to HDM.
Figure 13 Drive Usage Prediction
Event log dumping
About this task
FIST SMS supports saving HDM event log to the operating system. If the operating system or FIST SMS restarts, log entries generated during restart will also be saved to the operating system, which is convenient for unified operation and maintenance.
Before using this feature, make sure IPMITool is installed in the OS where FIST SMS resides.
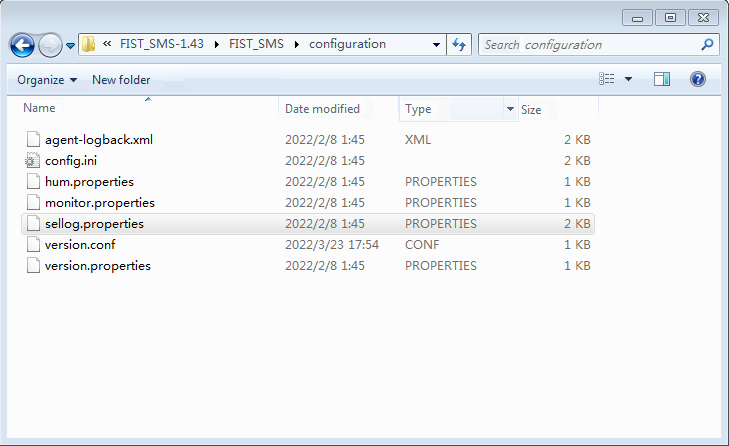
To use this feature, you must edit the configuration file in the FIST SMS installation package to enable event log dumping and configure related settings. The configuration file to be edited is sellog.properties in the /configuration folder, as shown in Figure 14.
Figure 14 Configuration file path
Configure log dumping settings
After editing the configuration file, restart FIST SMS for the configuration to take effect. For more information about restarting FIST SMS, see "Install and start FIST SMS."
To configure log dumping settings:
1. Open the sellog.properties file, and set the status field to on for enabling log dumping, as shown in Figure 15.
By default, log dumping is disabled.
Figure 15 Enabling log dumping

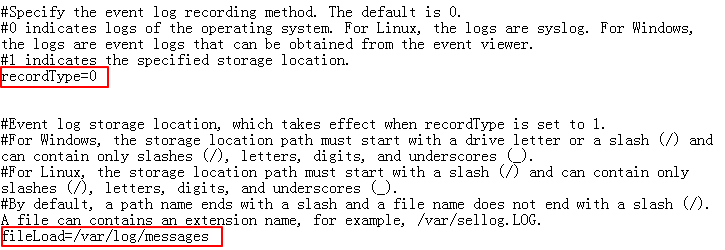
2. (Optional.) Specify the log storage location. As shown in Figure 16, set recordType to 1, and specify a storage location in the fileLoad field.
By default, the event log is saved in the operating system log.
Figure 16 Specifying the log storage location
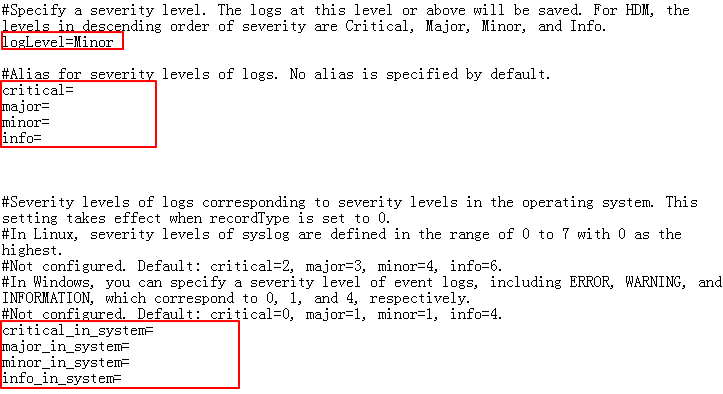
3. (Optional.) Specify the severity level of event log entries to be dumped, as shown in Figure 17. The log entries at the specified level or above will be dumped. You can customize aliases for severity levels and redefine the correspondence between severity levels of HDM event log and severity levels of the operating system log.
Figure 17 Specifying the severity level of event log entries to be dumped
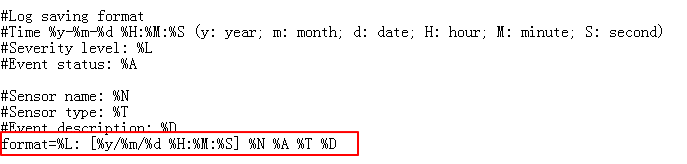
4. (Optional.) Specify the format for log dumping, as shown in Figure 18.
Figure 18 Specifying the format for log dumping
View dumped log entries
By default (recordType=0), HDM event log is saved to the operating system log.
If you specify a storage location (recordType=1), you can view log entries that are generated after log dumping is enabled from the path or file specified in the fileLoad field.
View dumped log entries in Linux
In Linux, HDM event log is saved to the rsyslog log by default.
To view dumped log entries:
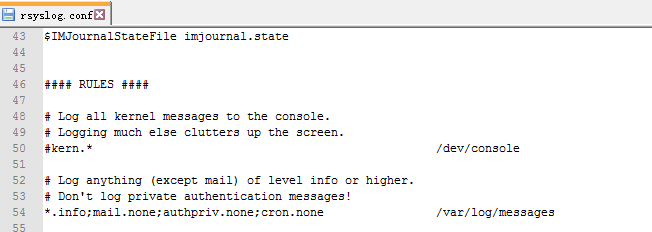
1. View the /etc/rsyslog.conf path to identify the location of the rsyslog log. As shown in Figure 19, the rsyslog log entries of info or above are saved in the /var/log/messages path.
Figure 19 Identifying the storage location of rsyslog log
2. Open the messages file to view dumped event log entries, as shown in Figure 20.
Figure 20 View dumped event log entries in Linux

Obtain XID fault information
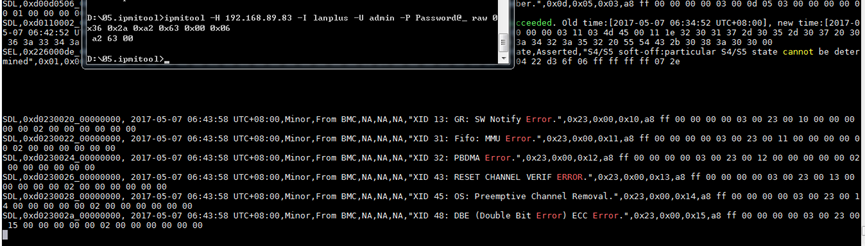
FIST SMS supports sending GPU XID faults to HDM, which then records SDS logs based on the received faults, including XID13, XID31, XID32, XID43, XID45, and XID48. This feature is applicable only to certain NVIDIA GPU models.
Figure 21 XID fault analysis
UniSystem-related functions
Performance monitoring
After a server that has FIST SMS installed is added to UniSystem, you can view the server's physical resource usage information in UniSystem. UniSystem collects the CPU usage, disk space usage, memory usage, and network throughput, cache memory, GPU usage, drive I/O, drive throughput, drive read/write ratio, drive queue depth, I/O latency, NFS client read/write speed, NFS server read/write speed, and system load statistics of managed FIST SMS server nodes at 30-second monitor intervals. You can view the past 30 days' resource usage data for a server in UniSystem.
Figure 22 shows the performance monitoring page of a FIST SMS server node in UniSystem. See Table 3 for descriptions of the charts on the page.
For more information about the performance monitoring function of UniSystem, see H3C Servers UniSystem User Guide.
Figure 22 Viewing the physical resource usage information of a server in FIST SMS
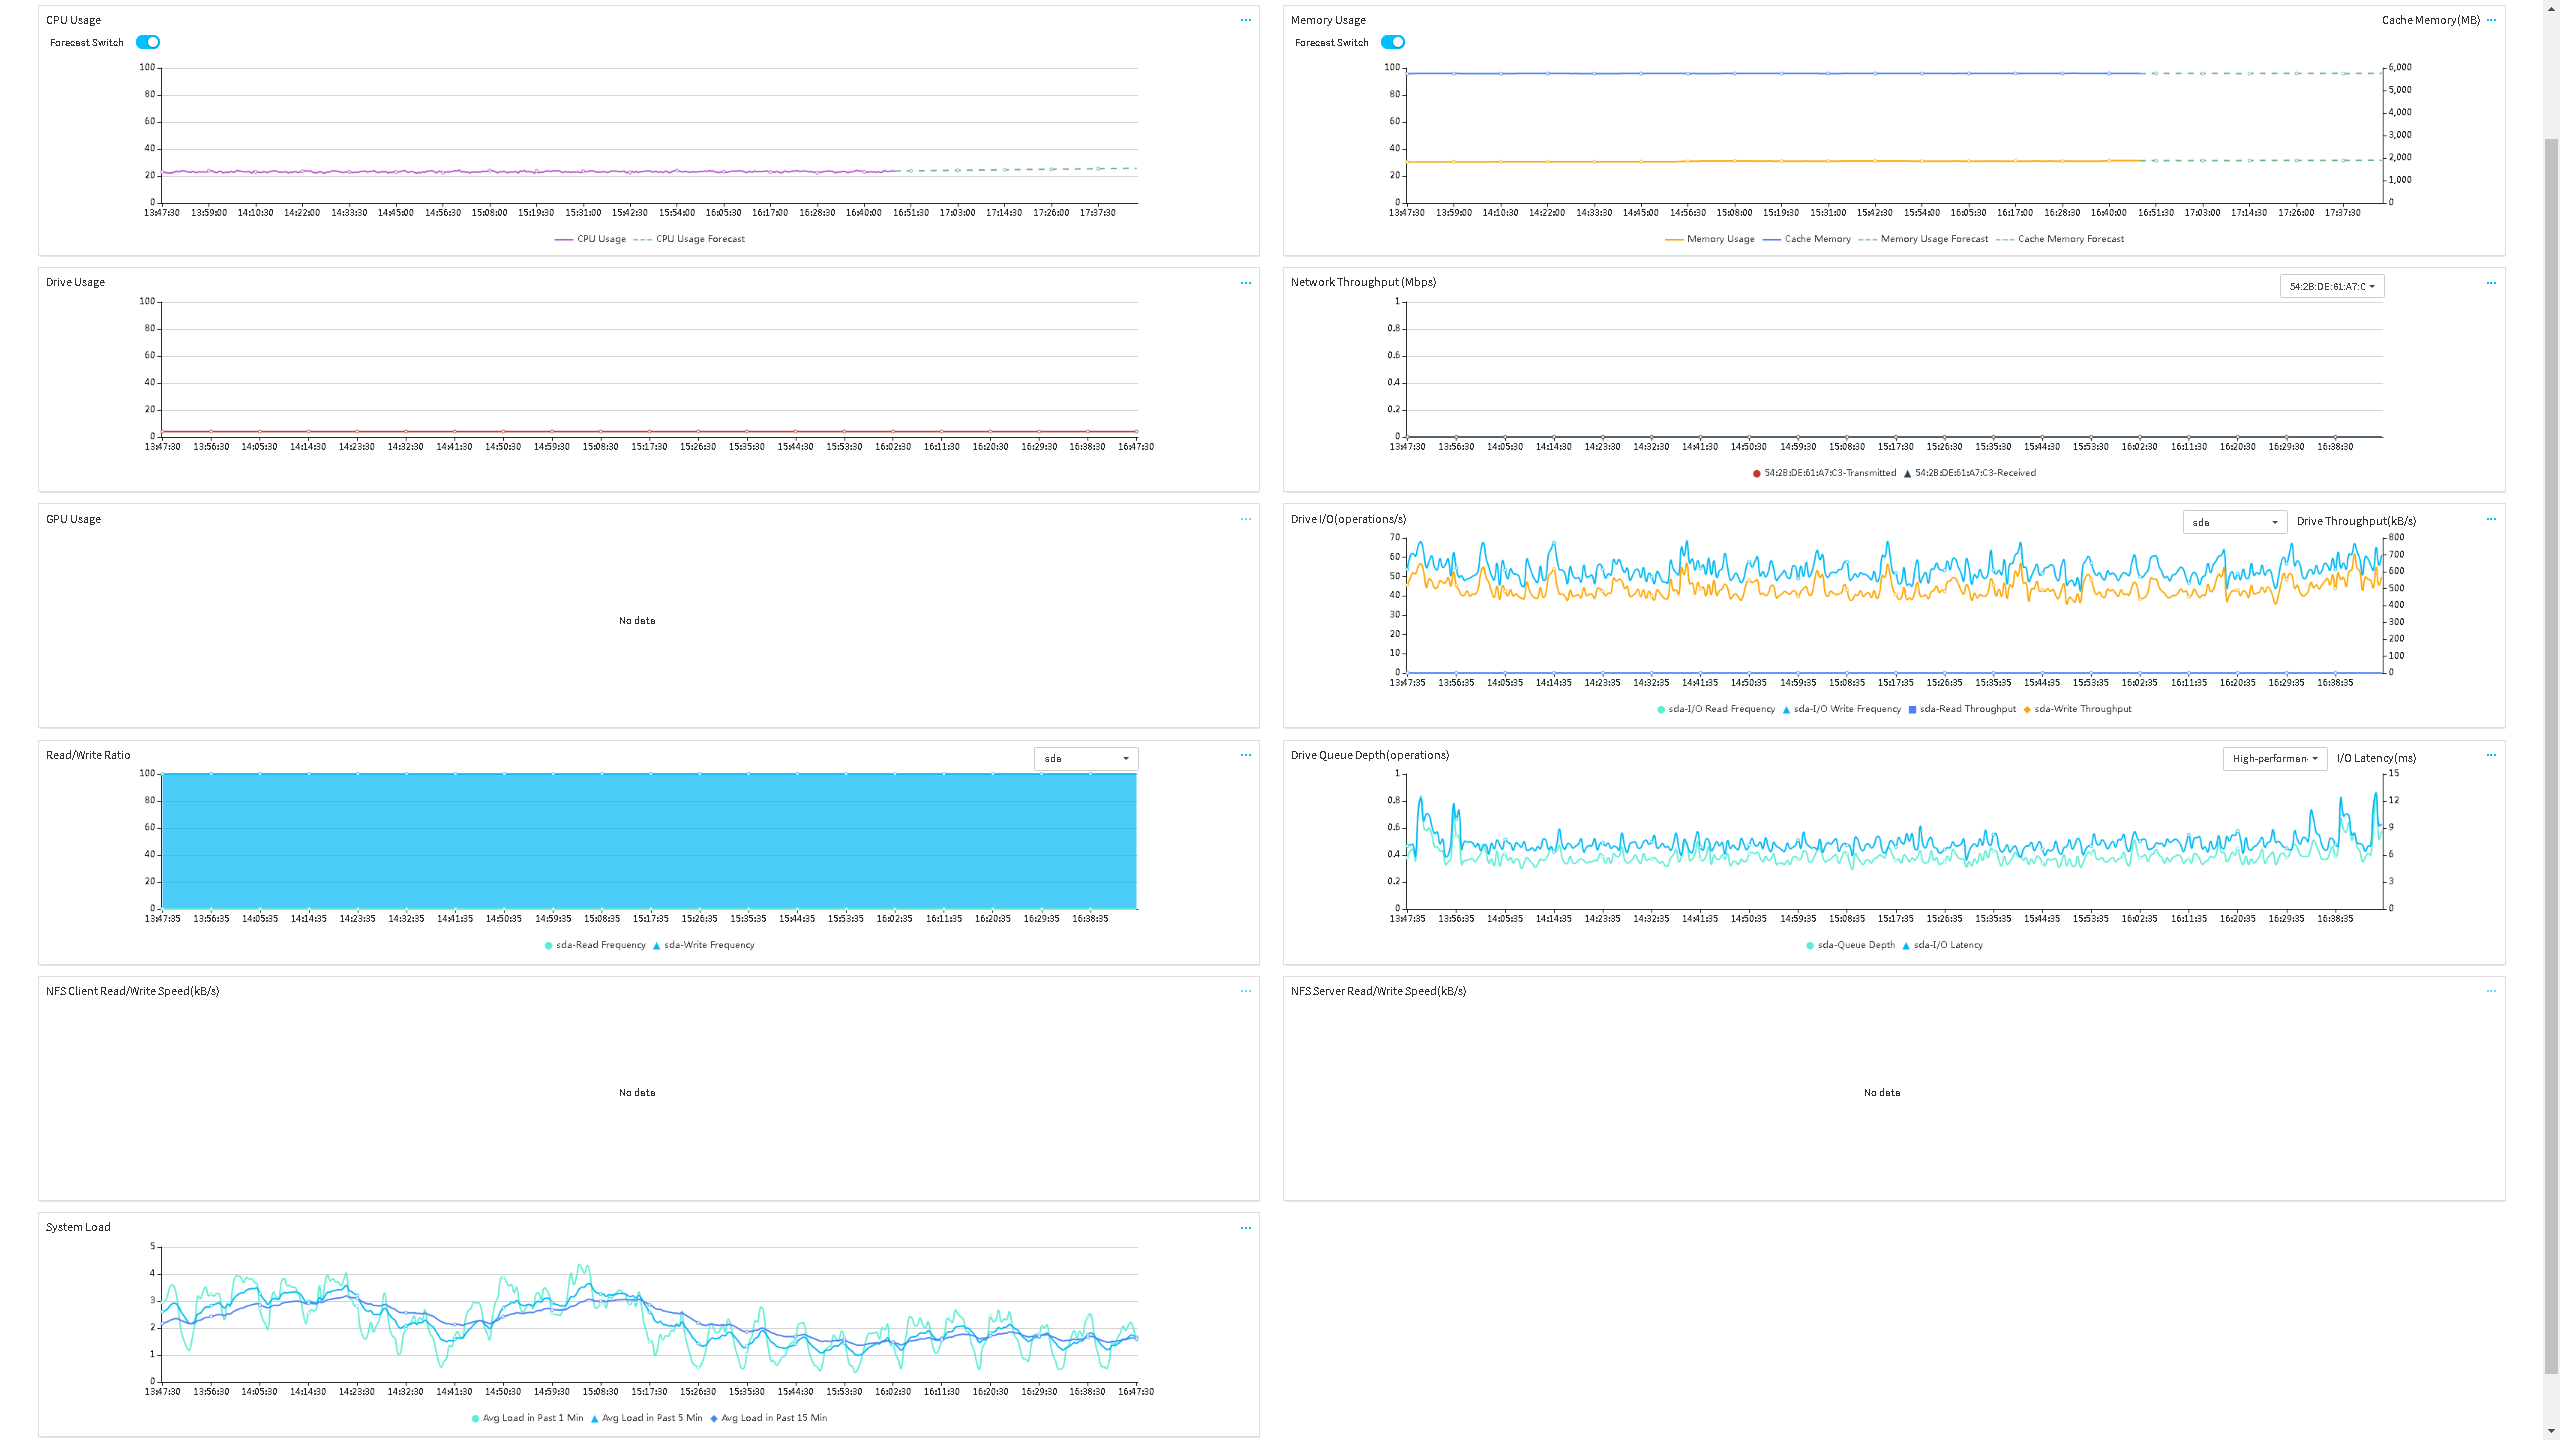
Table 3 Performance monitoring item description
|
Item |
Description |
|
CPU Usage |
CPU usage of applications running on the server. |
|
Disk Space Usage |
Percentage of used disk space to the total available disk space. |
|
Memory Usage |
Percentage of memory space used by all processes to the total available memory space. |
|
Network Throughput |
Amount of data transferred through a network adapter in a given unit of time. In the upper left corner of the chart, you can select the network adapter whose network throughput data to display on the chart. |
|
Cache Memory |
Cache memory size. |
|
GPU Usage |
Percentage of GPU resources used by running services to the total available GPU resources. |
|
Drive I/O |
Drive read/write in a given unit of time. |
|
Read/Write Ratio |
Percentage of drive read/write operations to the total read/write operations in a given unit of time. |
|
Drive Queue Depth |
Average queue length for drive read/write operations in a given unit of time. |
|
Drive Throughput |
Drive read and write throughput in a given unit of time. |
|
I/O Latency |
Average waiting time for a drive read/write operation to finish in a queue in a given unit of time. |
|
NFS Client Read/Write Speed |
Data amount of NFS client read/write operations in a given unit of time. |
|
NFS Server Read/Write Speed |
Data amount of NFS server read/write operations in a given unit of time. |
|
System Load |
Computing workload of the computer system in a given unit of time. |
Component update
When using UniSystem to update a component on a server, you can choose whether to update the component through FIST SMS or HDM. The update methods supported by a component vary by component type. For example, UniSystem can update hardware drivers and firmware only through FIST SMS, and can update server firmware such as BIOS, HDM and CPLD through either HDM or FIST SMS. For more information about the component update function of UniSystem, see H3C Servers UniSystem User Guide.
FIST SMS resources
You can refer to obtaining methods of FIST SMS resources to obtain information about versions, OS, NIC ports, CPUs, memory, and drives in the server. For example, you can distinguish servers with low usage from those with high usage or in busy state. This facilitates adjusting server resources as a whole and increases server resource usage.
FIST SMS resources (Linux)
In Linux, FIST SMS resources can be obtained typically from a third-party library, functions, and commands in the OS.
Table 4 lists FIST SMS resources and the corresponding obtaining methods.
|
|
NOTE: To use the iostat tool that comes with the system to obtain resources, value obtaining fails if the corresponding field is missing in iostat. In this case, manual installation is required. To manually install iostat, use the software package manager or the source code. To use the source code method, use the symbolic link to replace the iostat file path. |
Table 4 FIST SMS resources in Linux
|
Resource type |
Data category |
Item |
Obtaining method |
|
Version |
Basic information |
HDM |
Internal dynamic library |
|
Product name |
Internal dynamic library |
||
|
Maintenance serial number |
Internal dynamic library |
||
|
OS |
Basic information |
System name |
/Jar/sysinfo/lsb.sh |
|
Time zone |
/Jar/sysinfo/getLinux64SysDate.sh |
||
|
Time |
/Jar/sysinfo/getLinux64SysDate.sh |
||
|
Statistics |
System load |
Obtained from Sigar |
|
|
NIC |
Basic information |
Port list |
/Jar/sysinfo/ethtool {eth} | grep Speed" |
|
IP address |
Ifconfig {net}l | grep ‘inet’ |
||
|
Subnet mask |
Ifconfig {net} | grep ‘inet’ |
||
|
Speed |
ethtool " + name + " | grep Speed" |
||
|
NIC status |
ifconfig {name} | grep –I "RUNNING"; |
||
|
Statistics |
NIC usage |
Sigar.getNetInterfaceStat.getAfterRxBytes() Sigar.getNetInterfaceStat.getBeforeRxBytes() Sigar.getNetInterfaceStat.getAfterTxBytes() Sigar.getNetInterfaceStat.getBeforeTxBytes() NIC usage=[(Number of received bytes after statistics – Number of received bytes before statistics) + (Number of dropped bytes after statistics - Number of dropped bytes after statistics)]*8/NIC speed* Statistics interval*100 |
|
|
CPU |
Basic information |
CPU information |
cat /proc/cpuinfo | grep 'model name' |
|
Statistics |
Overall CPU usage |
Sigar.getCpuPerc().getCombined() |
|
|
Memory |
Basic information |
Overall memory usage |
cat /proc/meminfo | grep -i 'Mem' |
|
Memory capacity (GB) |
sigar.getMem().getTotal() |
||
|
Statistics |
Cache memory size |
Obtained from Sigar and then calculated: actualFree-free |
|
|
Disk |
Basic information |
Information of all disks |
df |
|
Disk capacity |
df |
||
|
Statistics |
Used disk space |
Sigar.getFileSystemUsage..getUsed() |
|
|
Disk usage |
Sigar.getFileSystemUsage..getUsePercent() |
||
|
I/O latency |
Obtained through iostat CLI tool: iostat -x 5 1 -y |
||
|
Disk I/O |
Obtained through iostat CLI tool: iostat -x 5 1 -y |
||
|
Disk throughput |
Obtained through iostat CLI tool: iostat -x 5 1 -y |
||
|
Disk read/write ratio |
Obtained through iostat CLI tool: iostat -x 5 1 -y |
||
|
Disk queue depth |
Obtained through iostat CLI tool: iostat -x 5 1 -y |
||
|
GPU |
Statistics |
GPU usage |
Obtained through NVIDIA CLI tool: nvidia-smi -I {GPU index} -q -d UTILIZATION |
|
NFS |
Statistics |
NFS client read/write speed |
Obtained through nfsiostat CLI tool: nfsiostat 5 2 |
|
NFS server read/write speed |
Read from /proc/net/rpc/nfsd |
Internal programs of FIST SMS software package
Internal programs of FIST SMS software package in Linux
You can use /Jar/sysinfo/ethtool in the installation directory to view driver parameters and hardware settings of network devices especially wired Ethernet devices. This tool provides a lot of information about Ethernet devices connected to the Linux system.
Usage guidelines
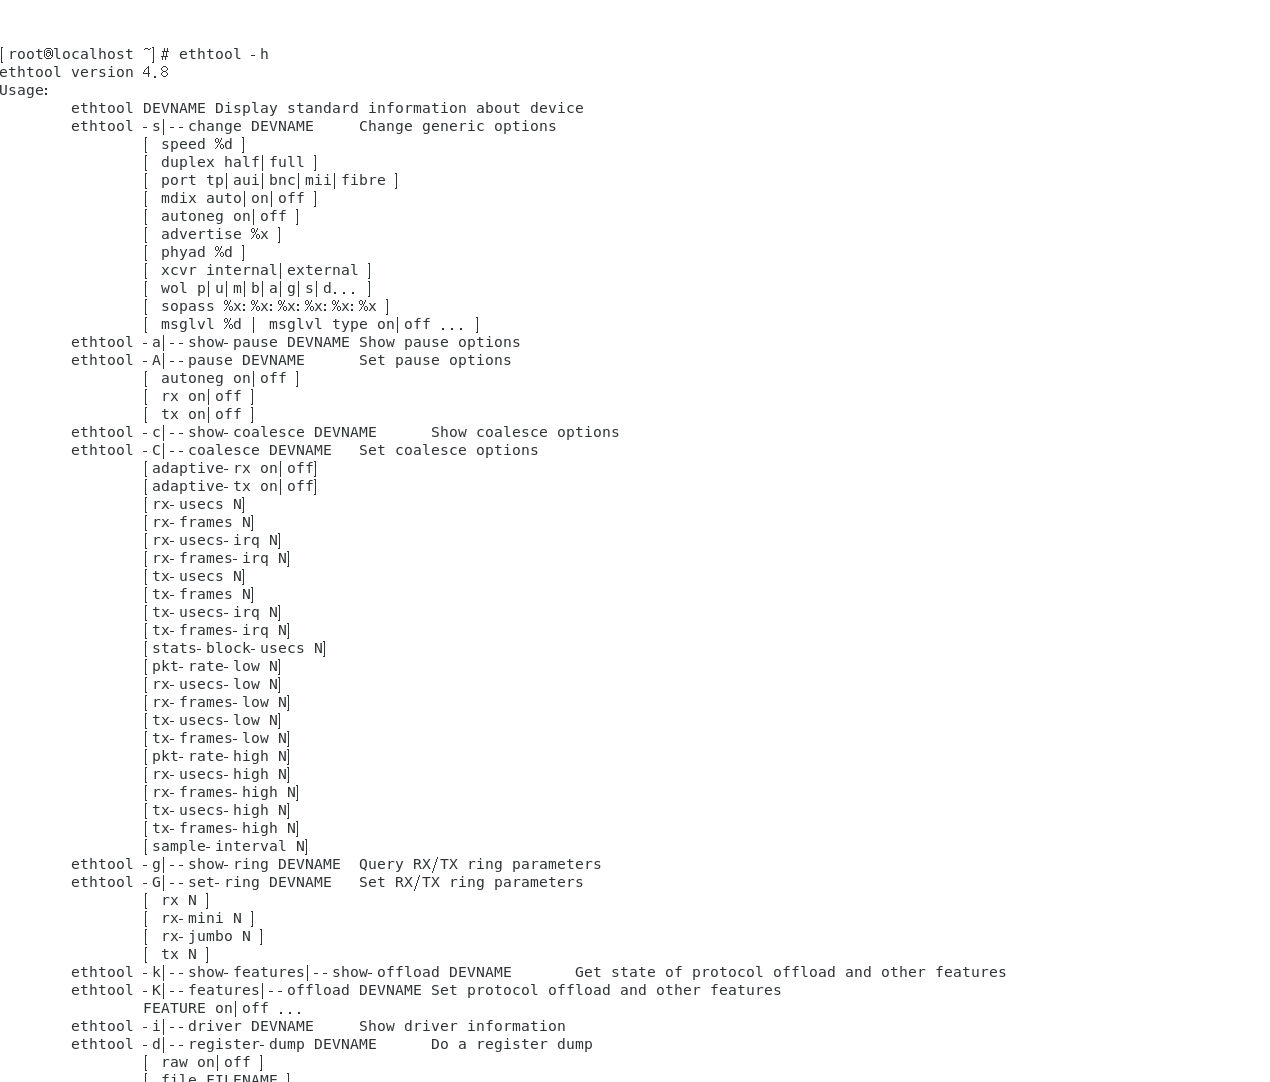
To view the help, execute the ethtool -h command, as shown in Figure 23.
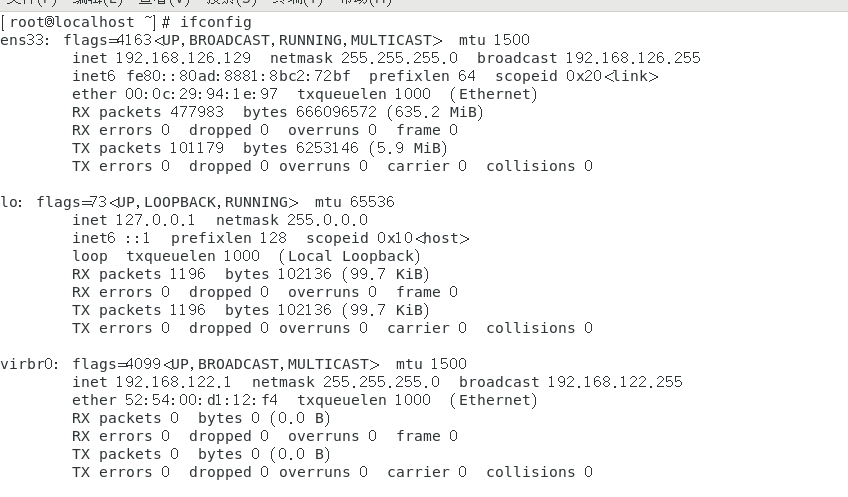
To view NIC information, execute the ifconfig command, as shown in Figure 24.
Figure 24 Viewing NIC information
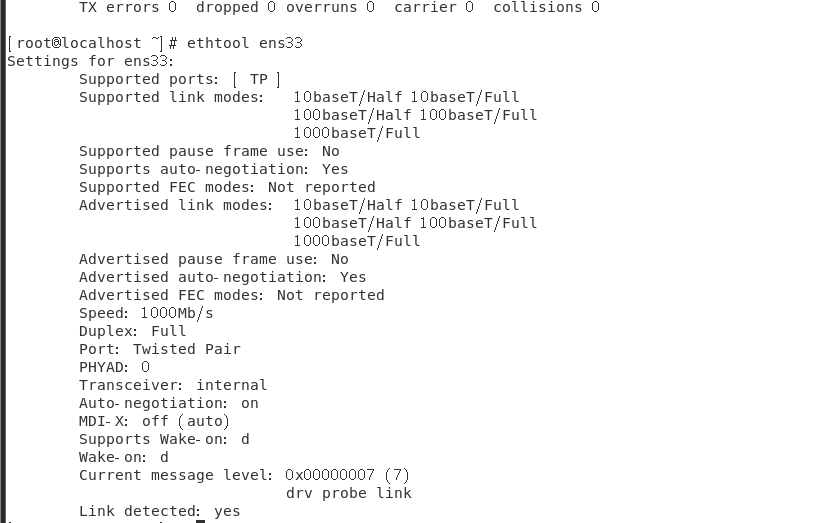
To view NIC speed, execute the ethtool NIC port command. This example uses NIC port ens33, as shown in Figure 25.
Edit configuration files
Edit the monitor.properties configuration file
The monitor.properties configuration file in the /configuration folder of the FIST SMS installation package contains reporting intervals of component parameters. These components include CPUs, memory, disks, and NICs. The configuration file monitors the settings of reporting intervals. For more information about the component parameters, see Table 5.
Table 5 Configuration items in the monitor.properties file
|
Item |
Description |
Default |
Value range |
|
cpuRate |
Reporting interval of CPU usage monitoring |
3 seconds |
1 to 3600 seconds |
|
memoryRate |
Reporting interval of memory usage |
3 seconds |
1 to 3600 seconds |
|
diskRate |
Reporting interval of disk usage |
30 seconds |
1 to 3600 seconds |
|
netSpeedRate |
Reporting interval of NIC speed on the OS side |
6 seconds |
1 to 3600 seconds |
|
netSpeedCountRate |
Calculating interval of NIC speed on the OS side |
5 seconds |
1 to 3600 seconds |
|
netLinkStatusCheckRate |
Detection interval of NIC link status on the OS side |
1 second |
1 to 30 seconds |
Edit the sellog.properties configuration file
The sellog.properties configuration file in the /configuration folder of the FIST SMS installation package is used to configure event log dumping settings. For more information about the configuration items in the file, see Table 6.
Table 6 Configuration items in the sellog.properties file
|
Item |
Description |
Default |
Value range |
|
status |
Enablement status of event log dumping. |
off |
· on—Enabled. · off—Disabled. |
|
recordType |
Event log recording method. |
0 |
Value of 0 indicates the operating system log. For Linux, the log is syslog. Value of 1 indicates the storage location specified by a user. |
|
fileLoad |
Event log storage location |
/var/log/messages |
This item takes effect only when recordType is set to 1. |
|
cycle |
Interval for obtaining event log information |
60 seconds |
30 to 600 seconds. |
|
logLevel |
Severity level, from which the log entries will be dumped. |
Minor |
Severity levels in descending order of severity: Critical, Major, Minor, and Info. |
|
critical |
Alias for the critical level. |
N/A |
N/A |
|
major |
Alias for the major level. |
N/A |
N/A |
|
minor |
Alias for the minor level. |
N/A |
N/A |
|
info |
Alias for the info level. |
N/A |
N/A |
|
critical_in_system |
Recording level for logs at the critical level. |
N/A |
This setting takes effect when recordType is set to 0. |
|
major_in_system |
Recording level for logs at the major level. |
N/A |
This setting takes effect when recordType is set to 0. |
|
minor_in_system |
Recording level for logs at the minor level. |
N/A |
This setting takes effect when recordType is set to 0. |
|
info_in_system |
Recording level for logs at the info level. |
N/A |
This setting takes effect when recordType is set to 0. |
|
format |
Log saving format |
%L: [%y/%m/%d %H:%M:%S] %N %A %T %D |
Log severity level: %L Time: %y-%m-%d %H:%M:%S (y: year; m: month; d: date; H: hour; M: minute; S: second) Event status: %A Sensor name: %N Sensor Type: %T Event description: %D |
Uninstall FIST SMS
Uninstall FIST SMS from Linux
Select one of the following methods to uninstall FIST SMS depending on FIST SMS startup mode:
· Uninstall directly started FIST SMS.
a. Open the terminal window.
b. Execute the rm -rf FIST_SMS FIST_SMS-1.03.08.tar.gz command to delete the installation folder and installation package of FIST SMS, as shown in Figure 26.
Figure 26 Deleting the installation folder and installation package of FIST SMS

a. Execute the ls command to verify that the installation folder and installation package of FIST SMS are deleted successfully.
· Uninstall registered FIST SMS.
b. Open the terminal window.
c. Execute the cd FIST_SMS/LinuxService/bin command to access the /LinuxService/bin directory, as shown in Figure 27.
Figure 27 Accessing the /LinuxService/bin directory

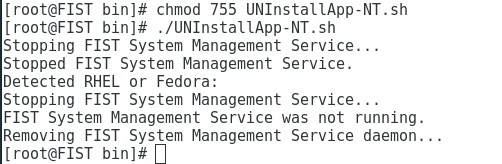
a. Execute the chmod 755 UNInstallApp-NT.sh command to make the UNInstallApp-NT.sh file executable. Then, execute the ./UNInstallApp-NT.sh script to uninstall FIST SMS.
Figure 28 Uninstalling FIST SMS
Acronyms
|
Acronym |
Full name |
|
BIOS |
Basic Input Output System |
|
CPLD |
Complex Programmable Logic Device |
|
CPU |
Central Processing Unit |
|
FIST SMS |
FIST System Management Service |
|
HDM |
Hardware Device Management |
|
OS |
Operating System |
