- Table of Contents
-
- H3C MSR Routers Configuration Examples(Web)-R6728-6W100
- 00-Preface
- 01-Web login Configuraiton Examples
- 02-Administrator Account Configuration Examples
- 03-Static Routing Configuration Examples
- 04-Cloud Connection Configuration Examples
- 05-Software Upgrade Examples
- 06-Port Mapping Configuration Examples
- 07-IPsec VPN Configuration Examples
- 08-L2TP VPN Configuration Examples
- 09-WLAN AC Configuration Examples
- Related Documents
-
| Title | Size | Download |
|---|---|---|
| 01-Web login Configuraiton Examples | 532.38 KB |
Introduction
This document provides an example of configuring Web login.
Prerequisites
This document is not restricted to specific software or hardware versions. Procedures and information in the examples might be slightly different depending on the software or hardware version of the device.
The configuration examples were created and verified in a lab environment, and all the devices were started with the factory default configuration. When you are working on a live network, make sure you understand the potential impact of every command on your network.
Restrictions and guidelines
When you configure Web login, follow these restrictions and guidelines:
· As a best practice, use one of the following Web browsers: Internet Explorer 10 or later, Chrome 57 or later, or Firefox 35 or later.
· Configure the Web browser to accept cookies from Web sites and use active scripts or JavaScript. For information about how to configure the Web browser, see the Web browser user guide.
· To use Internet Explorer, you must also enable the following features:
¡ Execute scripts for ActiveX controls that are marked as secure scripts
¡ Run ActiveX controls and plug-ins.
· After a device software version change, clear the browser cache to make sure the Web interface displays the correct information.
· This configuration example describes first login to the Web interface of the device.
Software version used
This configuration example was created and verified on Release 6728P19 of the MSR830-10HI router.
Example: Configuring Web login
Network configuration
As shown in Figure 1, connect the host (the PC) to the device. Configure the device to allow the host to log in to the Web interface of the device through a non-management interface.

Procedures
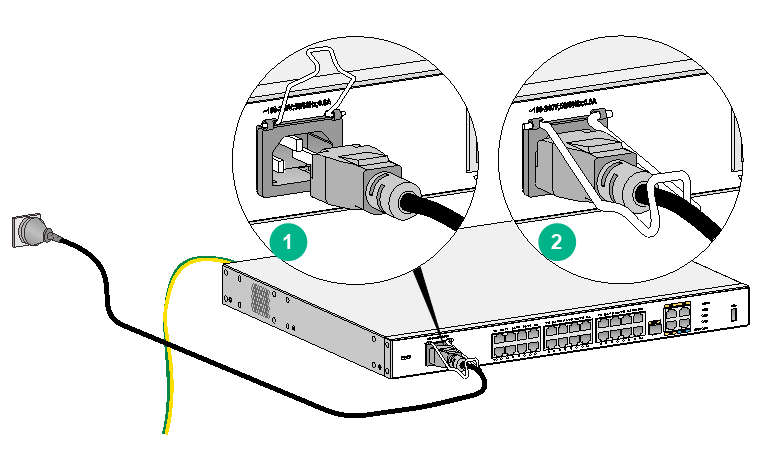
Powering on the device
To power on the device:
1. Connect one end of the power cord to the power receptacle on the device.
2. Secure the power cord with the retainer clip.
3. Connect the other end of the power cord to an AC power source.
4. Wait for the SYS LED to become flashing green, which indicates that the device is operating correctly.
Figure 2 Powering on the device
Connecting the device to the host
Use a network cable to connect the host to the LAN interface on the device.
Configuring NIC settings for the host
|
|
NOTE: You can configure the NIC on the host to automatically obtain its IP address or specify the IP address of the NIC on the host as 192.168.0.2/23. The specified IP address is on the same network segment with the IP address of the device for the host to reach the device. |
This example specifies an IP address for the NIC on the host. In this example, the host is a PC installed with Windows 7.
To specify an IP address for the host:
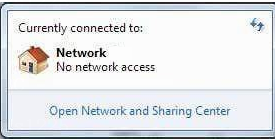
1. Click the network icon ![]() in the lower right corner of the desktop, that
is, in the task bar, and then click Open Network and Sharing Center.
in the lower right corner of the desktop, that
is, in the task bar, and then click Open Network and Sharing Center.
2. Click Local Area Connection.

3. Click the Properties button.

4. Double click Internet Protocol Version 4 (TCP/IPv4).

5. Select Use the following IP address:, and enter 192.168.0.2 as the IP address and 255.255.254.0 as the subnet mask.
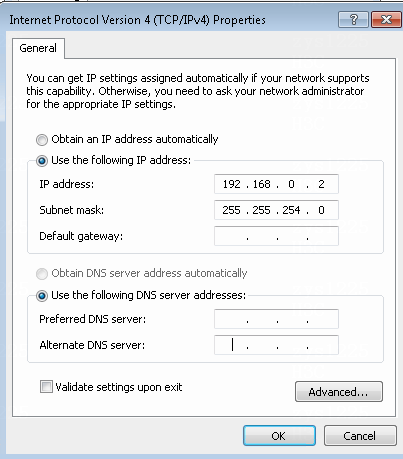
6. Click OK.
Logging in to the device
|
|
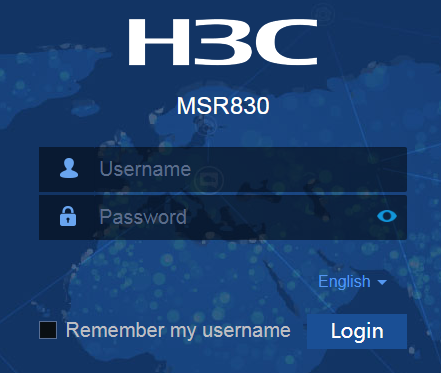
NOTE: The default addresses for device login are http://192.168.0.1 and https://192.168.0.1. The default username and password are both admin. You must change the default password at first login. |
This example uses http://192.168.0.1 to log in to the device as follows:
1. Launch the Web browser on the host and enter https://192.168.0.1 in the address bar.
The Web interface login page opens.
2. Enter the username admin and password admin, select a language, and click Login.
Figure 3 Web login page
3. Change the password for the factory-default account immediately.
a. Enter admin for the Old Password field.
b. Enter a new password for the New Password field.
c. Enter the new password again for the Confirm Password field.
d. Click Apply.
Figure 4 Changing the default password for Web login

After you change the password, the system automatically goes to the Web management interface of the device. The Web login succeeds.
Figure 5 Logging in to the Web interface successfully
