- Table of Contents
-
- 05-Objects
- 01-Health monitoring
- 02-User management
- 03-Authentication
- 04-Portal
- 05-WAF
- 06-IPS
- 07-Anti-virus
- 08-Data filtering
- 09-URL filtering
- 10-File filtering
- 11-APT defense
- 12-APR
- 13-Terminal identification
- 14-Security action
- 15-Advanced settings
- 16-Intelligences from the threat management platform
- 17-Object group
- 18-ACL
- 19-SSL
- 20-Public key management
- 21-PKI
- 22-Attack defense
- 23-Trusted access controllers
- Related Documents
-
| Title | Size | Download |
|---|---|---|
| 05-WAF | 131.96 KB |
WAF
This help contains the following topics:
¡ Configure a CC defense profile
¡ Create and delete user-defined signatures
Introduction
The Web application firewall (WAF) feature enables devices to monitor HTTP and HTTPS traffic to and from Web applications for malicious activity and to proactively take prevention actions.
WAF profiles
WAF is implemented based on WAF profiles. A WAF profile contains a set of WAF signatures to match packets and the actions for the matching packets.
WAF signatures
The device compares packets with WAF signatures to detect, classify, and prevent network attacks.
Each WAF signature contains multiple attributes, including attack category, action, protected target, severity level, and direction. You can set criteria to filter WAF signatures that a WAF profile uses based on the signature attributes.
Signature exceptions
WAF signatures have default signature actions and enabling status.
To change the enabling status or action for a WAF signature in a WAF profile, specify the WAF signature as a signature exception in the WAF profile. The action specified for the signature exception takes precedence over the global signature action.
Semantic analysis
Semantic analysis analyzes the semantics of SQL statements to detect SQL injection attacks.
By default, the system uses only signatures in the signature library to detect SQL injection attacks. You can enable the device to use semantic analysis in addition to the signature-based method to improve the detection rate of SQL injection attacks.
WAF profile actions
When the device detects an attack packet through WAF signature matching or semantic analysis, it takes the corresponding action on the packet.
You can specify the following actions to take on the WAF-detected attack packet in a WAF profile:
· Blacklist—Drops the packet and adds the source of the packet to the IP blacklist. If the IP blacklist feature is enabled, packets from the blacklisted sources will be blocked for the blacklist period. If the IP blacklist feature is not enabled, packets from the blacklisted sources are not blocked.
For more information about the IP blacklist feature, see attack defense online help.
· Drop—Drops the packet.
· Permit—Permits the packet to pass.
· Reset—Closes the TCP or UDP connection for the packet by sending TCP reset messages or ICMP port unreachable messages.
· Redirect—Redirects the packet to a webpage.
· Default—Takes the default signature action on the packet matching a signature or send a WAF log to the fast log output server for an attack packet detected by semantic analysis.
· Capture—Captures the packet.
· Logging—Logs the packet.
WAF mechanism
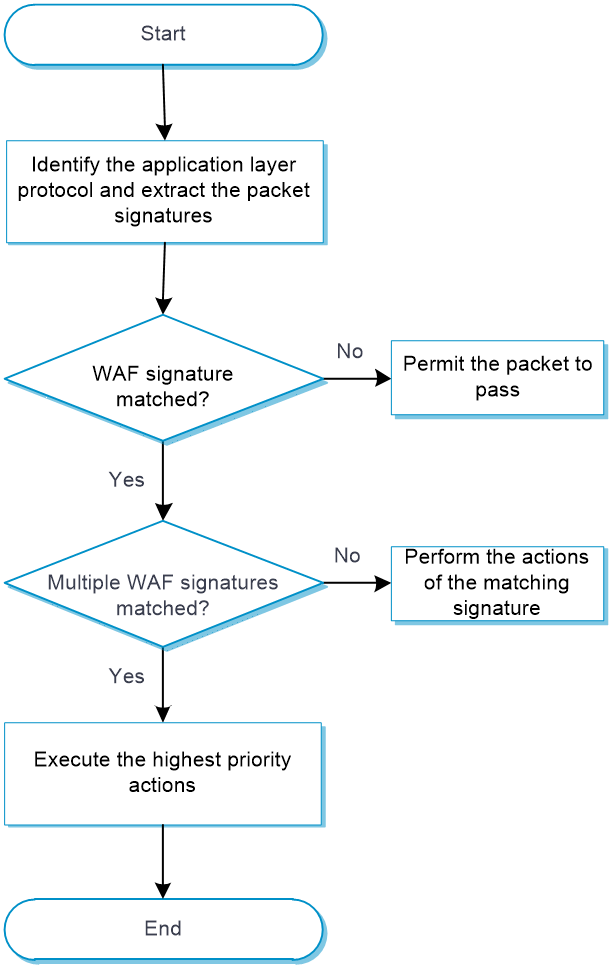
As shown in Figure 1, upon receiving a packet, the device performs the following operations:
1. The device compares the packet with the security policies.
If the packet matches a security policy that is associated with a WAF profile, the device identifies the packet application layer protocol and extracts the packet signatures. If semantic analysis is enabled in the WAF profile, the device also extracts the SQL statements in the packet for semantic analysis.
2. The device determines the actions for the packet by comparing the extracted packet signatures with the WAF signatures in the WAF profile:
¡ If the packet matches only one WAF signature, the device takes the signature actions.
¡ If the packet matches multiple WAF signatures, the device uses the following rules to select the actions:
- If the matching WAF signatures have two or more actions, including redirect, drop, permit, and reset, the device takes the action of the highest priority. The actions in descending order of priority are reset, redirect, drop, and permit.
- The device will execute the blacklist, capture, and logging actions if they are in the matching WAF signatures.
3. If semantic analysis is enabled in the WAF profile, the device performs semantic analysis on the SQL statements extracted from the packet to determine if the packet is an attack packet. If the packet is an attack packet, the device determines the action for the packet as follows:
¡ If an action other than Default is specified in the WAF profile, the device takes the specified action.
¡ If Default is selected for Action in the WAF profile, the device sends a WAF log for the packet to the fast log output server.
¡ If the packet is identified as an attack packet by both signature matching and semantic analysis, the device takes the higher-severity action of the two methods. If logging is enabled for either method, the device will send a log for the packet.
4. If the packet does not match any WAF signature and is not identified as an attack packet by semantic analysis, the device permits the packet to pass through.
CC defense
The Challenge Collapsar (CC) defense feature blocks malicious HTTP and HTTPS traffic from Web applications by performing content inspection, rule matching, and statistics collection.
The CC defense feature is implemented in a WAF profile that is associated with a security policy.
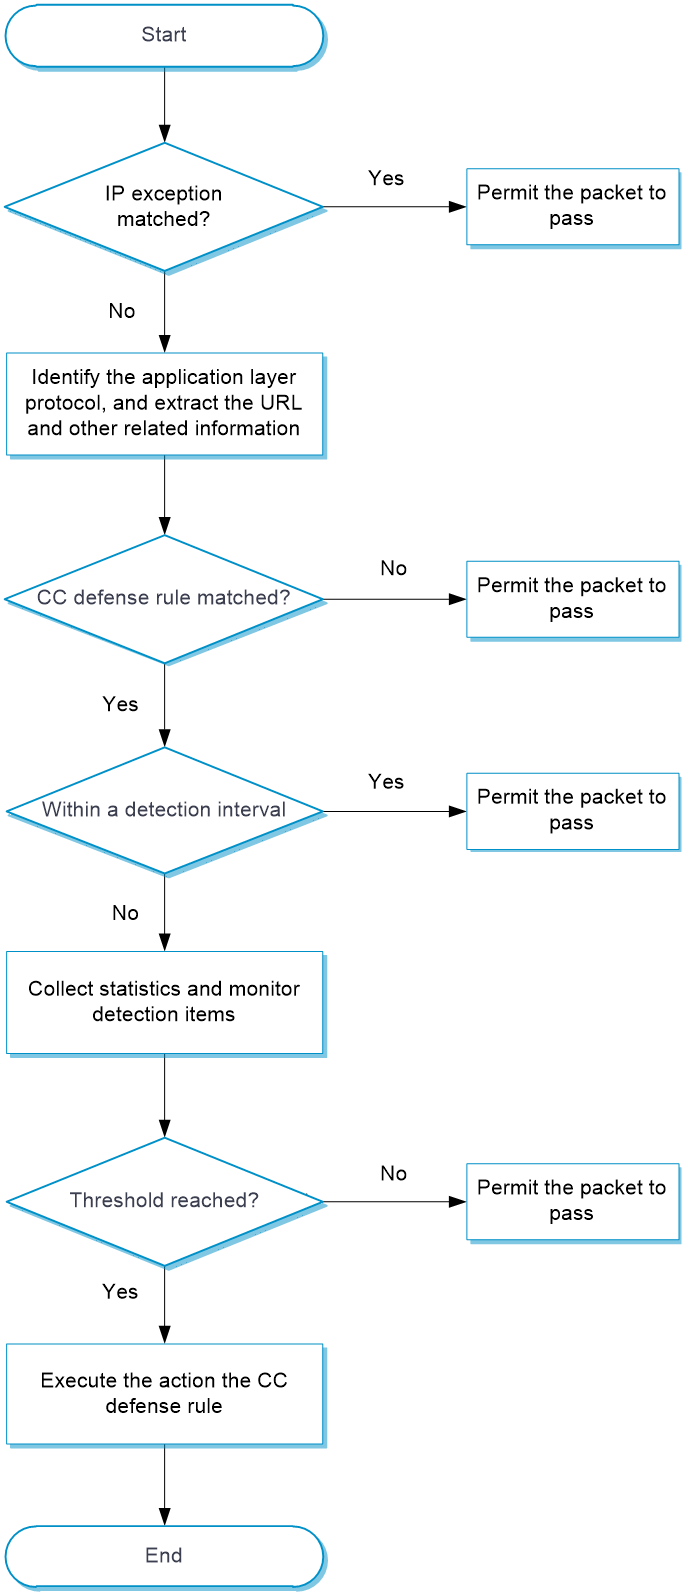
As shown in Figure 2, upon receiving a packet, the device performs the following operations:
1. The device compares the packet with IP exceptions.
¡ If an IP exception is found, the device permits the packet to pass through.
¡ If no IP exception is found, the device goes to step 2.
2. The device identifies the packet application layer protocol, and extracts the URL and other related information.
3. The device compares the extracted packet information with the CC defense rules and determines the action for the packet.
¡ If the packet does not match any CC defense rules, the device permits the packet to pass through.
¡ If the packet matches one CC defense rule, the device stops the matching process and goes to step 4.
4. The device determines the actions for the packet based on the detection interval:
¡ For a packet within the detection interval, the device performs the following actions after collecting statistics from the packet and compares the statistics with the thresholds of detection items:
- The device executes the permit, blacklist, and logging actions as needed if a threshold is reached.
- The device permits the packet to pass through if no threshold is reached.
¡ For a packet out of the detection interval, the device does not collect statistics from the packet and permits the packet to pass through.
Restrictions and guidelines
· Activating configuration causes transient DPI service interruption. DPI-based services might also be interrupted. For example, security policies cannot control access to applications.
· After you click Submit, the interface prompts a success message, but the configuration might not have been activated completely. The device cannot recognize packets that pass through before the configuration takes effect.
· The WAF module requires a license to run on the device. If the license expires, you can still use the WAF functions but you can no longer upgrade the WAF signature library on the device. For more information about licenses, see license online help.
· A user-defined signature of the number type supports only one detection item.
· Modifications to the semantic analysis and CC defense settings in a WAF profile take effect immediately and do not require manual activation.
· When you create a whitelist entry, at least one of the signature ID, URL, and IP address fields must be configured.
· The signature ID for attacks detected by semantic analysis is fixed at 4294967295. To add this ID to a whitelist entry, you must first configure the source IP address or URL.
· If you specify a real source IP address in the IP address field for a whitelist entry, you must enable client IP identification. For more information about client IP identification, see the help for advanced settings.
Configure WAF
Configure WAF as shown in Figure 3.
Figure 3 WAF configuration procedure
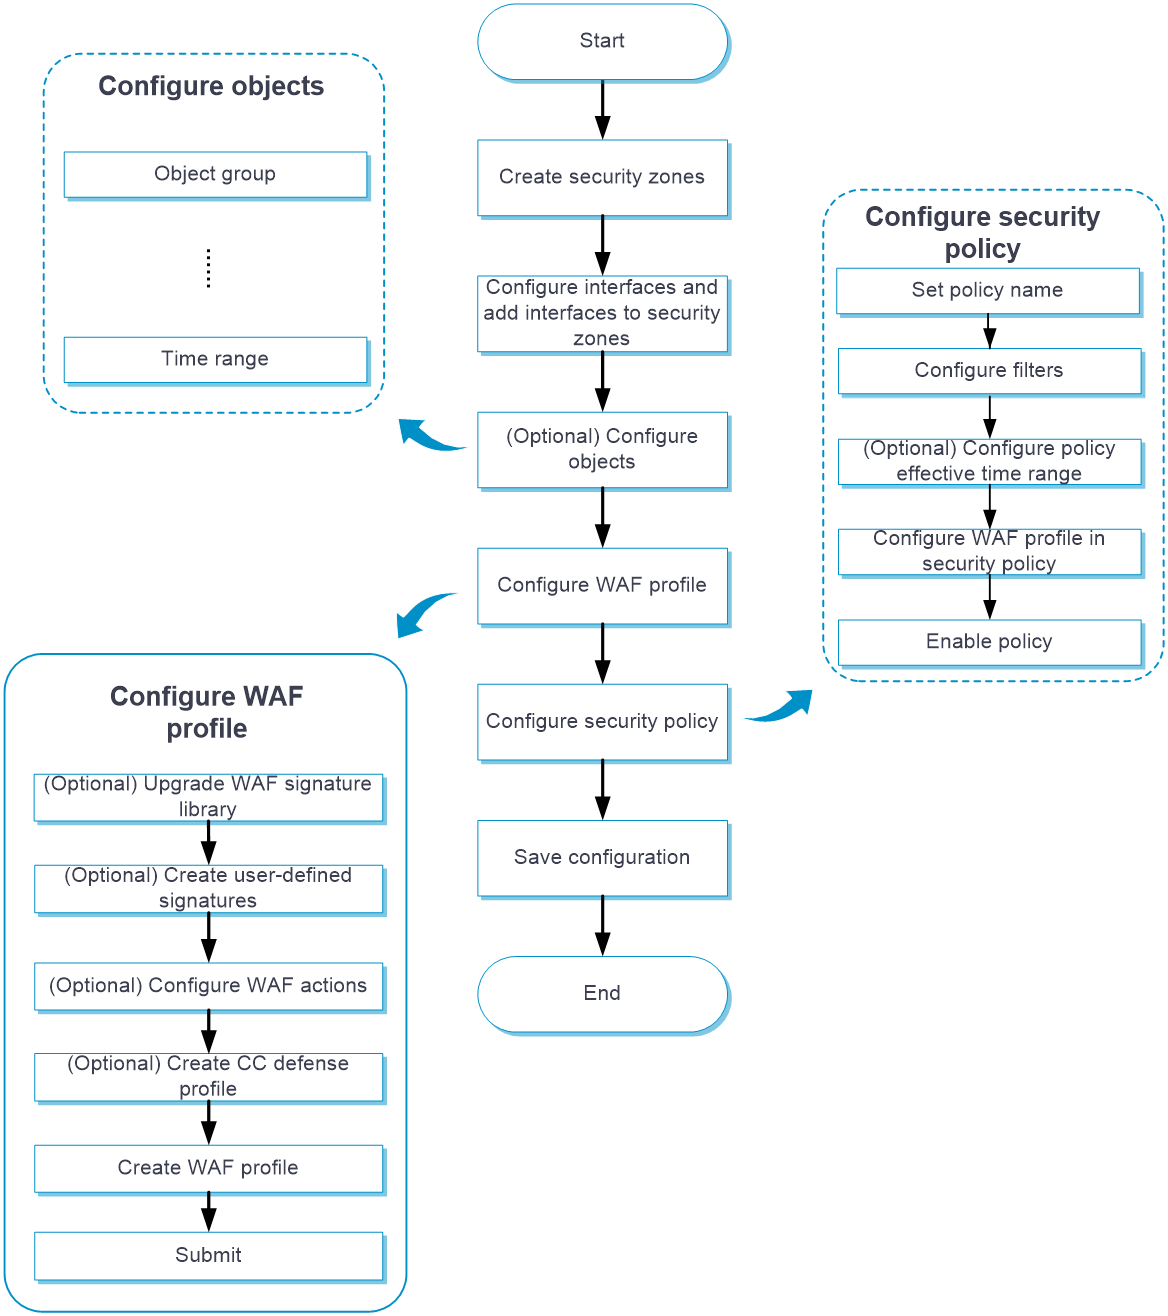
Configure a WAF profile
The device provides a predefined WAF profile named default. The default WAF profile uses all enabled WAF signatures on the device and cannot be modified or deleted.
You can also create WAF profiles on the device as needed.
You can configure global action for a WAF profile or change the action for individual WAF signatures in the profile.
The system selects the actions for packets matching a WAF signature in the following order:
1. Actions configured for the WAF signature as a signature exception in the WAF profile.
2. Global action configured for the WAF profile.
3. Default action of the WAF signature.
Procedure
1. Click the Objects tab.
2. In the navigation pane, select APP Security > WAF > Profiles.
The WAF Profiles page opens.
3. Click Create.
The Create WAF Profile page opens.
4. Create a WAF profile.
Table 1 WAF profile configuration items
|
Item |
Description |
|
Name |
Specify a WAF profile name. |
|
CC Defense Profile |
Select a CC defense profile for the WAF module. |
|
Semantic analysis |
Select whether to enable semantic analysis. |
|
Action |
Select the action to take on attack packets detected by signature matching and semantic analysis. If you select Default, the device processes the packet as follows: · If the packet matches a WAF signature, the device takes the default signature action. · If the packet is identified as an attack packet by semantic analysis, the device sends a WAF log for the packet to the fast log output server. |
|
Logging |
Select whether to log the attack packets detected by WAF. |
|
Capture |
Select whether to capture the attack packets detected by WAF. The capture action enables the device to capture packets and export the captured packets to the specified URL at the scheduled export time. For more information about configuring the capture action, see security actions online help. |
|
Signature filtering criteria |
In the Signature filtering criteria area, set the criteria to filter the WAF signatures used in the WAF profile based signature attributes including the protected target, attack category, direction, default signature action, and severity level. By default, no signature filtering criteria are set and a WAF profile uses all enabled WAF signatures on the device. A WAF profile uses a WAF signature only if the signature matches all the configured criteria. For each attribute-based criterion, you can specify multiple attribute values. A WAF signature matches the criterion if it matches any of the specified attribute values. To view the signatures filtered out by using the criteria, click View matching signatures. |
|
Protected target |
Select the protected targets for the protected target criterion. |
|
Attack category |
Select the attack categories for the attack category criterion. |
|
Direction |
Select the traffic directions for the direction criterion. Options are: · To-server—Client to server direction. · To-client—Server to client direction. |
|
Default action |
Select the actions for the default signature action criterion. Options are Drop, Permit, Reset, and Blacklist. |
|
Severity level |
Select the severity levels for the severity levels criterion. Options are Critical, High, Medium, and Low. |
|
Add signature exceptions |
To specify WAF signatures as signature exceptions in a WAF profile, use either of the following methods: · In the Signature exceptions area of the Create WAF Profile page, enter the ID of the WAF signature and click Add. · On the Create WAF Profile page, click View matching signatures. On the View Signatures page that opens, select the signatures you want to specify as signature exceptions, and then click Add to signature exception list. The Edit Exception Rule window opens. Configure the following settings as needed, and then click OK. ¡ Select the action for the signatures. ¡ Enable or disable the signatures. ¡ Select whether to enable packet capture and logging for packets matching the signatures. |
|
Edit Exception Rule |
On the signature exception list, click
the Edit icon · Select the action for the signature. · Enable or disable the signature. · Select whether to enable packet capture and logging for packets matching the signature. |
5. Click OK.
The WAF profile is displayed on the WAF Profiles page.
6. Use the WAF profile in a security policy. For more information about security policies, see security policy online help.
7. To have the configuration take effect, click Submit.
This operation can cause temporary DPI service outage. As a best practice, perform the operation after all DPI service configurations are complete.
Configure a CC defense profile
A CC defense profile takes effect only after it is specified in the WAF module. The device processes HTTP attack packets based on CC defense profiles.
You can configure filtering criteria and detection items as needed.
Procedure
1. Click the Objects tab.
2. In the navigation pane, select APP Security > WAF > CC Defense Profiles.
3. On the page that opens, click Create.
4. Configure basic settings for the CC defense profile.
Table 2 Basic configuration items for CC defense profile
|
Item |
Description |
|
Name |
Specify a CC defense profile name. |
|
Description |
Enter a description for easy identification. |
|
Source IP address exceptions |
Specify exceptional source IP addresses. The device permits an HTTP packet to pass through if the source IP address of the HTTP packet matches an IP address exception. If no match is found, the device continues the CC attack detection. |
|
Detection interval |
Set the detection timer for CC attack detection. The timer starts when a CC defense rule is first matched. |
5. In the CC defense rules area, click Create.
6. Create a CC defense rule.
Table 3 CC defense rule configuration items
|
Item |
Description |
|
Rule name |
Specify a CC defense rule name. |
|
Destination IPv4 addresses |
Specify destination IPv4 addresses as filtering criteria in the CC defense rule. |
|
Destination IPv6 addresses |
Specify destination IPv4 addresses as filtering criteria in the CC defense rule. |
|
Destination ports |
Specify destination ports as filtering criteria in the CC defense rule. |
|
Request methods |
Select request methods as filtering criteria in the CC defense rule. |
|
Protected path |
Specify the protected paths to the website resources. |
|
X-Forwarded-For detection |
Select whether to enable X-Forwarded-For detection for the device to obtain the true source IP address from HTTP packets. Options are Enable and Disable. This field is applicable to scenarios where a client uses a proxy to access the server. |
|
Detection items |
Select detection items to determine whether CC attacks are present. Options include Request rate and Request concentration ratio. · Request rate—Identifies whether a client is accessing a website too frequently. Set Request rate threshold to define the maximum number of requests allowed to access a protected path within the detection interval. · Request concentration ratio—Identifies whether a website is most frequently visited. ¡ Min requests—Defines the number of requests to protected paths within the detection interval for triggering the request concentration detection. ¡ Request concentration ratio threshold—Defines the request concentration ratio threshold (percentage of the requests to the most frequently visited protected path to total requests to all protected paths) to determine that a CC attack occurs. |
|
Action |
Select the action for the CC defense rule. Options are Permit and Blacklist. If you select Blacklist, you must set the blacklist period. |
|
Logging |
Select whether to enable logging when CC attacks are detected. Options are Enable and Disable. |
7. Click OK.
The CC defense rule is displayed on the CC defense rules list.
8. Click OK.
The CC defense profile is displayed on the CC Defense Profiles page.
9. Click the Objects tab.
10. In the navigation pane, select APP Security > WAF > Profiles.
11. Use the CC defense profile in a WAF profile. For more information about WAF profiles, see "Configure a WAF profile."
12. To have the configuration take effect, click Submit.
Create and delete user-defined signatures
You can create user-defined signatures that do not exist in the current signature library.
A user-defined signature contains basic settings and rules.
A user-defined signature can contain multiple rules. The logical operators between rules are as follows:
· Logical AND—A packet matches a signature when it matches all rules in the signature.
· Logical OR—A packet matches a signature when the packet matches any rule in the signature.
In a user-defined signature rule, you can configure the match criteria of source IPv4 address, destination IPv4 address, source port, destination port, and request method, the detection items, and the detection trigger items.
A user-defined signature can be one of the following types:
· Keyword—A keyword type requires configuring both the detection items and detection trigger conditions. The device continues to compare a packet with detection items only after the packet matches all detection trigger conditions. A packet matches a rule only when the packet matches all detection items in the rule.
· Number—A number type requires configuring the detection items. A packet matches a rule only when the packet matches all detection items in the rule.
Create a user-defined signature
1. Click the Objects tab.
2. In the navigation pane, select APP Security > WAF > Signatures.
3. Click Create user-defined signature.
4. On the page that opens, configure basic settings for a user-defined signature.
Table 4 Basic configuration items for a user-defined signature
|
Item |
Description |
|
Name |
Enter the name of the user-defined signature. |
|
Description |
Enter a description for easy identification. |
|
Severity level |
Select the severity level of the risk impacts that the matching packets might bring to the network. Options are Critical, High, Medium, and Low. |
|
Direction |
Select the traffic direction for the direction criterion. Options are: · To-server—Client to server direction. · To-client—Server to client direction. · To-client, To-server—Both client-to-server and server-to-client directions. |
|
Action |
Select the action for packets matching the signature. Options are Blacklist, Drop, Permit, and Reset. |
|
Logging |
Select whether to enable logging for matching packets. Options are Enable and Disable. |
|
Capture |
Select whether to enable capture matching packets. Options are Enable and Disable. The capture action enables the device to capture packets and export the captured packets to the specified URL at the scheduled export time. For more information about configuring the capture action, see security actions online help. |
5. In the Rules area, select a logical operator before you configure rules for the signature.
6. Click Create.
7. On the page that opens, configure basic settings for the rule.
Table 5 Basic configuration items for a user-defined signature rule
|
Item |
Description |
|
ID |
Enter the rule ID. |
|
Match pattern type |
Select the type of the match pattern. Options are Keyword and Number. |
|
Request methods |
Select an HTTP request method, such as GET and POST. |
|
Source IPv4 address |
Enter a source IPv4 address as the match criterion. |
|
Source port range |
Enter a source port range as the match criterion. |
|
Destination IPv4 address |
Enter a destination IPv4 address as the match criterion. |
|
Destination port range |
· Enter a destination port range as the match criterion. |
8. In the Detection trigger conditions area, click Create.
This area is available only when Keyword has been selected as the match pattern type.
9. Create a detection trigger condition.
Table 6 Detection trigger condition configuration items
|
Item |
Description |
|
Protocol filed |
Select a protocol field to inspect. |
|
Match pattern type |
Select the type of the match pattern. Options are Text and Hex. |
|
Match pattern |
Enter the content of the match pattern. |
|
Depth |
Specify the number of bytes to be inspected after an offset. |
|
Offset |
Enter an offset in bytes after which the inspection starts. The offset is counted from the beginning of the protocol filed. |
10. Click OK.
The detection trigger condition is displayed on the Detection trigger conditions list.
11. In the Detection items area, click Create.
12. Create a detection item.
Table 7 Detection item configuration items
|
Item |
Description |
|
ID |
Enter a detection item ID. |
|
Protocol field |
Select a protocol field. |
|
Operator |
Select an operator to define the match operation in the detection item. Options vary by the match pattern type selected in the Create Rule page: · If Keyword has been selected, the options are Contain and Not contain. · If Number has been selected, the options are Greater than, Equal to, Not equal to, Less than, Greater than or equal to, and Less than or equal to. |
|
Match pattern type |
Select the type of the match pattern. Options are Text, Regular expression, and Hex. |
|
Match pattern |
Enter the content of the match pattern. |
|
Depth |
Specify the number of bytes to be inspected. |
|
Offset |
Enter an offset in bytes after which the inspection starts. The offset is counted from the beginning of the protocol filed. |
|
Relative depth |
Specify the number of bytes to be inspected. |
|
Relative offset |
Enter an offset after which the inspection starts. The offset is counted from the end of the previous detection item. |
13. Click OK.
The detection item is displayed on the Detection items list.
14. Click OK.
The rule is displayed on the Rules list.
15. Click OK.
The signature is displayed on the WAF Signatures page.
16. To have the configuration take effect, click Submit.
Delete user-defined signatures
1. Click the Objects tab.
2. In the navigation pane, select APP Security > WAF > Signatures.
3. On the page that opens, select the user-defined signatures that you want to delete.
4. Click Delete.
Configure the WAF whitelist
When you find a false WAF log, you can add the signature ID, URL, or IP address in the log to the WAF whitelist to permit the matching traffic.
The device will collect statistics about traffic matching the WAF whitelist. You can view the Hit count field on the Whitelist page.
1. Click the Objects tab.
2. In the navigation pane, select APP Security > WAF > Whitelist.
3. Click Create to create a whitelist entry.
Table 8 Whitelist entry configuration items
|
Item |
Description |
|
Entry ID |
Enter an ID for the whitelist entry. |
|
Description |
Enter a description for easy identification. |
|
Signature ID |
Enter the signature ID in the false WAF log. |
|
URL |
Enter the URL in the false WAF log. |
|
Match type |
URL match type: · Exact match—A match is successful if the URL in packets is exactly the same as the entered URL. · Substring match—A match is successful if the URL in packets includes the entered URL. |
|
IP type |
IP type: IPv4 or IPv6. |
|
IP address |
Enter the source IP address or real source IP address in the false WAF log. If you enter the real source IP address, you must first enable client IP identification from the APP Security > Advanced Settings page. For more information about client IP identification, see the help for advanced settings. |
|
Status |
Select Enable to make the entry take effect. If you do not select Enable, the entry does not take effect. |
4. Click OK.
5. Click Enable whitelist.