- Table of Contents
- Related Documents
-
| Title | Size | Download |
|---|---|---|
| 01-Container application hosting configuration | 285.66 KB |
Hosting container applications
Containerization and container
Container deployment and management
Network communication of container applications
Restrictions and guidelines: Container application hosting
Container application hosting tasks at a glance
Enabling the container feature
About deploying Docker containers
Restrictions and guidelines for Docker container deployment
Reloading the Docker daemon configuration
Configuring network parameters for containers
Container network parameters configuration tasks at a glance
Configuring interface Loopback 0
Configuring interface Virtual-Eth-Group 0
Container application hosting examples
Example: Deploying a container application that uses the same network namespace as Comware
Example: Deploying a container application (separate network namespace)
Appendix Docker client command reference
Downloading and importing images
Running a container by using the docker run command
Allocating hardware resources to a container
Attaching to a running container
Hosting container applications
About container applications
Comware 9 supports open container applications based on Docker. You can install, run, and manage such applications on physical H3C devices in a fast and simple way to expand device functionality. You can also use Kubernetes to automate deployment, scaling, and management of the container applications, so the device can be easily integrated with SDN and the cloud platform.
Containerization and container
Containerization is a lightweight operating-system-level virtualization technology. A container includes everything required for an application to run -- the code, a runtime, libraries, environment variables, and configuration files. All containers share the operating system kernel of the host but are isolated from each other.
Typical container management tools include Docker and LXC. Built on top of facilities such as namespaces, cgroups, and UnionFS, Docker greatly simplifies container application and promotes wide use of containers.
The Comware system integrates Docker and incorporates resource restriction features. It provides robust support for you to run open container applications based on Docker.
Advantages of containers
Containers have the following advantages:
· Lightweight—Containers leverage and share the host kernel. Compared with traditional virtual machines, containers use fewer resources and are more lightweight and quicker to start, allowing the host to support more applications.
· Secure—Linux namespaces are used in combination with cgroups to isolate containers and control resource allocation and usage.
· Portable—Containers use RootFS and UnionFS technologies. You can run containers on various mainstream Linux versions.
Container deployment and management
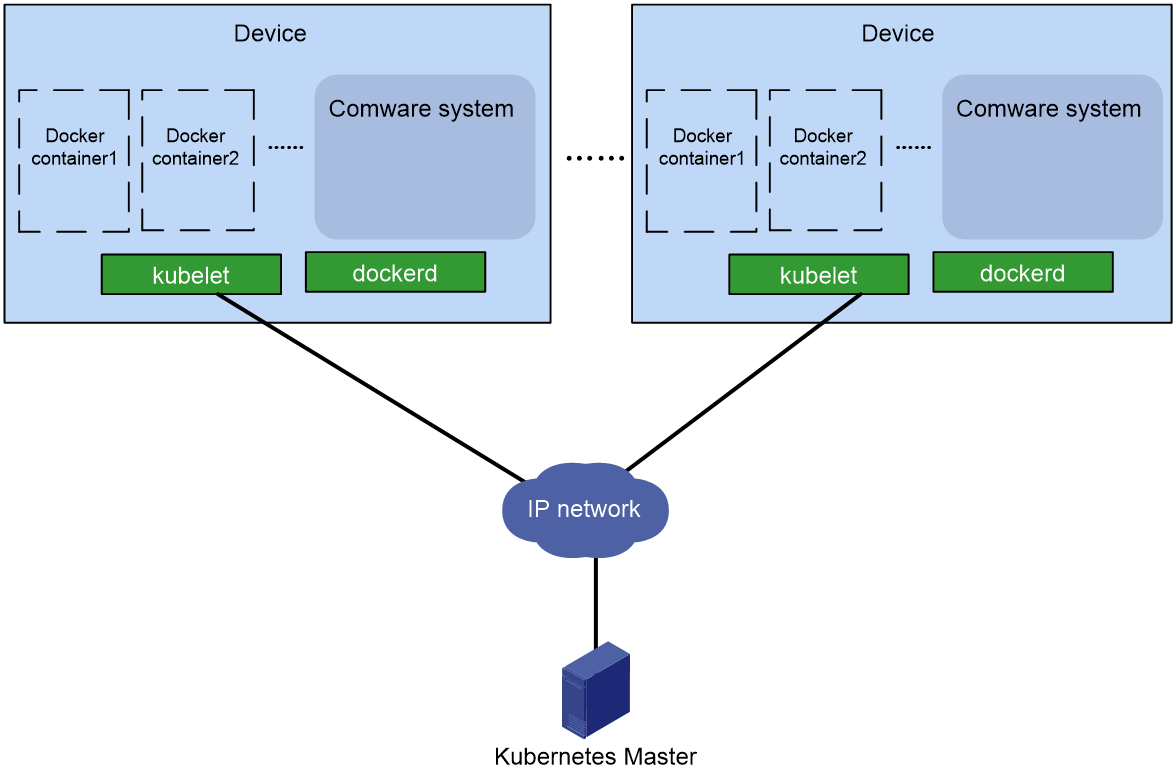
Comware 9 integrates Docker and kubelet. You can use Docker or Kubernetes to deploy container applications on the device.
· Comware supports native Docker client commands. When using the docker command to create a container, you can assign the container namespaces and resources (cgroups) to implement container isolation. You can also save containers to the flash memory on the device so the device restores the containers after a reboot.
· When kubelet is running on the device, the device is a Kubernetes node. You can use the Kubernetes master to orchestrate and manage open applications on the device.
Figure 1 Comware cooperation with Kubernetes
Container applications
You can create and start containers on the device and run Docker container-based applications in the containers to provide additional features, for example, information collection and monitoring.
Some containers are applications by themselves. For example, each device can run an agent container to collect statistics on CPU usage, memory usage, and traffic and send the statistics to the monitoring device.
Some containers provide a platform on which you can install open applications. You can use the interfaces provided by the applications in the containers to start or stop the applications. The containerization technology restricts the impact of open applications to the containers, isolating the applications from Comware.
Network communication of container applications
Comware provides network communication services for open applications. Open applications running on the device can communicate with both applications running on Comware and entities on networks. In the latter case, the forwarding module of Comware uses the device's physical interfaces to forward packets of open applications to entities on networks.
Docker uses namespaces to implement isolation between containers. The network namespaces are used to isolate network resources, for example, IP addresses, IP routing tables, /proc/net directories, and port numbers. When you create a container on the device, you can specify whether the container should share the network namespace of Comware. The communication mode of the container with entities on networks and the required networking configuration depend on the choice.
Network communication of containers that share the network namespace of Comware
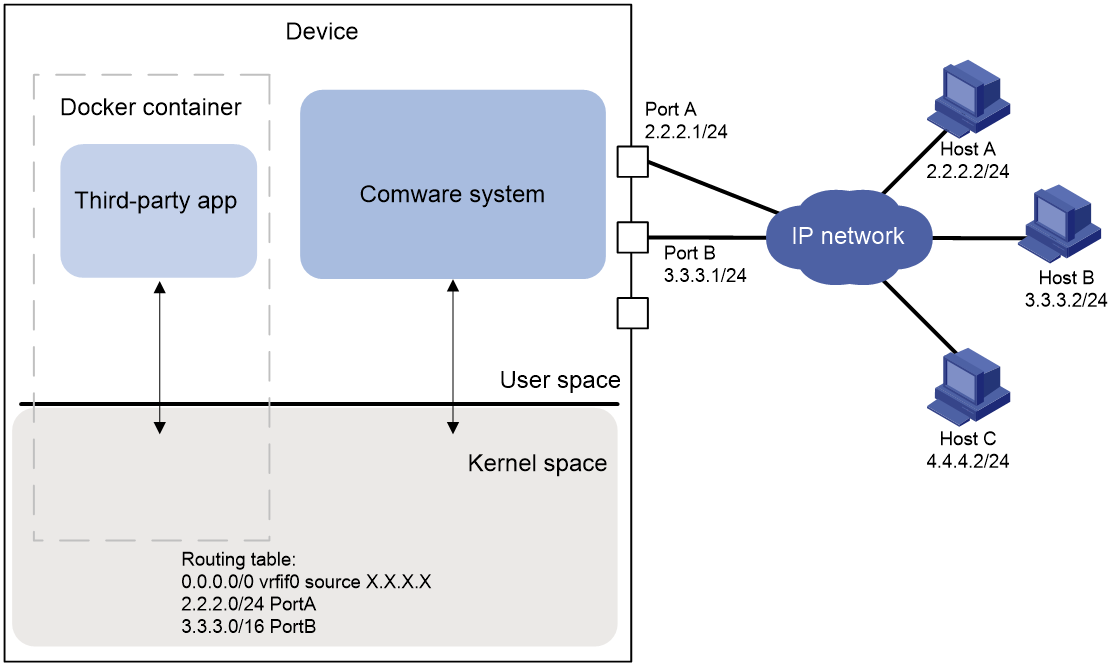
A open application in a container that shares the network namespace of Comware uses the network parameters of Comware, including the interfaces, IP addresses, IP routing table, and port numbers.
· For the application to communicate with a host that resides on the same network as the device, you do not need to configure additional network parameters. The application uses the IP address of the device to communicate with the host.
· For the application to communicate with a host that resides on a different network than the device, you must configure a source IP address for the application. You must also make sure that a connection is available between the source IP address and the remote host. The application uses the source IP address to communicate with the remote host.
For example, if you configure the Docker container in Figure 2 to use the same network namespace as Comware, the system kernel creates a default route and one direct route for each interface in up state. Because Host A and Port A reside on the same subnet, Host A can use IP address 2.2.2.1 to communicate with the open application. The similar is true for Host B. Because Host C resides on a different subnet than the device, Host C must use the source IP address specified for the application to communicate with the application.
Figure 2 Network diagram for containers that share the network namespace of Comware
Network communication of containers that do not share the network namespace of Comware
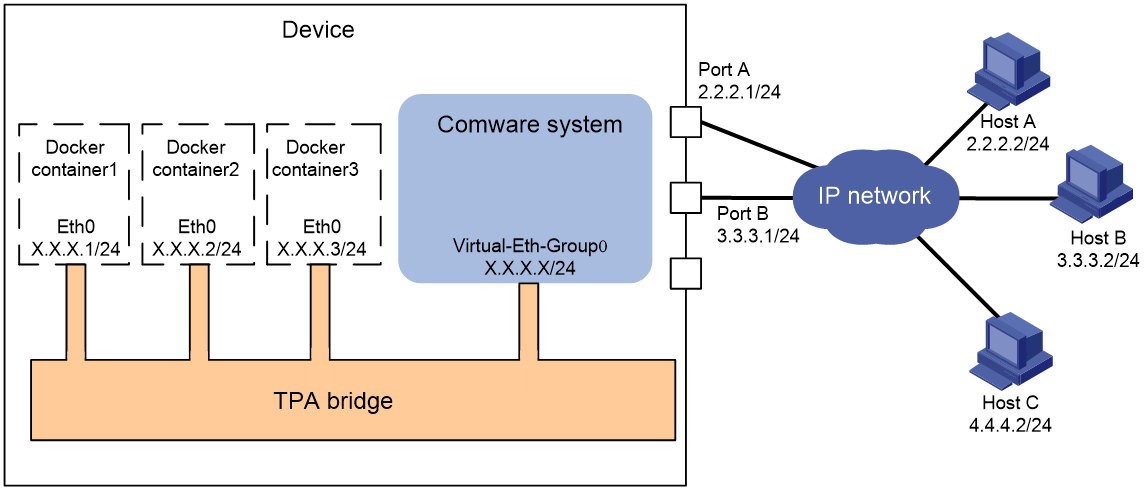
For open applications in containers that use a different network namespace than Comware to communicate with hosts on indirectly connected networks, you must create interface Virtual-Eth-Group 0. When creating interface Virtual-Eth-Group 0, Comware also creates an open bridge. The open applications use the bridge to communicate with hosts on indirectly connected networks.
As shown in Figure 3, after you create interface Virtual-Eth-Group 0 and assign it an IP address, an open bridge is created. When you create a Docker container that uses a different network namespace than Comware, Comware performs the following operations:
1. Creates virtual interface Eth 0 for the container.
2. Assigns the interface a free IP address that is on the subnet where Virtual-Eth-Group 0 resides, for example, X.X.X.1/24, X.X.X.2/24, and X.X.X.3/24.
3. Set the default gateway IP address to the IP address of interface Virtual-Eth-Group 0.
The open applications in the containers on the same device belong to the same subnet and can communicate with each other directly.
When an open application in a container needs to communicate with a host on an indirectly connected network, the application sends its packets to interface Virtual-Eth-Group 0. The host can communicate with the open application as long as a network connection is available between the host and interface Virtual-Eth-Group 0.
The applications in container 1, container 2, and container 3 uses X.X.X.1/24, X.X.X.2/24 and X.X.X.3/24, respectively, to communicate with Host A, Host B, and Host C.
Figure 3 Network diagram for containers that do not share the network namespace of Comware
Restrictions and guidelines: Container application hosting
Comware was developed based on the Linux kernel and uses the x86 architecture. The system used to compile containers and open applications must use the same CPU architecture as the device for hosting the containers and open applications.
Run only secure and trustworthy open applications on the device and patch the applications in time. Do not run malicious software.
You cannot reverse engineer open applications and Comware.
If an open application conflicts with a Comware application, the Comware application has higher priority. For example, if the Comware native FTP server and an FTP server container are available at the same IP address and port number, the device uses the native FTP server to respond to FTP clients. The device uses the FTP server in the container only if the native FTP server is disabled.
As a best practice, do not configure open application containers to share the network namespace for Comware containers. If an open application container shares the network space for Comware containers, that open application container cannot persist through a Comware system reboot. When the Comware system reboots, you must create that container again if you need to use it.
To prevent overuse of resources from degrading Comware performance, a system-defined limit is set on the CPU and memory resources assignable to open application containers. If the CPU or memory size specified for an open application container exceeds the system-defined limit when you run it by using the docker run command with the --cpuset-cpus, --cpuset-shared, or --memory option, the system-defined limit takes effect.
Container application hosting tasks at a glance
To host container applications, perform the following tasks:
1. Enabling the container feature
2. Deploying Docker containers
3. Configuring network parameters for containers
4. (Optional.) Enabling the kubelet service
5. (Optional.) Setting the virtual disk size
For more information, see "Configuring common container and open application parameters."
6. (Optional.) Backing up container data
For more information, see "Configuring common container and open application parameters."
Enabling the container feature
About this task
To install Docker containers on the device, you must enable the container feature.
Procedure
1. Enter system view.
system-view
2. Enable the container feature.
tpa container enable
By default, the container feature is enabled.
Deploying Docker containers
About deploying Docker containers
The Comware system is integrated with a modified version of the Docker daemon and can resolve standard Linux docker commands. At the Comware CLI, you can use standard Linux docker commands to create, run, and monitor containers and construct and store images.
To create a Docker container that uses the same network namespace as Comware, use the --network container:comware option. For example, the docker run --name tftpd --network container:comware vimagick/tftpd command creates and runs a TFTP server container that uses the same network namespace as Comware.
To create a Docker container that uses a different network namespace than Comware, use the --network tpa option. For example, the docker run --name tftpd --network tpa vimagick/tftpd command creates and runs a TFTP server container that uses a different network namespace than Comware.
Restrictions and guidelines for Docker container deployment
The parameter requirements of the docker command are the same as those of the standard Linux docker command. For more information, execute the docker –-help command. For convenience, this configuration guide describes the most commonly used parameters in "Appendix Docker client command reference."
If you modify the Docker daemon configuration file, verify that the modified configuration commands do not have errors. If the Docker daemon configuration file has errors, the Docker process might not be able to start up, causing the Comware system unable to start up correctly. If this symptom occurs, perform the following tasks:
1. Reboot the device and enter the BootWare menu.
2. Delete the erroneous Docker daemon configuration file and reboot the device.
3. If the symptom persists, reboot the device and enter the BootWare menu again.
4. Delete the flash: /third-party directory and reboot the device again.
Reloading the Docker daemon configuration
About this task
When Docker reboots or you reload the Docker daemon configuration, the device automatically loads the following files to the file system in memory:
· Docker daemon configuration file flash:/third-party/autocopy/etc/docker/daemon.json.
This file was saved on the device before the device was shipped. To pull images from a private registry, you must first create the daemon.json file and save it to the flash:/third-party/autocopy/etc/docker directory.
· Certificate for Docker registry access flash:/third-party/autocopy/etc/docker/certs.d. To use HTTPS to access a registry, you must download and save the certificate as file certs.d in the flash:/third-party/autocopy/etc/docker directory.
For the modified Docker daemon configuration file and the downloaded certificate to take effect, you must reboot the device or reload the Docker daemon configuration.
Procedure
1. Enter system view.
system-view
2. Reload the Docker daemon configuration.
docker-config reload
Deploying a Docker container
1. Download and import images or pull images from a registry.
2. Enter system view.
system-view
3. Deploy a Docker container.
docker [ params ]
You can execute this command multiple times to deploy more containers.
Configuring network parameters for containers
Container network parameters configuration tasks at a glance
Containers running in different environments require different network parameters.
· To configure network parameters for open applications in containers that use the same network namespace as Comware, perform the following tasks:
¡ Configuring interface Loopback 0
This task is required if you want to use Docker to pull images or use kubelet to communicate with the Kubernetes master.
¡ Specifying a source IP address for open applications
This task is required for the open applications to communicate with indirectly connected networks. For more information, see "Configuring common container and open application parameters."
¡ (Optional.) Reserving port numbers for open client applications
For more information, see "Configuring common container and open application parameters."
¡ (Optional.) Reserving port numbers for open server applications
For more information, see "Configuring common container and open application parameters."
¡ (Optional.) Preconditioning incoming IP packets
For more information, see "Configuring common container and open application parameters."
· To configure network parameters for open applications in containers that use a different network namespace than Comware, perform the following tasks:
¡ Configuring interface Loopback 0
This task is required if you want to use Docker to pull images or use kubelet to communicate with the Kubernetes master.
¡ Configuring interface Virtual-Eth-Group 0
¡ (Optional.) Preconditioning incoming IP packets
For more information, see "Configuring common container and open application parameters."
Configuring interface Loopback 0
About this task
Docker and kubelet use Comware interface Loopback 0 for network access. If the applications to be deployed need to access the network, you must configure interface Loopback 0.
Procedure
1. Enter system view.
system-view
2. Enter the view of interface Loopback 0.
interface loopback 0
3. Assign an IP address to the interface.
ip address ip-address { mask-length | mask } [ sub ]
By default, the interface does not have an IP address.
For more information about this command, see Layer 3—IP Services Command Reference.
Configuring interface Virtual-Eth-Group 0
About this task
Open applications in containers that do not share the network namespace of Comware uses interface Virtual-Eth-Group 0 to communicate with indirectly connected networks.
Procedure
1. Enter system view.
system-view
2. Create interface Virtual-Eth-Group 0 and enter its view.
interface virtual-eth-group 0
3. Assign an IP address to the interface.
ip address ip-address { mask-length | mask } [ sub ]
By default, the interface does not have an IP address.
Enabling the kubelet service
About this task
After you enable the kubelet service on the device, the device becomes a Kubernetes node. You can use the Kubernetes master to orchestrate and manage open applications on the device.
Restrictions and guidelines
The device is installed with kubelet when shipped. The Comware upgrade package contains the upgrade image for kubelet. When you upgrade the Comware system on the device, kubelet is also upgraded. You do not need to install or upgrade kubelet separately.
Prerequisites
When you enable the kubelet service, the system automatically synchronize the files listed in Table 1 to the file system in memory. To enable the kubelet service successfully, make sure the files exist in the specified directory.
Table 1 Files required for enabling the kubelet service
|
File description |
Storage location |
File name (extension not allowed) |
|
Kubernetes public configuration file |
kubeconfig |
|
|
Kubelet configuration file |
kubeletconfig |
|
|
Environment variable file for Kubelet command line parameters |
kubelet |
The following are the sample content of the files. You can modify the files as required.
/* Kubernetes public configuration file flash:/third-party/autocopy/etc/kubernetes/kubeconfig */
apiVersion: v1
clusters:
- cluster:
insecure-skip-tls-verify: true
server: http://192.168.111.62:8080
name: TestCluster
contexts:
- context:
cluster: TestCluster
user: comwarev9
name: Comware
current-context: Comware
kind: Config
preferences: {}
users: []
/* Kubelet configuration file flash:/third-party/autocopy/etc/kubernetes/kubeletconfig */
kind: KubeletConfiguration
apiVersion: kubelet.config.k8s.io/v1beta1
failSwapOn: false
address: 0.0.0.0
port: 10250
/* Environment variable file for kubelet command line parameters: flash:/third-party/autocopy/etc/kubernetes/kubelet */
KUBELET_ARGS=”--hostname-override 6890-A --pod-infra-container-image=192.168.111.62:5000/pause:3.1“
Procedure
1. Enter system view.
system-view
2. Enable the kubelet service.
kubelet enable
By default, the kubelet service is disabled.
Container application hosting examples
Example: Deploying a container application that uses the same network namespace as Comware
Network configuration
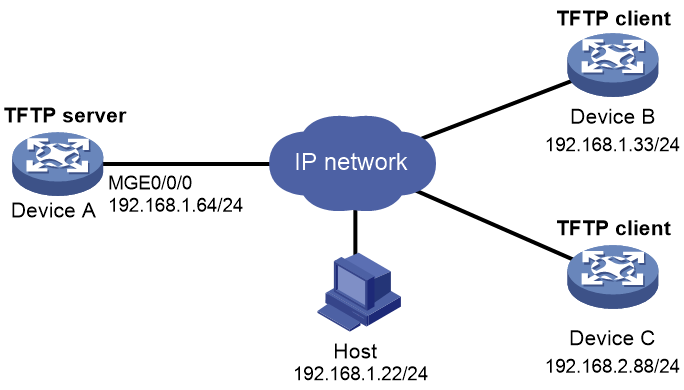
As shown in Figure 4, Device A is on the same subnet as Device B but is on a different subnet as Device C.
Deploy a containerized TFTP server application on Device A. On Device B and Device C, use 192.168.1.64 as the IP address of the TFTP server to upload the configuration files to the TFTP server.
Analysis
IP address 192.168.1.64 belongs to Device A. For the containerized TFTP server application to use the same IP address as Device A, you must configure the container to use the same network namespace as Comware.
Procedure
1. Configure Device A:
# Assign IP addresses to interfaces and configure routes. Make sure the network connections are available. (Details not shown.)
# Download TFTP server image file tftpd.tar.gz from the host.
<DeviceA> tftp 192.168.1.22 get tftpd.tar.gz
Press CTRL+C to abort.
% Total % Received % Xferd Average Speed Time Time Time Current
Dload Upload Total Spent Left Speed
100 2135k 100 2135k 0 0 138k 0 0:00:15 0:00:15 --:--:-- 97686
100 2135k 100 2135k 0 0 137k 0 0:00:15 0:00:15 --:--:-- 137k
# Verify that the image file is downloaded successfully.
<DeviceA> dir *.gz
Directory of flash:
0 -rw- 2186624 Jan 11 2019 16:04:16 tftpd.tar.gz
3710740 KB total (1893144 KB free)
# Load image file tftpd.tar.gz.
<DeviceA> system-view
[DeviceA] docker images
REPOSITORY TAG IMAGE ID CREATED SIZE
comware MPU 44921263afab 18 years ago 33B
[DeviceA] docker load -i tftpd.tar.gz
df64d3292fd6: Loading layer 4.672MB/4.672MB
ebf013859a34: Loading layer 99.84kB/99.84kB
Loaded image ID: sha256:1ae5a7ba615b2fdbbba1819745f44d253ad6980ad4517d41755e9822e89561fb
[DeviceA] docker images
REPOSITORY TAG IMAGE ID CREATED SIZE
<none> <none> 1ae5a7ba615b 5 weeks ago 4.5MB
comware MPU 44921263afab 18 years ago 33B
# Configure a tag that is used to refer to the TFTP server image.
[DeviceA] docker tag 1ae tftpd:latest
[DeviceA] docker images
REPOSITORY TAG IMAGE ID CREATED SIZE
tftpd latest 1ae5a7ba615b 5 weeks ago 4.5MB
comware MPU 44921263afab 18 years ago 33B
# Create a container named tftpserver that uses the same network namespace as Comware in the background, and run the TFTP server image in the container.
[DeviceA] docker run -d --name tftpserver --network container:comware tftpd
c773c637fd81d3dfb5453126b3b0bcaf20ab7a8b3e92875c4be69296b8b2928c
[DeviceA] docker ps
CONTAINER ID IMAGE COMMAND CREATED STATUS PORTS NAMES
c773c637fd81 tftpd "in.tftpd --verbose " 19 seconds ago Up 18 seconds tftpserver
bd84340b76a1 comware:MPU "/bin/v9.sh" 18 years ago Up 18 years comware
# Specify a source IPv4 address for the application.
[DeviceA] tpa ip source interface m-gigabitethernet 0/0/0
2. On Device B, save the running configuration and upload the configuration file to the TFTP server on Device A.
<DeviceB> save DeviceB.cfg
The current configuration will be saved to flash:/DeviceB.cfg. Continue? [Y/N]:y
Now saving current configuration to the device.
Saving configuration flash:/DeviceB.cfg.Please wait...
Configuration is saved to device successfully.
<DeviceB> tftp 192.168.1.64 put DeviceB.cfg
Press CTRL+C to abort.
% Total % Received % Xferd Average Speed Time Time Time Current
Dload Upload Total Spent Left Speed
100 13137 0 0 100 13137 0 534k --:--:-- --:--:-- --:--:-- 583k
3. On Device C, save the running configuration and upload the configuration file to the TFTP server on Device A.
<DeviceC> save DeviceC.cfg
The current configuration will be saved to flash:/DeviceC.cfg. Continue? [Y/N]:y
Now saving current configuration to the device.
Saving configuration flash:/DeviceC.cfg.Please wait...
Configuration is saved to device successfully.
<DeviceC> tftp 192.168.1.64 put DeviceC.cfg
Press CTRL+C to abort.
% Total % Received % Xferd Average Speed Time Time Time Current
Dload Upload Total Spent Left Speed
100 6120 0 0 100 6120 0 1103 0:00:05 0:00:05 --:--:-- 1111
Verifying the configuration
# Access the CLI of the containerized TFTP server application.
[DeviceA] docker exec -it tftpserver sh
/ #
# Display the routing table.
/ # ip route
default dev vrfif0 scope link src 192.168.1.64
127.0.0.0/8 dev InLoop0 scope link src 127.0.0.1
127.1.1.0/30 dev eth0 scope link src 127.1.1.2
192.168.1.0/24 dev MGE1_0_0_0 scope link src 192.168.1.64
// The command output shows that there is a default route and there are three direct routes. The source IP address of the default route is 192.168.1.64.
# List files.
/ # ls
bin home mnt run sys usr
dev lib proc sbin tftpboot var
etc media root srv tmp
/ # ls tftpboot/
DeviceB.cfg DeviceC.cfg
/ # exit
[DeviceA]
// Configuration files DeviceB.cfg and DeviceC.cfg are saved in the tftpboot directory.
Example: Deploying a container application (separate network namespace)
Network configuration
As shown in Figure 5, the Google cAdvisor image file is saved in the registry.
Pull and deploy Google cAdvisor on the device to monitor resource usage on the device. Use Host to view the resource usage information collected by cAdvisor.

Analysis
For cAdvisor to use a fixed IP address that is not the IP address of the device, you must configure the container to use a different network namespace than Comware.
Prerequisites
Make sure that network connections are available between the following items:
· Registry and IP address 1.1.1.1.
· Host and IP address 10.10.10.10.
· Host and IP address 135.1.1.6.
Procedure
# On Host, modify Docker daemon configuration file daemon.json. Set the registry IP address to 2.2.2.2.
{
"insecure-registries":["2.2.2.2"]
}
# On Device, create directory flash:/third-party/autocopy/docker and download file daemon.json to the directory.
<Device> mkdir flash:/third-party/autocopy/docker/
<Device> tftp 3.3.3.3 get daemon.json flash:/third-party/autocopy/docker/daemon.json
# Reload daemon.json.
<Device> system-view
[Device] docker-config reload
Reloading docker configuration...
Done.
# Assign IP address 1.1.1.1/32 to interface Loopback 0. Device will use Loopback 0 to pull an image.
[Device] interface loopback 0
[Device-LoopBack0] ip address 1.1.1.1 32
[Device-LoopBack0] quit
# Pull image google/cadvisor from the registry.
[Device] docker pull google/cadvisor
# List images.
[Device] docker images
REPOSITORY TAG IMAGE ID CREATED SIZE
google/cadvisor latest 75f88e3ec333 10 months ago 62.2MB
comware MPU 9b5091ba7bd0 17 years ago 33B
# Create a container named cadvisor that uses a different network namespace than Comware in the background, and run the cAdvisor image in the container.
[Device] docker run -v /:/rootfs:ro -v /var/run:/var/run:ro -v /sys:/sys:ro -v /var/lib/docker:/var/lib/docker:ro -v /dev/disk:/dev/disk:ro --detach --name cadvisor --ip 135.1.1.6 --network tpa google/cadvisor
4260ca77cec7b47649db94b9e63da7f57e06dcdb3d1c330707869f3818afcbbb
# List containers.
[Device] docker ps
CONTAINER ID IMAGE COMMAND CREATED STATUS
PORTS NAMES
4260ca77cec7 google/cadvisor "/usr/bin/cadvisor -…" 14 seconds ago Up 13 seconds 8080/tcp cadvisor
bd84340b76a1 comware:MPU "/bin/v9.sh" 18 years ago Up 18 years comware
# Create interface Virtual-Eth-Group 0 and assign IP address 135.1.1.1/24 to the interface. Google cAdvisor will use this interface to communicate with indirectly connected networks.
[Device] interface virtual-eth-group 0
[Device-Virtual-Eth-Group0] ip address 135.1.1.1 24
[Device-Virtual-Eth-Group0] quit
Verifying the configuration
# On Host, launch a Web browser and enter http://135.1.1.6:8080 in the address bar to connect to cAdvisor. Verify that the monitoring information on cAdvisor is displayed.

Appendix Docker client command reference
Downloading and importing images
Procedure
1. Export images as a tar archive. For more information, execute the docker save --help and docker export --help commands.
2. Download the tar archive file to a file system on the device, for example, the flash file system.
3. If the tar archive file is generated by using the docker save command, use the docker load command to load the images.
4. If the tar archive file is generated by using the docker export command, use the docker import command to import the images.
For more information about the docker commands, execute the docker load –help and docker import --help commands.
Examples
# Import the cAdvisor image from file cadvisor.img.tar.gz.
<Sysname> dir *.tar.gz
Directory of flash:
0 -rw- 694482 Jan 03 2001 18:55:02 busybox.tar.gz
1 -rw- 24297962 Jan 13 2001 02:35:51 cadvisor.img.tar.gz
3710740 KB total (1158972 KB free)
<Sysname> system-view
[Sysname] docker load -i cadvisor.img.tar.gz
52a5560f4ca0: Loading layer 5.06MB/5.06MB
f04a25da66bf: Loading layer 31.51MB/31.51MB
f60e27acaccf: Loading layer 26.49MB/26.49MB
Loaded image: google/cadvisor:latest
# List images.
<Sysname> system-view
[Sysname] docker images
REPOSITORY TAG IMAGE ID CREATED SIZE
registry latest d1fd7d86a825 Less than a second ago 33.3MB
google/cadvisor latest 75f88e3ec333 Less than a second ago 62.2MB
busybox latest 54511612f1c4 Less than a second ago 1.13MB
bd84340b76a1 comware:MPU "/bin/v9.sh" 18 years ago Up 18 years comware
Pulling images
Prerequisites
The Docker daemon uses Comware interface Loopback 0 for network access. Make sure that network connections are available between interface Loopback 0 and the public registry and private registry.
Pulling images from Docker's public registry
You can use the docker pull command to pull images from Docker's public registry after you register with the registry.
Pulling images from private registries (HTTP)
An HTTP-type private registry is an insecure registry. To pull images from HTTP-type private registries, you must use the insecure-registries option to specify the insecure registries.
1. Modify file flash:/third-party/autocopy/etc/docker/daemon.json as follows:
<Sysname> more flash:/third-party/autocopy/etc/docker/daemon.json
{
"live-restore": true,
"insecure-registries":["192.168.111.62","test.io:5000"]
}
This example supposes that the IP address of the private registry is 192.168.111.62 and the default port number is used. test.io:5000 is the domain name and port number of another image registry.
2. Reboot the device or execute the docker-config reload command to make the modifications take effect.
Pulling images from private registries (HTTPS)
An HTTPS-type private registry is a secure registry. When you pull images form a secure registry, the server might use one of the following client authentication modes:
· No authentication.
You can use the docker pull or docker push command to pull or push images directly.
· Simple authentication.
You must log in to a registry before you can use the docker pull or docker push command to pull images from or push images to the registry.
To log in to a registry, execute the docker login command and provide the correct authentication data.
· Certificate-based authentication.
To access a private registry that requires certificate-based authentication, you cannot use the IP address of the server. You must use the server's domain name.
Follow these steps:
a. Contact the service provider or administrator to obtain the server's certificate.
b. Download the server's certificate to the device.
The certificate must be saved in file flash:/third-party/autocopy/etc/docker/certs.d/server-domain-name:port-number/ca.crt, for example, flash:/third-party/autocopy/etc/docker/certs.d/img.h3c.com:5000/ca.crt. Because the flash file system does not support colons (:), the colon must be replaced with an at sign (@). The actual path is flash:/third-party/autocopy/etc/docker/certs.d/img.h3c.com@5000/ca.crt.
c. Reboot the device or execute the docker-config reload command to make the modifications take effect.
d. Execute the docker login command and provide the correct authentication data.
e. Execute the docker pull or docker push command to pull or push images.
Examples
# Pull image busybox from server 192.168.111.62:5000.
<Sysname> system-view
[Sysname] docker pull 192.168.111.62:5000/busybox
Using default tag: latest
latest: Pulling from busybox
Digest: sha256:545e6a6310a27636260920bc07b994a299b6708a1b26910cfefd335fdfb60d2b
Status: Image is up to date for 192.168.111.62:5000/busybox:latest
Running a container by using the docker run command
About this task
The most commonly used method for running a container is to use the docker run command. This command creates and starts a container based on the specified parameters. For information about available parameters, execute the docker run --help command.
Procedure
1. Enter system view.
system-view
2. Use the docker images command to list images. Identify whether the image that you want to run exists.
3. Use the docker run command to run the image in a new container.
4. Use the docker ps command to view the operating status of the container.
Examples
# Run a TFTP server container, making the container use the same network namespace as Comware.
<Sysname> system-view
[Sysname] docker run --name tftpd --network container:comware tftpd
# Run a TFTP server container, making the container use a different network namespace than Comware.
<Sysname> system-view
[Sysname] docker run --name tftpd --network tpa tftpd
# Run a TFTP server container, making the container use a different network namespace than Comware and use IP address 1.1.1.1/24.
<Sysname> system-view
[Sysname] docker run --name tftpd --network tpa --ip 1.1.1.1 tftpd
# Run a TFTP server container, making the container use a different network namespace than Comware and use IP address 1.1.1.1/24. Always restart the container when the device starts up.
<Sysname> system-view
[Sysname] docker run --name tftpd --network tpa --ip 1.1.1.1 --restart=always tftpd
Allocating hardware resources to a container
About this task
· Setting CPU weights for containers
The containers running on a device share and compete for CPU resources on the device. If one container occupies too many CPU resources, the other containers might not be able to operate. To ensure correct operation of containers, assign containers CPU weights.
The number of CPU resources a container can use depends on the percentage of its CPU weight among the CPU weights of all containers that share the same CPUs. For example, if three containers share the same CPUs, setting their weights to 10, 10, and 5 is equivalent to setting their weights to 2, 2, and 1.
¡ The two containers with the same weight can use the CPUs for approximately the same period of time.
¡ The third container can use the CPUs for approximately half of the time for each of the other two containers.
· Specifying the CPUs for containers to use
When you create or run a container, you can specify the CPUs for the container to use. You can also change the CPUs for the container to use while the container is running. The CPUs that containers can use depend on the device model.
· Allocating memory space to containers
The containers running on a device share and compete for the memory space on the device. If a container occupies too much memory space, the other containers might not be able to operate correctly. To ensure correct operation of containers, specify a memory space quota for each container.
By default, a container can use a maximum of 256 MB memory space. You can set the quota to 2 GB.
Restrictions and guidelines
The memory quota allocated to a container must be enough for the container to operate correctly. As a best practice, execute the docker stats --no-stream command to view the resource usages of the container after the container starts up. Then, adjust the quota as required.
Procedure
You can allocate CPU resources and memory resources to a container when you create or run the container or change the quotas while the container is running. For more information, execute the following commands: docker create –help, docker run –help, and docker update --help.
Examples
# Run container ubntu, setting its CPU weight so it can use up to 20% of the CPU resources.
<Sysname> system-view
[Sysname] docker run -it --cpu-period=100000 --cpu-quota=20000 ubntu /bin/bash
Attaching to a running container
About this task
After you attach local standard input, output, and error streams to a container running in the background, you can view the container's ongoing output or control the container interactively.
Procedure
1. Enter system view.
system-view
2. Attach local standard input, output, and error streams to a running container.
docker attach container-name or container-ID
For more information, execute the docker attach --help command.
Returning to the Comware CLI
To return to the Comware CLI from the interface of a container, press Ctrl+P+Q.
Listing containers
1. Enter system view.
system-view
2. List running containers.
docker ps
3. List all containers, including stopped containers.
docker ps -a
For more information, execute the docker ps --help command.
Saving containers
About this task
If you choose to save docker files when you execute the save command, the command archives directory flash:/third-party/etc/docker to the flash:/third-party/container_storage directory. When the device reboots, the system uses the archive file to restore the containers.
Procedure
To save containers, execute the save command in any view. The saved containers will be restored when the device starts up. For more information about the save command, see Fundamentals Command Reference.
Examples
<Sysname> save
The current configuration will be written to the device. Are you sure? [Y/N]:y
Please input the file name(*.cfg)[flash:/startup.cfg]
(To leave the existing filename unchanged, press the enter key):
flash:/startup.cfg exists, overwrite? [Y/N]:y
Validating file. Please wait...
Saving docker files need some time. Do you want to save docker files in this process? [Y/N]:y
Saving docker files
.....
Done.
Saved the current configuration to mainboard device successfully.
<Sysname>