- Table of Contents
-
- 14-Security Configuration Guide
- 00-Preface
- 01-Keychain configuration
- 02-Public key management
- 03-PKI configuration
- 04-SSH configuration
- 05-SSL configuration
- 06-Packet filter configuration
- 07-DHCP snooping configuration
- 08-DHCPv6 snooping configuration
- 09-ARP attack protection configuration
- 10-ND attack defense configuration
- 11-Attack detection and prevention configuration
- 12-uRPF configuration
- 13-IP source guard configuration
- 14-Crypto engine configuration
- Related Documents
-
| Title | Size | Download |
|---|---|---|
| 07-DHCP snooping configuration | 199.97 KB |
Application of trusted and untrusted ports
DHCP snooping support for Option 82
Restrictions and guidelines: DHCP snooping configuration
DHCP snooping tasks at a glance
Configuring basic DHCP snooping features
Configuring basic DHCP snooping features in a common network
Configuring basic DHCP snooping features in a VXLAN network
Configuring DHCP snooping support for Option 82
Configuring DHCP snooping entry auto backup
Setting the maximum number of DHCP snooping entries
Configuring DHCP packet rate limit
Configuring DHCP snooping security features
Enabling DHCP starvation attack protection
Enabling DHCP-REQUEST attack protection
Configuring a DHCP packet blocking port
Enabling DHCP snooping logging
Disabling DHCP snooping on an interface
Verifying and maintaining DHCP snooping
Verifying DHCP snooping configuration
Displaying and clearing DHCP snooping entries
Displaying and clearing DHCP packet statistics on the DHCP snooping device
DHCP snooping configuration examples
Example: Configuring basic DHCP snooping features globally
Example: Configuring basic DHCP snooping features for a VLAN
Example: Configuring DHCP snooping support for Option 82
Configuring DHCP snooping
About DHCP snooping
DHCP snooping is a security feature for DHCP.
DHCP snooping works between the DHCP client and server, or between the DHCP client and DHCP relay agent. It guarantees that DHCP clients obtain IP addresses from authorized DHCP servers. Also, it records IP-to-MAC bindings of DHCP clients (called DHCP snooping entries) for security purposes.
DHCP snooping defines trusted and untrusted ports to make sure clients obtain IP addresses only from authorized DHCP servers.
· Trusted—A trusted port can forward DHCP messages correctly to make sure the clients get IP addresses from authorized DHCP servers.
· Untrusted—An untrusted port discards received DHCP-ACK and DHCP-OFFER messages to prevent unauthorized servers from assigning IP addresses.
DHCP snooping reads DHCP-ACK messages received from trusted ports and DHCP-REQUEST messages to create DHCP snooping entries. A DHCP snooping entry includes the MAC and IP addresses of a client, the port that connects to the DHCP client, and the VLAN.
The following features need to use DHCP snooping entries:
· ARP fast-reply—Uses DHCP snooping entries to reduce ARP broadcast traffic. For more information, see "Configuring ARP fast-reply."
· ARP attack detection—Uses DHCP snooping entries to filter ARP packets from unauthorized clients. For more information, see Security Configuration Guide.
· IPsource guard—Uses DHCP snooping entries to filter illegal packets on a per-port basis. For more information, see Security Configuration Guide.
· VLAN mapping—Uses DHCP snooping entries to replace service provider VLAN in packets with customer VLAN before sending the packets to clients. For more information, see Layer 2—LAN Switching Configuration Guide.
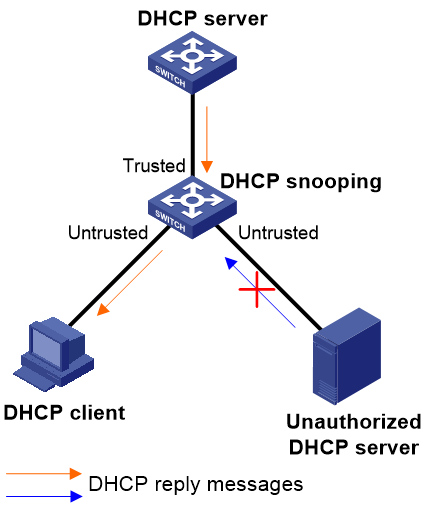
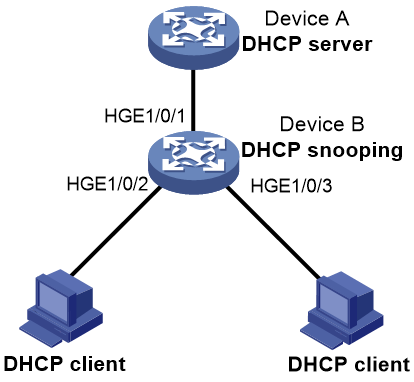
Application of trusted and untrusted ports
Configure ports facing the DHCP server as trusted ports, and configure other ports as untrusted ports.
As shown in Figure 1, configure the DHCP snooping device's port that is connected to the DHCP server as a trusted port. The trusted port forwards response messages from the DHCP server to the client. The untrusted port connected to the unauthorized DHCP server discards incoming DHCP response messages.
Figure 1 Trusted and untrusted ports
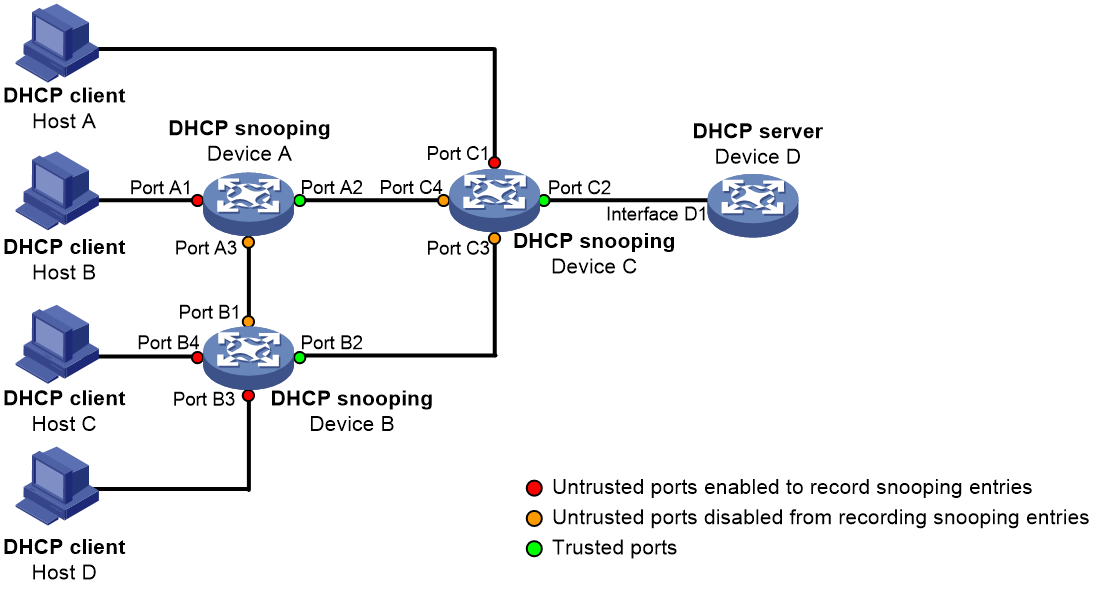
In a cascaded network as shown in Figure 2, configure the DHCP snooping devices' ports facing the DHCP server as trusted ports. To save system resources, you can enable only the untrusted ports directly connected to the DHCP clients to record DHCP snooping entries.
Figure 2 Trusted and untrusted ports in a cascaded network
DHCP snooping support for Option 82
Option 82 records the location information about the DHCP client so the administrator can locate the DHCP client for security and accounting purposes. For more information about Option 82, see DHCP overview in Layer 3—IP Services Configuration Guide.
Sub-option 9 (Vendor-Specific) in Option 82 is supported only on DHCP snooping devices. Each DHCP snooping device adds the following information to the sub-option in the received DHCP request:
· Node identifier of the current DHCP snooping device.
· Information about the client-side interface.
· VLAN of the DHCP client.
After the management device receives the DHCP request, the management device can determine the network topology that the request has travelled and locate the DHCP client.
DHCP snooping uses the same strategies as the DHCP relay agent to handle Option 82 for DHCP request messages, as shown in Table 1. If a response returned by the DHCP server contains Option 82, DHCP snooping removes Option 82 before forwarding the response to the client. If the response contains no Option 82, DHCP snooping forwards it directly.
|
If a DHCP request has… |
Handling strategy |
DHCP snooping… |
|
Option 82 |
Append |
· Forwards the message after padding the Vendor-Specific sub-option with the content specified in the dhcp snooping information vendor-specific command. · Forwards the message without changing Option 82 if the dhcp snooping information vendor-specific command is not configured. |
|
Drop |
Drops the message. |
|
|
Keep |
Forwards the message without changing Option 82. |
|
|
Replace |
Forwards the message after replacing the original Option 82 with the Option 82 padded according to the configured padding format, padding content, and code type. |
|
|
No Option 82 |
N/A |
Forwards the message after adding the Option 82 padded according to the configured padding format, padding content, and code type. |
Restrictions and guidelines: DHCP snooping configuration
· The DHCP snooping configuration does not take effect on a Layer 2 Ethernet interface that is an aggregation member port. The configuration takes effect when the interface leaves the aggregation group.
· Specify the ports connected to authorized DHCP servers as trusted ports to make sure that DHCP clients can obtain valid IP addresses. The trusted ports and the ports connected to DHCP clients must be in the same VLAN.
· You can specify the following interfaces as trusted ports: Layer 2 Ethernet interfaces, Layer 2 aggregate interfaces, Layer 3 Ethernet interfaces, and Layer 3 aggregate interfaces,. For more information about aggregate interfaces, see Layer 2—LAN Switching Configuration Guide.
DHCP snooping tasks at a glance
To configure DHCP snooping, perform the following tasks:
1. Configuring basic DHCP snooping features
2. (Optional.) Configuring DHCP snooping support for Option 82
3. (Optional.) Configuring DHCP snooping entry auto backup
4. (Optional.) Setting the maximum number of DHCP snooping entries
5. (Optional.) Configuring DHCP packet rate limit
6. (Optional.) Configuring DHCP snooping security features
7. (Optional.) Enabling DHCP snooping logging
8. (Optional.) Disabling DHCP snooping on an interface
Configuring basic DHCP snooping features
Configuring basic DHCP snooping features in a common network
About this task
Basic DHCP snooping features refer to the following:
· Enabling DHCP snooping.
· Configuring DHCP snooping trusted ports.
· Enabling recording client information in DHCP snooping entries.
If you enable DHCP snooping globally, DHCP snooping is enabled on all interfaces on the device.
You can also enable DHCP snooping for specific VLANs. After enabling DHCP snooping for a VLAN, you can configure the other basic DHCP snooping features in the VLAN.
Restrictions and guidelines
If the basic DHCP snooping features are configured globally, you can only use the undo form of the global configuration commands to disable the settings globally. The VLAN-specific configuration commands cannot disable the settings.
If the basic DHCP snooping features are configured in a VLAN, you can only use the undo form of the VLAN-specific configuration commands to disable the settings in the VLAN. The global configuration command cannot disable the settings.
Configuring basic DHCP snooping features globally
1. Enter system view.
system-view
2. Enable DHCP snooping globally.
dhcp snooping enable
By default, DHCP snooping is disabled globally.
3. Enter interface view.
interface interface-type interface-number
This interface must connect to the DHCP server.
4. Specify the port as a trusted port.
dhcp snooping trust
By default, all ports are untrusted ports after DHCP snooping is enabled.
5. (Optional.) Enable the recording of DHCP snooping entries.
a. Return to system view.
quit
b. Enter interface view.
interface interface-type interface-number
This interface must connect to the DHCP client.
c. Enable the recording of DHCP snooping entries.
dhcp snooping binding record
By default, the recording of DHCP snooping entries is disabled.
Configuring basic DHCP snooping features for VLANs
1. Enter system view.
system-view
2. Enable DHCP snooping for VLANs.
dhcp snooping enable vlan vlan-id-list
By default, DHCP snooping is disabled for all VLANs.
3. Enter VLAN view
vlan vlan-id
Make sure DHCP snooping is enabled for the VLAN.
4. Configure an interface in the VLAN as a trusted port.
dhcp snooping trust interface interface-type interface-number
By default, all interfaces in the VLAN are untrusted ports.
5. (Optional.) Enable recording of client information in DHCP snooping entries.
dhcp snooping binding record
By default, recording of client information in DHCP snooping entries is disabled.
Configuring basic DHCP snooping features in a VXLAN network
About this task
In a VXLAN network, you can configure the following interfaces as DHCP snooping trusted interfaces:
· ACs that are mapped to a VSI.
· VXLAN tunnel interfaces that are assigned to a VSI.
When the VTEP with DHCP snooping configured receives a DHCP request, the VTEP forwards this request through the trusted ACs or VXLAN tunnel interfaces.
Restrictions and guidelines
If the DHCP server is in the local site, configure the AC that connects to the DHCP server as trusted. If the DHCP server is in a remote site, configure the VXLAN tunnel interface as trusted.
Configuring basic DHCP snooping features in a VXLAN network (DHCP server at the local site)
1. Enter system view.
system-view
2. Enable DHCP snooping globally.
dhcp snooping enable
By default, DHCP snooping is disabled globally.
3. Enter interface view.
interface interface-type interface-number
4. Enter Ethernet service instance view.
service-instance instance-id
5. Configure the AC as the DHCP snooping trusted interface.
dhcp snooping trust
By default, all ports are untrusted after DHCP snooping is enabled.
6. (Optional.) Enable recording of client information in DHCP snooping entries.
a. Exit to interface view.
quit
b. Exit to the system view.
quit
c. Enter VSI view.
vsi vsi-name
d. Enable recording of client information in DHCP snooping entries on the ACs mapped to the VSI and VXLAN tunnel interfaces assigned to the VSI.
dhcp snooping binding record
By default, the recording of DHCP snooping entries is disabled.
Configuring basic DHCP snooping features in a VXLAN network (DHCP server at a remote site)
1. Enter system view.
system-view
2. Enable DHCP snooping globally.
dhcp snooping enable
By default, DHCP snooping is disabled globally.
3. Enter VSI view.
vsi vsi-name
4. Configure the VXLAN tunnel interfaces as the DHCP snooping trusted interface.
dhcp snooping trust tunnel
By default, all ports are untrusted after DHCP snooping is enabled.
This command sets all VXLAN tunnel interfaces in the VSI as DHCP snooping trusted interfaces.
5. (Optional.) Enable recording of client information in DHCP snooping entries on the ACs mapped to the VSI and VXLAN tunnel interfaces assigned to the VSI.
dhcp snooping binding record
By default, the recording of DHCP snooping entries is disabled.
Configuring DHCP snooping support for Option 82
Restrictions and guidelines
· The Option 82 configuration on a Layer 2 Ethernet interface that has been added to an aggregation group does not take effect unless the interface leaves the aggregation group.
· To support Option 82, you must configure Option 82 on both the DHCP server and the DHCP snooping device. For information about configuring Option 82 on the DHCP server, see DHCP server configuration in Layer 3—IP Services Configuration Guide.
· If Option 82 contains the device name, the device name must contain no spaces. Otherwise, DHCP snooping drops the message. You can use the sysname command to specify the device name. For more information about this command, see Fundamentals Command Reference.
· DHCP snooping uses "outer VLAN tag.inner VLAN tag" to fill the VLAN ID field of sub-option 1 in verbose padding format if either of the following conditions exists:
¡ DHCP snooping and QinQ work together.
¡ DHCP snooping receives a DHCP packet with two VLAN tags.
For example, if the outer VLAN tag is 10 and the inner VLAN tag is 20, the VLAN ID field is 000a.0014. The hexadecimal digit a represents the outer VLAN tag 10, and the hexadecimal digit 14 represents the inner VLAN tag 20.
Procedure
1. Enter system view.
system-view
2. Enter interface view.
interface interface-type interface-number
3. Enable DHCP snooping to support Option 82.
dhcp snooping information enable
By default, DHCP snooping does not support Option 82.
4. (Optional.) Configure a handling strategy for DHCP requests that contain Option 82.
dhcp snooping information strategy { append | drop | keep | replace }
By default, the handling strategy is replace.
If the handling strategy is append or replace, configure a padding mode and padding format for Option 82. If the handling strategy is keep or drop, you do not need to configure any padding mode or padding format for Option 82.
5. (Optional.) Configure the padding mode and padding format for the Circuit ID sub-option.
dhcp snooping information circuit-id { bas | [ vlan vlan-id ] string circuit-id | { normal | verbose [ node-identifier { mac | sysname | user-defined node-identifier } ] } [ format { ascii | hex } ] }
By default, the padding mode is normal and the padding format is hex for the Circuit ID sub-option.
If the device name (sysname) is configured as the padding content for sub-option 1, make sure the device name does not include spaces. Otherwise, the DHCP snooping device will fail to add or replace Option 82.
6. (Optional.) Configure the padding mode and padding format for the Remote ID sub-option.
dhcp snooping information remote-id { normal [ format { ascii | hex } ] | [ vlan vlan-id ] string remote-id | sysname }
By default, the padding mode is normal and the padding format is hex for the Remote ID sub-option.
7. (Optional.) Configure the padding mode for the Vendor-Specific sub-option.
dhcp snooping information vendor-specific [ vlan vlan-id ] bas [ node-identifier { mac | sysname | user-defined string } ]
By default, the device does not pad the Vendor-Specific sub-option.
Configuring DHCP snooping entry auto backup
About this task
The auto backup feature saves DHCP snooping entries to a backup file, and allows the DHCP snooping device to download the entries from the backup file at device reboot. The entries on the DHCP snooping device cannot survive a reboot. The auto backup helps the security features provide services if these features (such as IP source guard) must use DHCP snooping entries for user authentication.
Restrictions and guidelines
If you disable DHCP snooping with the undo dhcp snooping enable command, the device deletes all DHCP snooping entries, but entries stored in the backup file still exist. They are deleted next time the device updates the backup file.
Procedure
1. Enter system view.
system-view
2. Configure the DHCP snooping device to back up DHCP snooping entries to a file.
dhcp snooping binding database filename { filename | url url [ username username [ password { cipher | simple } string ] ] }
By default, the DHCP snooping device does not back up DHCP snooping entries.
With this command executed, the DHCP snooping device backs up DHCP snooping entries immediately and runs auto backup.
This command automatically creates the file if you specify a non-existent file.
3. (Optional.) Manually save DHCP snooping entries to the backup file.
dhcp snooping binding database update now
4. (Optional.) Set the waiting time after a DHCP snooping entry change for the DHCP snooping device to update the backup file.
dhcp snooping binding database update interval interval
By default, the DHCP snooping device waits 300 seconds to update the backup file after a DHCP snooping entry change. If no DHCP snooping entry changes, the backup file is not updated.
Setting the maximum number of DHCP snooping entries
About this task
Perform this task to prevent the system resources from being overused.
Procedure
1. Enter system view.
system-view
2. Enter interface view.
interface interface-type interface-number
3. Set the maximum number of DHCP snooping entries for the interface to learn.
dhcp snooping max-learning-num max-number
By default, the number of DHCP snooping entries for an interface to learn is unlimited.
Configuring DHCP packet rate limit
About this task
Perform this task to set the maximum rate at which an interface can receive DHCP packets. This feature discards exceeding DHCP packets to prevent attacks that send large number of DHCP packets.
Restrictions and guidelines
The rate set on the Layer 2 aggregate interface applies to all members of the aggregate interface. If a member interface leaves the aggregation group, it uses the rate set in its Ethernet interface view.
Procedure
1. Enter system view.
system-view
2. Enter interface view.
interface interface-type interface-number
3. Enable DHCP snooping packet rate limit on an interface and set the limit value.
dhcp snooping rate-limit rate
By default, the DHCP snooping packet rate limit is disabled on an interface.
Configuring DHCP snooping security features
Enabling DHCP starvation attack protection
About this task
A DHCP starvation attack occurs when an attacker constantly sends forged DHCP requests that contain identical or different sender MAC addresses in the chaddr field to a DHCP server. This attack exhausts the IP address resources of the DHCP server so legitimate DHCP clients cannot obtain IP addresses. The DHCP server might also fail to work because of exhaustion of system resources. For information about the fields of DHCP packet, see DHCP overview in Layer 3—IP Services Configuration Guide.
You can prevent DHCP starvation attacks in the following ways:
· If the forged DHCP requests contain different sender MAC addresses, use the mac-address max-mac-count command to set the MAC learning limit on a Layer 2 port. For more information about the command, see Layer 2—LAN Switching Command Reference.
· If the forged DHCP requests contain the same sender MAC address, perform this task to enable MAC address check for DHCP snooping. This feature compares the chaddr field of a received DHCP request with the source MAC address field in the frame header. If they are the same, the request is considered valid and forwarded to the DHCP server. If not, the request is discarded.
Procedure
1. Enter system view.
system-view
2. Enter interface view.
interface interface-type interface-number
3. Enable MAC address check.
dhcp snooping check mac-address
By default, MAC address check is disabled.
Enabling DHCP-REQUEST attack protection
About this task
DHCP-REQUEST messages include DHCP lease renewal packets, DHCP-DECLINE packets, and DHCP-RELEASE packets. This feature prevents the unauthorized clients that forge the DHCP-REQUEST messages from attacking the DHCP server.
Attackers can forge DHCP lease renewal packets to renew leases for legitimate DHCP clients that no longer need the IP addresses. These forged messages disable the victim DHCP server from releasing the IP addresses.
Attackers can also forge DHCP-DECLINE or DHCP-RELEASE packets to terminate leases for legitimate DHCP clients that still need the IP addresses.
To prevent such attacks, you can enable DHCP-REQUEST check. This feature uses DHCP snooping entries to check incoming DHCP-REQUEST messages.
· If a matching entry is found for a message, this feature compares the entry with the message information.
¡ If they are consistent, the message is considered as valid and forwarded to the DHCP server.
¡ If they are different, the message is considered as a forged message and is discarded.
· If no matching entry is found, the message is considered valid and forwarded to the DHCP server.
Procedure
1. Enter system view.
system-view
2. Enter interface view.
interface interface-type interface-number
3. Enable DHCP-REQUEST check.
dhcp snooping check request-message
By default, DHCP-REQUEST check is disabled.
Configuring a DHCP packet blocking port
About this task
Perform this task to configure a port as a DHCP packet blocking port. This blocking port drops all incoming DHCP requests.
Procedure
1. Enter system view.
system-view
2. Enter interface view.
interface interface-type interface-number
3. Configure the port to block DHCP requests.
dhcp snooping deny
By default, the port does not block DHCP requests.
|
|
CAUTION: To avoid IP address acquisition failure, configure a port to block DHCP packets only if no DHCP clients are attached to it. |
Enabling DHCP snooping logging
About this task
The DHCP snooping logging feature enables the DHCP snooping device to generate DHCP snooping logs and send them to the information center. The information helps administrators locate and solve problems. For information about the log destination and output rule configuration in the information center, see System Management Configuration Guide.
Restrictions and guidelines
As a best practice, disable this feature if the log generation affects the device performance.
Procedure
1. Enter system view.
system-view
2. Enable DHCP snooping logging.
dhcp snooping log enable
By default, DHCP snooping logging is disabled.
Disabling DHCP snooping on an interface
About this task
This feature allows you to narrow down the interface range where DHCP snooping takes effect. For example, to enable DHCP snooping globally except for a specific interface, you can enable DHCP snooping globally and disable DHCP snooping on the target interface.
Procedure
1. Enter system view.
system-view
2. Enter interface view.
interface interface-type interface-number
3. Disable DHCP snooping on the interface.
dhcp snooping disable
By default:
¡ If you enable DHCP snooping globally or for a VLAN, DHCP snooping is enabled on all interfaces on the device or on all interfaces in the VLAN.
¡ If you do not enable DHCP snooping globally or for a VLAN, DHCP snooping is disabled on all interfaces on the device or on all interfaces in the VLAN.
Verifying and maintaining DHCP snooping
Verifying DHCP snooping configuration
Perform display tasks in any view.
· Display information about trusted ports.
display dhcp snooping trust
· Display Option 82 configuration information on the DHCP snooping device.
display dhcp snooping information { all | interface interface-type interface-number }
Displaying and clearing DHCP snooping entries
Perform display tasks in any view.
· Display DHCP snooping entries.
display dhcp snooping binding [ ip ip-address [ vlan vlan-id ] ] [ verbose ]
· Display information about DHCP snooping entry auto backup.
display dhcp snooping binding database
To clear DHCP snooping entries, execute the following command in user view:
reset dhcp snooping binding { all | ip ip-address [ vlan vlan-id ] }
Displaying and clearing DHCP packet statistics on the DHCP snooping device
To display DHCP packet statistics on the DHCP snooping device, execute the following command in any view:
display dhcp snooping packet statistics [ slot slot-number ]
To clear DHCP packet statistics on the DHCP snooping device, execute the following command in user view:
reset dhcp snooping packet statistics [ slot slot-number ]
DHCP snooping configuration examples
Example: Configuring basic DHCP snooping features globally
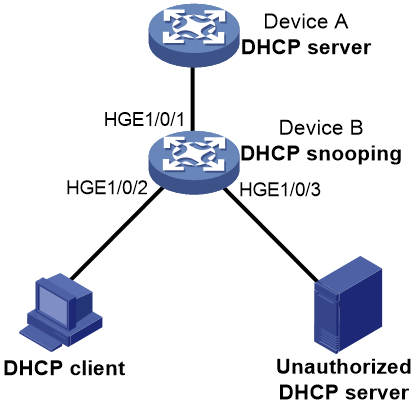
Network configuration
As shown in Figure 3, Device B is connected to the authorized DHCP server through HundredGigE 1/0/1, to the unauthorized DHCP server through HundredGigE 1/0/3, and to the DHCP client through HundredGigE 1/0/2.
Configure only the port connected to the authorized DHCP server to forward the responses from the DHCP server. Enable the DHCP snooping device to record clients' IP-to-MAC bindings by reading DHCP-ACK messages received from the trusted port and the DHCP-REQUEST messages.
Procedure
|
|
NOTE: · The interfaces in this configuration example must operate in Layer 2 mode. By default, interfaces on the device operate in Layer 3 mode. To change the link mode of an interface, you can use the port link-mode command. · By default, interfaces on the device are disabled (in ADM or Administratively Down state). To have an interface operate, you must use the undo shutdown command to enable that interface. |
# Enable DHCP snooping globally.
<DeviceB> system-view
[DeviceB] dhcp snooping enable
# Configure HundredGigE 1/0/1 as a trusted port.
[DeviceB] interface hundredgige 1/0/1
[DeviceB-HundredGigE1/0/1] dhcp snooping trust
[DeviceB-HundredGigE1/0/1] quit
# Enable recording clients' IP-to-MAC bindings on HundredGigE 1/0/2.
[DeviceB] interface hundredgige 1/0/2
[DeviceB-HundredGigE1/0/2] dhcp snooping binding record
[DeviceB-HundredGigE1/0/2] quit
Verifying the configuration
# Verify that the DHCP client can obtain an IP address and other configuration parameters only from the authorized DHCP server. (Details not shown.)
# Display the DHCP snooping entry recorded for the client.
[DeviceB] display dhcp snooping binding
Example: Configuring basic DHCP snooping features for a VLAN
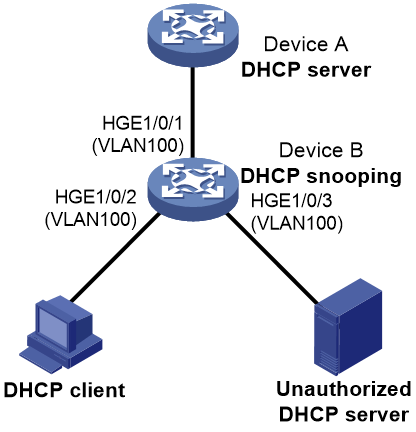
Network configuration
As shown in Figure 4, Device B is connected to the authorized DHCP server through HundredGigE 1/0/1, to the unauthorized DHCP server through HundredGigE 1/0/3, and to the DHCP client through HundredGigE 1/0/2.
Configure only the port in VLAN 100 connected to the authorized DHCP server to forward the responses from the DHCP server. Enable the port in VLAN 100 to record clients' IP-to-MAC bindings by reading DHCP-ACK messages received from the trusted port and the DHCP-REQUEST messages.
Procedure
|
|
NOTE: · The interfaces in this configuration example must operate in Layer 2 mode. By default, interfaces on the device operate in Layer 3 mode. To change the link mode of an interface, you can use the port link-mode command. · By default, interfaces on the device are disabled (in ADM or Administratively Down state). To have an interface operate, you must use the undo shutdown command to enable that interface. |
# Assign HundredGigE 1/0/1, HundredGigE 1/0/2, and HundredGigE 1/0/3 to VLAN 100.
<DeviceB> system-view
[DeviceB] vlan 100
[DeviceB-vlan100] port hundredgige 1/0/1 to hundredgige 1/0/3
[DeviceB-vlan100] quit
# Enable DHCP snooping for VLAN 100.
[DeviceB] dhcp snooping enable vlan 100
# Configure HundredGigE 1/0/1 as DHCP snooping trusted port.
[DeviceB] vlan 100
[DeviceB-vlan100] dhcp snooping trust interface hundredgige 1/0/1
# Enable recording clients' IP-to-MAC bindings in VLAN 100.
[DeviceB-vlan100] dhcp snooping binding record
[DeviceB-vlan100] quit
Verifying the configuration
# Verify that the DHCP client can obtain an IP address and other configuration parameters only from the authorized DHCP server. (Details not shown.)
# Display the DHCP snooping entry recorded for the client.
[DeviceB] display dhcp snooping binding
Example: Configuring DHCP snooping support for Option 82
Network configuration
As shown in Figure 5, enable DHCP snooping and configure Option 82 on Device B as follows:
· Configure the handling strategy for DHCP requests that contain Option 82 as replace.
· On HundredGigE 1/0/2, configure the padding content for the Circuit ID sub-option as company001 and for the Remote ID sub-option as device001.
· On HundredGigE 1/0/3, configure the padding mode for the Circuit ID sub-option as verbose, access node identifier as sysname, and padding format as ascii. Configure the padding content for the Remote ID sub-option as device001.
Procedure
|
|
NOTE: · The interfaces in this configuration example must operate in Layer 2 mode. By default, interfaces on the device operate in Layer 3 mode. To change the link mode of an interface, you can use the port link-mode command. · By default, interfaces on the device are disabled (in ADM or Administratively Down state). To have an interface operate, you must use the undo shutdown command to enable that interface. |
# Enable DHCP snooping.
<DeviceB> system-view
[DeviceB] dhcp snooping enable
# Configure HundredGigE 1/0/1 as a trusted port.
[DeviceB] interface hundredgige 1/0/1
[DeviceB-HundredGigE1/0/1] dhcp snooping trust
[DeviceB-HundredGigE1/0/1] quit
# Configure Option 82 on HundredGigE 1/0/2.
[DeviceB] interface hundredgige 1/0/2
[DeviceB-HundredGigE1/0/2] dhcp snooping information enable
[DeviceB-HundredGigE1/0/2] dhcp snooping information strategy replace
[DeviceB-HundredGigE1/0/2] dhcp snooping information circuit-id string company001
[DeviceB-HundredGigE1/0/2] dhcp snooping information remote-id string device001
[DeviceB-HundredGigE1/0/2] quit
# Configure Option 82 on HundredGigE 1/0/3.
[DeviceB] interface hundredgige 1/0/3
[DeviceB-HundredGigE1/0/3] dhcp snooping information enable
[DeviceB-HundredGigE1/0/3] dhcp snooping information strategy replace
[DeviceB-HundredGigE1/0/3] dhcp snooping information circuit-id verbose node-identifier sysname format ascii
[DeviceB-HundredGigE1/0/3] dhcp snooping information remote-id string device001
Verifying the configuration
# Display Option 82 configuration information on HundredGigE 1/0/2 and HundredGigE 1/0/3 on the DHCP snooping device.
[DeviceB] display dhcp snooping information