- Table of Contents
-
- 03-Security Configuration Guide
- 00-Preface
- 01-Security zone configuration
- 02-Security policy configuration
- 03-Object group configuration
- 04-Object policy configuration
- 05-AAA configuration
- 06-Portal configuration
- 07-User identification configuration
- 08-Password control configuration
- 09-Public key management
- 10-PKI configuration
- 11-SSH configuration
- 12-SSL configuration
- 13-ASPF configuration
- 14-APR configuration
- 15-Session management
- 16-Connection limit configuration
- 17-Attack detection and prevention configuration
- 18-IP source guard configuration
- 19-ARP attack protection configuration
- 20-ND attack defense configuration
- 21-uRPF configuration
- 22-Crypto engine configuration
- 23-IP-MAC binding configuration
- 24-IPoE configuration
- 25-IP reputation configuration
- 26-Keychain configuration
- 27-MAC authentication configuration
- 28-Server connection detection configuration
- Related Documents
-
| Title | Size | Download |
|---|---|---|
| 09-Public key management | 121.48 KB |
Asymmetric key algorithm overview
Usage of asymmetric key algorithms
Public key management tasks at a glance
Distributing a local host public key
About distribution of local host public keys
Configuring a peer host public key
About peer host public key configuration
Restrictions and guidelines for peer host public key configuration
Importing a peer host public key from a public key file
Entering a peer host public key
Display and maintenance commands for public keys
Examples of public key management
Managing public keys
About public key management
This chapter describes public key management for the following asymmetric key algorithms:
· Revest-Shamir-Adleman Algorithm (RSA).
· Digital Signature Algorithm (DSA).
· Elliptic Curve Digital Signature Algorithm (ECDSA).
· SM2.
Asymmetric key algorithm overview
Asymmetric key algorithms are used by security applications to secure communications between two parties, as shown in Figure 1. Asymmetric key algorithms use two separate keys (one public and one private) for encryption and decryption. Symmetric key algorithms use only one key.
Figure 1 Encryption and decryption
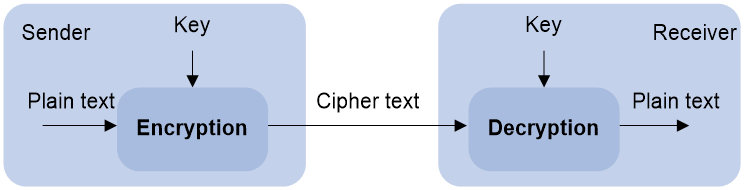
A key owner can distribute the public key in plain text on the network but must keep the private key in privacy. It is mathematically infeasible to calculate the private key even if an attacker knows the algorithm and the public key.
Usage of asymmetric key algorithms
Security applications (such as SSH, SSL, and PKI) use the asymmetric key algorithms for the following purposes:
· Encryption and decryption—Any public key receiver can use the public key to encrypt information, but only the private key owner can decrypt the information.
· Digital signature—The key owner uses the private key to digitally sign information to be sent. The receiver decrypts the information with the sender's public key to verify information authenticity.
RSA, DSA, ECDSA, and SM2 can all perform digital signature, but only RSA can perform encryption and decryption.
Public key management tasks at a glance
To manage public keys, perform the following tasks:
3. Distributing a local host public key
Choose one of the following tasks:
¡ Displaying a host public key
To enable the peer device to authenticate the local device, you must distribute the local device's public key to the peer device.
4. Configuring a peer host public key
Choose one of the following tasks:
¡ Importing a peer host public key from a public key file
¡ Entering a peer host public key
To encrypt information sent to a peer device or authenticate the digital signature of the peer device, you must configure the peer device's public key on the local device.
5. (Optional.) Destroying a local key pair
Creating a local key pair
Restrictions and guidelines
When you create a local key pair, follow these guidelines:
· The key algorithm must be the same as required by the security application.
· When you create an RSA or DSA key pair, enter an appropriate key modulus length at the prompt. The longer the key modulus length, the higher the security, and the longer the key generation time.
When you create an ECDSA key pair, choose the appropriate elliptic curve. The elliptic curve determines the ECDSA key length. The longer the key length, the higher the security, and the longer the key generation time.
When you create an SM2 key pair, you do not need to specify the key length. Only a 256-bit SM2 key pair can be created.
See Table 1 for more information about key modulus lengths and key lengths.
· If you do not assign the key pair a name, the system assigns the default name to the key pair and marks the key pair as default. You can also assign the default name to another key pair, but the system does not mark the key pair as default. The key pair name must be unique among all manually named key pairs that use the same key algorithm. If a name conflict occurs, the system asks whether you want to overwrite the existing key pair.
· The key pairs are automatically saved and can survive system reboots.
Table 1 A comparison of different types of asymmetric key algorithms
|
Type |
Generated key pairs |
Modulus/key length |
|
RSA |
· One host key pair, if you specify a key pair name. · One server key pair and one host key pair, if
you do not specify a key pair name. NOTE: Only SSH 1.5 uses the RSA server key pair. |
Key modulus length: 512 to 2048 bits. Default: 1024 bits. To ensure security, use a minimum of 768 bits. |
|
DSA |
One host key pair. |
Key modulus length: 512 to 2048 bits. Default: 1024 bits. To ensure security, use a minimum of 768 bits. |
|
ECDSA |
One host key pair. |
Key length: 192, 256, 384, or 521 bits. |
|
SM2 |
One host key pair. |
Key length: 256 bits. |
Procedure
1. Enter system view.
system-view
2. Create a local key pair.
public-key local create { dsa | ecdsa [ secp192r1 | secp256r1 | secp384r1 | secp521r1 ] | rsa } [ name key-name ]
public-key local create sm2 [ name key-name ] [ on device-name ]
Importing a local key pair
About this task
This task imports a key pair from a key pair file to the device. The imported key pairs are automatically saved and can survive system reboots.
Perform this task when the key pair to be imported is saved in a different file than the certificate. If the key pair and the certificate are saved in the same file, the device can obtain the key pair by importing the certificate.
Restrictions and guidelines
The device supports importing the RSA host key pair but not the RSA server key pair.
If you do not assign the key pair a name, the system assigns the default name to the key pair and marks the key pair as default. You can also assign the default name to another key pair, but the system does not mark the key pair as default. The name of a key pair must be unique among all manually named key pairs that use the same key algorithm. If a name conflict occurs, the system asks whether you want to overwrite the existing key pair.
To import the encrypted key pair into the device successfully, provide the decryption password.
See Table 2 for information about supported key modulus lengths and key lengths.
|
Type |
Modulus/key length |
|
RSA |
Key modulus length: 512 to 2048 bits. |
|
ECDSA |
Key length: 192, 256, 384, or 521 bits. |
Prerequisites
Before performing this task, save the key pair file to the local storage directory of the device through FTP or other methods.
Procedure
1. Enter system view.
system-view
2. Import a local key pair.
public-key local import { ecdsa | rsa } [ key-name ] filename filename
Distributing a local host public key
About distribution of local host public keys
You must distribute a local host public key to a peer device so the peer device can perform the following operations:
· Use the public key to encrypt information sent to the local device.
· Authenticate the digital signature signed by the local device.
To distribute a local host public key, you must first export or display the key.
· Export a host public key:
¡ Export a host public key to a file.
¡ Export a host public key to the monitor screen, and then save it to a file.
After the key is exported to a file, transfer the file to the peer device. On the peer device, import the key from the file.
· Display a host public key.
After the key is displayed, record the key, for example, copy it to an unformatted file. On the peer device, you must literally enter the key.
Exporting a host public key
Restrictions and guidelines
When you export a host public key, follow these restrictions and guidelines:
· If you specify a file name in the command, the command exports the key to the specified file.
· If you do not specify a file name, the command exports the key to the monitor screen. You must manually save the exported key to a file.
Procedure
1. Enter system view.
system-view
2. Export a local host public key.
¡ Export an RSA host public key:
public-key local export rsa [ name key-name ] { openssh | ssh1 | ssh2 } [ filename ]
¡ Export an ECDSA host public key.
public-key local export ecdsa [ name key-name ] { openssh | ssh2 } [ filename ]
¡ Export a DSA host public key.
public-key local export dsa [ name key-name ] { openssh | ssh2 } [ filename ]
¡ Export an SM2 host public key.
public-key local export sm2 [ name key-name ] { openssh | ssh2 } [ filename ]
Displaying a host public key
Perform the following tasks in any view:
· Display local RSA public keys.
display public-key local rsa public [ name key-name ]
Do not distribute the RSA server public key serverkey (default) to a peer device.
· Display local ECDSA public keys.
display public-key local ecdsa public [ name key-name ]
· Display local DSA public keys.
display public-key local dsa public [ name key-name ]
· Display local SM2 public keys.
display public-key local sm2 public [ name key-name ]
Configuring a peer host public key
About peer host public key configuration
To encrypt information sent to a peer device or authenticate the digital signature of the peer device, you must configure the peer device's public key on the local device.
You can configure the peer host public key by using the following methods:
· Import the peer host public key from a public key file (recommended).
· Manually enter (type or copy) the peer host public key.
For information about how to obtain the host public key of a device, see "Distributing a local host public key."
Restrictions and guidelines for peer host public key configuration
When you configure a peer host public key, follow these restrictions and guidelines:
· When you manually enter the peer host public key, make sure the entered key is in the correct format. To obtain the peer host public key in the correct format, use the display public-key local public command to display the public key on the peer device and record the key. The format of the public key displayed in any other way might be incorrect. If the key is not in the correct format, the system discards the key and displays an error message.
· Always import rather than enter the peer host public key if you are not sure whether the device supports the format of the recorded peer host public key.
Importing a peer host public key from a public key file
About this task
Before you perform this task, make sure you have exported the host public key to a file on the peer device and obtained the file from the peer device. For information about exporting a host public key, see "Exporting a host public key."
After you import the key, the system automatically converts the imported public key to a string in the Public Key Cryptography Standards (PKCS) format.
Procedure
1. Enter system view.
system-view
2. Import a peer host public key from a public key file.
public-key peer keyname import sshkey filename
By default, no peer host public keys exist.
Entering a peer host public key
About this task
Before you perform this task, make sure you have displayed the key on the peer device and recorded the key. For information about displaying a host public key, see "Displaying a host public key."
Procedure
1. Enter system view.
system-view
2. Specify a name for the peer host public key and enter public key view.
public-key peer keyname
3. Type or copy the key.
You can use spaces and carriage returns, but the system does not save them.
4. Exit public key view.
peer-public-key end
When you exit public key view, the system automatically saves the peer host public key.
Destroying a local key pair
About this task
To ensure security, destroy the local key pair and generate a new key pair in any of the following situations:
· The local key has leaked. An intrusion event might occur.
· The storage media of the device is replaced.
· The local certificate has expired. For more information about local certificates, see "Configuring PKI."
Procedure
1. Enter system view.
system-view
2. Destroy a local key pair.
public-key local destroy { dsa | ecdsa | rsa | sm2 } [ name key-name ]
Display and maintenance commands for public keys
Execute display commands in any view.
|
Task |
Command |
|
Display local public keys. |
display public-key local { dsa | ecdsa | rsa | sm2 } public [ name key-name ] |
|
Display peer host public keys. |
display public-key peer [ brief | name publickey-name ] |
Examples of public key management
Example: Entering a peer host public key
Network configuration
As shown in Figure 2, to prevent illegal access, Device B authenticates Device A through a digital signature. Before configuring authentication parameters on Device B, use the following procedure to configure the public key of Device A on Device B:
· Create RSA key pairs on Device A and export the RSA host public key to a file.
· Manually specify the RSA host public key of Device A on Device B.

Procedure
1. Assign IP addresses to interfaces and configure routes, security zones, zone pairs, and interzone policies. Make sure the network connections are available. (Details not shown.)
2. Configure Device A:
# Create local RSA key pairs with default names on Device A, and use the default modulus length 1024 bits.
<DeviceA> system-view
[DeviceA] public-key local create rsa
The range of public key modulus is (512 ~ 2048).
If the key modulus is greater than 512, it will take a few minutes.
Press CTRL+C to abort.
Input the modulus length [default = 1024]:
Generating Keys...
.
Create the key pair successfully.
# Display all local RSA public keys.
[DeviceA] display public-key local rsa public
=============================================
Key name: hostkey(default)
Key type: RSA
Time when key pair created: 10:28:00 2017/05/19
Key code:
30819F300D06092A864886F70D010101050003818D0030818902818100C305DA3BD5EDB06D
9828084DA4E4EA8E2FBA246BF29D85F71ABB6044CC5D4EC71E9A14220C38FE9EF2313E1FF6
2A927E44CF24E1341AF76CEF0D65A7E8E2E43596E9B8EB568DD5CFCDE4CDC892FDED1BC861
91E561D56E5E77C30D427D0D9D4B22E71572F725F63266C2D8E45BE87A7DAFE94204DAB702
4A6E137BE307C5ACB70203010001
=============================================
Key name: serverkey(default)
Key type: RSA
Time when key pair created: 10:28:00 2017/05/19
Key code:
307C300D06092A864886F70D0101010500036B003068026100CBF917CB6C6CFD28B92BC07E
621326E3079464B31BB18D3D3AC866D48812CE14DBFC9EFC347A7E96D3714B7CF918A1751C
681E5A3DBE79961E26829009308CAA3E920824BFE5B8907CCA073405CEDC5681B6AF82B7F9
593FF85DF70D607B13430203010001
3. Configure Device B:
# Enter the host public key of Device A in public key view. The key must be literally the same as displayed on Device A.
<DeviceB> system-view
[DeviceB] public-key peer devicea
Enter public key view. Return to system view with "peer-public-key end" command.
[DeviceB-pkey-public-key-devicea] 30819F300D06092A864886F70D010101050003818D003081890
2818100C305DA3BD5EDB06D
[DeviceB-pkey-public-key-devicea] 9828084DA4E4EA8E2FBA246BF29D85F71ABB6044CC5D4EC7
1E9A14220C38FE9EF2313E1FF6
[DeviceB-pkey-public-key-devicea] 2A927E44CF24E1341AF76CEF0D65A7E8E2E43596E9B8EB56
8DD5CFCDE4CDC892FDED1BC861
[DeviceB-pkey-public-key-devicea] 91E561D56E5E77C30D427D0D9D4B22E71572F725F63266C2
D8E45BE87A7DAFE94204DAB702
[DeviceB-pkey-public-key-devicea] 4A6E137BE307C5ACB70203010001
# Save the public key and return to system view.
[DeviceB-pkey-public-key-devicea] peer-public-key end
Verifying the configuration
# Verify that the peer host public key configured on Device B is the same as the key displayed on Device A.
[DeviceB] display public-key peer name devicea
=============================================
Key name: devicea
Key type: RSA
Key modulus: 1024
Key code:
30819F300D06092A864886F70D010101050003818D0030818902818100C305DA3BD5EDB06D
9828084DA4E4EA8E2FBA246BF29D85F71ABB6044CC5D4EC71E9A14220C38FE9EF2313E1FF6
2A927E44CF24E1341AF76CEF0D65A7E8E2E43596E9B8EB568DD5CFCDE4CDC892FDED1BC861
91E561D56E5E77C30D427D0D9D4B22E71572F725F63266C2D8E45BE87A7DAFE94204DAB702
4A6E137BE307C5ACB70203010001
Example: Importing a public key from a public key file
Network configuration
As shown in Figure 3, Device B authenticates Device A through a digital signature. Before configuring authentication parameters on Device B, use the following procedure to configure the public key of Device A on Device B:
· Create RSA key pairs on Device A and export the RSA host public key to a file.
· Import the RSA host public key of Device A from the public key file to Device B.

Procedure
1. Assign IP addresses to interfaces and configure routes, security zones, zone pairs, and interzone policies. Make sure the network connections are available. (Details not shown.)
2. Configure Device A:
# Create local RSA key pairs with default names on Device A, and use the default modulus length (1024 bits).
<DeviceA> system-view
[DeviceA] public-key local create rsa
The range of public key modulus is (512 ~ 2048).
If the key modulus is greater than 512, it will take a few minutes.
Press CTRL+C to abort.
Input the modulus length [default = 1024]:
Generating Keys...
.
Create the key pair successfully.
# Display all local RSA public keys.
[DeviceA] display public-key local rsa public
=============================================
Key name: hostkey(default)
Key type: RSA
Time when key pair created: 10:58:47 2017/05/19
Key code:
30819F300D06092A864886F70D010101050003818D0030818902818100D584D31764E92A97
11B6AE429BDF8A3C70D019D79D6F9905789E1020E5904121FB76261C48227451FE14B754EE
1C0CBFCD96021B55D4E439F1377DBBE466323F7559ED7BC3BC94F7CA16362A9E0FB010567A
F202B45906B71F90F75A09D72BA16EFB3F44D7B3AE90D450C4C72F478F57935FE4E8F6BFE1
C2F404E7E8C13174790203010001
=============================================
Key name: serverkey(default)
Key type: RSA
Time when key pair created: 10:58:47 2017/05/19
Key code:
307C300D06092A864886F70D0101010500036B003068026100BD8BED0D9EC4C8435B074FF4
0EDE756A7DE9276638184DF53A7AB072EC75025C22F65B68C16B04278E158078B44445E8F7
73BD4182616EB5F23089D214FE5A5E246B4C54C2B23491A690AA69C30CCE5E8705D8BFFDED
C90292074A836A86BB8D0203010001
# Export the RSA host public key to file devicea.pub.
[DeviceA] public-key local export rsa ssh2 devicea.pub
# Enable the FTP server function, create an FTP user with username ftp and password 123, and configure the FTP user role as network-admin.
[DeviceA] ftp server enable
[DeviceA] local-user ftp
[DeviceA-luser-manage-ftp] password simple 123
[DeviceA-luser-manage-ftp] service-type ftp
[DeviceA-luser-manage-ftp] authorization-attribute user-role network-admin
[DeviceA-luser-manage-ftp] quit
3. Configure Device B:
# Use FTP in binary mode to get public key file devicea.pub from Device A.
<DeviceB> ftp 10.1.1.1
Connected to 10.1.1.1 (10.1.1.1).
220 FTP service ready.
User (10.1.1.1:(none)): ftp
331 Password required for ftp.
Password:
230 User logged in.
Remote system type is UNIX.
Using binary mode to transfer files.
ftp> binary
200 TYPE is now 8-bit binary
ftp> get devicea.pub
227 Entering Passive Mode (10,1,1,1,118,252)
150 Accepted data connection
226 File successfully transferred
301 bytes received in 0.022 seconds (13.45 Kbytes/s)
ftp> quit
221-Goodbye. You uploaded 0 and downloaded 1 kbytes.
221 Logout.
# Import the host public key from key file devicea.pub.
<DeviceB> system-view
[DeviceB] public-key peer devicea import sshkey devicea.pub
Verifying the configuration
# Verify that the peer host public key configured on Device B is the same as the key displayed on Device A.
[DeviceB] display public-key peer name devicea
=============================================
Key name: devicea
Key type: RSA
Key modulus: 1024
Key code:
30819F300D06092A864886F70D010101050003818D0030818902818100D584D31764E92A97
11B6AE429BDF8A3C70D019D79D6F9905789E1020E5904121FB76261C48227451FE14B754EE
1C0CBFCD96021B55D4E439F1377DBBE466323F7559ED7BC3BC94F7CA16362A9E0FB010567A
F202B45906B71F90F75A09D72BA16EFB3F44D7B3AE90D450C4C72F478F57935FE4E8F6BFE1
C2F404E7E8C13174790203010001