- Table of Contents
- Related Documents
-
| Title | Size | Download |
|---|---|---|
| 01-Text | 594.00 KB |
Feature and hardware compatibility
Feature and hardware compatibility
Command and hardware compatibility
DPI engine configuration task list
Configure a DPI application profile
Activating policy and rule settings for DPI service modules
Configuring action parameter profiles
Configuring a block source parameter profile
Configuring a capture parameter profile
Configuring a logging parameter profile
Configuring a redirect parameter profile
Configuring an email parameter profile
Enabling inspection suspension upon excessive CPU usage
Configuring stream fixed length inspection
Specifying a proxy server for online DPI service signature update
Displaying and maintaining DPI engine
IPS signature library management
Feature and hardware compatibility
Configuring IPS signature filtering criteria for an IPS policy
Configuring IPS actions for an IPS policy
Specifying a parameter profile for an IPS action
Applying an IPS policy to a DPI application profile
Activating IPS policy settings
Using the DPI application profile in an object policy rule
Managing the IPS signature library
Scheduling automatic IPS signature library update
Triggering an immediate IPS signature update
Performing an IPS signature manual update
Rolling back the IPS signature library
Importing and deleting user-defined IPS signatures
Importing user-defined IPS signatures
Deleting user-defined IPS signatures
Displaying and maintaining IPS
Example of using the default IPS policy in an object policy
Example of using a user-defined IPS policy in an object policy
IPS signature library manual update configuration example
IPS signature library automatic update configuration example
URL filtering signature library management
Feature and hardware compatibility
URL filtering configuration task list
Configuring URL filtering cloud query
Configuring a URL filtering policy
Copying a URL filtering policy or category
Applying a URL filtering policy to a DPI application profile
Activating URL filtering policy and rule settings
Using the DPI application profile in an object policy rule
Managing the URL filtering signature library
Scheduling automatic URL filtering signature library update
Triggering an immediate URL filtering signature update
Performing a URL filtering signature manual update
Rolling back the URL filtering signature library
Configuring URL filtering logging for resource access
About URL filtering logging for resource access
Logging access to only resources in the root directories of websites
Disabling logging for access to resources of specific types
Displaying and maintaining URL filtering
URL filtering configuration examples
Example of using a URL filtering policy in an object policy
URL filtering signature library manual update configuration example
URL filtering signature library automatic update configuration example
Configuring bandwidth management
Traffic types supported by bandwidth management
Feature and hardware compatibility
Command and hardware compatibility
Bandwidth management configuration task list
Configuring parameters for the traffic profile
Setting the reference mode for the traffic profile
Configuring match criteria for the traffic rule
Specifying a traffic profile for the traffic rule
Specifying a time range for the traffic rule
Managing and maintaining a traffic rule
Displaying and maintaining bandwidth management
Bandwidth management configuration example
Single traffic profile configuration example
Parent/child traffic profile configuration example
DPI overview
About DPI
Deep packet inspection (DPI) inspects application layer payloads to protect the network against application layer malicious activities, such as worms, viruses, spams, breaches, and information leakage.
Firewalls operate at the network layer and transport layer. DPI further enhances network security.
DPI functions
DPI provides the following functions:
· Service identification—The DPI engine identifies the service of a data flow by analyzing the application layer payload and matching the payload against signatures. DPI engine informs the DPI service modules of the identification results for service control.
· Service control—DPI service modules control services flexibly by using DPI service policies. Actions that DPI service policies use for data flows include permit, drop, block source, reset, capture, and log.
· Service statistics—DPI provides service statistics about service types, protocol parsing, signature inspection, and packet processing. Service statistics visually display the distribution of data flows and the use of different services. You can find factors that might promote service development or affect network operation.
DPI signature libraries
A DPI signature library is a collection of common signatures that DPI uses for service identification. H3C releases up-to-date signatures in the form of DPI signature library files. You can manually download the files or configure the device to automatically download the files to update the DPI signature libraries. You can also define signatures of your own as required.
DPI signature libraries include the IPS signature library, URL filtering signature library, and APR signature library.
DPI services
Table 1 lists the supported DPI services.
Table 1 DPI services
|
DPI service |
Function |
|
IPS |
Monitors network traffic for malicious activities and proactively takes actions to protect the network against attacks. |
|
URL filtering |
Controls access to the Web resources by filtering the URLs that the users visit. |
|
NBAR |
Identifies the application layer protocols of packets by comparing packet content against signatures. For more information about NBAR, see Security Configuration Guide. |
DPI mechanism
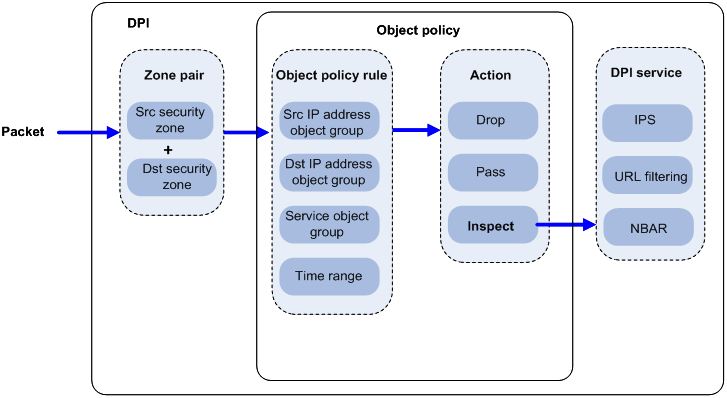
Figure 1 illustrates how object policy-based DPI works.
After receiving a packet in a zone pair, the device compares the packet against the object policy rules contained in the object policy applied to the zone pair.
An object policy rule can contain a set of match criteria, including source IP address, destination IP address, and service type. A packet matches a rule if the packet matches all the criteria in the rule. For information about security zones and zone pairs, see security zone configuration in Fundamentals Configuration Guide.
· If no matching object policy rule is found, the device drops the packet.
· If a matching object policy rule is found, the device processes the packet according to the configured rule action:
? If the rule action is drop, the device drops the packet.
? If the rule action is pass, the device permits the packet to pass.
? If the rule action is inspect, the device uses the specified DPI application profile to perform DPI on the packet. If the specified DPI application profile does not exist, the device permits the packet to pass.
Figure 1 Object policy-based DPI mechanism
Feature and hardware compatibility
|
Hardware |
DPI compatibility |
|
MSR810/810-W/810-W-DB/810-LM/810-W-LM/810-10-PoE/810-LM-HK/810-W-LM-HK |
Yes |
|
MSR810-LMS/810-LUS |
No |
|
MSR2600-6-X1/2600-10-X1 |
Yes |
|
MSR 2630 |
Yes |
|
MSR3600-28/3600-51 |
Yes |
|
MSR3600-28-SI/3600-51-SI |
No |
|
MSR3610-X1/3610-X1-DP/3610-X1-DC/3610-X1-DP-DC |
Yes |
|
MSR 3610/3620/3620-DP/3640/3660 |
Yes |
|
MSR5620/5660/5680 |
Yes |
|
Hardware |
DPI compatibility |
|
MSR810-LM-GL |
Yes |
|
MSR810-W-LM-GL |
Yes |
|
MSR830-6EI-GL |
Yes |
|
MSR830-10EI-GL |
Yes |
|
MSR830-6HI-GL |
Yes |
|
MSR830-10HI-GL |
Yes |
|
MSR2600-6-X1-GL |
Yes |
|
MSR3600-28-SI-GL |
No |
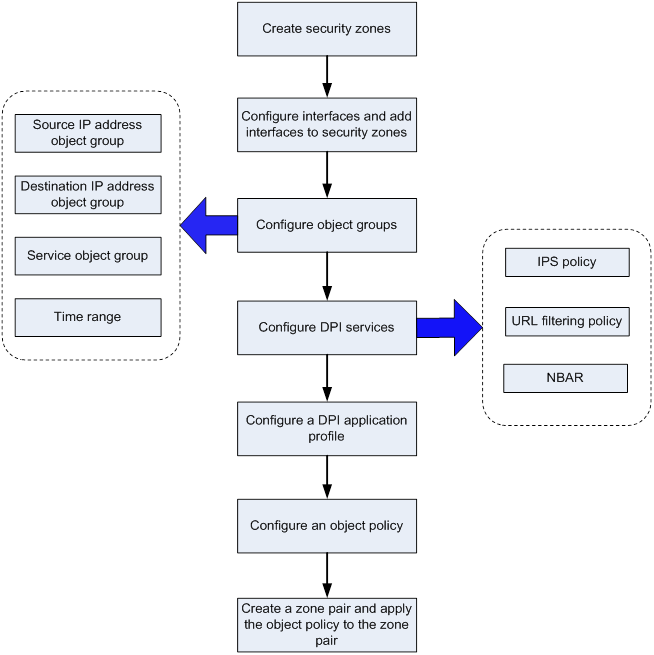
DPI configuration workflow
Figure 2 shows the basic configuration workflow for DPI.
Figure 2 DPI configuration flow
Configuring DPI engine
About DPI engine
DPI engine is an inspection module shared by DPI service modules. DPI engine uses inspection rules to identify the application layer information, including the application layer protocol and behavior. DPI service modules process packets based on the inspection results.
DPI functions
DPI engine provides the following functions:
· Protocol parsing—Identifies the application layer protocols and analyzes the application layer information. Information analysis includes recognizing, normalizing, and uncompressing application layer fields.
· AC pattern matching—Matches packet payloads by the Aho-Corasick (AC) patterns in inspection rules. AC pattern matching is fast and it is the core function of the DPI engine.
· Option matching—Matches packet payloads by the options in the inspection rules whose AC patterns have been matched. Option matching is slower than AC pattern matching.
DPI engine inspection rules
DPI engine uses inspection rules to match packets. Inspection rules are transformed from the rules or signatures of the DPI service modules. The match criteria in an inspection rule can contain the following types:
· AC pattern—Criteria that identify packet signatures. An AC pattern is a character string that is three or more bytes long.
· Option—Criteria other than AC patterns. For example, an option can be the port number or protocol type.
An inspection rule can contain both AC patterns and options. A packet must match both the AC patterns and options to match the rule.
An inspection rule can also contain only options. A packet matches the rule if it matches the options in the rule.
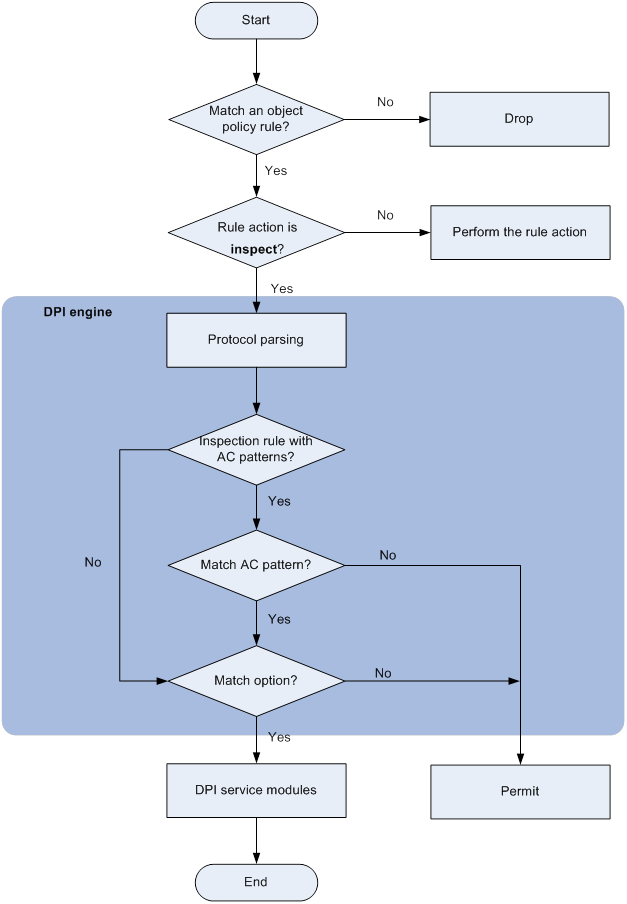
DPI engine mechanism
As shown in Figure 3, DPI engine works as follows:
1. Upon receiving a packet, the device compares the packet against the object policy rules.
? If a matching rule is found and the rule action is inspect, the device forwards the packet to the DPI engine.
? If a matching rule is found and the rule action is drop or pass, the device processes the packet according to the action.
? If no matching rule is found, the device drops the packet.
For more information about the object policy, see Security Configuration Guide.
2. The DPI engine performs protocol parsing for the packet and searches for applicable inspection rules according to the parsing results.
3. If an applicable inspection rule contains AC patterns, DPI engine performs AC pattern matching first. If an applicable inspection rule does not contain AC patterns, DPI engine directly performs option matching. The packet matches the rule if it matches the options.
4. If the packet matches an AC pattern in an applicable inspection rule, the DPI engine further compares the packet against the options associated with the AC pattern. The packet matches the rule if it matches the both the AC pattern and its associated options. If the packet matches an AC pattern but does not match its associated options, the DPI engine permits the packet to pass.
5. If the packet matches an inspection rule, the DPI engine submits the packet to the corresponding DPI service module for processing. If the packet does not match any rule, the DPI engine permits the packet to pass.
Compatibility information
Feature and hardware compatibility
|
Hardware |
DPI engine compatibility |
|
MSR810/810-W/810-W-DB/810-LM/810-W-LM/810-10-PoE/810-LM-HK/810-W-LM-HK |
Yes |
|
MSR810-LMS/810-LUS |
No |
|
MSR2600-6-X1/2600-10-X1 |
Yes |
|
MSR 2630 |
Yes |
|
MSR3600-28/3600-51 |
Yes |
|
MSR3600-28-SI/3600-51-SI |
No |
|
MSR3610-X1/3610-X1-DP/3610-X1-DC/3610-X1-DP-DC |
Yes |
|
MSR 3610/3620/3620-DP/3640/3660 |
Yes |
|
MSR5620/5660/5680 |
Yes |
|
Hardware |
DPI engine compatibility |
|
MSR810-LM-GL |
Yes |
|
MSR810-W-LM-GL |
Yes |
|
MSR830-6EI-GL |
Yes |
|
MSR830-10EI-GL |
Yes |
|
MSR830-6HI-GL |
Yes |
|
MSR830-10HI-GL |
Yes |
|
MSR2600-6-X1-GL |
Yes |
|
MSR3600-28-SI-GL |
No |
Command and hardware compatibility
Commands and descriptions for centralized devices apply to the following routers:
· MSR810/810-W/810-W-DB/810-LM/810-W-LM/810-10-PoE/810-LM-HK/810-W-LM-HK/810-LMS/810-LUS.
· MSR2600-6-X1/2600-10-X1.
· MSR 2630.
· MSR3600-28/3600-51.
· MSR3600-28-SI/3600-51-SI.
· MSR3610-X1/3610-X1-DP/3610-X1-DC/3610-X1-DP-DC.
· MSR 3610/3620/3620-DP/3640/3660.
· MSR810-LM-GL/810-W-LM-GL/830-6EI-GL/830-10EI-GL/830-6HI-GL/830-10HI-GL/2600-6-X1-GL/3600-28-SI-GL.
Commands and descriptions for distributed devices apply to the following routers:
· MSR5620.
· MSR 5660.
· MSR 5680.
DPI engine configuration task list
|
Task at a glance |
|
(Required.) Configure a DPI application profile |
|
(Required.) Activating policy and rule settings for DPI service modules |
|
(Optional.) Configuring action parameter profiles |
|
(Optional.) Optimizing the DPI engine |
|
(Optional.) Enabling inspection suspension upon excessive CPU usage |
|
(Optional.) Configuring stream fixed length inspection |
|
(Optional.) Specifying a proxy server for online DPI service signature update |
|
(Optional.) Disabling the DPI engine |
Configure a DPI application profile
About DPI application profiles
A DPI application profile includes a set of DPI service policies, such as an IPS policy and URL filtering policy. It can be applied to an object policy rule to specify the DPI service policy for packets that match the rule.
Procedure
|
Step |
Command |
Remarks |
|
1. Enter system view. |
system-view |
N/A |
|
2. Create a DPI application profile and enter its view. |
app-profile profile-name |
By default, no DPI application profiles exist. |
|
3. Specify an IPS policy. |
ips apply policy policy-name mode { protect | alert } |
For more information about this command, see DPI Command Reference. |
|
4. Specify a URL filtering policy. |
url-filter apply policy policy-name |
For more information about this command, see DPI Command Reference. |
Activating policy and rule settings for DPI service modules
About activating policy and rule settings for DPI service modules
After editing the policy and rule settings for DPI service modules such as IPS and URL filtering, you must manually activate the settings by using either of the following methods:
· Reboot the device.
· Execute the inspect activate command.
Restrictions and guidelines
This task can cause temporary service outage. As a best practice, perform the task after all DPI service policy and rule settings are complete.
Procedure
|
Step |
Command |
Remarks |
|
1. Enter system view. |
system-view |
N/A |
|
2. Activate policy and rule settings for DPI service modules. |
inspect activate |
By default, the creation, modification, and deletion of DPI service policies and rules do not take effect. |
Configuring action parameter profiles
Configuring a block source parameter profile
About block source parameter profiles
A block source parameter profile defines the block period for the block source action in DPI service modules.
Restrictions and guidelines
The block source action takes effect only after the blacklist feature is enabled.
With the blacklist feature is enabled, the device drops the matching packet and adds the packet's source IP address to the IP blacklist. Subsequent packets from the source IP address will be dropped directly during the block period.
For more information about the blacklist feature, see attack detection and prevention in the Security Configuration Guide.
Procedure
|
Step |
Command |
Remarks |
|
1. Enter system view. |
system-view |
N/A |
|
2. Create a block source parameter profile and enter its view. |
inspect block-source parameter-profile parameter-name |
By default, no block source parameter profiles exist. |
|
3. Set the block period during which a source IP address is blocked. |
block-period period |
The default setting is 1800 seconds. |
Configuring a capture parameter profile
About capture parameter profiles
A capture parameter profile defines the following parameters for the capture action in DPI service modules:
· Maximum number of bytes that can be cached.
· Daily export time for cached packets.
· URL to which cached packets are exported.
The device caches captured packets locally and exports the cached packets to the designated URL at the daily export time or when the number of cached bytes reaches the limit. After the export, the device clears the local cache and starts to capture new packets.
Procedure
|
Step |
Command |
Remarks |
|
1. Enter system view. |
system-view |
N/A |
|
2. Create a capture parameter profile and enter its view. |
inspect capture parameter-profile parameter-name |
By default, no capture parameter profiles exist. |
|
3. Set the maximum volume of captured packets that can be cached. |
capture-limit kilobytes |
By default, the device can cache a maximum of 512 kilobytes of captured packets. |
|
4. Set the daily export time for cached captured packets. |
export repeating-at time |
By default, the cached captured packets are exported at 1:00 a.m. every day. |
|
5. Specify the URL to which cached captured packets are exported |
export url url-string |
By default, no URL is specified for exporting the cached captured packets. |
Configuring a logging parameter profile
About logging parameter profiles
A logging parameter profile defines the log output method for the logging action in DPI service modules.
Procedure
|
Step |
Command |
Remarks |
|
1. Enter system view. |
system-view |
N/A |
|
2. Create a logging parameter profile and enter its view. |
inspect logging parameter-profile parameter-name |
By default, no logging parameter profiles exist. |
|
3. Specify the log storage method. |
log { email | syslog } |
By default, the logs are exported to the information center. |
Configuring a redirect parameter profile
About redirect parameter profiles
A redirect parameter profile defines the URL to which packets are redirected for the redirect action in DPI service modules.
Procedure
|
Step |
Command |
Remarks |
|
1. Enter system view. |
system-view |
N/A |
|
2. Create a redirect parameter profile and enter its view. |
inspect redirect parameter-profile parameter-name |
By default, no redirect parameter profiles exist. |
|
3. Specify the URL to which packets are redirected. |
redirect-url url-string |
By default, no URL is specified for packet redirecting. |
Configuring an email parameter profile
About email parameter profiles
An email parameter profile defines the following parameters for the email action in DPI service modules:
· Email server.
· Email sender and receiver.
· Username and password for logging in to the email server.
Procedure
|
Step |
Command |
Remarks |
|
1. Enter system view. |
system-view |
N/A |
|
2. Create an email parameter profile and enter its view. |
inspect email parameter-profile parameter-name |
By default, no email parameter profiles exist. |
|
3. Specify the email server. |
email-server addr-string |
By default, no email server is specified. |
|
4. Specify the DNS server address. |
dns-server ip-address |
By default, no DNS server address is specified. |
|
5. Specify the email sender address. |
sender addr-string |
By default, no email sender address is specified. |
|
6. Specify the email receiver address. |
receiver addr-string |
By default, no email receiver address is specified. |
|
7. Enable email client authentication. |
authentication enable |
By default, email client authentication is enabled. |
|
8. Enable the secure password authentication feature. |
secure-authentication enable |
By default, the secure password authentication feature is disabled. |
|
9. Specify the username for logging in to the email server. |
username name-string |
By default, no username is specified for logging in to the email server. |
|
10. Specify the password for logging in to the email server. |
password { cipher | simple } string |
By default, no password is specified for logging in to the email server. |
Optimizing the DPI engine
About optimizing the DPI engine
The DPI engine includes a series of optimization features. For example, you can enable the DPI engine to uncompress or decode the compressed or encoded packets to identify the application information of the packets. The optimization features improve inspection and accuracy of the DPI engine, but consume more system resources.
Procedure
|
Step |
Command |
Remarks |
|
1. Enter system view. |
system-view |
N/A |
|
2. Set the maximum number of payload-carrying packets to be inspected per data flow. |
inspect packet maximum max-number |
By default, the DPI engine can inspect a maximum of 32 payload-carrying packets per data flow. |
|
3. Set the maximum number of options to be cached per TCP/UDP data flow. |
inspect cache-option maximum max-number |
By default, the DPI engine can cache a maximum of 32 options per TCP/UDP data flow. |
|
4. Configure the TCP segment reassembly feature. |
·
Enable TCP segment reassembly. ·
Set the maximum number of TCP segments
that can be cached for reassembly per TCP flow: |
By default: · The TCP segment reassembly feature is disabled. · A maximum of 10 TCP segments can be cached for reassembly per TCP flow. The inspect tcp-reassemble max-segment command takes effect only after the command is inspect tcp-reassemble enable configured. |
|
5. Disable a DPI engine optimization feature. |
inspect optimization [ chunk | no-acsignature | raw | uncompress | url-normalization ] disable |
The default settings of DPI engine optimization features depend on the device model. |
Enabling inspection suspension upon excessive CPU usage
About inspection suspension upon excessive CPU usage
Packet inspection of the DPI engine is a complex and resource-consuming process.
When the device's CPU usage rises to or above the CPU usage threshold, inspection suspension upon excessive CPU usage is triggered and the DPI engine inspects packets as follows:
· If stream fixed length inspection is disabled, the DPI engine suspends packet inspection to guarantee the device performance.
· If stream fixed length inspection is enabled, the DPI engine inspects only a fixed length of data for a stream and ignores the remaining stream data.
When the device's CPU usage drops to or below the CPU usage recovery threshold, the DPI engine resumes the inspection of the whole stream data.
For information about configuring the CPU usage thresholds, see device management in Fundamentals Configuration Guide.
Restrictions and guidelines
Do not disable inspection suspension upon excessive CPU usage if the device's CPU usage is high. If you disable this feature, the DPI engine continues to inspect the whole stream data even when the CPU usage threshold is reached.
When the device's CPU usage is low, you can disable inspection suspension upon excessive CPU usage to improve inspection accuracy.
Procedure
|
Step |
Command |
Remarks |
|
1. Enter system view. |
system-view |
N/A |
|
2. Enable inspection suspension upon excessive CPU usage. |
undo inspect cpu-threshold disable |
By default, inspection suspension upon excessive CPU usage is enabled. |
Configuring stream fixed length inspection
About stream fixed length inspection
This feature enables the DPI engine to inspect only a fixed length of data for a stream when device's CPU usage rises to or above the CPU usage threshold. When the device's CPU usage drops to or below the CPU usage recovery threshold, the DPI engine inspects the whole packet data in a stream. For information about configuring the CPU usage thresholds, see device management in Fundamentals Configuration Guide.
Restrictions and guidelines
This feature takes effect only when inspection suspension upon excessive CPU usage is enabled.
You can also disable this feature so the DPI engine can suspend packet inspection to guarantee the device performance when the CPU usage threshold is reached.
Procedure
|
Step |
Command |
Remarks |
|
1. Enter system view. |
system-view |
N/A |
|
2. Enable stream fixed length inspection. |
undo inspect stream-fixed-length disable |
By default, stream fixed length inspection is enabled. |
|
3. Set the fixed data inspection length for application protocols. |
inspect stream-fixed-length { email I ftp | http } * length |
The default length is 32 kilobytes for FTP, HTTP, and email protocols. The larger the inspection length value, the lower the device throughput, and the higher the packet inspection accuracy. |
Specifying a proxy server for online DPI service signature update
About specifying a proxy server for online DPI service signature update
The device must access the H3C website for online signature update of DPI services (such as IPS and URL filtering). If direct connectivity is not available, the device can access the H3C website through the specified proxy server. For more information about online signature update, see "Configuring IPS" and "Configuring URL filtering."
Restrictions and guidelines
If you specify a proxy server by domain name instead of IP address, make sure the device can resolve the domain name into an IP address through DNS. For more information about DNS, see Layer 3—IP Services Configuration Guide.
Procedure
|
Step |
Command |
Remarks |
|
1. Enter system view. |
system-view |
N/A |
|
2. Specify a proxy server for online DPI service signature update |
inspect signature auto-update proxy { domain domain-name | ip ip-address } [ port port-number ] [ user user-name password { cipher | simple } string ] |
By default, the proxy server used by DPI services for online signature update is not specified. |
Disabling the DPI engine
About disabling the DPI engine
Packet inspection in the DPI engine is a complex and resource-consuming process. When the CPU usage is too high, you can disable the DPI engine to guarantee the device performance. After you disable the DPI engine, packets will not be processed by DPI.
Procedure
|
Step |
Command |
Remarks |
|
1. Enter system view. |
system-view |
N/A |
|
2. Disable the DPI engine. |
inspect bypass |
By default, the DPI engine is enabled. |
Displaying and maintaining DPI engine
Execute display commands in any view.
|
Task |
Command |
|
Display the status of the DPI engine. |
display inspect status |
Configuring IPS
About IPS
Intrusion prevention systems (IPS) is a security feature that enables devices to monitor network traffic for malicious activity and to proactively take prevention actions.
IPS functions
IPS provides the following functions:
· In-depth protection—IPS inspects the application layer data of packets, performs protocol analysis and reassembly on network traffic flows, and takes actions according to the analysis results.
· Real-time protection—IPS monitors network traffic in real-time and can take actions on detected attacks.
· All-around protection—IPS can detect and prevent the following types of attacks:
? Malicious software such as worms, viruses, Trojan, bots, spyware, adware, scanners, and backdoors.
? Malicious attacks such as common gateway interface (CGI) attacks, cross-site scripting attacks, injection attacks, directory traversal attacks, information leakage attacks, remote file inclusion attacks, buffer overflow attacks, code execution attacks, and DoS attacks.
· Bidirectional protection—IPS monitors both incoming and outgoing traffic to prevent attacks arising from the internal and external networks.
IPS policies
IPS is implemented based on IPS policies. An IPS policy contains a set of IPS signatures for matching packets and the actions for the packets.
IPS signatures
The device compares packets with IPS signatures to detect, classify, and prevent network attacks.
Each IPS signature contains various attributes, including attack category, action, protected target, severity level, and direction. You can filter the IPS signatures that an IPS policy uses based on the IPS signature attributes.
The device supports the following types of IPS signatures:
· Predefined IPS signatures—Automatically generated by the device based on the local signature library. You cannot add, modify, or delete a predefined IPS signature.
· User-defined IPS signatures—For new attacks that cannot be detected by predefined signatures, you can customize IPS signatures in a Snort file and import the signatures to the device. You can also delete all imported IPS signatures from the device.
Signature actions
When the device detects a matching packet for an IPS signature, it takes the actions specified for the signature on the packet.
The device supports the following signature actions:
· Reset—Closes the TCP connections for matching packets by sending TCP reset messages.
· Redirect—Redirects matching packets to a webpage.
· Block-source—Drops matching packets and adds the sources of the packets to the IP blacklist. If the IP blacklist feature is enabled, packets from the blacklisted sources will be blocked for a duration set by the block-period command. If the IP blacklist feature is not enabled, packets from the blacklisted sources are not blocked.
To enable the IP blacklist feature, use the blacklist global enable command. For more information about the IP blacklist feature, see Security Configuration Guide.
For more information about the block-period command, see DPI Command Reference.
· Drop—Drops matching packets.
· Permit—Permits matching packets to pass.
· Capture—Captures matching packets.
· Logging—Logs matching packets.
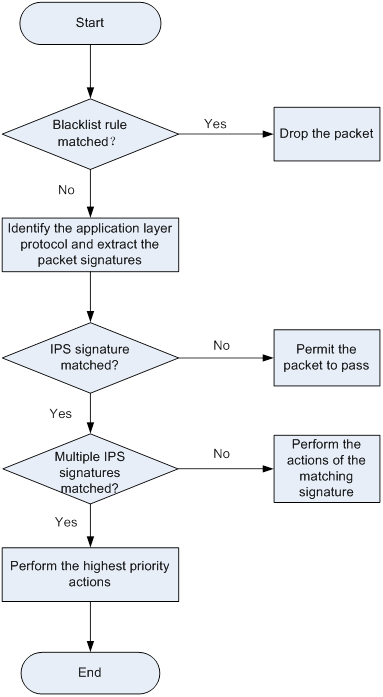
IPS mechanism
As shown in Figure 4, upon receiving a packet, the device performs the following operations:
1. The device compares the packet with the IP blacklist rules.
? If a matching rule is found, the device drops the packet.
? If no matching rule is found, the device goes to step 2.
2. The device compares the packet with the object policy rules.
If the packet matches a rule that is associated with an IPS policy (through a DPI application profile), the device identifies the packet application layer protocol and extracts the packet signatures.
For more information about object policies, see Security Configuration Guide.
3. The device determines the actions for the packet by comparing the extracted packet signatures with the IPS signatures in the IPS policy:
? If the packet does not match any IPS signatures, the device permits the packet to pass.
? If the packet matches only one IPS signature, the device takes the signature actions.
? If the packet matches multiple IPS signatures, the device uses the following rules to select the actions:
- If the matching IPS signatures have two or more actions, including redirect, drop, permit, and reset, the device takes the action of the highest priority. The actions in descending order of priority are reset, redirect, drop, and permit.
- The device will execute the block-source, capture, and logging actions if they are in the matching IPS signatures.
IPS signature library management
The device uses IPS signatures to inspect application layer traffic for malicious threats and attacks.
You can update the device IPS signature library to the latest version or roll back the library to the previous or the factory default version.
Updating the IPS signature library
The following methods are available for updating the IPS signature library on the device:
· Automatic update.
The device automatically downloads the most up-to-date IPS signature file to update its local signature library periodically.
· Triggered update.
The device downloads the most up-to-date IPS signature file to update its local signature library immediately after you trigger the operation.
· Manual update.
Use this method when the device cannot obtain the IPS signature file automatically.
You must manually download the most up-to-date IPS signature file, and then use the file to update the signature library on the device.
Rolling back the IPS signature library
If filtering false alarms or filtering exceptions occur frequently, you can roll back the IPS signature library to the previous version or to the factory default version.
Feature and hardware compatibility
|
Hardware |
IPS compatibility |
|
MSR810/810-W/810-W-DB/810-LM/810-W-LM/810-10-PoE/810-LM-HK/810-W-LM-HK |
Yes |
|
MSR810-LMS/810-LUS |
No |
|
MSR2600-6-X1/2600-10-X1 |
Yes |
|
MSR 2630 |
Yes |
|
MSR3600-28/3600-51 |
Yes |
|
MSR3600-28-SI/3600-51-SI |
No |
|
MSR3610-X1/3610-X1-DP/3610-X1-DC/3610-X1-DP-DC |
Yes |
|
MSR 3610/3620/3620-DP/3640/3660 |
Yes |
|
MSR5620/5660/5680 |
Yes |
|
Hardware |
IPS compatibility |
|
MSR810-LM-GL |
Yes |
|
MSR810-W-LM-GL |
Yes |
|
MSR830-6EI-GL |
Yes |
|
MSR830-10EI-GL |
Yes |
|
MSR830-6HI-GL |
Yes |
|
MSR830-10HI-GL |
Yes |
|
MSR2600-6-X1-GL |
Yes |
|
MSR3600-28-SI-GL |
No |
Licensing requirements
The IPS module requires a license to run on the device. If the license expires, you can still use the IPS functions but you can no longer upgrade the IPS signature library on the device. For more information about licenses, see license management in Fundamentals Configuration Guide.
IPS configuration task list
|
Tasks at a glance |
Remarks |
|
(Required.) Configuring an IPS policy: b (Optional.) Configuring IPS signature filtering criteria for an IPS policy c (Optional.) Configuring IPS actions for an IPS policy |
N/A |
|
(Optional.) Specifying a parameter profile for an IPS action |
N/A |
|
(Required.) Applying an IPS policy to a DPI application profile |
N/A |
|
(Required.) Activating IPS policy settings |
N/A |
|
(Required.) Using the DPI application profile in an object policy rule |
N/A |
|
(Optional.) Managing the IPS signature library |
N/A |
|
(Optional.) Importing and deleting user-defined IPS signatures |
N/A |
Creating an IPS policy
|
Step |
Command |
Remarks |
|
1. Enter system view. |
system-view |
N/A |
|
2. Create an IPS policy and enter its view. |
ips policy policy-name |
A default IPS policy named default exists. The default IPS policy includes all enabled IPS signatures on the device and cannot be modified or deleted. |
Configuring IPS signature filtering criteria for an IPS policy
About IPS signature filtering criteria
You can set criteria to filter IPS signatures that an IPS policy uses based on the signature attributes.
An IPS policy uses an IPS signature only if the signature matches all the configured criteria.
For certain attribute-based criterion (such as the action, object direction, or severity level criterion), you can specify multiple attribute values. An IPS signature matches the criterion if it matches any of the specified attribute values.
Procedure
|
Step |
Command |
Remarks |
|
1. Enter system view. |
system-view |
N/A |
|
2. Enter IPS policy view. |
ips policy policy-name |
N/A |
|
3. Configure the IPS signature filtering criteria. |
·
Set a target criterion. ·
Set an attack category criterion. ·
Set an action criterion. ·
Set an object direction criterion. ·
Set a severity level criterion. |
By default, an IPS policy uses all enabled IPS signatures on the device. |
Configuring IPS actions for an IPS policy
About configuring IPS actions for an IPS policy
By default, the system applies the default actions of an IPS signature to packets matching the signature.
You can also configure global actions for an IPS policy or change the actions for individual IPS signatures in the policy.
The system selects the actions for packets matching an IPS signature in the following order:
1. Actions configured for the IPS signature in the IPS policy.
2. Actions configured for the IPS policy.
3. Default actions of the IPS signature.
Procedure
|
Step |
Command |
Remarks |
|
1. Enter system view. |
system-view |
N/A |
|
2. Enter the view of an IPS policy. |
ips policy policy-name |
N/A |
|
3. Specify the global packet processing actions for the IPS policy. |
signature override all { { block-source | drop | permit | redirect | reset } | capture | logging } * |
By default, no actions are specified for an IPS policy and the default actions of IPS signatures are applied to matching packets. |
|
4. (Optional.) Change the status or actions for an IPS signature. |
signature override { pre-defined | user-defined } signature-id { { disable | enable } [ { block-source | drop | permit | redirect | reset } | capture | logging ] * } |
By default: · Predefined IPS signatures use the actions and states defined by the system. · User-defined IPS signatures use the actions and states defined in the IPS signature file from which the signatures are imported. |
Specifying a parameter profile for an IPS action
About specifying a parameter profile for an IPS action
You can specify parameter profiles for IPS signature actions. A parameter profile is a set of parameters that determine how an action is executed. If you do not specify a parameter profile for an action, or if the specified profile does not exist, the default action parameter settings are used. For information about configuring parameter profiles, see "Configuring DPI engine."
Procedure
|
Step |
Command |
Remarks |
|
1. Enter system view. |
system-view |
N/A |
|
2. Specify a parameter profile for an IPS action. |
ips { block-source | capture | email | logging | redirect } parameter-profile parameter-name |
By default, no parameter profile is specified for an IPS action. |
Applying an IPS policy to a DPI application profile
About applying an IPS policy to a DPI application profile
An IPS policy must be applied to a DPI application profile to take effect.
A DPI application profile can use only one IPS policy. If you apply different IPS policies to the same DPI application profile, only the most recent configuration takes effect.
Procedure
|
Command |
Remarks |
|
|
1. Enter system view. |
system-view |
N/A |
|
2. Enter DPI application profile view. |
app-profile profilename |
For more information about this command, see DPI Command Reference. |
|
3. Apply an IPS policy to the DPI application profile. |
ips apply policy policy-name mode { protect | alert } |
By default, no IPS policy is applied to the DPI application profile. |
Activating IPS policy settings
About activating IPS policy settings
After you edit the IPS policy settings, perform this task to activate the settings.
Restrictions and guidelines
This task can cause temporary outage for all DPI services. As a best practice, perform the task after all DPI service policy and rule settings are complete.
For more information about activating DPI service module configuration, see "Configuring the DPI engine."
Procedure
|
Step |
Command |
Remarks |
|
1. Enter system view. |
system-view |
N/A |
|
2. Activate IPS policy settings. |
inspect activate |
By default, IPS policy settings do not take effect. |
Using the DPI application profile in an object policy rule
|
Step |
Command |
Remarks |
|
1. Enter system view. |
system-view |
N/A |
|
2. Enter object policy view. |
object-policy { ip | ipv6 } object-policy-name |
N/A |
|
3. Use a DPI application profile in an object policy rule. |
rule [ rule-id ] inspect app-profile-name |
By default, no DPI application profile is used in an object policy rule. |
|
4. Return to system view. |
quit |
N/A |
|
5. Create a zone pair and enter zone pair view. |
zone-pair security source source-zone-name destination destination-zone-name |
By default, no zone pairs exist. For more information about zone pairs, see security zone configuration in Fundamentals Configuration Guide. |
|
6. Apply the object policy to the zone pair. |
object-policy apply { ip | ipv6 } object-policy-name |
By default, no object policy is applied to a zone pair. |
Managing the IPS signature library
You can update or roll back the version of the IPS signature library on the device.
Restrictions and guidelines
· Do not delete the /dpi/ folder in the root directory of the storage medium.
· Do not perform IPS signature update and rollback when the device's free memory is below the normal state threshold. For more information about device memory thresholds, see device management in Fundamentals Configuration Guide.
· For successful automatic and immediate signature update, make sure the device can resolve the domain name of the H3C website into an IP address through DNS. For more information about DNS, see DNS configuration in Layer 3—IP Services Configuration Guide.
Scheduling automatic IPS signature library update
About automatic IPS signature library update
You can schedule automatic IPS signature library update if the device can access the signature database services on the H3C website. The device periodically obtains the latest signature file from the H3C website to update its local signature library according to the update schedule.
Procedure
|
Step |
Command |
Remarks |
|
1. Enter system view. |
system-view |
N/A |
|
2. Enable automatic IPS signature library update and enter automatic IPS signature library update configuration view. |
ips signature auto-update |
By default, automatic IPS signature library update is disabled. |
|
3. Schedule the update time. |
update schedule { daily | weekly { fri | mon | sat | sun | thu | tue | wed } } start-time time tingle minutes |
By default, the device updates the IPS signature library at a random time between 01:00:00 and 03:00:00 every day. |
|
4. Configure the device to overwrite the current IPS signature library without backing up the library during an automatic signature library update. |
override-current |
By default, the device backs up the current IPS signature library as the previous version before performing an automatic IPS signature library update. |
Triggering an immediate IPS signature update
About immediate IPS signature library update
Anytime you find a release of new signature version on the H3C website, you can trigger the device to immediately update the local signature library.
Procedure
|
Step |
Command |
|
1. Enter system view. |
system-view |
|
2. Trigger an immediate IPS signature library update. |
ips signature auto-update-now |
Performing an IPS signature manual update
About IPS signature library manual update
If the device cannot access the signature database services on the H3C website, use one of the following methods to manually update the IPS signature library on the device:
· Local update—Updates the IPS signature library on the device by using the locally stored update IPS signature file.
Store the update file on the correct location for successful signature library update:
? For centralized devices in IRF mode, store the update file on the master device.
? For distributed devices in standalone mode, store the update file on the active MPU.
? For distributed devices in IRF mode, store the update file on the global active MPU.
· FTP/TFTP update—Updates the IPS signature library on the device by using the file stored on the FTP or TFTP server.
Procedure
|
Step |
Command |
|
1. Enter system view. |
system-view |
|
2. Manually update the IPS signature library on the device. |
ips signature update [ override-current ] file-path |
Rolling back the IPS signature library
About rolling back the IPS signature library
If an IPS signature library update causes exceptions or a high false alarm rate, you can roll back the IPS signature library.
Before rolling back the IPS signature library, the device backs up the current signature library as the previous version. For example, the previous library version is V1 and the current library version is V2. If you perform a rollback to the previous version, library version V1 becomes the current version and library version V2 becomes the previous version. If you perform a rollback to the previous version again, the library rolls back to library version V2.
Procedure
|
Step |
Command |
|
1. Enter system view. |
system-view |
|
2. Roll back the IPS signature library to the previous version or to the factory default version. |
ips signature rollback { factory | last } |
Importing and deleting user-defined IPS signatures
Importing user-defined IPS signatures
About importing user-defined IPS signatures
To add your own IPS signatures, create an IPS signature file in the Snort format and import the signatures from the file to the device.
Restrictions and guidelines
Make sure the IPS signature file contains all user-defined signatures that you want to use. All existing user-defined signatures on the device will be overwritten by the imported signatures.
For a signature defined by a Snort rule to be imported correctly from the IPS signature file, make sure Snort rule is valid.
Procedure
|
Step |
Command |
Remarks |
|
1. Enter system view. |
system-view |
N/A |
|
2. Import user-defined IPS signatures. |
ips signature import snort file-path |
By default, no user-defined IPS signatures exist. |
Deleting user-defined IPS signatures
|
Step |
Command |
|
1. Enter system view. |
system-view |
|
2. Delete all user-defined IPS signatures. |
ips signature remove snort |
Displaying and maintaining IPS
Execute display commands in any view.
|
Task |
Command |
|
Display IPS policy information. |
display ips policy policy-name |
|
Display IPS signature library information. |
display ips signature information |
|
Display IPS signature information. |
display ips signature [ pre-defined | user-defined ] [ direction { any | to-client | to-server } ] [ category category-name | fidelity { high | low | medium } | protocol { icmp | ip | tcp | udp } | severity { critical | high | low | medium } ] * |
|
Display detailed information about an IPS signature. |
display ips signature { pre-defined | user-defined } signature-id |
|
Display information about IPS signatures that failed to be parsed during signature import. |
display ips signature user-defined parse-failed |
IPS configuration examples
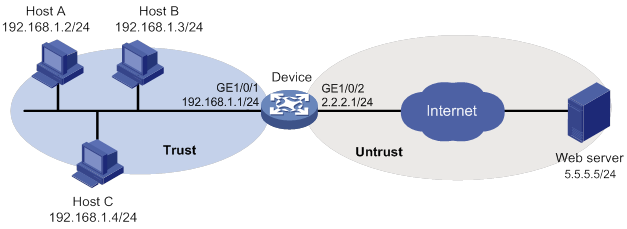
Example of using the default IPS policy in an object policy
Network requirements
As shown in Figure 5, the device connects to the LAN and Internet through security zones Trust and Untrust, respectively.
Configure the device to use the default IPS policy for attack detection and prevention.
Configuration procedure
1. Assign IP addresses to interfaces, as shown in Figure 5. (Details not shown.)
2. Configure the security zones:
# Assign GigabitEthernet 1/0/1 to security zone Trust.
<Device> system-view
[Device] security-zone name trust
[Device-security-zone-Trust] import interface gigabitethernet 1/0/1
[Device-security-zone-Trust] quit
# Assign GigabitEthernet 1/0/2 to security zone Untrust.
[Device] security-zone name untrust
[Device-security-zone-Untrust] import interface gigabitethernet 1/0/2
[Device-security-zone-Untrust] quit
3. Create an IP address object group named ipsfilter and configure an IP address object with subnet 192.168.1.0/24.
[Device] object-group ip address ipsfilter
[Device-obj-grp-ip-ipsfilter] network subnet 192.168.1.0 24
[Device-obj-grp-ip-ipsfilter] quit
4. Apply the default IPS policy to a DPI application profile:
# Create a DPI application profile named sec and enter its view.
[Device] app-profile sec
# Apply the default IPS policy to the DPI application profile and set the policy mode to protect.
[Device-app-profile-sec] ips apply policy default mode protect
[Device-app-profile-sec] quit
5. Activate the IPS policy settings.
[Device] inspect activate
6. Configure an object policy:
# Create an IPv4 object policy named ipsfilter and enter its view.
[Device] object-policy ip ipsfilter
# Configure an object policy rule to apply DPI application profile sec to packets with source IP addresses contained in IP address object group ipsfilter.
[Device-object-policy-ip-ipsfilter] rule inspect sec source-ip ipsfilter destination-ip any
[Device-object-policy-ip-ipsfilter] quit
7. Create a zone pair between source security zone Trust and destination security zone Untrust, and apply object policy ipsfilter to the zone pair.
[Device] zone-pair security source trust destination untrust
[Device-zone-pair-security-Trust-Untrust] object-policy apply ip ipsfilter
[Device-zone-pair-security-Trust-Untrust] quit
Verifying the configuration
# Verify that the device can use the default IPS policy to detect and prevent known network attacks. (Details not shown.)
For example, if an incoming attack packet matches predefined IPS signature GNU_Bash_Local_Memory_Corruption_Vulnerability(CVE-2014-718), the device automatically applies the signature actions (reset and logging) to the packet.
Example of using a user-defined IPS policy in an object policy
Network requirements
As shown in Figure 6, the device connects to the LAN and Internet through security zones Trust and Untrust, respectively.
Perform the following tasks:
1. Create IPS policy ips1 and modify its signature action and status settings as follows:
? Enable predefined IPS signature 2 and specify actions drop, capture, and logging for the signature.
? Disable predefined IPS signature 4.
? Enable predefined IPS signature 6.
2. Apply IPS policy ips1 to zone pair between source security zone Trust and destination security zone Untrust.
Configuration procedure
1. Assign IP addresses to interfaces, as shown in Figure 6. (Details not shown.)
2. Configure the security zones:
# Assign GigabitEthernet 1/0/1 to security zone Trust.
<Device> system-view
[Device] security-zone name trust
[Device-security-zone-Trust] import interface gigabitethernet 1/0/1
[Device-security-zone-Trust] quit
# Assign GigabitEthernet 1/0/2 to security zone Untrust.
[Device] security-zone name untrust
[Device-security-zone-Untrust] import interface gigabitethernet 1/0/2
[Device-security-zone-Untrust] quit
3. Create an IP address object group named ipsfilter and configure an IP address object with subnet 192.168.1.0/24.
[Device] object-group ip address ipsfilter
[Device-obj-grp-ip-ipsfilter] network subnet 192.168.1.0 24
[Device-obj-grp-ip-ipsfilter] quit
4. Configure an IPS policy:
# Create an IPS policy named ips1 and enter its view.
[Device] ips policy ips1
# Configure the IPS policy to use IPS signatures with all target and subtarget attributes.
[Device-ips-policy-ips1] protect-target all
# Enable predefined IPS signature 2 and specify actions drop, capture, and logging for the signature.
[Device-ips-policy-ips1] signature override pre-defined 2 enable drop capture logging
# Disable predefined IPS signature 4.
[Device-ips-policy-ips1] signature override pre-defined 4 disable
# Enable predefined IPS signature 6.
[Device-ips-policy-ips1] signature override pre-defined 6 enable
[Device-ips-policy-ips1] quit
5. Apply IPS policy ips1 to a DPI application profile:
# Create a DPI application profile named sec.
[Device] app-profile sec
# Apply IPS policy ips1 to the DPI application profile and set the policy mode to protect.
[Device-app-profile-sec] ips apply policy ips1 mode protect
[Device-app-profile-sec] quit
6. Activate the IPS policy settings.
[Device] inspect activate
7. Configure an object policy:
# Create an IPv4 object policy named ipsfilter and enter its view.
[Device] object-policy ip ipsfilter
# Configure an object policy rule to apply DPI application profile sec to packets with source IP addresses contained in IP address object group ipsfilter.
[Device-object-policy-ip-ipsfilter] rule inspect sec source-ip ipsfilter destination-ip any
[Device-object-policy-ip-ipsfilter] quit
8. Create a zone pair between source security zone Trust and destination security zone Untrust, and apply object policy ipsfilter to the zone pair.
[Device] zone-pair security source trust destination untrust
[Device-zone-pair-security-Trust-Untrust] object-policy apply ip ipsfilter
[Device-zone-pair-security-Trust-Untrust] quit
Verifying the configuration
# Verify that IPS policy ips1 is successfully configured.
<Device> display ips policy ips1
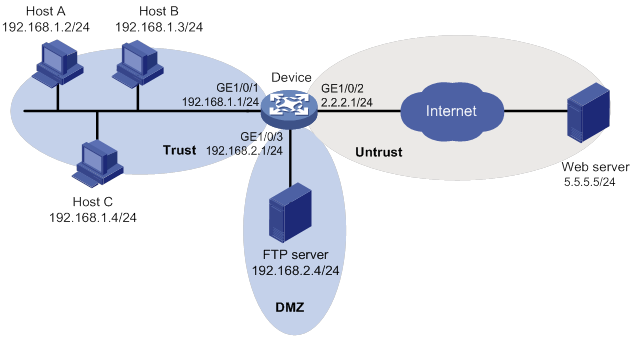
IPS signature library manual update configuration example
Network requirements
As shown in Figure 7, LAN users in security zone Trust can access the following resources:
· Internet resources in security zone Untrust.
· The FTP server at 192.168.2.1/24 in security zone DMZ. The FTP login username and password are ips and 123, respectively.
Perform the following tasks:
· Manually update the IPS signature library by using the latest IPS signature file stored on the FTP server.
· Configure the device to use the default IPS policy to detect and prevent known attacks on the network.
Configuration procedure
1. Assign IP addresses to interfaces, as shown in Figure 7. (Details not shown.)
2. Enable the device to communicate with the FTP server:
# Configure ACL 2001 to permit all traffic.
<Device> system-view
[Device] acl basic 2001
[Device-acl-ipv4-basic-2001] rule permit
[Device-acl-ipv4-basic-2001] quit
# Assign GigabitEthernet 1/0/3 to zone DMZ.
[Device] security-zone name dmz
[Device-security-zone-DMZ] import interface gigabitethernet 1/0/3
[Device-security-zone-DMZ] quit
# Create a zone pair between source security zone Local and destination security zone DMZ, and then apply ACL 2001 to the zone pair.
[Device] zone-pair security source local destination dmz
[Device-zone-pair-security-Local-DMZ] packet-filter 2001
[Device-zone-pair-security-Local-DMZ] quit
# Create a zone pair between source security zone DMZ and destination security zone Local, and the apply ACL 2001 to the zone pair.
[Device] zone-pair security source dmz destination local
[Device-zone-pair-security-DMZ-Local] packet-filter 2001
[Device-zone-pair-security-DMZ-Local] quit
3. Update the device IPS signature library by using IPS signature file ips-1.0.8-encrypt.dat on the FTP server.
[Device] ips signature update ftp://ips:[email protected]/ips-1.0.8-encrypt.dat
Verifying the configuration
# Verify that the device IPS signature library is updated.
<Device> display ips signature information
IPS signature library automatic update configuration example
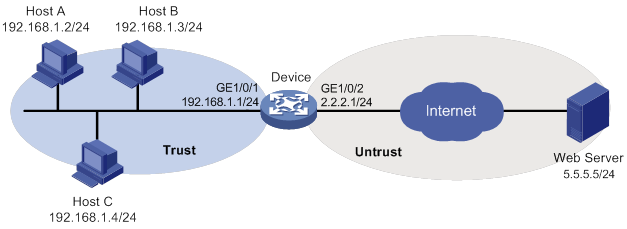
Network requirements
As shown in Figure 8, LAN users in security zone Trust can access Internet resources in security zone Untrust.
Configure the device to automatically update the local IPS signature library at a random time between 08:30 a.m. and 09:30 a.m. every Saturday.
Configuration procedure
1. Assign IP addresses to interfaces, as shown in Figure 8. (Details not shown.)
2. Configure DNS for the device to resolve the domain name of the H3C website into the IP address. (Details not shown.)
3. Configure an object policy to allow LAN users in security zone Trust to access Internet resources in security zone Untrust. (Details not shown.)
4. Configure automatic IPS signature library update:
# Enable automatic IPS signature library update.
<Device> system-view
[Device] ips signature auto-update
[Device-ips-autoupdate]
# Configure the device to perform automatic update at a random time between 08:30 a.m. and 09:30 a.m. every Saturday.
[Device-ips-autoupdate] update schedule weekly sat start-time 9:00:00 tingle 60
[Device-ips-autoupdate] quit
Verifying the configuration
# Verify that the device IPS signature library is updated as scheduled.
<Device> display ips signature information
Configuring URL filtering
About URL filtering
URL filtering controls access to the Web resources by filtering the URLs that the users visit.
The software supports only the HTTP URL filtering.
URL
A URL is a reference to a resource that specifies the location of the resource on a network and a mechanism for retrieving it. The syntax of a URL is protocol://host [:port]/path/[;parameters][?query]#fragment. Figure 9 shows an example URL.

Table 2 describes the fields in a URL.
Table 2 URL field descriptions
|
Field |
Description |
|
protocol |
Transmission protocol, such as HTTP. |
|
host |
Domain name or IP address of the server where the indicated resource is located. |
|
[:port] |
Optional field that identifies the port number of the transmission protocol. If this field is omitted, the default port number of the protocol is used. |
|
/path/ |
String that identifies the directory or file where the indicated resource is stored. The path is a sequence of segments separated by zero or multiple forward slashes. |
|
[parameters] |
Optional field that contains special parameters. |
|
[?query] |
Optional field that contains parameters to be passed to the software for querying dynamic webpages. Each parameter is a <key>=<value> pair. Different parameters are separated by an ampersand (&). |
|
URI |
Uniform resource identifier that identifies a resource on a network. |
Basic concepts
URL filtering rule
A URL filtering rule matches URLs based on the content in the URI or hostname field.
URL filtering provides the following types of URL filtering rules:
· Predefined URL filtering rules—Signature-based URL filtering rules. The device automatically generates them based on the local URL filtering signatures. In most cases, the predefined rules are sufficient for URL filtering.
· User-defined URL filtering rules—Regular expression- or text-based URL filtering rules that are manfully configured.
A URL filtering rule supports the following URL matching methods:
· Exact match by text—Performs an exact text string match on the hostname or URI field of the URL.
? If a rule is configured with the host keyword, a URL matches the rule only if it contains a host name exactly the same as the specified text sting. For example, the rule 1 host text abc.com.cn command matches URLs that carry the abc.com.cn hostname, but it does not match URLs carrying the dfabc.com.cn hostname.
? If a rule is configured with the uri keyword, a URL matches the rule if it contains a URI that begins with the complete text string in the rule. For example, the rule 2 uri text /sina/news command matches URLs that contain URIs /sina/news, /sina/news/sports, and /sina/news_sports. However, the command does not match URLs that contain URI /sina.
· Fuzzy match by regular expression—Performs a fuzzy regular expression match on the hostname or URI field of the URL. For example, the rule 3 host regex sina.*cn command matches URLs that carry the news.sina.com.cn hostname.
URL category
URL filtering provides the URL categorization feature to facilitate filtering rule management.
You can classify multiple URL filtering rules to a URL category and specify an action for the category. If a matching rule is in multiple URL categories, the system takes the action for the category with the highest severity level.
URL filtering supports the following types of URL categories:
· Predefined URL categories.
The predefined URL categories contain the predefined URL filtering rules. Each predefined URL category has a unique severity level in the range of 1 to 999, and a category name that begins Pre-. Predefined URL categories cannot be modified.
· User-defined URL categories.
You can manually create user-defined URL categories and configure filtering rules for them. The severity level of a user-defined URL category is in the range of 1000 to 65535. You can edit the filtering rules and change the severity level for a user-defined URL category.
URL filtering policy
A URL filtering policy can contain multiple URL categories, and each category has an action defined for packets that match a filtering rule in the category. You can also specify the default action for packets that do not match any filtering rules in the policy. URL filtering actions include drop, permit, block source, reset, redirect, and logging.
URL filtering whitelist/blacklist rule
The device supports using URL-based whitelist and blacklist rules to filter HTTP packets. If the URL in an HTTP packet matches a blacklist rule, the packet is dropped. If the URL matches a whitelist rule, the packet is permitted to pass through.
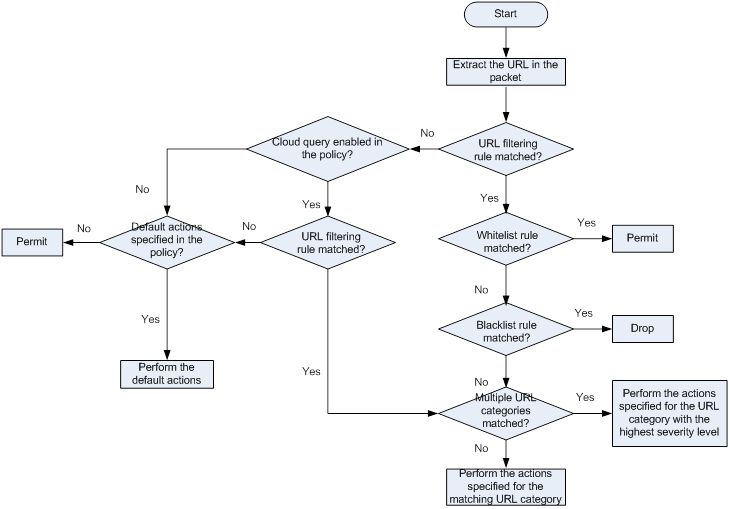
URL filtering mechanism
As shown in Figure 10, upon receiving an HTTP packet, the device performs the following operations:
1. The device compares the packet with the object policy rules.
If the packet matches a rule that is associated with a URL filtering policy (through a DPI application profile), the device extracts the URL from the packet.
For more information about object policies, see Security Configuration Guide.
2. The device compares the extracted URL with the rules in the URL filtering policy.
? If the URL matches a rule, the device determines the actions for the packet as follows:
- If the matching rule is a whitelist rule, the packet is permitted to pass through.
- If the matching rule is a blacklist rule, the packet is dropped.
- If the matching rule is a URL filtering rule, the devices takes the actions specified for the URL category to which the rule belongs.
If the URL filtering rule belongs to multiple URL categories, the actions specified for the URL category with the highest severity level apply.
? If the URL does not match any rule in the policy, and cloud query is disabled in the policy, the default action specified for the policy applies. If the default action is not configured, the device permits the packet to pass through.
? If the URL does not match any rule in the policy, and cloud query is enabled in the policy, the device performs step 3.
3. The device forwards the URL to the cloud server for further query.
? If a matching rule is found for the URL, the actions specified for the URL category to which the rule belongs apply. If the rule belongs to multiple URL categories, the actions specified for the category with the highest severity level apply.
? If no matching rule is found, the device executes the default action of the policy on the packet. If the default action is not configured, the device permits the packet to pass through.
Figure 10 URL filtering mechanism
URL filtering signature library management
The device uses the local URL filtering signature library to identify URLs in the HTTP packets.
You can update the device URL filtering signature library to the most up-to-date version or roll back the library to a version.
Updating the URL filtering signature library
The following methods are available for updating the URL filtering signature library on the device:
· Automatic update.
The device periodically accesses the H3C website and automatically downloads the most up-to-date URL filtering signature file to update its local signature library.
· Triggered update.
The device downloads the most up-to-date URL filtering signature file from the H3C website to update its local signature library immediately you trigger the operation.
· Manual update.
Use this method when the device cannot connect to the H3C website.
You must manually download the most up-to-date URL filtering signature file from the H3C website, and then use the file to update the signature library on the device.
Rolling back the URL filtering signature library
If filtering false alarms or filtering exceptions occur frequently, you can roll back the URL filtering signature library to the previous version or to the factory default version.
Feature and hardware compatibility
|
Hardware |
URL filtering compatibility |
|
MSR810/810-W/810-W-DB/810-LM/810-W-LM/810-10-PoE/810-LM-HK/810-W-LM-HK |
Yes |
|
MSR810-LMS/810-LUS |
No |
|
MSR2600-6-X1/2600-10-X1 |
Yes |
|
MSR 2630 |
Yes |
|
MSR3600-28/3600-51 |
Yes |
|
MSR3600-28-SI/3600-51-SI |
No |
|
MSR3610-X1/3610-X1-DP/3610-X1-DC/3610-X1-DP-DC |
Yes |
|
MSR 3610/3620/3620-DP/3640/3660 |
Yes |
|
MSR5620/5660/5680 |
Yes |
|
Hardware |
URL filtering compatibility |
|
MSR810-LM-GL |
Yes |
|
MSR810-W-LM-GL |
Yes |
|
MSR830-6EI-GL |
Yes |
|
MSR830-10EI-GL |
Yes |
|
MSR830-6HI-GL |
Yes |
|
MSR830-10HI-GL |
Yes |
|
MSR2600-6-X1-GL |
Yes |
|
MSR3600-28-SI-GL |
No |
URL filtering configuration task list
|
Task at a glance |
Remarks |
|
(Required.) Configuring a URL category |
N/A |
|
(Optional.) Configuring URL filtering cloud query |
N/A |
|
(Required.) Configuring a URL filtering policy |
N/A |
|
(Optional.) Copying a URL filtering policy or category |
N/A |
|
(Required.) Applying a URL filtering policy to a DPI application profile |
N/A |
|
(Required.) Activating URL filtering policy and rule settings |
N/A |
|
(Required.) Using the DPI application profile in an object policy rule |
N/A |
|
(Optional.) Managing the URL filtering signature library |
N/A |
|
(Optional.) Enabling DPI engine logging |
N/A |
|
(Optional.) Configuring URL filtering logging for resource access |
N/A |
Configuring a URL category
About configuring a URL category
Perform this task to create a user-defined URL category and configure filtering rules for it to meet specific URL filtering requirements.
Procedure
|
Step |
Command |
Remarks |
|
1. Enter system view. |
system-view |
N/A |
|
2. Create a URL category and enter its view. |
url-filter category category-name [ severity severity-level ] |
By default, only predefined URL categories exist. The name of a user-defined URL category cannot begin with Pre-. Assign a severity level in the range of 1000 to 65535 to the user-defined URL category. Severity levels 1 to 999 are reserved for predefined URL categories. |
|
3. (Optional.) Configure a description for the URL category. |
description text |
By default, a URL category does not have a description. |
|
4. Configure a URL filtering rule for the URL category. |
rule [ rule-id ] host { regex regex | text string } [ uri { regex regex | text string } ] |
By default, a user-defined URL category does not have any URL filtering rules. |
|
5. (Optional.) Add the URL filtering rules of a predefined URL category to the URL category. |
include pre-defined category-name |
By default, a user-defined URL category does not contain the URL filtering rules of any predefined URL category. |
|
6. (Optional.) Rename the URL category. |
rename new-name |
N/A |
Configuring URL filtering cloud query
About URL filtering cloud query
The URL filtering cloud query feature enables the system to send URLs that do not match any local URL filtering rules to the cloud server for further query. This helps improves URL filtering accuracy for HTTP traffic.
The device caches the URL filtering rules returned from the cloud query server and deploys them to the DPI inspection engine at regular intervals. You can set the deploy interval, the maximum number of rules that can be cached, and the minimum cache period for the cached rules.
Procedure
|
Step |
Command |
Remarks |
|
1. Enter system view. |
system-view |
N/A |
|
2. Specify the server to be used for URL filtering cloud query. |
url-filter category-server host-name |
By default, no server is specified for URL filtering cloud query. |
|
3. (Optional.) Set the interval for deploying cached URL filtering rules to the DPI inspection engine. |
url-filter cache deploy-interval interval |
The default deploy interval is 12 hours. |
|
4. (Optional.) Set URL filtering cache size. |
url-filter cache size cache-size |
The default URL filtering cache size depends on the memory size of the system. |
|
5. (Optional.) Set the minimum cache period for URL filtering rules. |
url-filter cache-time value |
By default, the minimum cache period of URL filtering rules is 43200 seconds. |
|
6. Enter the view of the URL filtering policy in which you want to enable cloud query. |
url-filter policy policy-name |
N/A |
|
7. Enable cloud query. |
cloud-query enable |
By default, cloud query is disabled in a URL filtering policy. |
Configuring a URL filtering policy
About URL filtering policies
A URL filtering policy contains the following settings:
· URL category-action mappings.
· Default action.
· Whitelist and blacklist rules.
Procedure
|
Step |
Command |
Remarks |
|
1. Enter system view. |
system-view |
N/A |
|
2. Configure a URL filtering policy and enter its view. |
url-filter policy policy-name |
By default, no URL filtering policies exist. The name of a URL filtering policy must be unique among all URL filtering policies. |
|
3. Specify the actions for a URL category. |
category category-name action { block-source [ parameter-profile parameter-name ] | drop | permit | redirect parameter-profile parameter-name | reset } [ logging [ parameter-profile parameter-name ] ] |
By default, no URL category-action mappings exist. If a packet matches a rule that is in multiple URL categories, the system uses the actions for the category with the highest severity level. |
|
4. (Optional.) Specify the default action for packets that do not match any rule in the policy. |
default-action { block-source [ parameter-profile parameter-name ] | drop | permit | redirect parameter-profile parameter-name | reset } [ logging [ parameter-profile parameter-name ] ] |
If you do not specify a default action for a URL filtering policy, the device permits packets that do not match any rule to pass through. |
|
5. (Optional.) Configure a whitelist or blacklist rule in the policy. |
add { blacklist | whitelist } [ id ] host { regex host-regex | text host-name } [ uri { regex uri-regex | text uri-name } ] |
By default, no blacklist or whitelist rules exist in a URL filtering policy. |
Copying a URL filtering policy or category
About copying a URL filtering policy or category
You can create a new URL filtering policy or URL category by copying an existing one.
When you copy a URL category, be sure to specify a unique severity level for the new URL category.
Procedure
|
Step |
Command |
|
1. Enter system view. |
system-view |
|
2. Copy a URL filtering policy or category. |
·
Copy a URL category: ·
Copy a URL filtering policy: |
Applying a URL filtering policy to a DPI application profile
About applying a URL filtering policy to a DPI application profile
A URL filtering policy must be applied to a DPI application profile to take effect.
Restrictions and guidelines
A DPI application profile can use only one URL filtering policy. If you apply different URL filtering policies to the same DPI application profile, only the most recent configuration takes effect.
Procedure
|
Step |
Command |
Remarks |
|
1. Enter system view. |
system-view |
N/A |
|
2. Enter DPI application profile view. |
app-profile profilename |
For more information about this command, see DPI Command Reference. |
|
3. Assign a URL filtering policy to the DPI application profile. |
url-filter apply policy policyname |
By default, no URL filtering policy is applied to the DPI application profile. |
Activating URL filtering policy and rule settings
About activating URL filtering policy and rule settings
After you edit the policy and rule settings in the URL filtering module, perform this task to activate the settings.
Restrictions and guidelines
This task can cause temporary outage for all DPI services. As a best practice, perform the task after all DPI service policy and rule settings are configured.
For more information about activating DPI service module configuration, see "Configuring the DPI engine."
Procedure
|
Step |
Command |
Remarks |
|
1. Enter system view. |
system-view |
N/A |
|
2. Activate URL filtering policy and rule settings. |
inspect activate |
By default, URL filtering policy and rule settings do not take effect. |
Using the DPI application profile in an object policy rule
|
Step |
Command |
Remarks |
|
1. Enter system view. |
system-view |
N/A |
|
2. Enter object policy view. |
object-policy { ip | ipv6 } object-policy-name |
N/A |
|
3. Use a DPI application profile in an object policy rule. |
rule [ rule-id ] inspect app-profile-name |
By default, no DPI application profile is used in an object policy rule. |
|
4. Return to system view. |
quit |
N/A |
|
5. Create a zone pair and enter zone pair view. |
zone-pair security source source-zone-name destination destination-zone-name |
By default, no zone pairs exist. For more information about zone pairs, see security zone configuration in Fundamentals Configuration Guide. |
|
6. Apply the object policy to the zone pair. |
object-policy apply { ip | ipv6 } object-policy-name |
By default, no object policy is applied to a zone pair. |
Managing the URL filtering signature library
You can update or roll back the version of the URL filtering signature library on the device.
Restrictions and guidelines
· Do not delete the /dpi/ folder in the root directory of the storage medium.
· Do not perform URL filtering signature update and rollback when the device's free memory is below the normal state threshold. For more information about device memory thresholds, see device management in Fundamentals Configuration Guide.
· For successful automatic and immediate signature update, make sure the device can resolve the domain name of the H3C website into an IP address through DNS. For more information about DNS, see DNS configuration in Layer 3—IP Services Configuration Guide.
Scheduling automatic URL filtering signature library update
About automatic URL filtering signature library update
You can schedule automatic URL filtering signature library update if the device can access the signature database services on the H3C website. The device periodically obtains the latest signature file from the H3C website to update its local signature library according to the update schedule.
Procedure
|
Step |
Command |
Remarks |
|
1. Enter system view. |
system-view |
N/A |
|
2. Enable automatic URL filtering signature library update and enter automatic URL filtering signature library update configuration view. |
url-filter signature auto-update |
By default, automatic URL filtering signature library update is disabled. |
|
3. Schedule the update time. |
update schedule { daily | weekly { fri | mon | sat | sun | thu | tue | wed } } start-time time tingle minutes |
By default, the device updates the URL filtering signature at a random time between 01:00:00 and 03:00:00 every day. |
Triggering an immediate URL filtering signature update
About immediate URL filtering signature update
Anytime you find a release of new signature version on the H3C website, you can trigger the device to immediately update the local signature library.
Procedure
|
Step |
Command |
|
1. Enter system view. |
system-view |
|
2. Trigger an automatic URL filtering signature library update. |
url-filter signature auto-update-now |
Performing a URL filtering signature manual update
About URL filtering signature manual update
If the device cannot access the signature database services on the H3C website, use one of the following methods to manually update the URL filtering signature library on the device:
· Local update—Updates the URL filtering signature library on the device by using the locally stored update URL filtering signature file.
Store the update file on the correct location for successful signature library update:
? For centralized devices in IRF mode, store the update file on the master device.
? For distributed devices in standalone mode, store the update file on the active MPU.
? For distributed devices in IRF mode, store the update file on the global active MPU.
· FTP/TFTP update—Updates the URL filtering signature library on the device by using the file stored on the FTP or TFTP server.
Procedure
|
Step |
Command |
|
1. Enter system view. |
system-view |
|
2. Manually update the URL filtering signature library on the device. |
url-filter signature update file-path |
Rolling back the URL filtering signature library
About rolling back the URL filtering signature library
If a URL filtering signature library update causes exceptions or a high false alarm rate, you can roll back the URL filtering signature library.
Before rolling back the URL filtering signature library, the device backs up the current signature library as the "previous version." For example, the previous library version is V1 and the current library version is V2. If you perform a rollback to the previous version, library version V1 becomes the current version and library version V2 becomes the previous version. If you perform a rollback to the previous version again, the library rolls back to library version V2.
Procedure
|
Step |
Command |
|
1. Enter system view. |
system-view |
|
2. Roll back the URL filtering signature library to the previous version or to the factory default version. |
url-filter signature rollback { factory | last } |
Enabling DPI engine logging
About DPI engine logging
You can enable DPI engine logging for audit purposes. Log messages generated by DPI engine are output to the device information center. The information center then sends the messages to designated destinations based on log output rules. For more information about the information center, see Network Management and Monitoring Configuration Guide.
Procedure
|
Step |
Command |
Remarks |
|
1. Enter system view. |
system-view |
N/A |
|
2. Enable DPI engine logging. |
url-filter log enable |
By default, DPI engine logging is disabled. |
Configuring URL filtering logging for resource access
About URL filtering logging for resource access
URL filtering logs user access to resources after you specify the logging action for a URL category or as a default action for a URL filtering policy.
You can use either of the following methods to configure URL filtering to log access to specific types of resources:
· Configure URL filtering to log access to only resources in the root directories of websites.
· Enable or disable URL filtering logging for access to resources of specific types.
Logging access to only resources in the root directories of websites
|
Step |
Command |
Remarks |
|
1. Enter system view. |
system-view |
N/A |
|
2. Configure URL filtering to log only access to resources in the root directories of websites. |
url-filter log directory root |
By default, URL filtering logs access to Web resources in all directories. |
Disabling logging for access to resources of specific types
|
Step |
Command |
Remarks |
|
1. Enter system view. |
system-view |
N/A |
|
2. Disable URL filtering logging for access to resources of a specific resource type. |
·
Disable logging for access to resources of a
predefined resource type. ·
Disable logging for access to resources
of a user-defined resource type. |
By default, URL filtering logs access to all resources except for resources of the predefined resource types (including CSS, GIF, ICO, JPG, JS, PNG, SWF, and XML resources). |
Displaying and maintaining URL filtering
Execute display commands in any view and reset commands in user view.
|
Task |
Command |
|
Display URL filtering cache information. |
display url-filter cache [ existence { eq | lt | gt } existence-time ] | [ category category-name] | [ hitcount { eq | lt | gt } hit-number ] |
|
Display URL category information. |
display url-filter category [ verbose ] |
|
Display information about the URL filtering signature library. |
display url-filter signature information |
|
Display URL filtering statistics. |
display url-filter statistics |
|
Clear URL filtering statistics. |
reset url-filter statistics |
URL filtering configuration examples
Example of using a URL filtering policy in an object policy
Network requirements
As shown in Figure 11, the device connects to the LAN and Internet through the security zones Trust and Untrust, respectively.
Configure a URL filtering policy on the device to meet the following requirements:
· The device permits LAN users in security zone Trust to access website http://www.sina.com on the Web server.
· The device drops and logs packets that match the Pre-Game URL category.
· The device drops and logs packets that do not match any filtering rule in the URL filtering policy.
Configuration procedure
1. Assign IP addresses to interfaces, as shown in Figure 11. (Details not shown.)
2. Configure the security zones:
# Assign GigabitEthernet 1/0/1 to security zone Trust.
<Device> system-view
[Device] security-zone name trust
[Device-security-zone-Trust] import interface gigabitethernet 1/0/1
[Device-security-zone-Trust] quit
# Assign GigabitEthernet 1/0/2 to security zone Untrust.
[Device] security-zone name untrust
[Device-security-zone-Untrust] import interface gigabitethernet 1/0/2
[Device-security-zone-Untrust] quit
3. Create IP address object group urlfilter and configure an IP address object with subnet 192.168.1.0/24.
[Device] object-group ip address urlfilter
[Device-obj-grp-ip-urlfilter] network subnet 192.168.1.0 24
[Device-obj-grp-ip-urlfilter] quit
4. Configure a URL category:
# Create URL category news and set its severity level to 2000.
[Device] url-filter category news severity 2000
# Create URL filtering rule 1 to match HTTP packets that contain the www.sina.com host name in the URL.
[Device-url-filter-category-news] rule 1 host text www.sina.com
[Device-url-filter-category-news] quit
5. Configure a URL filtering policy:
# Create URL filtering policy urlnews.
[Device] url-filter policy urlnews
# Specify the permit action for URL category news.
[Device-url-filter-policy-urlnews] category news action permit
# Specify the drop action for predefined URL category Pre-Games and enable logging for the matching packets.
[Device-url-filter-policy-urlnews] category Pre-Games action drop logging
# Set the default action to drop and enable logging for the matching packets.
[Device-url-filter-policy-urlnews] default-action drop logging
[Device-url-filter-policy-urlnews] quit
6. Apply URL filtering policy urlnews to a DPI application profile:
# Create DPI application profile sec.
[Device] app-profile sec
# Apply URL filtering policy urlnews to the DPI application profile.
[Device-app-profile-sec] url-filter apply policy urlnews
[Device-app-profile-sec] quit
7. Activate the URL filtering policy and rule settings.
[Device] inspect activate
8. Configure an object policy:
# Create IPv4 object policy urlfilter and enter its view.
[Device] object-policy ip urlfilter
# Configure an object policy rule to apply DPI application profile sec to packets with source IP addresses contained in IP address object group urlfilter.
[Device-object-policy-ip-urlfilter] rule inspect sec source-ip urlfilter destination-ip any
[Device-object-policy-ip-urlfilter] quit
9. Create a zone pair between source security zone Trust and destination security zone Untrust, and apply object policy urlfilter to the zone pair.
[Device] zone-pair security source trust destination untrust
[Device-zone-pair-security-Trust-Untrust] object-policy apply ip urlfilter
[Device-zone-pair-security-Trust-Untrust] quit
Verifying the configuration
# Verify that LAN users in security zone Trust can access website http://www.sina.com on the Web server
# Verify that the device drops and logs the LAN users' HTTP requests to game resources.
URL filtering signature library manual update configuration example
Network requirements
As shown in Figure 12, LAN users in security zone Trust can access the following resources:
· Internet resources in security zone Untrust.
· The FTP server at 192.168.2.4/24 in security zone DMZ. The FTP login username and password are url and 123, respectively.
Perform the following tasks:
· Manually update the URL filtering signature library by using the most up-to-date URL filtering signature file stored on the FTP server.
· Configure a URL filtering policy to block the LAN users' requests to game resources on the Internet.
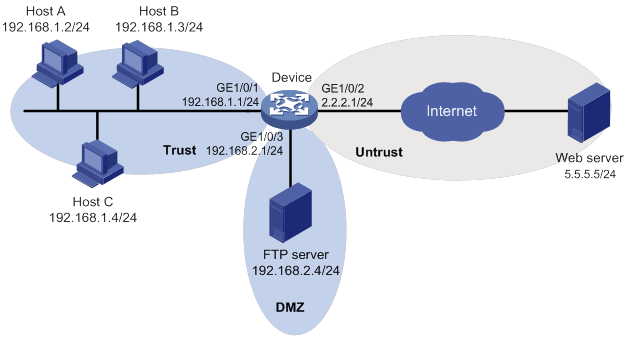
Configuration procedure
1. Assign IP addresses to interfaces, as shown in Figure 12. (Details not shown.)
2. Allow the device to communicate with the FTP server:
# Configure ACL 2001 to permit all traffic.
<Device> system-view
[Device] acl basic 2001
[Device-acl-ipv4-basic-2001] rule permit
[Device-acl-ipv4-basic-2001] quit
# Assign GigabitEthernet 1/0/3 to zone DMZ.
[Device] security-zone name dmz
[Device-security-zone-DMZ] import interface gigabitethernet 1/0/3
[Device-security-zone-DMZ] quit
# Create a zone pair between source security zone Local and destination security zone DMZ, and then apply ACL 2001 to the zone pair for packet filtering.
[Device] zone-pair security source local destination dmz
[Device-zone-pair-security-Local-DMZ] packet-filter 2001
[Device-zone-pair-security-Local-DMZ] quit
# Create a zone pair between source security zone DMZ and destination security zone Local, and then apply ACL 2001 to the zone pair for packet filtering.
[Device] zone-pair security source dmz destination local
[Device-zone-pair-security-DMZ-Local] packet-filter 2001
[Device-zone-pair-security-DMZ-Local] quit
3. Configure the security zones:
# Assign GigabitEthernet 1/0/1 to security zone Trust.
[Device] security-zone name trust
[Device-security-zone-Trust] import interface gigabitethernet 1/0/1
[Device-security-zone-Trust] quit
# Assign GigabitEthernet 1/0/2 to security zone Untrust.
[Device] security-zone name untrust
[Device-security-zone-Untrust] import interface gigabitethernet 1/0/2
[Device-security-zone-Untrust] quit
4. Create IP address object group urlfilter and configure an IP address object with subnet 192.168.1.0/24.
[Device] object-group ip address urlfilter
[Device-obj-grp-ip-urlfilter] network subnet 192.168.1.0 24
[Device-obj-grp-ip-urlfilter] quit
5. Update the device URL filtering signature library by using URL filtering signature file url-1.0.2-encrypt.dat stored on the FTP server.
[Device] url-filter signature update ftp://url:[email protected]/url-1.0.2-encrypt.dat
6. Configure a URL filtering policy:
# Create URL filtering policy urlnews.
[Device] url-filter policy urlnews
# Specify the drop action for predefined URL category Pre-Games and enable logging for the matching packets.
[Device-url-filter-policy-urlnews] category Pre-Games action drop logging
[Device-url-filter-policy-urlnews] quit
7. Apply URL filtering policy urlnews to a DPI application profile:
# Create DPI application profile sec.
[Device] app-profile sec
# Apply URL filtering policy urlnews to the DPI application profile.
[Device-app-profile-sec] url-filter apply policy urlnews
[Device-app-profile-sec] quit
8. Activate the URL filtering policy and rule settings.
[Device] inspect activate
9. Configure an object policy:
# Create IPv4 object policy urlfilter and enter its view.
[Device] object-policy ip urlfilter
# Configure an object policy rule to apply DPI application profile sec to packets that match IP address object group urlfilter.
[Device-object-policy-ip-urlfilter] rule inspect sec source-ip urlfilter destination-ip any
[Device-object-policy-ip-urlfilter] quit
10. Create a zone pair between source security zone Trust and destination security zone Untrust, and then apply object policy urlfilter to the zone pair.
[Device] zone-pair security source trust destination untrust
[Device-zone-pair-security-Trust-Untrust] object-policy apply ip urlfilter
[Device-zone-pair-security-Trust-Untrust] quit
Verifying the configuration
# Verify that the LAN users cannot access the Web game resources on the Internet, and the device blocks and logs the HTTP requests to such resources.
# Verify that the device URL filtering signature library is updated.
<Device> display url-filter signature information
URL filtering signature library automatic update configuration example
Network requirements
As shown in Figure 13, LAN users in security zone Trust can access Internet resources in security zone Untrust.
Configure the device to automatically update the local URL filtering signature library at a random time between 08:30 a.m. and 09:30 a.m. every Saturday.
Configuration procedure
1. Assign IP addresses to interfaces, as shown in Figure 13. (Details not shown.)
2. Configure DNS for the device to resolve the domain name of the H3C website into the IP address. (Details not shown.)
3. Configure an object policy to allow LAN users in security zone Trust to access Internet resources in security zone Untrust. (Details not shown.)
4. Configure automatic URL filtering signature library update:
# Enable automatic URL filtering signature library update.
<Device> system-view
[Device] url-filter signature auto-update
# Configure the device to perform automatic update at a random time between 08:30 a.m. and 09:30 a.m. every Saturday.
[Device-url-filter-autoupdate] update schedule weekly sat start-time 9:00:00 tingle 60
[Device-url-filter-autoupdate] quit
Verifying the configuration
# Verify that the device URL filtering signature library is updated as scheduled.
<Device> display url-filter signature information
Configuring bandwidth management
Overview
Bandwidth management provides fine-grained control over traffic that flows through the device by using information such as source and destination IP addresses and usernames.
Traffic types supported by bandwidth management
Bandwidth management can manage bandwidth only for TCP, UDP, and ICMP traffic.
Application scenarios
Bandwidth management is used in the following scenarios:
· Enterprise intranet users need far more bandwidth than the amount of bandwidth leased from an ISP. This creates a bandwidth bottleneck at the intranet egress.
· The P2P traffic on the intranet egress consumes a majority of the bandwidth resources. As a result, bandwidth cannot be guaranteed for key services.
Bandwidth management allows you to deploy traffic rules on the network egress for different traffic types. Bandwidth management improves bandwidth efficiency and guarantees bandwidth for key services when congestion occurs.
Bandwidth management process
Bandwidth management is implemented through the traffic policy. You can configure traffic profiles and traffic rules in traffic policy view. A traffic profile specifies the guaranteed bandwidth and maximum bandwidth. A traffic rule specifies match criteria to match packets and the traffic profile to apply to matching packets.
As shown in Figure 14, the bandwidth management process is as follows:
1. The device matches the packet against the match criteria in a traffic rule.
The packet meets a match criterion if it matches any of its match values. A packet does not match a match criterion if it matches none of its match values.
2. If the packet meets all match criteria in the traffic rule (for the user and user group criteria, only one criterion needs to be matched), the packet matches the traffic rule. Otherwise, the packet does not match the traffic rule and continues to be matched by the next traffic rule. If the packet does not match any traffic rule, the packet is forwarded without bandwidth management.
3. After the packet matches a traffic rule, the interface processes the packet according to the traffic profile (if any) specified for the traffic rule.
If no traffic profile is specified for the traffic rule, the packet is forwarded without bandwidth management.
4. The traffic profile processes the packet according to its settings.
5. If the interface is configured with a QoS feature in the outbound direction, the interface performs bandwidth management before performing QoS.
6. The packet is controlled by the interface bandwidth of the output interface.
Figure 14 Bandwidth management process
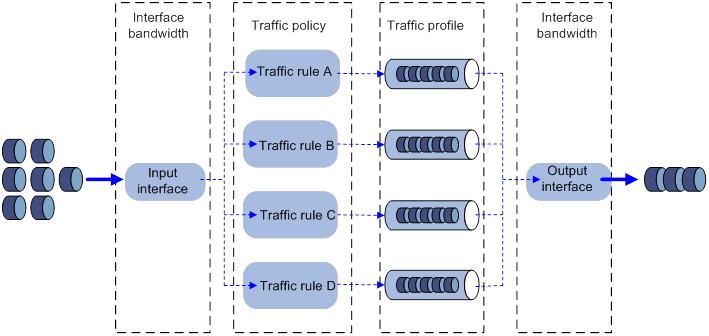
Traffic rule
Multiple traffic rules can be configured in the traffic policy. For a traffic rule, you can define the match criteria to match packets and specify the traffic profile to apply to matching packets.
Traffic rules support rule nesting, which allows a traffic rule to have a parent traffic rule. A maximum of four nesting levels are supported.
Match criteria in a traffic rule
A traffic rule can have multiple match criteria. You can configure the following match criteria in a traffic rule:
· Source and destination security zones.
· Source and destination IP addresses.
· Services.
· Users/user groups.
· Applications.
· DSCP priorities.
One match criterion can contain multiple match values. For example, you can configure multiple source security zones for a source security zone match criterion.
Action in a traffic rule
You can use a traffic profile for an action in a traffic rule. The device limits the matching traffic according to the settings in the traffic profile.
Parent and child traffic rules
The following rules apply when the device matches a traffic rule with a parent traffic rule:
· The parent traffic rule is first matched. After the parent traffic rule is matched, the child traffic rule is matched. If the parent traffic rule is not matched, the child traffic rule is ignored and the matching process fails.
· If both parent and child traffic rules are matched, the traffic profile for the child traffic rule is applied. If only the parent traffic rule is matched, the traffic profile for the parent traffic rule is applied.
Traffic profile
A traffic profile defines bandwidth resources that can be used by a traffic type. The interface bandwidth can be allocated among multiple traffic profiles. You can configure the following bandwidth limit parameters and priority parameters in a traffic profile:
Rate limit mode for a traffic profile
You can limit the traffic rate in one of the following ways:
· Limit the upstream bandwidth and downstream bandwidth separately.
· Limit the upstream bandwidth and downstream bandwidth as a whole.
Per-rule bandwidth limits
· Per-rule guaranteed bandwidth—Guarantees the minimum bandwidth on a per-rule basis for key services when congestion occurs.
· Per-rule maximum bandwidth—Controls the maximum bandwidth on a per-rule basis for non-key services to prevent them consuming a large amount of bandwidth.
Per-IP or per-user bandwidth limits
· Per-IP or per-user guaranteed bandwidth—Guarantees the minimum bandwidth per IP address or per user to provide for bandwidth management at finer granularity.
· Per-IP or per-user maximum bandwidth—Controls the maximum bandwidth allowed per IP address or per user to provide for bandwidth management at finer granularity.
Per-rule, per-IP, or per-user connection limits
You can set the per-rule, per-IP, or per-user connection count limit and connection rate limit to prevent the following situations:
· The system resources on the device are exhausted because internal users initiate a large number of connections to external networks in a short time period.
· An internal server cannot process normal connection requests because it receives a large number of connection requests in a short time period.
Priority parameters
· Traffic priority—When an interface is congested with packets of multiple traffic profiles, packets with higher priority are sent first. Packets with the same priority have the same chance of being forwarded.
· DSCP marking—Modifies the DSCP value in packets. Network devices can classify traffic by using DSCP values and provide different treatment for packets according to the modified DSCP values.
Compatibility information
Feature and hardware compatibility
The following matrix shows the feature and hardware compatibility:
|
Hardware |
Bandwidth management compatibility |
|
MSR810/810-W/810-W-DB/810-LM/810-W-LM/810-10-PoE/810-LM-HK/810-W-LM-HK |
Yes |
|
MSR810-LMS/810-LUS |
No |
|
MSR2600-6-X1/2600-10-X1 |
Yes |
|
MSR 2630 |
Yes |
|
MSR3600-28/3600-51 |
Yes |
|
MSR3600-28-SI/3600-51-SI |
No |
|
MSR3610-X1/3610-X1-DP/3610-X1-DC/3610-X1-DP-DC |
Yes |
|
MSR 3610/3620/3620-DP/3640/3660 |
Yes |
|
MSR5620/5660/5680 |
Yes |
|
Hardware |
Bandwidth management compatibility |
|
MSR810-LM-GL |
Yes |
|
MSR810-W-LM-GL |
Yes |
|
MSR830-6EI-GL |
Yes |
|
MSR830-10EI-GL |
Yes |
|
MSR830-6HI-GL |
Yes |
|
MSR830-10HI-GL |
Yes |
|
MSR2600-6-X1-GL |
Yes |
|
MSR3600-28-SI-GL |
No |
Command and hardware compatibility
Commands and descriptions for centralized devices apply to the following routers:
· MSR810/810-W/810-W-DB/810-LM/810-W-LM/810-10-PoE/810-LM-HK/810-W-LM-HK/810-LMS/810-LUS.
· MSR2600-6-X1/2600-10-X1.
· MSR 2630.
· MSR3600-28/3600-51.
· MSR3600-28-SI/3600-51-SI.
· MSR3610-X1/3610-X1-DP/3610-X1-DC/3610-X1-DP-DC.
· MSR 3610/3620/3620-DP/3640/3660.
· MSR810-LM-GL/810-W-LM-GL/830-6EI-GL/830-10EI-GL/830-6HI-GL/830-10HI-GL/2600-6-X1-GL/3600-28-SI-GL.
Commands and descriptions for distributed devices apply to the following routers:
· MSR5620.
· MSR 5660.
· MSR 5680.
IPv6-related parameters are not supported on the following routers:
· MSR810/810-W/810-W-DB/810-LM/810-W-LM/810-10-PoE/810-LM-HK/810-W-LM-HK/810-LMS/810-LUS.
· MSR3600-28-SI/3600-51-SI.
Restrictions and guidelines
As a best practice, observe the depth-first principle when creating policies. Always create a policy with a smaller management scope before a policy with a larger management scope.
Prerequisites
Before configuring bandwidth management, complete the following tasks:
· Configure time ranges (see time range configuration in ACL and QoS Configuration Guide).
· Configure IP address object groups and service object groups (see object group configuration in Security Configuration Guide).
· Configure applications (see APR configuration in Security Configuration Guide).
· Configure security zones (see security zone configuration in Fundamentals Configuration Guide).
Bandwidth management configuration task list
|
Tasks at a glance |
|
· (Required.) Creating a traffic profile · (Required.) Configuring parameters for the traffic profile · (Required.) Setting the reference mode for the traffic profile · (Optional.) Renaming the traffic profile |
|
· (Required.) Creating a traffic rule · (Optional.) Configuring match criteria for the traffic rule · (Optional.) Specifying a traffic profile for the traffic rule · (Optional.) Specifying a time range for the traffic rule |
|
(Optional.) Managing and maintaining a traffic rule |
Configuring a traffic profile
Creating a traffic profile
|
Step |
Command |
Remarks |
|
1. Enter system view. |
system-view |
N/A |
|
2. Enter traffic policy view. |
traffic-policy |
N/A |
|
3. Create a traffic profile and enter traffic profile view. |
profile name profile-name |
By default, no traffic profiles exist. |
Configuring parameters for the traffic profile
About configuring parameters for the traffic profile
A traffic profile defines the bandwidth resources that can be used and takes effect after it is specified for a traffic rule.
Restrictions and guidelines
· Any two of the following settings are mutually exclusive:
? Per-IP maximum bandwidth.
? Per-user maximum bandwidth.
? Dynamic and even allocation for maximum bandwidth.
The most recent configuration takes effect.
· The per-IP guaranteed bandwidth setting and per-user guaranteed bandwidth setting are mutually exclusive.
Prerequisites
Before you can enable dynamic and even allocation for maximum bandwidth, you must set the total maximum bandwidth.
Procedure
|
Step |
Command |
Remarks |
|
1. Enter system view. |
system-view |
N/A |
|
2. Enter traffic policy view. |
traffic-policy |
N/A |
|
3. Enter traffic profile view. |
profile name profile-name |
By default, no traffic profile exists. |
|
4. Set the per-rule guaranteed bandwidth or maximum bandwidth for the traffic profile. |
bandwidth { downstream | total | upstream } { guaranteed | maximum } bandwidth-value |
By default, the per-rule guaranteed bandwidth and maximum bandwidth are not set. The maximum bandwidth must be greater than or equal to the guaranteed bandwidth. |
|
5. Set the per-IP or per-user guaranteed bandwidth or maximum bandwidth for the traffic profile. |
bandwidth { downstream | total | upstream | } { guaranteed | maximum } { per-ip | per-user } bandwidth-value |
By default, the per-IP or per-user guaranteed bandwidth and maximum bandwidth are not set. |
|
6. Enable dynamic and even allocation for maximum bandwidth. |
bandwidth average enable |
By default, dynamic and even allocation for maximum bandwidth is disabled. |
|
7. Set the connection count limit for the traffic profile. |
connection-limit count { per-rule | per-ip | per-user } connection-number |
By default, the connection count limit is not set. |
|
8. Set the connection rate limit for the traffic profile. |
connection-limit rate { per-rule | per-ip | per-user } connection-rate |
By default, the connection rate limit is not set. |
|
9. Set the traffic priority for packets of the traffic profile. |
traffic-priority priority-value |
By default, the traffic priority for packets of a traffic profile is 1. |
|
10. Mark the DSCP value for packets of the traffic profile. |
remark dscp dscp-value |
By default, the DSCP value for packets of a traffic profile is not marked. |
Setting the reference mode for the traffic profile
A traffic profile can be referenced by multiple traffic rules in one of the following ways:
· per-rule—Each rule that uses the profile can reach the bandwidth limits and connection limits specified in the profile.
· rule-shared—All rules that use the profile share the bandwidth limits and connection limits specified in the profile.
To set the reference mode for a traffic profile:
|
Step |
Command |
Remarks |
|
1. Enter system view. |
system-view |
N/A |
|
2. Enter traffic policy view. |
traffic-policy |
N/A |
|
3. Enter traffic profile view. |
profile name profile-name |
By default, no traffic profiles exist. |
|
4. Set the reference mode for the traffic profile. |
profile reference-mode { per-rule | rule-shared } |
The default setting is per-rule. |
Renaming the traffic profile
|
Step |
Command |
|
1. Enter system view. |
system-view |
|
2. Enter traffic policy view. |
traffic-policy |
|
3. Rename the traffic profile. |
profile rename old-name new-name |
Configuring a traffic rule
Creating a traffic rule
About creating a traffic rule
For a new traffic rule to inherit the match criteria of an existing traffic rule, specify the existing traffic rule as the parent of the new traffic rule.
Restrictions and guidelines
A level-4 rule cannot act as a parent rule.
You can specify a parent traffic rule only when creating a traffic rule. You cannot add or modify a parent traffic rule for an existing traffic rule.
Procedure
|
Step |
Command |
Remarks |
|
1. Enter system view. |
system-view |
N/A |
|
2. Enter traffic policy view. |
traffic-policy |
N/A |
|
3. Create a traffic rule and enter traffic rule view. |
rule name rule-name [ parent parent-rule-name ] |
By default, no traffic rule exists. You can specify a traffic rule as the parent traffic rule for multiple child traffic rules. |
Configuring match criteria for the traffic rule
|
Step |
Command |
Remarks |
|
1. Enter system view. |
system-view |
N/A |
|
2. Enter traffic policy view. |
traffic-policy |
N/A |
|
3. Enter traffic rule view. |
rule name rule-name [ parent parent-rule-name ] |
N/A |
|
4. Configure a destination security zone as a match criterion. |
destination-zone destination-zone-name |
By default, no destination security zone is used as a match criterion. |
|
5. Configure a source security zone as a match criterion. |
source-zone source-zone-name |
By default, no source security zone is used as a match criterion. |
|
6. Configure a destination IP address object group as a match criterion. |
destination-address address-set object-group-name |
By default, no destination IP address object group is used as a match criterion. |
|
7. Configure a source IP address object group as a match criterion. |
source-address address-set object-group-name |
By default, no source IP address object group is used as a match criterion. |
|
8. Configure a service object group as a match criterion. |
service object-group-name |
By default, no service object group is used as a match criterion. |
|
9. Configure an application or application group as a match criterion. |
application { app application-name | app-group application-group-name } |
By default, no application or application group is used as a match criterion. |
|
10. Configure a DSCP value as a match criterion. |
dscp |
By default, no DSCP value is used as a match criterion. |
|
11. Configure an SSID as a match criterion. |
wlan ssid ssid-name |
By default, no SSID is used as a match criterion. |
|
12. Configure a user profile as a match criterion. |
wlan user-profile profile-name |
By default, no user profile is used as a match criterion. |
Specifying a traffic profile for the traffic rule
About specifying a traffic profile for a traffic rule
If a packet matches a traffic rule, the device applies the traffic profile specified for the traffic rule to the packet. You can set the guaranteed bandwidth and maximum bandwidth in a traffic profile.
Restrictions and guidelines
When you specify traffic profiles for parent and child traffic rules, make sure the following conditions are met:
· The maximum bandwidth for a child traffic rule must be smaller than or equal to that for the parent traffic rule.
· The guaranteed bandwidth for the parent traffic rule must be greater than or equal to the sum of the guaranteed bandwidth for its child traffic rules.
· The traffic profiles cannot be the same for the child and parent traffic rules.
Procedure
|
Step |
Command |
Remarks |
|
1. Enter system view. |
system-view |
N/A |
|
2. Enter traffic policy view. |
traffic-policy |
N/A |
|
3. Enter traffic rule view. |
rule name rule-name [ parent parent-rule-name ] |
N/A |
|
4. Specify a traffic profile for the traffic rule. |
action qos profile profile-name |
By default, no traffic profile is specified for a traffic rule (packets matching a traffic rule are allowed to pass). |
Specifying a time range for the traffic rule
|
Step |
Command |
Remarks |
|
1. Enter system view. |
system-view |
N/A |
|
2. Enter traffic policy view. |
traffic-policy |
N/A |
|
3. Enter traffic rule view. |
rule name rule-name [ parent parent-rule-name ] |
N/A |
|
4. Specify a time range during which the traffic rule is in effect. |
time-range time-range-name |
By default, a traffic rule is in effect at any time. |
Managing and maintaining a traffic rule
Copying a traffic rule
|
Step |
Command |
Remarks |
|
1. Enter system view. |
system-view |
N/A |
|
2. Enter traffic policy view. |
traffic-policy |
N/A |
|
3. Copy a traffic rule. |
rule copy rule-name new-rule-name |
N/A |
Renaming a traffic rule
|
Step |
Command |
|
1. Enter system view. |
system-view |
|
2. Enter traffic policy view. |
traffic-policy |
|
3. Rename a traffic rule. |
rule rename old-rule-name new-rule-name |
Moving a traffic rule
|
Step |
Command |
|
1. Enter system view. |
system-view |
|
2. Enter traffic policy view. |
traffic-policy |
|
3. Move a traffic rule to a new position. |
rule move rule-name1 { after | before } rule-name2 |
Disabling a traffic rule
|
Step |
Command |
Remarks |
|
1. Enter system view. |
system-view |
N/A |
|
2. Enter traffic policy view. |
traffic-policy |
N/A |
|
3. Enter traffic rule view. |
rule name rule-name [ parent parent-rule-name ] |
N/A |
|
4. Disable the traffic rule. |
disable |
By default, a traffic rule is enabled. |
Displaying and maintaining bandwidth management
Execute display commands in any view.
|
Task |
Command |
|
Display traffic statistics for traffic rules (centralized devices in standalone mode). |
display traffic-policy statistics bandwidth { downstream | total | upstream } { per-ip { ipv4 [ ipv4-address ] | ipv6 [ ipv6-address ] } rule rule-name | per-rule [ rule-name ] | per-user [ user user-name ] rule rule-name } |
|
Display traffic statistics for traffic rules (distributed devices in standalone mode/centralized devices in IRF mode). |
display traffic-policy statistics bandwidth { downstream | total | upstream } { per-ip { ipv4 [ ipv4-address ] | ipv6 [ ipv6-address ] } rule rule-name | per-rule [ rule-name ] | per-user [ user user-name ] rule rule-name } [ slot slot-number ] |
|
Display traffic statistics for traffic rules (distributed devices in IRF mode). |
display traffic-policy statistics bandwidth { downstream | total | upstream } { per-ip { ipv4 [ ipv4-address ] | ipv6 [ ipv6-address ] } rule rule-name | per-rule [ rule-name ] | per-user [ user user-name ] rule rule-name } [ chassis chassis-number slot slot-number ] |
|
Display connection limit statistics (centralized devices in standalone mode). |
display traffic-policy statistics connection-limit { per-ip { ipv4 [ ipv4-address ] | ipv6 [ ipv6-address ] } rule rule-name | per-rule [ rule-name ] | per-user [ user user-name ] rule rule-name } } |
|
Display connection limit statistics (distributed devices in standalone mode/centralized devices in IRF mode). |
display traffic-policy statistics connection-limit { per-ip { ipv4 [ ipv4-address ] | ipv6 [ ipv6-address ] } rule rule-name | per-rule [ rule-name ] | per-user [ user user-name ] rule rule-name } } [ slot slot-number ] |
|
Display connection limit statistics (distributed devices in IRF mode). |
display traffic-policy statistics connection-limit { per-ip { ipv4 [ ipv4-address ] | ipv6 [ ipv6-address ] } rule rule-name | per-rule [ rule-name ] | per-user [ user user-name ] rule rule-name } } [ chassis chassis-number slot slot-number ] |
|
Display rule-hit statistics (centralized devices in standalone mode). |
display traffic-policy statistics rule-hit [ rule rule-name ] |
|
Display rule-hit statistics (distributed devices in standalone mode/centralized devices in IRF mode). |
display traffic-policy statistics rule-hit [ rule rule-name ] [ slot slot-number ] |
|
Display rule-hit statistics (distributed devices in IRF mode). |
display traffic-policy statistics rule-hit [ rule rule-name ] [ chassis chassis-number slot slot-number ] |
|
Clear traffic statistics for traffic rules (centralized devices in standalone mode). |
reset traffic-policy statistics bandwidth { downstream | total | upstream } { per-ip { ipv4 [ ipv4-address ] | ipv6 [ ipv6-address ] } rule rule-name | per-rule [ rule-name ] | per-user [ user user-name ] rule rule-name } |
|
Clear traffic statistics for traffic rules (distributed devices in standalone mode/centralized devices in IRF mode). |
reset traffic-policy statistics bandwidth { downstream | total | upstream } { per-ip { ipv4 [ ipv4-address ] | ipv6 [ ipv6-address ] } rule rule-name | per-rule [ rule-name ] | per-user [ user user-name ] rule rule-name } [ slot slot-number ] |
|
Clear traffic statistics for traffic rules (distributed devices in IRF mode). |
reset traffic-policy statistics bandwidth { downstream | total | upstream } { per-ip { ipv4 [ ipv4-address ] | ipv6 [ ipv6-address ] } rule rule-name | per-rule [ rule-name ] | per-user [ user user-name ] rule rule-name } [ chassis chassis-number slot slot-number ] |
|
Clear connection limit statistics (centralized devices in standalone mode). |
reset traffic-policy statistics connection-limit { per-ip { ipv4 [ ipv4-address ] | ipv6 [ ipv6-address ] } rule rule-name | per-rule [ rule-name ] | per-user [ user user-name ] rule rule-name } } |
|
Clear connection limit statistics (distributed devices in standalone mode/centralized devices in IRF mode). |
reset traffic-policy statistics connection-limit { per-ip { ipv4 [ ipv4-address ] | ipv6 [ ipv6-address ] } rule rule-name | per-rule [ rule-name ] | per-user [ user user-name ] rule rule-name } } [ slot slot-number ] |
|
Clear connection limit statistics (distributed devices in IRF mode). |
reset traffic-policy statistics connection-limit { per-ip { ipv4 [ ipv4-address ] | ipv6 [ ipv6-address ] } rule rule-name | per-rule [ rule-name ] | per-user [ user user-name ] rule rule-name } } [ chassis chassis-number slot slot-number ] |
|
Clear rule-hit statistics (centralized devices in standalone mode). |
reset traffic-policy statistics rule-hit [ rule rule-name ] |
|
Clear rule-hit statistics (distributed devices in standalone mode/centralized devices in IRF mode). |
reset traffic-policy statistics rule-hit [ rule rule-name ] [ slot slot-number ] |
|
Clear rule-hit statistics (distributed devices in IRF mode). |
reset traffic-policy statistics rule-hit [ rule rule-name ] [ chassis chassis-number slot slot-number ] |
Bandwidth management configuration example
Single traffic profile configuration example
Network requirements
As shown in Figure 15, configure bandwidth management on the device to meet the following requirements:
· The maximum bandwidth is limited to 30720 kbps for both upstream and downstream iQiYiPPS application traffic of the host in the intranet.
· The guaranteed bandwidth is 30720 kbps for both upstream and downstream FTP traffic of the host.
· The bandwidth of the interface to the Internet is limited to 102400 kbps.

Configuration procedure
1. Assign IP addresses to interfaces and configure routes, security zones, zone pairs, and security policies. Make sure the network connections are available. (Details not shown.)
2. Configure traffic profiles:
# Create a traffic profile named aiqiyi, and enter traffic profile view.
<Device> system-view
[Device] traffic-policy
[Device-traffic-policy] profile name aiqiyi
# Set the maximum bandwidth to 30720 kbps for both upstream and downstream traffic.
[Device-traffic-policy-profile-aiqiyi] bandwidth upstream maximum 30720
[Device-traffic-policy-profile-aiqiyi] bandwidth downstream maximum 30720
[Device-traffic-policy-profile-aiqiyi] quit
# Create a traffic profile named profileFTP, and enter traffic profile view.
<Device> system-view
[Device] traffic-policy
[Device-traffic-policy] profile name profileFTP
# Set the guaranteed bandwidth to 30720 kbps for both upstream and downstream traffic.
[Device-traffic-policy-profile-profileFTP] bandwidth upstream guaranteed 30720
[Device-traffic-policy-profile-profileFTP] bandwidth downstream guaranteed 30720
[Device-traffic-policy-profile-profileFTP] quit
[Device-traffic-policy] quit
3. Set the expected bandwidth to 102400 kbps for interface GigabitEthernet 1/0/2.
[Device] interface gigabitethernet 1/0/2
[Device-GigabitEthernet1/0/2] bandwidth 102400
[Device-GigabitEthernet1/0/2] quit
4. Configure traffic rules:
[Device] traffic-policy
# Create a traffic rule named aiqiyi, and enter traffic rule view.
[Device-traffic-policy] rule name aiqiyi
# Configure the predefined application iQiYiPPS as a match criterion.
[Device-traffic-policy-rule-aiqiyi] application app iQiYiPPS
# Specify the traffic profile aiqiyi for the traffic rule aiqiyi.
[Device-traffic-policy-rule-aiqiyi] action qos profile aiqiyi
[Device-traffic-policy-rule-aiqiyi] quit
# Create a traffic rule named ruleFTP, and enter traffic rule view.
[Device-traffic-policy] rule name ruleFTP
# Configure the traffic rule to match FTP traffic.
[Device-traffic-policy-rule-ruleFTP] application app ftp
# Specify the traffic profile profileFTP for the traffic rule ruleFTP.
[Device-traffic-policy-rule-ruleFTP] action qos profile profileFTP
[Device-traffic-policy-rule-ruleFTP] quit
[Device-traffic-policy] quit
Verifying the configuration
# Verify that the iQiYiPPS application traffic rate cannot exceed 30720 kbps and the FTP traffic rate can reach a minimum of 30720 kbps when the total traffic rate on GigabitEthernet 1/0/2 reaches 102400 kbps. (Details not shown.)
Parent/child traffic profile configuration example
Network requirements
As shown in Figure 16, configure bandwidth management on the device to meet the following requirements:
· The maximum bandwidth is limited to 30720 kbps for both upstream and downstream iQiYiPPS application traffic of the host in the intranet.
· The guaranteed bandwidth is 30720 kbps for both upstream and downstream FTP traffic of the host .
· The total traffic rate of the host is limited to 40960 kbps.
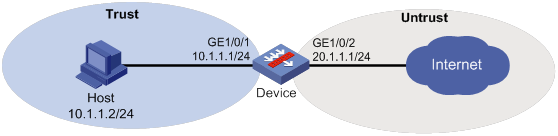
Configuration procedure
1. Assign IP addresses to interfaces and configure routes, security zones, zone pairs, and security policies. Make sure the network connections are available. (Details not shown.)
2. Configure traffic profiles:
# Create a traffic profile named profile, and enter traffic profile view.
<Device> system-view
[Device] traffic-policy
[Device-traffic-policy] profile name profile
# Set the maximum bandwidth to 40960 kbps for both upstream and downstream traffic.
[Device-traffic-policy-profile-profile] bandwidth upstream maximum 40960
[Device-traffic-policy-profile-profile] bandwidth downstream maximum 40960
[Device-traffic-policy-profile-profile] quit
# Create a traffic profile named aiqiyi, and enter traffic profile view.
[Device-traffic-policy] profile name aiqiyi
# Set the maximum bandwidth to 30720 kbps for both upstream and downstream traffic.
[Device-traffic-policy-profile-aiqiyi] bandwidth upstream maximum 30720
[Device-traffic-policy-profile-aiqiyi] bandwidth downstream maximum 30720
[Device-traffic-policy-profile-aiqiyi] quit
# Create a traffic profile named profileFTP, and enter traffic profile view.
[Device-traffic-policy] profile name profileFTP
# Set the guaranteed bandwidth to 30720 kbps for both upstream and downstream traffic.
[Device-traffic-policy-profile-profileFTP] bandwidth upstream guaranteed 30720
[Device-traffic-policy-profile-profileFTP] bandwidth downstream guaranteed 30720
[Device-traffic-policy-profile-profileFTP] quit
3. Configure traffic rules:
# Create a traffic rule named rule, and enter traffic rule view.
[Device-traffic-policy] rule name rule
# Specify traffic profile profile for traffic rule rule.
[Device-traffic-policy-rule-rule] action qos profile profile
[Device-traffic-policy-rule-rule] quit
# Create a traffic rule named aiqiyi, enter traffic rule view, and specify traffic rule rule as its parent rule.
[Device-traffic-policy] rule name aiqiyi parent rule
# Configure the predefined application iQiYiPPS as a match criterion.
[Device-traffic-policy-rule-aiqiyi] application app iQiYiPPS
# Specify traffic profile aiqiyi for traffic rule aiqiyi.
[Device-traffic-policy-rule-aiqiyi] action qos profile aiqiyi
[Device-traffic-policy-rule-aiqiyi] quit
# Create a traffic rule named ruleFTP, enter traffic rule view, and specify traffic rule rule as its parent rule.
[Device-traffic-policy] rule name ruleFTP parent rule
# Configure the predefined application FTP as a match criterion.
[Device-traffic-policy-rule-aiqiyi] application app ftp
# Specify traffic profile profileFTP for traffic rule ruleFTP.
[Device-traffic-policy-rule-ruleFTP] action qos profile profileFTP
[Device-traffic-policy-rule-ruleFTP] quit
[Device-traffic-policy] quit
Verifying the configuration
# Verify that the total traffic rate of the host is limited to 40960 kbps, and that the iQiYiPPS application traffic rate is limited to 30720 kbps. When congestion occurs, FTP traffic is not affected. (Details not shown.)
About DPI,1
About DPI engine,4
About IPS,15
About URL filtering,31
Activating IPS policy settings,21
Activating policy and rule settings for DPI service modules,8
Activating URL filtering policy and rule settings,38
Applying a URL filtering policy to a DPI application profile,37
Applying an IPS policy to a DPI application profile,20
Bandwidth management configuration example,58
Bandwidth management configuration task list,52
Compatibility information,50
Compatibility information,7
Configure a DPI application profile,8
Configuring a traffic profile,52
Configuring a traffic rule,54
Configuring a URL category,35
Configuring a URL filtering policy,36
Configuring action parameter profiles,9
Configuring IPS actions for an IPS policy,19
Configuring IPS signature filtering criteria for an IPS policy,19
Configuring match criteria for the traffic rule,54
Configuring stream fixed length inspection,13
Configuring URL filtering cloud query,35
Configuring URL filtering logging for resource access,41
Copying a URL filtering policy or category,37
Creating a traffic rule,54
Creating an IPS policy,19
Disabling the DPI engine,14
Displaying and maintaining bandwidth management,57
Displaying and maintaining DPI engine,14
Displaying and maintaining IPS,24
Displaying and maintaining URL filtering,41
DPI configuration workflow,3
DPI engine configuration task list,7
Enabling DPI engine logging,40
Enabling inspection suspension upon excessive CPU usage,12
Feature and hardware compatibility,34
Feature and hardware compatibility,18
Feature and hardware compatibility,2
Importing and deleting user-defined IPS signatures,24
IPS configuration examples,25
IPS configuration task list,18
Licensing requirements,18
Managing and maintaining a traffic rule,56
Managing the IPS signature library,22
Managing the URL filtering signature library,38
Optimizing the DPI engine,11
Overview,48
Prerequisites,51
Restrictions and guidelines,51
Specifying a parameter profile for an IPS action,20
Specifying a proxy server for online DPI service signature update,13
Specifying a traffic profile for the traffic rule,55
URL filtering configuration examples,42
URL filtering configuration task list,34
Using the DPI application profile in an object policy rule,38
Using the DPI application profile in an object policy rule,21