- Table of Contents
- Related Documents
-
| Title | Size | Download |
|---|---|---|
| 02-H3C_Port_Security_Configuration_Examples | 759.77 KB |
|
|
|
H3C Port Security Configuration Examples |
|
|
|
|
|
|
Software version: Release 7577P04
Document version: 6W100-20190330
Copyright © 2019 New H3C Technologies Co., Ltd. All rights reserved.
No part of this manual may be reproduced or transmitted in any form or by any means without prior written consent of New H3C Technologies Co., Ltd.
Except for the trademarks of New H3C Technologies Co., Ltd., any trademarks that may be mentioned in this document are the property of their respective owners.
The information in this document is subject to change without notice.
Contents
General restrictions and guidelines
Example: Configuring autoLearn mode
Example: Configuring userLoginWithOUI mode
Example: Configuring macAddressElseUserLoginSecure mode
Introduction
This document provides port security configuration examples.
Prerequisites
The configuration examples in this document were created and verified in a lab environment, and all the devices were started with the factory default configuration. When you are working on a live network, make sure you understand the potential impact of every command on your network.
This document assumes that you have basic knowledge of port security.
General restrictions and guidelines
When you configure port security, follow these restrictions and guidelines:
· Disable global 802.1X and MAC authentications before you enable port security on a port.
· Port security automatically modifies the following 802.1X or MAC authentication settings for different security modes:
¡ The status of 802.1X and MAC authentication.
¡ The 802.1X access control method.
¡ The 802.1X port authorization state.
· You cannot disable port security when online users are present.
· Port security modes are mutually exclusive with link aggregation and service loopback group.
· The maximum number of users a port supports equals the smaller value from the following values:
¡ The maximum number of secure MAC addresses that port security allows.
¡ The maximum number of concurrent users the authentication mode in use allows.
For example, if 802.1X allows more concurrent users than port security's limit on the number of MAC addresses on the port in userLoginSecureExt mode, port security's limit takes effect.
· To change the security mode of a port security-enabled port, you must use the undo port-security port-mode command to set the port in noRestrictions mode first.
Example: Configuring autoLearn mode
Network configuration
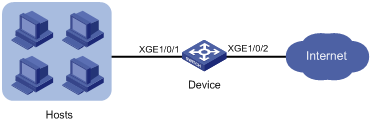
As shown in Figure 1, configure port security mode autoLearn on Ten-GigabitEthernet 1/0/1 to meet the following requirements:
· The device accepts a maximum of 64 users to log in through the port without authentication.
· After the number of users reaches 64, the port denies any new users to access the Internet.
Analysis
To meet the network requirements, you must perform the following tasks:
· Configure the autoLearn mode on the port through which the users access the device. The access port is Ten-GigabitEthernet 1/0/1 in this example.
· Configure an aging timer for the secure MAC addresses, so the device can update its secure MAC address table.
· Configure Ten-GigabitEthernet 1/0/1 to shut down temporarily for 30 seconds when it receives illegal frames. The device can deny any new users to access the Internet after the number of online users reaches 64.
Restrictions and guidelines
Before you enable the autoLearn mode, set the maximum number of secure MAC addresses that port security allows on the port (by using the port-security max-mac-count command). You cannot change the setting when the port is operating in autoLearn mode.
Procedures
# Enable port security.
<Device> system-view
[Device] port-security enable
# Set the secure MAC aging timer to 30 minutes.
[Device] port-security timer autolearn aging 30
# Set port security's limit on the number of secure MAC addresses to 64 on Ten-GigabitEthernet 1/0/1.
[Device] interface ten-gigabitethernet 1/0/1
[Device-Ten-GigabitEthernet1/0/1] port-security max-mac-count 64
# Set the port security mode to autoLearn.
[Device-Ten-GigabitEthernet1/0/1] port-security port-mode autolearn
# Specify the intrusion protection action as disableport-temporarily.
[Device-Ten-GigabitEthernet1/0/1] port-security intrusion-mode disableport-temporarily
[Device-Ten-GigabitEthernet1/0/1] quit
# Configure the port to be silent for 30 seconds after the intrusion protection feature is triggered.
[Device] port-security timer disableport 30
Verifying the configuration
# Verify that port security is correctly configured.
[Device] display port-security interface ten-gigabitethernet 1/0/1
Global port security parameters:
Port security : Enabled
AutoLearn aging time : 30 min
Disableport timeout : 30 s
MAC move : Denied
Authorization fail : Online
NAS-ID profile : Not configured
Dot1x-failure trap : Disabled
Dot1x-logon trap : Disabled
Dot1x-logoff trap : Disabled
Intrusion trap : Disabled
Address-learned trap : Disabled
Mac-auth-failure trap : Disabled
Mac-auth-logon trap : Disabled
Mac-auth-logoff trap : Disabled
OUI value list :
Ten-GigabitEthernet1/0/1 is link-up
Port mode : autoLearn
NeedToKnow mode : Disabled
Intrusion protection mode : DisablePortTemporarily
Security MAC address attribute
Learning mode : Sticky
Aging type : Periodical
Max secure MAC addresses : 64
Current secure MAC addresses : 5
Authorization : Permitted
NAS-ID profile : Not configured
The port allows for MAC address learning, and you can view the number of learned MAC addresses in the Current secure MAC addresses field.
# Display information about the learned MAC addresses.
[Device] interface ten-gigabitethernet 1/0/1
[Device-Ten-GigabitEthernet1/0/1] display this
#
interface Ten-GigabitEthernet1/0/1
port link-mode bridge
port-security intrusion-mode disableport-temporarily
port-security max-mac-count 64
port-security port-mode autolearn
port-security mac-address security sticky 00e0-fc00-5920 vlan 1
port-security mac-address security sticky 00e0-fc00-592a vlan 1
port-security mac-address security sticky 00e0-fc00-592b vlan 1
port-security mac-address security sticky 00e0-fc00-592c vlan 1
port-security mac-address security sticky 00e0-fc00-592d vlan 1
[Device-Ten-GigabitEthernet1/0/1] quit
# Verify that the port security mode changes to secure after the number of MAC addresses learned by the port reaches 64.
[Device] display port-security interface ten-gigabitethernet 1/0/1
# Verify that the port is disabled after it receives a frame with an unknown MAC address.
[Device] display interface ten-gigabitethernet 1/0/1
# Verify that the interface is re-enabled after 30 seconds.
[Device] display interface ten-gigabitethernet 1/0/1
# Delete several secure MAC addresses.
[Device] interface ten-gigabitethernet 1/0/1
[Device-Ten-GigabitEthernet1/0/1] undo port-security mac-address security sticky 00e0-fc00-5920 vlan 1
[Device-Ten-GigabitEthernet1/0/1] undo port-security mac-address security sticky 00e0-fc00-592a vlan 1
…
# Verify that the port security mode changes to autoLearn and the port can learn MAC addresses again. (Details not shown.)
Configuration files
#
port-security enable
port-security timer disableport 30
port-security timer autolearn aging 30
#
interface Ten-GigabitEthernet1/0/1
port link-mode bridge
port-security intrusion-mode disableport-temporarily
port-security max-mac-count 64
port-security port-mode autolearn
#
Example: Configuring userLoginWithOUI mode
Network configuration
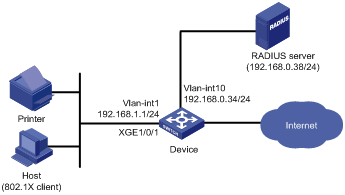
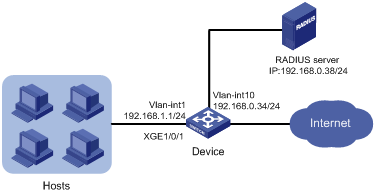
As shown in Figure 2:
· Users use the 802.1X client on the host to initiate 802.1X authentication.
· The device uses the RADIUS server to perform authentication, authorization, and accounting for all users in ISP domain sun.
· IMC is the RADIUS server.
· The device and the server use the shared key expert for secure RADIUS communication.
Configure port security mode userLoginWithOUI on the device to meet the following requirements:
· Permit only one 802.1X user to pass authentication to access the Internet.
· Permit the printer to access the Internet.
· Discard all illegal frames without disabling the port security-enabled port.
Analysis
To meet the network requirements, you must perform the following tasks:
· Configure the userLoginWithOUI mode on the port through which the users access the device. The access port is Ten-GigabitEthernet 1/0/1 in this example.
· Add the printer's OUI to the port security module of the device, so the device can permit the printer to access the Internet in userLoginWithOUI mode. To match the OUIs of different printer vendors, add multiple OUIs to the device.
· Configure the blockmac intrusion protection on Ten-GigabitEthernet 1/0/1, so the device adds the source MAC addresses of illegal frames to the blocked MAC address list. The device discards all frames sourced from the blocked MAC addresses.
Procedures
Configuring the RADIUS server
In this example, the RADIUS server runs IMC PLAT 7.0 (E0201) and IMC UAM 7.0 (E0201).
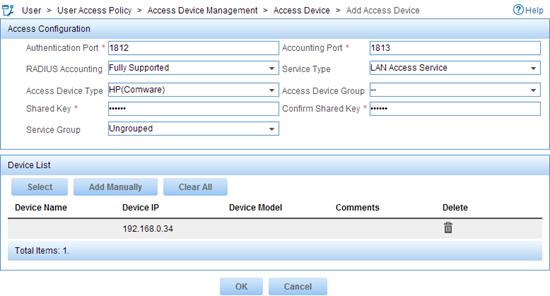
1. Add the device to IMC as an access device:
a. Click the User tab.
b. From the navigation tree, select User Access Policy > Access Device Management > Access Device.
c. Click Add.
The Add Access Device page appears.
d. In the Access Configuration area, configure the following parameters:
- Enter 1812 in the Authentication Port field, and enter 1813 in the Accounting Port field.
- Select LAN Access Service from the Service Type list.
- Select HP(Comware) from the Access Device Type list.
- Enter expert in the Shared Key and Confirm Shared Key field.
- Use the default values for other parameters.
e. In the Device List area, click Select or Add Manually to add the device at 192.168.0.34 as an access device.
The IP address of the access device specified here must be the same as the source IP address of the RADIUS packets sent from the device. The source IP address is chosen in the following order on the device:
- IP address specified by the nas-ip command.
- IP address specified by the radius nas-ip command.
- IP address of the outbound interface (the default).
f. Click OK.
Figure 3 Adding the device as an access device
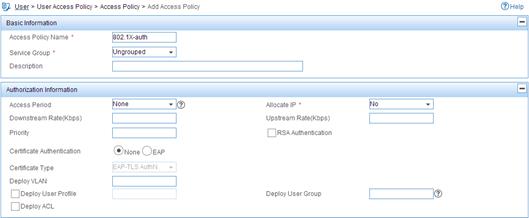
2. Add an access policy:
a. Click the User tab.
b. From the navigation tree, select User Access Policy > Access Policy.
c. Click Add.
d. On the page that appears, configure the following parameters, as shown in Figure 4:
- Enter 802.1X-auth in the Access Policy Name field.
- Use the default values for other parameters.
Figure 4 Adding an access policy
e. Click OK.
3. Add an access service:
a. Click the User tab.
b. From the navigation tree, select User Access Policy > Access Service.
c. Click Add.
d. On the page that appears, configure the following parameters, as shown in Figure 5:
- Enter 802.1X-auth in the Service Name field.
- Select 802.1X-auth from the Default Access Policy list.
Figure 5 Adding an access service
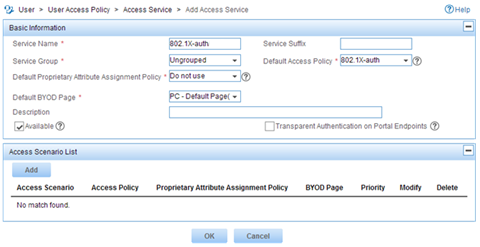
e. Click OK.
4. Add an access user:
a. Click the User tab.
b. From the navigation tree, select Access User Management > All Access Users.
The access user list appears.
c. Click Add.
d. On the Add Access User page, configure the following parameters, as shown in Figure 6:
- Click Select or Add User to associate the user with IMC Platform user hello.
- Enter 802.1X in the Account Name field.
- Enter 802.1X in the Password and Confirm Password fields.
- Configure other parameters in the Access Information area as needed.
- Select 802.1X-auth from the Access Service list.
Figure 6 Adding an access user account
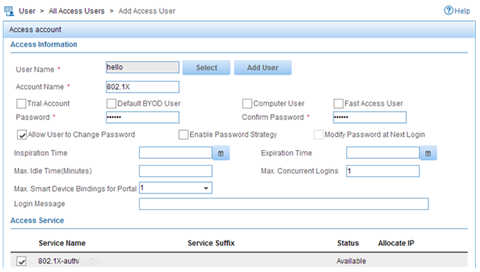
e. Click OK.
Configuring the device
The following steps have AAA RADIUS commands. For more information about the AAA RADIUS commands, see AAA commands in the security command reference for the device.
1. Assign an IP address to each interface, as shown in Figure 2. Make sure the host, printer, device, and RADIUS server can reach each other. (Details not shown.)
2. Configure the RADIUS scheme:
# Create RADIUS scheme radsun.
<Device> system-view
[Device] radius scheme radsun
New RADIUS scheme.
# Specify the primary RADIUS authentication server at 192.168.0.38.
[Device-radius-radsun] primary authentication 192.168.0.38
# Specify the primary RADIUS accounting server at 192.168.0.38.
[Device-radius-radsun] primary accounting 192.168.0.38
# Set the authentication shared key to expert in plain text for secure communication between the device and the RADIUS server.
[Device-radius-radsun] key authentication simple expert
# Set the accounting shared key to expert in plain text for secure communication between the device and the RADIUS server.
[Device-radius-radsun] key accounting simple expert
# Set the response timeout time of the RADIUS server to 5 seconds.
[Device-radius-radsun] timer response-timeout 5
# Set the maximum number of RADIUS packet retransmission attempts to 5.
[Device-radius-radsun] retry 5
# Set the real-time accounting interval to 15 minutes.
[Device-radius-radsun] timer realtime-accounting 15
# Exclude domain names from the usernames sent to the RADIUS server.
[Device-radius-radsun] user-name-format without-domain
[Device-radius-radsun] quit
# Create ISP domain sun and enter ISP domain view.
[Device] domain sun
# Configure ISP domain sun to use RADIUS scheme radsun for authentication, authorization, and accounting of all LAN users.
[Device-isp-sun] authentication lan-access radius-scheme radsun
[Device-isp-sun] authorization lan-access radius-scheme radsun
[Device-isp-sun] accounting lan-access radius-scheme radsun
[Device-isp-sun] quit
# Configure domain sun as the default domain.
[Device] domain default enable sun
3. Set the 802.1X authentication method to CHAP. By default, the authentication method for 802.1X is CHAP.
[Device] dot1x authentication-method chap
4. Configure port security:
# Add five OUI values.
[Device] port-security oui index 1 mac-address 1234-0100-1111
[Device] port-security oui index 2 mac-address 1234-0200-1111
[Device] port-security oui index 3 mac-address 1234-0300-1111
[Device] port-security oui index 4 mac-address 1234-0400-1111
[Device] port-security oui index 5 mac-address 1234-0500-1111
# Set the port security mode to userLoginWithOUI.
[Device] interface ten-gigabitethernet 1/0/1
[Device-Ten-GigabitEthernet1/0/1] port-security port-mode userlogin-withoui
# Configure port Ten-GigabitEthernet 1/0/1 to perform the blockmac intrusion protection action.
[Device-Ten-GigabitEthernet1/0/1] port-security intrusion-mode blockmac
[Device-Ten-GigabitEthernet1/0/1] quit
# Enable port security.
[Device] port-security enable
Verifying the configuration
# Display RADIUS scheme radsun.
[Device] display radius scheme radsun
Index: 0
Primary authentication server:
IP : 192.168.0.38 Port: 1812
VPN : Not configured
State: Active
Test profile: Not configured
Weight: 0
Primary accounting server:
IP : 192.168.0.38 Port: 1813
VPN : Not configured
State: Active
Weight: 0
Accounting-On function : Disabled
extended function : Disabled
retransmission times : 50
retransmission interval(seconds) : 3
Timeout Interval(seconds) : 5
Retransmission Times : 5
Retransmission Times for Accounting Update : 5
Server Quiet Period(minutes) : 5
Realtime Accounting Interval(seconds) : 900
Stop-accounting packets buffering : Enabled
Retransmission times : 500
NAS IP Address : Not configured
VPN : Not configured
User Name Format : without-domain
Data flow unit : Byte
Packet unit : One
Attribute 15 check-mode : Strict
Attribute 25 : Standard
Attribute Remanent-Volume unit : Kilo
server-load-sharing : Disabled
Attribute 31 MAC format : hh:hh:hh:hh:hh:hh.
# Display port security configuration on Ten-GigabitEthernet 1/0/1.
[Device] display port-security interface ten-gigabitethernet 1/0/1
Global port security parameters:
Port security : Enabled
AutoLearn aging time : 0 min
Disableport timeout : 20 s
MAC move : Denied
Authorization fail : Online
NAS-ID profile : Not configured
Dot1x-failure trap : Disabled
Dot1x-logon trap : Disabled
Dot1x-logoff trap : Disabled
Intrusion trap : Disabled
Address-learned trap : Disabled
Mac-auth-failure trap : Disabled
Mac-auth-logon trap : Disabled
Mac-auth-logoff trap : Disabled
OUI value list :
Index : 1 Value : 123401
Index : 2 Value : 123402
Index : 3 Value : 123403
Index : 4 Value : 123404
Index : 5 Value : 123405
Ten-GigabitEthernet1/0/1 is link-up
Port mode : userLoginWithOUI
NeedToKnow mode : Disabled
Intrusion protection mode : BlockMacAddress
Security MAC address attribute
Learning mode : Sticky
Aging type : Periodical
Max secure MAC addresses : Not configured
Current secure MAC addresses : 0
Authorization : Permitted
NAS-ID profile : Not configured
After an 802.1X user comes online, the number of secure MAC addresses saved by the port is 1.
# Display 802.1X information.
[Device] display dot1x interface ten-gigabitethernet 1/0/1
# Verify that Ten-GigabitEthernet 1/0/1 allows a user whose MAC address has an OUI from the specified OUIs to pass authentication.
[Device] display mac-address interface ten-gigabitethernet 1/0/1
MAC Address VLAN ID State Port/NickName Aging
1234-0300-0011 1 Learned XGE1/0/1 Y
Configuration files
#
port-security enable
port-security oui index 1 mac-address 1234-0100-0000
port-security oui index 2 mac-address 1234-0200-0000
port-security oui index 3 mac-address 1234-0300-0000
port-security oui index 4 mac-address 1234-0400-0000
port-security oui index 5 mac-address 1234-0500-0000
#
interface Ten-GigabitEthernet1/0/1
port link-mode bridge
port-security port-mode userlogin-withoui
port-security intrusion-mode blockmac
#
radius scheme radsun
primary authentication 192.168.0.38
primary accounting 192.168.0.38
key authentication cipher $c$3$s9TAYm34R8sS5k/Cylg2sDm69ZRupMvGJg==
key accounting cipher $c$3$UaUPGk8AfZAQLHFlbKNcEoM2HXGiuWowBQ==
retry 5
timer response-timeout 5
timer realtime-accounting 15
user-name-format without-domain
#
domain sun
authentication lan-access radius-scheme radsun
authorization lan-access radius-scheme radsun
accounting lan-access radius-scheme radsun
#
domain default enable sun
#
Example: Configuring macAddressElseUserLoginSecure mode
Network configuration
As shown in Figure 7, the device uses the RADIUS server to perform authentication, authorization, and accounting for all users in domain sun.
Configure port security mode macAddressElseUserLoginSecure on the device to meet the following requirements:
· Allow only one 802.1X user to pass authentication, and allow multiple MAC authentication users to pass authentication.
· Perform MAC authentication first for an 802.1X user, and then 802.1X authentication if the user fails MAC authentication.
· Use shared user account with username aaa and password 123456 for MAC authentication users.
· Allow a maximum of 64 authenticated users.
· Prevent frames from being sent to unknown MAC addresses.
Analysis
To meet the network requirements, you must perform the following tasks:
· Configure the macAddressElseUserLoginSecure mode on the port through which the users access the device. The access port is Ten-GigabitEthernet 1/0/1 in this example.
· Set the NTK mode to ntkonly, so the device will prevent frames from being sent to unknown MAC addresses. In this mode, the device permits only unicast frames that are destined for the authenticated MAC addresses.
Procedures
Configuring the RADIUS server
In this example, the RADIUS server runs IMC PLAT 7.0 (E0201) and IMC UAM 7.0 (E0201).
1. Add the device to IMC as an access device in the same way the device is added to IMC in "Example: Configuring userLoginWithOUI mode."
2. Add an access policy, an access service, and an access user for 802.1X authentication in the same way they are added in "Example: Configuring userLoginWithOUI mode."
3. Add an access policy for MAC authentication:
a. Click the User tab.
b. From the navigation tree, select User Access Policy > Access Policy.
c. Click Add.
d. On the page that appears, configure the following parameters, as shown in Figure 8:
- Enter MAC-auth in the Access Policy Name field.
- Use the default values for other parameters.
Figure 8 Adding an access policy
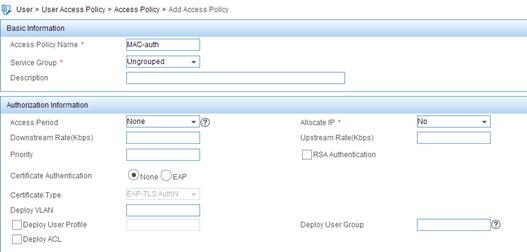
e. Click OK.
4. Add an access service for MAC authentication:
a. Click the User tab.
b. From the navigation tree, select User Access Policy > Access Service.
c. Click Add.
d. On the page that appears, configure the following parameters, as shown in Figure 9:
- Enter MAC-auth in the Service Name field.
- Select MAC-auth from the Default Access Policy list.
Figure 9 Adding an access service
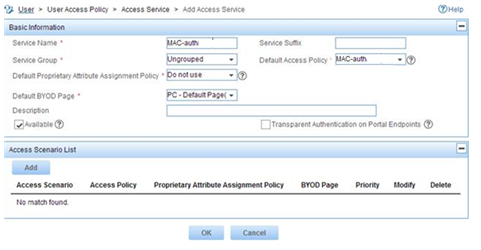
e. Click OK.
5. Add an access user for MAC authentication:
a. Click the User tab.
b. From the navigation tree, select Access User Management > All Access Users.
The access user list appears.
c. Click Add.
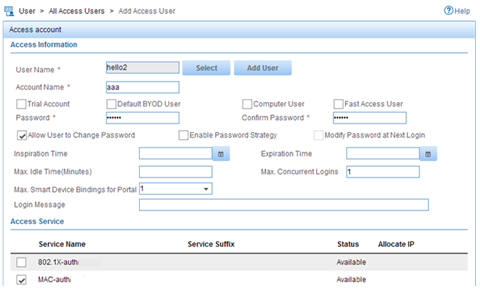
d. On the Add Access User page, configure the following parameters, as shown in Figure 10:
- Click Select or Add User to associate the user with IMC Platform user hello2.
- Enter aaa in the Account Name field.
- Enter 123456 in the Password and Confirm Password fields.
- Configure other parameters in the Access Information area as needed.
- Select MAC-auth from the Access Service list.
Figure 10 Adding an access user account
e. Click OK.
Configuring the device
1. Assign an IP address to each interface, as shown in Figure 7. Make sure the hosts, device, and RADIUS server can reach each other. (Details not shown.)
2. Configure the RADIUS scheme:
# Create RADIUS scheme radsun.
<Device> system-view
[Device] radius scheme radsun
New RADIUS scheme.
# Specify the primary RADIUS authentication server at 192.168.0.38.
[Device-radius-radsun] primary authentication 192.168.0.38
# Specify the primary RADIUS accounting server at 192.168.0.38.
[Device-radius-radsun] primary accounting 192.168.0.38
# Set the authentication shared key to expert in plain text for secure communication between the device and the RADIUS server.
[Device-radius-radsun] key authentication simple expert
# Set the accounting shared key to expert in plain text for secure communication between the device and the RADIUS server.
[Device-radius-radsun] key accounting simple expert
# Set the response timeout time of the RADIUS server to 5 seconds.
[Device-radius-radsun] timer response-timeout 5
# Set the maximum number of RADIUS packet retransmission attempts to 5.
[Device-radius-radsun] retry 5
# Set the real-time accounting interval to 15 minutes.
[Device-radius-radsun] timer realtime-accounting 15
# Exclude domain names from the usernames sent to the RADIUS server.
[Device-radius-radsun] user-name-format without-domain
[Device-radius-radsun] quit
# Create ISP domain sun and enter ISP domain view.
[Device] domain sun
# Configure ISP domain sun to use RADIUS scheme radsun for authentication, authorization, and accounting of all LAN users.
[Device-isp-sun] authentication lan-access radius-scheme radsun
[Device-isp-sun] authorization lan-access radius-scheme radsun
[Device-isp-sun] accounting lan-access radius-scheme radsun
[Device-isp-sun] quit
# Specify ISP domain sun as the default domain.
[Device] domain default enable sun
3. Configure MAC authentication:
# Configure a shared account for MAC authentication users, and set the username to aaa and password to plaintext string of 123456.
[Device] mac-authentication user-name-format fixed account aaa password simple 123456
# Specify domain sun as the global MAC authentication domain.
[Device] mac-authentication domain sun
4. Set the 802.1X authentication method to CHAP. By default, the authentication method for 802.1X is CHAP.
[Device] dot1x authentication-method chap
5. Configure port security:
# Set port security's limit on the number of secure MAC addresses to 64 on Ten-GigabitEthernet 1/0/1.
[Device] interface ten-gigabitethernet 1/0/1
[Device-Ten-GigabitEthernet1/0/1] port-security max-mac-count 64
# Set the port security mode to macAddressElseUserLoginSecure.
[Device-Ten-GigabitEthernet1/0/1] port-security port-mode mac-else-userlogin-secure
# Set the NTK mode of the port to ntkonly.
[Device-Ten-GigabitEthernet1/0/1] port-security ntk-mode ntkonly
[Device-Ten-GigabitEthernet1/0/1] quit
# Enable port security.
[Device] port-security enable
Verifying the configuration
# Verify that port security is correctly configured.
[Device] display port-security interface ten-gigabitethernet 1/0/1
Global port security parameters:
Port security : Enabled
AutoLearn aging time : 0 min
Disableport timeout : 20 s
MAC move : Denied
Authorization fail : Online
NAS-ID profile : Not configured
Dot1x-failure trap : Disabled
Dot1x-logon trap : Disabled
Dot1x-logoff trap : Disabled
Intrusion trap : Disabled
Address-learned trap : Disabled
Mac-auth-failure trap : Disabled
Mac-auth-logon trap : Disabled
Mac-auth-logoff trap : Disabled
OUI value list :
Ten-GigabitEthernet1/0/1 is link-up
Port mode : macAddressElseUserLoginSecure
NeedToKnow mode : NeedToKnowOnly
Intrusion protection mode : NoAction
Security MAC address attribute
Learning mode : Sticky
Aging type : Periodical
Max secure MAC addresses : 64
Current secure MAC addresses : 0
Authorization : Permitted
NAS-ID profile : Not configured
# Verify that port GigabitEthernet 1/0/1 allows multiple MAC authentication users to be authenticated.
[Device] display mac-authentication interface ten-gigabitethernet 1/0/1
Global MAC authentication parameters:
MAC authentication : Enabled
Username format : Fixed account
Username : aaa
Password : ******
Offline detect period : 300 s
Quiet period : 60 s
Server timeout : 100 s
Reauth period : 3600 s
Authentication domain : sun
Online MAC-auth wired user : 3
Silent MAC users:
MAC address VLAN ID From port Port index
Ten-GigabitEthernet1/0/1 is link-up
MAC authentication : Enabled
Carry User-IP : Disabled
Authentication domain : Not configured
Auth-delay timer : Disabled
Periodic reauth : Disabled
Re-auth server-unreachable : Logoff
Guest VLAN : Not configured
Guest VLAN auth-period : 30
Critical VLAN : Not configured
Critical voice VLAN : Disabled
Host mode : Single VLAN
Offline detection : Enabled
Authentication order : Default
Max online users : 4294967295
Authentication attempts : successful 0, failed 0
Current online users : 3
MAC address Auth state
1234-0300-0011 authenticated
1234-0300-0012 authenticated
1234-0300-0013 authenticated
# Verify that Ten-GigabitEthernet 1/0/1 allows only one 802.1X user to be authenticated.
[Device] display dot1x interface ten-gigabitethernet 1/0/1
Global 802.1X parameters:
802.1X authentication : Enabled
CHAP authentication : Enabled
Max-tx period : 30 s
Handshake period : 15 s
Quiet timer : Disabled
Quiet period : 60 s
Supp timeout : 30 s
Server timeout : 100 s
Reauth period : 3600 s
Max auth requests : 2
SmartOn supp timeout : 30 s
SmartOn retry counts : 3
EAD assistant function : Disabled
EAD timeout : 30 min
Domain delimiter : @
Online 802.1X wired users : 1
Ten-GigabitEthernet1/0/1 is link-up
802.1X authentication : Enabled
Handshake : Enabled
Handshake reply : Disabled
Handshake security : Disabled
Unicast trigger : Disabled
Periodic reauth : Disabled
Port role : Authenticator
Authorization mode : Auto
Port access control : MAC-based
Multicast trigger : Enabled
Mandatory auth domain : Not configured
Guest VLAN : Not configured
Auth-Fail VLAN : Not configured
Critical VLAN : Not configured
Critical voice VLAN : Disabled
Re-auth server-unreachable : Logoff
Max online users : 4294967295
SmartOn : Disabled
Add Guest VLAN delay : Disabled
User IP freezing : Disabled
Reauth period : 0 s
Send Packets Without Tag : Disabled
Max Attempts Fail Number : 0
EAPOL packets: Tx 0, Rx 0
Sent EAP Request/Identity packets : 0
EAP Request/Challenge packets: 0
EAP Success packets: 0
EAP Failure packets: 0
Received EAPOL Start packets : 0
EAPOL LogOff packets: 0
EAP Response/Identity packets : 0
EAP Response/Challenge packets: 0
Error packets: 0
Online 802.1X users: 1
# Verify that frames with an unknown destination MAC address, multicast address, or broadcast address are discarded. (Details not shown.)
Configuration files
#
mac-authentication domain sun
mac-authentication user-name-format fixed account aaa password cipher $c$3$HAlQ
nyXOwZXTgiOBPd7+kSPClKm7JbZ1Rw==
#
port-security enable
#
interface Ten-GigabitEthernet1/0/1
port link-mode bridge
port-security ntk-mode ntkonly
port-security max-mac-count 64
port-security port-mode mac-else-userlogin-secure
#
radius scheme radsun
primary authentication 192.168.0.38
primary accounting 192.168.0.38
key authentication cipher $c$3$s9TAYm34R8sS5k/Cylg2sDm69ZRupMvGJg==
key accounting cipher $c$3$UaUPGk8AfZAQLHFlbKNcEoM2HXGiuWowBQ==
retry 5
timer response-timeout 5
timer realtime-accounting 15
user-name-format without-domain
#
domain sun
authentication lan-access radius-scheme radsun
authorization lan-access radius-scheme radsun
accounting lan-access radius-scheme radsun
#
domain default enable sun
#
Related documentation
· H3C S7500E Switch Series Security Configuration Guide-R757X
· H3C S7500E Switch Series Security Command Reference-R757X