- Table of Contents
-
- 04-Layer 3—IP Services Configuration Guide
- 00-Preface
- 01-ARP configuration
- 02-IP addressing configuration
- 03-DHCP configuration
- 04-DNS configuration
- 05-IP forwarding basics configuration
- 06-Fast forwarding configuration
- 07-IRDP configuration
- 08-IP performance optimization configuration
- 09-UDP Helper configuration
- 10-IPv6 basics configuration
- 11-DHCPv6 configuration
- 12-IPv6 fast forwarding configuration
- Related Documents
-
| Title | Size | Download |
|---|---|---|
| 04-DNS configuration | 404.94 KB |
Dynamic domain name resolution
Configuring the IPv4 DNS client
Configuring static domain name resolution
Configuring dynamic domain name resolution
Configuring the IPv6 DNS client
Configuring static domain name resolution
Configuring dynamic domain name resolution
Specifying the source interface for DNS packets
Configuring the DNS trusted interface
Setting the DSCP value for outgoing DNS packets
Displaying and maintaining DNS
IPv4 DNS configuration examples
Static domain name resolution configuration example
Dynamic domain name resolution configuration example
DNS proxy configuration example
IPv6 DNS configuration examples
Static domain name resolution configuration example
Dynamic domain name resolution configuration example
DNS proxy configuration example
Troubleshooting IPv4 DNS configuration
Troubleshooting IPv6 DNS configuration
DDNS client configuration task list
Applying the DDNS policy to an interface
Setting the DSCP value for outgoing DDNS packets
Configuring DNS
Overview
Domain Name System (DNS) is a distributed database used by TCP/IP applications to translate domain names into IP addresses. The domain name-to-IP address mapping is called a DNS entry.
DNS services can be static or dynamic. After a user specifies a name, the device checks the static name resolution table for an IP address. If no IP address is available, it contacts the DNS server for dynamic name resolution, which takes more time than static name resolution. To improve efficiency, you can put frequently queried name-to-IP address mappings in the local static name resolution table.
Static domain name resolution
Static domain name resolution means manually creating mappings between domain names and IP addresses. For example, you can create a static DNS mapping for a device so that you can Telnet to the device by using the domain name.
Dynamic domain name resolution
Resolution process
1. A user program sends a name query to the resolver of the DNS client.
2. The DNS resolver looks up the local domain name cache for a match. If the resolver finds a match, it sends the corresponding IP address back. If not, it sends a query to the DNS server.
3. The DNS server looks up the corresponding IP address of the domain name in its DNS database. If no match is found, the server sends a query to other DNS servers. This process continues until a result, whether successful or not, is returned.
4. After receiving a response from the DNS server, the DNS client returns the resolution result to the user program.
Figure 1 shows the relationship between the user program, DNS client, and DNS server.
The DNS client includes the resolver and cache. The user program and DNS client can run on the same device or different devices, but the DNS server and the DNS client usually run on different devices.
Figure 1 Dynamic domain name resolution
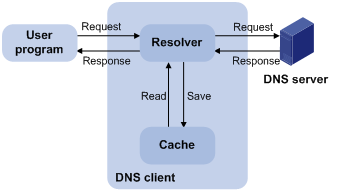
Dynamic domain name resolution allows the DNS client to store latest DNS entries in the dynamic domain name cache. The DNS client does not need to send a request to the DNS server for a repeated query within the aging time. To make sure the entries from the DNS server are up to date, a DNS entry is removed when its aging timer expires. The DNS server determines how long a mapping is valid, and the DNS client obtains the aging information from DNS responses.
DNS suffixes
You can configure a domain name suffix list so that the resolver can use the list to supply the missing part of an incomplete name.
For example, you can configure com as the suffix for aabbcc.com. The user only needs to enter aabbcc to obtain the IP address of aabbcc.com because the resolver adds the suffix and delimiter before passing the name to the DNS server.
The name resolver handles the queries based on the domain names that the user enters:
· If the user enters a domain name without a dot (.) (for example, aabbcc), the resolver considers the domain name to be a host name and adds a DNS suffix before performing the query operation. If no match is found for the domain names with any configured suffix, the resolver uses the user entered domain name (for example, aabbcc) to query the IP address.
· If the user enters a domain name with a dot (.) among the letters (for example, www.aabbcc), the resolver directly uses this domain name for the query operation. If the query fails, the resolver adds a DNS suffix for another query operation.
· If the user enters a domain name with a dot (.) at the end (for example, aabbcc.com.), the resolver considers the domain name an FQDN and returns the successful or failed query result. The dot at the end of the domain name is considered a terminating symbol.
The device supports static and dynamic DNS client services.
If an alias is configured for a domain name on the DNS server, the device can resolve the alias into the IP address of the host.
DNS proxy
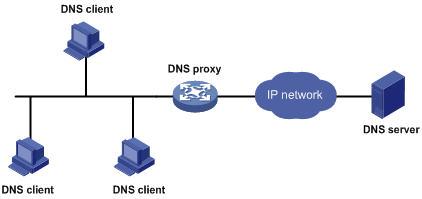
As shown in Figure 2, the DNS proxy performs the following operations:
· Forwards the request from the DNS client to the designated DNS server.
· Conveys the reply from the DNS server to the client.
The DNS proxy simplifies network management. When the DNS server address is changed, you can change the configuration only on the DNS proxy instead of on each DNS client.
Figure 2 DNS proxy application
A DNS proxy operates as follows:
1. A DNS client considers the DNS proxy as the DNS server, and sends a DNS request to the DNS proxy. The destination address of the request is the IP address of the DNS proxy.
2. The DNS proxy searches the local static domain name resolution table and dynamic domain name resolution cache after receiving the request. If the requested information is found, the DNS proxy returns a DNS reply to the client.
3. If the requested information is not found, the DNS proxy sends the request to the designated DNS server for domain name resolution.
4. After receiving a reply from the DNS server, the DNS proxy records the IP address-to-domain name mapping and forwards the reply to the DNS client.
If no DNS server is designated or no route is available to the designated DNS server, the DNS proxy does not forward DNS requests.
DNS spoofing
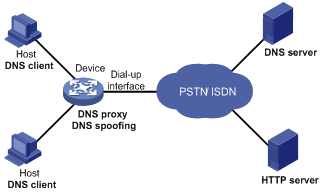
DNS spoofing is applied to the dial-up network, as shown in Figure 3.
· The device connects to a PSTN/ISDN network through a dial-up interface. The device triggers the establishment of a dial-up connection only when packets are to be forwarded through the dial-up interface.
· The device acts as a DNS proxy and is specified as a DNS server on the hosts. After the dial-up connection is established, the device dynamically obtains the DNS server address through DHCP or another autoconfiguration mechanism.
Figure 3 DNS spoofing application
The DNS proxy does not have the DNS server address or cannot reach the DNS server after startup. A host accesses the HTTP server in following these steps:
1. The host sends a DNS request to the device to resolve the domain name of the HTTP server into an IP address.
2. Upon receiving the request, the device searches the local static and dynamic DNS entries for a match. Because no match is found, the device spoofs the host by replying a configured IP address. The device must have a route to the IP address with the dial-up interface as the output interface.
The IP address configured for DNS spoofing is not the actual IP address of the requested domain name. Therefore, the TTL field in the DNS reply is set to 0. When the DNS client receives the reply, it creates a DNS entry and ages it out immediately.
3. Upon receiving the reply, the host sends an HTTP request to the replied IP address.
4. When forwarding the HTTP request through the dial-up interface, the device performs the following operations:
¡ Establishes a dial-up connection with the network.
¡ Dynamically obtains the DNS server address through DHCP or another autoconfiguration mechanism.
5. Because the DNS entry ages out immediately upon creation, the host sends a DNS request to the device again to resolve the HTTP server domain name into an IP address.
6. The device operates the same as a DNS proxy. For more information, see "DNS proxy."
7. After obtaining the IP address of the HTTP server, the host can access the HTTP server.
Without DNS spoofing, the device forwards the DNS requests from the host to the DNS server if it cannot find a matching local DNS entry. However, the device cannot obtain the DNS server address, because no dial-up connection is established. Therefore, the device cannot forward or answer the requests from the client. DNS resolution fails, and the client cannot access the HTTP server.
DNS configuration task list
|
Tasks at a glance |
|
Perform one of the following tasks: |
|
(Optional.) Configuring the DNS proxy |
|
(Optional.) Configuring DNS spoofing |
|
(Optional.) Specifying the source interface for DNS packets |
|
(Optional.) Configuring the DNS trusted interface |
|
(Optional.) Setting the DSCP value for outgoing DNS packets |
Configuring the IPv4 DNS client
Configuring static domain name resolution
Static domain name resolution allows applications such as Telnet to contact hosts by using host names instead of IPv4 addresses.
Follow these guidelines when you configure static domain name resolution:
· On the public network or a VPN, each host name maps to only one IPv4 address. The most recent configuration for a host name takes effect.
· You can configure the following:
¡ IPv4 DNS entries for the public network and up to 1024 VPNs.
¡ A maximum of 1024 IPv4 DNS entries for the public network or each VPN.
To configure static domain name resolution:
|
Step |
Command |
Remarks |
|
1. Enter system view. |
system-view |
N/A |
|
2. Configure a mapping between a host name and an IPv4 address. |
ip host host-name ip-address [ vpn-instance vpn-instance-name ] |
By default, no mapping between a host name and an IPv4 address is configured. |
Configuring dynamic domain name resolution
To use dynamic domain name resolution, configure DNS servers so that DNS queries can be sent to a correct server for resolution. A DNS server manually configured takes precedence over the one dynamically obtained through DHCP, and a DNS server configured earlier takes precedence. A name query is first sent to the DNS server that has the highest priority. If no reply is received, it is sent to the DNS server that has the second highest priority, and so on.
In addition, you can configure a DNS suffix that the system automatically adds to the provided domain name for resolution. A DNS suffix manually configured takes precedence over the one dynamically obtained through DHCP, and a DNS suffix configured earlier takes precedence. The DNS resolver first uses the suffix that has the highest priority. If the name resolution fails, the DNS resolver uses the suffix that has the second highest priority, and so on.
Configuration guidelines
Follow these guidelines when you configure dynamic domain name resolution:
· You can specify DNS server IPv4 addresses as follows:
¡ Specify DNS server IPv4 addresses for the public network and up to 1024 VPNs.
¡ Specify a maximum of six DNS server IPv4 addresses for the public network or each VPN.
· You can specify DNS server IPv6 addresses as follows:
¡ Specify DNS server IPv6 addresses for the public network and up to 1024 VPNs.
¡ Specify a maximum of six DNS server IPv6 addresses for the public network or each VPN.
An IPv4 name query is first sent to the DNS server IPv4 addresses. If no reply is received, it is sent to the DNS server IPv6 addresses.
· You can specify DNS suffixes as follows:
¡ Specify DNS suffixes for the public network and up to 1024 VPNs.
¡ Specify a maximum of 16 DNS suffixes for the public network or each VPN.
Configuration procedure
To configure dynamic domain name resolution:
|
Command |
Remarks |
|
|
1. Enter system view. |
system-view |
N/A |
|
2. Specify a DNS server IP address. |
·
Specify a DNS server IPv4 address: ·
Specify a DNS server IPv6 address: |
Use at least one command. By default, no DNS server IP address is specified. |
|
3. (Optional.) Configure a DNS suffix. |
dns domain domain-name [ vpn-instance vpn-instance-name ] |
By default, no DNS suffix is configured and only the provided domain name is resolved. |
Configuring the IPv6 DNS client
Configuring static domain name resolution
Static domain name resolution allows applications such as Telnet to contact hosts by using host names instead of IPv6 addresses.
Follow these guidelines when you configure static domain name resolution:
· For the public network or a VPN, each host name maps to only one IPv6 address. The most recent configuration for a host name takes effect.
· You can configure the following:
¡ IPv6 DNS entries for the public network and up to 1024 VPNs.
¡ A maximum of 1024 IPv6 DNS entries for the public network or each VPN.
To configure static domain name resolution:
|
Step |
Command |
Remarks |
|
1. Enter system view. |
system-view |
N/A |
|
2. Configure a mapping between a host name and an IPv6 address. |
ipv6 host host-name ipv6-address [ vpn-instance vpn-instance-name ] |
By default, no mapping between a host name and an IPv6 address is configured. |
Configuring dynamic domain name resolution
To send DNS queries to a correct server for resolution, you must enable dynamic domain name resolution and configure DNS servers. A DNS server manually configured takes precedence over the one dynamically obtained through DHCP, and a DNS server configured earlier takes precedence. A name query is first sent to the DNS server that has the highest priority. If no reply is received, it is sent to the DNS server that has the second highest priority, and so on.
In addition, you can configure a DNS suffix that the system automatically adds to the provided domain name for resolution. A DNS suffix manually configured takes precedence over the one dynamically obtained through DHCP, and a DNS suffix configured earlier takes precedence. The DNS resolver first uses the suffix that has the highest priority. If the name resolution fails, the DNS resolver uses the suffix that has the second highest priority, and so on.
Configuration guidelines
Follow these guidelines when you configure dynamic domain name resolution:
· You can specify DNS server IPv4 addresses as follows:
¡ Specify DNS server IPv4 addresses for the public network and up to 1024 VPNs.
¡ Specify a maximum of six DNS server IPv4 addresses for the public network or each VPN.
· You can specify DNS server IPv6 addresses as follows:
¡ Specify DNS server IPv6 addresses for the public network and up to 1024 VPNs.
¡ Specify a maximum of six DNS server IPv6 addresses for the public network or each VPN.
An IPv6 name query is first sent to the IPv6 DNS servers. If no reply is received, it is sent to the IPv4 DNS servers.
· You can specify DNS suffixes as follows:
¡ Specify DNS suffixes for the public network and up to 1024 VPNs.
¡ Specify a maximum of 16 DNS suffixes for the public network or each VPN.
Configuration procedure
To configure dynamic domain name resolution:
|
Step |
Command |
Remarks |
|
1. Enter system view. |
system-view |
N/A |
|
2. Specify a DNS server IP address. |
·
Specify a DNS server IPv4 address: ·
Specify a DNS server IPv6 address: |
Use at least one command. By default, no DNS server IP address is specified. |
|
3. (Optional.) Configure a DNS suffix. |
dns domain domain-name [ vpn-instance vpn-instance-name ] |
By default, no DNS suffix is configured. Only the provided domain name is resolved. |
Configuring the DNS proxy
You can specify multiple DNS servers. The DNS proxy forwards a request to the DNS server that has the highest priority. If having not received a reply, it forwards the request to a DNS server that has the second highest priority, and so on.
A DNS proxy forwards an IPv4 name query first to IPv4 DNS servers, and if no reply is received, it forwards the request to IPv6 DNS servers. The DNS proxy forwards an IPv6 name query first to IPv6 DNS servers, and if no reply is received, it forwards the request to IPv4 DNS servers.
To configure the DNS proxy:
|
Step |
Command |
Remarks |
|
1. Enter system view. |
system-view |
N/A |
|
2. Enable DNS proxy. |
dns proxy enable |
By default, DNS proxy is disabled. |
|
3. Specify a DNS server IP address. |
·
Specify a DNS server IPv4 address: ·
Specify a DNS server IPv6 address: |
Use at least one command. By default, no DNS server IP address is specified. |
Configuring DNS spoofing
DNS spoofing is effective only when:
· The DNS proxy is enabled on the device.
· No DNS server or route to any DNS server is specified on the device.
Follow these guidelines when you configure DNS spoofing:
· You can configure only one replied IPv4 address and one replied IPv6 address for the public network or a VPN. If you use the command multiple times, the most recent configuration takes effect.
· You can configure DNS spoofing for the public network and a maximum of 1024 VPNs.
To configure DNS spoofing:
|
Step |
Command |
Remarks |
|
1. Enter system view. |
system-view |
N/A |
|
2. Enable DNS proxy. |
dns proxy enable |
By default, DNS proxy is disabled. |
|
3. Enable DNS spoofing and specify the translated IP address. |
·
Specify a translated IPv4 address: ·
Specify a translated IPv6 address: |
Use at least one command. By default, no translated IP address is specified. |
Specifying the source interface for DNS packets
This task enables the device to always use the primary IP address of the specified source interface as the source IP address of outgoing DNS packets. This feature applies to scenarios in which the DNS server responds only to DNS requests sourced from a specific IP address. If no IP address is configured on the source interface, no DNS packets can be sent out.
When sending an IPv6 DNS request, the device follows the method defined in RFC 3484 to select an IPv6 address of the source interface.
You can configure only one source interface on the public network or a VPN. You can configure the source interface for the public network and a maximum of 1024 VPNs.
To specify the source interface for DNS packets:
|
Step |
Command |
Remarks |
|
1. Enter system view. |
system-view |
N/A |
|
2. Specify the source interface for DNS packets. |
dns source-interface interface-type interface-number [ vpn-instance vpn-instance-name ] |
By default, no source interface for DNS packets is specified. If you execute the command multiple times, the most recent configuration takes effect. If you specify the vpn-instance vpn-instance-name option, make sure the source interface is on the specified VPN. |
Configuring the DNS trusted interface
By default, an interface obtains DNS suffix and domain name server information from DHCP. The network attacker might act as the DHCP server to assign wrong DNS suffix and domain name server address to the device. As a result, the device fails to get the resolved IP address or might get the wrong IP address. With the DNS trusted interface specified, the device only uses the DNS suffix and domain name server information obtained through the trusted interface to avoid attack.
To configure the DNS trusted interface:
|
Step |
Command |
Remarks |
|
1. Enter system view. |
system-view |
N/A |
|
2. Specify the DNS trusted interface. |
dns trust-interface interface-type interface-number |
By default, no DNS trusted interface is specified. You can configure up to 128 DNS trusted interfaces. |
Setting the DSCP value for outgoing DNS packets
The DSCP value of a packet specifies the priority level of the packet and affects the transmission priority of the packet. A bigger DSCP value represents a higher priority.
To specify the DSCP value for outgoing DNS packets:
|
Step |
Command |
Remarks |
|
1. Enter system view. |
system-view |
N/A |
|
2. Specify the DSCP value for outgoing DNS packets. |
·
DSCP value for IPv4
DNS packets: ·
DSCP value for IPv6 DNS packets: |
By default, the DSCP value for outgoing DNS packets is 0. The configuration is available on DNS clients and DNS proxy devices. |
Displaying and maintaining DNS
Execute display commands in any view and reset commands in user view.
|
Task |
Command |
|
Display the domain name resolution table. |
display dns host [ ip | ipv6 ] [ vpn-instance vpn-instance-name ] |
|
Display IPv4 DNS server information. |
display dns server [ dynamic ] [ vpn-instance vpn-instance-name ] |
|
Display IPv6 DNS server information. |
display ipv6 dns server [ dynamic ] [ vpn-instance vpn-instance-name ] |
|
Display DNS suffixes. |
display dns domain [ dynamic ] [ vpn-instance vpn-instance-name ] |
|
Clear information about the dynamic domain name cache. |
reset dns host [ ip | ipv6 ] [ vpn-instance vpn-instance-name ] |
IPv4 DNS configuration examples
Static domain name resolution configuration example
Network requirements
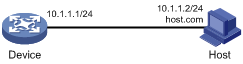
As shown in Figure 4, the device wants to access the host by using an easy-to-remember domain name rather than an IP address.
Configure static domain name resolution on the device so that the device can use the domain name host.com to access the host whose IP address is 10.1.1.2.
Configuration procedure
# Configure a mapping between host name host.com and IP address 10.1.1.2.
<Sysname> system-view
[Sysname] ip host host.com 10.1.1.2
# Use the ping host.com command to verify that the device can use static domain name resolution to resolve domain name host.com into IP address 10.1.1.2.
[Sysname] ping host.com
Ping host.com (10.1.1.2): 56 data bytes, press CTRL_C to break
56 bytes from 10.1.1.2: icmp_seq=0 ttl=255 time=1.000 ms
56 bytes from 10.1.1.2: icmp_seq=1 ttl=255 time=1.000 ms
56 bytes from 10.1.1.2: icmp_seq=2 ttl=255 time=1.000 ms
56 bytes from 10.1.1.2: icmp_seq=3 ttl=255 time=1.000 ms
56 bytes from 10.1.1.2: icmp_seq=4 ttl=255 time=2.000 ms
--- Ping statistics for host.com ---
5 packet(s) transmitted, 5 packet(s) received, 0.0% packet loss
round-trip min/avg/max/std-dev = 1.000/1.200/2.000/0.400 ms
Dynamic domain name resolution configuration example
Network requirements
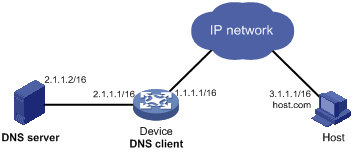
As shown in Figure 5, the device wants to do the following:
· Access the host by using an easy-to-remember domain name rather than an IP address.
· Ask the DNS server on the network for an IP address by using dynamic domain name resolution.
The IP address of the DNS server is 2.1.1.2/16 and the DNS server has a com domain, which stores the mapping between domain name host and IP address 3.1.1.1/16.
Configure dynamic DNS and the DNS suffix com on the device that acts as a DNS client. The device can then use the domain name host to access the host with the domain name host.com and the IP address 3.1.1.1/16.
Configuration procedure
Before performing the following configuration, make sure that:
· The device and the host can reach each other.
· The IP addresses of the interfaces are configured as shown in Figure 5.
1. Configure the DNS server:
The configuration might vary by DNS server. The following configuration is performed on a PC running Windows Server 2000.
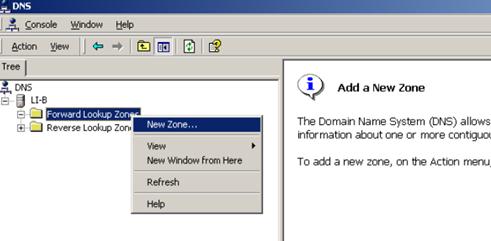
a. Select Start > Programs > Administrative Tools > DNS.
The DNS server configuration page appears, as shown in Figure 6.
b. Right-click Forward Lookup Zones, select New Zone, and then follow the wizard to create a new zone named com.
Figure 6 Creating a zone
c. On the DNS server configuration page, right-click zone com, and select New Host.
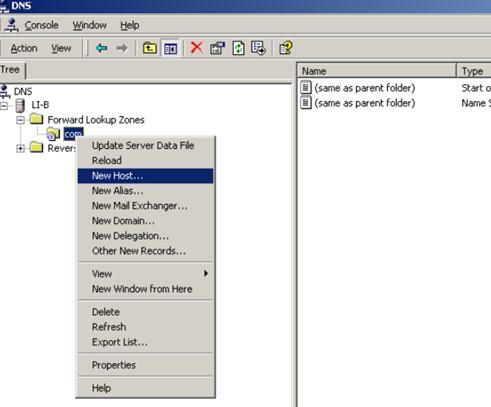
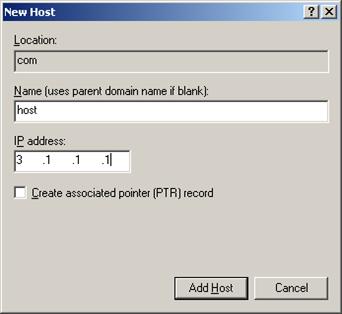
d. On the page that appears, enter host name host and IP address 3.1.1.1.
e. Click Add Host.
The mapping between the IP address and host name is created.
Figure 8 Adding a mapping between domain name and IP address
2. Configure the DNS client:
# Specify the DNS server 2.1.1.2.
<Sysname> system-view
[Sysname] dns server 2.1.1.2
# Specify com as the name suffix.
[Sysname] dns domain com
Verifying the configuration
# Use the ping host command on the device to verify that the communication between the device and the host is normal and that the translated destination IP address is 3.1.1.1.
[Sysname] ping host
Ping host.com (3.1.1.1): 56 data bytes, press CTRL_C to break
56 bytes from 3.1.1.1: icmp_seq=0 ttl=255 time=1.000 ms
56 bytes from 3.1.1.1: icmp_seq=1 ttl=255 time=1.000 ms
56 bytes from 3.1.1.1: icmp_seq=2 ttl=255 time=1.000 ms
56 bytes from 3.1.1.1: icmp_seq=3 ttl=255 time=1.000 ms
56 bytes from 3.1.1.1: icmp_seq=4 ttl=255 time=2.000 ms
--- Ping statistics for host ---
5 packet(s) transmitted, 5 packet(s) received, 0.0% packet loss
round-trip min/avg/max/std-dev = 1.000/1.200/2.000/0.400 ms
DNS proxy configuration example
Network requirements
When the IP address of the DNS server changes, you must configure the new IPv6 address of the DNS server on each device on the LAN. To simplify network management, you can use the DNS proxy feature.
As shown in Figure 9:
· Specify Device A as the DNS server of Device B (the DNS client). Device A acts as a DNS proxy. The IPv6 address of the real DNS server is 4.1.1.1.
· Configure the IP address of the DNS proxy on Device B. DNS requests of Device B are forwarded to the real DNS server through the DNS proxy.

Configuration procedure
Before performing the following configuration, make sure that:
· Device A, the DNS server, and the host can reach each other.
· The IPv6 addresses of the interfaces are configured as shown in Figure 9.
1. Configure the DNS server:
The configuration might vary by DNS server. When a PC running Windows Server 2000 acts as the DNS server, see "Dynamic domain name resolution configuration example" for configuration information.
2. Configure the DNS proxy:
# Specify the DNS server 4.1.1.1.
<DeviceA> system-view
[DeviceA] dns server 4.1.1.1
# Enable DNS proxy.
[DeviceA] dns proxy enable
3. Configure the DNS client:
<DeviceB> system-view
# Specify the DNS server 2.1.1.2.
[DeviceB] dns server 2.1.1.2
Verifying the configuration
# Use the ping host.com command on Device B to verify the connection between the device and the host is normal and that the translated destination IP address is 3.1.1.1.
[DeviceB] ping host.com
Ping host.com (3.1.1.1): 56 data bytes, press CTRL_C to break
56 bytes from 3.1.1.1: icmp_seq=0 ttl=255 time=1.000 ms
56 bytes from 3.1.1.1: icmp_seq=1 ttl=255 time=1.000 ms
56 bytes from 3.1.1.1: icmp_seq=2 ttl=255 time=1.000 ms
56 bytes from 3.1.1.1: icmp_seq=3 ttl=255 time=1.000 ms
56 bytes from 3.1.1.1: icmp_seq=4 ttl=255 time=2.000 ms
--- Ping statistics for host.com ---
5 packet(s) transmitted, 5 packet(s) received, 0.0% packet loss
round-trip min/avg/max/std-dev = 1.000/1.200/2.000/0.400 ms
IPv6 DNS configuration examples
Static domain name resolution configuration example
Network requirements
As shown in Figure 10, the device wants to access the host by using an easy-to-remember domain name rather than an IPv6 address. Configure static domain name resolution on the device so that the device can use the domain name host.com to access the host whose IPv6 address is 1::2.

Configuration procedure
# Configure a mapping between host name host.com and IPv6 address 1::2.
<Device> system-view
[Device] ipv6 host host.com 1::2
# Use the ping ipv6 host.com command to verify that the device can use static domain name resolution to resolve domain name host.com into IPv6 address 1::2.
[Sysname] ping ipv6 host.com
Ping6(56 data bytes) 1::1 --> 1::2, press CTRL_C to break
56 bytes from 1::2, icmp_seq=0 hlim=128 time=1.000 ms
56 bytes from 1::2, icmp_seq=1 hlim=128 time=0.000 ms
56 bytes from 1::2, icmp_seq=2 hlim=128 time=1.000 ms
56 bytes from 1::2, icmp_seq=3 hlim=128 time=1.000 ms
56 bytes from 1::2, icmp_seq=4 hlim=128 time=0.000 ms
--- Ping6 statistics for host.com ---
5 packet(s) transmitted, 5 packet(s) received, 0.0% packet loss
round-trip min/avg/max/std-dev = 0.000/0.600/1.000/0.490 ms
Dynamic domain name resolution configuration example
Network requirements
As shown in Figure 11, the device wants to access the host by using an easy-to-remember domain name rather than an IPv6 address. The IPv6 address of the DNS server is 2::2/64. The server has a com domain, which stores the mapping between domain name host and IPv6 address 1::1/64.
Configure dynamic DNS and the DNS suffix com on the device that acts as a DNS client. The device can then use domain name host to access the host with the domain name host.com and the IPv6 address 1::1/64.

Configuration procedure
Before performing the following configuration, make sure that:
· The device and the host can reach each other.
· The IPv6 addresses of the interfaces are configured as shown in Figure 11.
1. Configure the DNS server:
The configuration might vary by DNS server. The following configuration is performed on a PC running Windows Server 2003. Make sure that the DNS server supports IPv6 DNS so that the server can process IPv6 DNS packets and the interfaces of the DNS server can forward IPv6 packets.
a. Select Start > Programs > Administrative Tools > DNS.
The DNS server configuration page appears, as shown in Figure 12.
b. Right-click Forward Lookup Zones, select New Zone, and then follow the wizard to create a new zone named com.
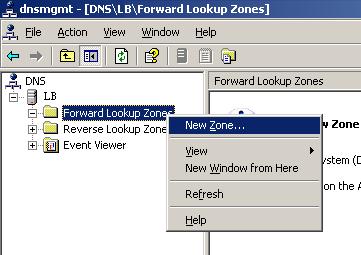
c. On the DNS server configuration page, right-click zone com, and select Other New Records.
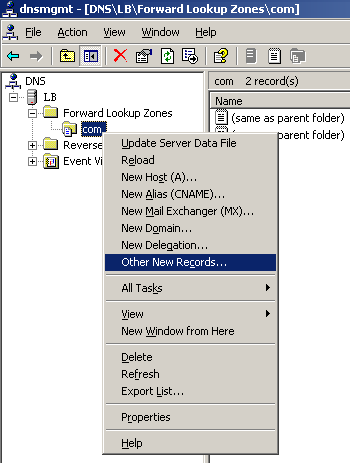
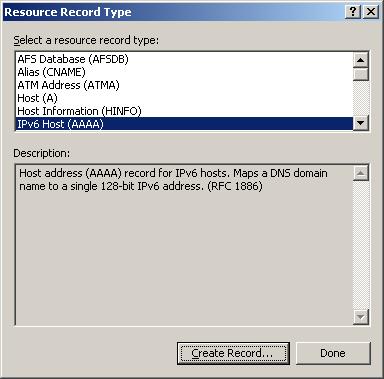
d. On the page that appears, select IPv6 Host (AAAA) as the resource record type.
Figure 14 Selecting the resource record type
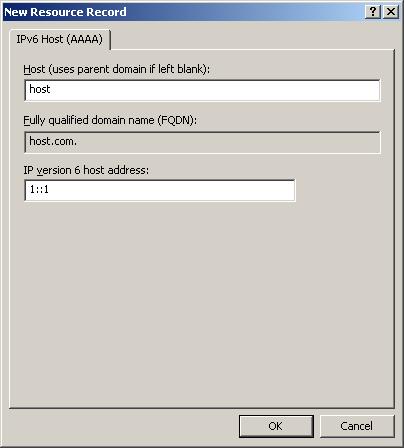
e. Type host name host and IPv6 address 1::1.
f. Click OK.
The mapping between the IPv6 address and host name is created.
Figure 15 Adding a mapping between domain name and IPv6 address
2. Configure the DNS client:
# Specify the DNS server 2::2.
<Device> system-view
[Device] ipv6 dns server 2::2
# Configure com as the DNS suffix.
[Device] dns domain com
Verifying the configuration
# Use the ping ipv6 host command on the device to verify that the communication between the device and the host is normal and that the translated destination IP address is 1::1.
[Device] ping ipv6 host
Ping6(56 data bytes) 3::1 --> 1::1, press CTRL_C to break
56 bytes from 1::1, icmp_seq=0 hlim=128 time=1.000 ms
56 bytes from 1::1, icmp_seq=1 hlim=128 time=0.000 ms
56 bytes from 1::1, icmp_seq=2 hlim=128 time=1.000 ms
56 bytes from 1::1, icmp_seq=3 hlim=128 time=1.000 ms
56 bytes from 1::1, icmp_seq=4 hlim=128 time=0.000 ms
--- Ping6 statistics for host ---
5 packet(s) transmitted, 5 packet(s) received, 0.0% packet loss
round-trip min/avg/max/std-dev = 0.000/0.600/1.000/0.490 ms
DNS proxy configuration example
Network requirements
When the IP address of the DNS server changes, you must configure the new IP address of the DNS server on each device on the LAN. To simplify network management, you can use the DNS proxy feature.
As shown in Figure 16:
· Specify Device A as the DNS server of Device B (the DNS client). Device A acts as a DNS proxy. The IP address of the real DNS server is 4000::1.
· Configure the IP address of the DNS proxy on Device B. DNS requests of Device B are forwarded to the real DNS server through the DNS proxy.
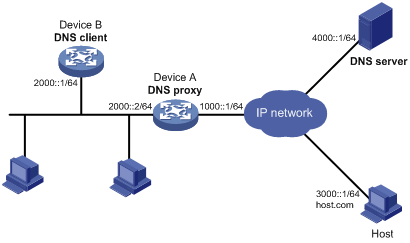
Configuration procedure
Before performing the following configuration, make sure that:
· Device A, the DNS server, and the host are reachable to each other.
· The IP addresses of the interfaces are configured as shown in Figure 16.
1. Configure the DNS server:
This configuration might vary by DNS server. When a PC running Windows Server 2003 acts as the DNS server, see "Dynamic domain name resolution configuration example" for configuration information.
2. Configure the DNS proxy:
# Specify the DNS server 4000::1.
<DeviceA> system-view
[DeviceA] ipv6 dns server 4000::1
# Enable DNS proxy.
[DeviceA] dns proxy enable
3. Configure the DNS client:
# Specify the DNS server 2000::2.
<DeviceB> system-view
[DeviceB] ipv6 dns server 2000::2
Verifying the configuration
# Use the ping host.com command on Device B to verify that the connection between the device and the host is normal and that the translated destination IP address is 3000::1.
[DeviceB] ping host.com
Ping6(56 data bytes) 2000::1 --> 3000::1, press CTRL_C to break
56 bytes from 3000::1, icmp_seq=0 hlim=128 time=1.000 ms
56 bytes from 3000::1, icmp_seq=1 hlim=128 time=0.000 ms
56 bytes from 3000::1, icmp_seq=2 hlim=128 time=1.000 ms
56 bytes from 3000::1, icmp_seq=3 hlim=128 time=1.000 ms
56 bytes from 3000::1, icmp_seq=4 hlim=128 time=0.000 ms
--- Ping6 statistics for host.com ---
5 packet(s) transmitted, 5 packet(s) received, 0.0% packet loss
round-trip min/avg/max/std-dev = 0.000/0.600/1.000/0.490 ms
Troubleshooting IPv4 DNS configuration
Symptom
After enabling dynamic domain name resolution, the user cannot get the correct IP address.
Solution
1. Use the display dns host ip command to verify that the specified domain name is in the cache.
2. If the specified domain name does not exist, check that the DNS client can communicate with the DNS server.
3. If the specified domain name is in the cache, but the IP address is incorrect, check that the DNS client has the correct IP address of the DNS server.
4. Verify that the mapping between the domain name and IP address is correct on the DNS server.
Troubleshooting IPv6 DNS configuration
Symptom
After enabling dynamic domain name resolution, the user cannot get the correct IPv6 address.
Solution
1. Use the display dns host ipv6 command to verify that the specified domain name is in the cache.
2. If the specified domain name does not exist, check that dynamic domain name resolution is enabled, and that the DNS client can communicate with the DNS server.
3. If the specified domain name is in the cache, but the IPv6 address is incorrect, check that the DNS client has the correct IPv6 address of the DNS server.
4. Verify that the mapping between the domain name and IPv6 address is correct on the DNS server.
Configuring DDNS
Overview
DNS provides only the static mappings between domain names and IP addresses. When the IP address of a node changes, your access to the node fails.
Dynamic Domain Name System (DDNS) can dynamically update the mappings between domain names and IP addresses for DNS servers.
DDNS is supported only by IPv4 DNS, and it is used to update the mappings between domain names and IPv4 addresses.
|
|
NOTE: The term "interface" in this chapter refers to VLAN interfaces. |
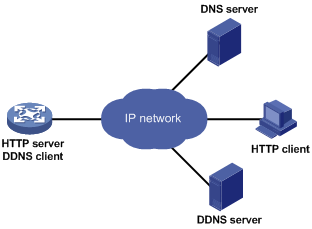
DDNS application
As shown in Figure 17, DDNS works on the client-server model.
· DDNS client—A device that needs to update the mapping between its domain name and its IP address dynamically on the DNS server when its IP address changes. An Internet user typically accesses an application layer server such as an HTTP server or an FTP server by using the server's domain name. When its IP address changes, the application layer server runs as a DDNS client. It sends a request to the DDNS server for updating the mapping between its domain name and its IP address.
· DDNS server—Informs the DNS server of latest mappings. When receiving the mapping update request from a DDNS client, the DDNS server tells the DNS server to re-map the domain name and the IP address of the DDNS client. Therefore, the Internet users can use the same domain name to access the DDNS client even if the IP address of the DDNS client has changed.
With the DDNS client configured, a device can dynamically update the latest mapping between its domain name and IP address on the DNS server through DDNS servers.
|
|
NOTE: The DDNS update process does not have a unified standard but varies by DDNS server that the DDNS client contacts. |
DDNS client configuration task list
|
Tasks at a glance |
|
(Required.) Configuring a DDNS policy |
|
(Required.) Applying the DDNS policy to an interface |
|
(Optional.) Setting the DSCP value for outgoing DDNS packets |
Configuring a DDNS policy
A DDNS policy contains the DDNS server address, port number, login ID, password, time interval, associated SSL client policy, and update time interval. After creating a DDNS policy, you can apply it to multiple interfaces to simplify DDNS configuration.
The URL addresses configured for update requests vary by DDNS server.
Table 1 Common URL addresses
|
DDNS server |
URL addresses for DDNS update requests |
|
www.3322.org |
http://members.3322.org/dyndns/update?system=dyndns&hostname=<h>&myip=<a> |
|
DYNDNS |
http://members.dyndns.org/nic/update?system=dyndns&hostname=<h>&myip=<a> |
|
DYNS |
http://www.dyns.cx/postscript.php?host=<h>&ip=<a> |
|
ZONEEDIT |
http://dynamic.zoneedit.com/auth/dynamic.html?host=<h>&dnsto=<a> |
|
TZO |
http://cgi.tzo.com/webclient/signedon.html?TZOName=<h>IPAddress=<a> |
|
EASYDNS |
http://members.easydns.com/dyn/ez-ipupdate.php?action=edit&myip=<a>&host_id=<h> |
|
HEIPV6TB |
http://dyn.dns.he.net/nic/update?hostname=<h>&myip=<a> |
|
CHANGE-IP |
http://nic.changeip.com/nic/update?hostname=<h>&offline=1 |
|
NO-IP |
http://dynupdate.no-ip.com/nic/update?hostname=<h>&myip=<a> |
|
DHS |
http://members.dhs.org/nic/hosts?domain=dyn.dhs.org&hostname=<h>&hostscmd=edit&hostscmdstage=2&type=1&ip=<a> |
|
HP |
https://server-name/nic/update?group=group-name&myip=<a> |
|
ODS |
ods://update.ods.org |
|
GNUDIP |
gnudip://server-name |
|
PeanutHull |
oray://phservice2.oray.net |
The URL address cannot contain a username or password. To configure the username and password, use the username command and the password command.
HP and GNUDIP are common DDNS update protocols. The server-name parameter is the domain name or IP address of the service provider's server using one of the update protocols.
The URL address for an update request can start with:
· http://—The HTTP-based DDNS server.
· https://—The HTTPS-based DDNS server.
· ods://—The TCP-based ODS server.
· gnudip://—The TCP-based GNUDIP server.
· oray://—The TCP-based DDNS server.
The domain names of DDNS servers are members.3322.org and phservice2.oray.net. The domain names of PeanutHull DDNS servers can be phservice2.oray.net, phddns60.oray.net, client.oray.net, ph031.oray.net, and so on. Determine the domain name in the URL according to the actual situation.
The port number in the URL address is optional. If no port is specified, the system uses the default port numbers: port 80 for HTTP, port 443 for HTTPS, and port 6060 for PeanutHull DDNS server.
The system automatically performs the following operations:
· Fills <h> with the FQDN that is specified when the DDNS policy is applied to an interface.
· Fills <a> with the primary IP address of the interface to which the DDNS policy is applied.
You can also manually specify an FQDN and an IP address in <h> and <a>, respectively. In this case, the FQDN that is specified when the DDNS policy is applied to an interface will not take effect. As a best practice, do not manually change the <h> and <a> because your configuration might be incorrect. For more information about applying DDNS policies, see "Applying the DDNS policy to an interface."
No FQDN or IP address can be specified in the URL address for update requests sent to the PeanutHull DDNS server. You can specify the FQDN when applying the DDNS policy to an interface. The IP address is the primary IP address of the interface to which the DDNS policy is applied.
|
|
TIP: The FQDN is the only identification of a node in the network. An FQDN consists of a local host name and a parent domain name and can be translated into an IP address. |
Configuration prerequisites
Visit the website of a DDNS service provider, register an account, and apply for a domain name for the DDNS client. When the DDNS client updates the mapping between the domain name and the IP address through the DDNS server, the DDNS server checks the following:
· Whether the account information is correct.
· Whether the domain name to be updated belongs to the account.
Configuration procedure
To configure a DDNS policy:
|
Step |
Command |
Remarks |
|
1. Enter system view. |
system-view |
N/A |
|
2. Create a DDNS policy and enter its view. |
ddns policy policy-name |
By default, no DDNS policy is created. |
|
3. Specify a URL address for DDNS update requests. |
url request-url |
By default, no URL address is specified for DDNS update requests. |
|
4. Specify the username to be contained in the URL address. |
username username |
By default, no username is specified. |
|
5. Specify the password to be contained in the URL address. |
password { cipher | simple } password |
By default, no password is specified. |
|
6. (Optional.) Specify the parameter transmission method for sending DDNS update requests to HTTP/HTTPS-based DDNS servers. |
method { http-get | http-post } |
By default, http-get is used. Use the method http-post command to specify the POST method for DDNS update with a DHS server. |
|
7. (Optional.) Associate an SSL client policy with the DDNS policy. |
ssl-client-policy policy-name |
By default, no SSL client policy is associated with the DDNS policy. This step is only effective and a must for HTTP-based DDNS update requests. For SSL client policy configuration, see Security Configuration Guide. |
|
8. (Optional.) Specify the interval for sending update requests. |
interval days [ hours [ minutes ] ] |
By default, the time interval is one hour. |
Applying the DDNS policy to an interface
After you apply the DDNS policy to an interface and specify the FQDN for update, the DDNS client sends requests to the DDNS server to update the mapping between the domain name and the primary IP address of the interface at the specified interval.
Before you apply a DDNS policy to an interface, complete the following tasks:
· Specify the primary IP address of the interface and make sure the DDNS server and the interface can reach each other.
· Configure static or dynamic domain name resolution to translate the domain name of the DDNS server into the IPv4 address. For more information, see "Configuring the IPv4 DNS client."
To apply the DDNS policy to an interface:
|
Step |
Command |
Remarks |
|
1. Enter system view. |
system-view |
N/A |
|
2. Enter interface view. |
interface interface-type interface-number |
N/A |
|
3. Apply the DDNS policy to the interface to update the mapping between the specified FQDN and the primary IP address of the interface, and enable DDNS update. |
ddns apply policy policy-name [ fqdn domain-name ] |
By default, no DDNS policy is applied to the interface, no FQDN is specified for update, and DDNS update is disabled. The fqdn domain-name option must be specified for all DDNS servers except the PeanutHull DDNS server. |
|
|
NOTE: If no FQDN is specified for the PeanutHull DDNS server, the DDNS server updates all domain names of the DDNS client account. If an FQDN is specified, the DDNS server updates only the mapping between the specified FQDN and the primary IP address. |
Setting the DSCP value for outgoing DDNS packets
The DSCP value of a packet specifies the priority level of the packet and affects the transmission priority of the packet. A bigger DSCP value represents a higher priority.
To specify the DSCP value for outgoing DDNS packets:
|
Step |
Command |
Remarks |
|
1. Enter system view. |
system-view |
N/A |
|
2. Specify the DSCP value for outgoing DDNS packets. |
ddns dscp dscp-value |
By default, the DSCP value for outgoing DDNS packets is 0. |
Displaying DDNS
Execute display commands in any view.
|
Task |
Command |
|
Display information about the DDNS policy. |
display ddns policy [ policy-name ] |
DDNS configuration examples
DDNS configuration example with www.3322.org
Network requirements
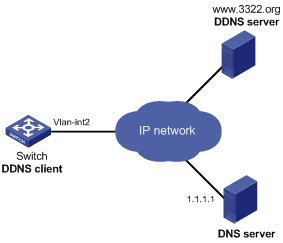
As shown in Figure 18, Switch uses the domain name whatever.3322.org.
Switch acquires the IP address through DHCP. Through DDNS service provided by www.3322.org, Switch informs the DNS server of the latest mapping between its domain name and IP address. Switch uses the DNS server to translate www.3322.org into the corresponding IP address.
Configuration procedure
Before configuring DDNS on Switch, perform the following tasks:
· Register with username steven and password nevets at http://www.3322.org/.
· Add Switch's host name-to-IP address mapping to the DNS server.
· Make sure the devices can reach each other.
# Create a DDNS policy named 3322.org, and enter its view.
<Switch> system-view
[Switch] ddns policy 3322.org
# Specify for DDNS update requests the URL address with the login ID steven and plaintext password nevets.
[Switch-ddns-policy-3322.org] url http:// members.3322.org/dyndns/update?system=dyndns&hostname=<h>&myip=<a>
[Switch-ddns-policy-3322.org] username steven
[Switch-ddns-policy-3322.org] password simple nevets
# Set the interval for sending DDNS update requests to 15 minutes.
[Switch-ddns-policy-3322.org] interval 0 0 15
[Switch-ddns-policy-3322.org] quit
# Specify the IP address of the DNS server as 1.1.1.1.
[Switch] dns server 1.1.1.1
# Apply DDNS policy 3322.org to VLAN-interface 2 to enable DDNS update and dynamically update the mapping between domain name whatever.3322.org and the primary IP address of VLAN-interface 2.
[Switch] interface vlan-interface 2
[Switch-Vlan-interface2] ddns apply policy 3322.org fqdn whatever.3322.org
After the preceding configuration is completed, Switch notifies the DNS server of its new domain name-to-IP address mapping through the DDNS server provided by www.3322.org, whenever the IP address of Switch changes. Therefore, Switch can always provide services at whatever.3322.org.
DDNS configuration example with PeanutHull server
Network requirements
As shown in Figure 19, Switch uses domain name whatever.gicp.cn.
Switch acquires the IP address through DHCP. Through the PeanutHull server, Switch informs the DNS server of the latest mapping between its domain name and IP address. The IP address of the DNS server is 1.1.1.1. Switch uses the DNS server to translate www.oray.cn into the corresponding IP address.

Configuration procedure
Before configuring DDNS on Switch, perform the following tasks:
· Register with username steven and password nevets at http://www.oray.cn/.
· Add Switch's host name-to-IP address mapping to the DNS server.
· Make sure the devices can reach each other.
# Create a DDNS policy named oray.cn and enter its view.
<Switch> system-view
[Switch] ddns policy oray.cn
# Specify for DDNS update requests the URL address with the login ID steven and plaintext password nevets.
[Switch-ddns-policy-oray.cn] url oray://phservice2.oray.net
[Switch-ddns-policy-oray.cn] username steven
[Switch-ddns-policy-oray.cn] password simple nevets
# Set the DDNS update request interval to 12 minutes.
[Switch-ddns-policy-oray.cn] interval 0 0 12
[Switch-ddns-policy-oray.cn] quit
# Specify the IP address of the DNS server as 1.1.1.1.
[Switch] dns server 1.1.1.1
# Apply the DDNS policy oray.cn to VLAN-interface 2 to enable DDNS update and to dynamically update the mapping between whatever.gicp.cn and the primary IP address of VLAN-interface 2.
[Switch] interface vlan-interface 2
[Switch-Vlan-interface2] ddns apply policy oray.cn fqdn whatever.gicp.cn
After the preceding configuration is completed, Switch notifies the DNS server of its new domain name-to-IP address mapping through the PeanutHull server, whenever the IP address of Switch changes. Therefore, Switch can always provide services at whatever.gicp.cn.