- Table of Contents
-
- 01-Fundamentals Configuration Guide
- 00-Preface
- 01-CLI configuration
- 02-RBAC configuration
- 03-Login management configuration
- 04-FTP and TFTP configuration
- 05-File system management configuration
- 06-Configuration file management configuration
- 07-Software upgrade configuration
- 08-Emergency shell configuration
- 09-Automatic configuration
- 10-Device management configuration
- 11-Tcl configuration
- 12-Python configuration
- 13-License management
- Related Documents
-
| Title | Size | Download |
|---|---|---|
| 05-File system management configuration | 85.56 KB |
Storage media and file systems
Specifying a directory name or file name
Restrictions and guidelines: File system management
Managing storage media and file systems
Mounting or unmounting a file system
Managing files and directories
Setting the operation mode for files and directories
Displaying file and directory information
Displaying the contents of a text file
Displaying the working directory
Changing the working directory
Archiving files and directories
Extracting files and directories
Synchronizing files and directories from an Rsync server
Using the automatic copying feature
Managing file systems
This chapter describes how to manage file systems.
About file system management
Storage media and file systems
The devices support both fixed and hot swappable storage media. Some devices support partitioning hot swappable storage media. Each unpartitioned storage medium has one file system. On a partitioned storage medium, each partition has one file system.
The following matrix shows the supported storage media on different devices:
|
Hardware |
Fixed storage media |
Hot-swappable storage media |
|
MSR810, MSR810-W, MSR810-W-DB, MSR810-LM, MSR810-W-LM, MSR810-10-PoE, MSR810-LM-HK, MSR810-W-LM-HK, MSR810-LMS-EA |
Flash memory |
USB disk and SD card |
|
MSR810-LMS, MSR810-LUS |
Flash memory |
USB disk and SD card |
|
MSR2600-6-X1, MSR2600-10-X1 |
Flash memory |
USB disk |
|
MSR 2630 |
Flash memory |
USB disk |
|
MSR3600-28, MSR3600-51 |
CF card |
USB disk |
|
MSR3600-28-SI, MSR3600-51-SI |
Flash memory |
USB disk |
|
MSR3600-28-X1, MSR3600-28-X1-DP, MSR3600-51-X1, MSR3600-51-X1-DP |
Flash memory |
USB disk |
|
MSR3610-I-DP, MSR3610-IE-DP |
SD card |
USB disk and HD card |
|
MSR3610-X1, MSR3610-X1-DP |
Flash memory |
USB disk, HD card, and SD card |
|
MSR3610-X1-DC, MSR3610-X1-DP-DC |
Flash memory |
USB disk and SD card |
|
MSR 3610, MSR 3620, MSR 3640, MSR 3660 |
CF card |
USB disk |
|
MSR 3620-DP |
Flash memory |
USB disk and SD card |
|
MSR3610-G, MSR3620-G |
SD card |
USB disk and SD card |
Storage medium and file system naming conventions
The file system on the flash memory has the same name as the flash memory. The name has the following parts:
· Storage medium type flash.
· Colon (:).
A CF card, HD card, SD card, or USB disk name and the file system names share the following parts:
· Storage medium type, for example, usb for the USB disk.
· Sequence number, a lower-case English letter such as a, b, or c.
· Partition number, a digit that starts at 0 and increments by 1. If the storage medium is not partitioned, the system determines that the storage medium has one partition. (A storage medium name does not contain a partition number.)
· Colon (:).
For example, the first USB disk is named usba:, and the file system on the first partition of the first USB disk is named usba0:.
|
|
IMPORTANT: File system names are case sensitive and must be entered in lower case. |
File system location
(In IRF mode.) To identify a file system on the master device, you do not need to specify the file system location. To identify a file system on a subordinate member device, you must specify the file system location in the slotn# format. The n argument represents the IRF member ID of the member device. For example, the location is slot2# for a file system that resides on member device 2.
|
|
IMPORTANT: The file system location string is case sensitive and must be entered in lower case. |
Default file system
You are working with the default file system by default after you log in. To specify a file or directory on the default file system, you do not need to specify the file system name. For example, you do not need to specify any location information if you want to save the running configuration to the root directory of the default file system.
To change the default file system, use the BootWare or Boot ROM menu. For more information, see the software release notes.
Directories
Directories in a file system are structured in a tree form.
Root directory
The root directory is represented by a forwarding slash (/). For example, flash:/ represents the root directory of the flash memory.
Working directory
The working directory is also called the current directory.
Directory naming conventions
When you specify a name for a directory, follow these conventions:
· A directory name can contain letters, digits, and special characters except for asterisks (*), vertical bars (|), forward slashes (/), backward slashes (\), question marks (?), left angle brackets (<), right angle brackets (>), quotation marks ("), and colons (:).
· A directory whose name starts with a dot character (.) is a hidden directory. To prevent the system from hiding a directory, make sure the directory name does not start with a dot character.
Commonly used directories
The device has some factory-default directories. The system automatically creates directories during operation. These directories include:
· diagfile—Stores diagnostic information files.
· license—Stores license files.
· logfile—Stores log files.
· seclog—Stores security log files.
· versionInfo—Stores software version information files.
Files
File naming conventions
When you specify a name for a file, follow these conventions:
· A file name can contain letters, digits, and special characters except for asterisks (*), vertical bars (|), forward slashes (/), backward slashes (\), question marks (?), left angle brackets (<), right angle brackets (>), quotation marks ("), and colons (:).
· A file whose name starts with a dot character (.) is a hidden file. To prevent the system from hiding a file, make sure the file name does not start with a dot character.
Common file types
The device is shipped with some files. The system automatically creates files during operation. The types of these files include:
· .ipe file—Compressed software image package file.
· .bin file—Software image file.
· .cfg file—Configuration file.
· .mdb file—Binary configuration file.
· .log file—Log file.
Specifying a directory name or file name
Specifying a directory name
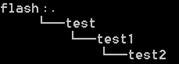
To specify a directory, you can use the absolute path or a relative path. For example, the working directory is flash:/. To specify the test2 directory in Figure 1, you can use the following methods:
· flash:/test/test1/test2 (absolute path)
· flash:/test/test1/test2/ (absolute path)
· test/test1/test2 (relative path)
· test/test1/test2/ (relative path)
Figure 1 Sample directory hierarchy
Specifying a file name
To specify a file, use the following methods:
· Enter the absolute path of the file and the file name in the format of filesystem/directory1/directory2/…/directoryn/filename, where directoryn is the directory in which the file resides.
· Enter the relative path of the file and the file name.
For example, the working directory is flash:/. The samplefile.cfg file is in the test2 directory shown in Figure 1. To specify the file, you can use the following methods:
· flash:/test/test1/test2/samplefile.cfg
· test/test1/test2/samplefile.cfg
FIPS compliance
The device supports the FIPS mode that complies with NIST FIPS 140-2 requirements. Support for features, commands, and parameters might differ in FIPS mode and non-FIPS mode. For more information about FIPS mode, see Security Configuration Guide.
Restrictions and guidelines: File system management
(In standalone mode.) To avoid file system corruption, do not install or remove storage media during file system management.
(In IRF mode.) To avoid file system corruption, do not perform the following tasks during file system management:
· Install or remove storage media.
· Perform a master/subordinate switchover.
If you remove a storage medium while a directory or file on the medium is being accessed, the device might not recognize the medium when you reinstall it. To reinstall this kind of storage medium, first complete one of the following tasks:
· If you were accessing a directory on the storage medium, change the working directory.
· If you were accessing a file on the storage medium, close the file.
· If another administrator was accessing the storage medium, unmount all partitions on the storage medium.
Make sure a USB disk is not write protected before an operation that requires the write right on the disk.
You cannot access a storage medium that is being partitioned, or a file system that is being formatted or repaired.
Before managing file systems, directories, and files, make sure you know the possible impact.
Managing storage media and file systems
Partitioning a storage medium
About partitioning a storage medium
A storage medium can be divided into logical devices called partitions. Operations on one partition do not affect the other partitions.
Hardware and feature compatibility
|
Hardware |
Feature compatibility |
|
MSR810, MSR810-W, MSR810-W-DB, MSR810-LM, MSR810-W-LM, MSR810-10-PoE, MSR810-LM-HK, MSR810-W-LM-HK, MSR810-LMS-EA |
No |
|
MSR810-LMS, MSR810-LUS |
No |
|
MSR2600-6-X1, MSR2600-10-X1 |
No |
|
MSR 2630 |
No |
|
MSR3600-28, MSR3600-51 |
Yes |
|
MSR3600-28-SI, MSR3600-51-SI |
No |
|
MSR3600-28-X1, MSR3600-28-X1-DP, MSR3600-51-X1, MSR3600-51-X1-DP |
No |
|
MSR3610-I-DP, MSR3610-IE-DP |
Yes |
|
MSR3610-X1, MSR3610-X1-DP, MSR3610-X1-DC, MSR3610-X1-DP-DC |
Yes |
|
MSR 3610, MSR 3620, MSR 3620-DP, MSR 3640, MSR 3660 |
Yes |
|
MSR3610-G, MSR3620-G |
Yes |
Restrictions and guidelines
|
|
IMPORTANT: Partitioning a storage medium clears all data on the medium. |
The flash memory does not support partitioning.
Before partitioning a storage medium, make sure no other users are accessing the medium.
To partition a USB disk, make sure the disk is not write protected. If the disk is write protected, the partition operation will fail. To restore access to the USB disk, you must reinstall the disk or remount the file systems on the disk.
A partition must have a minimum of 32 MB of storage space.
The actual partition size and the specified partition size might have a difference of less than 5% of the storage medium's total size.
Prerequisites
Back up the files in the storage medium.
Procedure
To partition a storage medium, execute the following command in user view:
fdisk medium [ partition-number ]
To partition a storage medium evenly, specify the partition-number argument. To customize the sizes of partitions, do not specify the partition-number argument. The command will require you to specify a size for each partition.
Mounting or unmounting a file system
Restrictions and guidelines
You can mount or unmount only a file system that is on a hot-swappable storage medium.
You can unmount a file system only when no other users are accessing the file system.
To prevent a USB disk and the USB interface from being damaged, make sure the following requirements are met before unmounting file systems on the USB disk:
· The system has recognized the USB disk.
· The USB disk LED is not blinking.
Mounting a file system
To mount a file system, execute the following command in user view:
mount filesystem
File systems on a hot-swappable storage medium are automatically mounted when the storage medium is connected to the device. If the system cannot recognize a file system, you must mount the file system before you can access it.
Unmounting a file system
To unmount a file system, execute the following command in user view:
umount filesystem
To remove a hot-swappable storage medium from the device, you must first unmount all file systems on the storage medium to disconnect the medium from the device. Removing a connected hot-swappable storage medium might damage files on the storage medium or even the storage medium itself.
Formatting a file system
Restrictions and guidelines
Formatting a file system permanently deletes all files and directories in the file system. You cannot restore the deleted files or directories.
You can format a file system only when no other users are accessing the file system.
Procedure
To format a file system, execute the following command in user view:
format filesystem [ ext4 | vfat ]
Repairing a file system
Restrictions and guidelines
If part of a file system is inaccessible, use this task to examine and repair the file system.
You can repair a file system only when no other users are accessing the file system.
Procedure
To repair a file system, execute the following command in user view:
fixdisk filesystem
Managing files and directories
Setting the operation mode for files and directories
About file and directory operation modes
The device supports the following operation modes:
· alert—The system prompts for confirmation when your operation might cause problems such as file corruption or data loss. This mode provides an opportunity for you to cancel a disruptive operation.
· quiet—The system does not prompt for confirmation.
Procedure
1. Enter system view.
system-view
2. Set the operation mode for files and directories.
file prompt { alert | quiet }
The default mode is alert.
Displaying file and directory information
To display file and directory information, execute the following command in user view:
dir [ /all ] [ file | directory | /all-filesystems ]
If multiple users perform file operations (for example, creating or deleting files or directories) at the same time, the output from this command might be incorrect.
Displaying the contents of a text file
To display the contents of a text file, execute the following command in user view:
more file
Displaying the working directory
To display the working directory, execute the following command in user view:
pwd
Changing the working directory
About changing the working directory
(In standalone mode.) The default working directory is the root directory of the default file system.
(In IRF mode.) The default working directory is the root directory of the default file system on the master device.
Procedure
To change the working directory, execute the following command in user view:
cd { directory | .. }
Creating a directory
To create a directory, execute the following command in user view:
mkdir directory
Renaming a file or directory
To rename a file or directory, execute the following command in user view:
rename { source-file | source-directory } { dest-file | dest-directory }
Copying a file
To copy a file, execute the command in user view.
In non-FIPS mode:
copy source-file { dest-file | dest-directory } [ vpn-instance vpn-instance-name ] [ source interface interface-type interface-number ]
In FIPS mode:
copy source-file { dest-file | dest-directory }
Moving a file
To move a file, execute the following command in user view:
move source-file { dest-file | dest-directory }
Deleting and restoring files
About deleting and restoring a file
You can delete a file permanently or move it to the recycle bin of the file system. A file moved to the recycle bin can be restored, but a permanently deleted file cannot.
Each file system has a recycle bin. A recycle bin is a directory named .trash in the root directory of the file system.
Restrictions and guidelines
Files in the recycle bin occupy storage space. To release the occupied storage space, delete files from the recycle bin.
To delete files from the recycle bin, use the reset recycle-bin command. If you use the delete command, the recycle bin might not be able to operate correctly.
To display files in a recycle bin, use one of the following methods:
· Access the root directory of the file system and execute the dir /all .trash command.
· Access the recycle bin directory of the file system and execute the dir command.
Deleting a file
To delete a file, execute one of the following commands in user view:
· Delete a file by moving it to the recycle bin.
delete file
· Delete a file permanently.
delete /unreserved file
· Delete files from the recycle bin.
reset recycle-bin [ /force ]
Restoring a file
To restore a file from the recycle bin, execute the following command in user view:
undelete file
Deleting a directory
Restrictions and guidelines
To delete a directory, you must delete all files and subdirectories in the directory.
Deleting a directory permanently deletes all its files in the recycle bin, if any.
Procedure
To delete a directory, execute the following command in user view:
rmdir directory
Archiving files and directories
About archiving files and directories
You can archive files and directories to a single file for purposes such as file backup. The original files and directories still exist.
When you archive files and directories, you can choose to compress the archive files so the archive files use less storage space.
Procedure
To archive files and directories, execute the following command in user view:
tar create [ gz ] archive-file dest-file [ verbose ] source { source-file | source-directory }&<1-5>
Extracting files and directories
About extracting files and directories
Use this feature to extract files and directories from archive files.
Procedure
To extract files and directories, execute the following commands in user view:
1. (Optional.) Display archived files and directories.
tar list archive-file file
2. Extract files and directories.
tar extract archive-file file [ verbose ] [ screen | to directory ]
Compressing a file
To compress a file, execute the following command in user view:
gzip file
Decompressing a file
To decompress a file, execute the following command in user view:
gunzip file
Calculating the file digest
About file digests
File digests are used to verify file integrity.
Procedure
To calculate the digest of a file, execute one of the following commands in user view:
· Use the SHA-256 algorithm.
sha256sum file
· Use the MD5 algorithm.
md5sum file
Synchronizing files and directories from an Rsync server
About file and directory synchronization
This feature synchronizes files and directories from an Rsync server to a directory on the device.
Hardware and feature compatibility
|
Hardware |
Feature compatibility |
|
MSR810, MSR810-W, MSR810-W-DB, MSR810-LM, MSR810-W-LM, MSR810-10-PoE, MSR810-LM-HK, MSR810-W-LM-HK, MSR810-LMS-EA |
Yes |
|
MSR810-LMS, MSR810-LUS |
No |
|
MSR2600-6-X1, MSR2600-10-X1 |
No |
|
MSR 2630 |
No |
|
MSR3600-28, MSR3600-51 |
No |
|
MSR3600-28-SI, MSR3600-51-SI |
No |
|
MSR3600-28-X1, MSR3600-28-X1-DP, MSR3600-51-X1, MSR3600-51-X1-DP |
No |
|
MSR3610-I-DP, MSR3610-IE-DP |
No |
|
MSR3610-X1, MSR3610-X1-DP, MSR3610-X1-DC, MSR3610-X1-DP-DC |
No |
|
MSR 3610, MSR 3620, MSR 3620-DP, MSR 3640, MSR 3660 |
No |
|
MSR3610-G, MSR3620-G |
No |
Restrictions and guidelines
This feature applies only to an IPv4 network.
Procedure
1. Enter system view.
system-view
2. (Optional.) Specify the source IP address for packets sent to the Rsync server.
rsync client source { interface interface-type interface-number | ip source-ip }
By default, no outbound interface or source IP address is specified. The device uses the primary IPv4 address of the outbound interface as the source IP address for outgoing packets during file and directory synchronization.
3. Synchronize files and directories from the Rsync server.
rsync [ -s source-ip ] rsync-server { source-file | source-directory } dest-directory [ user-name password ]
Using the automatic copying feature
About the automatic copying feature
The automatic copying feature automatically copies files from a hot-swappable storage medium to the device when you connect the storage medium to the device. You can use this feature to update files on a device without logging in to the device. For example, you can use this feature to update the webpages and video files on a vehicle-mounted AP.
Hardware and feature compatibility
|
Hardware |
Feature compatibility |
|
MSR810, MSR810-W, MSR810-W-DB, MSR810-LM, MSR810-W-LM, MSR810-10-PoE, MSR810-LM-HK, MSR810-W-LM-HK, MSR810-LMS-EA |
Yes |
|
MSR810-LMS, MSR810-LUS |
No |
|
MSR2600-6-X1, MSR2600-10-X1 |
No |
|
MSR 2630 |
No |
|
MSR3600-28, MSR3600-51 |
No |
|
MSR3600-28-SI, MSR3600-51-SI |
No |
|
MSR3600-28-X1, MSR3600-28-X1-DP, MSR3600-51-X1, MSR3600-51-X1-DP |
No |
|
MSR3610-I-DP, MSR3610-IE-DP |
No |
|
MSR3610-X1, MSR3610-X1-DP, MSR3610-X1-DC, MSR3610-X1-DP-DC |
No |
|
MSR 3610, MSR 3620, MSR 3620-DP, MSR 3640, MSR 3660 |
No |
|
MSR3610-G, MSR3620-G |
No |
Restrictions and guidelines
During the automatic copying process, observe the LEDs on the device to determine progress and results.
· If the SYS LED flashes quickly, the copy operation is in progress.
· If the SYS LED flashes normally, the copy operation is completed.
· If the ALARM LED flashes for 10 seconds, the copy operation failed.
Possible reasons for copy operation failures include:
· You are not assigned the write right to the destination directory.
· The destination directory does not have sufficient free storage space to save the files.
· The hot-swappable storage medium is removed before the copy operation is completed.
· The specified source directory does not exist on the hot-swappable storage medium.
For the automatic copying feature to operate correctly, you must specify the source directory and the destination directory for the copy operation.
Procedure
1. Enter system view.
system-view
2. Specify the source directory.
auto-copy source-directory source-directory
By default, no source directory is specified for the automatic copying feature.
3. Specify the destination directory.
auto-copy destination-directory destination-directory
By default, no destination directory is specified for the automatic copying feature.