
- Released At: 13-09-2023
- Page Views:
- Downloads:
- Table of Contents
- Related Documents
-
|
|
|
AD-Campus 6.2 |
|
Tight Microsoft DHCP Management Configuration Guide |
|
|
|
|
Document version: 5W100-20230221
Copyright © 2023 New H3C Technologies Co., Ltd. All rights reserved.
No part of this manual may be reproduced or transmitted in any form or by any means without prior written consent of New H3C Technologies Co., Ltd.
Except for the trademarks of New H3C Technologies Co., Ltd., any trademarks that may be mentioned in this document are the property of their respective owners.
The information in this document is subject to change without notice.
Contents
Prepare for DHCP configuration
Configure the system log size for DHCP Server
Configure the DHCP log file size for DHCP Server
(Optional) Uninstall Windows DHCP plug-in
(Optional) Upgrade Windows DHCP plug-in
Incorporate DHCP servers on the controller
Check the maximum client lead time (MCLT)
Configure Microsoft DHCP servers for isolation domains
General restrictions and guidelines
Overview
The SeerEngine-Campus controller supports the following DHCP server management modes:
· Loose management—The SeerEngine-Campus controller does not send any requests of IP address pool creation to the DHCP server or synchronize IP address pool information from the DHCP server. All IP address pools on the DHCP server are manually configured.
· Tight management—After you create IP address pools and specify address ranges for them on the SeerEngine-Campus controller, the controller sends requests of IP address pool creation to the DHCP server. IP address binding is supported in this management mode.
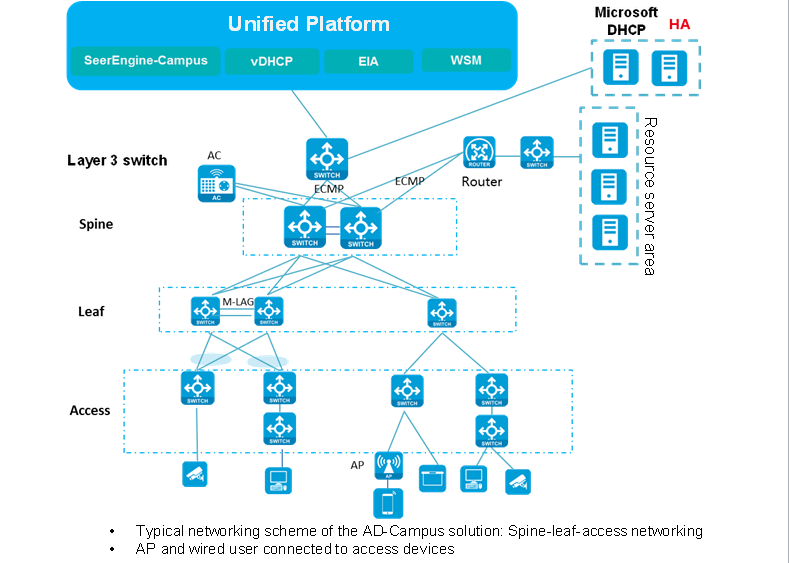
This document provides a configuration guide only on tight Microsoft DHCP management. Figure 1 shows the location of Microsoft DHCP HA (High Availability) on the network.
Configuration procedure
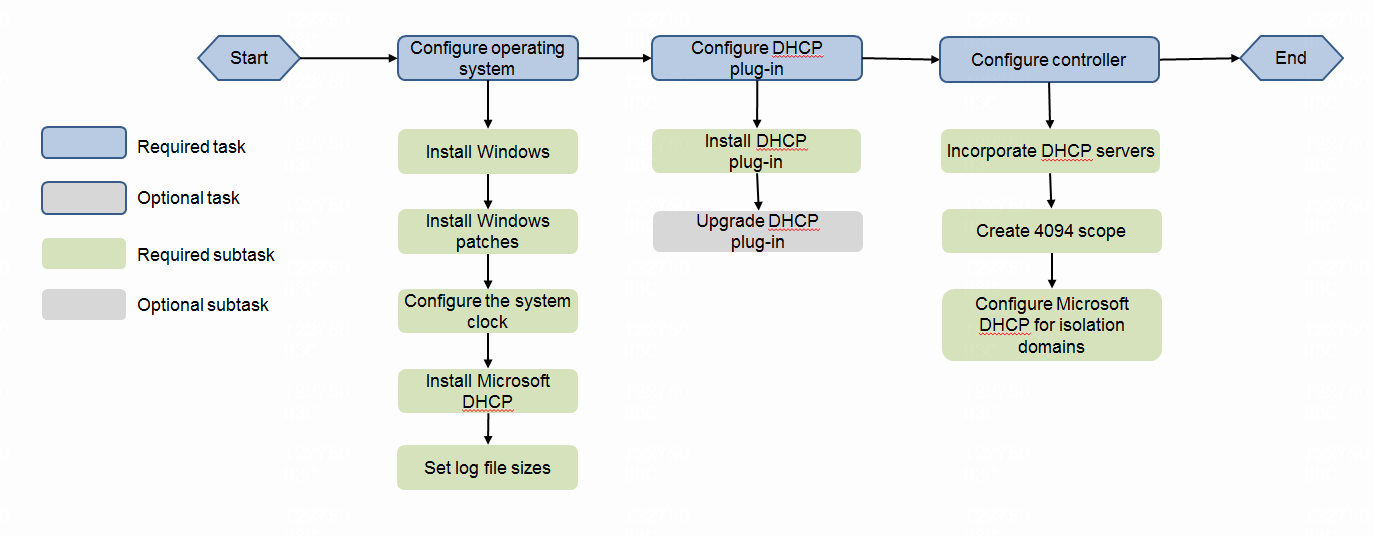
Deployment workflow
Figure 2 Deployment workflow
Prepare for DHCP configuration
Hardware requirements
Microsoft DHCP HA is recommended by AD-Campus 6.2. The deployment of Microsoft DHCP HA requires two servers.
If HA is unnecessary, you can deploy Microsoft DHCP in standalone mode.
Table 1 shows the hardware requirements on Windows DHCP servers:
Table 1 Hardware requirements on Windows DHCP servers
|
Number of managed devices |
Hardware requirements |
|
Less than 40000 |
· CPU: 16 cores, 2.0GHz. · Memory: 32GB or above. · Disk: 2 × 300GB RAID1. · RAID: 256MB cache. |
|
40000 to 60000 |
· CPU: 24 cores, 2.0GHz. · Memory: 64GB or above. · Disk: 2 × 500GB RAID1. · RAID: 1GB cache. |
|
60000 to 100000 |
· CPU: 24 cores, 2.0GHz. · Memory: 64GB or above. · Disk: 2 × 500GB RAID1. · RAID: 1GB cache. |
|
|
IMPORTANT: · Configure RAID 1, RAID 5, or RAID 10 for the disks of physical servers and configure the cache space for the RAID controller according to Table 1. The RAID controller must support the power fail safeguard method and has a supercapacitor installed. · Configure dual-NIC aggregation on physical servers. For more information about this task, see the official configuration guide provided by Microsoft. |
Software requirements
The DHCP service built in Windows can meet the requirement of Microsoft DHCP configuration. Table 2 shows the version requirements on operation system and DHCP:
Table 2 Software version requirements
|
Software requirements |
Remarks |
|
Built-in DHCP service of Windows |
· DHCP Microsoft Corporation version: 6.3 or 10. · Operation system version: Windows Server 2016 (recommended), Windows Server 2012 R2 or later. |
Install Windows patches
Microsoft DHCP might allocate reserved IP addresses incorrectly after running for a long time. To avoid this issue, install version-specific patches. For example, if the operation system version is Windows Server 2012 R2, install the following patches:
· https://support.microsoft.com/en-us/kb/2919355
· https://support.microsoft.com/en-us/kb/3022781
· https://support.microsoft.com/en-us/kb/3000850
Configure system clock
To ensure that the DHCP HA service can run correctly, the two servers must use the same system clock setting.
|
|
CAUTION: If the time difference between the two servers exceeds one minute, DHCP HA failover will be faulty. To avoid this issue, the time difference between the two servers must be less than one minute. |
Install Microsoft DHCP
|
|
CAUTION: · For DHCP HA, install Microsoft DHCP on both servers. · The two servers cannot use the same hostname. If they use the same hostname, the establishment of failover relationship between the primary and secondary servers might be affected, and then data synchronization will be interrupted. · Configure a gateway address for each DHCP server's NIC, because the DHCP server needs to establish Layer 3 connection with the spine device. |
1. Log in to the Windows server, click the Windows key, and then click the Server Manager icon.
2. From the left navigation pane, select Dashboard.
3. Click Add roles and features, and then click Next.
Figure 3 Add roles and features

4. On the Select installation type page, select Role-based or feature-based installation, and then click Next.
5. On the Select destination server page, perform the following task:
a. Select Select a server from the server pool.
b. Check the IP address and the operating system of the Windows server in the Server Pool area below.
c. Click Next.
6. On the Select server roles page, select DHCP Server, click Add Features on the pop-up window, and then click Next.
7. Do not change the default feature settings and click Next.
8. On the page that opens, view DHCP role information and the things to note, and then click Next.
9. On the Confirm installation selections page, confirm the configuration, and then click Install.
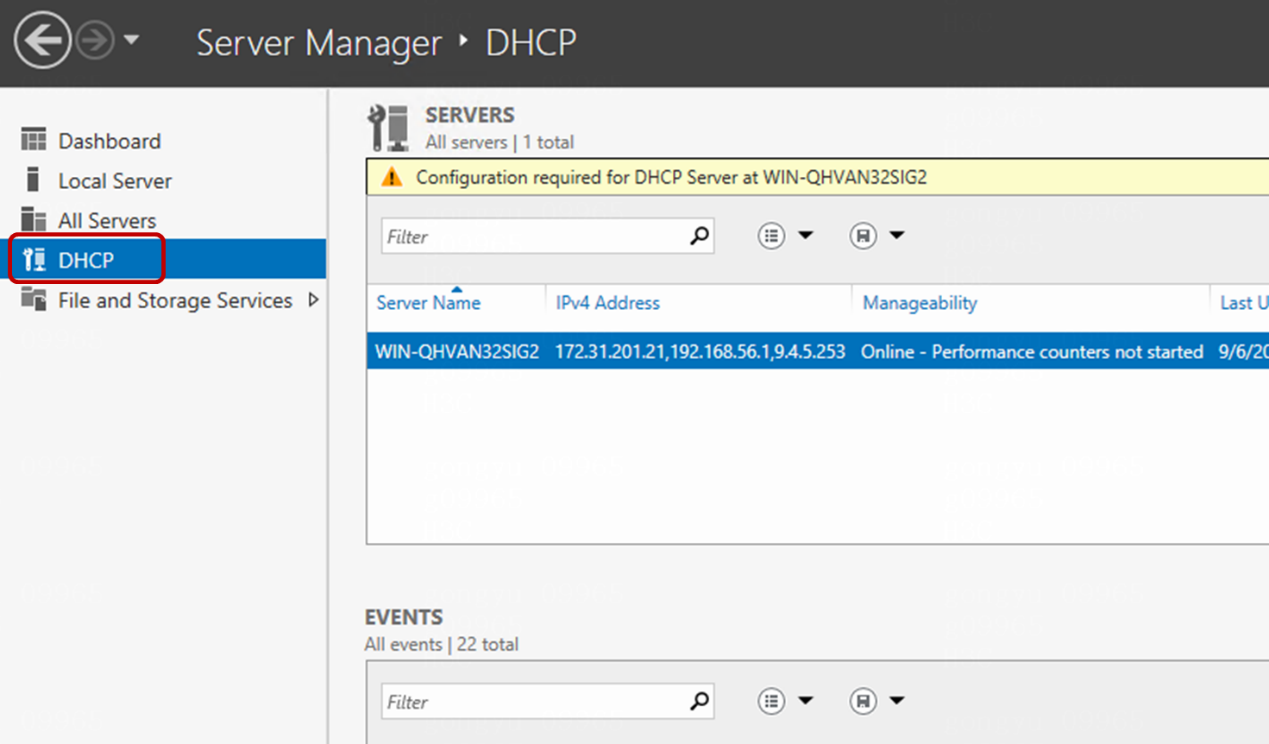
10. After DHCP server installation finishes, click Close. The DHCP option will appear on the left navigation pane of the server manager page.
Figure 4 Successful DHCP server installation
11. Click the Windows and R keys to open the Run box, enter the cmd command in the search box, and then click OK.
12. Execute the netstat –ano | findstr "67" command to check whether UDP port 67 is used by the DHCP Server service.
Figure 5 Usage of UDP port 67

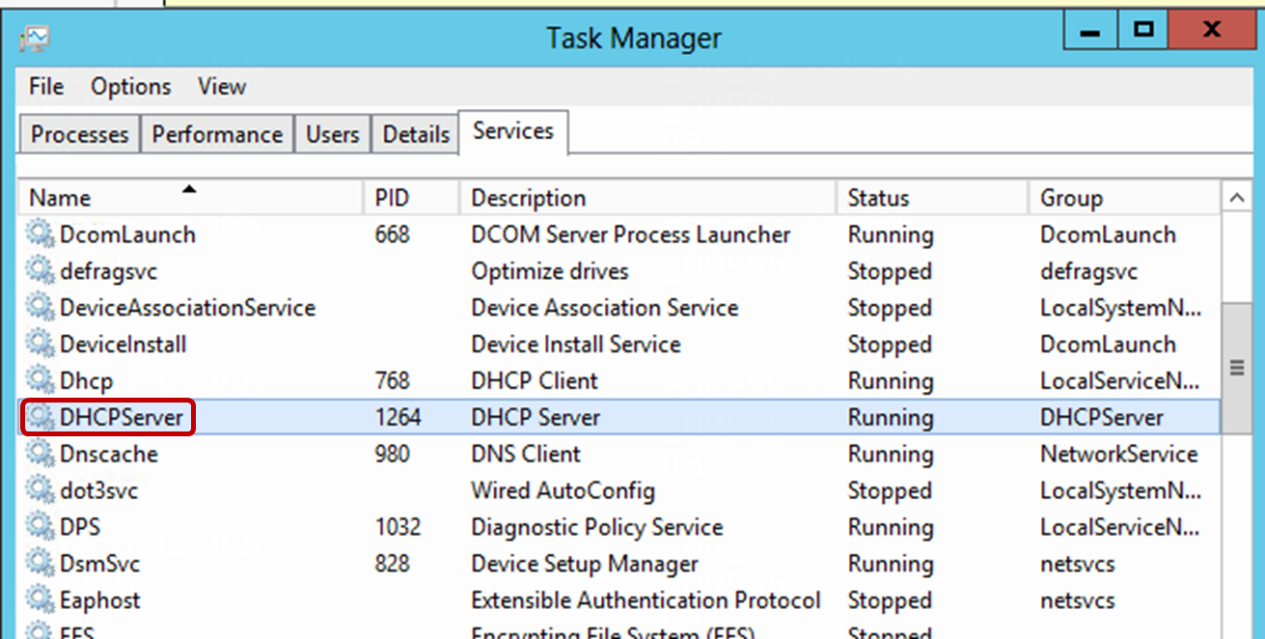
13. Open up Task Manager, and then click the Services tab to view the running state of the DHCP Server service.
Figure 6 Running state of DHCP Server
Configure the system log size for DHCP Server
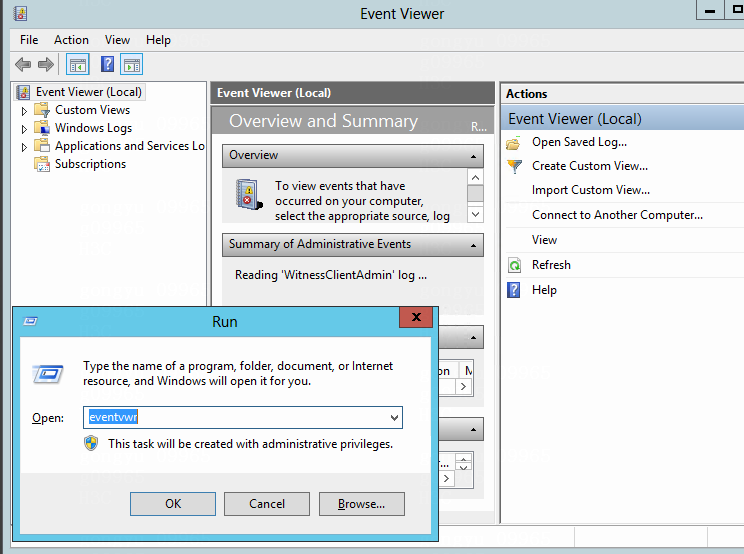
1. Click the Windows and R keys to open the Run box, enter the eventvwr command in the search box, and then click OK to open Event Viewer.
Figure 7 Event Viewer
2. From the left navigation pane of Event Viewer, select Applications and Services Logs > Microsoft > Windows > DHCP-Server.
Figure 8 DHCP-Server area
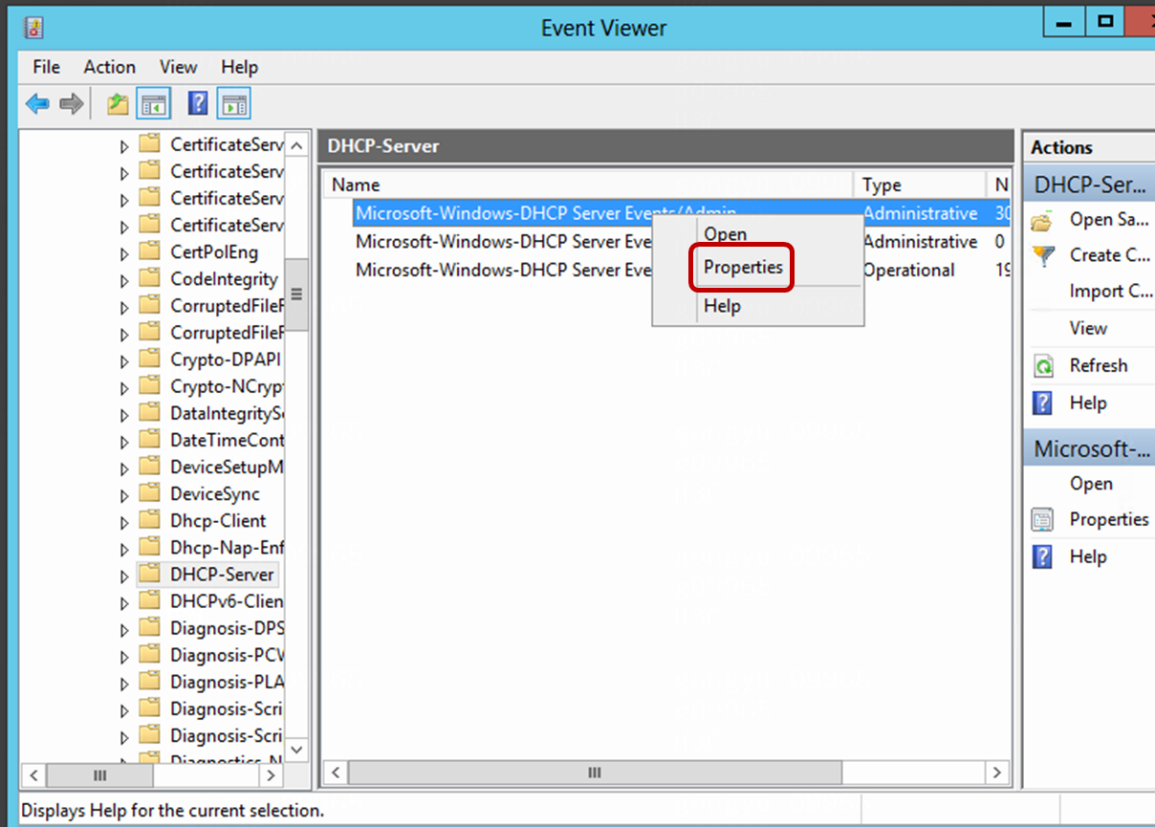
3. Right click on Microsoft-Windows-DHCP Server Events/Admin, and then select Properties in the pop-up menu.
Figure 9 Editing log size
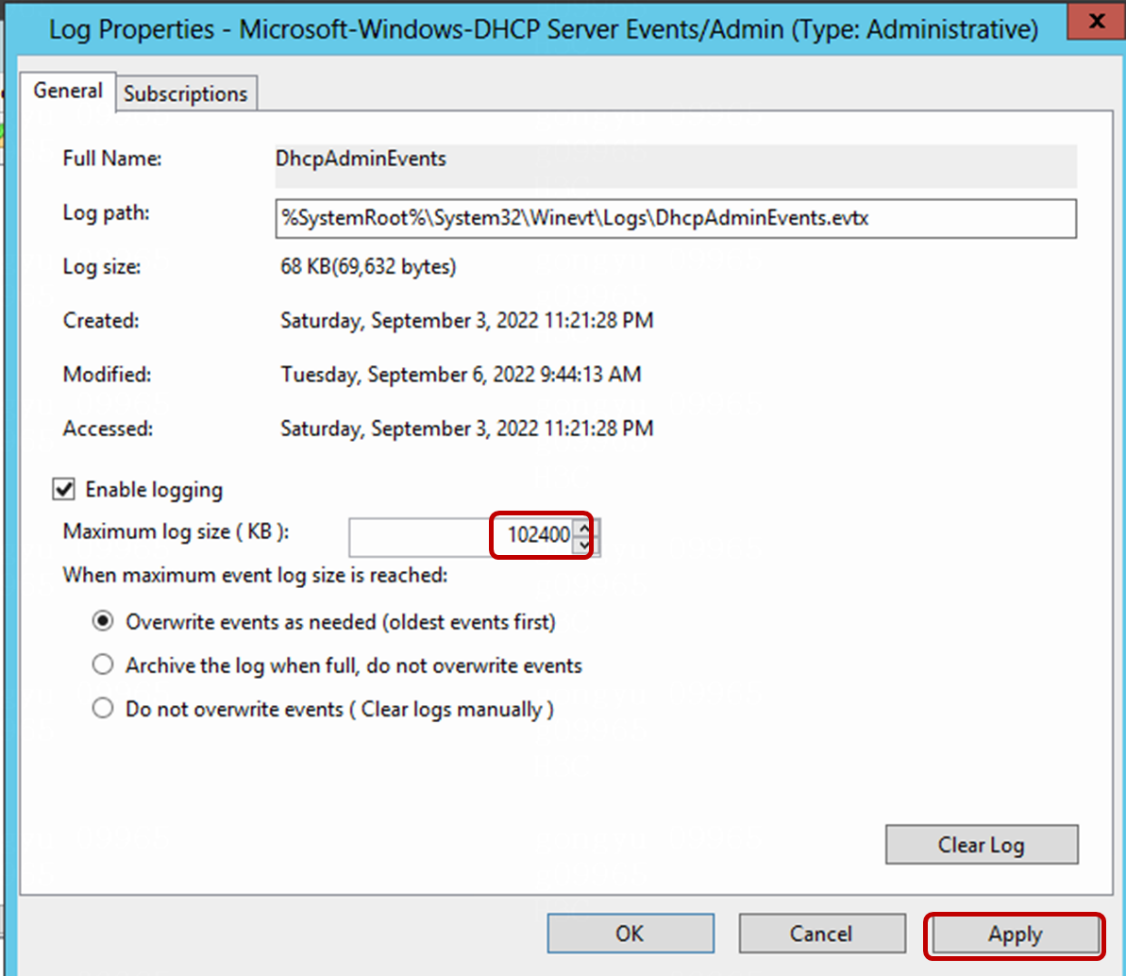
4. Set the value for the Maximum log size parameter to 102400, and then click Apply to save the configuration.
5. Repeat steps 3 and 4 to configure the maximum log size to 102400 for Microsoft-Windows-DHCP Server Events/FilterNotifications and Microsoft-Windows-DHCP Server Events/Operational separately.
Configure the DHCP log file size for DHCP Server
1. Click the Windows and R keys to open the Run box, enter the regedit command in the search box, and then click OK to open Registry Editor.
2. From the left navigation pane of Registry Editor, select HKEY_LOCAL_MACHINE > SYSTEM > ControlSet001 > Services > DHCPServer > Parameters.
Figure 10 Parameters area
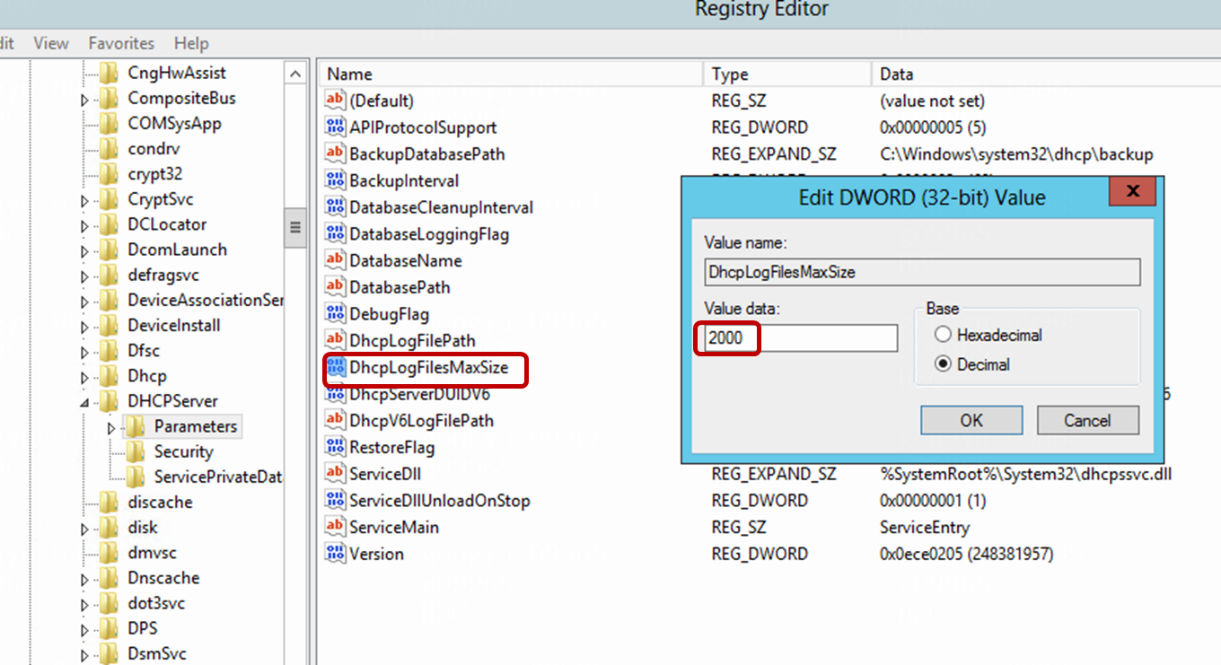
3. Right click DhcpLogFilesMaxSize, and then click Edit in the pop-up menu.
4. In the Edit DWORD (32-bit) Value window, set the value for the Value Data parameter to 2000, and then click OK. The default unit for this parameter is M.
5. Open up Task Manager, click the Services tab, right click the DHCP Server service, and then select Restart in the pop-up menu to restart the service.
Manage DHCP plug-in
Restrictions and guidelines
· In the DHCP HA scenario, install the DHCP plug-in on both servers.
· When you install the DHCP plug-in, run the installation setup as Administrator.
Install Windows DHCP plug-in
Obtain the software package for Windows DHCP plug-in installation
|
|
CAUTION: When you upload the compressed installation package of Windows DHCP plug-in through FTP or TFTP, use the binary mode to avoid package damage. |
Copy the compressed package of Windows DHCP plug-in from the attachment of the SeerEngine-Campus software package to the destination file folder on the Windows server.
Alternatively, you can upload the compressed DHCP plug-in package to the destination directory on the Windows server through a file transfer protocol, such as FTP, TFTP or SCP.
Install Windows DHCP plug-in
|
|
CAUTION: To ensure successful installation, do not install the Windows DHCP plug-in at directory C:\Program Files or C:\ProgramData. |
1. Find the compressed DHCP plug-in package according the storage path.
2. Decompress the package to the desired file folder for installation.
3. Double click the install.bat file to start DHCP plug-in installation.
4. After successful DHCP plug-in installation, perform the following task:
a. Open up Task Manager, and then click the Services tab.
b. Right click the DHCP Server service.
c. Select Restart in the pop-up menu to restart the service.
Edit the service permission of DHCP plug-in
|
CAUTION: After you install the DHCP plug-in on two Windows servers, edit the service permission of DHCP plug-in on the servers separately. |
This section takes one of the two servers as an example to introduce the procedure of this task.
1. Log in to the Windows server, click the Windows key, and then click the Server Manager icon.
2. Click Tools(T) at the upper right corner of the page, and click Services in the pop-up menu.
Figure 11 Services page
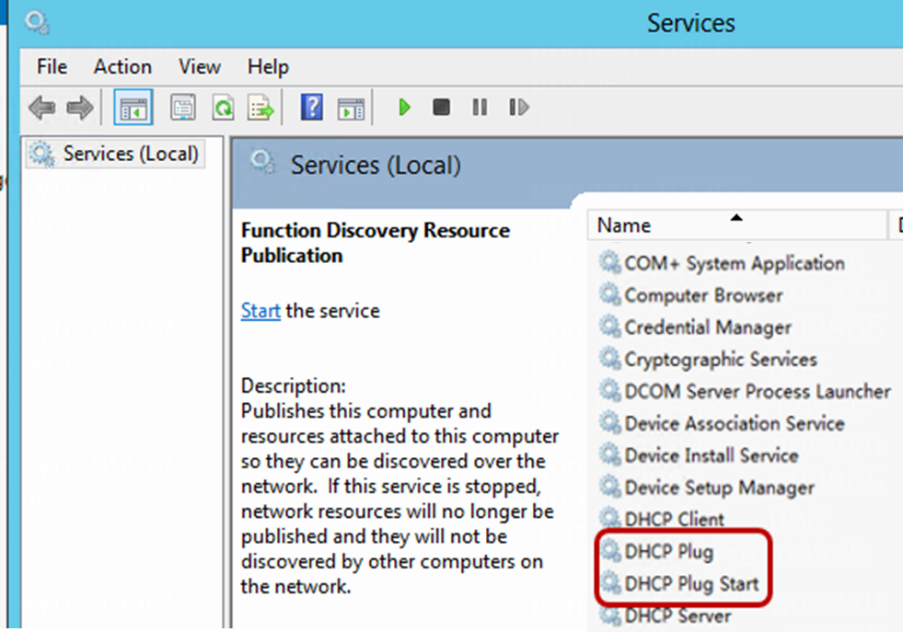
3. Right click DHCP Plug, and then select Properties in the pop-up menu.
Figure 12 Properties of DHCP Plug

\Administrator represents the local user account. Make sure the primary server and the secondary server use the same username and password.
5. Repeat steps 3 and 4 to configure the DHCP Plug Start service.
6. After configuring the DHCP Plug and DHCP Plug Start services, right click the DHCP Plug and DHCP Plug Start services separately, click Stop in the pop-up menu to stop the services.
7. Right click the DHCP Plug and DHCP Plug Start services separately, click Start in the pop-up menu to start the services.
(Optional) Uninstall Windows DHCP plug-in
Perform this task to uninstall the Windows DHCP plug-in on demand.
|
|
CAUTION: Stop the DHCP service before uninstalling the DHCP plug-in. |
1. Open the file folder at which the Windows DHCP plug-in is installed.
2. Open the software installation package, and then double click the uninstall.bat file.
(Optional) Upgrade Windows DHCP plug-in
Perform this task to upgrade the Windows DHCP plug-in on demand.
|
|
CAUTION: · The DHCP plug-in version must be compatible with the controller version. Before upgrading the controller, first upgrade the DHCP plug-in. · Before upgrading the DHCP plug-in, first stop the DHCP service and reserve a window period for upgrade. This operation will interrupt DHCP client services, for example, the client cannot request an IP address from the DHCP server or renews the address lease. |
1. Back up DHCP configuration files.
After you decompress the new-version Windows DHCP plug-in, the new installation directory will overwrite the original installation directory of Windows DHCP plug-in. To avoid data loss, back up the original files in the dhcp-plug-windows\server\imf\server\conf directory before decompressing the new-version Windows DHCP plug-in.
The original files include dhcp_agent.cfg, imf.cfg, plugin.cfg, and qvdm.conf. The dhcp_agent.cfg and qvdm.conf files are initial files. The plugin.cfg and imf.cfg files are generated after the DHCP server is managed by the controller.
2. Stop the DHCP Server service.
a. Log in to the Windows server, click the Windows key, and then click the Administrative Tools icon.
b. Double click Services.
c. Right click the DHCP Server service, and then click Stop in the pop-up menu.
3. Uninstall the original DHCP plug-in.
a. Open the file folder at which the original DHCP plug-in is installed.
b. Open the software installation package, and then double click the uninstall.bat file.
4. Replace the files in the installation package of the new-version DHCP plug-in with the backup files.
a. Copy the backup dhcp_agent.cfg, imf.cfg, plugin.cfg, and qvdm.conf files.
b. Access the dhcp-plug-windows\server\imf\server\conf directory, and the paste the backup files.
5. Install the new-version DHCP plug-in.
a. Access the installation directory of the new-version DHCP plug-in.
b. Double click the install.bat file to start DHCP plug-in installation.
6. Start the DHCP Sever service.
7. Edit the service permission of the DHCP plug-in and restart the DHCP plug-in services, including DHCP Plug Start and DHCP Plug.
For more information about this step, see "Edit the service permission of DHCP plug-in."
Incorporate DHCP servers on the controller
IP address plan
The following table describes the IP address planning for SeerEngine-Campus DHCP HA deployment:
|
Plan item |
Example IP address |
Description |
|
Northbound service IP for Unified Platform |
100.1.0.100 |
IP address used for Unified Platform login. |
|
8.0.0.171 |
IP address of the primary Microsoft DHCP server. |
|
|
Secondary Microsoft DHCP server |
8.0.0.172 |
IP address of the secondary Microsoft DHCP server. |
|
Subnet for 4094 IP address pool |
130.1.0.0/24 |
Network used for device management. |
Procedure
1. Navigate to Automation > Campus Network > Network Parameters > DHCP.
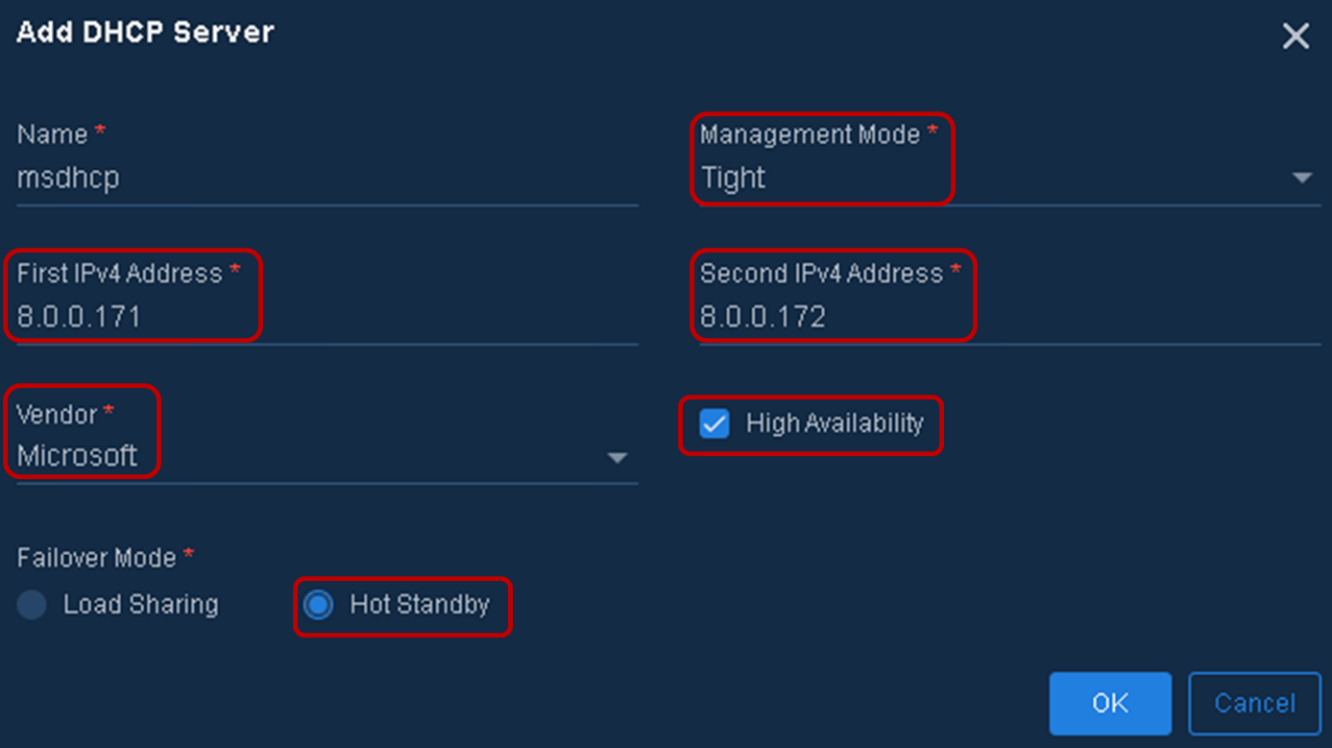
2. Click Add, and then configure the following parameters:
¡ Name: This section uses msdhcp as an example name.
¡ Management Mode: Select Tight.
¡ First/Second IPv4 Address: Enter the service IPs of the two DHCP servers. This section uses 8.0.0.171 and 8.0.0.172 as example addresses.
¡ Vendor: Select Microsoft.
¡ High Availability: Select this feature.
¡ Failover Mode: Select Hot Standby.
Figure 13 Adding a DHCP server
3. Click OK.
4. Return to the DHCP page, and then click
the Audit icon (![]() ) in the Actions column for the added DHCP server.
) in the Actions column for the added DHCP server.
If the audit is successful, the DHCP page displays the DHCP server as follows:
Figure 14 Successful audit

Create VSI4094 network scope
About VSI4094 address pool
According to the current solution, the VSI4094 interface on the leaf device relays the DHCP requests from access users to the Microsoft DHCP server. For the DHCP server to respond to these relayed DHCP requests, create an IP address pool whose subnet includes the IP address of the VSI4094 interface. This address pool is independent of the vDHCP 4094 address pool configured for automated deployment. It is used only to ensure that the Microsoft DHCP server responds to the DHCP requests relayed from the VSI4094 interface on the leaf device.
Procedure
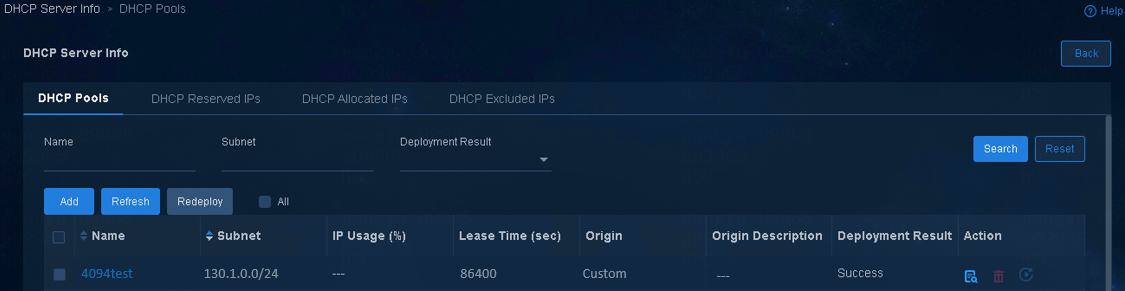
1. Add a 4094 address pool.
|
|
NOTE: This address pool is not used for real services. When you configure the parameters of the address pool, use the default settings of these parameters except for the gateway. You can select a random IP from the address pool's subnet as its gateway, for example, the IP address of the VSI4094 interface on the spine device. |
a. Navigate to Automation > Campus Network > Network Parameters > DHCP.
b. Click the name of the target DHCP server, and then click the Address Pools tab.
c. Click Add, and then configure the address pool settings.
Make sure the subnet specified for the address pool is the subnet to which the VSI4094 interface IP address belongs.
Figure 15 Adding a DHCP address pool

d. Click OK to save the configuration. The DHCP Pools tab will display the added address pool.
Figure 16 Result of address pool configuration
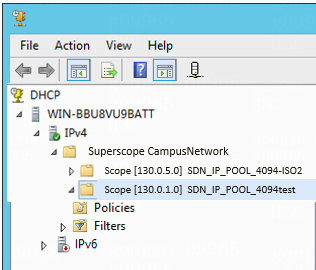
2. Verify that the backstage DHCP management pages of the two servers display the 4094 address pool.
a. Log in to the Windows server, click the Windows key, and then click the Server Manager icon.
b. From the left navigation pane, select DHCP.
Figure 17 DHCP

c. Right click the DHCP server in the Servers area, and then select DHCP Manager in the pop-up menu to open the backstage DHCP management window.
You can find that the controller has created superscope CampusNetwork and scope VLAN4094 on the DHCP server.
Figure 18 Backstage DHCP management page
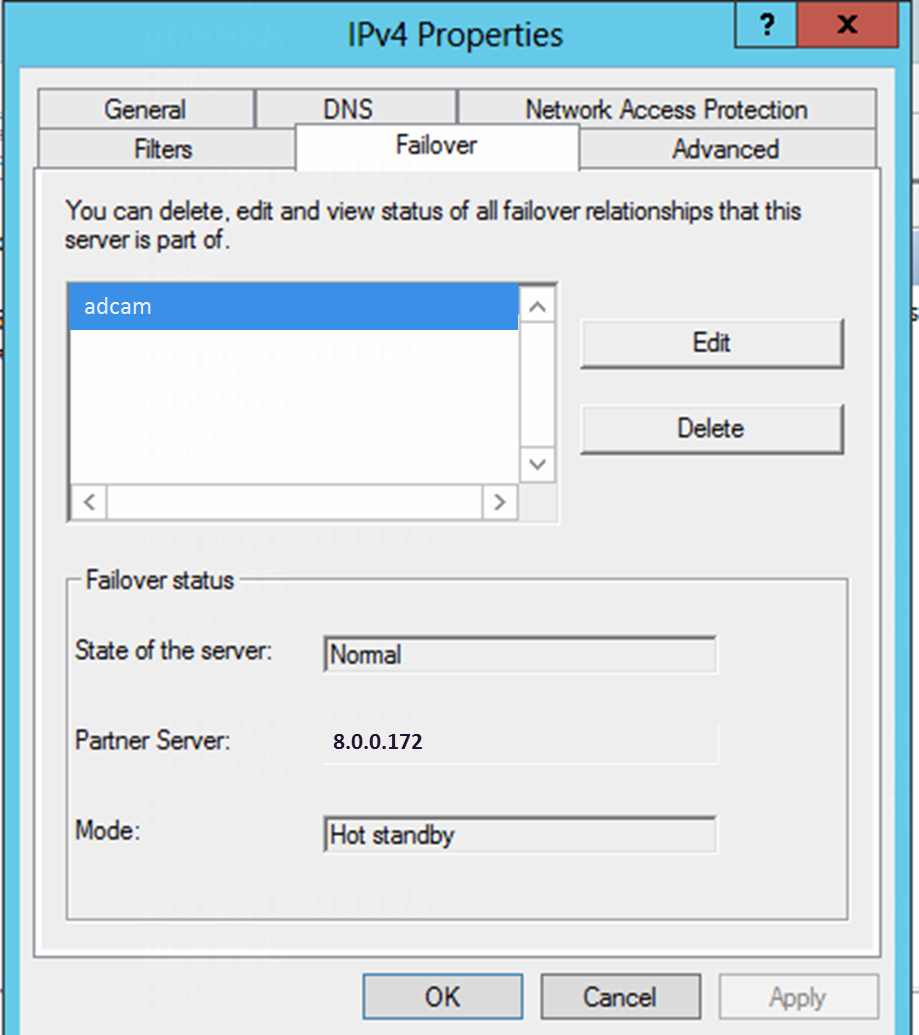
3. Verify that the failover state of the two servers is normal.
a. On the backstage DHCP management page of a DHCP server, right click IPv4 on the left navigation pane, and the select Properties in the pop-up menu.
b. Click the Failover tab on the IPv4 Properties window, and then verify that the state of the server is normal in the Failover status area.
Figure 19 Checking failover state
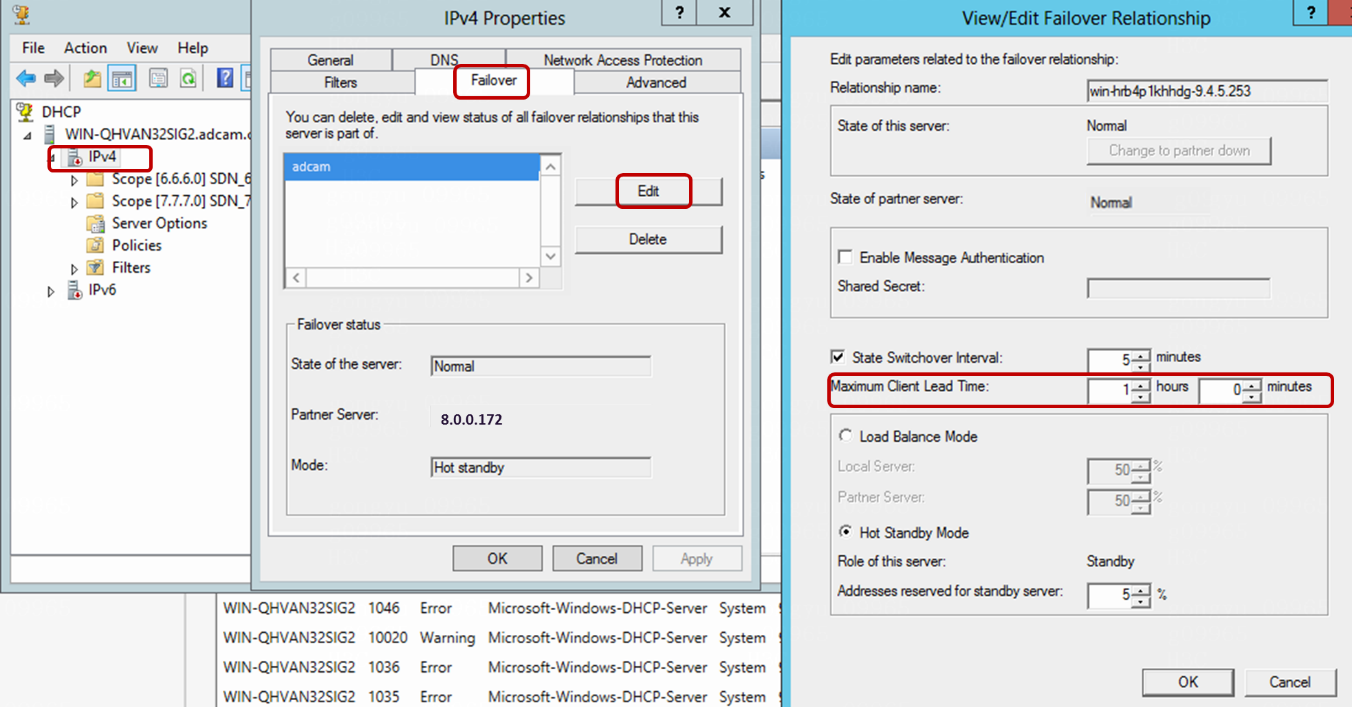
Check the maximum client lead time (MCLT)
|
|
NOTE: When the failover state of the DHCP server is abnormal, the IP lease duration for DHCP clients equals the maximum client lead time. |
1. Navigate to the backstage DHCP management page of the DHCP server.
For more information about this step, see "Verify that the backstage DHCP management pages of the two servers display the 4094 address pool."
2. Right click IPv4 on the left navigation pane, and the select Properties in the pop-up menu.
3. Click the Failover tab on the IPv4 Properties window, and then click Edit.
4. Verify that the maximum client lead time is one hour on the View/Edit Failover Relationship window.
The controller automatically deploys the MCLT setting to the DHCP server and you do not need to configure this setting manually.
Figure 20 Checking MCLT
5. Return to the IPv4 Properties window, and then verify that the state of the server is normal in the Failover status area.
If the state of the server is normal, Microsoft DHCP HA setup is complete.
Figure 21 Checking failover state

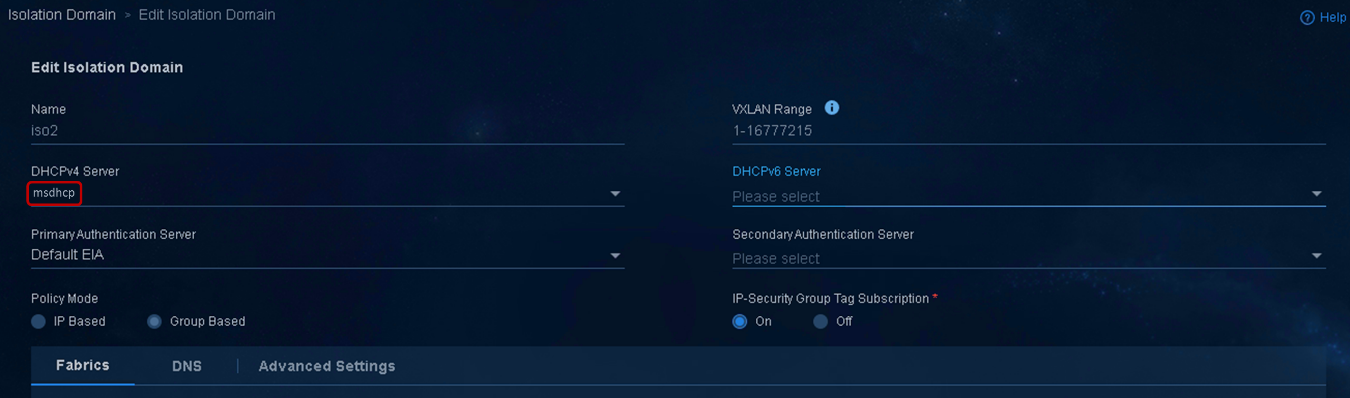
Configure Microsoft DHCP servers for isolation domains
After you complete Microsoft DHCP HA configuration, you need to configure Microsoft DHCP for isolation domains as follows:
1. Navigate to Automation > Campus Network > Isolation Domain > Isolation Domain.
2. Click Add to add an isolation domain or
click the Edit icon (![]() ) in the Actions column
for an isolation domain to edit the isolation domain.
) in the Actions column
for an isolation domain to edit the isolation domain.
3. Specify the desired DHCP server for the isolation domain.
When you create security groups in an isolation domain configured with a Microsoft DHCP server, the controller automatically creates IP address pools on the DHCP server.
Figure 22 Configuring Microsoft DHCP for an isolation domain
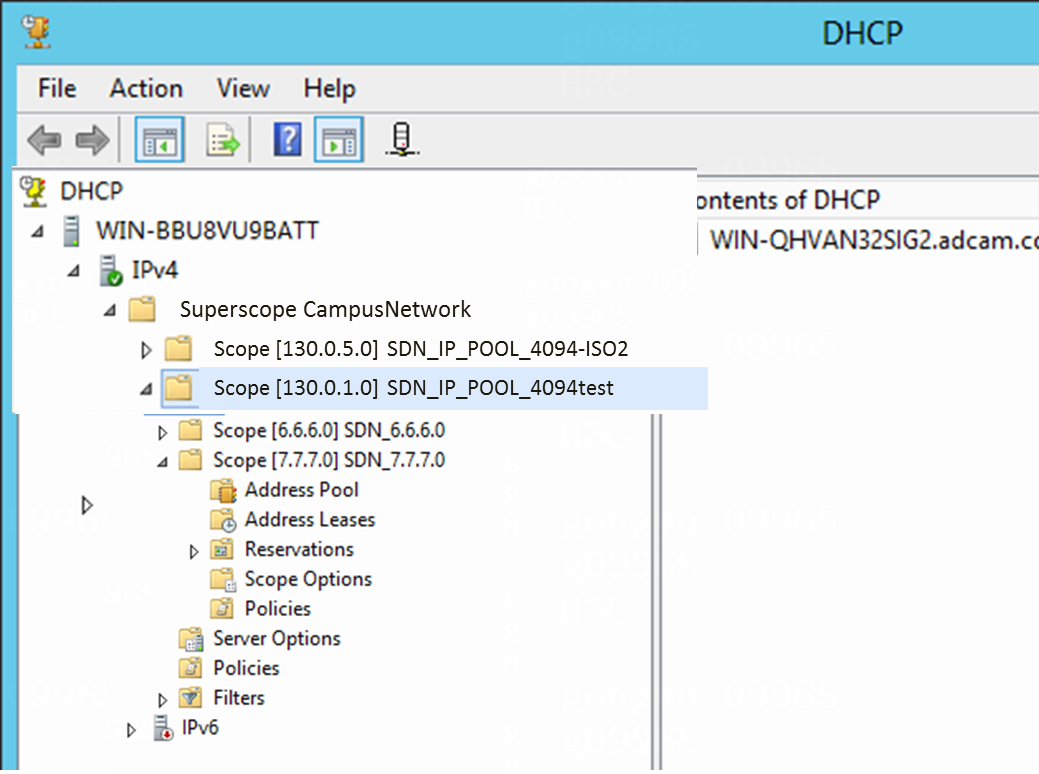
4. Complete the subsequent configuration under the guidance of AD-Campus 6.2 Basic Configuration Guide. The controller then deploys the IP address pools for security groups on the DHCP server. As shown in Figure 23 (for illustration only), you can view the deployment result on the backstage management page of the DHCP server.
Figure 23 Viewing address pool deployment result
General restrictions and guidelines
· The DHCP plug-in version depends on the controller component version. Before upgrading the controller component, you must first upgrade the DHCP plug-in. For more information about this task, see "(Optional) Upgrade Windows DHCP plug-in."
· For Microsoft DHCP HA to operate correctly, the system clock difference between the two HA servers cannot exceed one minute. To meet this requirement, configure the NTP service as a best practice.
· For a Microsoft DHCP server to respond to the DHCP requests relayed from the leaf device, create a 4094 address pool on that DHCP server. For more information about this task, see "Create VSI4094 network scope."
· When you edit the admin password of the two Microsoft DHCP servers used for HA, you must edit the login password for DHCP plug-in together. For more information about password update, see "Edit the service permission of DHCP plug-in."
¡ By default, if you configure an address binding for a single account associated with multiple user endpoints, the endpoints are bound to different IP addresses. For these endpoints to use the same IP address, perform the following task:
i. Navigate to Automation > User > Service Parameters > Access Parameters > System Settings > User Endpoint Settings.
ii. Enable Unbind IP from Duplicate Account, set the value for Max. Device for Single Account to one, and configure iNode+802.1X as the authentication method.
¡ The number of MAC-IP bindings in a single address pool must be less than 4000.
· When you configure name-address bindings in the Microsoft DHCP HA scenario, follow these restrictions and guidelines:
¡ When the primary Microsoft DHCP server fails and the secondary Microsoft DHCP server takes over, the secondary one can allocate IP address only and you cannot configure name-address bindings. After the primary recovers, some of the name-address binding entries will be missing. To resolve this issue, make the involved endpoints offline, and then configure name-address bindings for them after they come online again.
¡ When the secondary Microsoft DHCP server fails, only the primary one can generate name-address binding entries. The DHCP plug-in will synchronize these name-address binding entries to the secondary after 24 hours.
· You cannot bind an account name to IPv6 addresses.
· On a network configured with multiple isolation domains, deploy a DHCP server for each isolation domain and do not configure any name-address bindings as a best practice.
· In the public host scenario, the name-address binding feature supports only iNode-based 802.1X authentication.
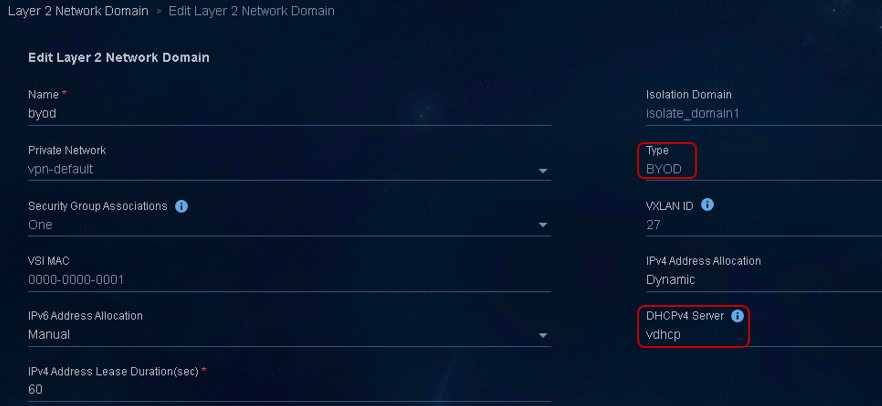
· Configure BYOD address pools only on vDHCP servers.
In the current solution, Microsoft DHCP is not supported for BYOD-type security groups. You must configure vDHCP for these security groups. When you create a BYOD-type Layer 2 network domain, specify a vDHCP server as the DHCPv4 server.
Figure 24 Editing a Layer 2 network domain
· The primary and secondary Microsoft DHCP servers can establish a failover relationship only when the following conditions exist:
¡ The system clock difference does not exceed one minute between the two servers.
¡ The two servers can reach each other.
¡ File sharing port 445 is enabled correctly and operates normally.
· Do not disable TCP ports 135 and 647, because the following issues will occur if RPC communication is abnormal:
¡ The failover relationship between the Microsoft DHCP servers is in abnormal state.
¡ Failover relationship re-establishment fails.
· As from controller component version E6204, you can configure multiple Microsoft DHCP servers in tight management mode for the same isolation domain. In this situation, you need to configure 4094 address pools on these Microsoft DHCP servers for the isolation domain. These address pools are used for the DHCP service and the DHCP failover service. (This feature is supported only for solution 6.0.)
· When you enable the firewall service for a Microsoft DHCP server, configure the firewall settings under the guidance of Port Communication Matrix.
· When you configure Microsoft DHCP HA, follow these restrictions and guidelines:
¡ Use the hot backup mode as a best practice.
¡ Determine the mode of Microsoft DHCP HA before incorporating Microsoft DHCP servers on the controller, because Microsoft DHCP does not support HA mode switchover when DHCP services exist.
O&M monitoring
For more information, see AD-Campus 6.2 Operations Monitoring Deployment Guide.
