- Released At: 03-11-2025
- Page Views:
- Downloads:
- Table of Contents
- Related Documents
-
|
|
|
H3C NETCONF-Based Device Configuration and Management Guide |
|
|
|
|
|
|
Copyright © 2020 New H3C Technologies Co., Ltd. All rights reserved.
No part of this manual may be reproduced or transmitted in any form or by any means without prior written consent of New H3C Technologies Co., Ltd.
Except for the trademarks of New H3C Technologies Co., Ltd., any trademarks that may be mentioned in this document are the property of their respective owners.
The information in this document is subject to change without notice.
Format of NETCONF over SOAP messages
Choosing a NETCONF configuration tool and session type
Assigning access permissions to a NETCONF user on the device
About NETCONF user access permissions
Configuring user role rules for the NETCONF user
Configuring user attributes for the NETCONF user
Configuring the device for NETCONF session establishment
Configuring the device for NETCONF over SSH session establishment
Configuring NETCONF over SSH service
Configuring the device for NETCONF over SOAP over HTTP/HTTPS session establishment
Exchanging capability sets on a NETCONF over SSH session
Exchanging capability sets on a NETCONF over SOAP session
Commonly used NETCONF API references
Document organization of NETCONF API references
Using NETCONF API references to construct NETCONF requests
Example: Constructing a NETCONF request
edit-config: default-operation
NETCONF configuration examples
Example: Configuring DHCP through NETCONF
Configuring NETCONF on Device A
Configuring Device A as the DHCP server from the NETCONF client
Configuring Device B as the DHCP client through CLI
Example: Establishing a NETCONF over SSH session by using ncclient
About NETCONF
Network Configuration Protocol (NETCONF) is an XML-based network management protocol. It provides programmable mechanisms to manage and configure network devices. Through NETCONF, you can configure device parameters, retrieve parameter values, and collect statistics.
Using XML as the encoding format, NETCONF messages have strong filtering capability. Each data item is an element with a fixed name and position. This design provides uniform data access and retrieval to different devices from the same vendor as well as devices from different vendors. You only need to define XML mappings between different XML schemas. NETCONF facilitates the development of a NETCONF-based NMS system for you to configure and manage devices from different vendors easily and efficiently.
NETCONF structure
NETCONF has the following layers: content layer, operations layer, RPC layer, and transport protocol layer.
Table 1 NETCONF layers and XML layers
|
NETCONF layer |
XML layer |
Description |
|
|
Content |
Configuration data, status data, and statistics |
Contains a set of managed objects, including configuration data, status data, and statistics. For information about the operable data, see the NETCONF XML API references for the device. |
|
|
Operations |
<get>,<get-config>,<edit-config>… |
Defines a set of base operations invoked as RPC methods with XML-encoded parameters. NETCONF base operations include data retrieval operations, configuration operations, lock operations, and session operations. For more information about operations available on the device, see "Supported NETCONF operations." |
|
|
RPC |
<rpc>,<rpc-reply> |
Provides a simple, transport-independent framing mechanism for encoding RPCs. The <rpc> and <rpc-reply> elements are used to enclose NETCONF requests and responses (data at the operations layer and the content layer). |
|
|
Transport protocol |
In
non-FIPS mode: In
FIPS mode: |
Provides reliable, connection-oriented, serial data links. The following transport layer sessions are available: In non-FIPS mode: · CLI sessions, including NETCONF over Telnet, NETCONF over SSH, and NETCONF over console. · NETCONF over HTTP sessions and NETCONF over HTTPS sessions. · NETCONF over SOAP sessions, including NETCONF over SOAP over HTTP and NETCONF over SOAP over HTTPS. In FIPS mode: · CLI sessions, including NETCONF over SSH and NETCONF over console. · NETCONF over HTTPS sessions. · NETCONF over SOAP over HTTPS sessions. |
|
NETCONF message formats
All NETCONF messages are XML-based and comply with RFC 4741 or RFC 6241. A NETCONF over SOAP message encapsulates a NETCONF message in its <Body> element.
Format of NETCONF messages
Format of NETCONF request messages
A NETCONF request contains the RFC-defined part and the H3C-proprietary part.
· RFC-defined part—This part is defined by RFC 4741 or RFC 6241, which includes the following attributes:
¡ encoding—XML encoding format being used in the NETCONF request message. Comware V7 NETCONF supports the following encoding formats: GB2312, GB18030, UTF-8, UTF-16, UTF-16BE, UTF-16LE, UTF-32, UTF-32BE, and UTF-32LE. If a request message does not carry an encoding format declaration, UTF-8 is used.
¡ message-id—ID of the NETCONF request message. The NETCONF client uses a monotonically increasing integer as the message-id attribute value of a NETCONF request messages. The server uses the same message-id attribute value in the response message.
¡ namespace—The namespace is urn:ietf:params:xml:ns:netconf:base:1.0.
The following example shows the RFC-defined part in a NETCONF request message.
<?xml version="1.0" encoding="utf-8"?>
<rpc message-id =”101” xmlns=”urn:ietf:params:xml:ns:netconf:base:1.0”>
<operation>
</rpc>
· H3C-proprietary part—For <get> operations, all content under the <filter> element belongs to this part. For <edit-config> operations, all content under the <config> element belongs to this part.
¡ The H3C-proprietary part must use H3C namespaces. The following H3C namespaces are supported:
- Base namespace—The namespace is http://www.h3c.com/netconf/base:1.0.
- Config namespace—The namespace is http://www.h3c.com/netconf/config:1.0.
- Data namespace—The namespace is http://www.h3c.com/netconf/data:1.0.
- Action namespace—The namespace is http://www.h3c.com/netconf/action:1.0.
The namespace to be used varies by the operation and content of a NETCONF request message. For more information about operations available on the device, see "Supported NETCONF operations."
¡ The H3C-proprietary part can use the common namespace or module-specific namespaces. By default, this part uses the common namespace, which is indicated in the <top> element.
For NETCONF to use module-specific namespaces in this part, execute the netconf capability specific-namespace command. Then, each module has its own namespace. A NETCONF message that uses a module-specific namespace does not have the <top> element. A module-specific namespace is in the format of H3CNamespace-ModuleName, http://www.h3c.com/netconf/data:1.0-Ifmgr, for example.
¡ The module information between the <top> and </top> tags is defined by the NETCONF XML API references of the device.
The following example shows a <get-config> message that uses the common namespace.
<?xml version="1.0" encoding="utf-8"?>
<rpc message-id=”101” xmlns=”urn:ietf:params:xml:ns:netconf:base:1.0”>
<get-config>
<source>
<running/>
</source>
<filter type=”subtree”>
<top xmlns=”http://www.h3c.com/netconf/config:1.0”>
Module information
</top>
</filter>
</get-config>
</rpc>
The following example shows an <edit-config> message that uses the common namespace.
<?xml version="1.0" encoding="utf-8"?>
<rpc message-id =”101” xmlns=”urn:ietf:params:xml:ns:netconf:base:1.0”>
<edit-config>
<target>
<running/>
</target>
<config xmlns:xc=”urn:ietf:params:xml:ns:netconf:base:1.0”>
<top xmlns=”http://www.h3c.com/netconf/config:1.0”>
Module information
</top>
</config>
</edit-config>
</rpc>
Format of NETCONF response messages
All NETCONF response messages are standard <rpc-reply> messages, which are defined by RFC 4741.
The following example shows a NETCONF response message.
<?xml version="1.0" encoding="utf-8"?>
<rpc-reply xmlns=”urn:ietf:params:xml:ns:netconf:base:1.0” message-id=”101”>
<ok/>
</rpc-reply>
Examples of NETCONF request messages
The following examples show the NETCONF request message for retrieving all parameters of all interfaces on the device by using different namespaces.
· Using the common namespace:
<?xml version="1.0" encoding="utf-8"?>
<rpc message-id ="100" xmlns="urn:ietf:params:xml:ns:netconf:base:1.0">
<get-bulk>
<filter type="subtree">
<top xmlns="http://www.h3c.com/netconf/data:1.0">
<Ifmgr>
<Interfaces>
<Interface/>
</Interfaces>
</Ifmgr>
</top>
</filter>
</get-bulk>
</rpc>
· Using the module-specific namespace:
<?xml version="1.0" encoding="utf-8"?>
<rpc message-id ="100" xmlns="urn:ietf:params:xml:ns:netconf:base:1.0">
<get-bulk>
<filter type="subtree">
<Ifmgr xmlns="http://www.h3c.com/netconf/data:1.0-Ifmgr">
<Interfaces>
<Interface/>
</Interfaces>
</Ifmgr>
</filter>
</get-bulk>
</rpc>
Format of NETCONF over SOAP messages
NETCONF over SOAP messages must comply with the following rules:
· SOAP messages must use SOAP envelope namespaces. Available SOAP envelope namespaces include the following:
¡ http://schemas.xmlsoap.org/soap/envelope/.
¡ http://www.w3.org/2003/05/soap-envelope.
Support for the SOAP envelope namespaces varies by device model.
· SOAP messages cannot contain the following information:
· DTD reference.
· XML processing instructions.
A NETCONF over SOAP message includes the following elements:
· Envelope—(Required.) This element defines an XML document as a SOAP message. This element must indicate the envelope namespace.
· Header—(Optional.) This element indicates authentication and language information.
¡ Authentication information—In the hello message sent to the device for establishing a session, the NETCONF client encapsulates the username and password in the auth:UserName and auth:Password elements, respectively. If the client passes authentication, the device encapsulates a credential in the auth:AuthInfo element of the response message. All subsequent NETCONF request messages for this session must carry this credential.
The authentication information elements must use the http://www.h3c.com/netconf/base:1.0 namespace and must carry the mustUnderstand attribute (with value 1 or true) of the http://www.w3.org/2003/05/soap-envelope namespace.
¡ Language—The NETCONF client indicates the expected language to be used for returned errors in the auth:Language element of a request message. Supported languages include Chinese (zh-cn) and English (en). By default, the language is English.
Not all NETCONF request messages support using Chinses as the language for returned errors. If Chinses is not supported, the device encapsulates the xml:lang="en" attribute to indicate the actual language.
The auth:Language element must be placed behind the auth:UserName, auth:Password, and auth:AuthInfo elements.
· Body—(Required.) This element contains the NETCONF message.
· Fault—(Optional.) This element provides errors that occur during processing the message.
Format of NETCONF over SOAP hello messages
The following example shows a NETCONF over SOAP hello message:
<env:Envelope xmlns:env="http://schemas.xmlsoap.org/soap/envelope/">
<env:Header>
<auth:Authentication env:mustUnderstand="1" xmlns:auth="http://www.h3c.com/netconf/base:1.0">
<auth:UserName>test</auth:UserName>
<auth:Password>test</auth:Password>
<auth:Language>en</auth:Language>
</auth:Authentication>
</env:Header>
<env:Body>
<hello xmlns="urn:ietf:params:xml:ns:netconf:base:1.0">
<capabilities>
<capability>urn:ietf:params:netconf:base:1.0</capability>
</capabilities>
</hello>
</env:Body>
</env:Envelope>
Format of NETCONF over SOAP request messages
The following example shows a NETCONF over SOAP request message:
<env:Envelope xmlns:env=”http://schemas.xmlsoap.org/soap/envelope/”>
<env:Header>
<auth:Authentication env:mustUnderstand=”1” xmlns:auth=”http://www.h3c.com/netconf/base:1.0”>
<auth:AuthInfo>10027c2abebdb482633f847102fbc890d22a</auth:AuthInfo>
<auth:Language>en</auth:Language>
</auth:Authentication>
</env:Header>
<env:Body>
<rpc message-id=”101” xmlns=”urn:ietf:params:xml:ns:netconf:base:1.0”>
<get-config>
<source>
<running/>
</source>
<filter type=”subtree”>
<top xmlns=”http://www.h3c.com/netconf/config:1.0”>
<Syslog/>
</top>
</filter>
</get-config>
</rpc>
</env:Body>
</env:Envelope>
Example of NETCONF over SOAP request messages
The following example shows a NETCONF over SOAP request for retrieving all parameters of all interfaces on the device:
<env:Envelope xmlns:env="http://www.w3.org/2003/05/soap-envelope">
<env:Header>
<auth:Authentication env:mustUnderstand="1" xmlns:auth="http://www.h3c.com/netconf/base:1.0">
<auth:AuthInfo>800207F0120020C</auth:AuthInfo>
</auth:Authentication>
</env:Header>
<env:Body>
<rpc message-id ="100" xmlns="urn:ietf:params:xml:ns:netconf:base:1.0">
<get-bulk>
<filter type="subtree">
<top xmlns="http://www.h3c.com/netconf/data:1.0">
<Ifmgr>
<Interfaces>
<Interface/>
</Interfaces>
</Ifmgr>
</top>
</filter>
</get-bulk>
</rpc>
</env:Body>
</env:Envelope>
NETCONF tasks at a glance
Figure 1 shows the main process for configuring a device by using NETCONF.
Figure 1 Flowchart for configuring a device by using NETCONF

You can also write Python scripts for configuring a device in a standard or user-developed Python IDE, and then use Python library ncclient to convert the scripts to NETCONF messages. This method simplifies the construction of NETCONF messages.
Choosing a NETCONF configuration tool and session type
To use NETCONF to manage and configure the device, choose a configuration tool from Table 2. Table 3 shows the types of NETCONF sessions that the device supports in different operating modes.
Table 2 NETCONF configuration tools
|
Configuration tool |
Login method |
NETCONF session type |
Remarks |
|
CLI |
Console port SSH Telnet |
· Console login: · SSH login: · Telnet login: |
To perform NETCONF operations, copy NETCONF messages to the CLI in XML view. The NETCONF messages must conform to the format described in "Format of NETCONF messages." For the device to correctly identify NETCONF messages, you must add ]]>]]> to the end of each NETCONF message in XML view.
The console port has rate limiting, and the device does not generate prompts or warning in XML view. As a best practice to avoid configuration errors, do not use this method. |
|
Standard Web interface for the device |
HTTP HTTPS |
· HTTP login: · HTTPS login: |
The system automatically converts the configuration operations on the Web interface to NETCONF messages and sends them to the device to perform NETCONF operations. Support for this tool depends on the device model. |
|
SSH NETCONF configuration application |
N/A |
NETCONF over SSH |
The application client establishes an SSH connection to the device and sends NETCONF messages to the device. The NETCONF messages must conform to the format described in "Format of NETCONF messages." By using long connections, this type of configuration applications provide high configuration efficiency at the cost of resources. To use this method, you must enable NETCONF over SSH. |
|
SOAP NETCONF configuration application |
N/A |
NETCONF over SOAP over HTTP NETCONF over SOAP over HTTPS |
The application client establishes a connection to the device through HTTP or HTTPS and sends SOAP-encapsulated NETCONF messages to the device. The messages must conform to the format described in "Format of NETCONF over SOAP messages." This type of applications use short connections. To use this method, you must enable NETCONF over SOAP. |
Table 3 NETCONF session types supported by the device in different operating modes
|
Device operating mode |
Supported NETCONF session types |
|
Non-FIPS mode |
· NETCONF over SSH · NETCONF over Telnet · NETCONF over console · NETCONF over HTTP · NETCONF over HTTPS · NETCONF over SOAP over HTTP · NETCONF over SOAP over HTTPS |
|
FIPS mode |
· NETCONF over SSH · NETCONF over console · NETCONF over HTTPS · NETCONF over SOAP over HTTPS |
In practice, NETCONF configuration applications are widely used. You can develop and custom your own configuration application or use a third-party configuration application. Typical third-party configuration applications include NETCONF Browser (SSH-type) and SOAP UI (SOAP-type). For more information about how to use the applications to configure a device through NETCONF, see the user guide of the applications.
This document introduces only the establishment of NETCONF over SSH, NETCONF over SOAP over HTTP, and NETCONF over SOAP over HTTPS sessions.
Assigning access permissions to a NETCONF user on the device
Before you can use the NETCONF client to establish a NETCONF session with the device, you must make sure the NETCONF user account you use has the required access permissions.
About NETCONF user access permissions
Comware 7 controls access to the system by user role. The access permissions of a user role are determined by user role rules and resource access policies.
When you configure rules for a NETCONF user role, make sure these rules include the following access permissions:
· Access to the <rpc> element and the elements used to perform NETCONF operations. Table 4 shows the NETCONF operations and their required access permissions
· Access to feature modules and tables in the modules. To have access to a module or table, assign permission to access the Xpath of the module or table. For example, to permit the user role to access the interface module in XML elements, execute the rule number permit read write execute xml-element ifmgr/ command.
The resource access policies of a user role determine its access to system resources, including interfaces, VLANs, VPN instances, and security zones. Configure the resource access policies depending on the actual requirements. By default, a user role has access to all system resources.
Predefined user roles network-admin, mdc-admin, and context-admin have access to all features and resources on the device, administered MDC, and administered context, respectively, except for the display security-logfile summary, info-center security-logfile directory, and security-logfile save commands. If a NETCONF user has one of the user roles, you do not need to configure access permissions for the user.
For more information about user role-based access control, see RBAC in the fundamentals configuration guide for the device.
Table 4 NETCONF operations and required access permissions
|
NETCONF operation |
XML element path |
Required access permissions to the path |
|
Establishing a NETCONF session |
N/A |
Has access to the xml command. |
|
Subscribing to events |
rpc/create-subscription |
Execute. |
|
Locking the running configuration |
rpc/lock |
Execute. |
|
Unlocking the running configuration |
rpc/unlock |
Execute. |
|
Retrieving device configuration and status data |
rpc/get |
Read. |
|
Retrieving event streams supported by the system |
rpc/get/filter/netconf |
Read. |
|
Retrieving NETCONF status data |
rpc/get/filter/netconf-state |
Read. |
|
Retrieving data in bulk |
rpc/get-bulk |
Read. |
|
Retrieving non-default configuration data |
rpc/get-config |
Read. |
|
Retrieving non-default configuration data entries in bulk |
rpc/get-bulk-config |
Read. |
|
Retrieving YANG file content |
rpc/get-schema |
Read. |
|
Modifying the specified module data |
rpc/edit-config |
Write. |
|
Executing a non-configuration instruction |
rpc/action |
Execute. |
|
Saving the running configuration |
rpc/save |
Write. |
|
Rolling back the configuration |
rpc/rollback |
Write. |
|
Loading the configuration |
rpc/load |
Write. |
|
Executing CLI commands |
rpc/CLI |
Write. |
|
Retrieving NETCONF session information |
rpc/get-sessions |
Read. |
|
Terminating the NETCONF session of another user |
rpc/kill-session |
Execute. |
|
Validating NETCONF messages |
rpc/validate |
Read. |
Configuring user role rules for the NETCONF user
1. Enter system view.
system-view
2. Create a user role and enter its view.
role name role-name
3. Configure user role rules depending on the access permissions required by the NETCONF user.
¡Configure the user role to have access permissions to the <rpc> element.
rule number permit { execute | read | write } * xml-element rpc/
If you do not specify an operation, this command permits the user role to have access to all NETCONF operations.
To view the list of NETCONF operations, execute the rule number permit { execute | read | write } * xml-element rpc/? command.
¡Configure the user role to have access permissions to a module or table in XML elements.
rule number { deny | permit } { execute | read | write } * xml-element [ module-xpath ]
If you do not specify a module, this command permits the user role to have access to all modules. If you do not specify a table, this command permits the user role to have access to all tables in the specified module.
To view the list of modules, execute the rule number { deny | permit } { execute | read | write } * xml-element ? command. To view the list of tables in a module, execute the rule number { deny | permit } { execute | read | write } * xml-element module-name/? command.
Configuring user attributes for the NETCONF user
Restrictions and guidelines
This task uses a local user to describe the configuration procedure. For information about the configuration procedure for remote users, see RADIUS, HWTACACS, or LDAP configuration and configuration examples in the security configuration guide for the device.
Make sure the NETCONF user has been assigned the connection service type for NETCONF service after it passes authentication.
· To run NETCONF service over SSH, the user must have SSH service authorization.
· To run NETCONF service over SOAP over HTTP, the user must have HTTP service authorization.
· To run NETCONF service over SOAP over HTTPS, the user must have HTTPS service authorization.
Procedure
1. Enter system view.
system-view
2. Create a device management user and enter its view.
local-user user-name class manage
3. Configure a password for the user.
In non-FIPS mode:
password [ { hash | simple } string ]
In FIPS mode:
password
In non-FIPS mode, a non-password-protected user passes authentication if the user provides the correct username and passes attribute checks. To enhance security, configure a password for each device management user.
In FIPS mode, only password-protected users can pass authentication. You must set the password in interactive mode for a device management user.
4. Assign services to the user. Choose one of the following tasks depending on the NETCONF session type:
¡For NETCONF service over SSH, execute the following command:
service-type ssh
¡For NETCONF service over SOAP over HTTP/HTTPS, execute the following command:
In non-FIPS mode:
service-type { http | https } *
In FIPS mode:
service-type https
By default, no services are authorized to a device management user.
5. Assign a user role to the user.
authorization-attribute user-role role-name
Configuring the device for NETCONF session establishment
Configuring the device for NETCONF over SSH session establishment
To allow a NETCONF client (the network manager or controller) to establish a NETCONF over SSH session, perform the following tasks on the device:
2. Configuring NETCONF over SSH service
This document provides only the configuration procedure on the device. For more information about configuring the NETCONF client to initiate a NETCONF over SSH session with the device, see the NETCONF client documentation.
Configuring SSH service
About this task
The following information provides the SSH server configuration procedure used when the SSH client authentication method is password. For information about SSH and publickey authentication configuration, see the security configuration guide for the device.
Procedure
1. Enter system view.
system-view
2. Create local key pairs.
In non-FIPS mode:
public-key local create { dsa | ecdsa [ secp192r1 | secp256r1 | secp384r1 | secp521r1 ] | rsa } [ name key-name ]
In FIPS mode:
public-key local create { dsa | ecdsa [ secp256r1 | secp384r1 | secp521r1 ] | rsa } [ name key-name ]
3. (Optional.) Create an SSH user, authorize the user to use the NETCONF service, and set the authentication method to password.
ssh user username service-type netconf authentication-type password
4. Enter VTY line view or class view.
¡ Enter VTY line view.
line vty first-number [ last-number ]
¡ Enter VTY line class view.
line class vty
5. Enable scheme authentication.
In non-FIPS mode:
authentication-mode scheme
By default, password authentication is enabled for VTY lines.
In FIPS mode:
authentication-mode scheme
By default, scheme authentication is enabled for VTY lines.
Configuring NETCONF over SSH service
1. Enter system view.
system-view
2. Enable NETCONF over SSH.
netconf ssh server enable
By default, NETCONF over SSH is disabled.
3. Specify the listening port for NETCONF over SSH packets.
netconf ssh server port port-number
By default, the listening port for NETCONF over SSH packets is 830.
4. (Optional.) Enable NETCONF logging.
netconf log source { all | { agent | soap | web } * } { protocol-operation { all | { action | config | get | set | session | syntax | others } * } | row-operation | verbose }
By default, NETCONF logging is disabled.
Configuring the device for NETCONF over SOAP over HTTP/HTTPS session establishment
About this task
This task allows a NETCONF client (the network manager or controller) to establish a NETCONF over SOAP over HTTP/HTTPS session with the device.
This task provides only the basic configuration procedure. For information about advanced features such as marking the DSCP value of SOAP packets, controlling NETCONF access, and configuring the NETCONF user authentication domain, see the NETCONF configuration guide and command reference for the device.
This document provides only the configuration procedure on the device. For more information about configuring the NETCONF client to initial a NETCONF over SOAP over HTTP/HTTPS session with the device, see the NETCONF client documentation.
Procedure
1. Enter system view.
system-view
2. Enable NETCONF over SOAP.
In non-FIPS mode:
netconf soap { http | https } enable
In FIPS mode:
netconf soap https enable
By default, NETCONF over SOAP is disabled.
3. (Optional.) Enable NETCONF logging.
netconf log source { all | { agent | soap | web } * } { protocol-operation { all | { action | config | get | set | session | syntax | others } * } | row-operation | verbose }
By default, NETCONF logging is disabled.
Exchanging capability sets
About this task
The device and the NETCONF client exchange their capability sets in a hello message immediately after they are connected. Only after the capability set exchange is complete will the device process requests from the NETCONF client.
The capability set is described in the URI form, for example, urn:ietf:params:netconf:base:1.0.
Restrictions and guidelines
Before performing a NETCONF operation, make sure no other users are configuring or managing the device. If multiple users simultaneously configure or manage the device, the result might be different from what you expect.
You can use the aaa session-limit command to set the maximum number of concurrent NETCONF sessions to the device. If the upper limit is reached, new NETCONF users cannot access the device. For more information about this command, see the security command reference for the device.
Exchanging capability sets on a NETCONF over SSH session
Hello message from the device to the client
<hello xmlns="urn:ietf:params:xml:ns:netconf:base:1.0">
<capabilities>
<capability>urn:ietf:params:netconf:base:1.0</capability>
...
<capability>http://www.h3c.com/netconf/action:1.0-Configuration?module=Configuration&revision=2015-05-07</capability>
</capabilities>
<session-id>1</session-id>
</hello>
The <capabilities> element carries the capabilities supported by the device. The supported capabilities vary by device model.
The <session-id> element carries the unique ID assigned to the NETCONF session.
Hello message from the client to the device
Client-side capability sets depend on the client model. In this example, the client supports the urn:ietf:params:netconf:base:1.0 capability set.
<hello xmlns="urn:ietf:params:xml:ns:netconf:base:1.0">
<capabilities>
<capability>urn:ietf:params:netconf:base:1.0</capability>
</capabilities>
</hello>
If the client supports multiple capability sets, use the <capability> and </capability> tags to enclose the capability set, one capability set in each tag pair.
Exchanging capability sets on a NETCONF over SOAP session
Hello message from the device to the client
<env:Envelope xmlns:env="http://schemas.xmlsoap.org/soap/envelope/">
<env:Header>
<auth:Authentication env:mustUnderstand="true" xmlns:auth="http://www.h3c.com/netconf/base:1.0">
<auth:AuthInfo>100002fbf58da6797490a3ef11142d879212</auth:AuthInfo>
</auth:Authentication>
</env:Header>
<env:Body>
<hello xmlns="urn:ietf:params:xml:ns:netconf:base:1.0">
<capabilities>
<capability>urn:ietf:params:netconf:base:1.0</capability>
...
<capability>http://www.h3c.com/netconf/action:1.0-Configuration?module=Configuration&revision=2015-05-07</capability>
</capabilities>
<session-id>2</session-id>
</hello>
</env:Body>
</env:Envelope>
The <capabilities> element carries the capabilities supported by the device. The supported capabilities vary by device model.
The <session-id> element carries the unique ID assigned to the NETCONF session.
Hello message from the client to the device
Client-side capability sets depend on the client model. In this example, the client supports the urn:ietf:params:netconf:base:1.0 capability set.
<env:Envelope xmlns:env="http://schemas.xmlsoap.org/soap/envelope/">
<env:Header>
<auth:Authentication env:mustUnderstand="1" xmlns:auth="http://www.h3c.com/netconf/base:1.0">
<auth:UserName>test</auth:UserName>
<auth:Password>test</auth:Password>
<auth:Language>en</auth:Language>
</auth:Authentication>
</env:Header>
<env:Body>
<hello xmlns="urn:ietf:params:xml:ns:netconf:base:1.0">
<capabilities>
<capability>urn:ietf:params:netconf:base:1.0</capability>
</capabilities>
</hello>
</env:Body>
</env:Envelope>
If the client supports multiple capability sets, use the <capability> and </capability> tags to enclose the capability set, one capability set in each tag pair.
Constructing NETCONF requests
About NETCONF API references
Commonly used NETCONF API references
Each NETCONF-capable feature (for example, ARP and DHCP) has a set of NETCONF API references. Table 5 describes the most commonly used NETCONF API references for configuring a feature on the device.
Table 5 NETCONF API references commonly used for configuring the device
|
Reference type |
API namespace |
Data in the namespace |
Access |
Supported operations |
|
NETCONF XML API Data Reference |
Data |
System operating states and configuration data. |
Read |
<get> <get-bulk> |
|
NETCONF XML API Configuration Reference |
Configuration |
Configuration data. |
Read and write |
<get-config> <get-bulk-config> <edit-config> |
|
NETCONF XML API Action Reference |
Action |
Non-configuration operations such as ping and reset, and their operation status. |
Read and write |
<action> |
Document organization of NETCONF API references
The NETCONF API references describe the objects in the tables for each feature.
A table contains rows and columns, with each row representing an object instance and each column containing a parameter for the instance.
For example, each row in the ARP table is an ARP entry. Each ARP entry contains several parameters, including the IP address, MAC address, and native VLAN.
In a NETCONF API reference, a table has the following parts:
· Table name—Presented in the table-path/table-name format, for example, ACL/Base. The table path starts with the feature name.
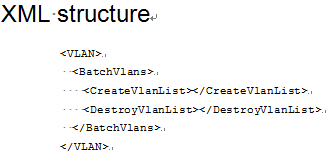
· XML structure—The XML structure for the table, starting from the element for the feature. In the API references, values are omitted, as shown in Figure 2:
Figure 2 A sample XML structure
· Table description—Provides information about the feature name, table name, table type, row name, and restrictions.
The table type indicates whether the table is a single-instance table or a multi-instance table.
¡ Single-instance table—Contains only one row.
¡ Multi-instance table—Contains one or more rows.
· Columns—Provides information about the column name, column description, column type, and data type and restrictions. The column type indicates whether the column is an index column.
¡ Index—The column is an index column.
¡ N/A—The column is not an index column.
· XML structure for the response—This structure starts with the element for the feature. In the API references, values are omitted. The NETCONF client uses the response to identify the operation result. This structure is provided only in the action namespace for a table that requires a response..
· Columns in the response—Describes the columns in a response.
Using NETCONF API references to construct NETCONF requests
1. Copy the protocol definition part from this document or an existing request. The protocol definition section includes the lines before the <top> tag and the lines after the </top> tag.
For example, the protocol definition section for a <get> operation includes the following highlighted lines:
<rpc message-id="100" xmlns="urn:ietf:params:xml:ns:netconf:base:1.0">
<get>
<filter>
<top xmlns="http://www.h3c.com/netconf/data:1.0">
Copy the XML structure for the feature here.
</top>
</filter>
</get>
</rpc>
For information about the protocol definition parts for other operations, see "Supported NETCONF operations."
2. Construct the <top> element.
The typical <top> element format is <top xmlns="http://www.h3c.com/netconf/data:1.0">, where http://www.h3c.com/netconf/data:1.0 indicates the H3C-defined data namespace. Replace data with config for the configuration namespace, or with action for the action namespace.
3. Construct the operation section.
Copy the XML structure for the feature from the NETCONF API reference, and paste the XML structure in the <top> element. Then, delete unused columns and enter values in the remaining columns as required.
Example: Constructing a NETCONF request
Network configuration
Construct a NETCONF request to configure an ARP entry in the ArpConfig table in the config namespace.
Procedure
# Look up the NETCONF API configuration reference for the XML structure for the ArpConfig table. Figure 3 shows the XML structure. The ARP entry columns include the IP address, MAC address, native VPN instance, native VLAN, outbound interface, and entry type.
Figure 3 XML structure for the ARP/ArpConfig table
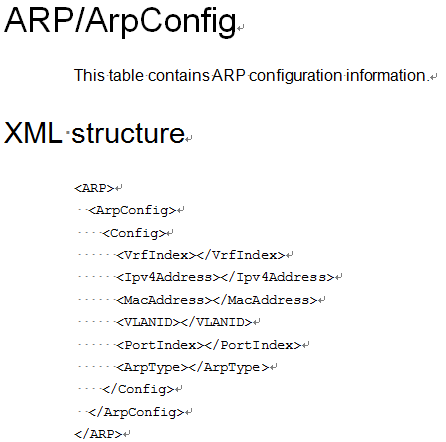
# Construct a request that performs the edit-config:merge operation to add a static ARP entry. Set the IP address to 1.1.1.1, the MAC address to 1-1-1, the native VLAN to VLAN 10, and the outbound interface to 20.
<rpc message-id="100" xmlns="urn:ietf:params:xml:ns:netconf:base:1.0" xmlns:xc="urn:ietf:params:xml:ns:netconf:base:1.0">
<edit-config>
<target>
<running/>
</target>
<config>
<top xmlns="http://www.h3c.com/netconf/config:1.0" xc:operation="merge">
<ARP>
<ArpConfig>
<Config>
<VrfIndex>0</VrfIndex>
<Ipv4Address>1.1.1.1</Ipv4Address>
<MacAddress>00-01-00-01-00-02</MacAddress>
<VLANID>10</VLANID>
<PortIndex>20</PortIndex>
<ArpType>1</ArpType>
</Config>
</ArpConfig>
</ARP>
</top>
</config>
</edit-config>
</rpc>
Supported NETCONF operations
H3C modified some standard NETCONF operations, deleted some unused operations, and added some new operations. The following information describes the typical NETCONF operations available with Comware 7.
action
Usage guidelines
This operation sends a non-configuration instruction to the device, for example, a reset instruction.
XML example
# Clear statistics for all interfaces.
<rpc message-id="100" xmlns="urn:ietf:params:xml:ns:netconf:base:1.0">
<action>
<top xmlns="http://www.h3c.com/netconf/action:1.0">
<Ifmgr>
<ClearAllIfStatistics>
<Clear>
</Clear>
</ClearAllIfStatistics>
</Ifmgr>
</top>
</action>
</rpc>
CLI
Usage guidelines
This operation executes CLI commands.
A request message encloses commands in the <CLI> element. A response message encloses the command output in the <CLI> element.
You can use the following elements to execute commands:
· Execution—Executes commands in user view.
· Configuration—Executes commands in system view. To execute commands in a lower-level view of the system view, use the <Configuration> element to enter the view first.
To use this element, include the exec-use-channel attribute and specify a value for the attribute:
¡ false—Executes commands without using a channel.
¡ true—Executes commands by using a temporary channel. The channel is automatically closed after the execution.
¡ persist—Executes commands by using the persistent channel for the session.
To use the persistent channel, first perform an <Open-channel> operation to open the persistent channel. If you do not do so, the system will automatically open the persistent channel.
After using the persistent channel, perform a <Close-channel> operation to close the channel and return to system view. If you do not perform an <Open-channel> operation, the system stays in the view and will execute subsequent commands in the view.
A NETCONF session supports one persistent channel and multiple temporary channels.
This operation cannot execute interactive CLI commands.
You cannot execute the quit command by using a channel to exit user view.
XML example
# Execute the telnet server enable command in system view without using a channel.
<rpc message-id="100" xmlns="urn:ietf:params:xml:ns:netconf:base:1.0">
<CLI>
<Configuration exec-use-channel="false">telnet server enable</Configuration>
</CLI>
</rpc>
close-session
Usage guidelines
This operation terminates the current NETCONF session, unlocks the configuration, releases the resources (for example, memory) used by the session, and exits the XML view.
XML example
# Terminate the current NETCONF session.
<rpc message-id="100" xmlns="urn:ietf:params:xml:ns:netconf:base:1.0">
<close-session/>
edit-config: create
Usage guidelines
This operation creates configuration items.
To use the create attribute in an <edit-config> operation, you must specify the target configuration item.
· If the table supports creating a target configuration item and the item does not exist, the operation creates the item and configures the item.
· If the specified item already exists, a data-exist error message is returned.
XML example
# Set the syslog buffer size to 120.
<rpc message-id ="101" xmlns="urn:ietf:params:xml:ns:netconf:base:1.0" xmlns:xc="urn:ietf:params:xml:ns:netconf:base:1.0">
<edit-config>
<target>
<running/>
</target>
<config>
<top xmlns="http://www.h3c.com/netconf/config:1.0" xc:operation="create">
<Syslog>
<LogBuffer>
<BufferSize>120</BufferSize>
</LogBuffer>
</Syslog>
</top>
</config>
</edit-config>
</rpc>
edit-config: default-operation
Usage guidelines
This operation modifies the running configuration of the device by using the default operation method.
NETCONF offers the following operation attributes for configuration modification: merge, create, delete, and replace. If you do not specify an operation attribute for an edit-config message, NETCONF uses the default operation method. If you do not specify an operation attribute or the default operation method for an <edit-config> message, the merge operation always applies.
The <default-operation> element has the following values:
· merge—Default value for the <default-operation> element.
· replace—Value used when the operation attribute is not specified and the default operation method is specified as replace.
· none—Value used when the operation attribute is not specified and the default operation method is none. If this value is specified, the <edit-config> operation only performs schema verification and it cannot issue a configuration. If schema verification is passed, a success message is returned. If schema verification fails, an error message is returned.
XML example
# Issue an empty operation for schema verification purposes.
<rpc message-id ="101" xmlns="urn:ietf:params:xml:ns:netconf:base:1.0" xmlns:xc="urn:ietf:params:xml:ns:netconf:base:1.0">
<edit-config>
<target>
<running/>
</target>
<default-operation>none</default-operation>
<config>
<top xmlns="http://www.h3c.com/netconf/config:1.0">
<Ifmgr>
<Interfaces>
<Interface>
<IfIndex>262</IfIndex>
<Description>222222</Description>
</Interface>
</Interfaces>
</Ifmgr>
</top>
</config>
</edit-config>
</rpc>
edit-config: delete
Usage guidelines
This operation deletes the specified configuration.
· If the specified target only has the table index, the operation deletes all configuration from the specified target, and then deletes the target.
· If the specified target has the table index and configuration data, the operation deletes the specified configuration data from this target.
· If the specified target does not exist, an error message is returned, showing that the target does not exist.
XML example
The syntax is the same as the edit-config message with the create attribute. Change the operation attribute from create to delete.
edit-config: error-option
Usage guidelines
This operation determines the action to take when a configuration error occurs.
The <error-option> element has the following values:
· stop-on-error—Stops the operation and returns an error message. This is the default error-option value.
· continue-on-error—Continues with the operation and returns an error message.
· rollback-on-error—Rolls back the configuration.
XML example
# Issue configuration for two interfaces, setting the <error-option> element to continue-on-error.
<rpc message-id ="101" xmlns="urn:ietf:params:xml:ns:netconf:base:1.0" xmlns:xc="urn:ietf:params:xml:ns:netconf:base:1.0">
<edit-config>
<target>
<running/>
</target>
<error-option>continue-on-error</error-option>
<config>
<top xmlns="http://www.h3c.com/netconf/config:1.0" xc:operation="merge">
<Ifmgr>
<Interfaces>
<Interface>
<IfIndex>262</IfIndex>
<Description>222</Description>
<ConfigSpeed>1024</ConfigSpeed>
<ConfigDuplex>1</ConfigDuplex>
</Interface>
<Interface>
<IfIndex>263</IfIndex>
<Description>333</Description>
<ConfigSpeed>1024</ConfigSpeed>
<ConfigDuplex>1</ConfigDuplex>
</Interface>
</Interfaces>
</Ifmgr>
</top>
</config>
</edit-config>
</rpc>
If the configuration for an interface fails to be deployed, the system continues to deploy the configuration for the next interface.
edit-config: incremental
Usage guidelines
This operation adds configuration data to a column without affecting the original data.
The incremental attribute applies to a list column that supports incremental deployment, such as the UntaggedVlanList column.
You can use the incremental attribute for <edit-config> operations with an attribute other than replace.
Support for the incremental attribute varies by module. For more information, see NETCONF XML API references.
XML example
# Add VLANs 1 through 10 to the untagged VLAN list on interface 262. The list has untagged VLANs 12 through 15.
<rpc message-id ="101" xmlns="urn:ietf:params:xml:ns:netconf:base:1.0" xmlns:h3c="http://www.h3c.com/netconf/base:1.0" xmlns:xc="urn:ietf:params:xml:ns:netconf:base:1.0">
<edit-config>
<target>
<running/>
</target>
<config>
<top xmlns="http://www.h3c.com/netconf/config:1.0" xc:operation="merge">
<VLAN>
<HybridInterfaces>
<Interface>
<IfIndex>262</IfIndex>
<UntaggedVlanList h3c: incremental="true">1-10</UntaggedVlanList>
</Interface>
</HybridInterfaces>
</VLAN>
</top>
</config>
</edit-config>
</rpc>
edit-config: merge
Usage guidelines
This operation commits target configuration items to the running configuration.
To use the merge attribute in an <edit-config> operation, you must specify the target configuration item (on a specific row):
· If the specified item exists, the operation directly updates the setting for the item.
· If the specified item does not exist, the operation creates the item and configures the item.
· If the specified item does not exist and it cannot be created, an error message is returned.
XML example
The XML data format is the same as the edit-config message with the create attribute. Change the operation attribute from create to merge.
edit-config: remove
Usage guidelines
This operation removes the specified configuration.
· If the specified target only has the table index, the operation deletes all configuration from the specified target, and then removes the target.
· If the specified target has the table index and configuration data, the operation deletes the specified configuration data from the target.
· If the specified target does not exist, or the XML message does not specify any targets, a success message is returned.
XML example
The syntax is the same as the edit-config message with the create attribute. Change the operation attribute from create to remove.
edit-config: replace
Usage guidelines
This operation replaces the specified configuration.
· If the specified target exists, the operation replaces the target configuration with the configuration specified in the message.
· If the specified target does not exist but it is allowed to be created, the operation creates the target and then applies the configuration.
· If the specified target does not exist and it is not allowed to be created, the operation is not performed and an invalid-value error message is returned.
XML example
The syntax is the same as the edit-config message with the create attribute. Change the operation attribute from create to replace.
edit-config: test-option
Usage guidelines
This operation determines whether to commit a configuration item in an <edit-configure> operation. The <test-option> element has one of the following values:
· test-then-set—Performs a syntax check, and commits an item if the item passes the check. If the item fails the check, the item is not committed. This is the default test-option value.
· set—Commits the item without performing a syntax check.
· test-only—Performs only a syntax check. If the item passes the check, a success message is returned. If the syntax check fails, an error message is returned.
XML example
# Test the configuration for an interface.
<rpc message-id ="101" xmlns="urn:ietf:params:xml:ns:netconf:base:1.0" xmlns:xc="urn:ietf:params:xml:ns:netconf:base:1.0">
<edit-config>
<target>
<running/>
</target>
<test-option>test-only</test-option>
<config>
<top xmlns="http://www.h3c.com/netconf/config:1.0" xc:operation="merge">
<Ifmgr>
<Interfaces>
<Interface>
<IfIndex>262</IfIndex>
<Description>222</Description>
<ConfigSpeed>2</ConfigSpeed>
<ConfigDuplex>1</ConfigDuplex>
</Interface>
</Interfaces>
</Ifmgr>
</top>
</config>
</edit-config>
</rpc
get
Usage guidelines
This operation retrieves all device configuration and operation status information that matches the specified conditions.
The <get-bulk> operation is more efficient than the <get> operation if you are obtaining only a specific number of data entries.
XML example
# Retrieve device configuration and operation status information for the Syslog module.
<rpc message-id ="101" xmlns="urn:ietf:params:xml:ns:netconf:base:1.0" xmlns:h3c="http://www.h3c.com/netconf/base:1.0">
<get>
<filter type="subtree">
<top xmlns="http://www.h3c.com/netconf/data:1.0">
<Syslog>
</Syslog>
</top>
</filter>
</get>
</rpc
get-bulk
Usage guidelines
This operation retrieves a specific number of data entries (including device configuration and status information) starting from the data entry next to the one with the specified index.
Use the index attribute to specify an index. If you do not specify an index, the retrieval starts from the first data entry.
Use the count attribute to specify the number of data entries to be retrieved. This operation retrieves all remaining data entries starting from the data entry next to the one with the specified index if either of the following conditions occurs:
· You do not specify the count attribute.
· The number of matching data entries is less than the value in the count attribute.
XML example
# Retrieve device configuration and status information for all interfaces.
<rpc message-id ="100" xmlns="urn:ietf:params:xml:ns:netconf:base:1.0" xmlns:h3c ="http://www.h3c.com/netconf/base:1.0">
<get-bulk>
<filter type="subtree">
<top xmlns="http://www.h3c.com/netconf/data:1.0">
<Ifmgr>
<Interfaces h3c:count="5">
<Interface/>
</Interfaces>
</Ifmgr>
</top>
</filter>
</get-bulk>
</rpc>
get-bulk-config
Usage guidelines
This operation retrieves a specific number of non-default configuration data entries, starting from the data entry next to the one with the specified index.
The guidelines for the <get-bulk> operation also apply to this operation.
XML example
# Retrieve non-default configuration for all interfaces.
<rpc message-id ="100" xmlns="urn:ietf:params:xml:ns:netconf:base:1.0">
<get-bulk-config>
<source>
<running/>
</source>
<filter type="subtree">
<top xmlns="http://www.h3c.com/netconf/config:1.0">
<Ifmgr>
</Ifmgr>
</top>
</filter>
</get-bulk-config>
</rpc>
get-config
Usage guidelines
This operation retrieves non-default configuration data. If no non-default configuration data exists, the device returns a response with empty data.
XML example
# Retrieve non-default configuration data for the interface table.
<rpc message-id ="100" xmlns="urn:ietf:params:xml:ns:netconf:base:1.0" xmlns:h3c="http://www.h3c.com/netconf/base:1.0">
<get-config>
<source>
<running/>
</source>
<filter type="subtree">
<top xmlns="http://www.h3c.com/netconf/config:1.0">
<Ifmgr>
<Interfaces>
<Interface/>
</Interfaces>
</Ifmgr>
</top>
</filter>
</get-config>
</rpc>
get-sessions
Usage guidelines
This operation retrieves information about all NETCONF sessions in the system. You cannot specify a session ID to retrieve information about a specific NETCONF session.
XML example
# Retrieve information about all NETCONF sessions in the system.
<rpc message-id="100" xmlns="urn:ietf:params:xml:ns:netconf:base:1.0">
<get-sessions/>
</rpc>
kill-session
Usage guidelines
This operation terminates the NETCONF session for another user. This operation cannot terminate the NETCONF session for the current user.
XML example
# Terminate the NETCONF session with session ID 1.
<rpc message-id="100" xmlns="urn:ietf:params:xml:ns:netconf:base:1.0">
<kill-session>
<session-id>1</session-id>
</kill-session>
</rpc>
load
Usage guidelines
This operation loads the configuration. After the device finishes a <load> operation, the configuration in the specified file is merged into the running configuration on the device.
XML example
# Merge the configuration in file a1.cfg to the running configuration on the device.
<rpc message-id="100"
xmlns="urn:ietf:params:xml:ns:netconf:base:1.0">
<load>
<file>a1.cfg</file>
</load>
</rpc>
lock
Usage guidelines
This operation locks the configuration. After you perform this operation, other users cannot perform <edit-config> operations. However, they can still perform other NETCONF operations or use other configuration methods such as CLI and SNMP.
XML example
# Lock the configuration.
<rpc message-id="100" xmlns="urn:ietf:params:xml:ns:netconf:base:1.0">
<lock>
<target>
<running/>
</target>
</lock>
</rpc>
rollback
Usage guidelines
This operation rolls back the configuration. To do so, you must specify the configuration file in the <file> element. After the device finishes the <rollback> operation, the running configuration is totally replaced with the configuration in the specified configuration file.
XML example
# Roll back the running configuration to the configuration in file 1A.cfg.
<rpc message-id="100"
xmlns="urn:ietf:params:xml:ns:netconf:base:1.0">
<rollback>
<file>1A.cfg</file>
</rollback>
</rpc>
save
Usage guidelines
This operation saves the running configuration. You can use the <file> element to specify the name of the file for saving the configuration. If you do not specify a file name, the running configuration is saved to the main next-startup configuration file.
The OverWrite attribute determines whether the running configuration overwrites the original configuration file when the specified file already exists.
The Binary-only attribute determines whether to save the running configuration only to the binary configuration file.
XML example
# Save the running configuration to file test.cfg.
<rpc message-id="100"
xmlns="urn:ietf:params:xml:ns:netconf:base:1.0">
<save OverWrite="false" Binary-only="true">
<file>test.cfg</file>
</save>
</rpc>
unlock
Usage guidelines
This operation unlocks the configuration.
Terminating a NETCONF session automatically unlocks the configuration.
XML example
# Unlock the configuration.
<rpc message-id="100" xmlns="urn:ietf:params:xml:ns:netconf:base:1.0">
<unlock>
<target>
<running/>
</target>
</unlock>
</rpc>
Validating NETCONF messages
Before you issue NETCONF commands, use an XML tool to verify that the NETCONF request messages pass XML scheme check and the device supports the NETCONF operations.
This example uses Altova XMLSpy to validate a NETCONF message.
1. Copy XSD files released with the device software to a directory on a PC installed with Altova XMLSpy.
2. Create an XML document and copy the NETCONF message to the XML document.
Figure 4 Creating an XML document

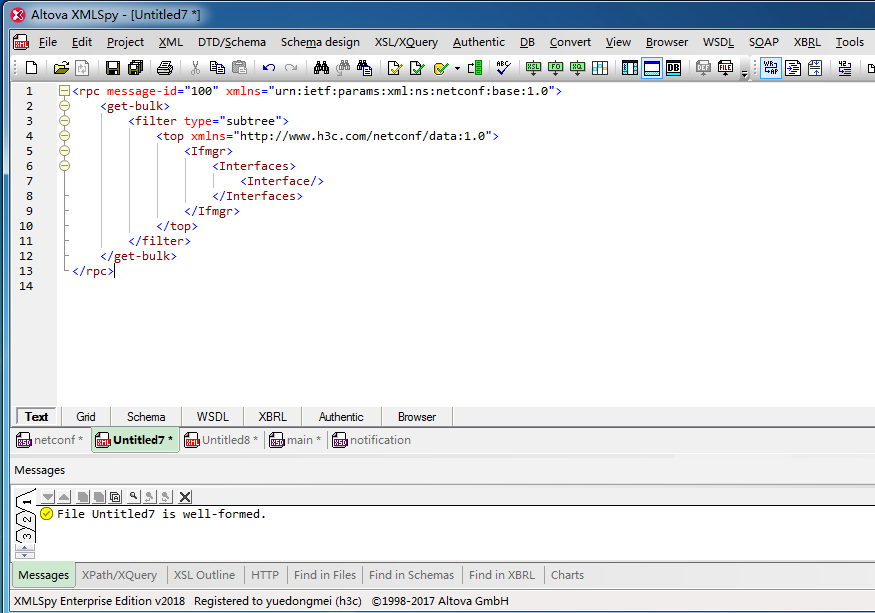
3. On the navigation bar, click XML, and then select Check Formedness to validate the format of the XML document. If the format is invalid, modify the XML document as prompted by the Messages area.
Figure 5 Validating the XML schema
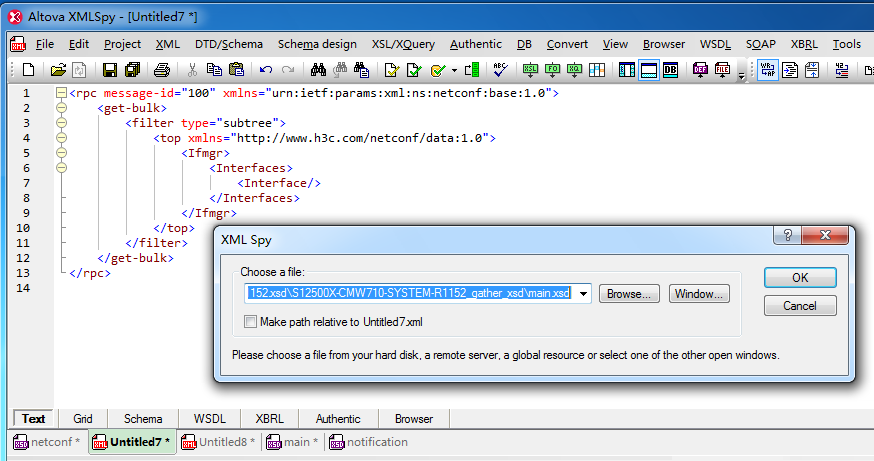
4. From the navigation bar, click DTD/Schema and then select Assign Schema. In the window that opens, select the main.xsd file you saved previously.
Figure 6 Selecting the main. XSD file
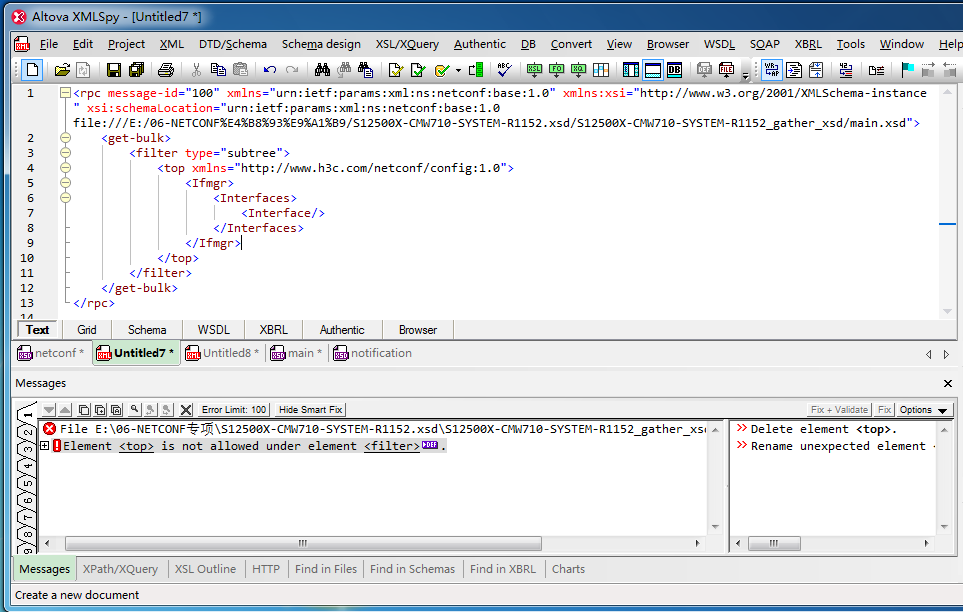
5. On the navigation bar, click XML, and then select Validate XML to validate the format of the XML document. If the Messages area displays error messages, modify the document as prompted and then re-validate the XML document until the XML document passes the XML schema check.
Figure 7 Validating the XML document (example of a valid XML document)
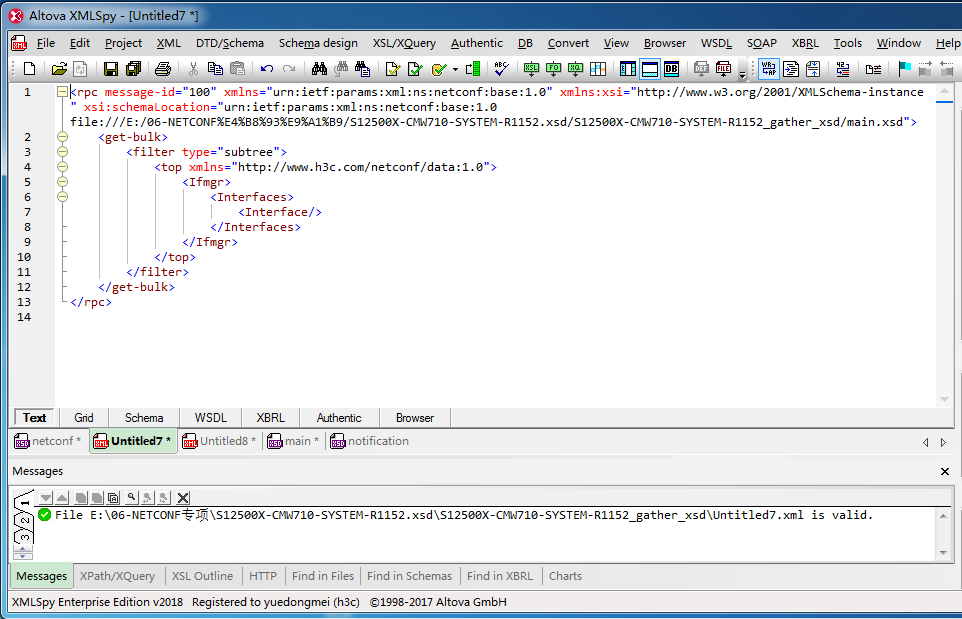
Figure 8 Validating the XML document (example of an invalid XML document)
Issuing NETCONF commands
Issue the NETCONF commands if the XML documents have passed the XML schema check.
Terminating a NETCONF session
# Copy the following message to the client to terminate a NETCONF session:
<rpc message-id=”101” xmlns=”urn:ietf:params:xml:ns:netconf:base:1.0”>
<close-session/>
</rpc>
If the <close-session> operation succeeds, the device returns the following response:
<?xml version=”1.0” encoding=”UTF-8” ?>
<rpc-reply message-id=”101”
xmlns=”urn:ietf:params:xml:ns:netconf:base:1.0”>
<ok/>
</rpc-reply>
The client might fail to receive this message because the session has already been terminated.
NETCONF configuration examples
Example: Configuring DHCP through NETCONF
Network configuration
As shown in Figure 9, Device A acts as the DHCP server and Device B acts as the DHCP client. Use the NETCONF client to configure Device A so Device A assigns the following items to Device B:
· An IP address on subnet 10.1.1.0/24 (the IP address lease duration is 1 day).
· Gateway address 10.1.1.1.
· DNS server address 10.1.1.10.

Configuring NETCONF on Device A
1. Enable NETCONF over SOAP:
<DeviceA> system-view
[DeviceA] netconf soap http enable
2. Configure a device management user that can use NETCONF to configure the DHCP module and interface management (Ifmgr) module.
# Create user role dhcp-ifmgr-vlan, and permit the user role to read, write, and execute related XML elements in the DHCP and Ifmgr modules.
[DeviceA] role name dhcp-ifmgr-vlan
[DeviceA-role-dhcp-ifmgr-vlan] rule 1 permit command xml
[DeviceA-role-dhcp-ifmgr-vlan] rule 2 permit read write execute xml-element rpc/
[DeviceA-role-dhcp-ifmgr-vlan] rule 3 permit read write execute xml-element dhcp/
[DeviceA-role-dhcp-ifmgr-vlan] rule 4 permit read write execute xml-element ifmgr/
[DeviceA-role-dhcp-ifmgr-vlan] rule 5 permit read write execute xml-element vlan/
[DeviceA-role-dhcp-ifmgr-vlan] quit
# Create device management user admin, set the password of the user to admin, and assign the HTTP service to the user.
[DeviceA] local-user admin
[DeviceA-luser-manage-admin] password simple admin
[DeviceA-luser-manage-admin] service-type http
# Assign user role dhcp-ifmgr-vlan to the user.
[DeviceA-luser-manage-admin] authorization-attribute user-role dhcp-ifmgr-vlan
Configuring Device A as the DHCP server from the NETCONF client
1. Install the NETCONF client software on a host. For more information about installing the NETCONF client software, see the user guide of the NETCONF client software.
2. Exchange capabilities with Device A:
# Copy the following hello message to the NETCONF client. In the message, the username and password are both admin. Make sure the URL is http://192.168.1.121/soap/netconf/ on each page.
<env:Envelope xmlns:env="http://www.w3.org/2003/05/soap-envelope">
<env:Header>
<auth:Authentication env:mustUnderstand="1" xmlns:auth="http://www.h3c.com/netconf/base:1.0">
<auth:UserName>admin</auth:UserName>
<auth:Password>admin</auth:Password>
<auth:Language>en</auth:Language>
</auth:Authentication>
</env:Header>
<env:Body>
<hello xmlns="urn:ietf:params:xml:ns:netconf:base:1.0">
<capabilities>
<capability>urn:ietf:params:netconf:base:1.0</capability>
</capabilities>
</hello>
</env:Body>
</env:Envelope>
The NETCONF client receives the following message from Device A. All subsequent NETCONF requests sent to Device A must carry credential 100001ac479ef0988d587b74e787a0917f69.
<env:Envelope xmlns:env="http://www.w3.org/2003/05/soap-envelope">
<env:Header>
<auth:Authentication env:mustUnderstand="true" xmlns:auth="http://www.h3c.com/netconf/base:1.0">
<auth:AuthInfo>100001ac479ef0988d587b74e787a0917f69</auth:AuthInfo>
</auth:Authentication>
</env:Header>
<env:Body>
<hello xmlns="urn:ietf:params:xml:ns:netconf:base:1.0">
<capabilities>
<capability>urn:ietf:params:netconf:base:1.0</capability>
...
</capabilities>
<session-id>1</session-id>
</hello>
</env:Body>
</env:Envelope>
3. Retrieve the indexes of GigabitEthernet 1/0/1 and GigabitEthernet 1/0/2 on Device A:
# Copy the following message to the NETCONF client.
<env:Envelope xmlns:env="http://www.w3.org/2003/05/soap-envelope">
<env:Header>
<auth:Authentication env:mustUnderstand="true" xmlns:auth="http://www.h3c.com/netconf/base:1.0">
<auth:AuthInfo>100001ac479ef0988d587b74e787a0917f69</auth:AuthInfo>
</auth:Authentication>
</env:Header>
<env:Body>
<rpc message-id ="100" xmlns="urn:ietf:params:xml:ns:netconf:base:1.0">
<get>
<filter type="subtree">
<top xmlns="http://www.h3c.com/netconf/data:1.0">
<Ifmgr>
<Interfaces>
<Interface>
<IfIndex></IfIndex>
<Name>GigabitEthernet1/0/1</Name>
</Interface>
<Interface>
<IfIndex></IfIndex>
<Name>GigabitEthernet1/0/2</Name>
</Interface>
</Interfaces>
</Ifmgr>
</top>
</filter>
</get>
</rpc>
</env:Body>
</env:Envelope>
The NETCONF client receives the following message from Device A. The message shows that, the indexes of GigabitEthernet 1/0/1 and GigabitEthernet 1/0/2 are 1 and 2, respectively.
<env:Envelope xmlns:env="http://www.w3.org/2003/05/soap-envelope">
<env:Header>
<auth:Authentication env:mustUnderstand="true" xmlns:auth="http://www.h3c.com/netconf/base:1.0">
<auth:AuthInfo>100001ac479ef0988d587b74e787a0917f69</auth:AuthInfo>
</auth:Authentication>
</env:Header>
<env:Body>
<rpc-reply message-id="100" xmlns="urn:ietf:params:xml:ns:netconf:base:1.0">
<data>
<top xmlns="http://www.h3c.com/netconf/data:1.0">
<Ifmgr>
<Interfaces>
<Interface>
<IfIndex>1</IfIndex>
<Name>GigabitEthernet1/0/1</Name>
</Interface>
</Interfaces>
</Ifmgr>
</top>
</data>
</rpc-reply>
</env:Body>
</env:Envelope>
4. Configure VLANs and VLAN-interfaces on Device A:
# Copy the following message to the NETCONF client. This message requests Device A to perform the following tasks:
¡ Create VLAN 10 and VLAN 20.
¡ Assign GigabitEthernet 1/0/1 and GigabitEthernet 1/0/2 to VLAN 10 and VLAN 20, respectively.
¡ Create VLAN-interface 10 and VLAN-interface 20.
¡ Assign IP addresses 10.1.1.1/24 and 192.168.1.1/24 to VLAN-interface 10 and VLAN-interface 20, respectively.
<env:Envelope xmlns:env="http://www.w3.org/2003/05/soap-envelope">
<env:Header>
<auth:Authentication env:mustUnderstand="true" xmlns:auth="http://www.h3c.com/netconf/base:1.0">
<auth:AuthInfo>100001ac479ef0988d587b74e787a0917f69</auth:AuthInfo>
</auth:Authentication>
</env:Header>
<env:Body>
<rpc message-id ="101" xmlns="urn:ietf:params:xml:ns:netconf:base:1.0" xmlns:xc="urn:ietf:params:xml:ns:netconf:base:1.0">
<edit-config>
<target>
<running/>
</target>
<config>
<top xmlns="http://www.h3c.com/netconf/config:1.0" xc:operation="merge">
<VLAN>
<VLANs>
<VLANID>
<ID>10</ID>
<AccessPortList>1</AccessPortList>
<Ipv4>
<Ipv4Address>10.1.1.1</Ipv4Address>
<Ipv4Mask>255.255.255.0</Ipv4Mask>
</Ipv4>
</VLANID>
<VLANID>
<ID>20</ID>
<AccessPortList>2</AccessPortList>
<Ipv4>
<Ipv4Address>192.168.2.1</Ipv4Address>
<Ipv4Mask>255.255.255.0</Ipv4Mask>
</Ipv4>
</VLANID>
</VLANs>
</VLAN>
</top>
</config>
</edit-config>
</rpc>
The NETCONF client receives the following message, indicating that Device A has configured the VLANs and VLAN-interfaces successfully.
</env:Body>
</env:Envelope>
<env:Envelope xmlns:env="http://www.w3.org/2003/05/soap-envelope">
<env:Header>
<auth:Authentication env:mustUnderstand="true" xmlns:auth="http://www.h3c.com/netconf/base:1.0">
<auth:AuthInfo>100001ac479ef0988d587b74e787a0917f69</auth:AuthInfo>
</auth:Authentication>
</env:Header>
<env:Body>
<rpc-reply message-id="101" xmlns="urn:ietf:params:xml:ns:netconf:base:1.0" xmlns:xc="urn:ietf:params:xml:ns:netconf:base:1.0">
<ok/>
</rpc-reply>
</env:Body>
</env:Envelope>
5. Create a DHCP pool on Device A:
# Copy the following message to the NETCONF client. This message requests Device A to create address pool pool1. In the IP address pool, the subnet for IP address allocation is 10.1.1.0/24, the IP address lease duration is 1 day, the gateway address is 10.1.1.1, and the DNS server address is 10.1.1.10.
<env:Envelope xmlns:env="http://www.w3.org/2003/05/soap-envelope">
<env:Header>
<auth:Authentication env:mustUnderstand="true" xmlns:auth="http://www.h3c.com/netconf/base:1.0">
<auth:AuthInfo>100001ac479ef0988d587b74e787a0917f69</auth:AuthInfo>
</auth:Authentication>
</env:Header>
<env:Body>
<rpc message-id ="101" xmlns="urn:ietf:params:xml:ns:netconf:base:1.0" xmlns:xc="urn:ietf:params:xml:ns:netconf:base:1.0">
<edit-config>
<target>
<running/>
</target>
<config>
<top xmlns="http://www.h3c.com/netconf/config:1.0" xc:operation="create">
<DHCP>
<DHCPServerIpPool>
<IpPool>
<PoolIndex>1</PoolIndex>
<PoolName>pool1</PoolName>
<NetworkIpv4Address>10.1.1.0</NetworkIpv4Address>
<NetworkIpv4Mask>255.255.255.0</NetworkIpv4Mask>
<LeaseDay>1</LeaseDay>
<LeaseHour>0</LeaseHour>
<LeaseMinute>0</LeaseMinute>
<LeaseSecond>0</LeaseSecond>
<GatewayIpv4Address>10.1.1.1</GatewayIpv4Address>
<DNSIpv4Address>10.1.1.10</DNSIpv4Address>
</IpPool>
</DHCPServerIpPool>
</DHCP>
</top>
</config>
</edit-config>
</rpc>
</env:Body>
</env:Envelope>
The NETCONF client receives the following message, indicating that Device A has created the IP address pool successfully.
<env:Envelope xmlns:env="http://www.w3.org/2003/05/soap-envelope">
<env:Header>
<auth:Authentication env:mustUnderstand="true" xmlns:auth="http://www.h3c.com/netconf/base:1.0">
<auth:AuthInfo>100001ac479ef0988d587b74e787a0917f69</auth:AuthInfo>
</auth:Authentication>
</env:Header>
<env:Body>
<rpc-reply message-id="101" xmlns="urn:ietf:params:xml:ns:netconf:base:1.0" xmlns:xc="urn:ietf:params:xml:ns:netconf:base:1.0">
<ok/>
</rpc-reply>
</env:Body>
</env:Envelope>
6. Enable the DHCP service on Device A.
# Copy the following message to Device A to enable the DHCP service:
<env:Envelope xmlns:env="http://www.w3.org/2003/05/soap-envelope">
<env:Header>
<auth:Authentication env:mustUnderstand="true" xmlns:auth="http://www.h3c.com/netconf/base:1.0">
<auth:AuthInfo>100001ac479ef0988d587b74e787a0917f69</auth:AuthInfo>
</auth:Authentication>
</env:Header>
<env:Body>
<rpc message-id ="101" xmlns="urn:ietf:params:xml:ns:netconf:base:1.0" xmlns:xc="urn:ietf:params:xml:ns:netconf:base:1.0">
<edit-config>
<target>
<running/>
</target>
<config>
<top xmlns="http://www.h3c.com/netconf/config:1.0" xc:operation="create">
<DHCP>
<DHCPConfig>
<DHCPEnable>1</DHCPEnable>
</DHCPConfig>
</DHCP>
</top>
</config>
</edit-config>
</rpc>
</env:Body>
</env:Envelope>
The NETCONF client receives the following message, indicating that Device A has enabled the DHCP service successfully.
<env:Envelope xmlns:env="http://www.w3.org/2003/05/soap-envelope">
<env:Header>
<auth:Authentication env:mustUnderstand="true" xmlns:auth="http://www.h3c.com/netconf/base:1.0">
<auth:AuthInfo>100001ac479ef0988d587b74e787a0917f69</auth:AuthInfo>
</auth:Authentication>
</env:Header>
<env:Body>
<rpc-reply message-id="101" xmlns="urn:ietf:params:xml:ns:netconf:base:1.0" xmlns:xc="urn:ietf:params:xml:ns:netconf:base:1.0">
<ok/>
</rpc-reply>
</env:Body>
</env:Envelope>
Configuring Device B as the DHCP client through CLI
# Create VLAN 10 and assign GigabitEthernet 1/0/1 to VLAN 10.
<DeviceB> system-view
[DeviceB] vlan 10
[DeviceB-vlan10] port GigabitEthernet 1/0/1
[DeviceB-vlan10] quit
# Create VLAN-interface 10 and configure the interface to use DHCP for IP address acquisition.
[DeviceB] interface vlan-interface 10
[DeviceB-Vlan-interface10] ip address dhcp-alloc
[DeviceB-Vlan-interface10] quit
Verifying the configuration
# Display the brief IP configuration for Layer 3 interfaces on Device B.
[DeviceB] display ip interface brief
*down: administratively down
(s): spoofing (l): loopback
Interface Physical Protocol IP address VPN instance Description
Vlan10 up up 10.1.1.2 -- --
The output shows that VLAN-interface 10 has obtained IP address 10.1.1.2.
# Display detailed DHCP client information about all interfaces on Device B.
[DeviceB] display dhcp client verbose
Vlan-interface10 DHCP client information:
Current state: BOUND
Allocated IP: 10.1.1.2 255.255.255.0
Allocated lease: 86400 seconds, T1: 38637 seconds, T2: 75600 seconds
Lease from Jan 1 08:54:48 2013 to Jan 2 08:54:48 2013
DHCP server: 10.1.1.1
Transaction ID: 0x81876da6
Default router: 10.1.1.1
DNS servers: 10.1.1.10
Client ID type: ascii(type value=00)
Client ID value: 00e0.fc00.511a-Vlan10
Client ID (with type) hex: 0030-3065-302e-6663-
3030-2e35-3131-612d-
566c-616e-3130
T1 will timeout in 0 days 10 hours 40 minutes 20 seconds
The output shows that Device A has assigned an IP address and the other network parameters to Device B as expected.
Example: Establishing a NETCONF over SSH session by using ncclient
Network configuration
As shown in Figure 10, install ncclient on the host, establish a NETCONF over SSH session with the device, and then perform the following tasks through NETCONF:
· Retrieve the ARP entry information and interface information on the device.
· Configure BGP on the device .

Procedure
1. Configure IP addresses for the host and the device. Make sure the host and the device can reach each other. (Details not shown.)
2. Enable NETCONF over SSH on the device:
# Create local RSA key pairs with default names.
<Router> system-view
[Router] public-key local create rsa
The range of public key modulus is (512 ~ 4096).
If the key modulus is greater than 512, it will take a few minutes.
Press CTRL+C to abort.
Input the modulus length [default = 1024]:
Generating Keys...
.
Create the key pair successfully.
# Create a local DSA key pair with the default name.
[Router] public-key local create dsa
The range of public key modulus is (512 ~ 2048).
If the key modulus is greater than 512, it will take a few minutes.
Press CTRL+C to abort.
Input the modulus length [default = 1024]:
Generating Keys...
.
Create the key pair successfully.
# # Create a local ECDSA key pair with the default name.
[Router] public-key local create ecdsa secp256r1
Generating Keys...
.
Create the key pair successfully.
# Enable NETCONF over SSH.
<Device> system-view
[Device] netconf ssh server enable
# Create device management user admin, set the password of the user to admin, and assign the SSH service to the user.
[Device] local-user admin class manage
[Device-luser-manage-admin] password simple admin
[Device-luser-manage-admin] service-type ssh
# Assign authorization user roles network-admin and network-operator to the user.
[Device-luser-manage-admin] authorization-attribute user-role network-admin
[Device-luser-manage-admin] authorization-attribute user-role network-operator
[Device-luser-manage-admin] quit
# Enable scheme authentication for VTY lines 0 through 63, and assign user roles network-admin and network-operator to the VTY lines.
[Device] line vty 0 63
[Device-line-vty0-63] authentication-mode scheme
[Device-line-vty0-63] user-role network-admin
[Device-line-vty0-63] user-role network-operator
3. Install ncclient on the host:
¡ Using PIP:
# Run the pip install ncclient command at the CLI.
This method will automatically install dependency packages required by ncclient. You do not need to manually download and install the dependency packages or troubleshoot installation errors.
¡ Using the source codes:
# Download the software package file from https://pypi.org/project/ncclient/.
# Decompress the package file.
# Run the python setup.py install command at the CLI.
This method requires you to install multiple dependency packages manually.
4. Use ncclient to write Phython codes for retrieving the device information and configuring the device:
# Edit Python script file query.py to retrieve ARP entries and interface information on the device.
#! /usr/bin/env python2.7
import sys, os, warnings
warnings.simplefilter("ignore", DeprecationWarning)
from ncclient import manager
import time
def my_unknown_host_cb(host, figerprint):
return True
def demo(host, port, user, pwd):
with manager.connect_ssh(host=host,
port=port,
username=user,
password=pwd,
unknown_host_cb=my_unknown_host_cb,
device_params = {'name':'h3c'}) as m:
for c in m.server_capabilities:
print (c)
get_xml = """
<top xmlns="http://www.h3c.com/netconf/data:1.0">
<ARP>
<ArpTable>
<ArpEntry>
<IfIndex></IfIndex>
<Ipv4Address></Ipv4Address>
<MacAddress></MacAddress>
<VLANID></VLANID>
<PortIndex></PortIndex>
<VrfIndex></VrfIndex>
<ArpType></ArpType>
</ArpEntry>
</ArpTable>
</ARP>
<Ifmgr>
<Interfaces>
<Interface>
<IfIndex></IfIndex>
<Name></Name>
</Interface>
</Interfaces>
</Ifmgr>
</top>
"""
print (m.get(('subtree', get_xml)))
if __name__ == '__main__':
demo("17.1.1.124", 830, "admin", "admin")
print ("closed")
time.sleep(1)
# Save the query.py file and run the python query.py command to execute the script. The ARP entry information and interface information of the device is displayed.
# Edit Python script file deploy.py to enable BGP NSR on the device.
#! /usr/bin/env python2.7
import sys, os, warnings
warnings.simplefilter("ignore", DeprecationWarning)
from ncclient import manager
import time
def my_unknown_host_cb(host, figerprint):
return True
def demo(host, port, user, pwd):
xml = """
<config xmlns="urn:ietf:params:xml:ns:netconf:base:1.0" xmlns:xc="urn:ietf:params:xml:ns:netconf:base:1.0">
<top xmlns="http://www.h3c.com/netconf/config:1.0">
<BGP>
<Instances>
<Instance>
<Name></Name>
<ASNumber>111</ASNumber>
<NSR>1</NSR>
</Instance>
</Instances>
</BGP>
</top>
</config>"""
with manager.connect_ssh(host=host,
port=port,
username=user,
password=pwd,
unknown_host_cb=my_unknown_host_cb,
device_params = {'name':'h3c'}) as m:
for c in m.server_capabilities:
print (c)
print (xml)
print (m.edit_config(target='running', config=xml))
if __name__ == '__main__':
demo("17.1.1.124", 830, "admin", "admin")
# Save the deploy.py file and then run the python deploy.py command to execute the script. A message returned by the device will be received. If the value of the <rpc-reply> element is ok, BGP NSR has been enabled on the device. You can use the display current-configuration configuration bgp command on the device to view BGP information.