- Table of Contents
- Related Documents
-
| Title | Size | Download |
|---|---|---|
| 01-Text | 2.51 MB |
Contents
Preparation (non-unified O&M version)
Preparation (unified O&M version)
Obtaining the UniSystem installation package
Installing UniSystem on a VMware ESXi system by using a .ova file
Installing UniSystem on a Windows system by using a .tar installation package
Installing UniSystem on a Linux system by using a .tar installation package
Installing and starting UniSystem on a GUI Linux system
Installing and starting UniSystem on a non-GUI Linux operating system
Installing and starting UniSystem on Rocky Linux 9.2 OS in VMware ESXi 7.0.0 and later versions
Installing and starting UniSystem by using an ISO image
Installing UniSystem on U-Center
Logging in to UniSystem (non-unified O&M version)
Logging in to UniSystem (unified O&M version)
Using UniSystem (non-unified O&M version)
Using UniSystem (unified O&M version)
Configuring the network settings
Setting the host name for UniSystem
Setting the IP address obtaining method for a network port
Synchronizing the system time with an NTP server
Incorporating UniSystem to vCenter Server as a UniSystem plugin
Uninstalling UniSystem installed by using a .tar installation package
Uninstalling UniSystem from a Windows operating system
Uninstalling UniSystem from a GUI Linux operating system
Uninstalling UniSystem on a non-GUI Linux operating system
About UniSystem
As an intelligent, scalable server management software, UniSystem provides comprehensive server management capabilities for customers to manage servers quickly, flexibly, and intelligently. UniSystem also allows customers to develop and incorporate their own management tools into the UniSystem system to extend its functionality.
This document is applicable to the following products:
· AE modules
· H3C UniServer B16000
· H3C UniServer R3350 G7
· H3C UniServer R3950 G7
· H3C UniServer R4950 G7
· H3C UniServer R6930 G7
· H3C UniServer R5330 G7
· H3C UniServer R5500 G7
· H3C UniServer R4330 G7
· H3C UniServer R4930 G7
· H3C UniServer R4970 G7
· H3C UniServer B5700 G6
· H3C UniServer E3300 G6
· H3C UniServer R3950 G6
· H3C UniServer R4300 G6
· H3C UniServer R4500 G6
· H3C UniServer R4700 G6
· H3C UniServer R4700LE G6
· H3C UniServer R4900 G6
· H3C UniServer R4900LE G6 Ultra
· H3C UniServer R4900 G6 Ultra
· H3C UniServer R4950 G6
· H3C UniServer R5350 G6
· H3C UniServer R5300 G6
· H3C UniServer R5500 G6 AMD
· H3C UniServer R5500 G6 Intel
· H3C UniServer R6700 G6
· H3C UniServer R6900 G6
· H3C UniServer B5700 G5
· H3C UniServer R4300 G5
· H3C UniServer R4330 G5
· H3C UniServer R4330 G5 H3
· H3C UniServer R4700 G5
· H3C UniServer R4700LC G5
· H3C UniServer R4900 G5
· H3C UniServer R4900LC G5
· H3C UniServer R4930 G5
· H3C UniServer R4930 G5 H3
· H3C UniServer R4930 G5 H3 PKG
· H3C UniServer R4930LC G5 H3
· H3C UniServer R4950 G5
· H3C UniServer R5300 G5
· H3C UniServer R5500 G5
· H3C UniServer R5500LC G5
· H3C UniServer R6900 G5
· H3C UniServer B5700 G3
· H3C UniServer B5800 G3
· H3C UniServer B7800 G3
· H3C UniServer E3200 G3
· H3C UniServer R2700 G3
· H3C UniServer R2900 G3
· H3C UniServer R4300 G3
· H3C UniServer R4360 G3
· H3C UniServer R4500 G3
· H3C UniServer R4700 G3
· H3C UniServer R4900 G3
· H3C UniServer R4950 G3
· H3C UniServer R4960 G3
· H3C UniServer R5300 G3
· H3C UniServer R6700 G3
· H3C UniServer R6900 G3
· H3C UniServer R8900 G3
· H3C UniStor X10516 G6
· H3C UniStor X10529 G6
· H3C UniStor X10536 G6
· H3C UniStor X18000 G6
|
|
NOTE: · The UniSystem screenshots used in this document are for illustration only and might differ from your products. · The information in this document might differ from your product if it contains custom configuration options or features. |
Architecture
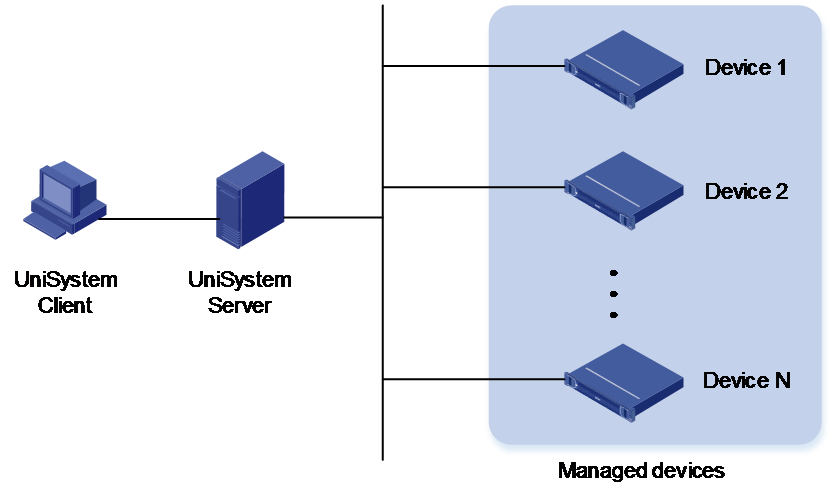
As shown in Figure 1, the UniSystem architecture contains the following elements:
· UniSystem client—A PC or physical server used to access UniSystem through the Web browser.
· UniSystem server—A PC, physical server, or AE module hosting the UniSystem software. An AE module ships with UniSystem pre-installed.
· Managed devices—Devices managed by UniSystem, including enclosures, switches, and servers.
You can access UniSystem from the browser of the UniSystem client or UniSystem server and manage devices through UniSystem. The UniSystem client and UniSystem server can be the same device, unless the UniSystem server runs on an AE module.
UniSystem supports a maximum of 10 users with the default user included.
Figure 1 UniSystem architecture
To upgrade the server drives or view more information about managed devices on UniSystem, you need to install and start FIST System Management Service (SMS) on the managed devices. FIST SMS is the software installed in the operating system of a server to enhance UniSystem management capabilities.
For more information about FIST SMS, see the user guide for FIST SMS.
Preparing for installation
Preparation (non-unified O&M version)
|
|
NOTE: The content of this section is only applicable to the UniSystem running on PC, AE module, and VM environments. |
UniSystem server requirements
Table 1 Configuration requirements
|
Operating system type |
Hardware requirements |
Operating system configuration requirements |
|
Microsoft Windows 11 (64 bit) |
· CPU: X86, 4 cores or more · Memory: ¡ 8GB or more (less than 2000 devices) ¡ 16GB or more (2000 to 5000 devices) · Disk: 20GB or more · NIC: 1 × 10/100/1000Mb autosensing Ethernet adapter |
· Only 64-bit operating systems are supported · OpenJDK 1.8 version (64 bit) |
|
Microsoft Windows 10 (64 bit) |
||
|
Microsoft Windows 7 (64 bit) |
||
|
Microsoft Windows Server 2012R2 Datacenter (64 bit) |
||
|
Microsoft Windows Server 2016 (64 bit) |
||
|
Microsoft Windows Server 2019 (64 bit) |
||
|
CentOS 7.4 (64 bit) (includes KVM) |
||
|
CentOS 7.5 (64 bit) (includes KVM) |
||
|
VMware ESXi |
· CPU: X86, 8 cores or more · Memory: 32GB or more · Disk: 500GB or more |
· Only .ova file-based import is supported. |
|
Galaxy Kylin Advanced Server Operating System V10 SP3 |
· CPU: X86, 8 cores or more · Memory: 32GB or more · Disk: 500GB or more |
· Only 64-bit operating systems are supported · OpenJDK 1.8 version (64 bit) · Only .tar.gz file-based installation is supported |
|
Rocky Linux 9.2 |
||
|
Red Hat Enterprise Linux 7.9 (64 bit) |
UniSystem client requirements
You can use a Web browser to access UniSystem without installation of a client. Make sure the UniSystem client meets the requirements in Table 2.
Table 2 UniSystem client requirements
|
Browser |
Resolution |
|
Google Chrome 66.0 (or higher) Mozilla Firefox 60.0 (or higher) Internet Explorer 11 (or higher) |
1600*900 (or higher) |
Network planning
UniSystem IP address planning
Before installing UniSystem, the administrator must plan network parameters for UniSystem. UniSystem supports creating a cluster of primary/secondary AE modules. After a cluster is created, UniSystem automatically monitors the state of the primary node. When the primary node fails, UniSystem will switch to run on the secondary node, which avoids service interruption caused by the failure of the primary AE module. You can plan IP addresses for nodes in the cluster in advance to ensure that the cluster node IP addresses can normally communicate with the login IP address. Table 3 shows the UniSystem IP address plan, and Table 4 shows the cluster node IP address plan. The default subnet for UniSystem on AE modules and VMs is 192.168.0.100/192.168.0.101.
Table 3 UniSystem IP address plan
|
IP address |
Subnet mask |
|
Login IP address of UniSystem |
N/A |
Table 4 Cluster IP address plan
|
IP address |
Subnet mask |
|
Primary node IP address of UniSystem |
N/A |
|
Secondary node IP address of UniSystem |
N/A |
|
UniSystem virtual IP address |
N/A |
|
iSCSI virtual IP address |
N/A |
IP address plan for devices to be managed
A single UniSystem system can manage up to 5000 H3C UniServer servers and 30 S6800-54QT, M8380-C, M8310, S6840-56HF, and S6800-54QF switches.
Before installing UniSystem, the administrator must plan network parameters for devices to be managed, as shown in Table 5.
Table 5 Network parameter plan for devices to be managed
|
Parameter |
Description |
|
IP address |
Server IP address. |
|
Protocol |
HTTP and HTTPS are supported. |
|
Port |
The default port is 80 for HTTP and 443 for HTTPS. |
|
Username |
The default username is admin. |
|
Password |
The default password is Password@_. |
Preparation (unified O&M version)
|
|
NOTE: The content of this section is only applicable to the UniSystem running on the U-Center unified operation and maintenance platform. |
Prerequisites
Considering that the unified O&M version of UniSystem is installed on the U-Center unified O&M platform, for more information about the E07xx version, see H3C U-Center 2.0 Deployment Guide on the H3C official website. For more information about the E710x version, see H3C U-Center 5.0 Deployment Guide on the H3C official website. You can also contact Technical Support to obtain the manual.
Restrictions and guidelines
If you use the UniSystem component of the U-Center unified O&M platform on the CAS platform, make sure the processor operating mode of VMs for the U-Center unified O&M platform is set to passthrough mode. If you fail to do so, the management of servers by the UniSystem component might be affected. For more information, see the user guide for the H3C CAS cloud computing management platform.
Installing UniSystem
Obtaining the UniSystem installation package
The following types of UniSystem installation packages are available.
· .tar installation package—An installation-free UniSystem installation package. It allows you to start UniSystem after decompressing the installation package
· .iso image file—An ISO image that allows UniSystem to be installed automatically, applicable to AE modules. UniSystem will run automatically after installation.
· .ova file—A file used to install UniSystem on the VMware ESXi system running on a VM. UniSystem will run automatically after installation.
· .zip file—Applicable to the unified O&M version of the U-Center platform.
Installing UniSystem on a VMware ESXi system by using a .ova file
Restrictions and guidelines
Before the installation, make sure the minimum hardware requirements for installing UniSystem on a VM are met. For more information, see Table 1.
Procedure
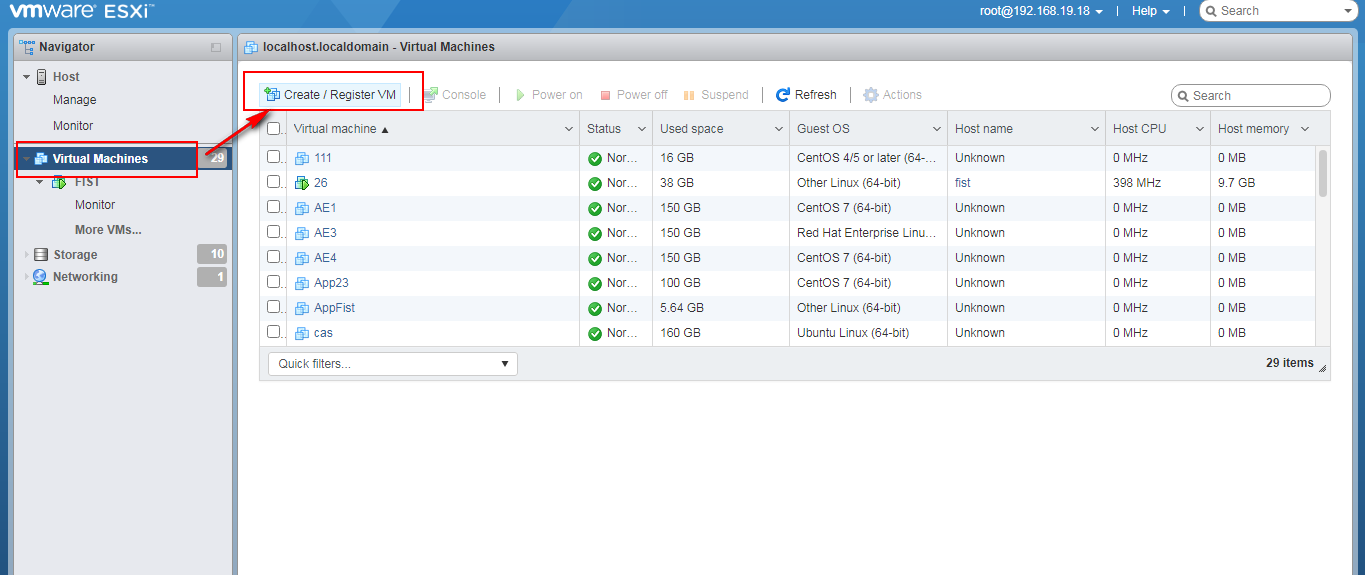
1. From the left navigation pane, select Virtual Machines. Click Create/Register VM to launch the VM deployment wizard.
Figure 2 Launching the VM creation wizard
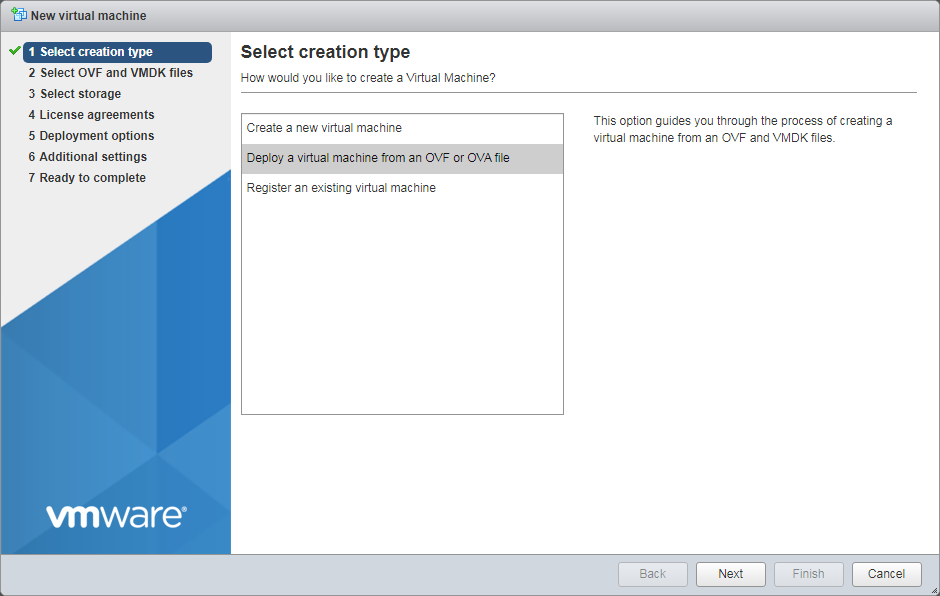
2. On the Select Creation Type page that opens, select Deploy a virtual machine from an OVF or OVA file, and then click Next.
Figure 3 Selecting a creation type
3. On the Select OVF and VMDK files page, specify a name for the VM to be created, upload the local .ova UniSystem installation file, and then click Next.
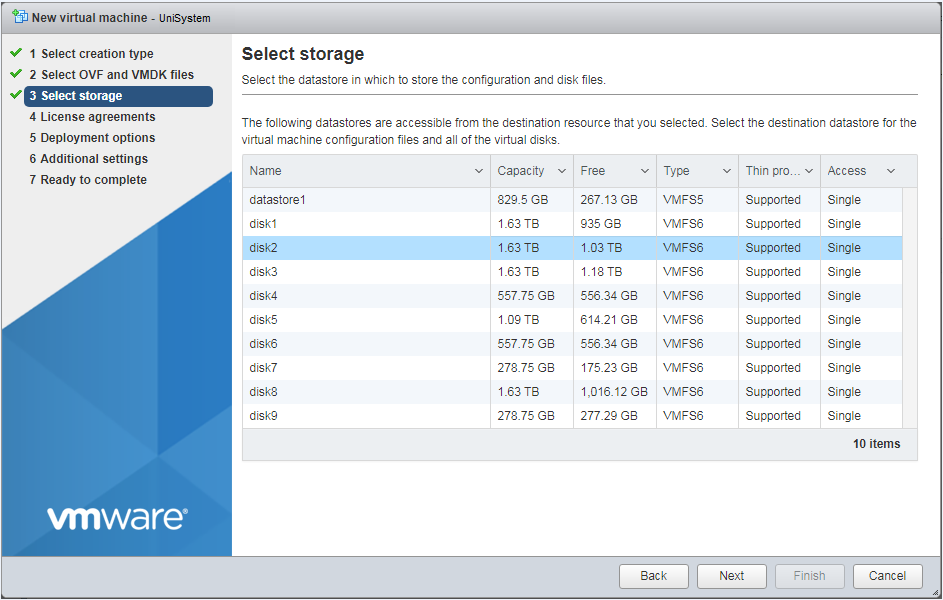
4. On the Select Storage page, select the destination datastore for the VM configuration files and all of the virtual disks.
Figure 4 Selecting the destination datastore
5. On the Deployment options page, configure the Network mappings and Disk provisioning parameters, and then click Next.
Figure 5 Configuring deployment options

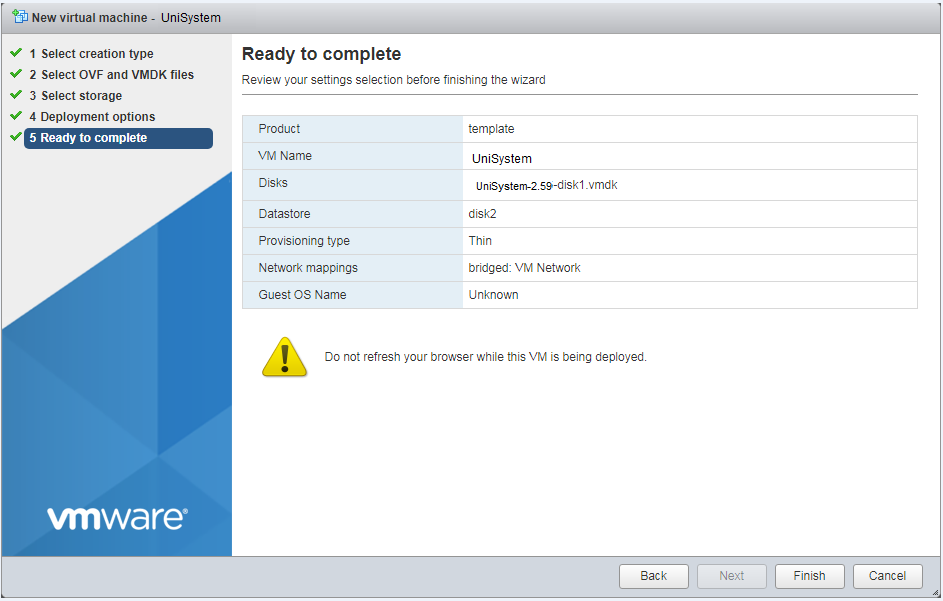
6. On the Ready to complete page, review the VM deployment settings and click Finish to start the deployment.
Figure 6 Starting VM deployment
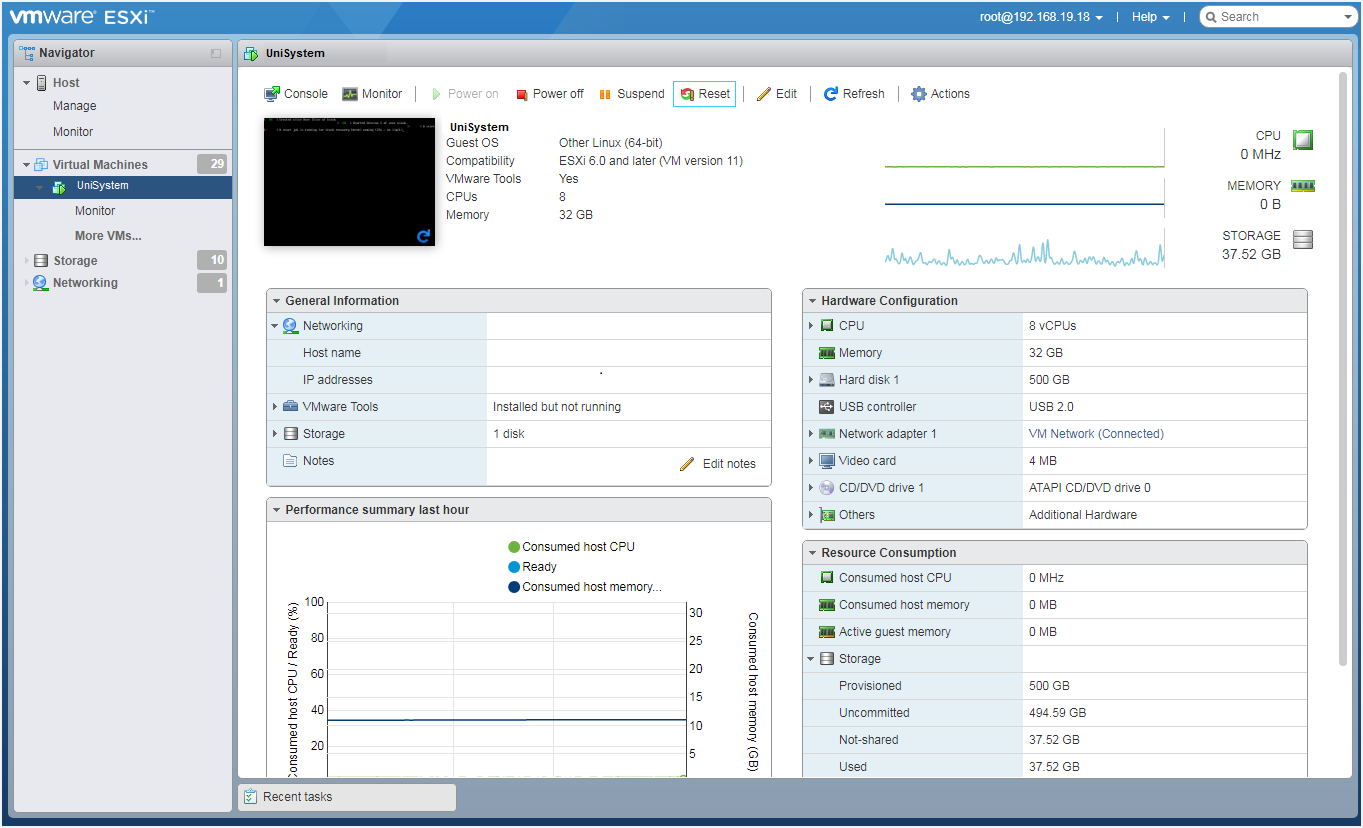
7. After the VM deployment is complete, the VM automatically starts and proceeds to install and run UniSystem on itself.
Figure 7 UniSystem installed on the VM
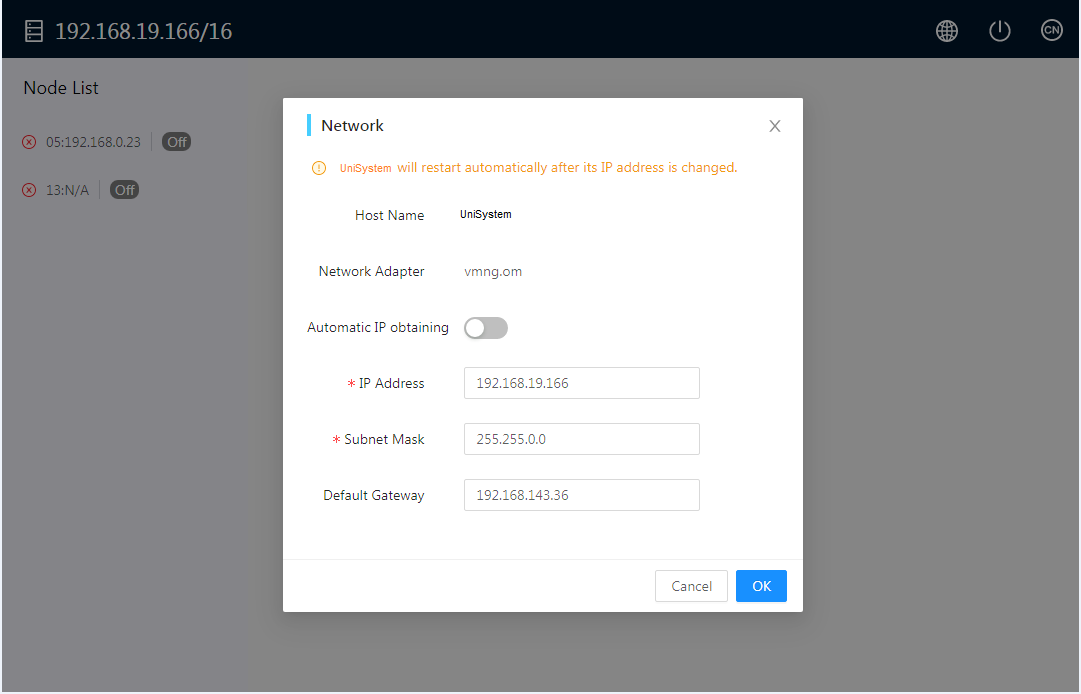
8. (Optional.) Log in to the Web interface of
the VM. After UniSystem starts up on the VM, click ![]() in the
upper right corner to change the IP address settings for UniSystem.
in the
upper right corner to change the IP address settings for UniSystem.
Figure 8 Editing the IP address settings for UniSystem
9. Log in to UniSystem. For more information, see "Logging in to UniSystem."
Installing UniSystem on a Windows system by using a .tar installation package
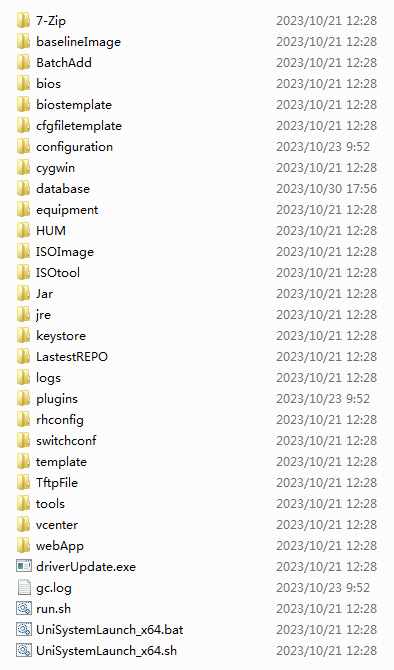
1. Download the UniSystem installation package, and then decompress the package.
Figure 9 Decompressed UniSystem installation package
2. Right-click the UniSystemLaunch_x64.bat file and select Run as administrator.
The UniSystem console opens a few seconds later.
|
|
IMPORTANT: If you use a non-administrator role to run UniSystem on a Windows system, the image files cannot be used. |
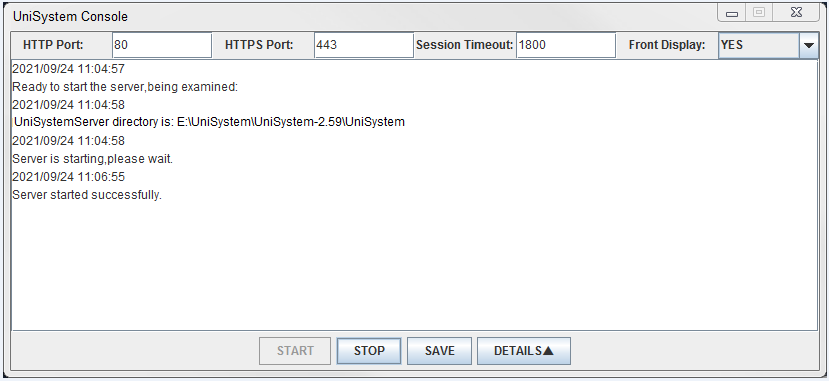
3. Verify the UniSystem settings.
¡ HTTP Port—HTTP service port number. The value range is 1 to 65535, and the default value is 80.
¡ HTTPS Port—HTTPS service port number. The value range is 1 to 65535, and the default value is 443.
¡ Session Timeout—Session timeout time in seconds. The value range is 600 to 1800, and the default value is 1800.
¡ Front Display—Whether or not to display the UniSystem console always in the foreground.
|
|
|
IMPORTANT: The HTTP and HTTPS service port numbers cannot be the same or be used by another service. If the port number is used by another service, change the port number. |

4. Click START.
5. Click Details to view the UniSystem startup progress and verify that it is started correctly.
Figure 11 Viewing UniSystem startup details

Installing UniSystem on a Linux system by using a .tar installation package
Restrictions and guidelines
· You must have root privileges to perform this task.
· You must run UniSystem as an administrator.
Installing and starting UniSystem on a GUI Linux system
1. Download the UniSystem installation package (UniSystem-2.59.tar.gz in this example), and then save the package to its installation directory. This examples save the package to the root directory.
2. Open the terminal window.
3. Enter the tar -xf UniSystem-2.59.tar.gz command, and then press Enter to decompress the installation package.
Figure 12 Decompressing the UniSystem installation package

4. Enter the cd UniSystem/ command to access the UniSystem folder.
Figure 13 Accessing the UniSystem folder

5. Enter the UniSystemLaunch_x64.sh command, and then press Enter to launch the UniSystem console window.
6. Verify the UniSystem settings:
¡ HTTP Port—HTTP service port number. The value range is 1 to 65535, and the default value is 80.
¡ HTTPS Port—HTTPS service port number. The value range is 1 to 65535, and the default value is 443.
¡ Session Timeout—Session timeout time in seconds. The value range is 600 to 1800, and the default value is 1800.
¡ Front Display—Whether or not to display the UniSystem console always in the foreground.
|
|
IMPORTANT: The HTTP and HTTPS service port numbers cannot be the same or be used by another service. If the port number is used by another service, change the port number. |
Figure 14 UniSystem console

7. Click START.
|
|
IMPORTANT: Keep the terminal window open while UniSystem is running. Closing the window will interrupt the UniSystem service. |
8. Click Details to view the UniSystem startup progress and verify that it is started correctly.
Figure 15 Viewing UniSystem startup details
Installing and starting UniSystem on a non-GUI Linux operating system
1. Download the UniSystem installation package (UniSystem-2.59.tar.gz in this example), and then save the package to the root directory.
2. Enter the tar -xf UniSystem-2.59.tar.gz command, and then press Enter to decompress the installation package.
Figure 16 Decompressing the UniSystem installation package

3. Enter the cd UniSystem/ command to access the UniSystem folder.
Figure 17 Accessing the UniSystem folder

4. Execute the ./run.sh 80 443 1800 command to start UniSystem.
The value 80 is the default HTTP port number and 443 is the default HTTPS port number. The port number is in the range of 1 to 65535. You can change the port number as needed.
The value 1800 is the default session timeout time. The session timeout time value is in the range of 600 to 1800, in seconds. You can change the value as needed.
Figure 18 Starting UniSystem

Installing and starting UniSystem on Rocky Linux 9.2 OS in VMware ESXi 7.0.0 and later versions
1. Configure the VMX file for the VM for UniSystem installation
a. Power off the VM.
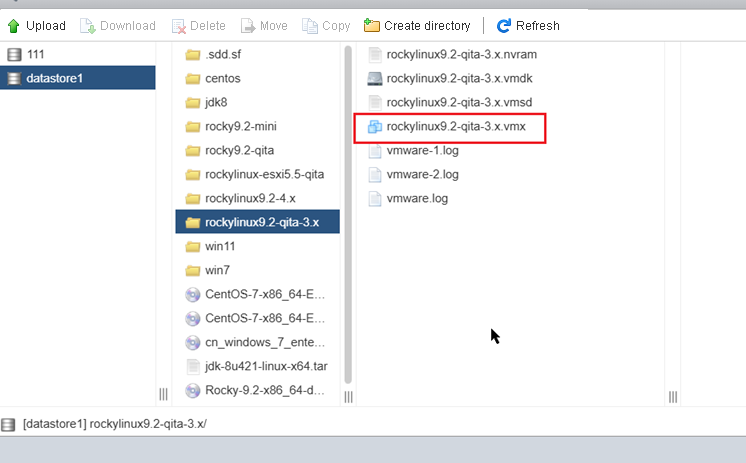
b. Click Datastore browser to locate the installation path of the VM.
Figure 19 Installation path of the VM

c. Select the target VMX file of the VM for UniSystem installation, and click Download to download the VMX file to the local.
Figure 20 Downloading the VMX file of the VM
d. Modify the VMX file of the VM, correct the value of the virtualHW.version field to 10, and save the configuration.
Figure 21 Modifying the VMX file of the VM

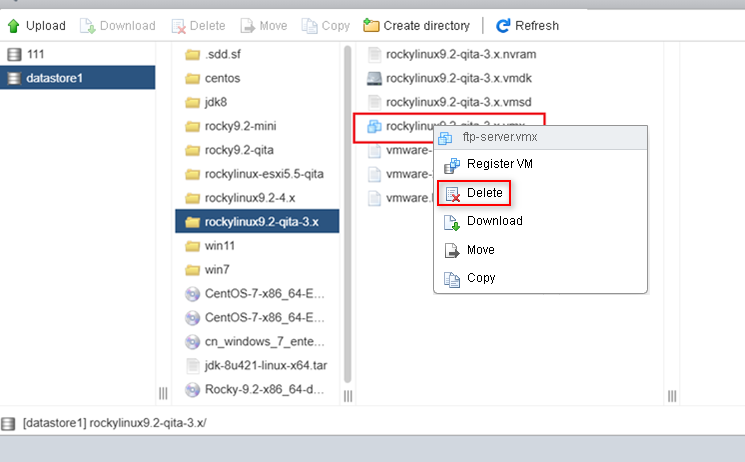
e. Delete the original VMX file of the VM.
Figure 22 Deleting the original VMX file of the VM
f. Select the VM for UniSystem installation, click Upload in the upper left corner, and select the modified VMX file from the local to upload.
g. Power on the VM.
2. Installing and starting UniSystem
¡ For information about installing and starting UniSystem on a Linux OS with a graphical interface, see "Installing and starting UniSystem on a GUI Linux system."
¡ For information about installing and starting UniSystem on a Linux OS without a graphical interface, see "Installing and starting UniSystem on a non-GUI Linux operating system."
Installing and starting UniSystem by using an ISO image
Using a UniSystem ISO image file, you can install UniSystem automatically without manual intervention during the installation process.
The following procedure describes the procedure for using an ISO image to install and start UniSystem on an AE module.
Procedure
1. Launch the HDM KVM console of the AE module.
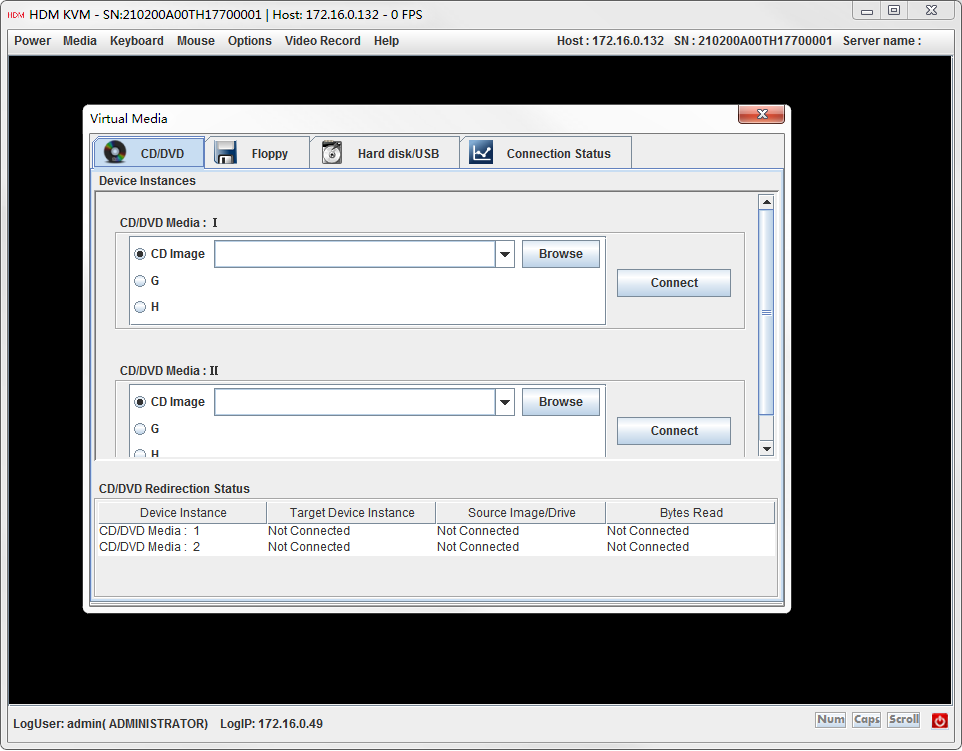
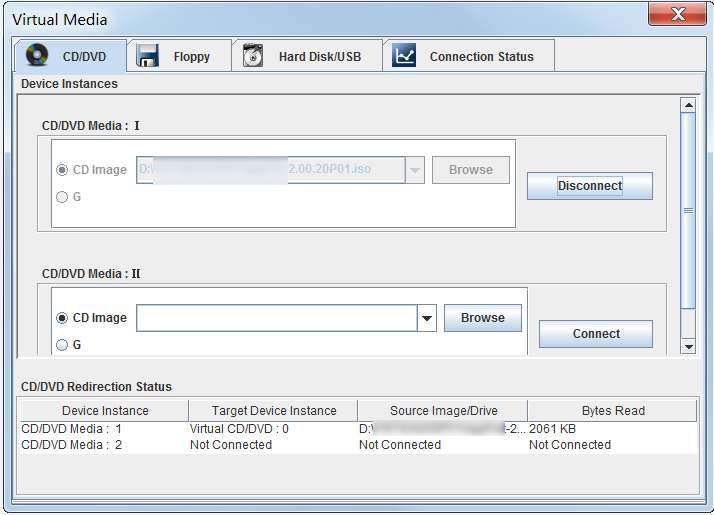
2. Select Media > Virtual Media Wizard from the top menu bar.
The Virtual Media window opens.
Figure 23 Virtual Media window
3. On the CD/DVD tab, click Browse to select an ISO image file, and then click Open.
4. Click Connect.
Figure 24 ISO image file mounted
5. Reboot the server. The server automatically enters the UEFI: AMI Virtual CDROM 1.00 boot option.
6. The system starts to install UniSystem. The process takes about 30 minutes and does not require manual intervention.
Figure 25 Installing UniSystem

7. After the installation is complete, UniSystem will automatically start to run.
Restrictions and guidelines
If the UniSystem installation screen turns black, it might be because KVM fails to process data in time due to high network traffic. To resolve this issue, check your local PC's connection speed and duplex mode, and configure the settings or set automatic detection accordingly as follows:
1. Select Network and Internet.
2. Select Network Connections, and choose the network in use.
3. Select Properties, click Configure > Advanced, select Speed & Duplex in the property list, and then set Value to Auto Negotiation.
Installing UniSystem on U-Center
1. Enter the login URL http://ip_address:8443/matrix/ui in the browser address bar to access the Matrix login page, where ip_address is the designated northbound virtual IP address and 8443 is the default port number.
2. Enter the username and password. The default username is admin, and the password is Pwd@12345. If you set a password during the operating system installation, use that password to log in.
3. Click Login.
4. From the left navigation pane, select Deploy > Application.
5. Click Deploy Application to start deploying UniSystem.
6. Click Upload and then browse to the target UniSystem installation package (.zip file), such as UniSystem-DOCKER-<version>.zip.
Figure 26 Uploading the installation package

7. After the file is uploaded, click Next to access the application selection page.
Figure 27 Selecting applications
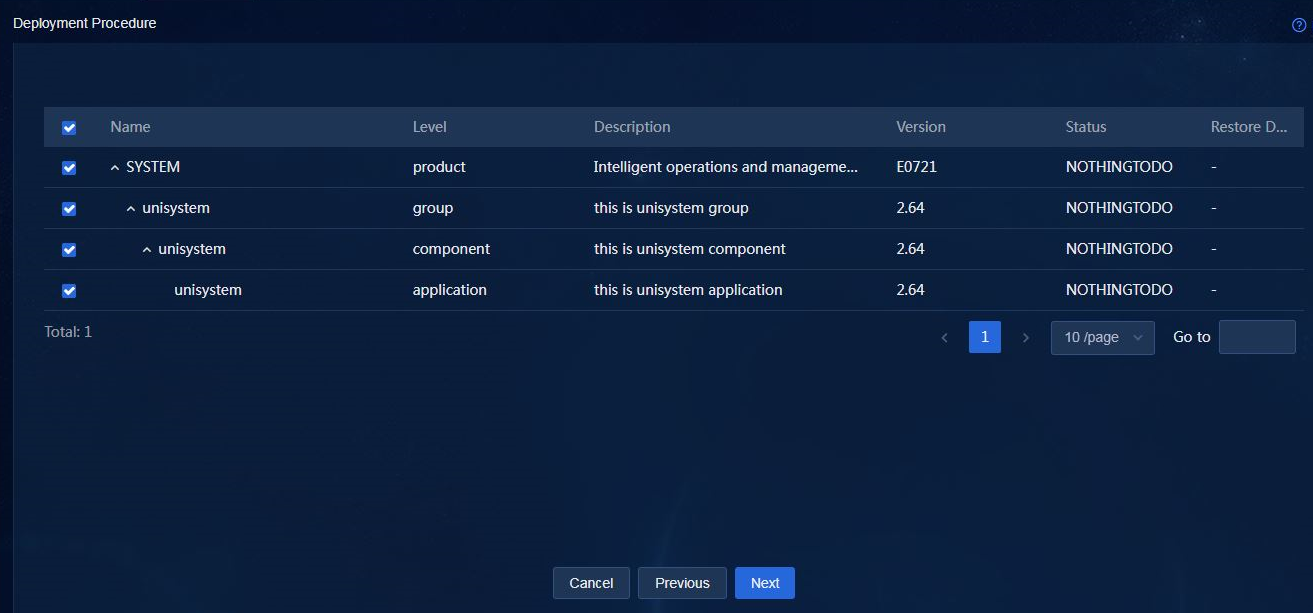
8. Select the target applications and then click Next to access the shared storage page. By default, all applications are selected.
Figure 28 Configuring the shared storage

9. Click Next to access the database configuration page.
Figure 29 Configuring the database

10. Click Next to access the parameter configuration page.
Figure 30 Configuring parameters
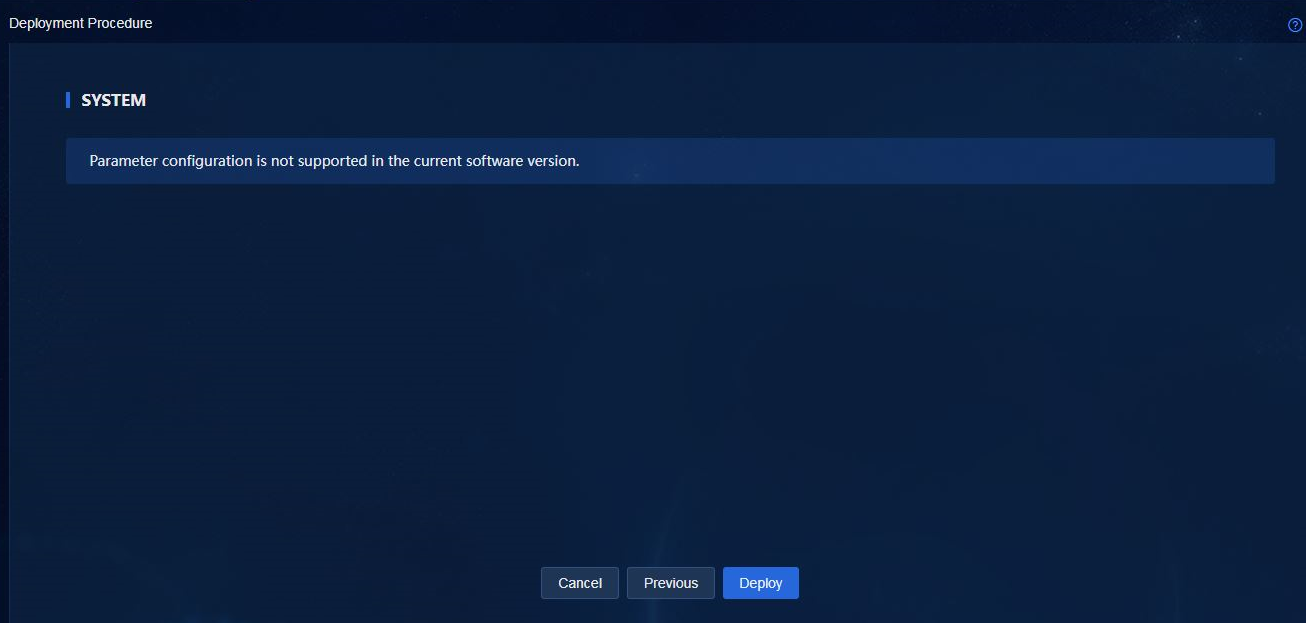
11. Click Deploy to start deploying UniSystem applications. Wait for the deployment to finish.
Logging in to UniSystem
Logging in to UniSystem (non-unified O&M version)
|
|
NOTE: The content of this section is only applicable to the UniSystem running on PC, AE module, and VM environments. |
Restrictions and guidelines
· Only a user account in On state (activated) can be used to log in to UniSystem. Login to UniSystem with an inactivated account will be rejected.
· By default, a user will be logged out automatically after 30 minutes of inactivity.
Procedure
1. Enter the login address in the web browser.
You can log in to UniSystem from a UniSystem client or the UniSystem sever.
¡ To log in to UniSystem from a UniSystem client, enter http://UniSystem_ip_address in the address bar of the client browser.
UniSystem_ip_address represents the IP address of the UniSystem server. If UniSystem is installed on an AE module in slot E1, the IP address is 192.168.0.100/24. If UniSystem is installed on an AE module in slot E2, the IP address is 192.168.0.101/24. If UniSystem is installed on a VM, the IP address is 192.168.0.100/24.
¡ To log in to UniSystem from the UniSystem server, enter http://localhost or http://127.0.0.1 in the address bar of the host browser.
|
|
IMPORTANT: If the default port number is changed, use the modified port number when entering the login address. |
2. On the login page, enter the username and password, and then click Log In. The UniSystem home page opens
The default username is admin and password is Password@_.
Figure 31 UniSystem login page
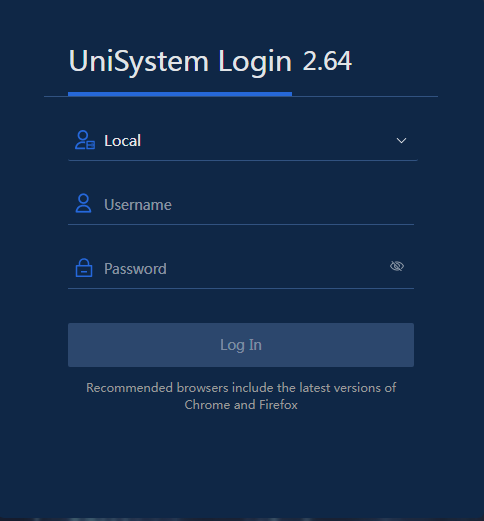
Figure 32 UniSystem home page
|
|
NOTE: When UniSystem runs on an AE module, all its functions are available. When UniSystem runs on a non-AE module, only part of its functions are available. |
3. (Optional.) To modify the login password, select Menu > System > Users and Security > User List and then modify the password.
For more information about modifying the password, see UniSystem Online Help.
Logging in to UniSystem (unified O&M version)
|
|
NOTE: The content of this section is only applicable to the UniSystem running on the U-Center unified operation and maintenance platform. |
1. Enter the login URL http://ip_address:port in the browser address bar to access the U-Center 2.0 login page, where ip_address is the designated northbound virtual IP address and port is the port number (30000 by default).
2. Enter the username and password. The default username is admin, and the password is Pwd@12345. If you set a password during the operating system installation, use that password to log in.
3. Click Login.
4. Click the Settings icon ![]() at the upper right corner. Click Change Views.
at the upper right corner. Click Change Views.
Figure 33 Settings menu

5. Click ![]() icon
for UniSystem to change to
UniSystem view.
icon
for UniSystem to change to
UniSystem view.
Figure 34 Changing views
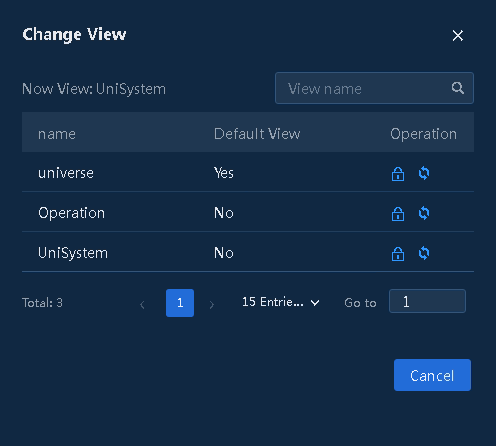
You are placed on the UniSystem home page as shown in Figure 35.
6. (Optional.) To modify the login password, select Menu > System > Users and Security > User List and then modify the password.
For more information about modifying the password, see UniSystem Online Help.
Using UniSystem
Using UniSystem (non-unified O&M version)
|
|
NOTE: The content of this section is only applicable to the UniSystem running on PC, AE module, and VM environments. |
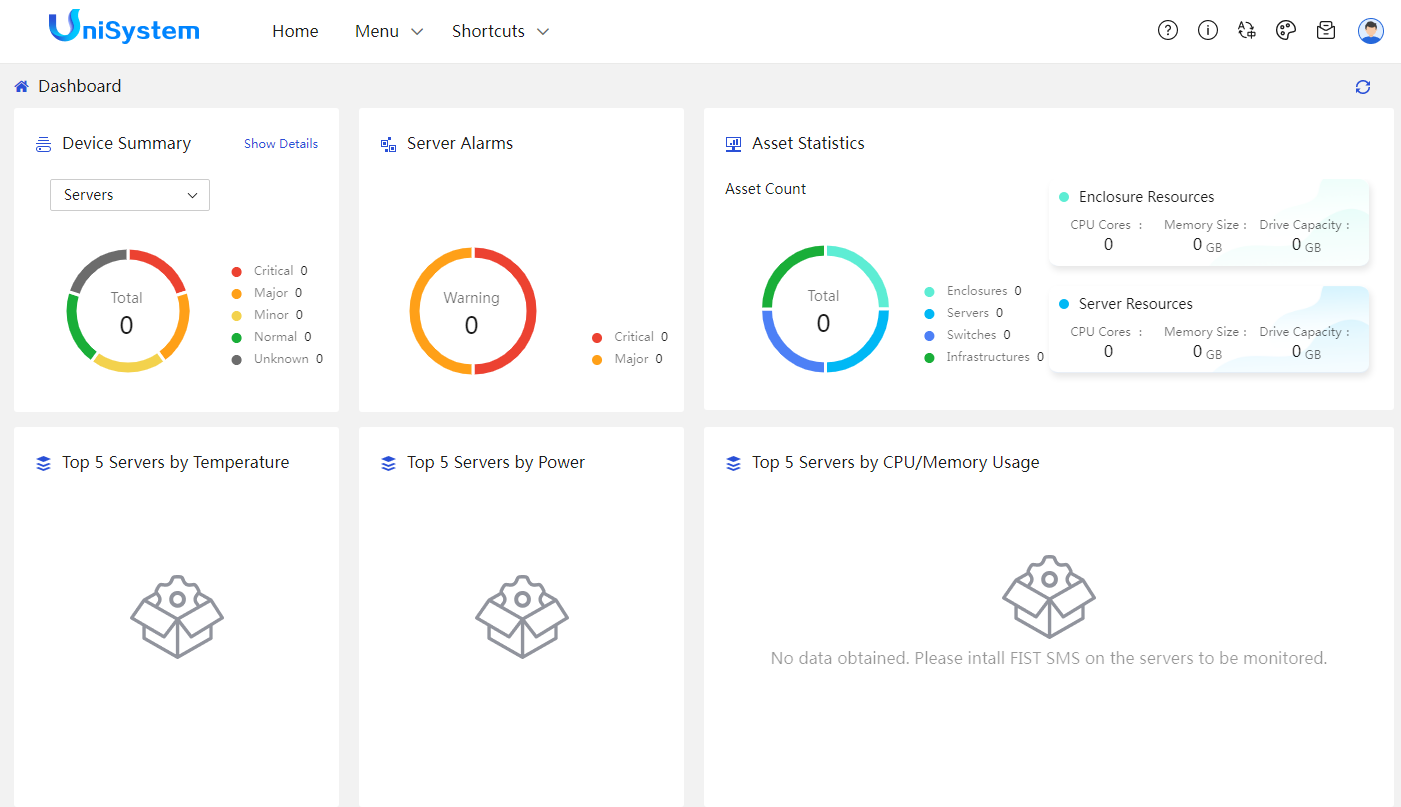
The UniSystem Web interface, as shown in Figure 36, opens upon your login. The UniSystem Web interface can be divided into two areas, as described in Table 6.
Figure 36 UniSystem Web interface
Table 6 UniSystem Web interface design description
|
Area |
Description |
|
Header section |
Provides function menus, login user information, and the following administrative options: · · · · · · |
|
Work pane |
Displays current operation information and function links. |
Using UniSystem (unified O&M version)
|
|
NOTE: The content of this section is only applicable to the UniSystem running on the U-Center unified operation and maintenance platform. |
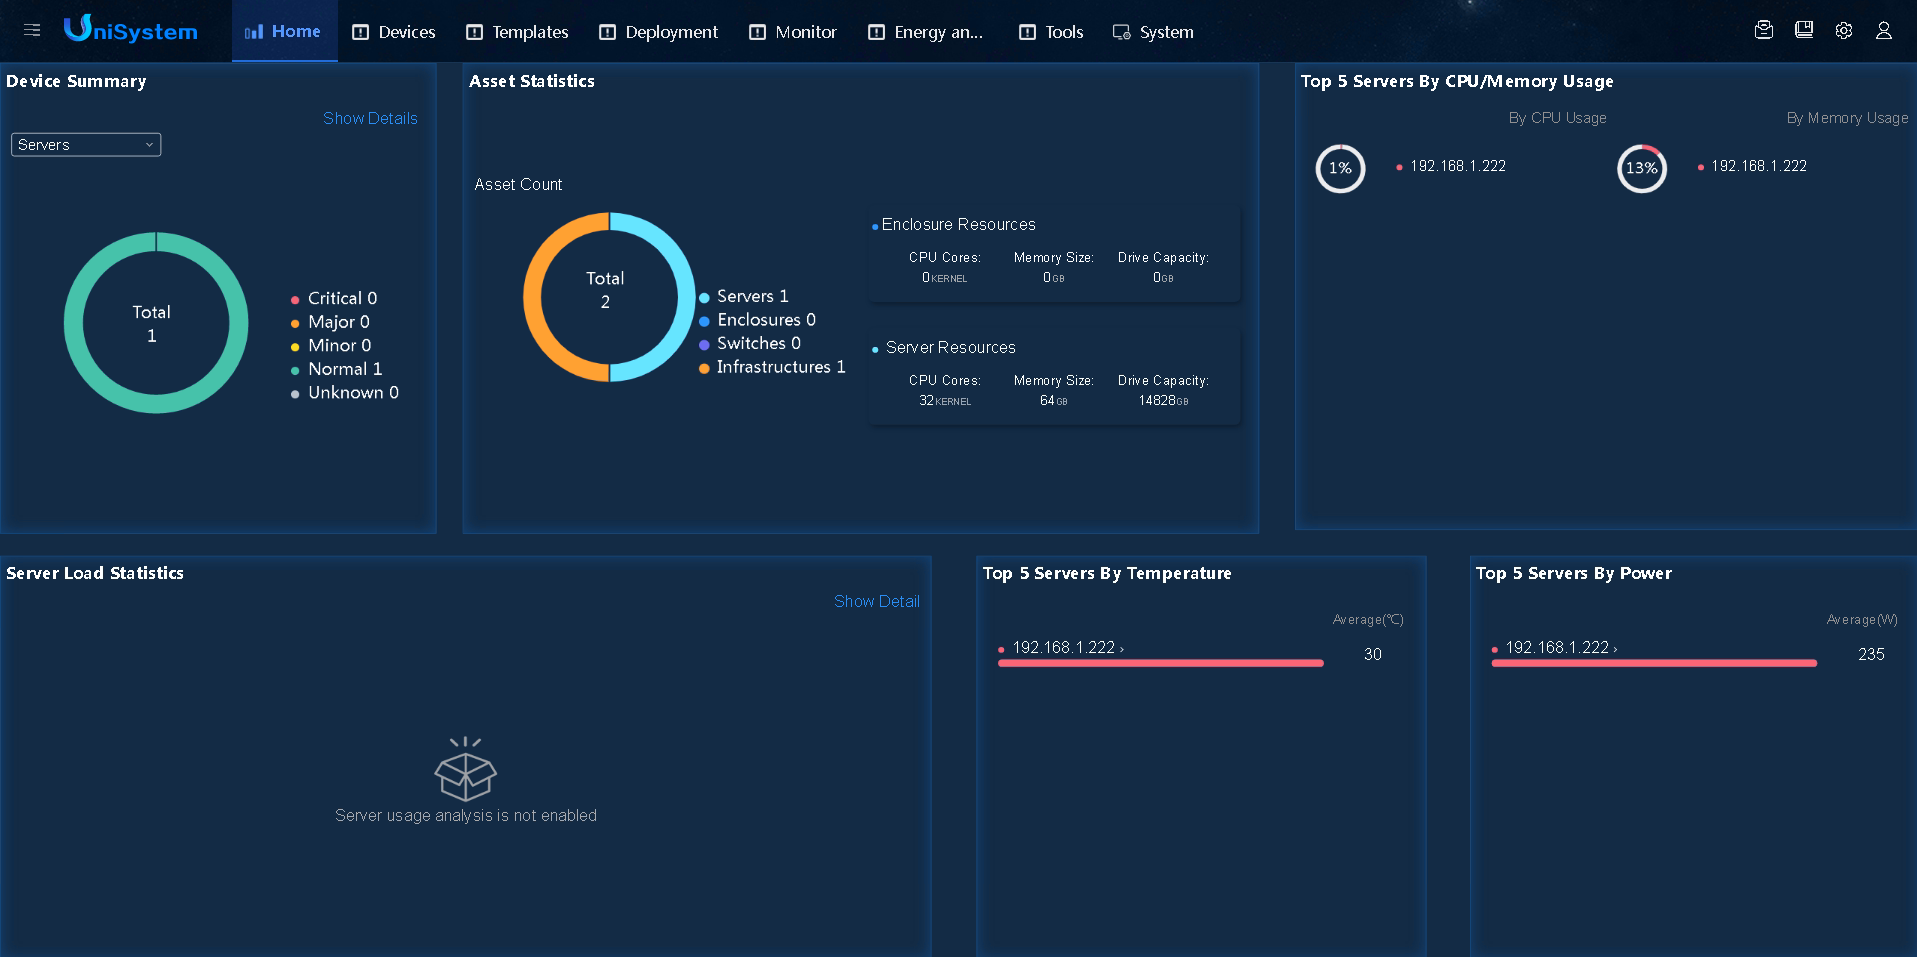
The UniSystem Web interface, as shown in Figure 37,
opens upon your login. The UniSystem Web interface can be divided into two
areas, as described in Table 7. You
can access the UniSystem online help by clicking ![]() at
the upper right corner of any page.
at
the upper right corner of any page.
Figure 37 UniSystem Web interface

Table 7 UniSystem Web interface design description
|
Area |
Description |
|
Header section |
· · |
|
Work pane |
Displays current operation information and function links. |
Configuring initial settings
After UniSystem is installed, configure initial settings to use the features of UniSystem as a best practice. The features in this chapter are optional and configure them as needed.
Configuring the network settings
This feature is available only when UniSystem runs on a VM or an AE module.
Setting the host name for UniSystem
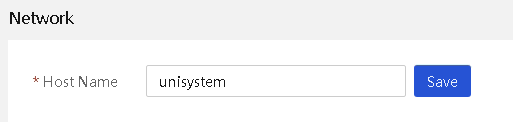
Perform this task to view or set the host name used for the UniSystem server.
Procedure
1. In the navigation pane, select Menu > System > System > Network.
2. Enter the host name.
3. Click Save.
Figure 38 Setting the host name for UniSystem
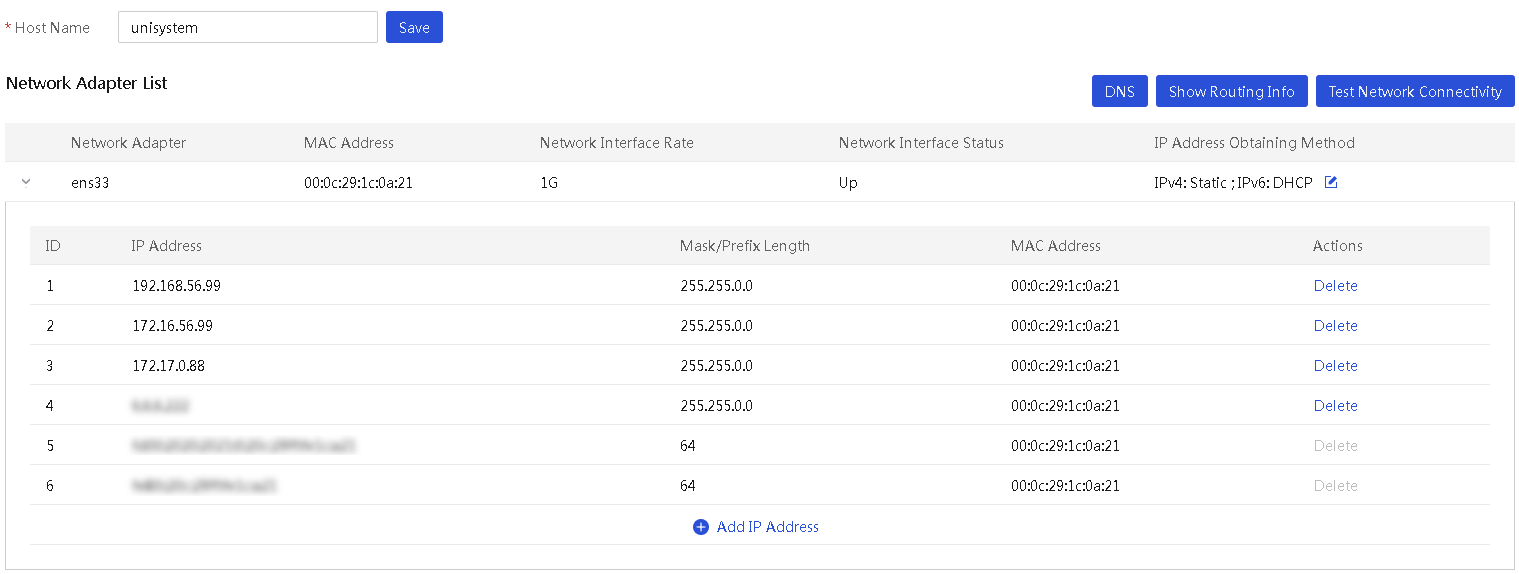
Setting the IP address obtaining method for a network port
Perform this task to set the method used to obtain an IP address for a network port of the UniSystem server.
Procedure
1. In the navigation pane, select Menu > System > System > Network.
Figure 39 Viewing the network port information
2. Click the Edit icon ![]() in
the IP Address Obtaining Method column for the target network adapter and change the network
adapter mode and DNS address obtaining method.
in
the IP Address Obtaining Method column for the target network adapter and change the network
adapter mode and DNS address obtaining method.
¡ If the DHCP mode is used, select whether to enable DHCP/DHCPv6 for DNS address obtaining.
¡ If the static mode is used, enter the DNS addresses manually.
Figure 40 Changing the IP Address Obtaining Method
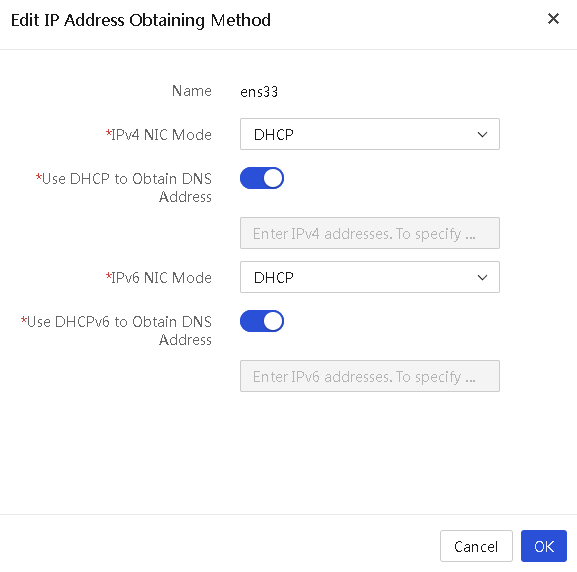
3. Click OK.
4. To add a new IP address to a network port, click Add New IP for that network port. Enter an IP address and subnet mask, and click OK.
Displaying DNS information
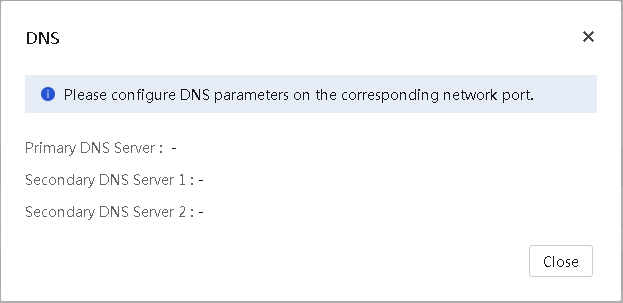
About this feature
Perform this task to view the DNS servers used by the local UniSystem server.
Procedure
1. In the navigation pane, select Menu > System > System > Network.
2. Click DNS.
3. In the dialog box that opens, view DNS servers.
Figure 41 Configuring DNS
Configuring proxy
About this feature
Perform this task to configure a proxy server. Thus, UniSystem can use the HTTP or HTTPS protocol for external communication. A proxy server address can be an IPv4 address, IPv6 address, or domain address. To use domain addresses, first configure DNS. For more information, see "Displaying DNS information."
Procedure
1. In the navigation pane, select Menu > System > System > Proxy Settings.
Figure 42 Configuring proxy settings
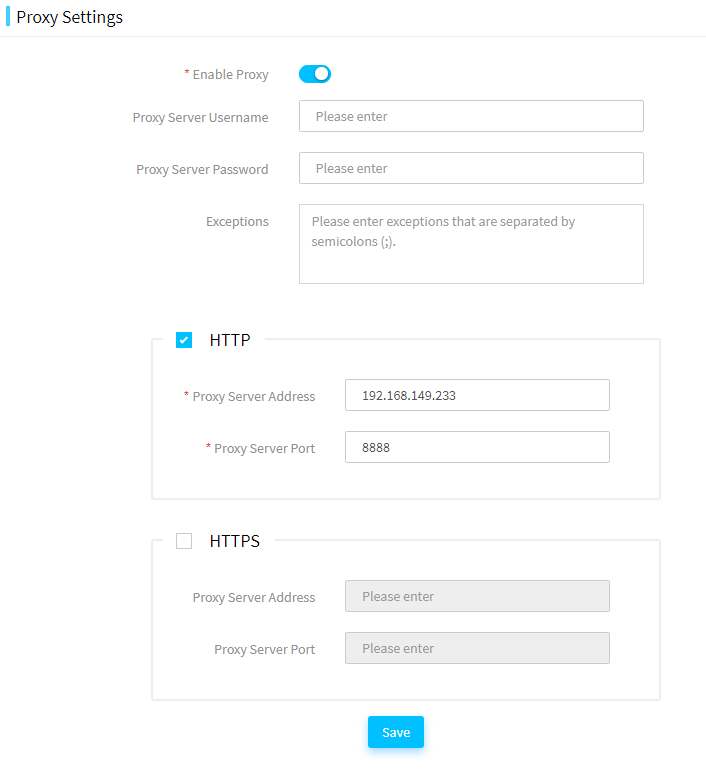
2. Select whether to enable proxy.
3. Enter the proxy server parameters.
4. (Optional.) Select HTTP to enable HTTP proxy.
5. (Optional.) Select HTTPS to enable HTTPS proxy.
6. Click Save.
Synchronizing the system time with an NTP server
This feature is available only when UniSystem runs on a VM or an AE module.
About this feature
Perform this task to synchronize the system time of UniSystem with an NTP server to ensure the time accuracy.
Procedure
1. In the navigation pane, select Menu > System> System > System Time Settings.
Figure 43 Configuring system time settings
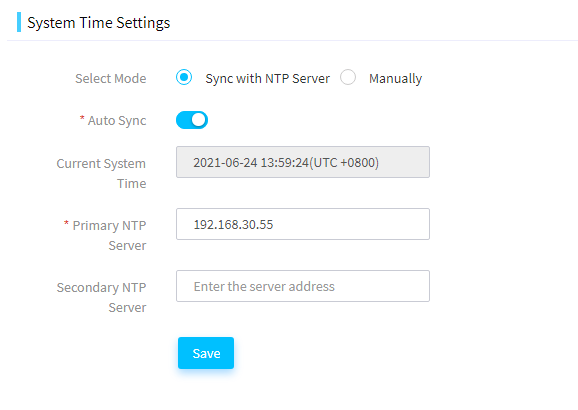
2. Select Sync with NTP Server for the Select Mode field.
3. Click Auto Sync to enable auto synchronization.
4. Enter the IP address of the primary NTP server.
5. Enter the IP address of the secondary NTP server.
6. Click Save.
Configuring a cluster
This module is available only when UniSystem runs on AE modules.
About this feature
Perform this task to create or manage a cluster of AE modules to implement high availability. UniSystem automatically monitors the status of the primary node. When the primary node fails, UniSystem will switch to run on the secondary node, which avoids service interruption caused by the failure of the primary AE module.
Prerequisites
Cluster creation requires data synchronization. For correct data synchronization, make sure the time difference between the primary and secondary nodes is shorter than 10 seconds. For more information about how to set the system time, see "Synchronizing the system time with an NTP server."
If a cluster is created, make sure the following conditions are met:
· Make sure the primary and secondary nodes can reach each other. As a best practice, assign static IP addresses to ports for the primary and secondary nodes to communicate with each other and make sure the ports have the same subnet mask.
· Make sure the primary and secondary nodes each have a unique host name for UniSystem access. Do not set the host name to localhost or an all-digit string.
For more information about how to set the host name and the network settings, see "Configuring the network settings."
Restrictions and guidelines
· The secondary UniSystem node in the cluster will be stopped during cluster creation.
· During cluster creation, do not power off the AE modules or disconnect the network. Data synchronization will take a long time. Please wait till the whole progress finishes.
· During cluster creation, do not perform any other operations on UniSystem of the primary node.
· After the cluster is created, do not edit the host name, system time, or network settings of UniSystem.
· UniSystem cannot be reverted from cluster mode to standalone mode.
· Cluster creation failure will cause the unavailability of UniSystem. Please try again to create the cluster.
Procedure
1. In the navigation pane, select Menu > System > Cluster.
2. Click the Create Cluster link.
3. On the page that opens, configure the following parameters for the cluster to be created.
¡ Secondary Node Address—IP address used by the secondary node to communicate with the primary node. As a best practice, use the IP address of network port vmng.om or the 10-GE network port of the secondary AE module.
¡ UniSystem Virtual IP Address—Virtual IP address for users to access UniSystem after the cluster is created.
¡ iSCSI Virtual IP Address—IP address used to configure the iSCSI service. Make sure the entered iSCSI virtual IP address is on the same network segment as an IP address of the 10-GE network port on the primary AE module.
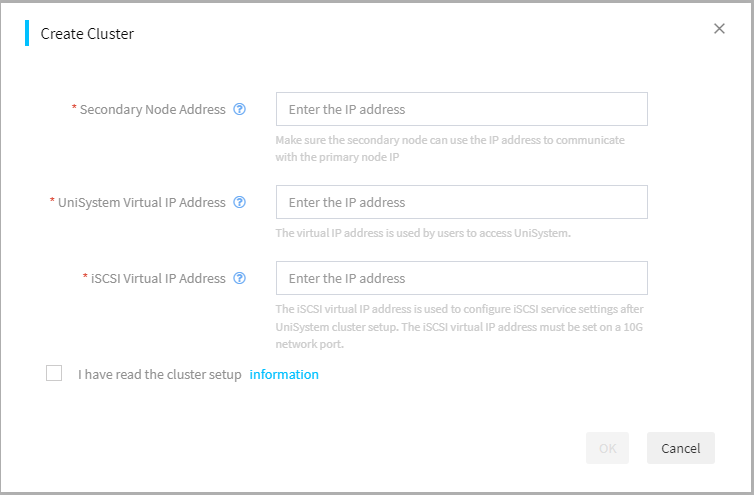
4. Click OK. You can see the progress of the creation from the progress bar. To view detailed information about the cluster creation, click View Log.
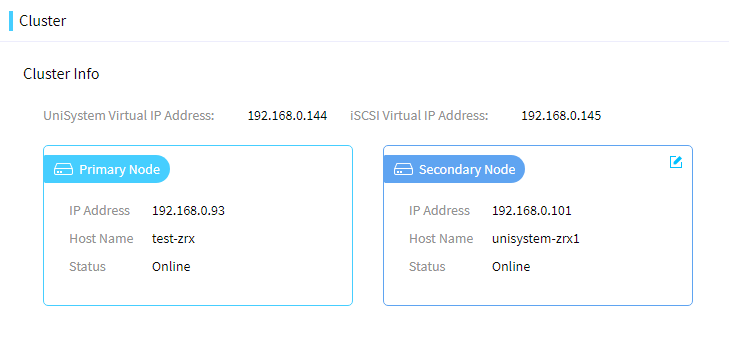
5. UniSystem will automatically restart after the cluster is successfully created. Log in to UniSystem by using the virtual IP address of UniSystem.
6. View information about the primary and secondary nodes on the Cluster page.
Figure 45 Viewing the cluster information
Configuring LDAP
|
|
NOTE: This feature is supported only when UniSystem runs on a PC, AE module, or VM environment. |
About this feature
UniSystem can work with an LDAP server to provide quick access to LDAP users on the server.
You can add LDAP servers to UniSystem and then add LDAP user groups on the LDAP servers to UniSystem. Member users in the LDAP user groups can then log in to UniSystem directly with their credentials stored in the LDAP server.
Procedure
1. In the navigation pane, select Menu > System > Users and Security > LDAP Management.
2. Click Add LDAP Server.
3. In the Add LDAP Server dialog box that opens, configure the LDAP server parameters. For information about LDAP server parameters, see UniSystem Online Help.
Figure 46 Adding an LDAP server
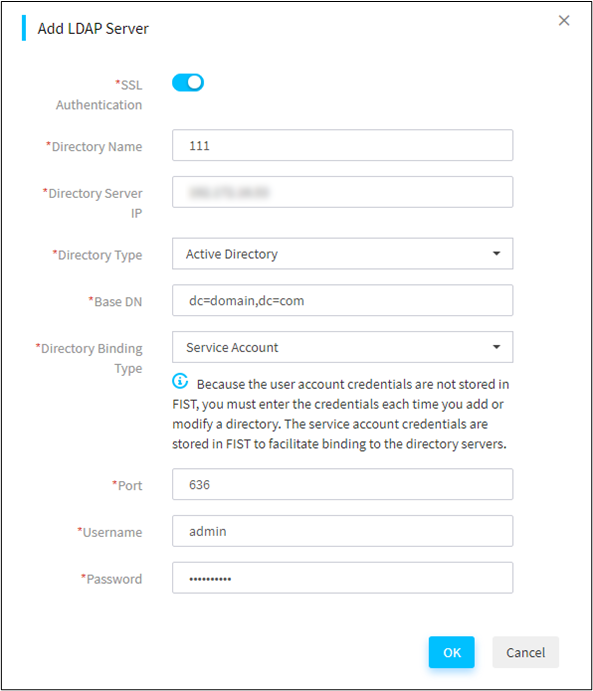
4. Click OK.
Incorporating UniSystem to vCenter Server as a UniSystem plugin
|
|
NOTE: This feature is supported only when UniSystem runs on a PC, AE module, or VM environment. |
About this feature
You can incorporate UniSystem as a plugin to vCenter Server. After that, you can access UniSystem through vSphere Client, an application that allows you to directly connect to a vCenter Server instance.
Prerequisites
Obtain the IP address, login username, and password of the vCenter Server.
Procedure
1. Enter https://UniSystem ip address:https port in the address bar to log in to UniSystem. Then, enter https://UniSystem ip address:https port/server/0/register-plugin in the address bar to access the Register Plugin page.
|
|
IMPORTANT: To ensure normal access to UniSystem after UniSystem plugin registration, log in to UniSystem through HTTPS. |
Figure 47 Accessing the Register Plugin page
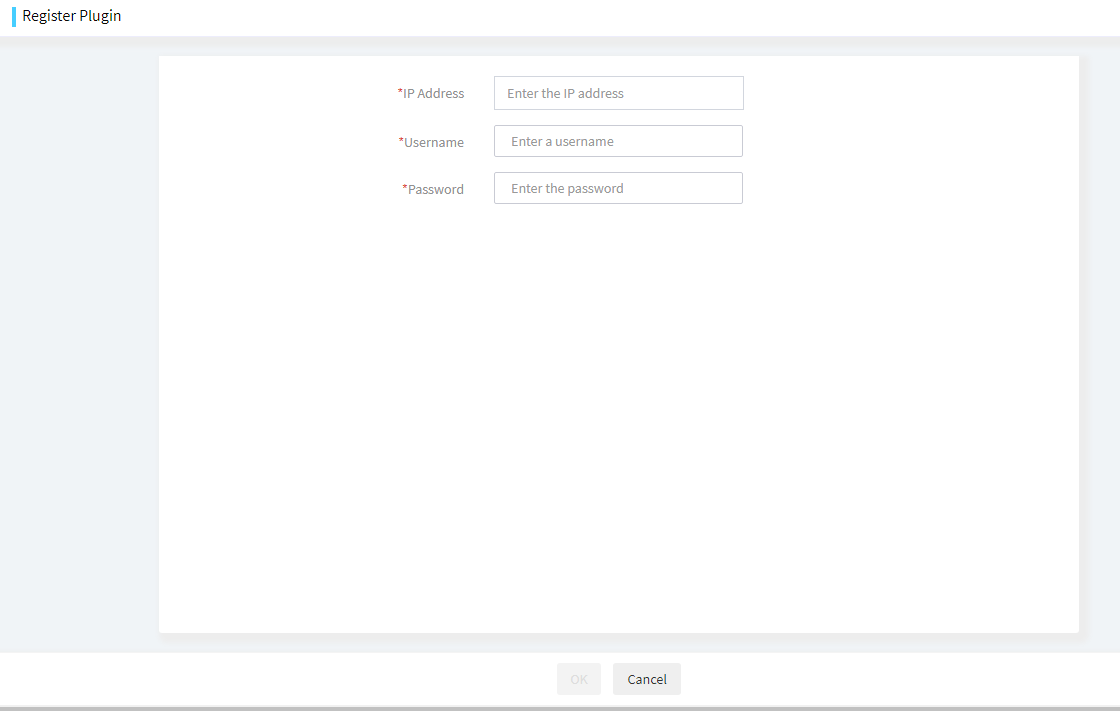
2. Enter the IP address, username, and password of vCenter Server, and then click OK.
3. After the registration is complete, log in to vSphere Client. Click the UniSystem icon on the Shortcuts page to access UniSystem through vSphere Client.
Uninstalling UniSystem
Uninstalling UniSystem installed by using a .tar installation package
Uninstalling UniSystem from a Windows operating system
1. Close the UniSystem console window.
2. Access the directory where the UniSystem installation folder resides and then delete the folder.
3. Access the directory where the UniSystem installation package resides and then delete the installation package.
Uninstalling UniSystem from a GUI Linux operating system
1. Close the UniSystem console window.
2. Open the terminal window.
3. Enter the rm -rf AppFist/ AppFist-1.00.04.tar.gz command and press Enter. Then delete the UniSystem installation package and UniSystem installation folder.
Figure 48 Deleting UniSystem installation folder and installation package

4. Enter ls to verify that the UniSystem installation package and UniSystem installation folder have been deleted.
Uninstalling UniSystem on a non-GUI Linux operating system
1. Enter the exit command and then press y to stop the UniSystem service.
Figure 49 Stopping the UniSystem service
![]()
2. Enter the rm -rf AppFist/ command and then press Enter to delete the UniSystem installation folder.
3. Enter the rm -rf AppFist-1.00.04.tar.gz command and then press Enter to delete the UniSystem installation package.
4. Enter the ls command to verify that the UniSystem installation package and UniSystem installation folder have been deleted.
Figure 50 Verifying the UniSystem uninstallation

