H3C Unified Platform Component License Registration and Expansion Configuration Examples-5W102-book.pdf(1.17 MB)
- Released At: 19-10-2022
- Page Views:
- Downloads:
- Table of Contents
- Related Documents
-
Contents
Obtaining device information (on license server)
Requesting an activation file (on H3C License Management Platform)
Installing an activation file (on the license server)
Configuring a license client to obtain licenses from the license server
Extending the license validity period
Overview
H3C offers licensing options for you to deploy features and expand resource capacity on an as needed basis. To use license-based features, you purchase licenses from H3C and install the licenses.
To obtain information about license-based features, their licensing status, and license availability, access the licensing page on the Web management interface. Then, you can purchase and install licenses as needed.
Usage guide
License types
H3C offers pre-installed, trial (or temporary), and formal licenses. Support for preinstalled and trial licenses varies by product. For more information about the license options available for a product, see the license matrixes document for that product. This document takes trial license as an example to illustrate license registration and expansion.
Preparation
Installing the H3C license server
To obtain the up-to-date installation guide for the H3C license server, access the H3C website at https://www.h3c.com.
|
|
IMPORTANT: · Unified Platform supports only remote licensing. · The license server version must be compatible with the Unified Platform component version. For more information about the compatibility matrix, see PLAT 2.0 release notes. |
Ensuring Layer 3 reachability between license server and license client (Unified Platform)
Configure network parameters for the license server and license client (Unified Platform) to make sure they each have a route to reach each other.
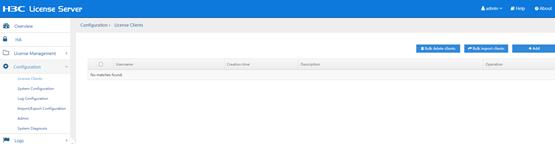
Adding a client to the license server
1. Log in to the license server and navigate to the Configuration > License Clients page ,as shown in Figure 1.
Figure 1 Client configuration page
2. Click Add.
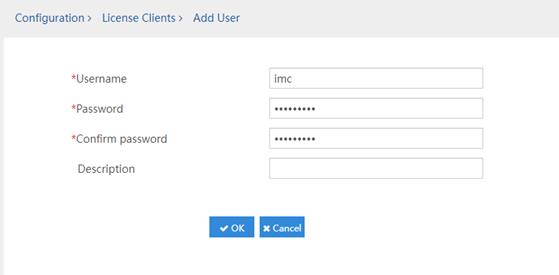
3. Configure the client parameters such as the username and password for accessing the client as shown in Figure 2, and then click OK.
|
|
NOTE: Make sure the username and password are the same as those configured in "Configuring a license client to obtain licenses from the license server." |
Restrictions and guidelines
· License registration for the Unified Platform component does not entirely overwrite the license provided for original installation.
· The license client must reconnect to the license server after license registration and expansion for relevant settings to take effect.
Configuration examples
The licensing method for Unified Platform is remote licensing.
License activation
Obtaining a license key
|
|
CAUTION: Save the license key properly after obtaining it. |
This document takes a trial license as an example to illustrate how to obtain a license key. Trial licenses are provided for you to verify the functionality of premium features so you can make an educated purchase decision. To obtain a trial license key, contact your H3C sales representative or H3C technical support.
|
|
NOTE: Purchase licenses from H3C authorized channels obtain the associated license keys. |
The following are license keys used in this document:
· H3C U-Center2.0, Intelligent Operations Platform Software
· H3C U-Center2.0, IOM License
· H3C U-Center2.0-IOM-100 License
For licensing information, see the document that provides product support for licenses.
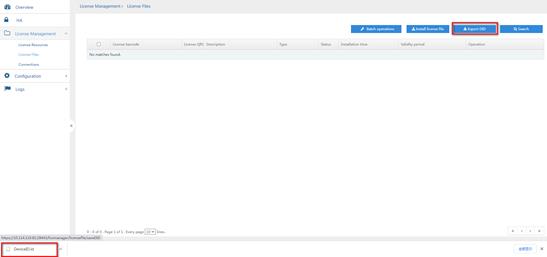
Obtaining device information (on license server)
1. Log in to the license server and navigate to the License Management > License Files page, as shown in Figure 3.
Figure 3 License file management

2. Click Export DID to obtain the license server device information file, as shown in Figure 4.
Requesting an activation file (on H3C License Management Platform)
About this task
On H3C License Management Platform, you can bind one or multiple license keys to one license server or perform the binding operation for multiple servers in one request.
Adding license keys
1. Access H3C License Management Platform at https://www.h3c.com/en/License ,as shown in Figure 5.
Figure 5 Requesting license activation
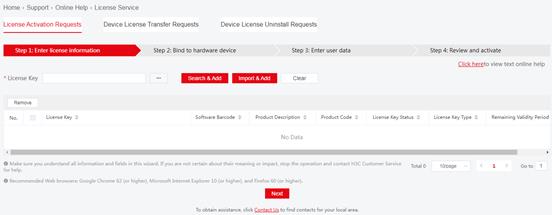
2. Add license keys. You can add license keys through Search & Add or Import & Add. This document takes Import & Add as an example.
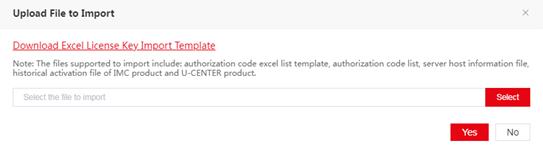
Click Import & Add. In the Upload File to Import dialog box that opens as shown in Figure 6, click Select to upload the template file that contains the license keys, and then click Yes.
3. Select the license keys to be activated, as shown in Figure 7.
Figure 7 Selecting license keys
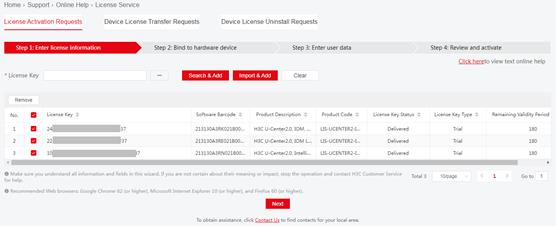
4. Click Next to enter the Bind to hardware device page.
Binding license keys to hardware device
1. Enter device information. For more information, see "Obtaining device information (on license server)." You can bind one or multiple license keys to a license server. This document takes bulk binding as an example.
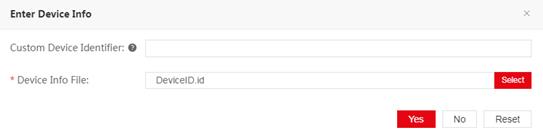
As shown in Figure 8, click Bulk Bind. In the Enter Device Info dialog box that opens as shown in Figure 9, click Select to upload the device information file, and then click Yes.
Figure 8 Binding license keys in bulk

Figure 9 Uploading device information file
|
|
NOTE: The Import and Export buttons are not available for bulk binding. |
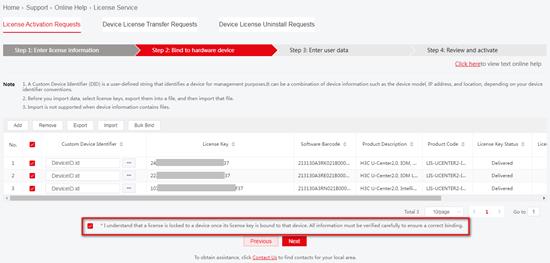
2. Review the bindings carefully.
Each license key will be locked to the device to which each of them is bound.
3. Make sure you understand the impact of the binding operation, and then select the option that explicitly states so, as shown in Figure 10.
Figure 10 Selecting the agreement option
4. Click Next to enter the Enter user data page, as shown in Figure 11.
Figure 11 Enter user data page
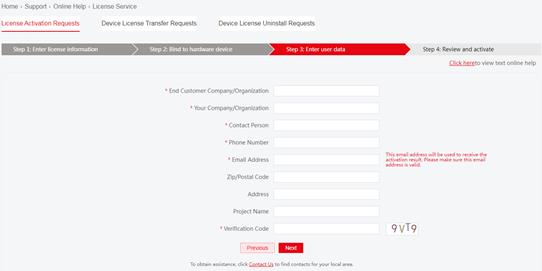
Specifying customer information
Configure the parameters in Table 1, and then click Next to enter the Review and activate page.
|
Parameters |
Remarks |
|
End Customer Company/Organization |
(Required.) Company or organization that uses the licenses. |
|
Your Company/Organization |
(Required.) Company or organization with which the license applicant works. |
|
Contact Person |
(Required.) Name of the contact person. |
|
Phone Number |
(Required.) Contact phone number. |
|
Email Address |
(Required.) Contact email address.
H3C License Management Platform will send the generated activation files to this email address. Make sure the email address is correct and available. |
|
Zip/Postal Code |
(Optional.) Zip code or postal code for the contact address. |
|
Address |
(Optional.) Contact address. |
|
Project Name |
(Optional.) Project name. |
|
Verification Code |
(Required.) The verification code is case insensitive. |
Reviewing information and activating the licenses
1. Review the license key and device information, and then select I accept all terms and conditions of H3C License Service Portal Legal Statement, as shown in Figure 12.
Figure 12 Selecting the statement
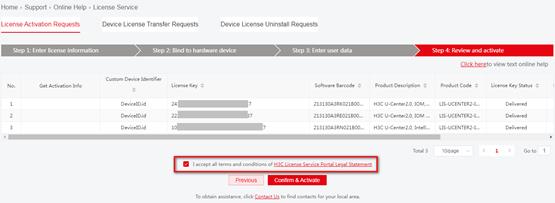
2. Click Confirm & Activate.
3. Double-check the license and device information as shown in Figure 13, and then click OK.
The platform automatically generates an activation file for each binding and sends them to the specified email address.
Figure 13 Confirming the information

4. Perform one of the following tasks to obtain activation files:
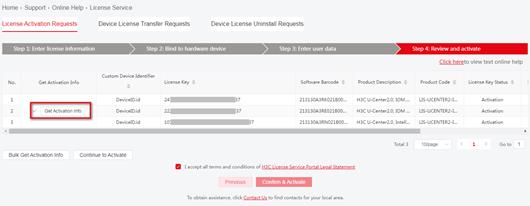
¡ Click Get Activation Info to download an activation file to the local disk, as shown in Figure 14.
Figure 14 Getting activation information
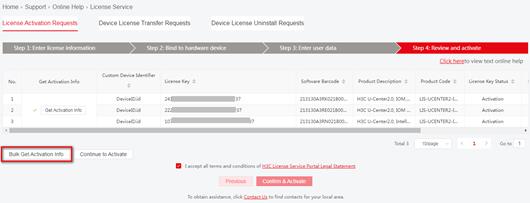
¡ Click Bulk Get Activation Info to obtain all activation files generated for this request, as shown in Figure 15.
Figure 15 Bulk getting activation information
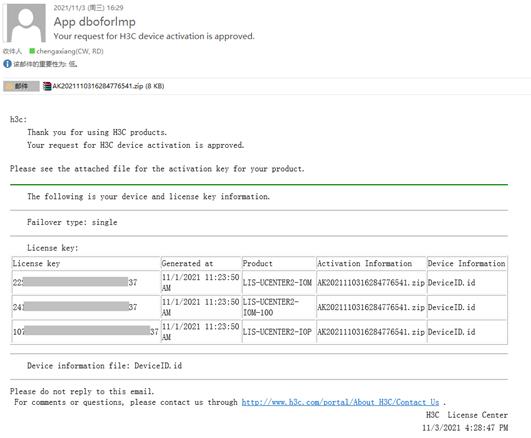
¡ Access the email box at the specified address to obtain the activation files, as shown in Figure 16.
|
|
NOTE: · When you activate multiple license keys in bulk for a license server, H3C License Management Platform might generate one or multiple activation files. The number of activation files does not affect the availability of the licenses. After you install all generated activation files on the license server, you can use all of the licenses. · It takes some time for H3C License Management Platform to generate multiple activation files. In this scenario, you cannot download the activation files from the webpage. To obtain the activation files, you must access the email box at the specified address. · If you do not receive an activation file for a license key from the platform and you cannot use the license key to re-apply for license activation, contact H3C Support. |
Installing an activation file (on the license server)
|
|
CAUTION: Back up an activation file before you install it. If the activation file is inadvertently deleted or becomes unavailable for some other reason, you can use the backup activation file to restore the license. |
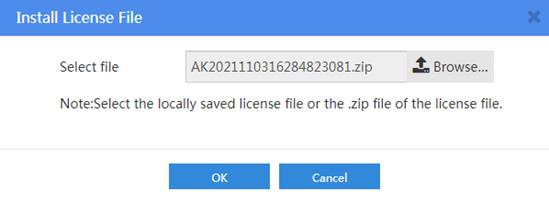
1. Log in to the license server and navigate to the License Management > License Files page.
2. Click Install License File. In the dialog box that opens, upload the activation file and click OK, as shown in Figure 17.
Figure 17 Uploading the activation file
3. After the installation, you can view the license information on the license installation page, as shown in Figure 18.

Configuring a license client to obtain licenses from the license server
1. Log in to the Web management interface of U-Center 2.0 (license client), and navigate to the System > License Management > License Info page, as shown in Figure 19.
Figure 19 License server information

2. Configure the following license server parameters:
¡ Address: Enter the IP address of the license server.
¡ Port Number: Enter the port number of the license server. The default port number is 5555.
¡ Username: Enter the name of the license client configured on the license server. For more information, see "Adding a client to the license server."
¡ Password: Enter the password of the username.
|
|
NOTE: Support for the license server parameters varies by product model. |
3. Click Connect. The license client will automatically establish a TCP connection to the license server and obtain license information from the server.
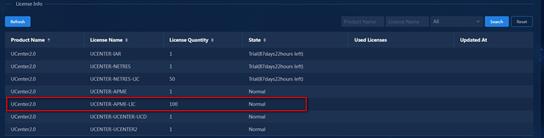
4. On the License Info page, click Refresh to view license information, as shown in Figure 20
|
|
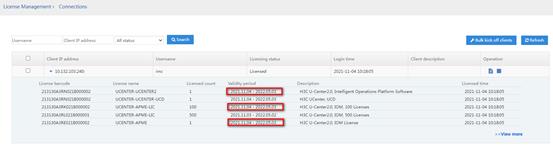
NOTE: You can also log in to the license server, and navigate to the License Management > Connections page to view the license information. |
License expansion
Adding license nodes
1. Obtain a new temporary license key.
For more information, see "Obtaining a license key." The license key used in this example is H3C U-Center2.0-IOM-500 License.
2. Obtain a new activation file.
For more information, see "Requesting an activation file (on H3C License Management Platform)." You can bind the device information file of the license server to the new temporary license key, and generate a new activation file.
3. Install the new activation file.
Log in to the license server to install the activation file. For more information, see "Installing an activation file (on the license server)." Use the new activation file for activation.
4. Reconfigure the license client and obtain licenses.
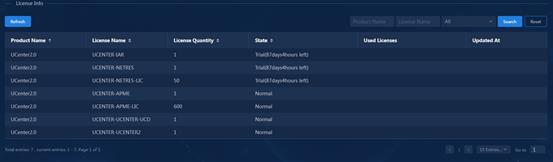
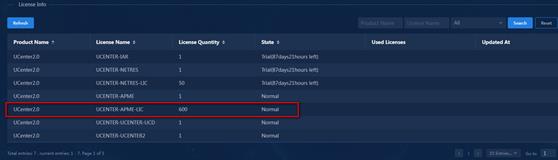
Log in to the Web management interface of U-Center 2.0, click Disconnect, and then reconfigure the license client. For more information, see "Installing an activation file (on the license server)." Click Refresh on the License Info page to view license information, as shown in Figure 21. The number of UCENTER-APME-LIC license nodes is updated from 100 to 600.
Extending the license validity period
1. Obtain a new temporary license key.
For more information, see "Obtaining a license key." The license keys used in this example are:
¡ H3C U-Center2.0, Intelligent Operations Platform Software
¡ H3C U-Center2.0-IOM-100 License
¡ H3C U-Center2.0, IOM License
2. Obtain a new activation file.
For more information, see "Requesting an activation file (on H3C License Management Platform)." You can bind the device information file of the license server to the new temporary license key, and generate a new activation file.
3. Install the new activation file.
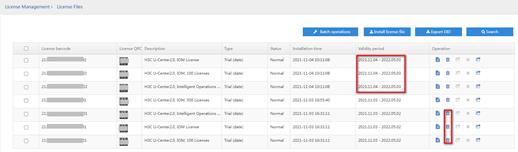
Log in to the license server to install the activation file. For more information, see "Installing an activation file (on the license server)." After installation, delete the license keys that are about to expire, as shown in Figure 22. After extending the license validity period, the license expiration date is changed from 2022.04.12 to 2022.04.19.
Figure 22 Deleting license keys
4. Reconfigure the license client and obtain licenses.
Log in to the Web management interface of U-Center 2.0, click Disconnect, and then reconfigure the license client. For more information, see "Installing an activation file (on the license server)." Click Refresh on the License Info to view license information, as shown in Figure 23. You can also log in to the license server, and navigate to the License Management > Connections page to view license information, as shown in Figure 24.