- Released At: 09-12-2024
- Page Views:
- Downloads:
- Table of Contents
- Related Documents
-
H3C EIA Certificate User Guide
Product Version: EIA (E6202)
Document version: 5W103-20240226
Copyright © 2024 New H3C Technologies Co., Ltd. All rights reserved.
No part of this manual may be reproduced or transmitted in any form or by any means without prior written consent of New H3C Technologies Co., Ltd.
Except for the trademarks of New H3C Technologies Co., Ltd., any trademarks that may be mentioned in this document are the property of their respective owners.
The information in this document is subject to change without notice.
Contents
Applying for and installing certificates on the server
Exporting the server certificate
Importing the root certificate and the server certificate into the EIA server
Applying for and installing certificates on the client
Exporting the client certificate
Importing the root certificate and the client certificate into the EIA server
Introduction
To have EIA cooperate with clients for certificate-based authentication, you need to apply for and install certificates including root certificates, server certificates, and client certificates. This document introduces the application scenarios of various certificates and the methods for requesting and installing certificates.
Certificate usage guidelines
You can use authentication methods in different certificate authentication scenarios. The certificates required by the server and the client also vary by authentication method. For more information, see Table 1.
|
Certificate type |
Application scenarios |
Required certificates |
|
|
Client |
EIA |
||
|
EAP-TLS |
User certificate authentication |
Root certificate User certificate |
Root certificate Server certificate |
|
Computer certificate authentication |
Root certificate Computer certificate |
||
|
EAP-TTLS |
User certificate authentication |
Root certificate |
Server certificate |
|
EAP-PEAP |
|||
|
|
NOTE: Both the user certificate and the computer certificate are client certificates. Their names are different when you apply for them. The name of a user certificate is the account name and the name of a computer certificate is the full computer name. |
Prerequisites
Before applying for and installing a certificate, set up a Certification Authority (CA) server. This document uses CA server 10.114.119.41 as an example.
|
|
CAUTION: · Before accessing the certificate server through Internet Explorer, navigate to the Internet options > Security > Custom level windows, set the options in the ActiveX controls and plug-ins area to Enable or Prompt, and then reboot the browser. · Restricted by IE, the IE version used to access the CA server cannot be higher than that installed on the system that hosts the CA server. |
Applying for and installing certificates on the server
The EIA server has the certificate-based authentication capability only after you import the root certificate and the server certificate into the EIA server. You can obtain the related certificate files as follows:
· Root certificate: Download directly.
· Server certificate: It cannot be downloaded directly. You can install the server certificate into the server's operating system, and then export the server certificate from the operating system.
Applying for certificates
Applying for the root certificate
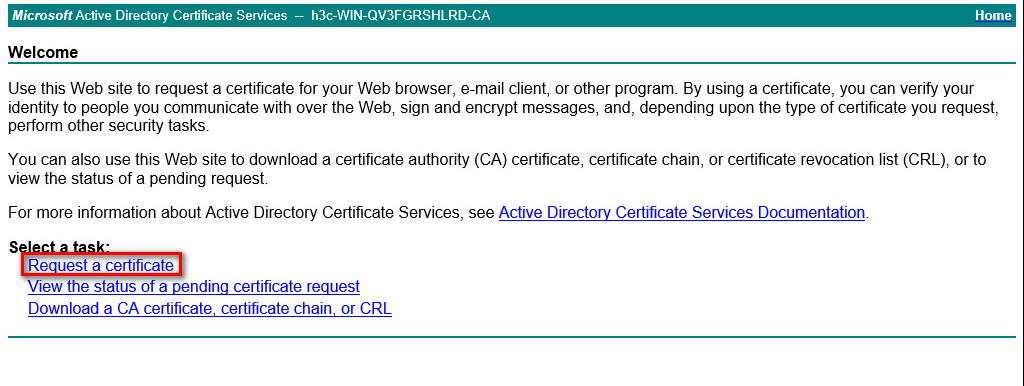
1. Enter http://10.114.119.41/certsrv/ in Internet Explorer to access the Microsoft Active Directory Certificate Services page. 10.114.119.41 is the IP address of the CA server.

2. Click the Download CA certificate, certificate chain, or CRL link.
Figure 2 Downloading the CA certificate
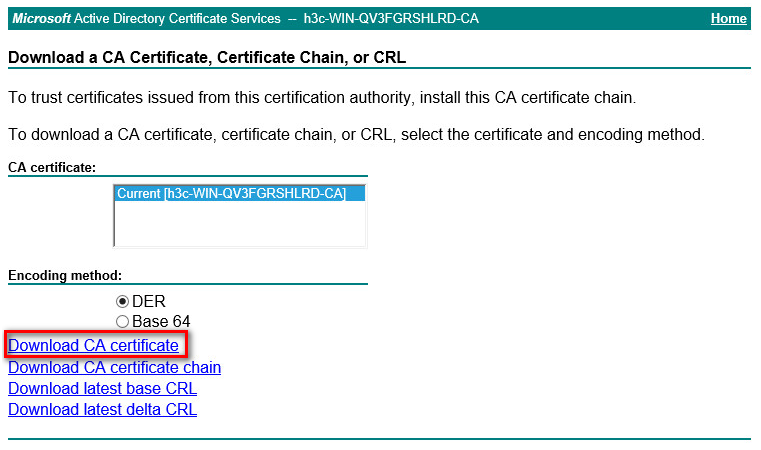
3. Click the Download CA certificate link and save the certificate to your local device as prompted.
4. Double click the downloaded certnew.cer file to open the root certificate on your local device.
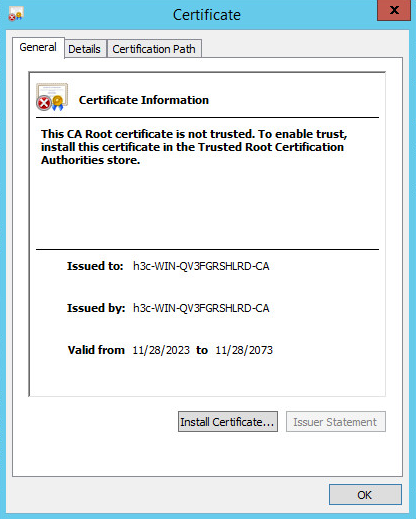
5. Click the Install certificate button to open the Certificate Import Wizard page.
Figure 4 Certificate import wizard
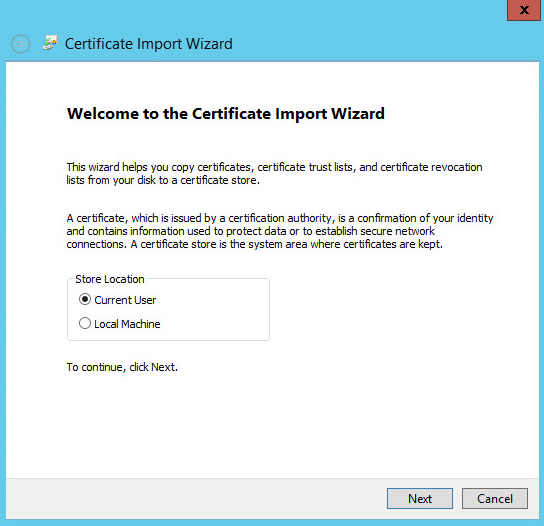
6. Select a storage location as needed, click Next.
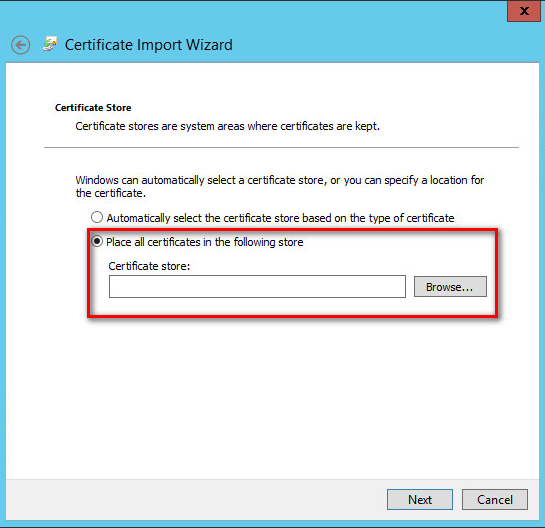
7. Enable the Place all certificates in the following storage option, click Browse.
Figure 6 Selecting certificate storage
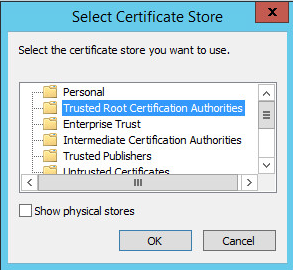
8. Select the Trusted Root Certification Authorities option, and then click OK. Click Next to open the Finishing Certificate Import Wizard page.
Figure 7 Finishing the certificate import wizard
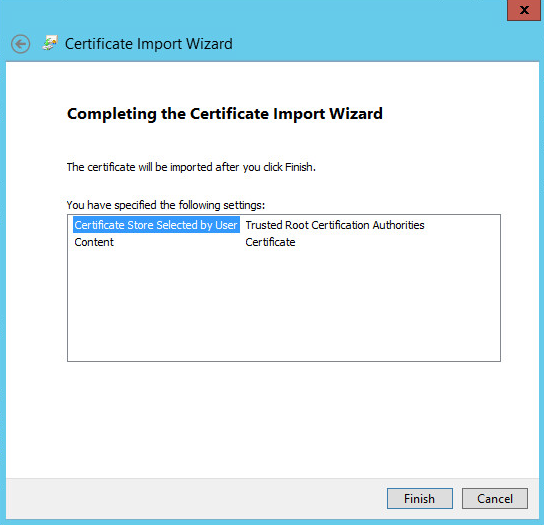
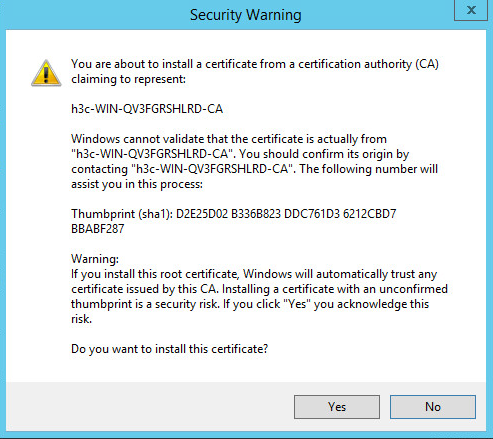
9. Click Finish. Click Yes after the system prompts a security alert.
Applying for the server certificate
1. Enter http://10.114.119.41/certsrv/ in Internet Explorer to access the Microsoft Active Directory Certificate Services page. 10.114.119.41 is the IP address of the CA server.

2. Click Request a certificate > Advanced certificate request > Create and submit a certificate request to this CA, and then configure the server certificate application settings on the advanced certificate application page.
Figure 10 Configuring server certificate application settings
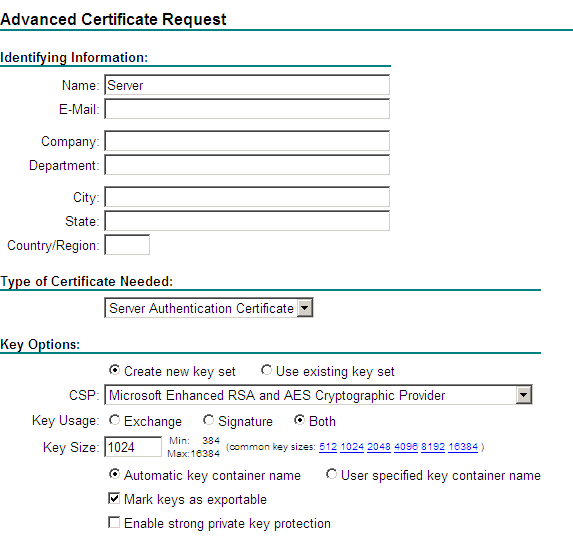
The parameters include:
¡ Name: Enter Server.
¡ Required Certificate Type: Select Server Identity Verification Certificate.
¡ CSP: Select Microsoft Enhanced RSA and AES Cryptographic Provider.
¡ Select the Mark key as exportable option to set the certificate exportable.
You can leave the other parameters at their default values.
3. Click Submit to submit the server certificate application.
4. Click the Server Identity Verification Certificate link to open the Certificate issued page.

5. Click the Install this certificate link, and then install this certificate as prompted. The page will display Your new certificate has been successfully installed after successfully installation.
Figure 12 Certificate installed

Exporting the server certificate
During server certificate application, you cannot download the certificate. For EIA to have the certificate-based authentication capability, you must install the server certificate into the server's operating system, export the server certificate from the operating system, and then import the server certificate to EIA.
1. Click the Tools
icon (![]() ) in the upper right corner of the browser, and then select Internet Options.
) in the upper right corner of the browser, and then select Internet Options.
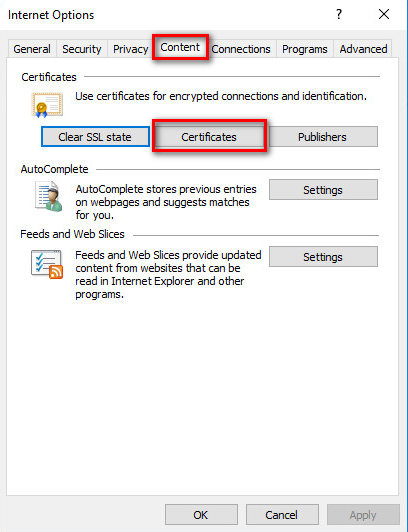
2. Click the Content tab, and then click the Certificate button.
Figure 14 Exporting certificates
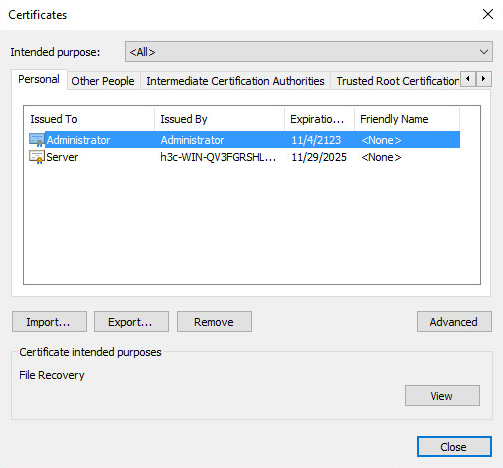
3. Select the desired server certificate, and then click Export. The Certificate Export Wizard will open.
Figure 15 Certificate export wizard
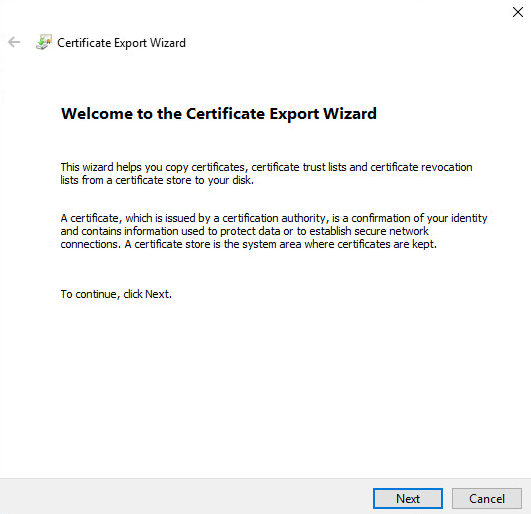
4. Click Next to open the private key export page.
Figure 16 Exporting the private key
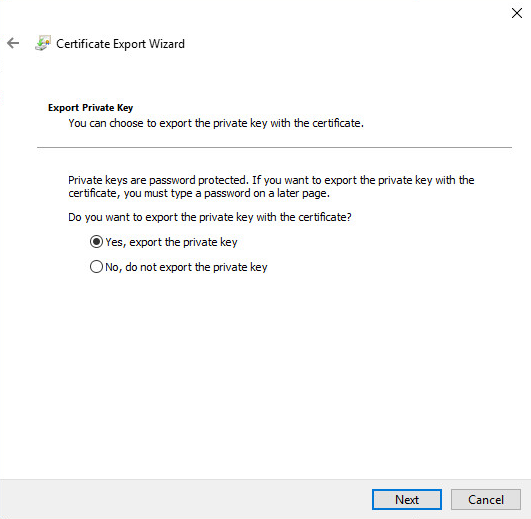
5. Select the Yes, export the private key option, and then click Next to open the export file format page.

6. Enable the Personal Information Exchange–PKCS #12(.PFX)(P) option. Select the Include all certificates in the certification path if possible option as needed. Click Next to access the security configuration page.
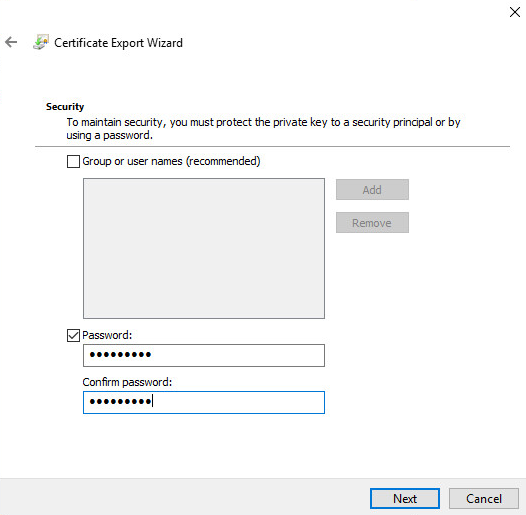
7. Select the Password option, input and confirm the password, and then click Next to open the file selection page.
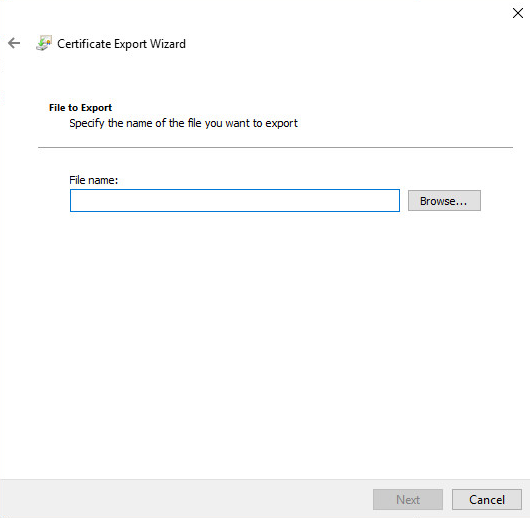
8. Click Browse. A selection window will pop up.
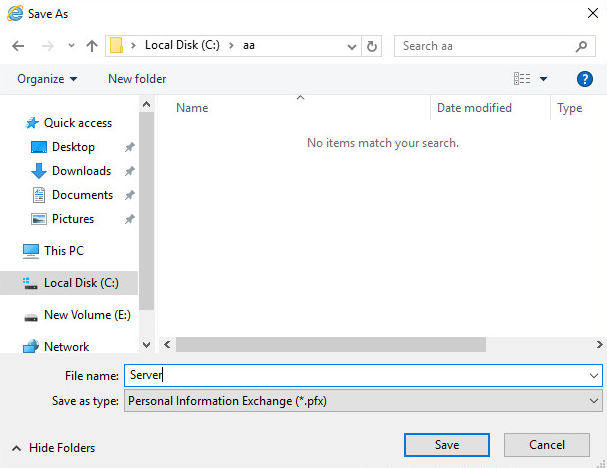
9. Select the private key storage path, enter a filename, and then click Save. Click Next to open the Finishing Certificate Export Wizard page.
Figure 21 Finishing the certificate export wizard
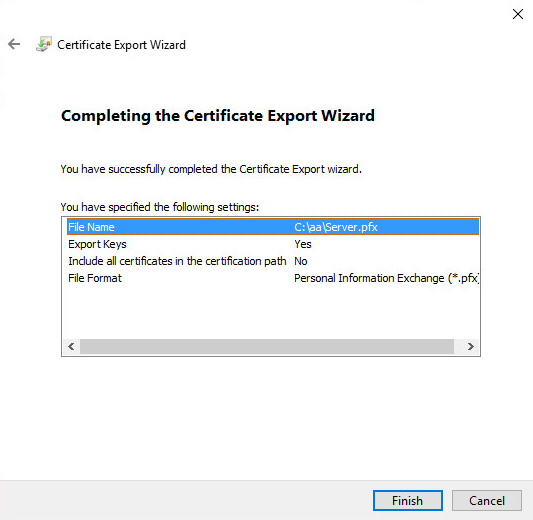
10. Click Finish to finish the export.
Importing the root certificate and the server certificate into the EIA server
For EIA 9.0 (E0215) and later versions, the import procedure is as follows:
Importing the root certificate
1. Log in to the management interface, navigate to the Automation > User > Service Parameters > Access Parameters > Certificate Configuration page.
Figure 22 Certificate configuration
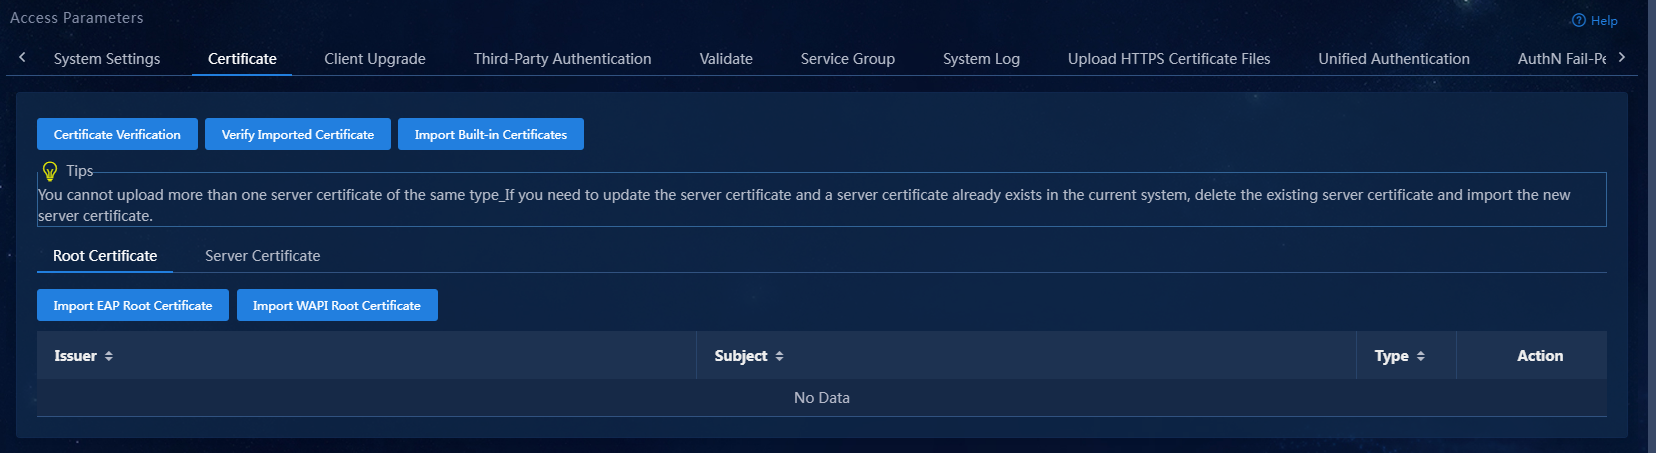
2. Click the Root Certificate Configuration tab, and then click the Import EAP Root Certificate button.
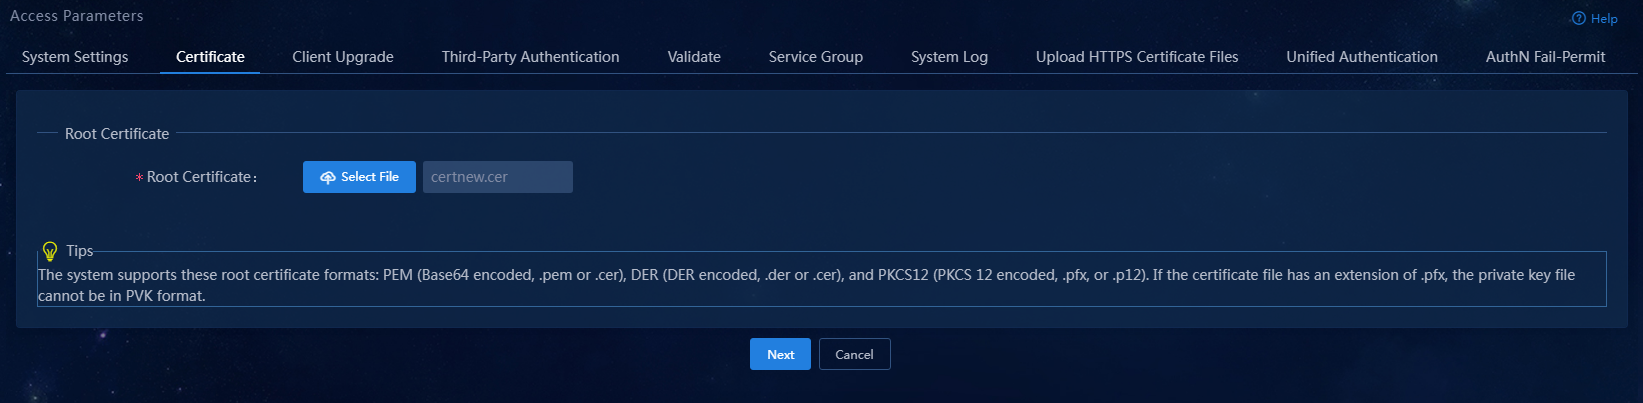
3. Click Select File to select the desired root certificate, and then click Next to open the CRL configuration page.
4. Click OK to finish importing the root certificate. You can view the imported root certificate in the list.
Figure 24 Root certificate imported

Importing the server certificate.
1. Log in to the management interface, navigate to the Automation > User > Service Parameters > Access Parameters > Certificate Configuration page.
Figure 25 Server certificate configuration
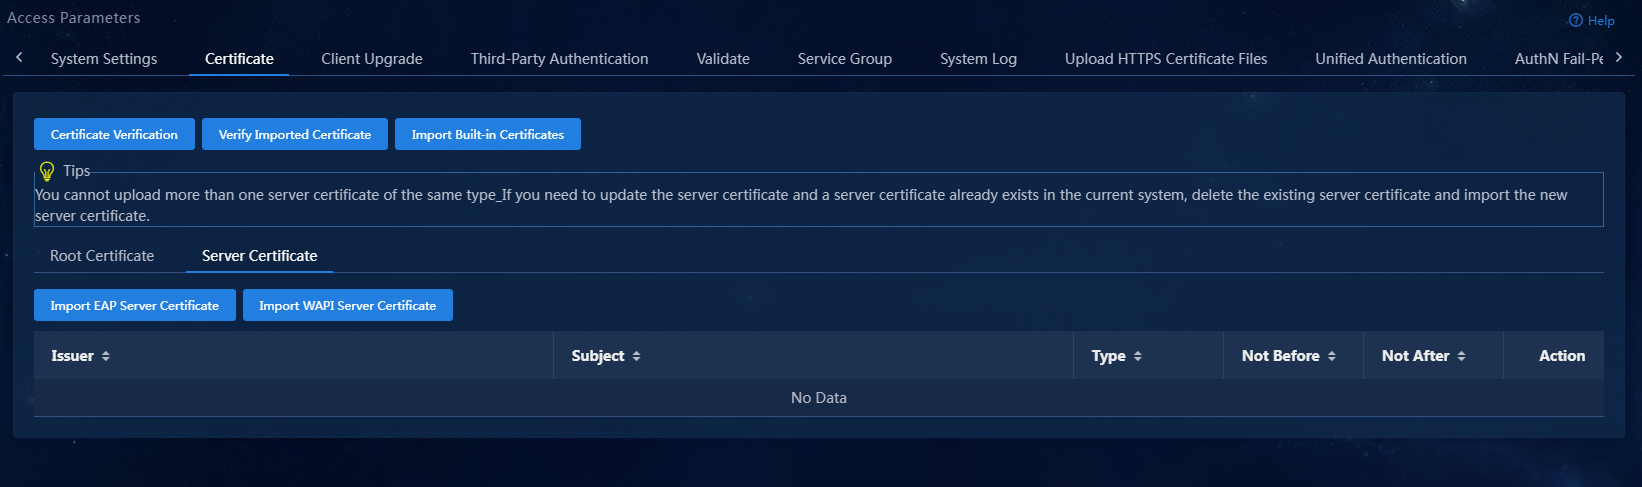
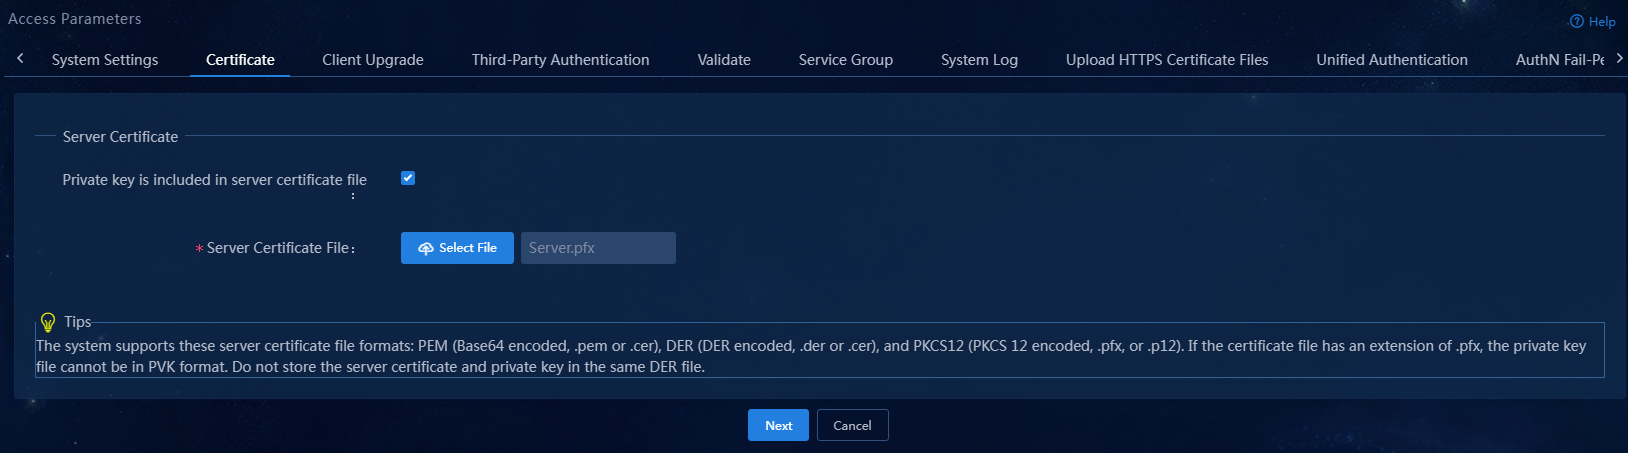
2. Click the Server Certificate Configuration tab, and then click the Import EAP Server Certificate button.
Figure 26 Importing a server certificate 2
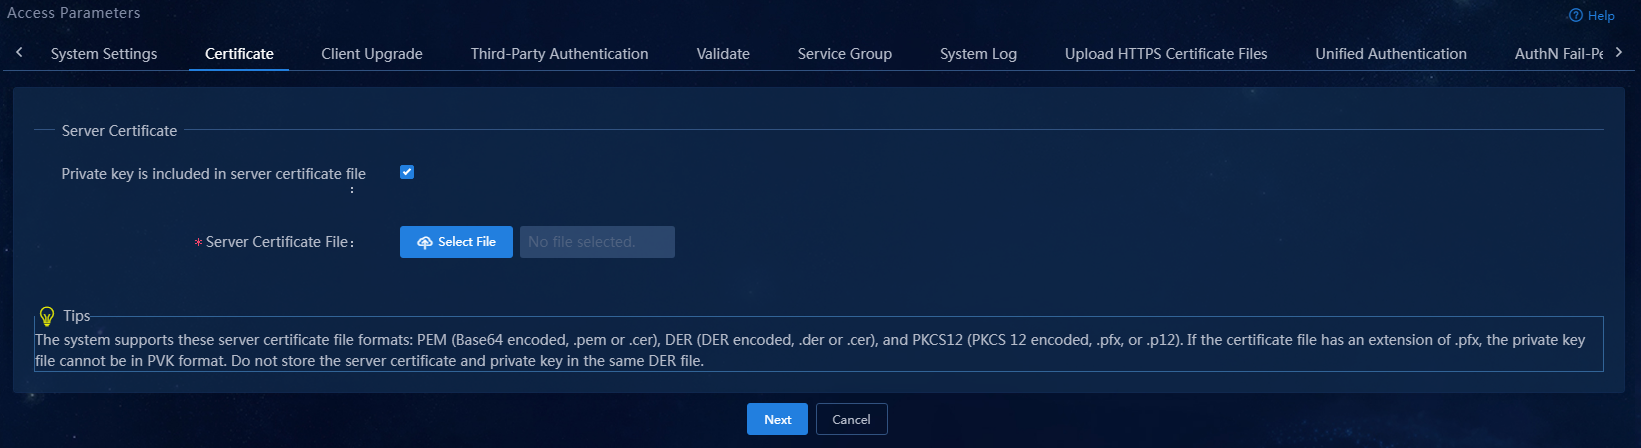
3. Select the Server certificate and private key are in the same file option, click Select File to select the exported server certificate file.
Figure 27 Importing a server certificate 2
4. Click Next to open the server private key password page.
Figure 28 Server private key password
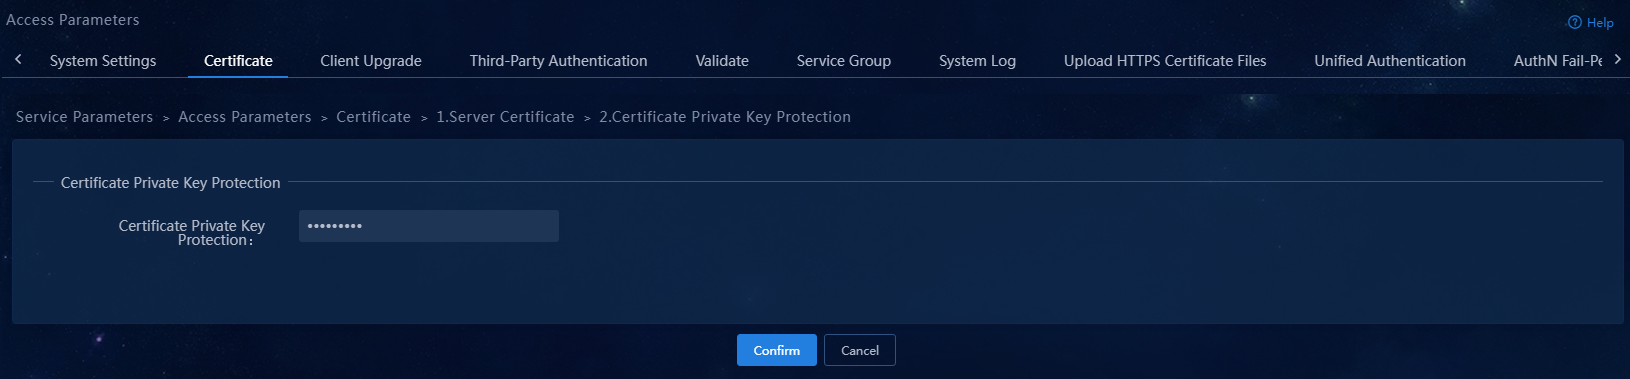
5. Enter the server's private key password (set during the export of the server certificate), and then click OK to finish importing the server certificate to EIA. You can view the imported server certificate in the list.
Figure 29 Server certificate imported
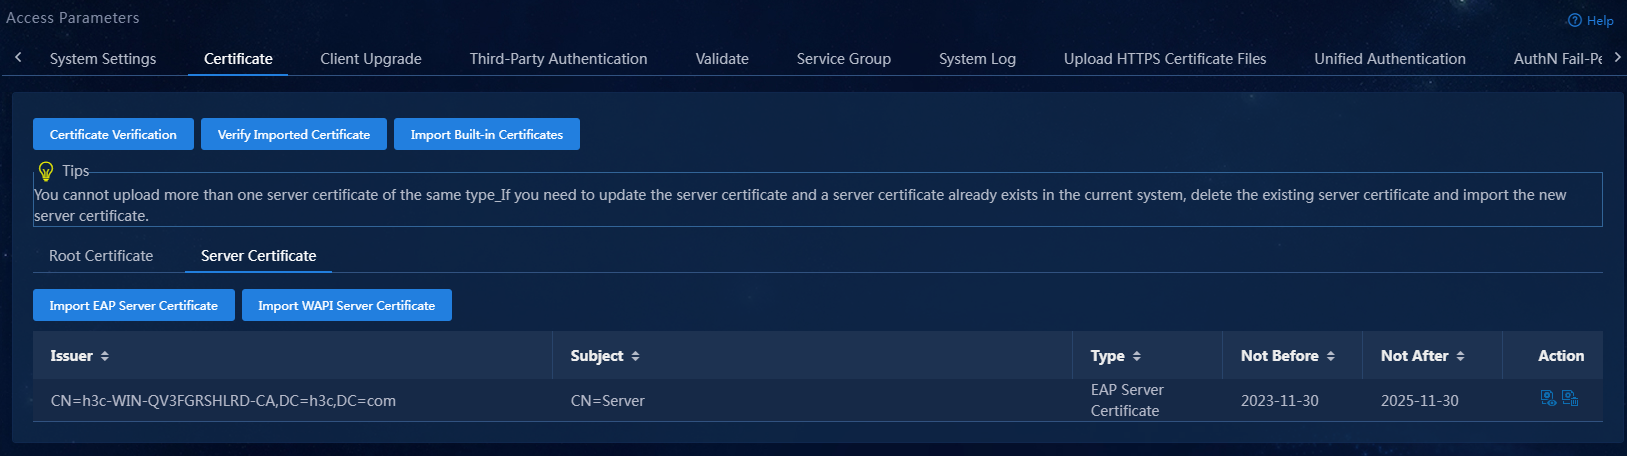
6. After the import is complete, click Validate Imported Certificate to verify the integrity of the certificate. If the certificate is complete, the EIA server has the ability to perform certificate-based authentication.
Applying for and installing certificates on the client
Applying for certificates
Applying for the root certificate
For more information about this task, see “Applying for the root certificate.”
Applying for the client certificate
1. Enter http://10.114.119.41/certsrv/ in Internet Explorer to access the Microsoft Active Directory Certificate Services page. 10.114.119.41 is the IP address of the CA server.
Figure 30 Certificate services
2. Click Request a certificate > Advanced certificate request > Create and submit a certificate request to this CA, and then configure the client certificate application settings on the advanced certificate application page.
Figure 31 Configuring client certificate application settings
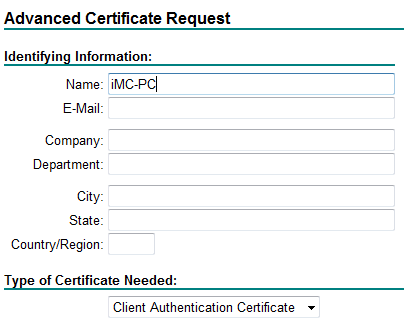
The parameters include:
¡ Name: Enter a client certificate name.
- To apply for a user certificate, enter the name of the account that uses this certificate. If the account name is within a domain, the domain name is also required.
- To apply for a computer certificate, enter the name of the computer that uses this certificate.
|
|
NOTE: When the EIA server coordinates with the client for certificate-based authentication make sure the account name matches a minimum of one selected attributes if the following conditions exist: · The Check Account Name and Certificate Attributes parameter is enabled on the System Parameters page. · One or multiple of the Subject-CN,
Subject-Email, Backup
Subject Name-DNS, and Backup Subject Name-UPN
attributes are selected. |
¡ Required Certificate Type: Select Client Identity Verification Certificate.
¡ To export the client certificate, you must select the Mark key as exportable option to set the certificate exportable.
You can leave the other parameters at their default values.
3. Click the Client Identity Verification Certificate link to open the Certificate issued page.
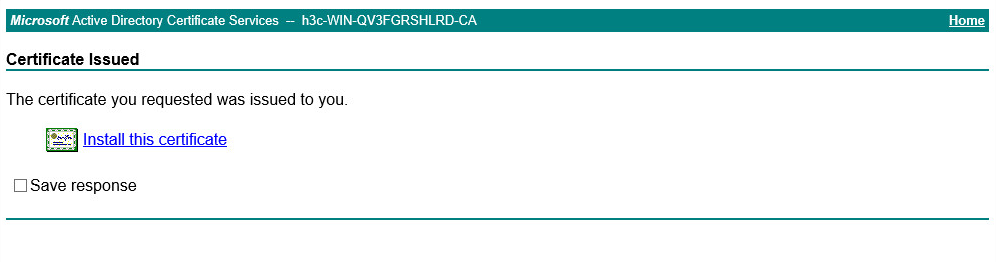
4. Click the Install this certificate link, and then install this certificate as prompted. The page will display Your new certificate has been successfully installed after successfully installation.
Figure 33 Certificate installed

Exporting the client certificate
For more information about this task, see “Exporting the server certificate.”
Importing the root certificate and the client certificate into the EIA server
For more information about this task, see “Importing the root certificate and the server certificate into the EIA server.”
